
This post is also available in: 日本語 (Japanese)
Executive Summary
In recent years, Remote Desktop Protocol (RDP) has been exploited by attackers to access unsecured servers and enterprise networks. Since 2017, RDP has become a significant vector in malware attacks using ransomware. Security professionals have increasingly focused their attention on this protocol by writing signatures to detect RDP vulnerabilities and prevent attacks.
As a proprietary protocol from Microsoft, RDP supports several operating modes that encrypt network traffic. Unfortunately, this encryption makes writing RDP signatures difficult because RDP content is hidden.
Fortunately, we can establish a test environment that provides a key file, and we can use that key to decrypt a packet capture (pcap) of the RDP traffic in Wireshark.
This blog demonstrates how to prepare the environment, obtain a decryption key and use it to decrypt RDP traffic.
Requirements
The following are necessary to get the most value from this tutorial:
- A virtual environment to run two Windows hosts like VirtualBox or VMware.
- An understanding of how to set up and use RDP.
- An RDP client. We use a host running Windows 10 Professional for this tutorial.
- An RDP server. This can be another Windows host with RDP enabled, or it can be a non-Windows host running FreeRDP.
- A way to record the network traffic between these two hosts. This is most easily done within a virtual environment.
- Wireshark version 3.0 or better.
- A basic knowledge of network traffic fundamentals.
Overall Process
The overall process follows seven general steps:
Step 1: Set up a virtual environment with two hosts, one acting as an RDP client and one acting as an RDP server.
Step 2: Remove forward secrecy ciphers from the RDP client.
Step 3: Obtain the RDP server's private encryption key.
Step 4: Capture RDP traffic between the RDP server and Windows client.
Step 5: Open the pcap in Wireshark.
Step 6: Load the key in Wireshark.
Step 7: Examine RDP data.
Step 1: Set Up Virtual Environment
The two most common virtual environments for this type of analysis are VirtualBox or VMware Workstation for Windows and Linux. VMWare Fusion is used for macOS. VirtualBox is free, while VMware is a commercial product.
This tutorial does not cover setting up virtual machines (VMs) in a virtual environment. The basic structure of our lab used for this tutorial is shown below in Figure 1.
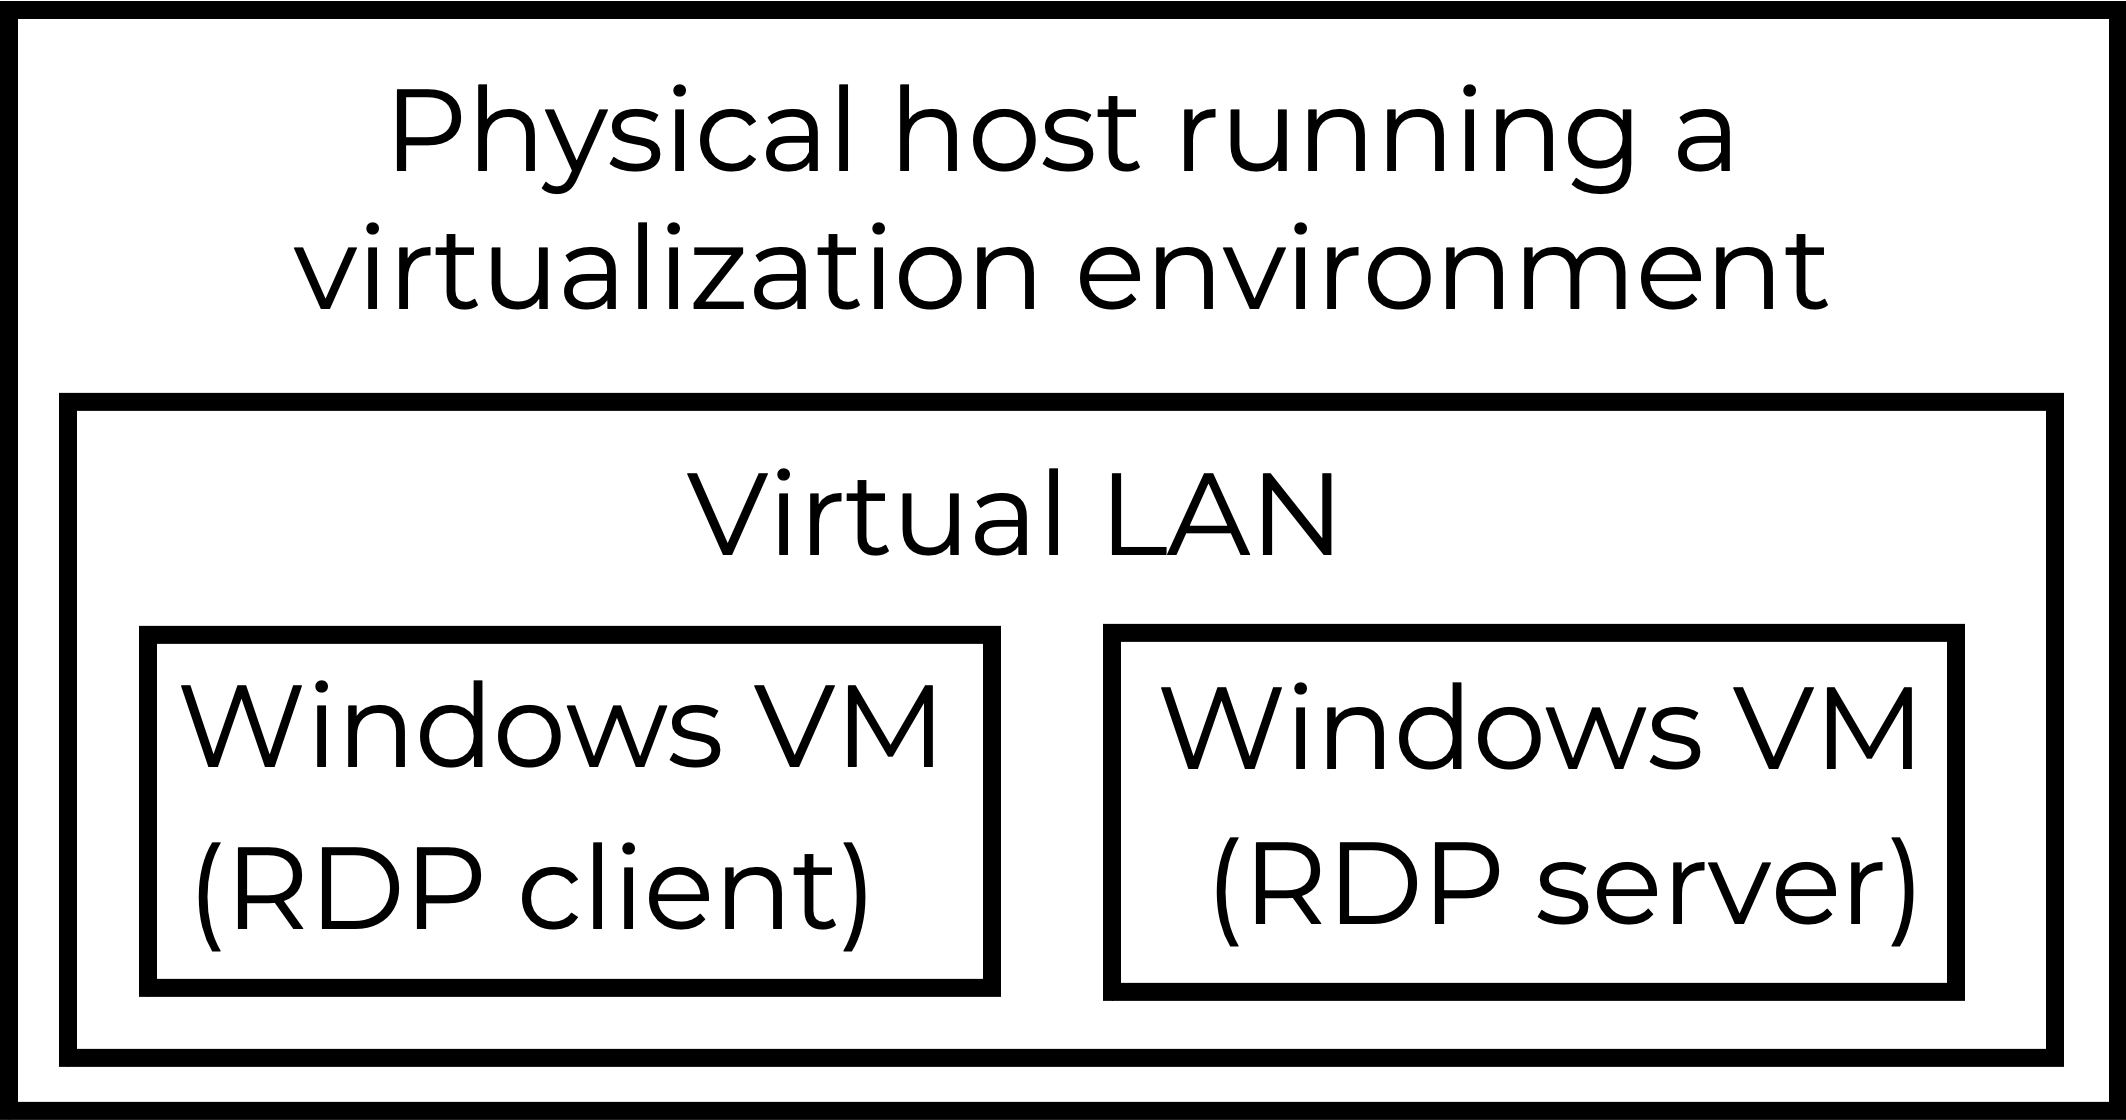
Our lab environment contained two Windows 10 hosts. One of the hosts acted as an RDP client, and the other acted as an RDP server. We recorded network traffic from an RDP session between these two hosts from the virtual LAN.
Step 2: Remove Forward Secrecy Ciphers From RDP Client
Some encryption ciphers provide forward secrecy, which is also known as perfect forward secrecy. These types of ciphers create multiple session keys for an SSL/TLS connection. With forward secrecy, we cannot decrypt SSL/TLS traffic using a single private encryption key from the RDP server. Therefore, we had to remove configuration options that support forward secrecy on the RDP client.
For this tutorial, our RDP client was a host running Windows 10 Pro. This host has a built-in RDP client.
Microsoft has published details on removing configuration options that support forward secrecy in the articles, “Manage Transport Layer Security (TLS)” and “Prioritizing Schannel Cipher Suites.” Below is a step-by-step process that we used.
Open the Group Policy Management Console gpedit.msc as an administrator as shown below in Figure 2.

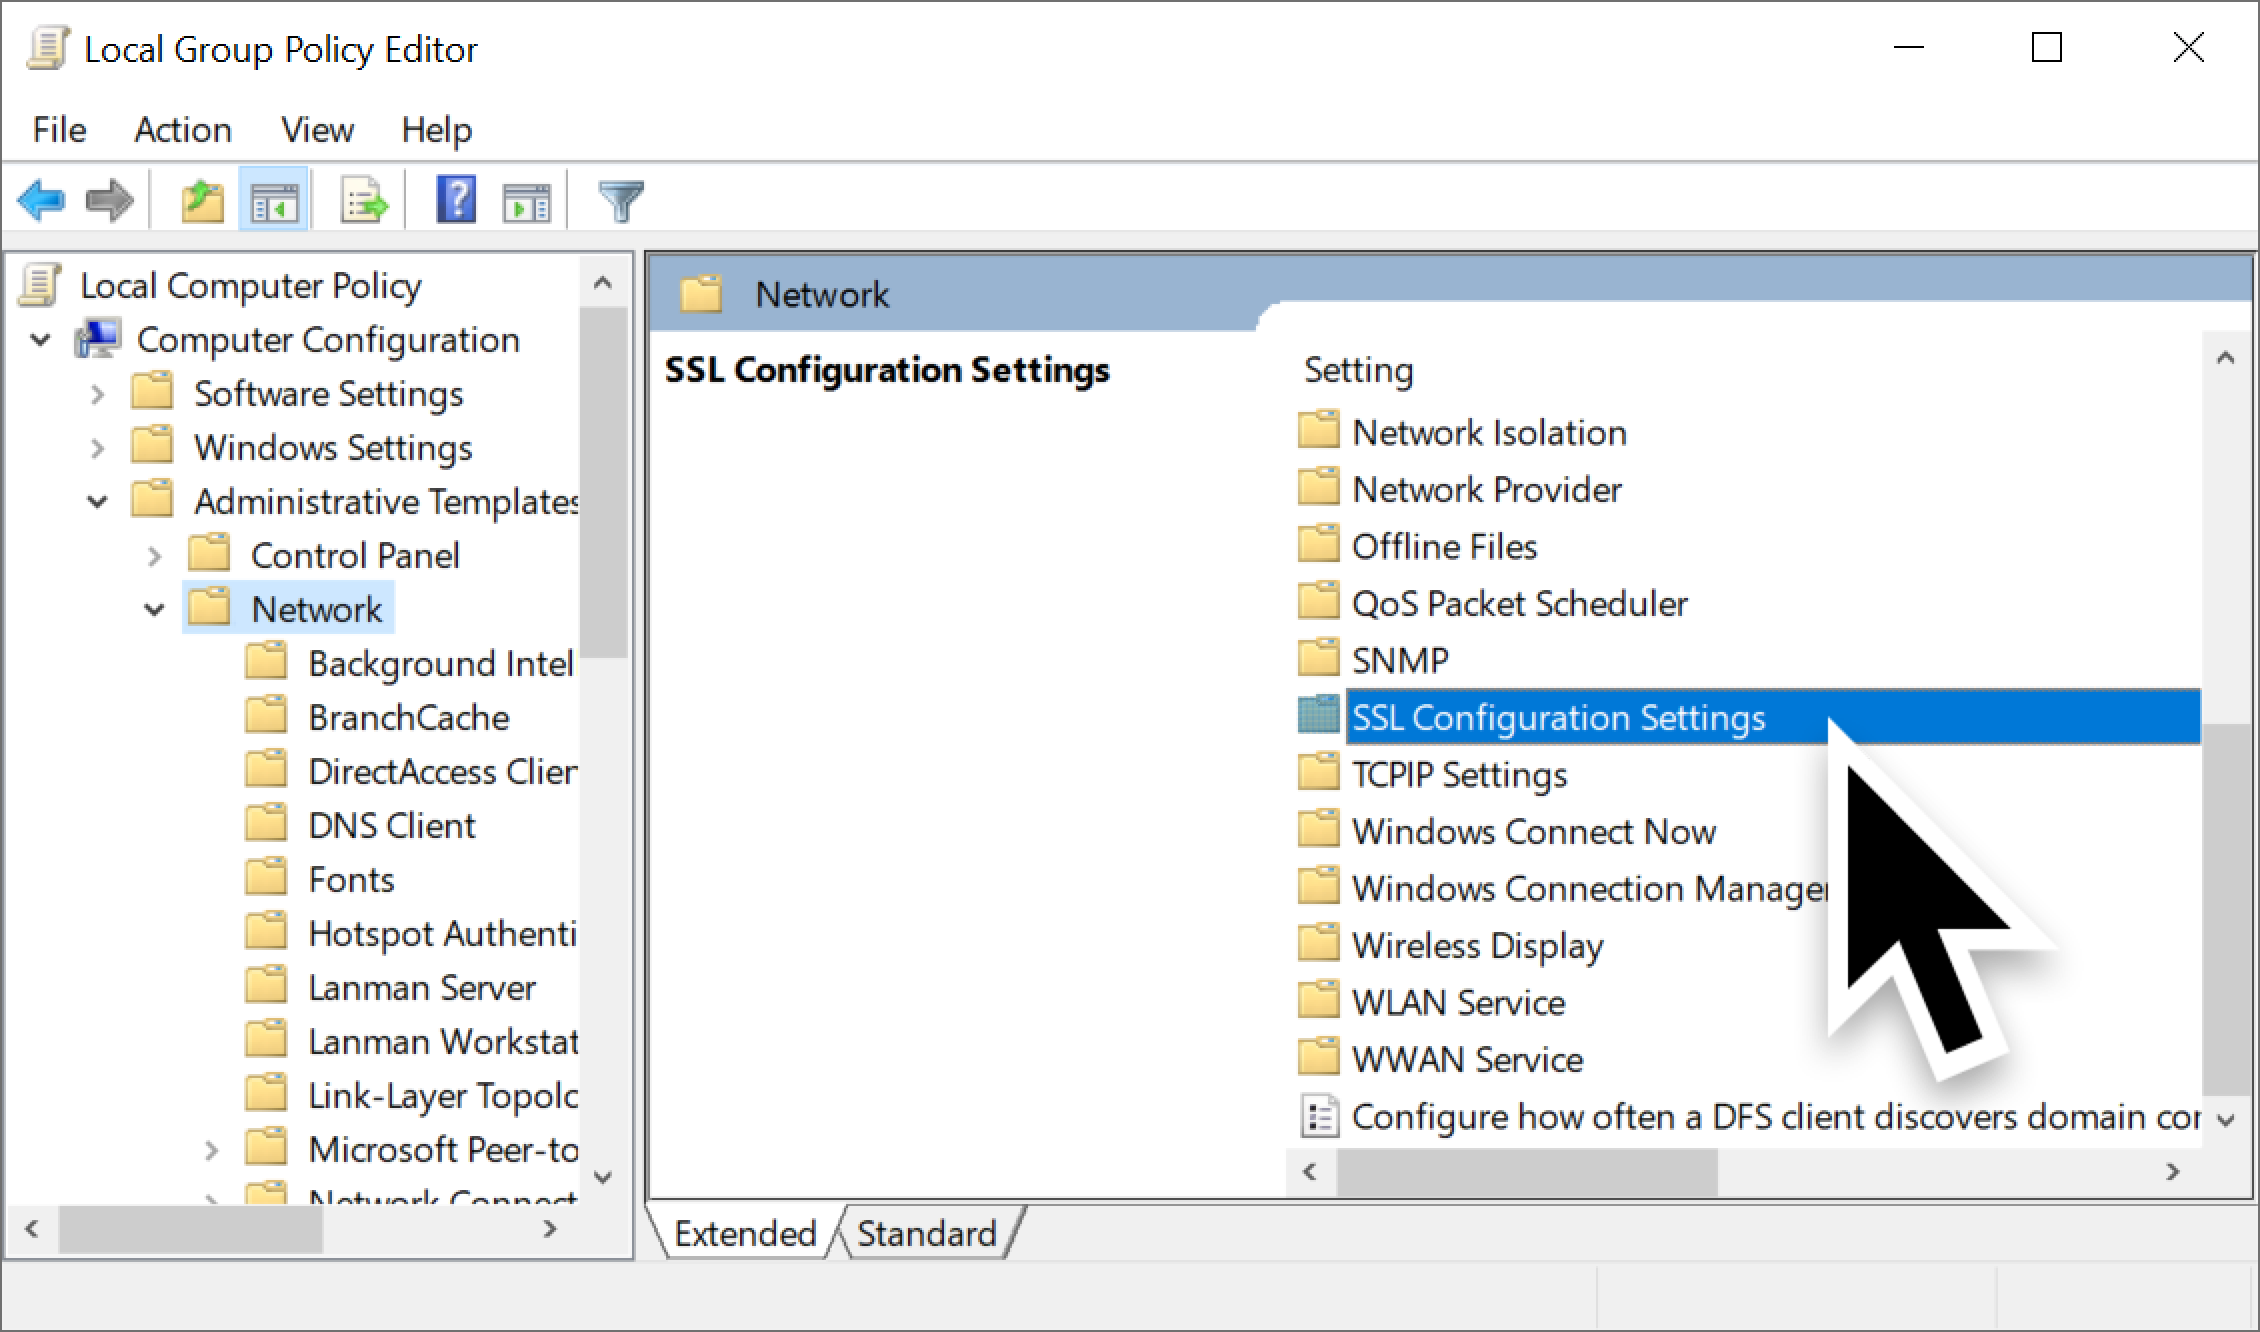
From the console, use the following menu path:
- Computer Configuration.
- Administrative Templates.
- Network.
- SSL Configuration Settings.
Below, Figure 3 shows how to find SSL Configuration Settings.
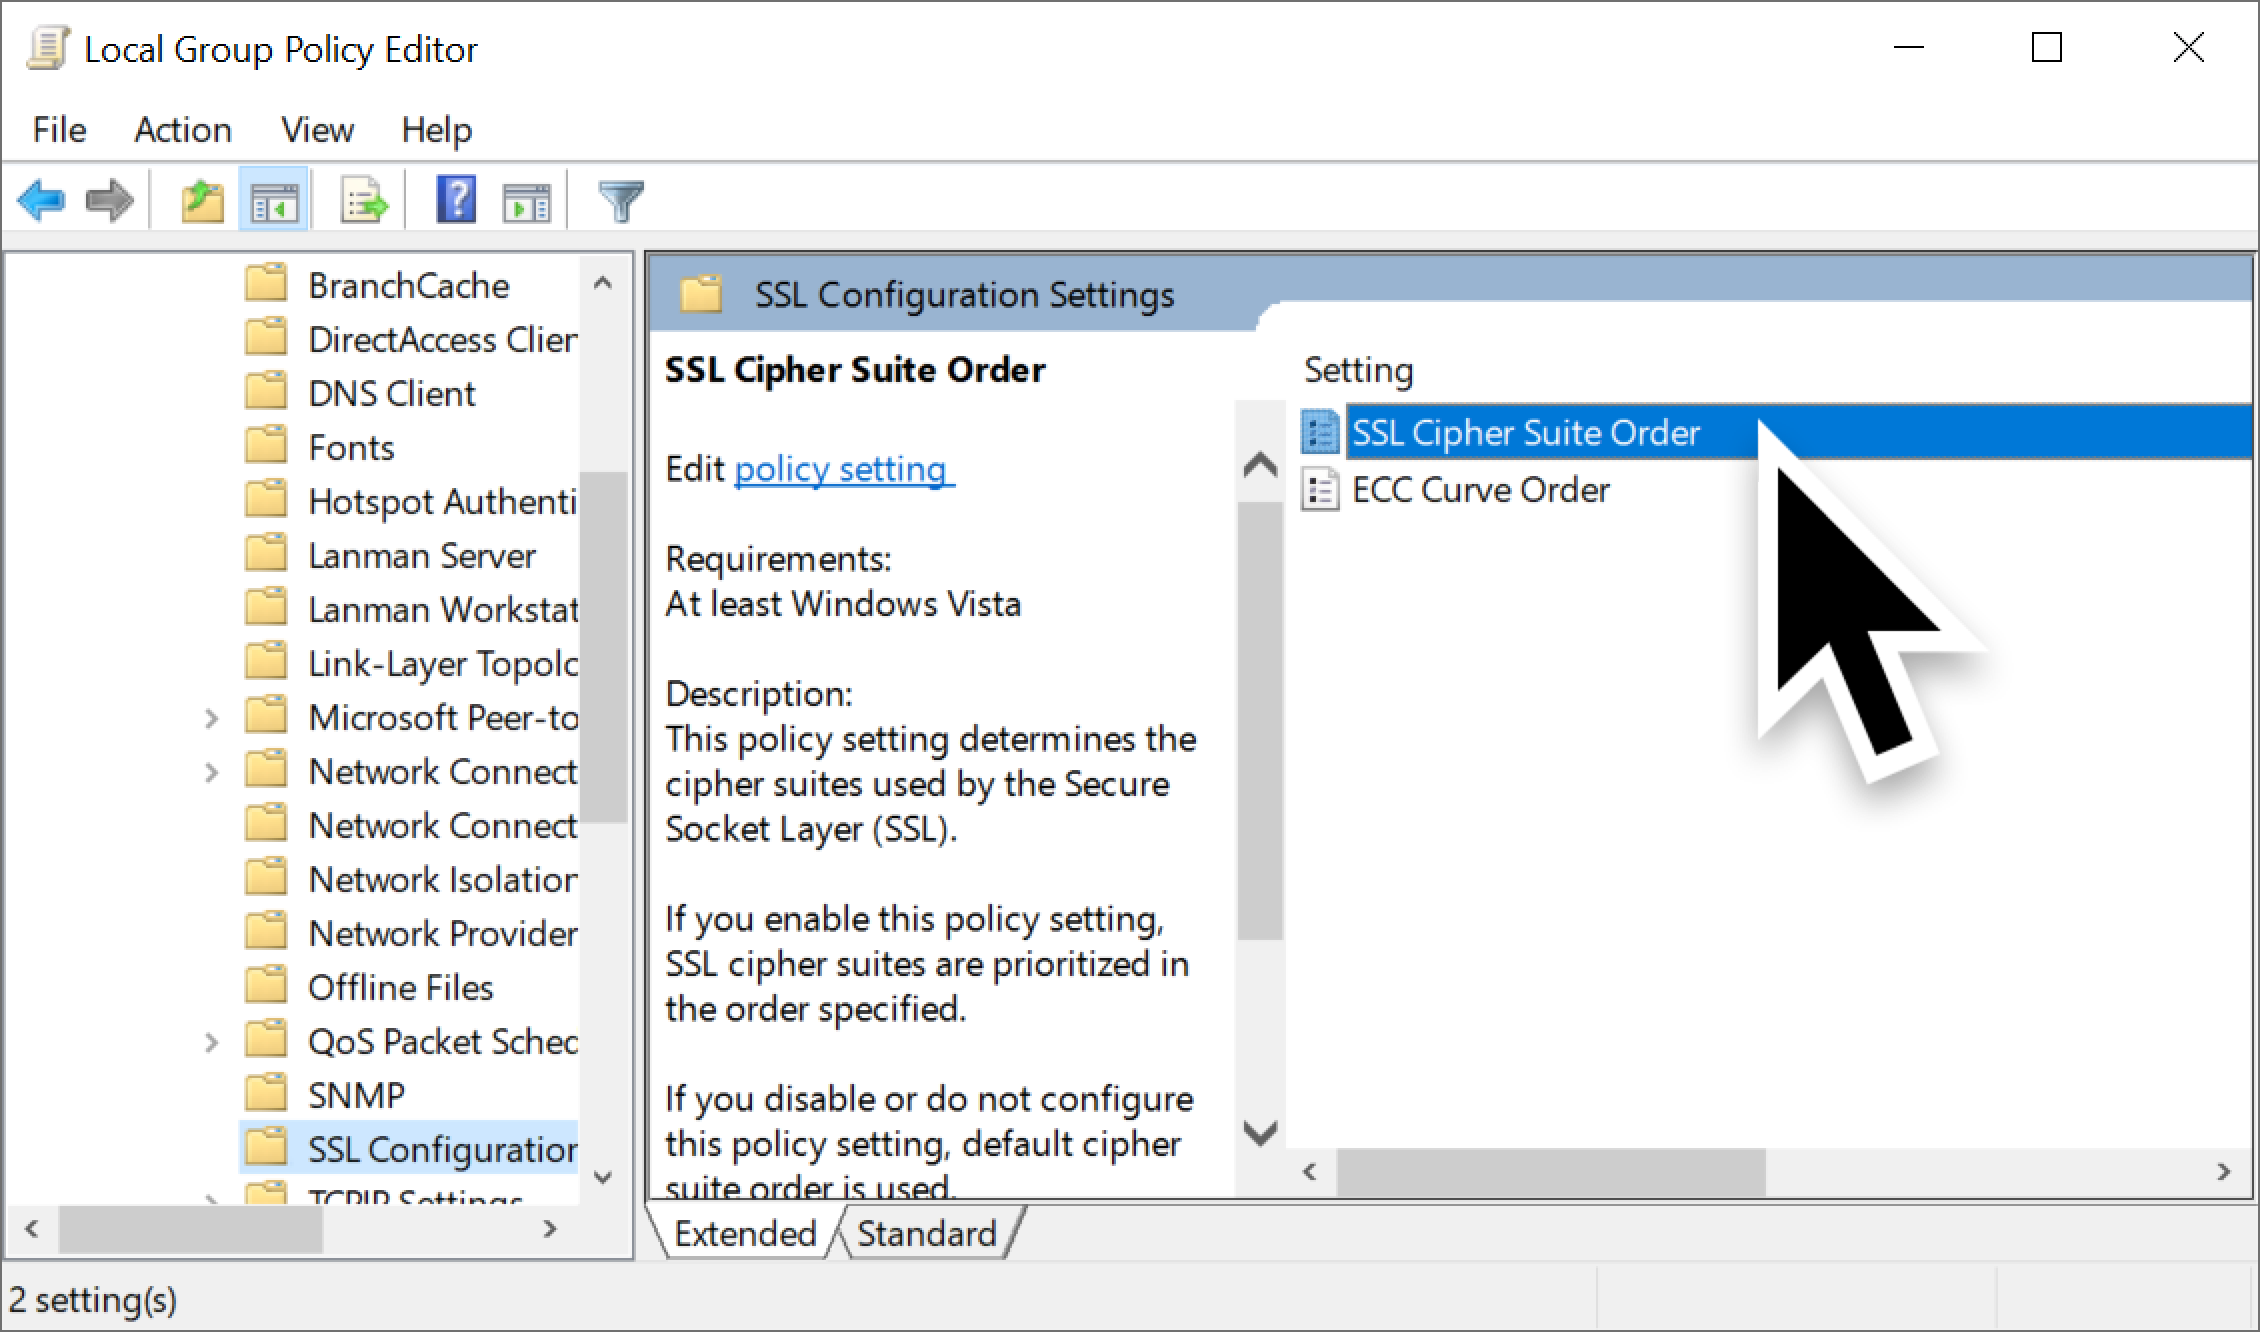
Under SSL Configuration Settings, double-click the entry for SSL Cipher Suite Order as shown below in Figure 4.
Under the SSL Cipher Suite Order, click the Enabled option as shown below in Figure 5.

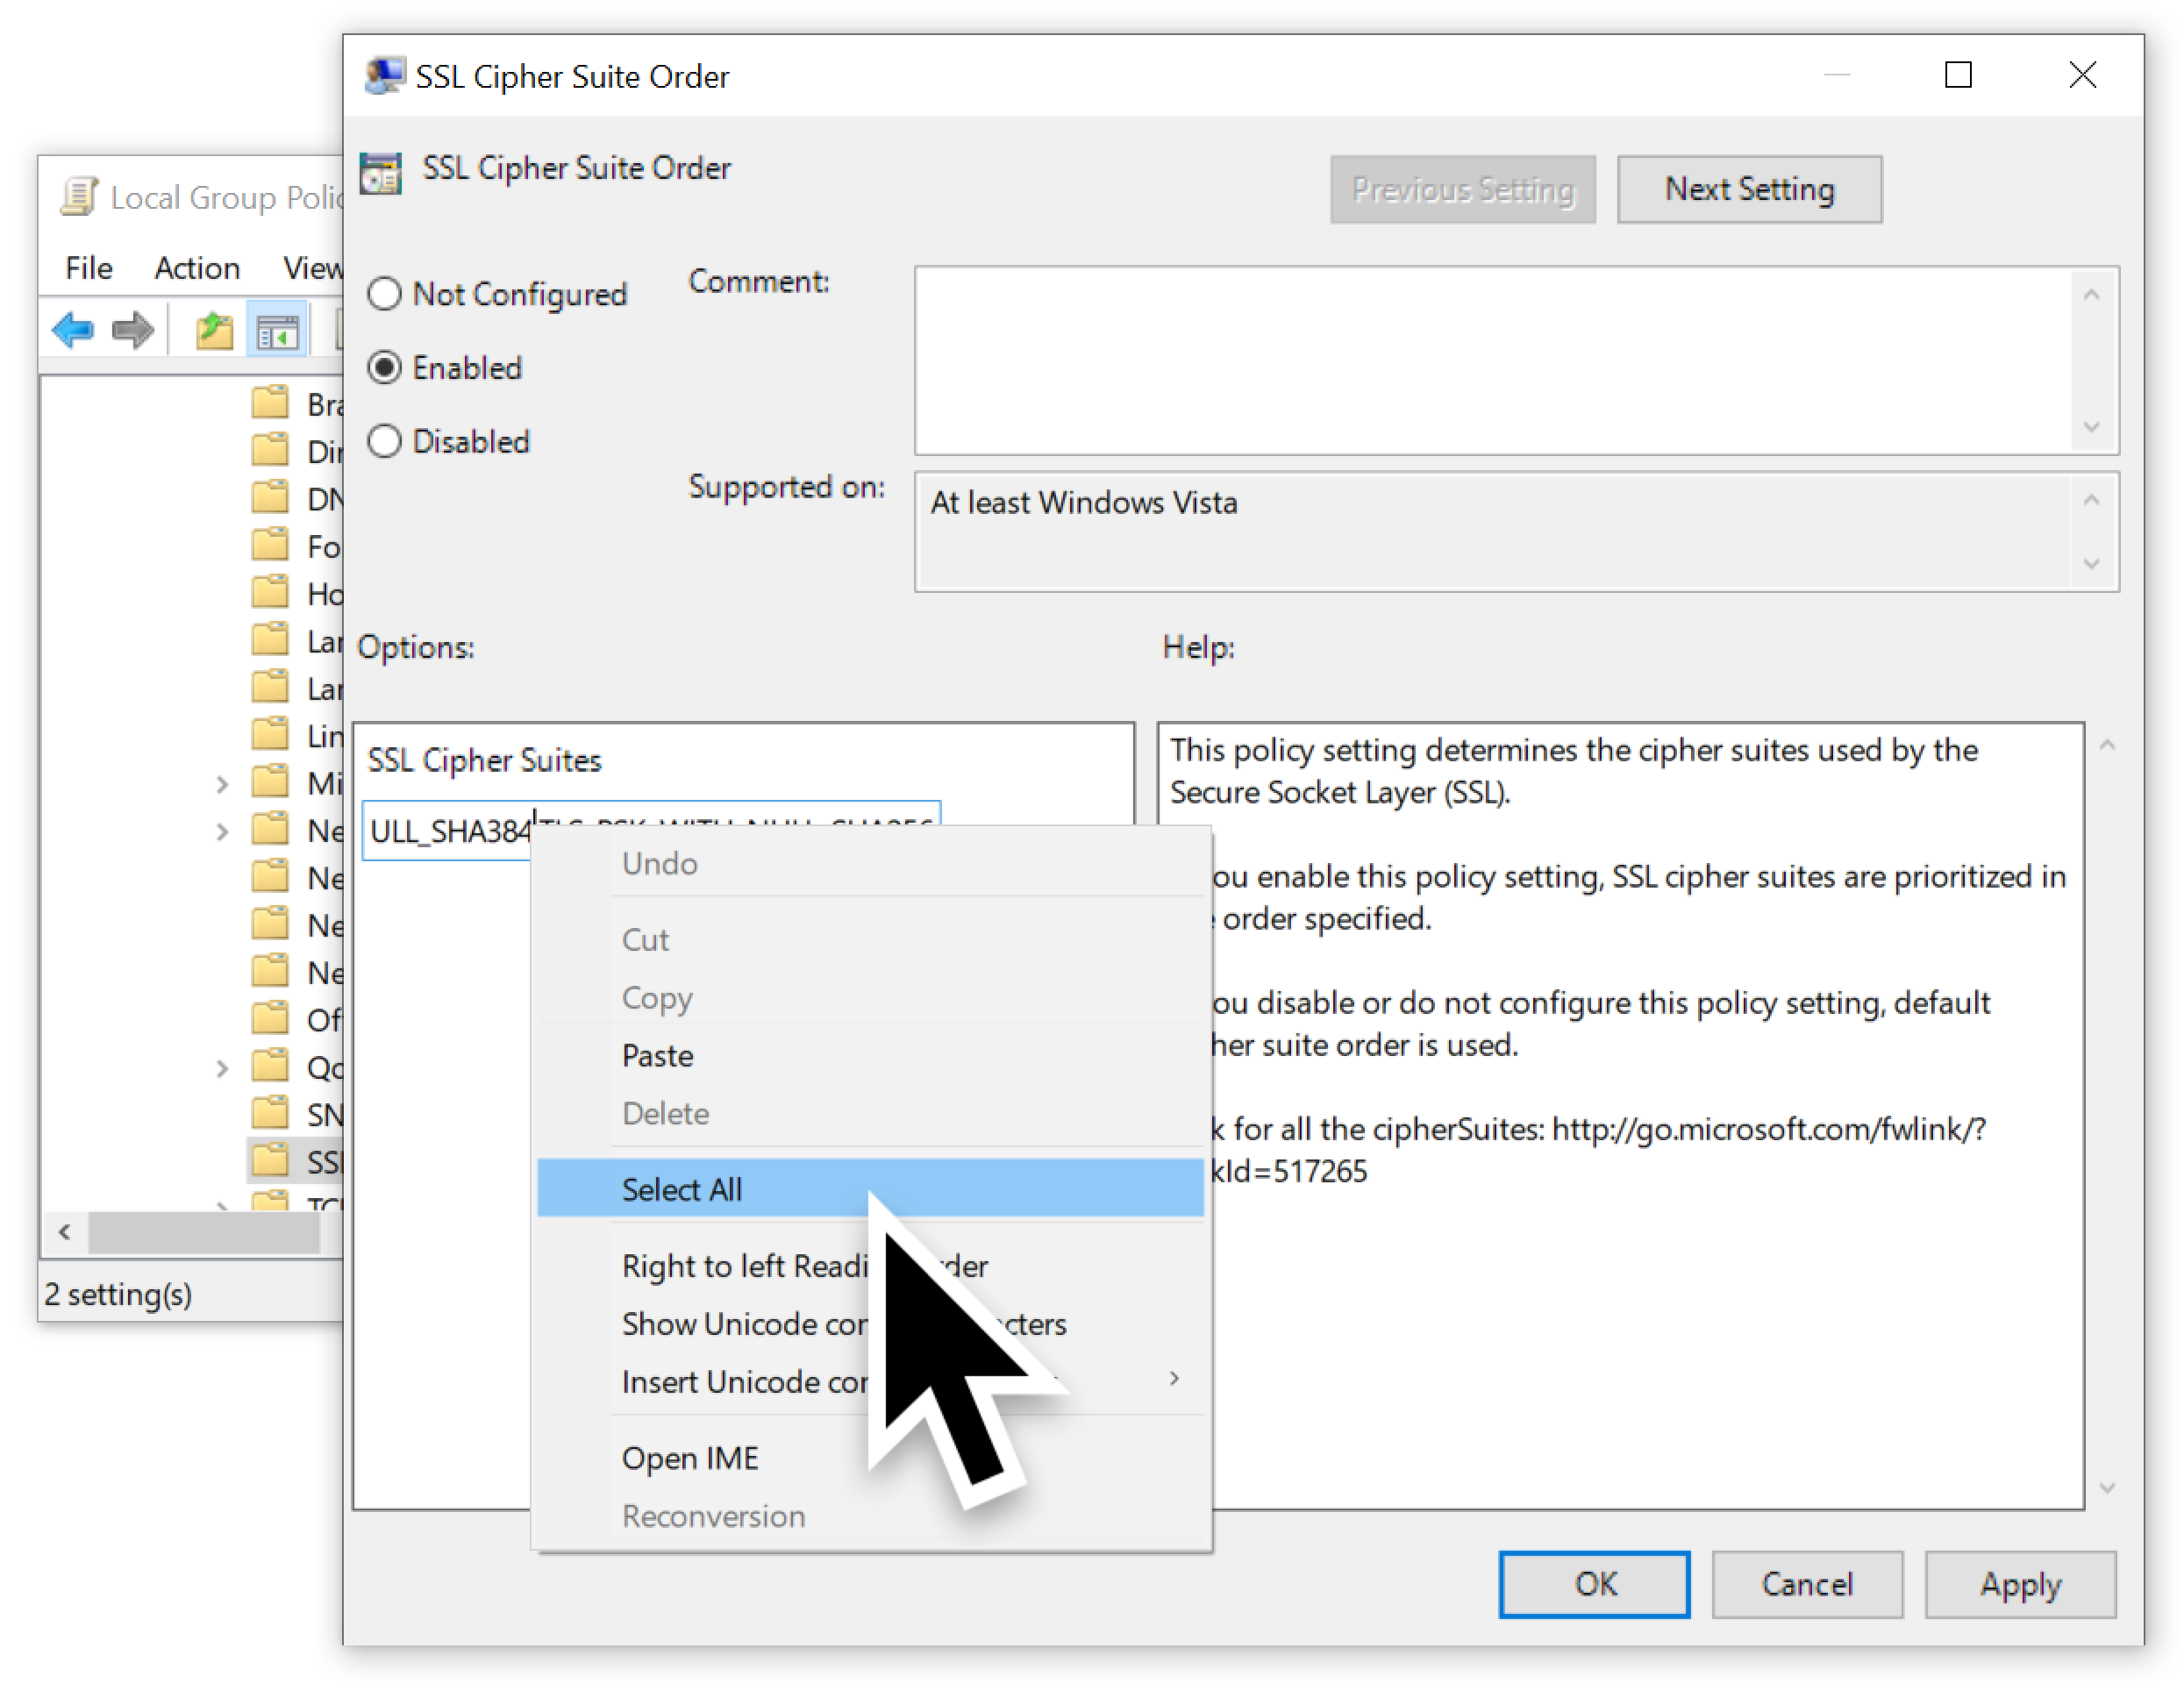
Next, double-click the list of ciphers and select the entire list as shown below in Figure 6.
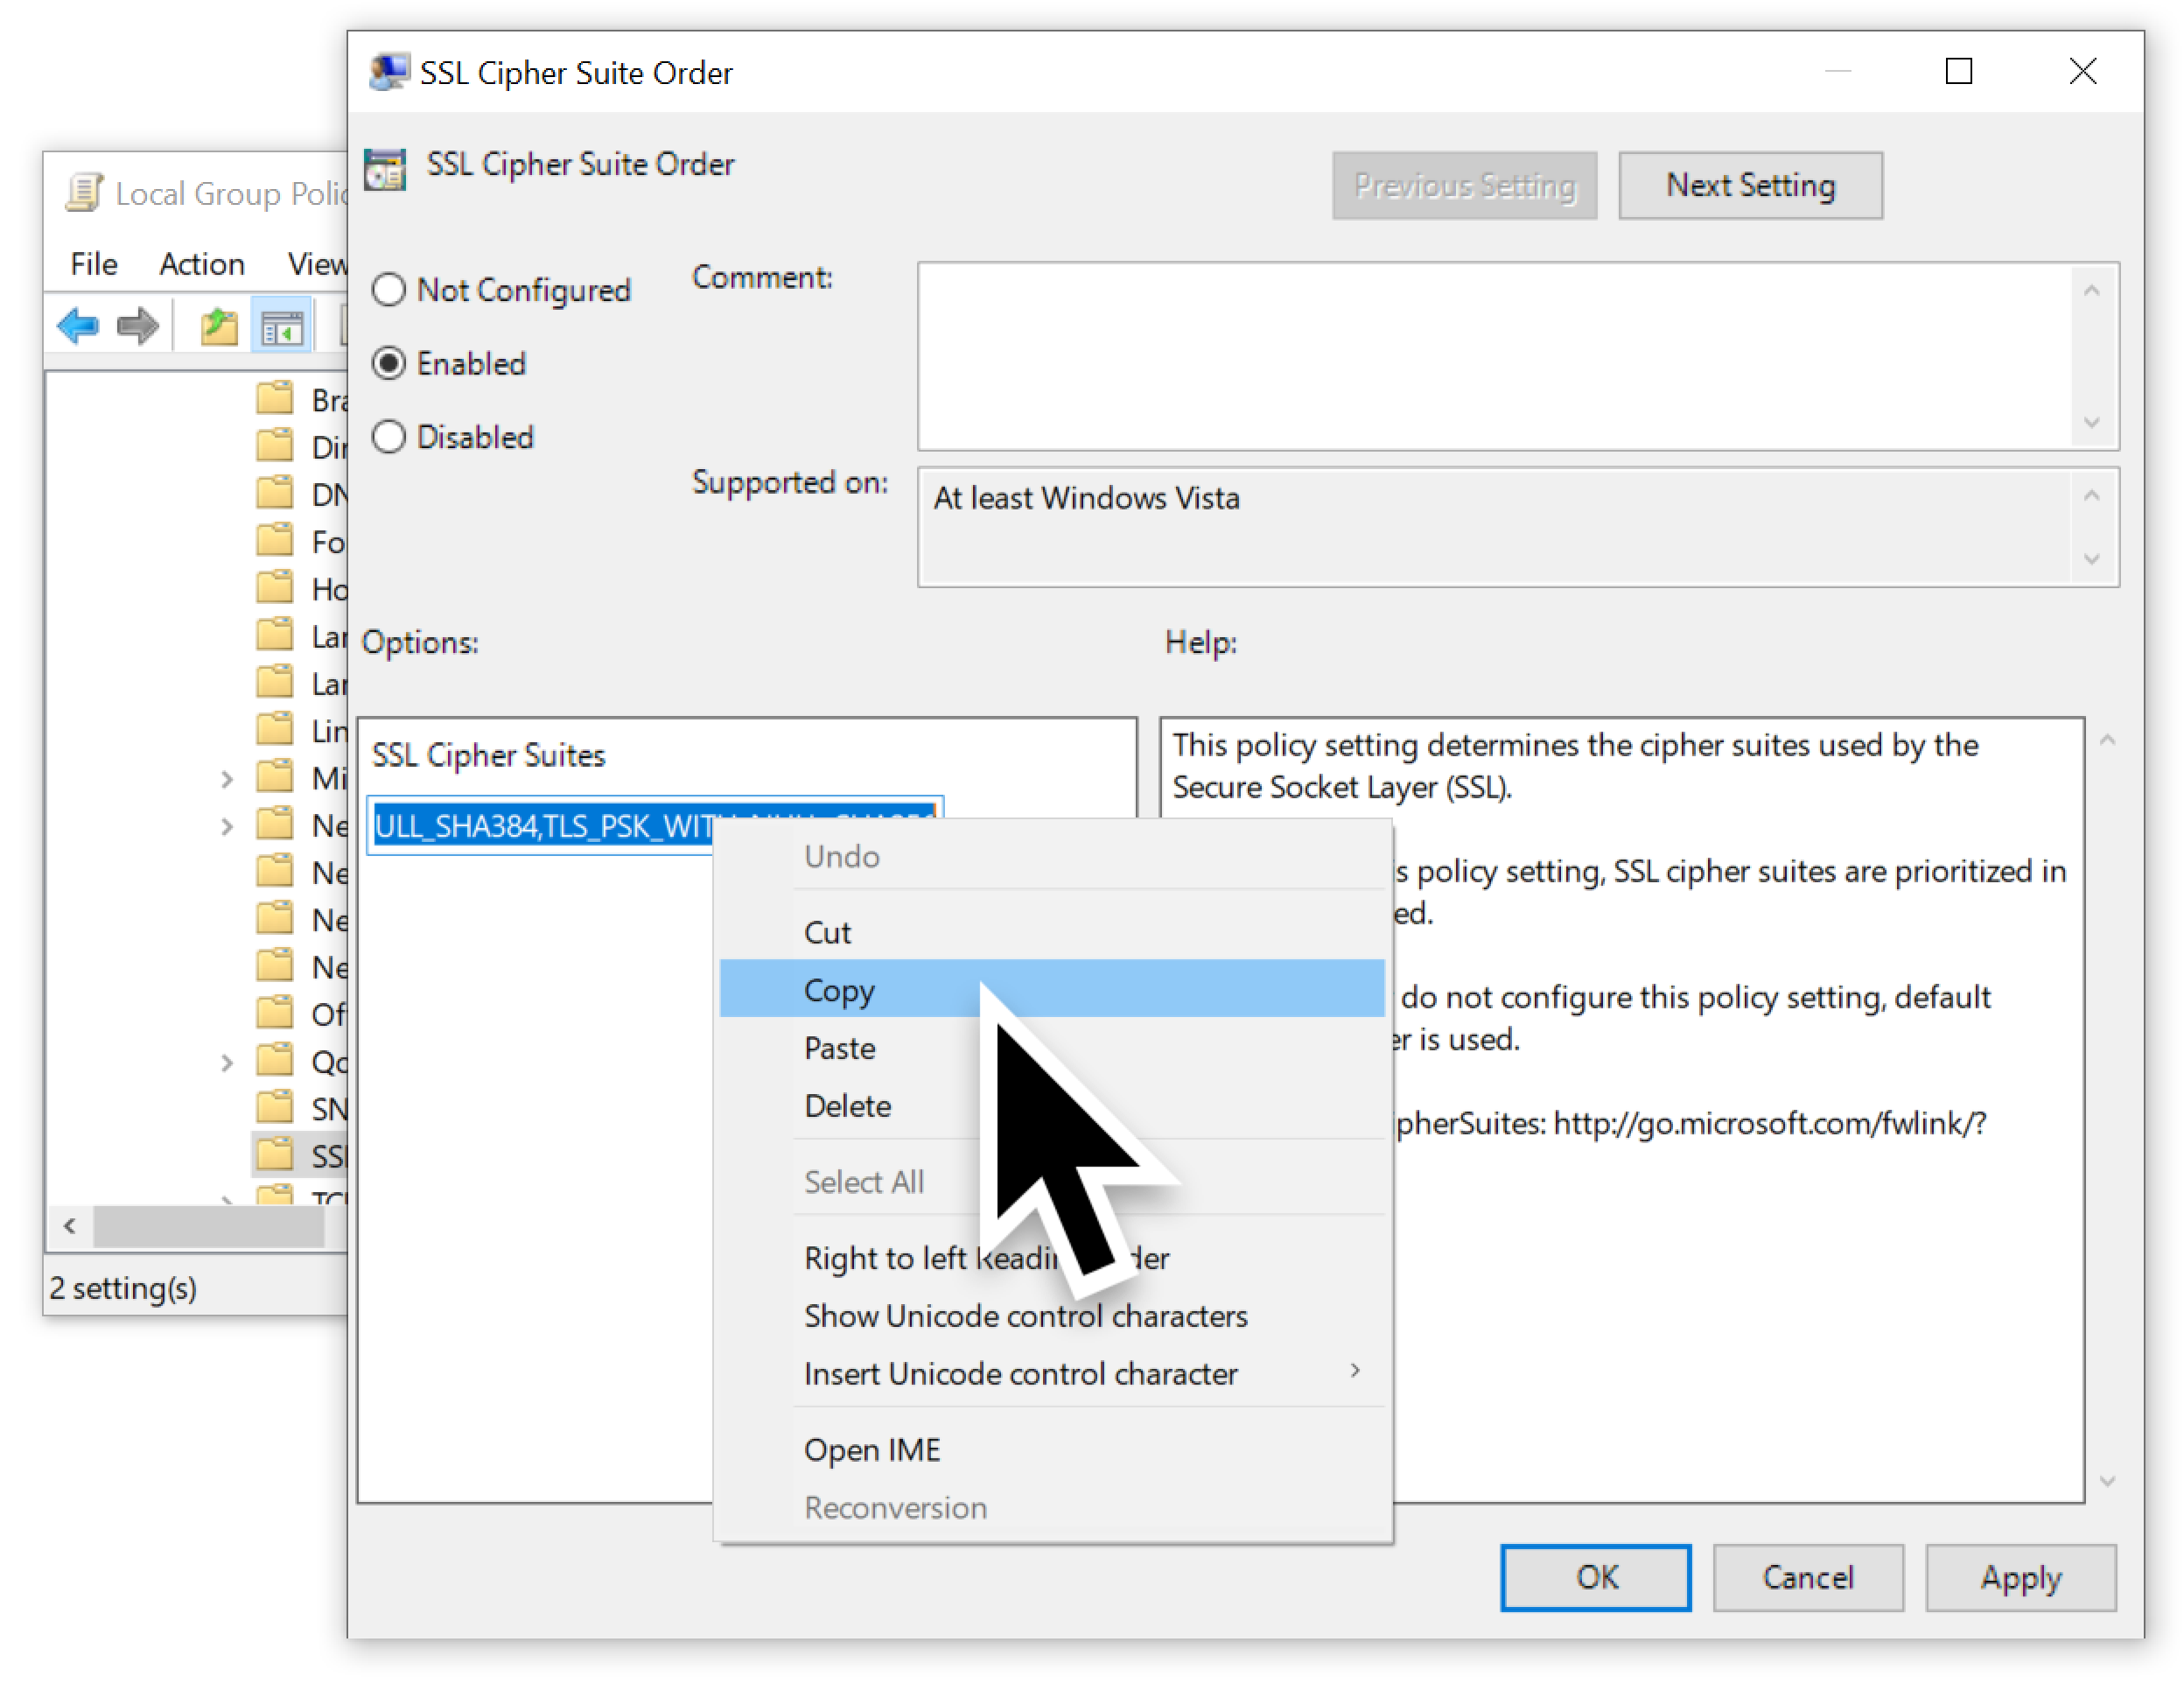
Once the list has been selected, copy it as shown below in Figure 7.
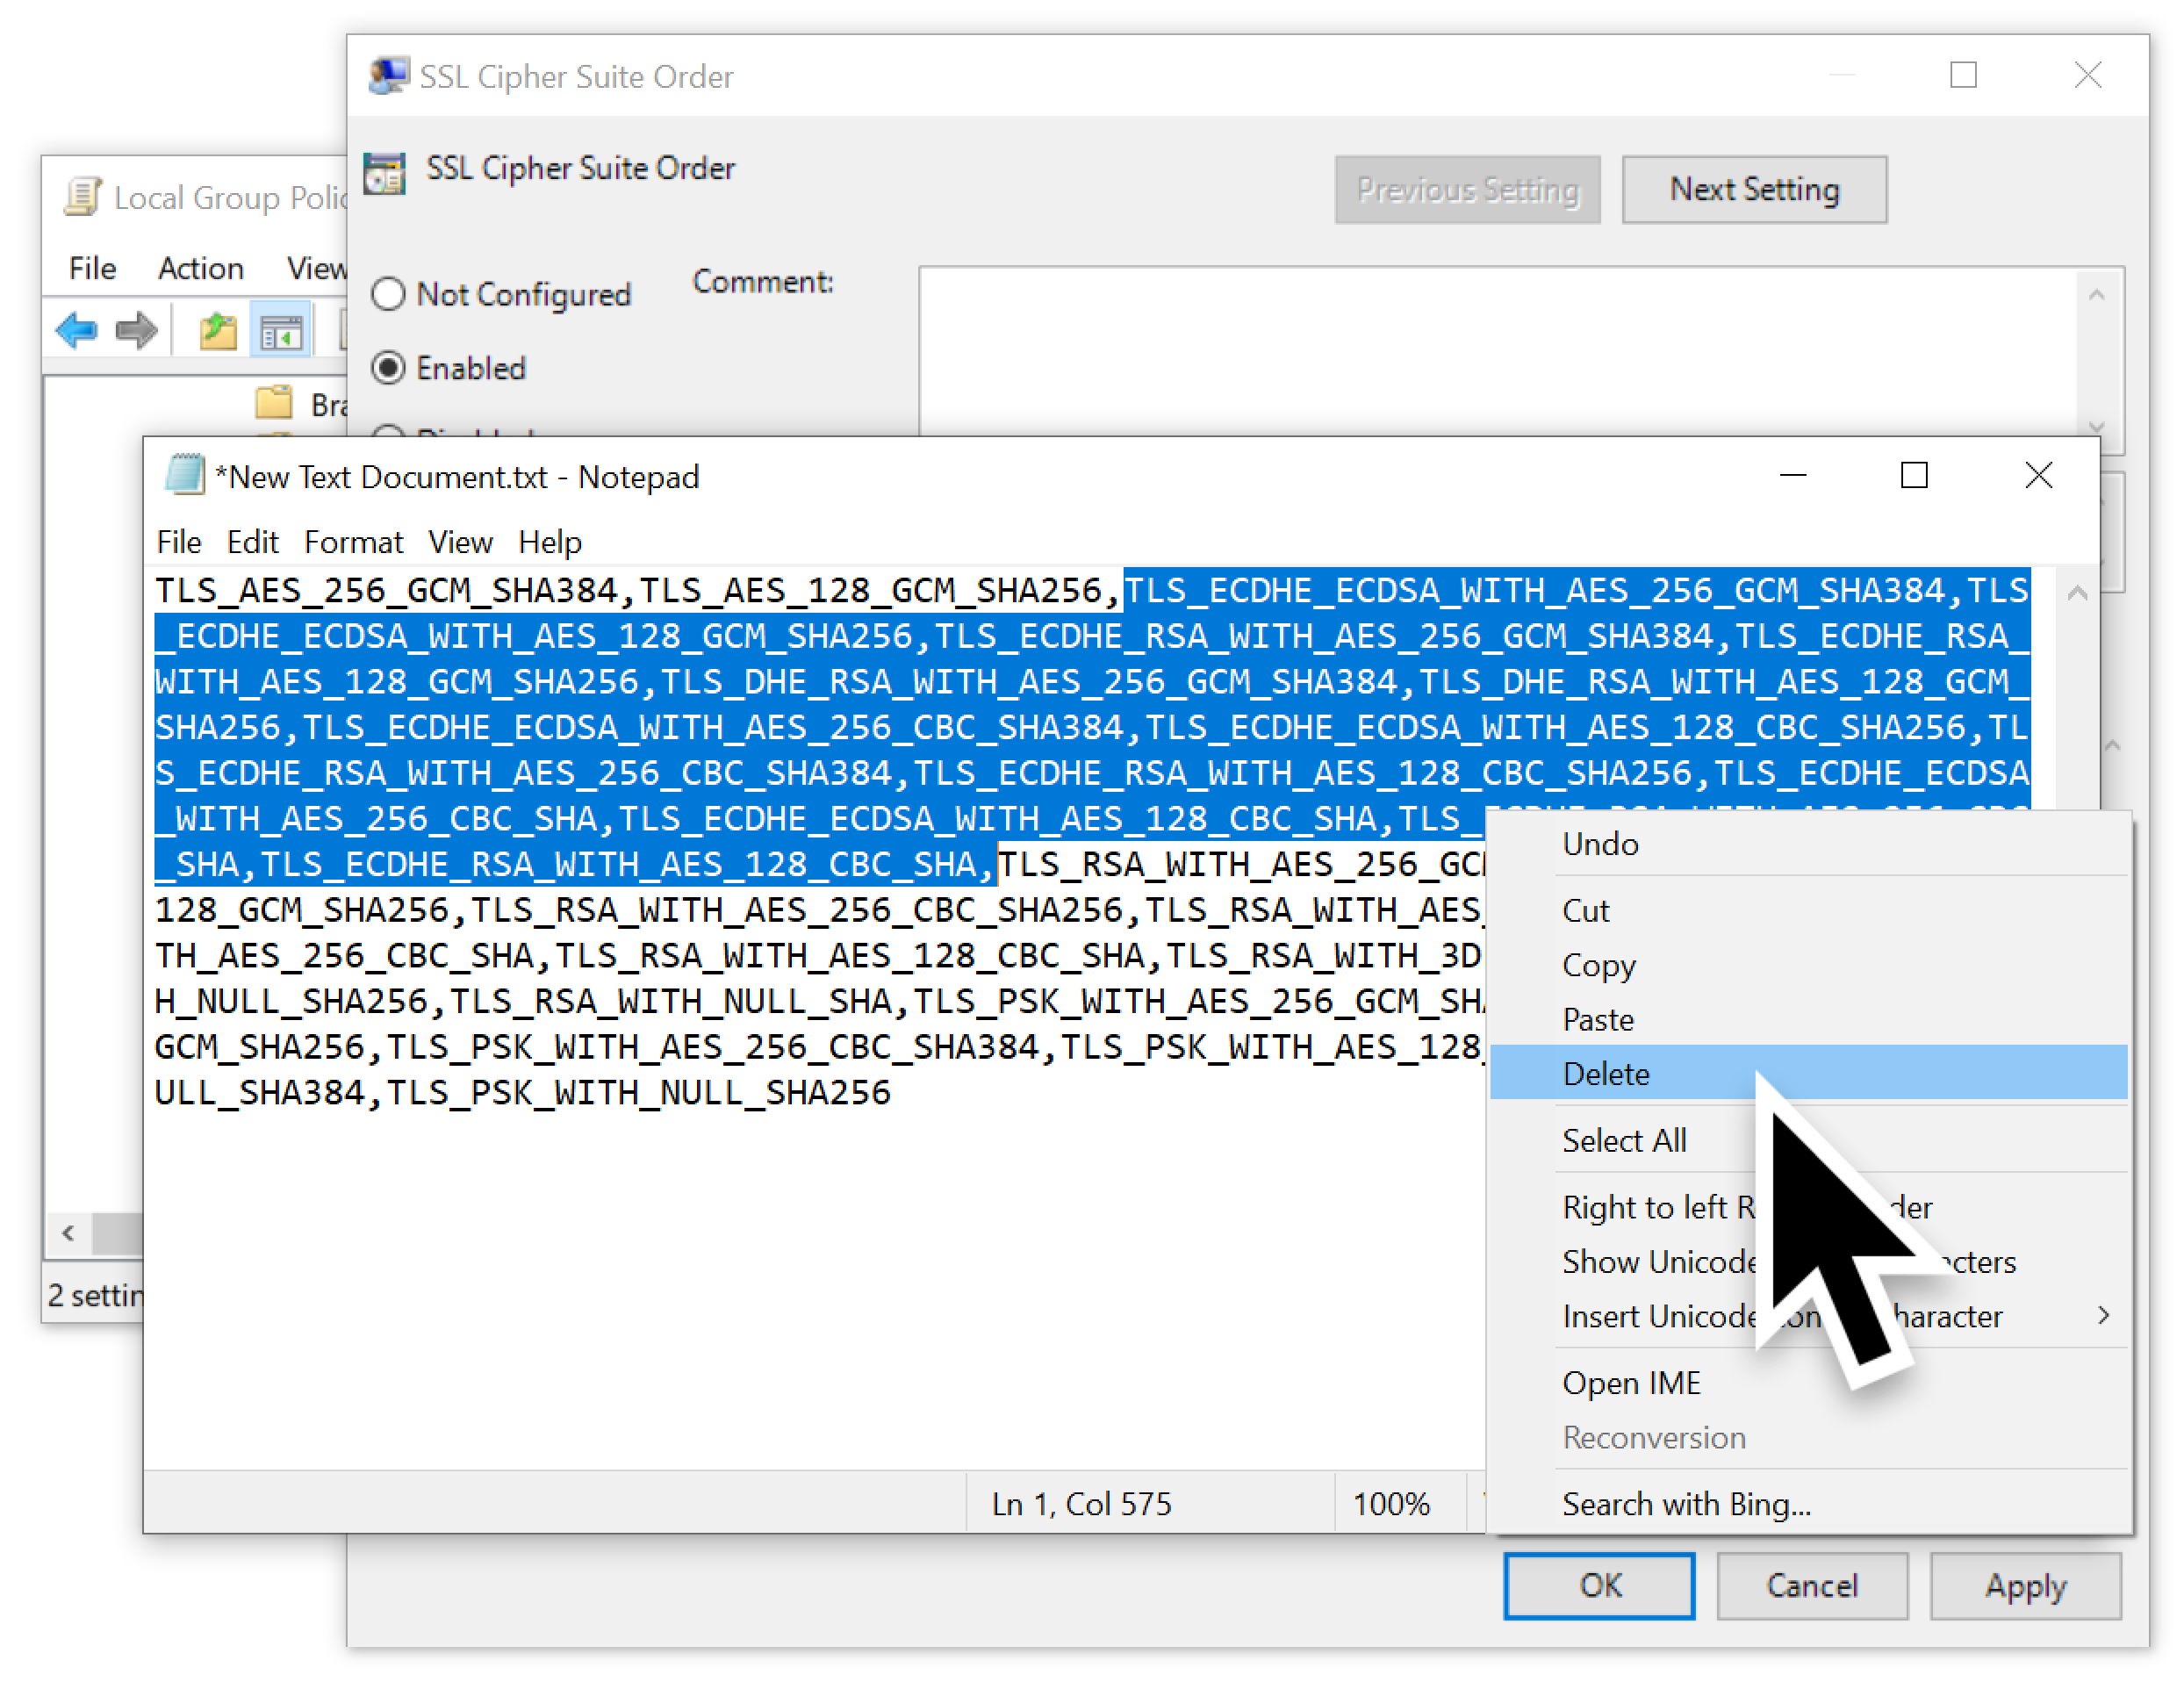
Copy this list of ciphers into a text editor such as Notepad. Remove any ciphers that support Elliptic Curve cryptography using Diffie-Hellman Ephemeral (ECDHE) or Digital Signature Algorithm (ECDSA) encryption. These should be any entries with ECDHE and/or ECDSA in the name. In the example shown below in Figure 8, these ciphers were all located sequentially, so they were easy to delete from the text.
Our updated list of ciphers from Figure 8 is listed below in Table 1.
| TLS_AES_256_GCM_SHA384,TLS_AES_128_GCM_SHA256,TLS_RSA_WITH_AES_256_GCM_SHA384,TLS_RSA_WITH_AES_128_GCM_SHA256,TLS_RSA_WITH_AES_256_CBC_SHA256,TLS_RSA_WITH_AES_128_CBC_SHA256,TLS_RSA_WITH_AES_256_CBC_SHA,TLS_RSA_WITH_AES_128_CBC_SHA,TLS_RSA_WITH_3DES_EDE_CBC_SHA,TLS_RSA_WITH_NULL_SHA256,TLS_RSA_WITH_NULL_SHA,TLS_PSK_WITH_AES_256_GCM_SHA384,TLS_PSK_WITH_AES_128_GCM_SHA256,TLS_PSK_WITH_AES_256_CBC_SHA384,TLS_PSK_WITH_AES_128_CBC_SHA256,TLS_PSK_WITH_NULL_SHA384,TLS_PSK_WITH_NULL_SHA256 |
Table 1. Updated list after removing forward secrecy ciphers.
Paste the updated cipher list back into the SSL Cipher Suites Field, making sure to overwrite the original list. Click the Apply button, then click OK to close the window. You have now updated the list and can close the Group Policy Editor.
After we accomplished this step, we had to obtain the RDP server’s private key.
Step 3: Obtain RDP Server's Private Key
FreeRDP is one option to use as an RDP server. You can get FreeRDP from this GitHub repository, as well as build instructions. Make sure to set the WITH_SERVER=ON flag when creating the server. Once the server is built, you must provide it with a private key, or use one that comes with FreeRDP.
For our RDP server in this tutorial, we used another host running Windows 10 Pro. Then we extracted the private key from the host’s operating system.
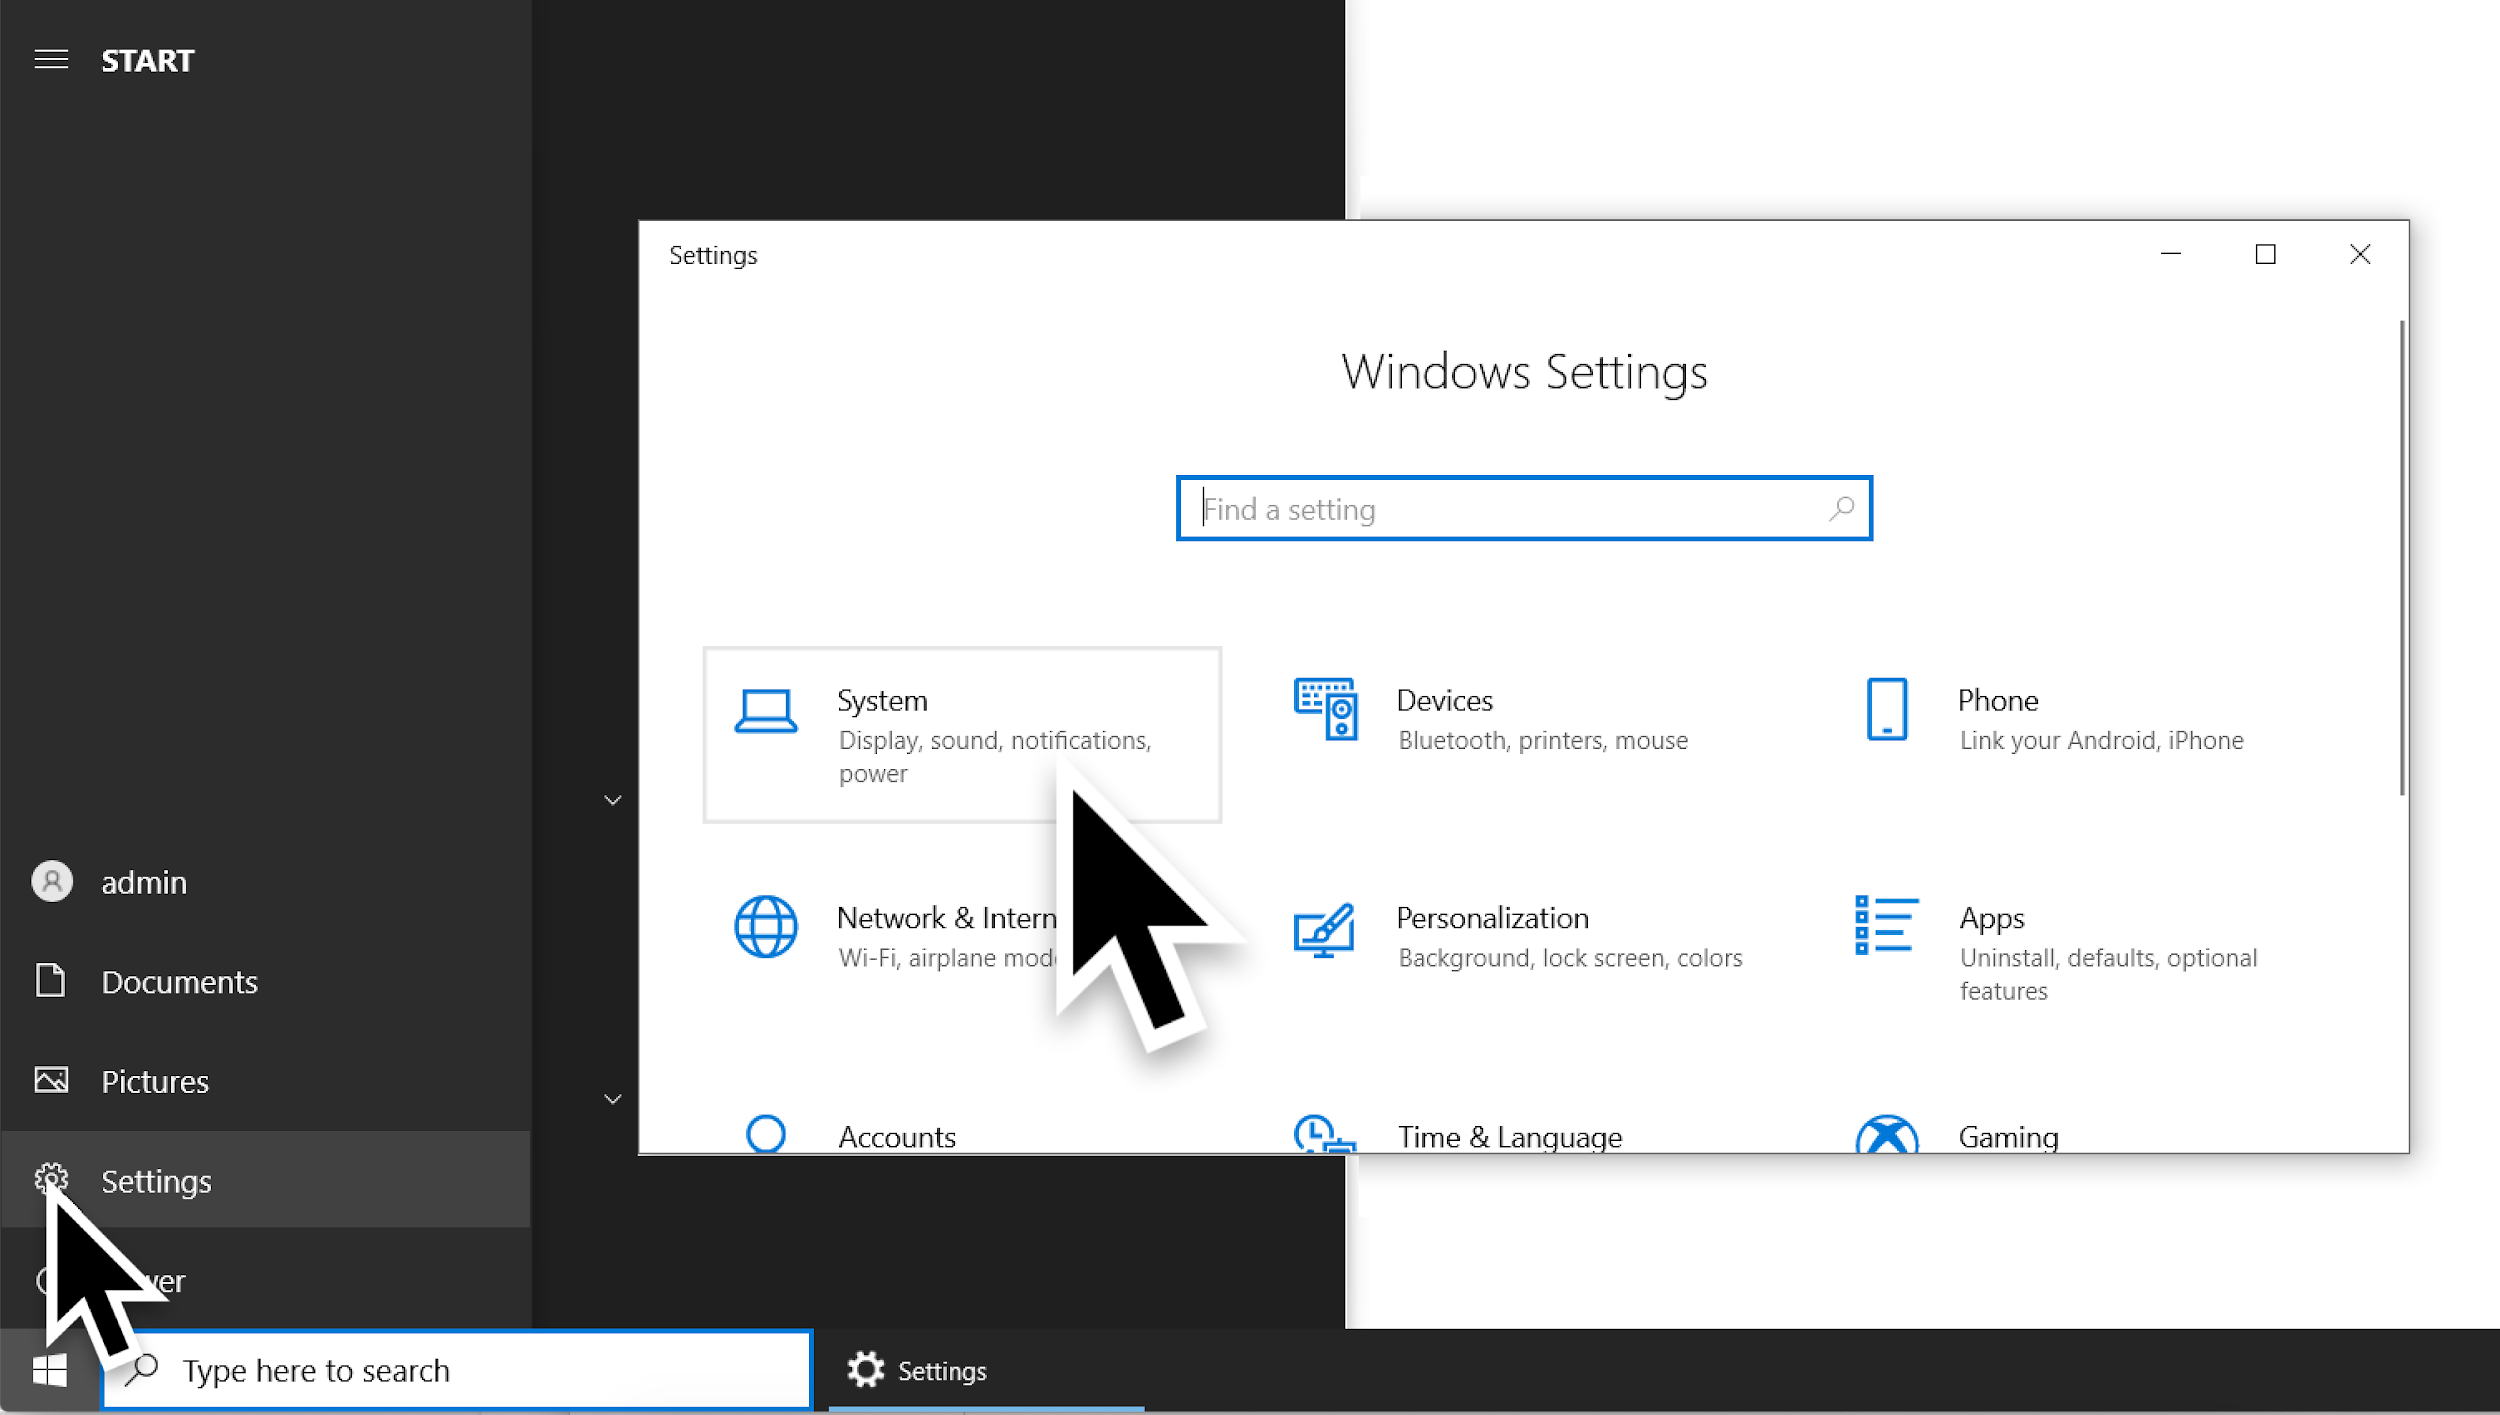
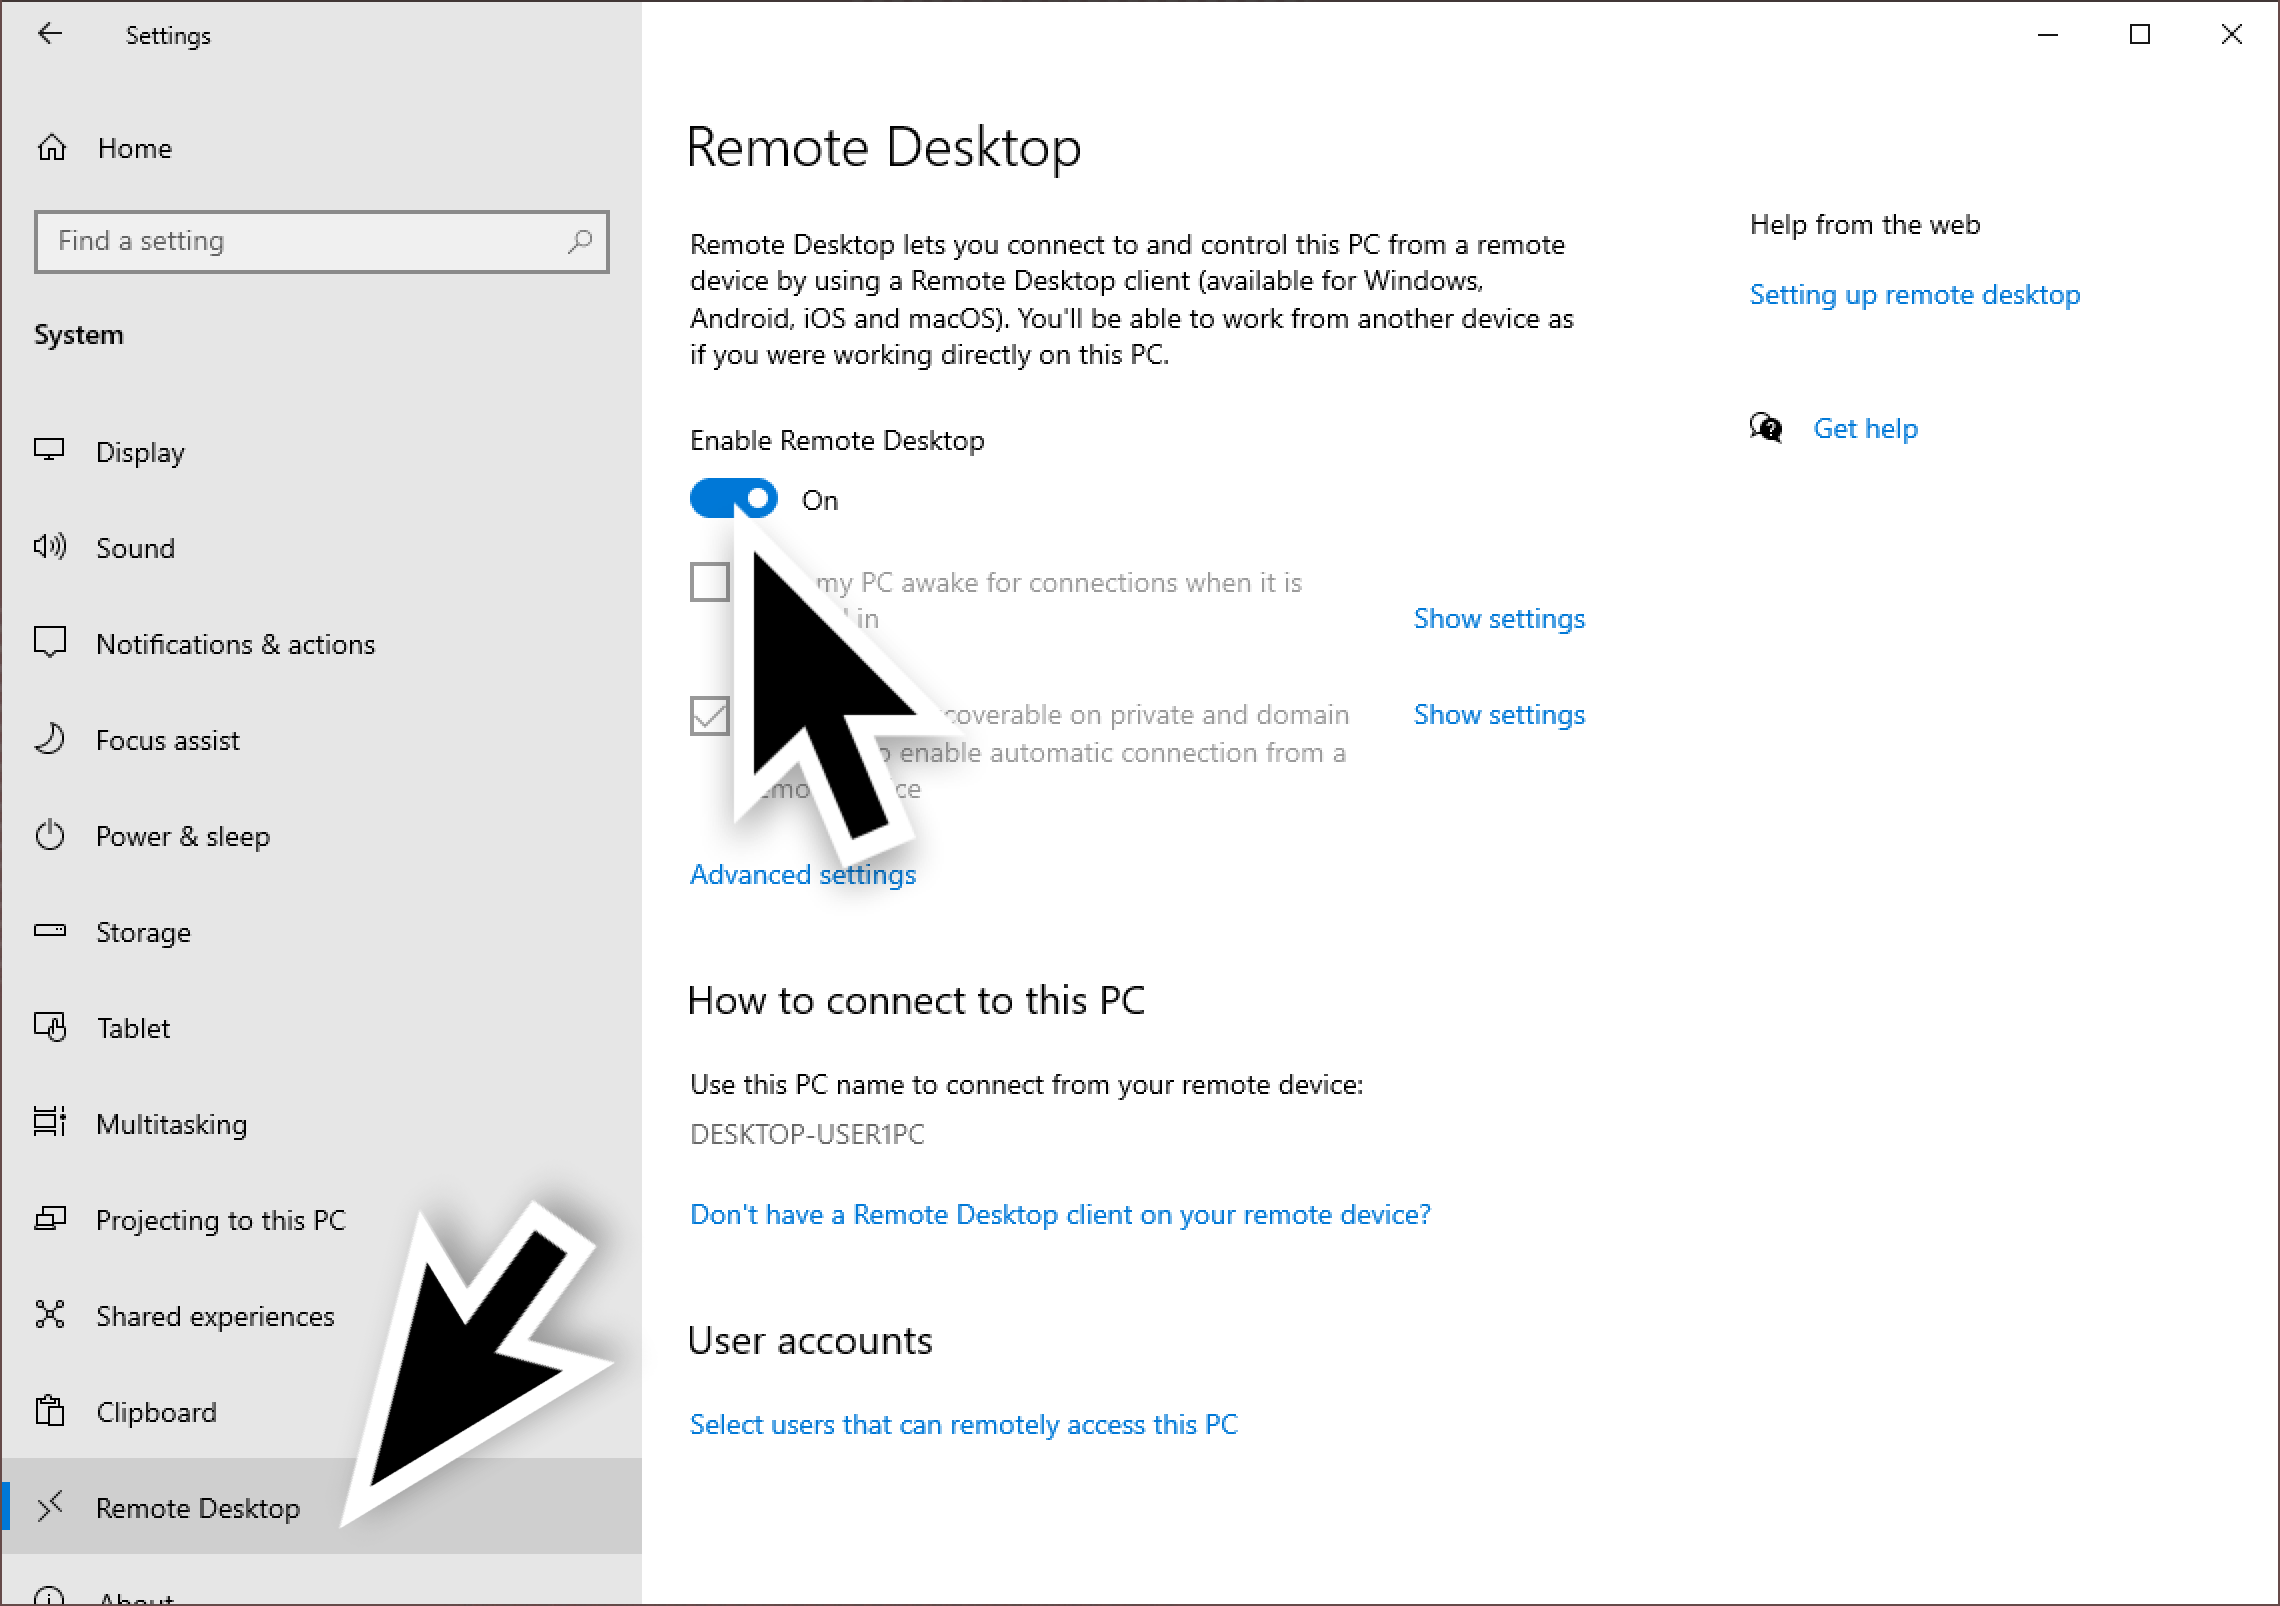
To ensure our second Windows host acted as an RDP server, we enabled RDP. To enable RDP on a host running Windows 10 Pro, go to Windows Settings from the Start Menu, then select the System icon as shown below in Figure 9.
Under the system settings, select Remote Desktop and click the switch for Enable Remote Desktop as shown below in Figure 10.
After setting up our second Windows host as an RDP server, we extracted the private key from its operating system.
To extract the server key, we could either use either Jailbreak or Mimikatz. We chose Jailbreak.
Jailbreak is a tool by iSECPartners that can export the server's RDP certificate. From the exported certificate, we could extract the private key.
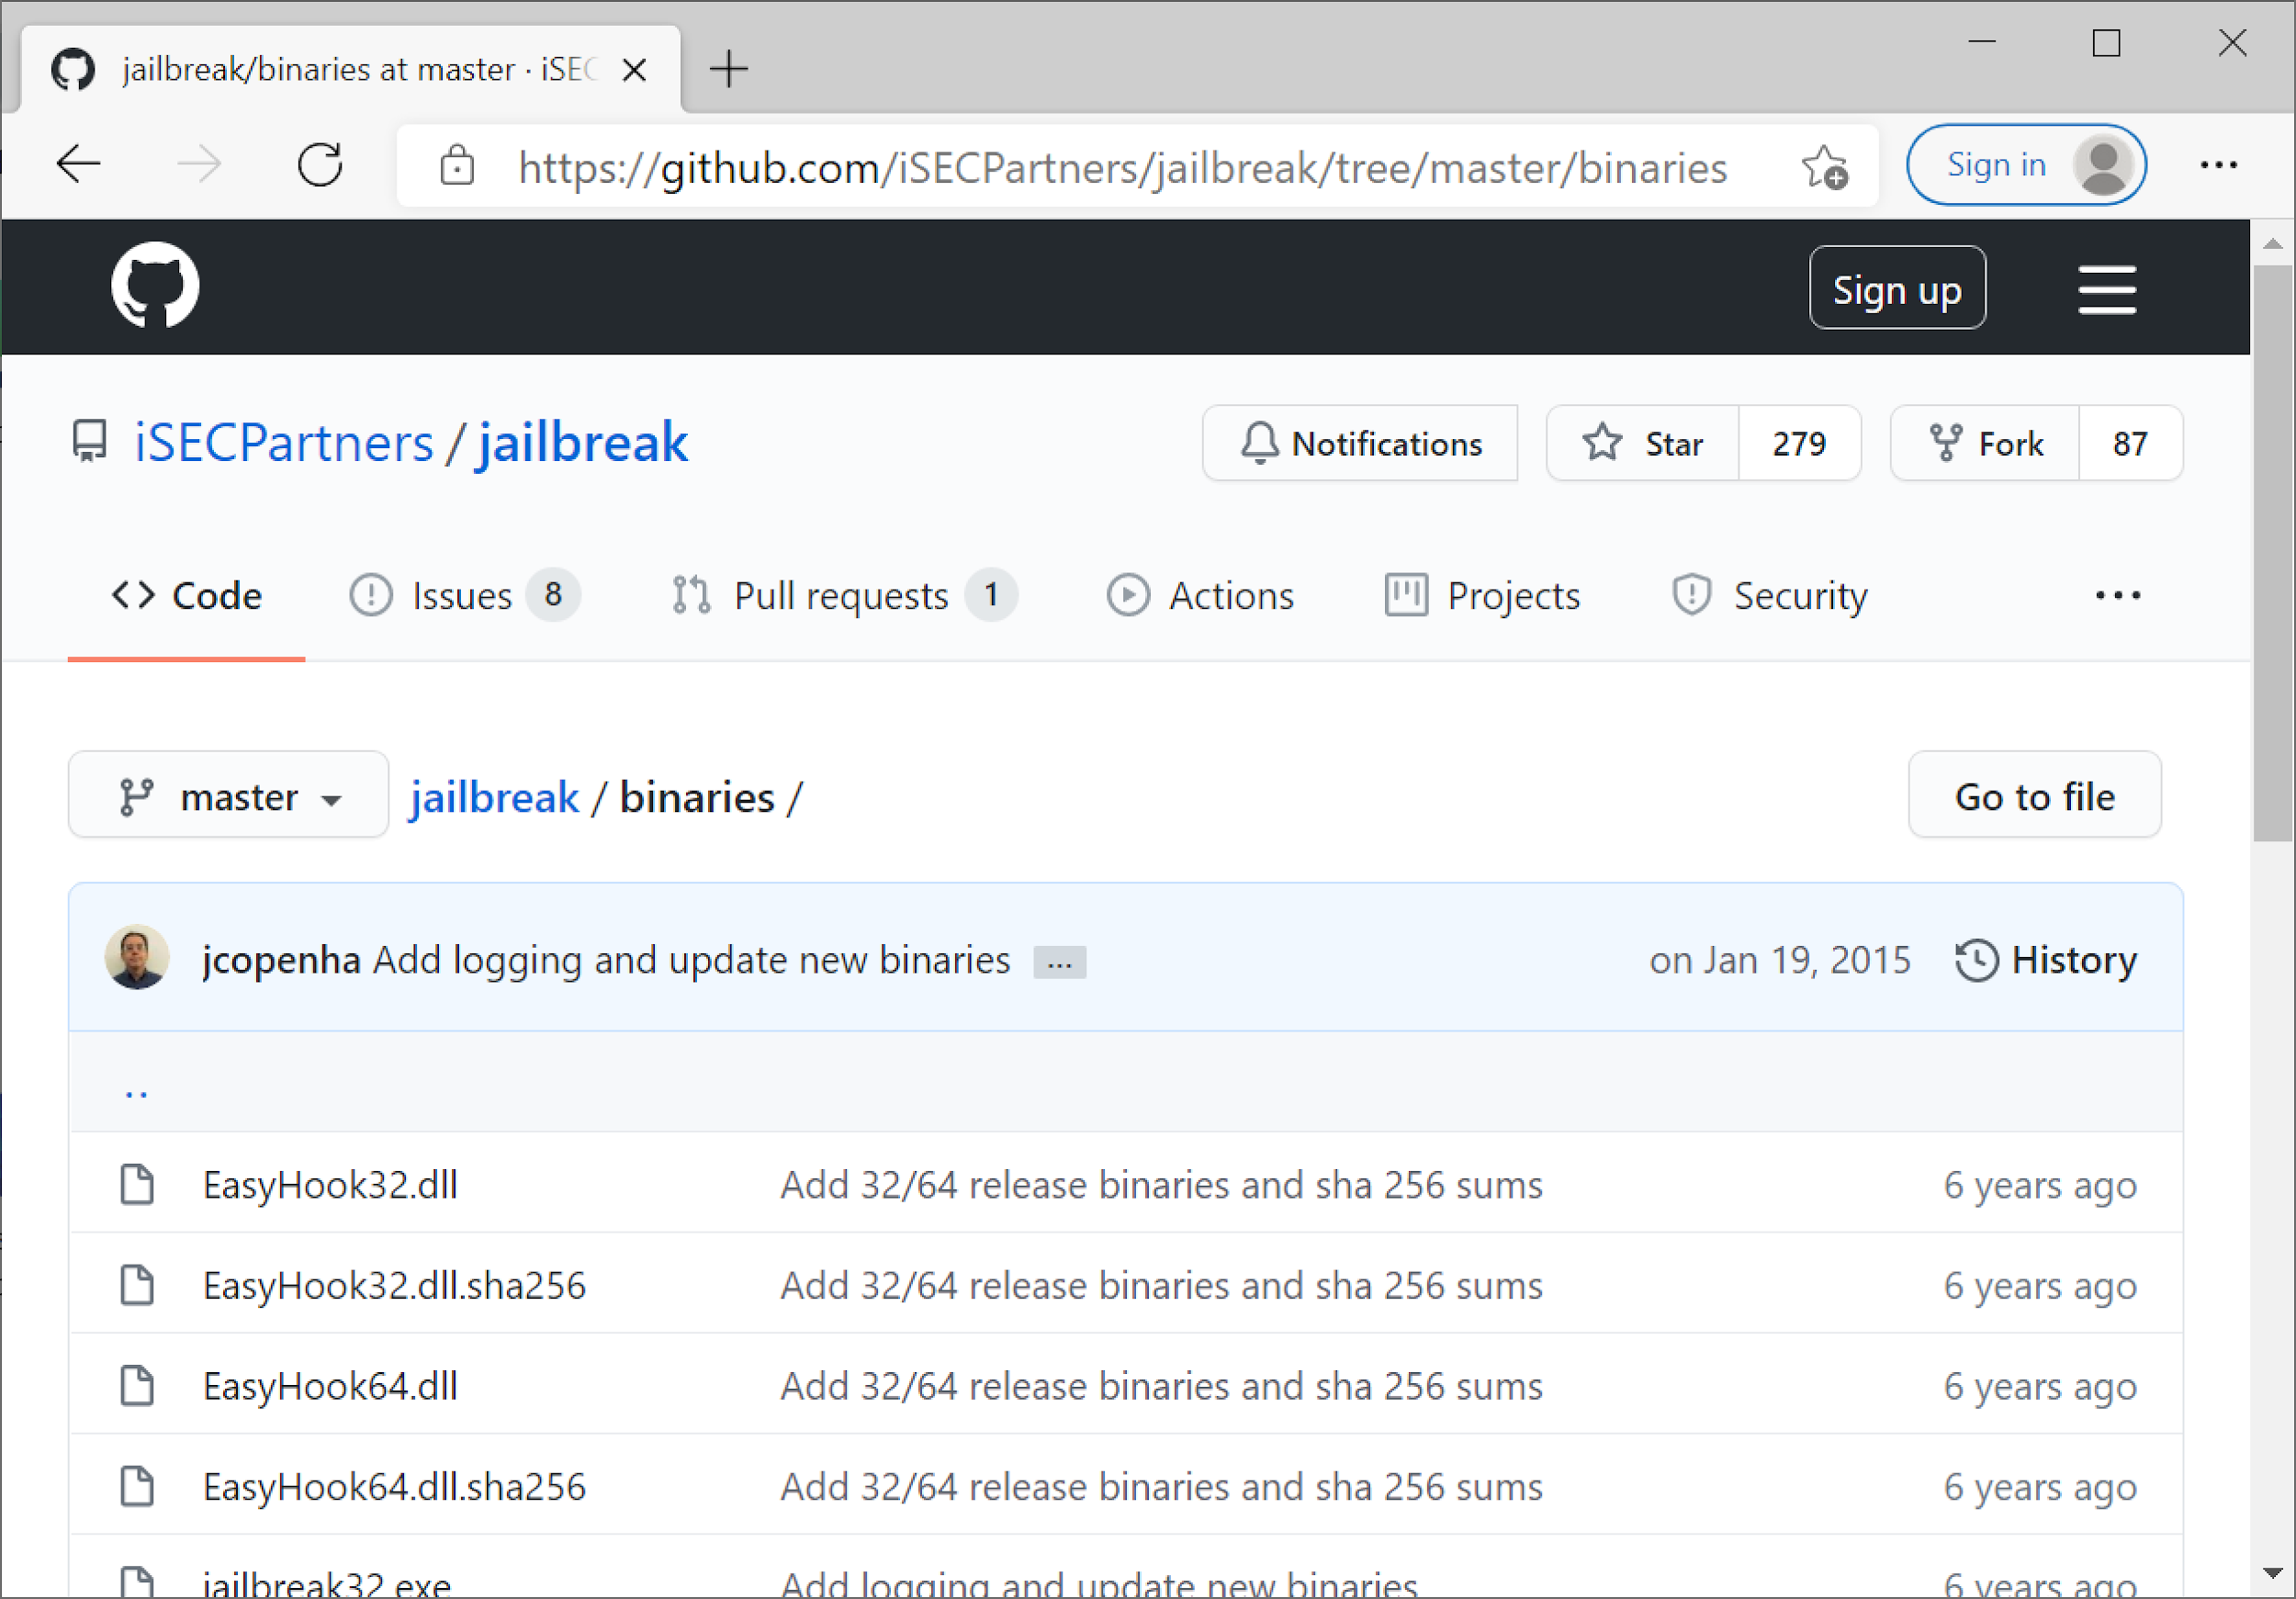
To use Jailbreak, we downloaded the following Jailbreak binaires from this GitHub repository on our newly established RDP server:
- EasyHook64.dll
- jailbreak64.exe
- jailbreakhook64.dll
- jbstore2_64.exe
Note: The above files were used on a Windows 10 Pro 64-bit host downloaded on March 4, 2021. A screenshot of the GitHub page is shown below in Figure 11.
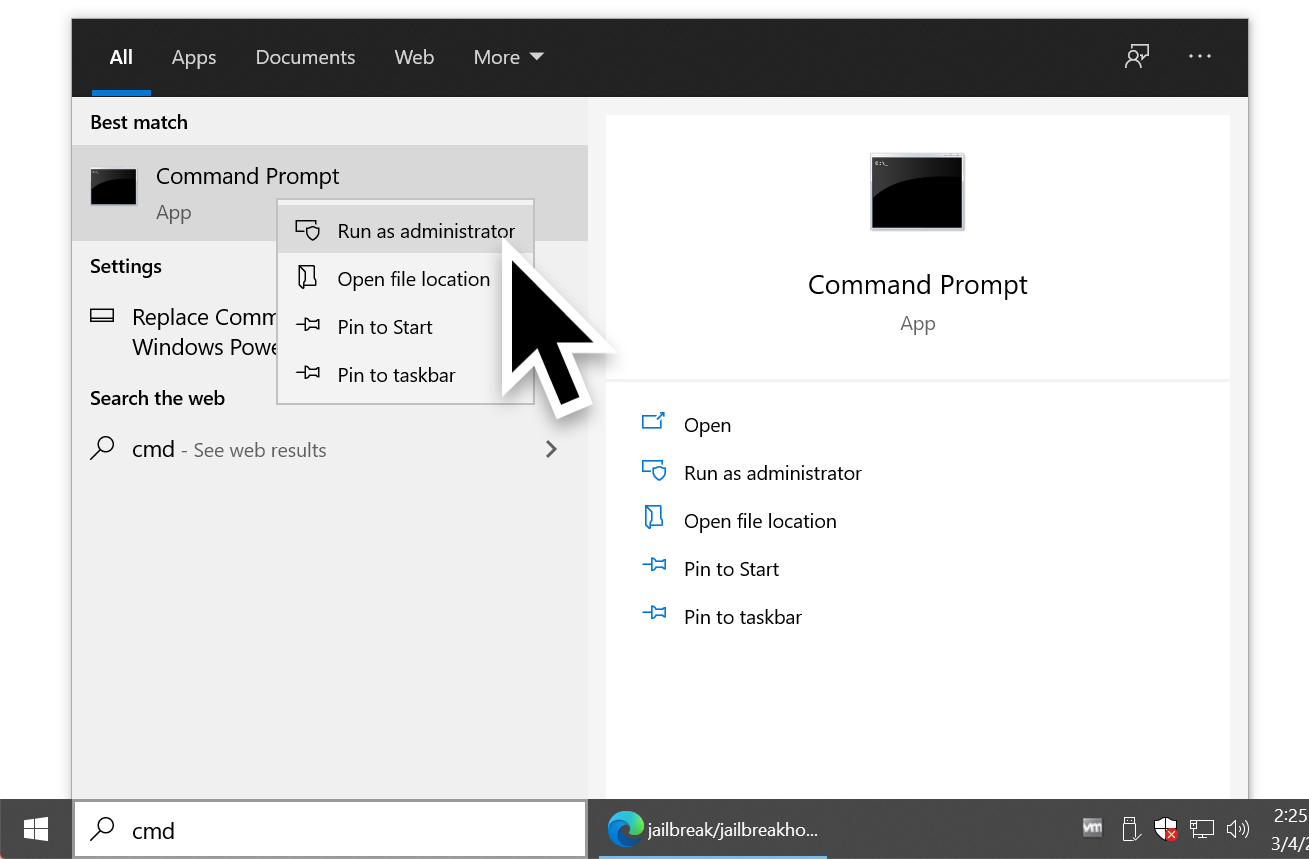
After we downloaded the Jailbreak binaries, we opened a Command prompt with administrator privileges as shown below in Figure 12.
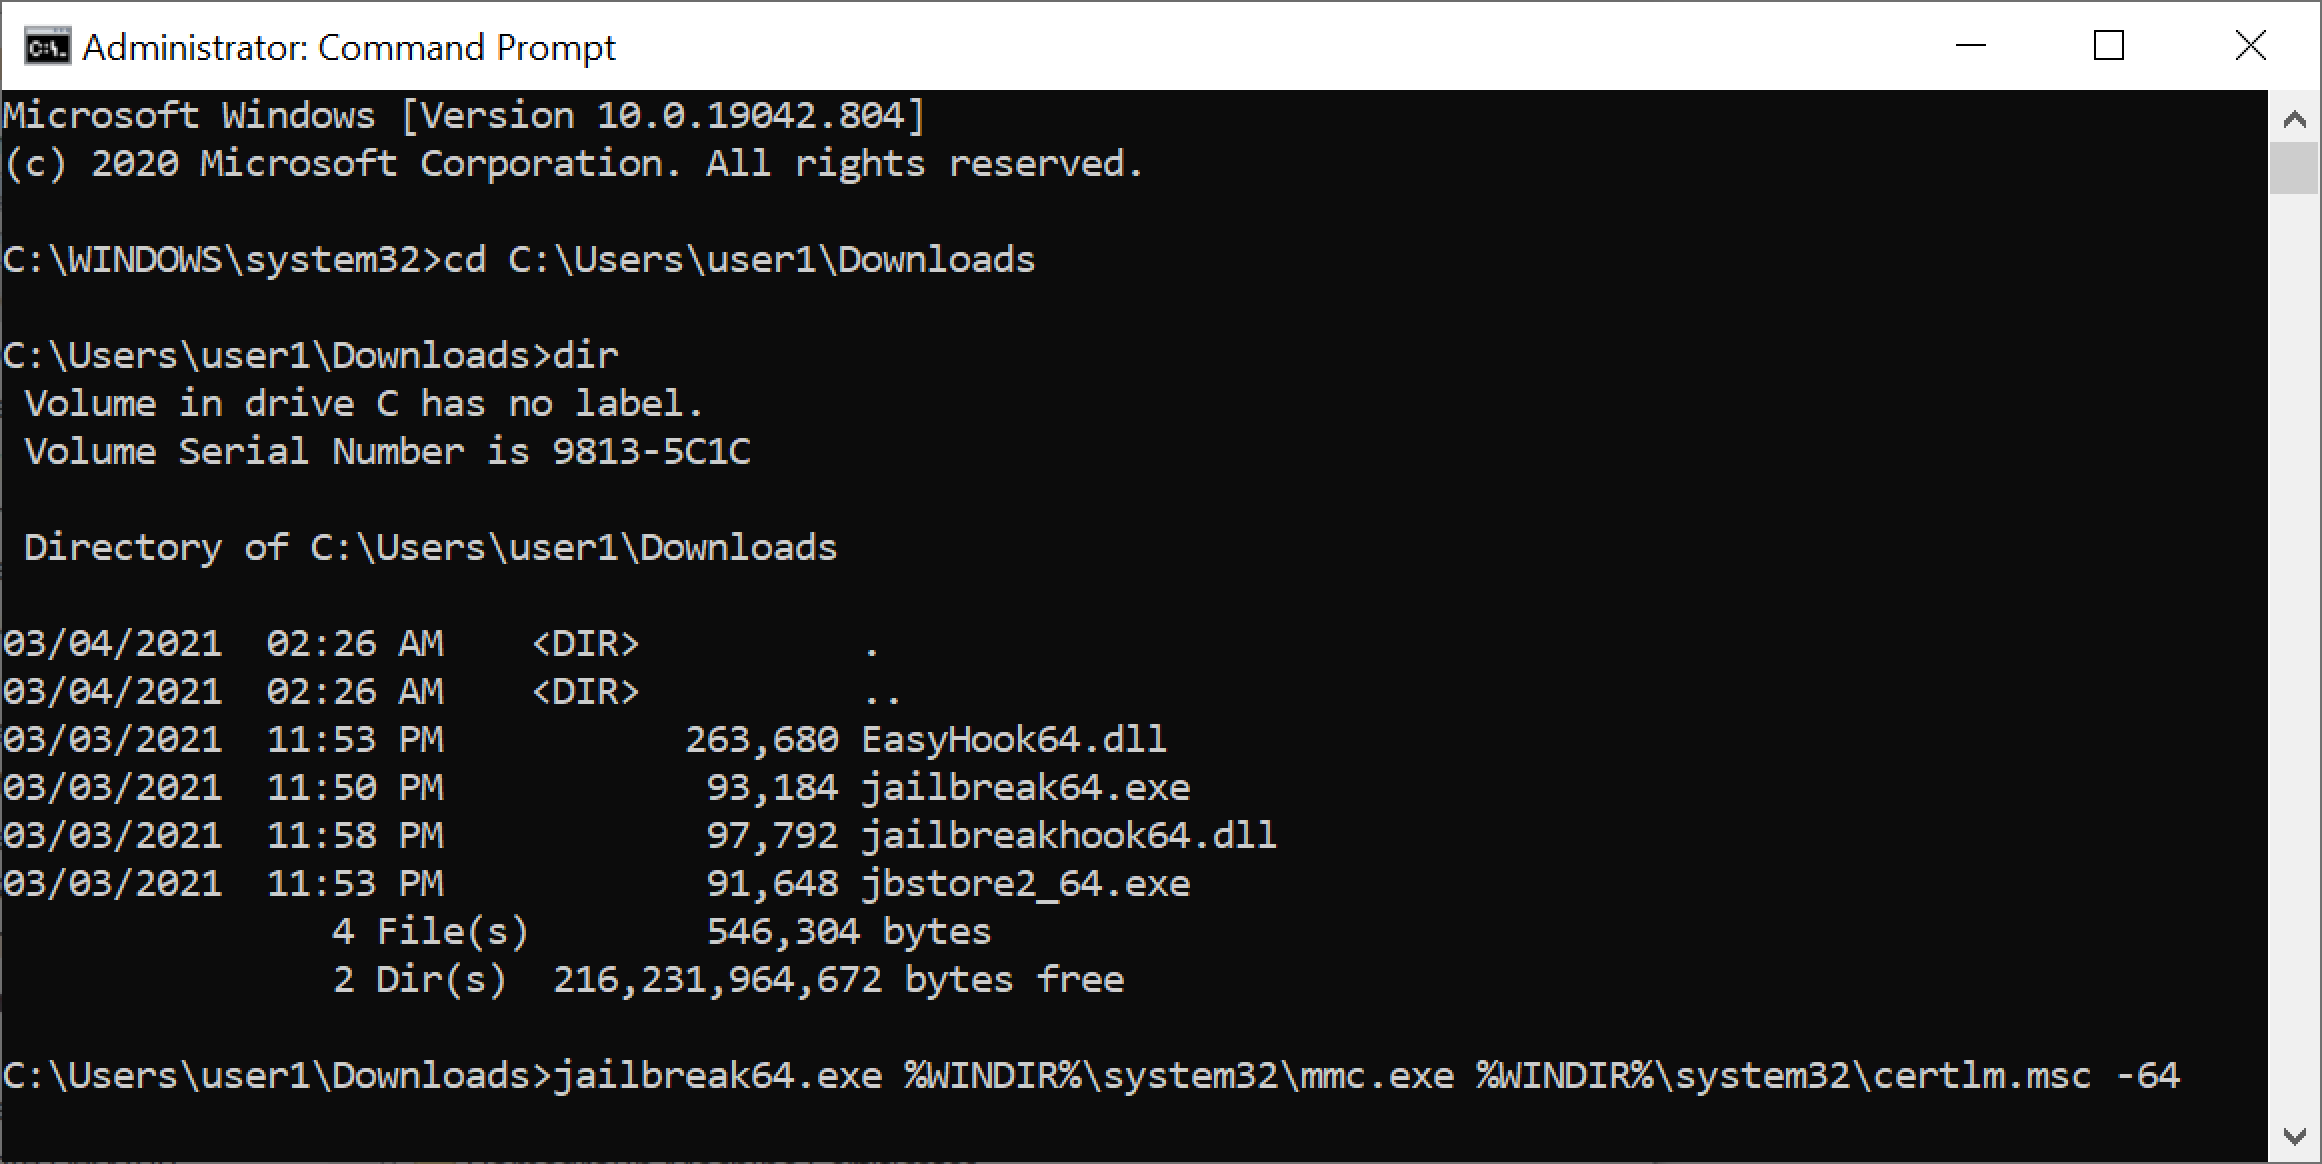
In the command prompt, we went to the directory with the downloaded Jailbreak binaries. We ran the following command from this directory:
- jailbreak64.exe %WINDIR%\system32\mmc.exe %WINDIR%\system32\certlm.msc -64
If we were running a 32-bit version of Windows, we would use:
- jailbreak32.exe %WINDIR%\system32\mmc.exe %WINDIR%\system32\certlm.msc -32
See Figure 13 below for an example of running the 64-bit command on our Windows host acting as the RDP server.
This command opened the certificate manager for our local machine. From the left column, we expanded Remote Desktop and went to the Certificates folder. This showed one certificate. If there had been more than one certificate, we would have selected the one with the most recent expiration date. We right-clicked on the certificate, selected All Tasks then used Export as shown below in Figure 14.

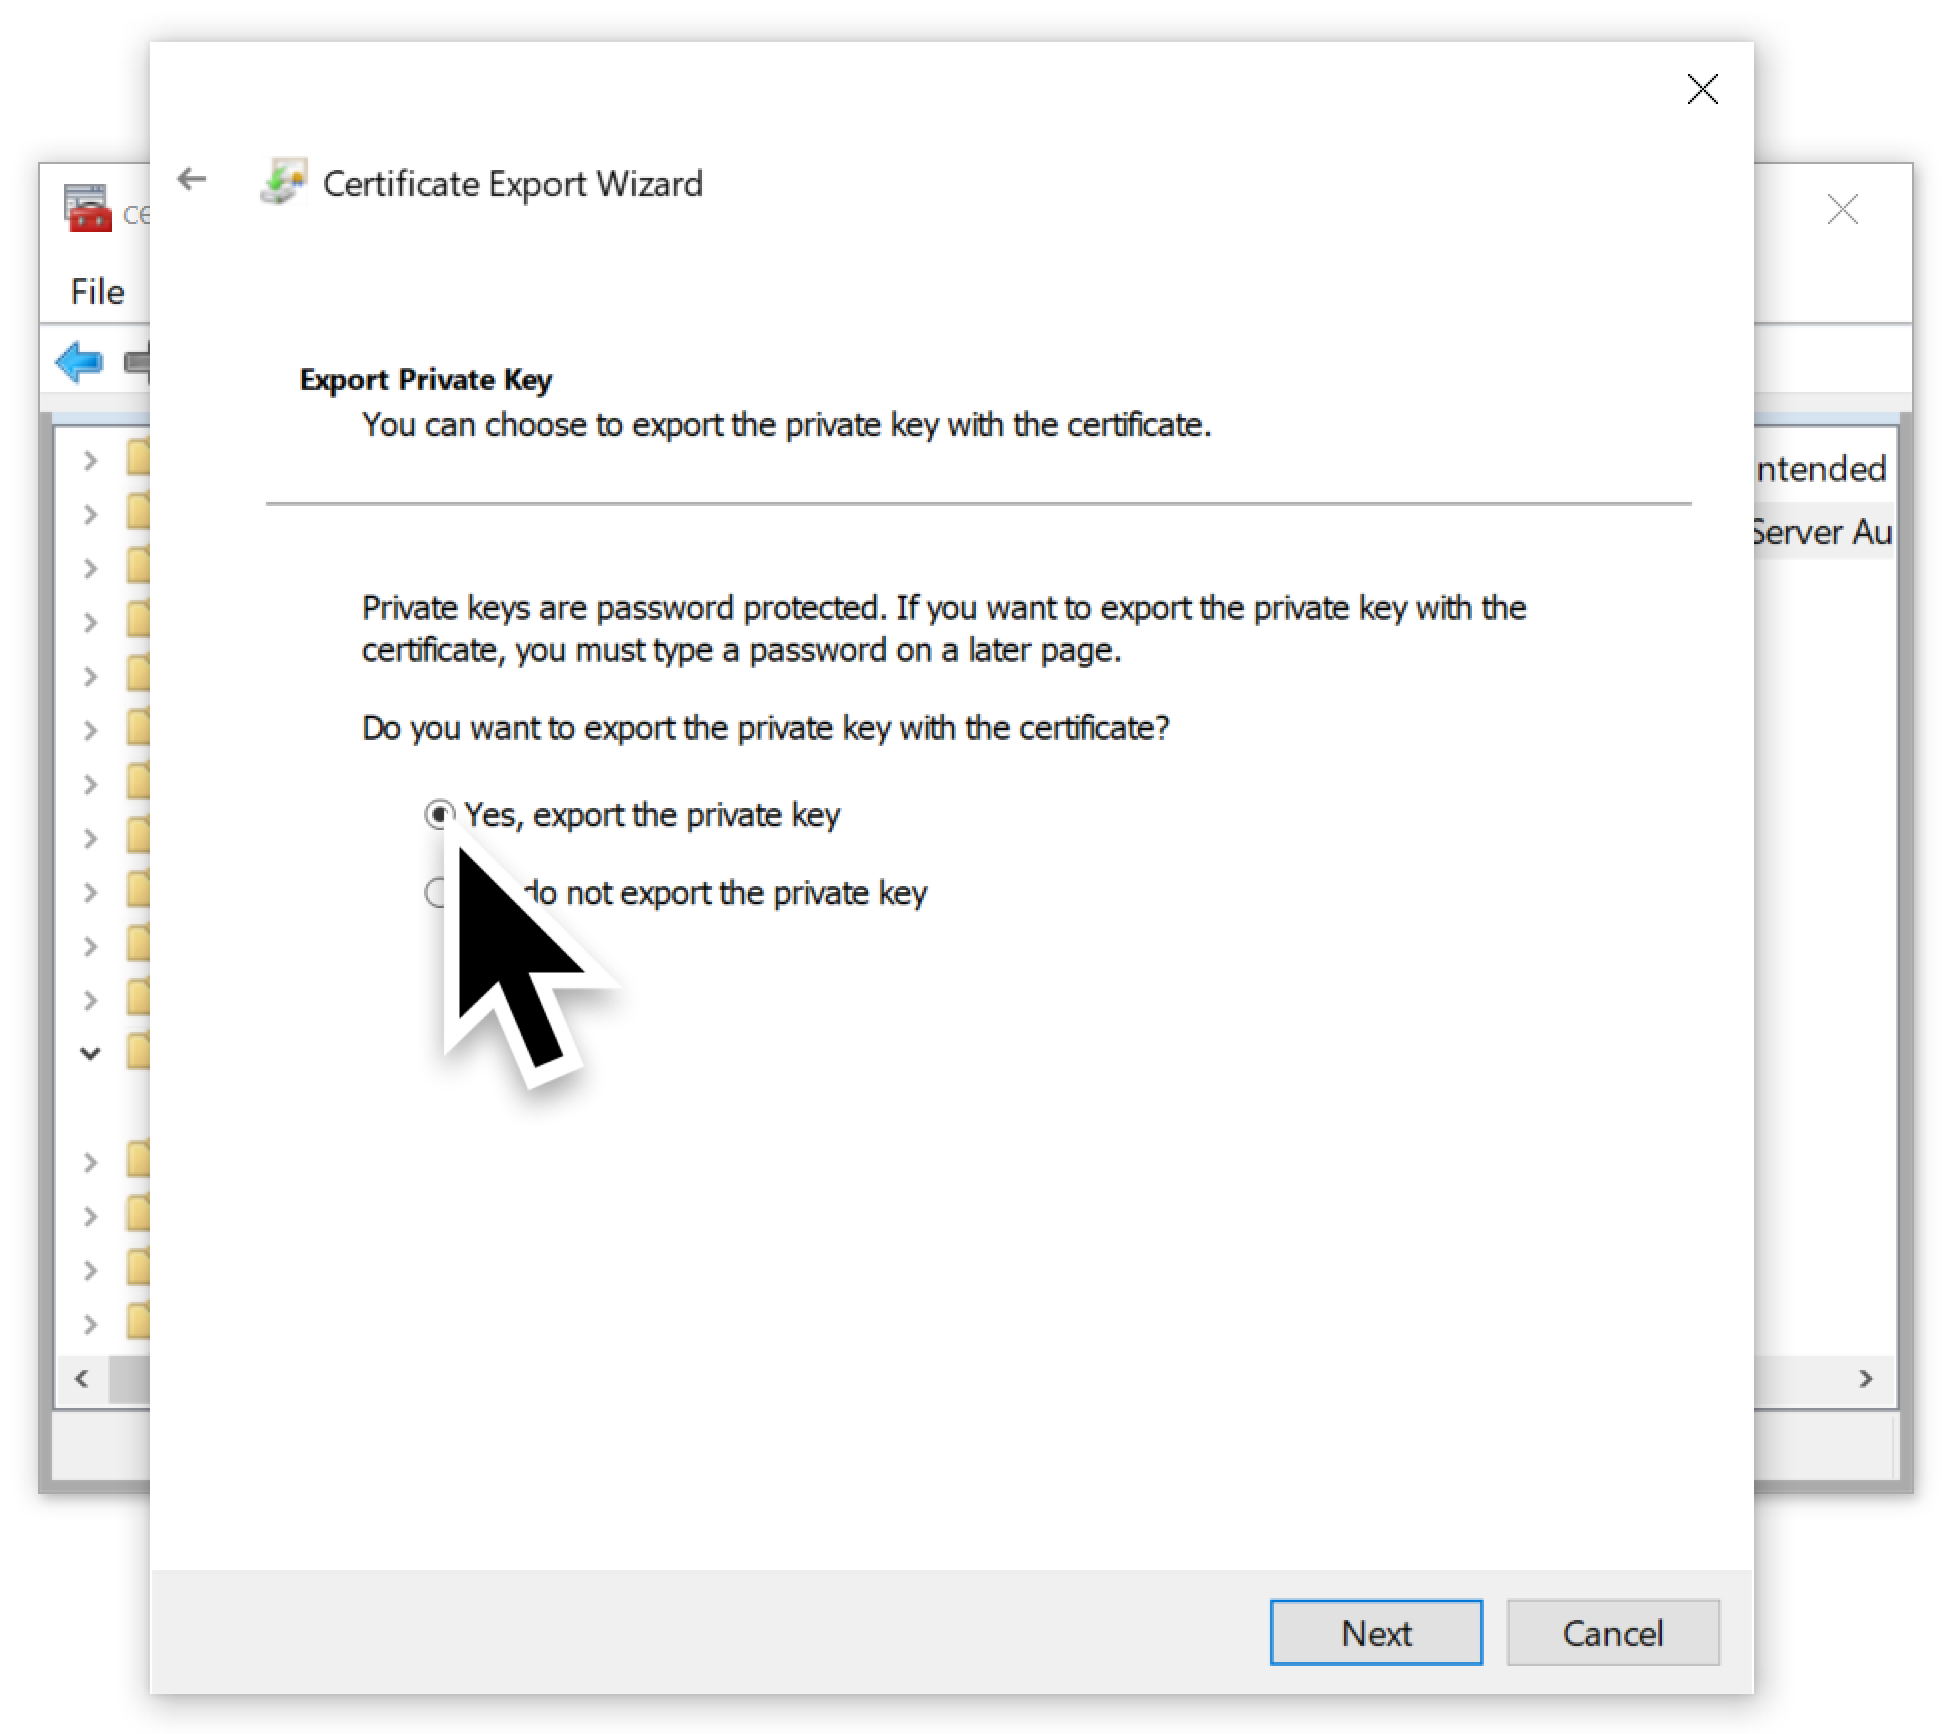
When exporting the certificate, we made sure to select the option to export the private key as shown below in Figure 15.
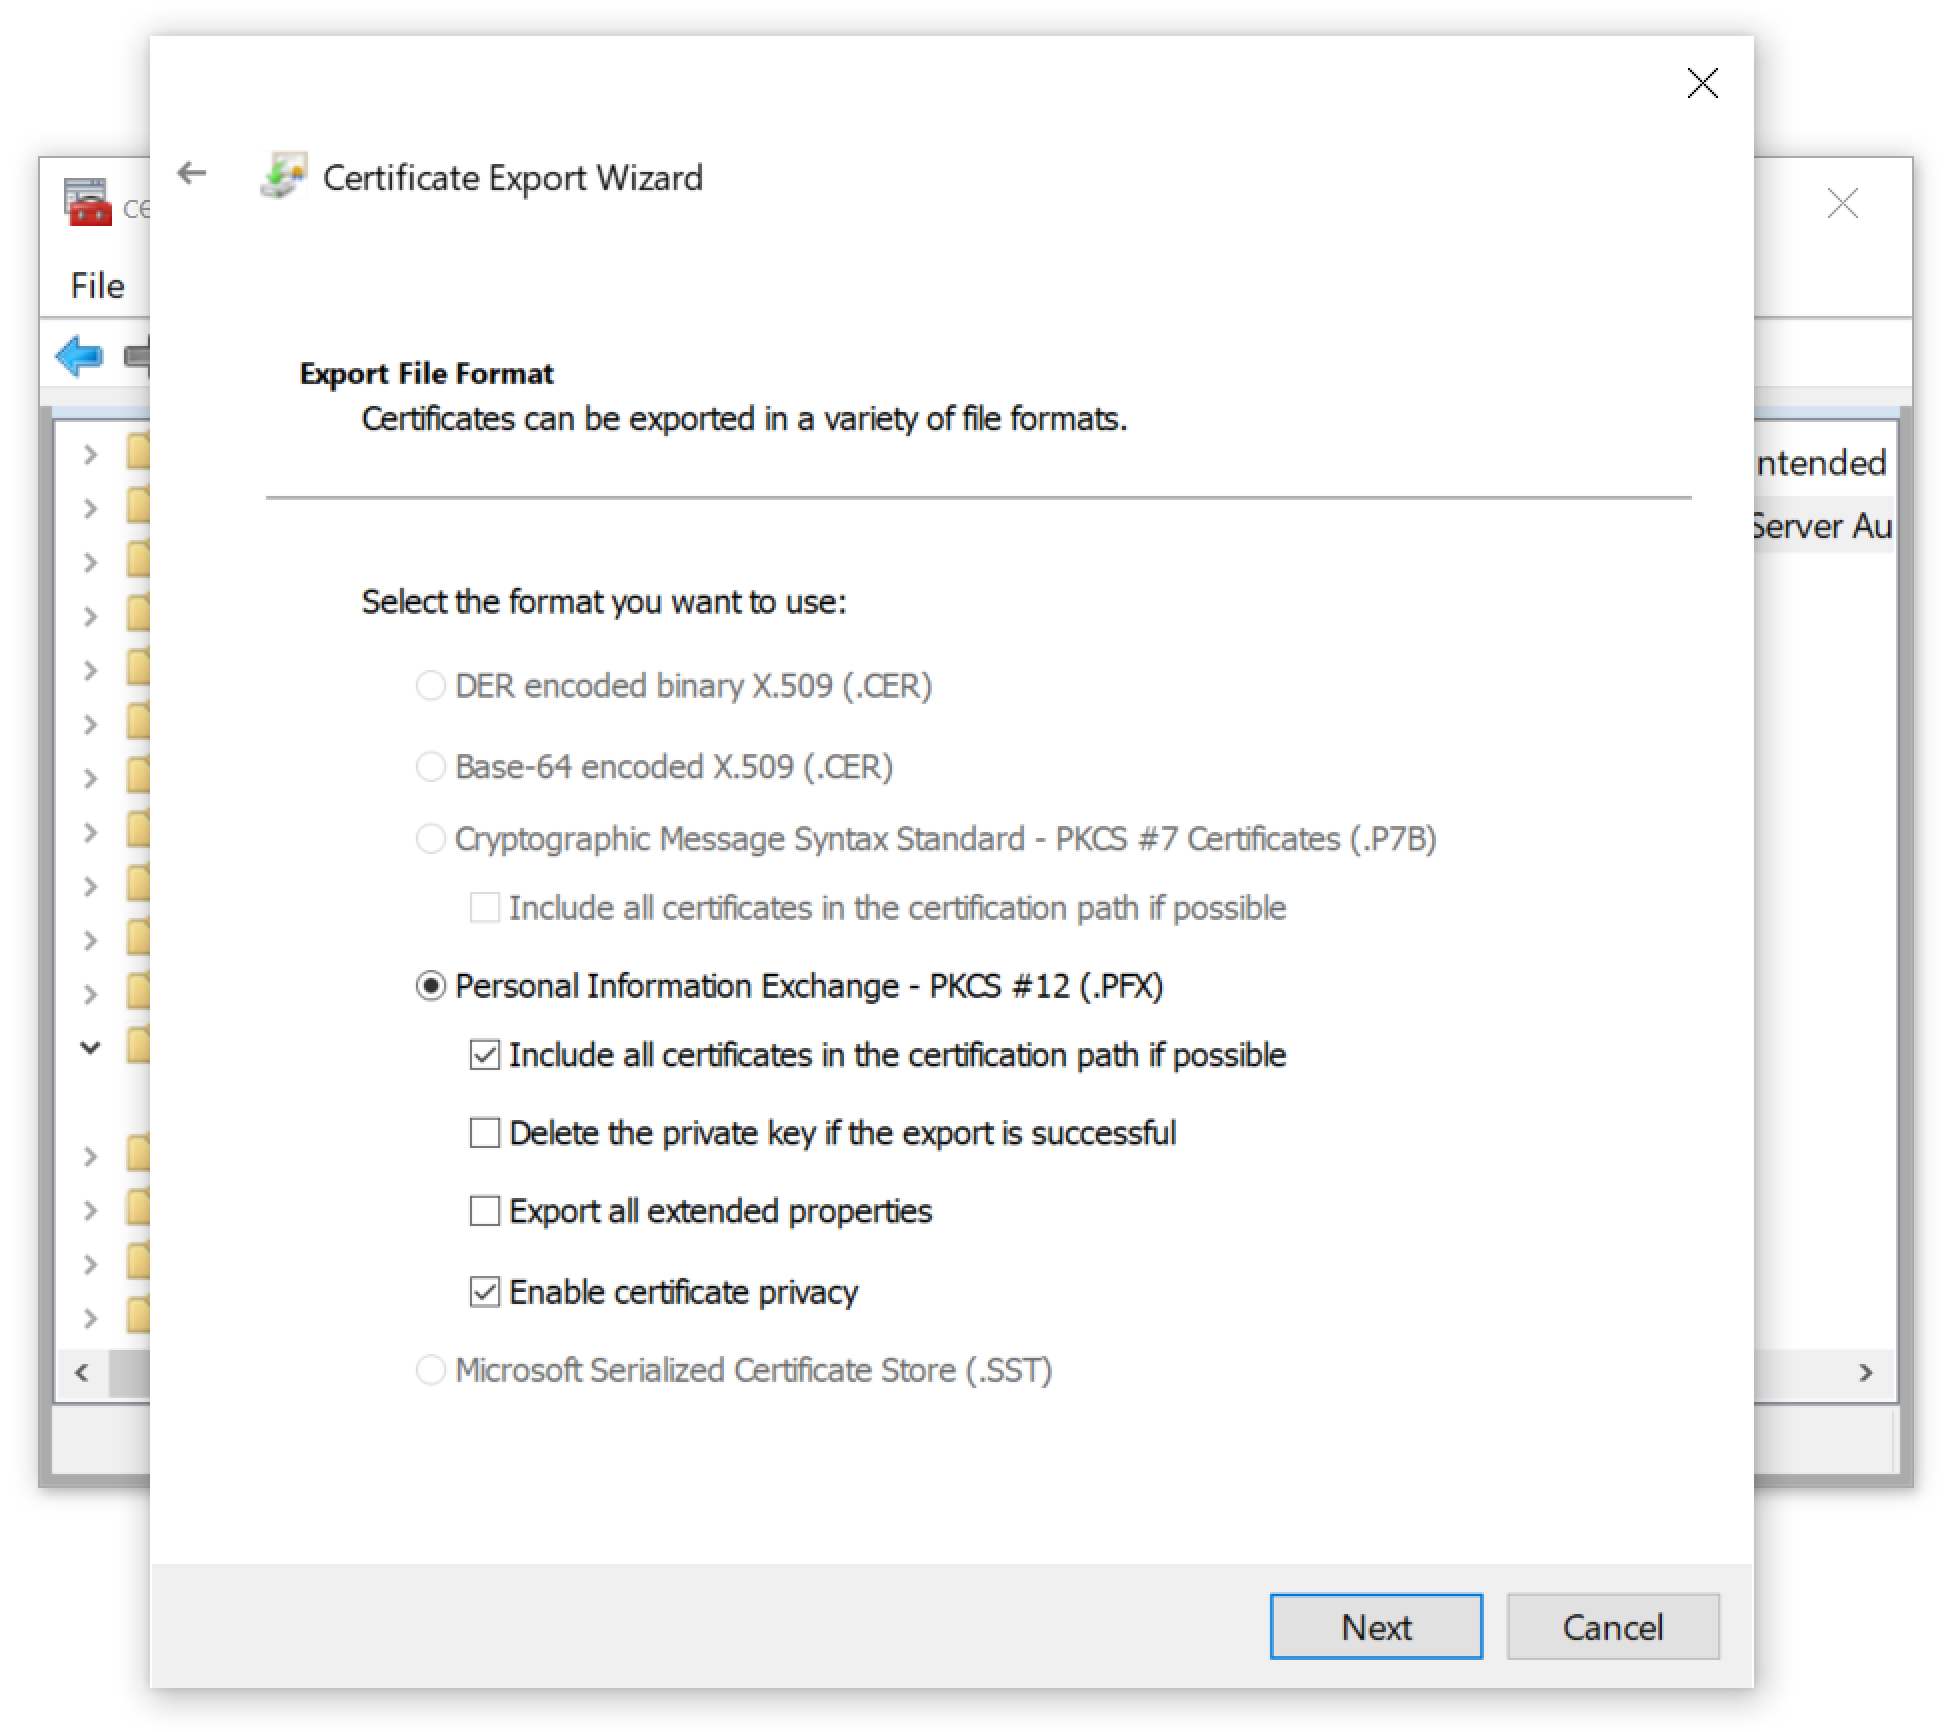
For our host, we could only export the certificate as a PKCS #12 (.PFX) file as shown below in Figure 16.
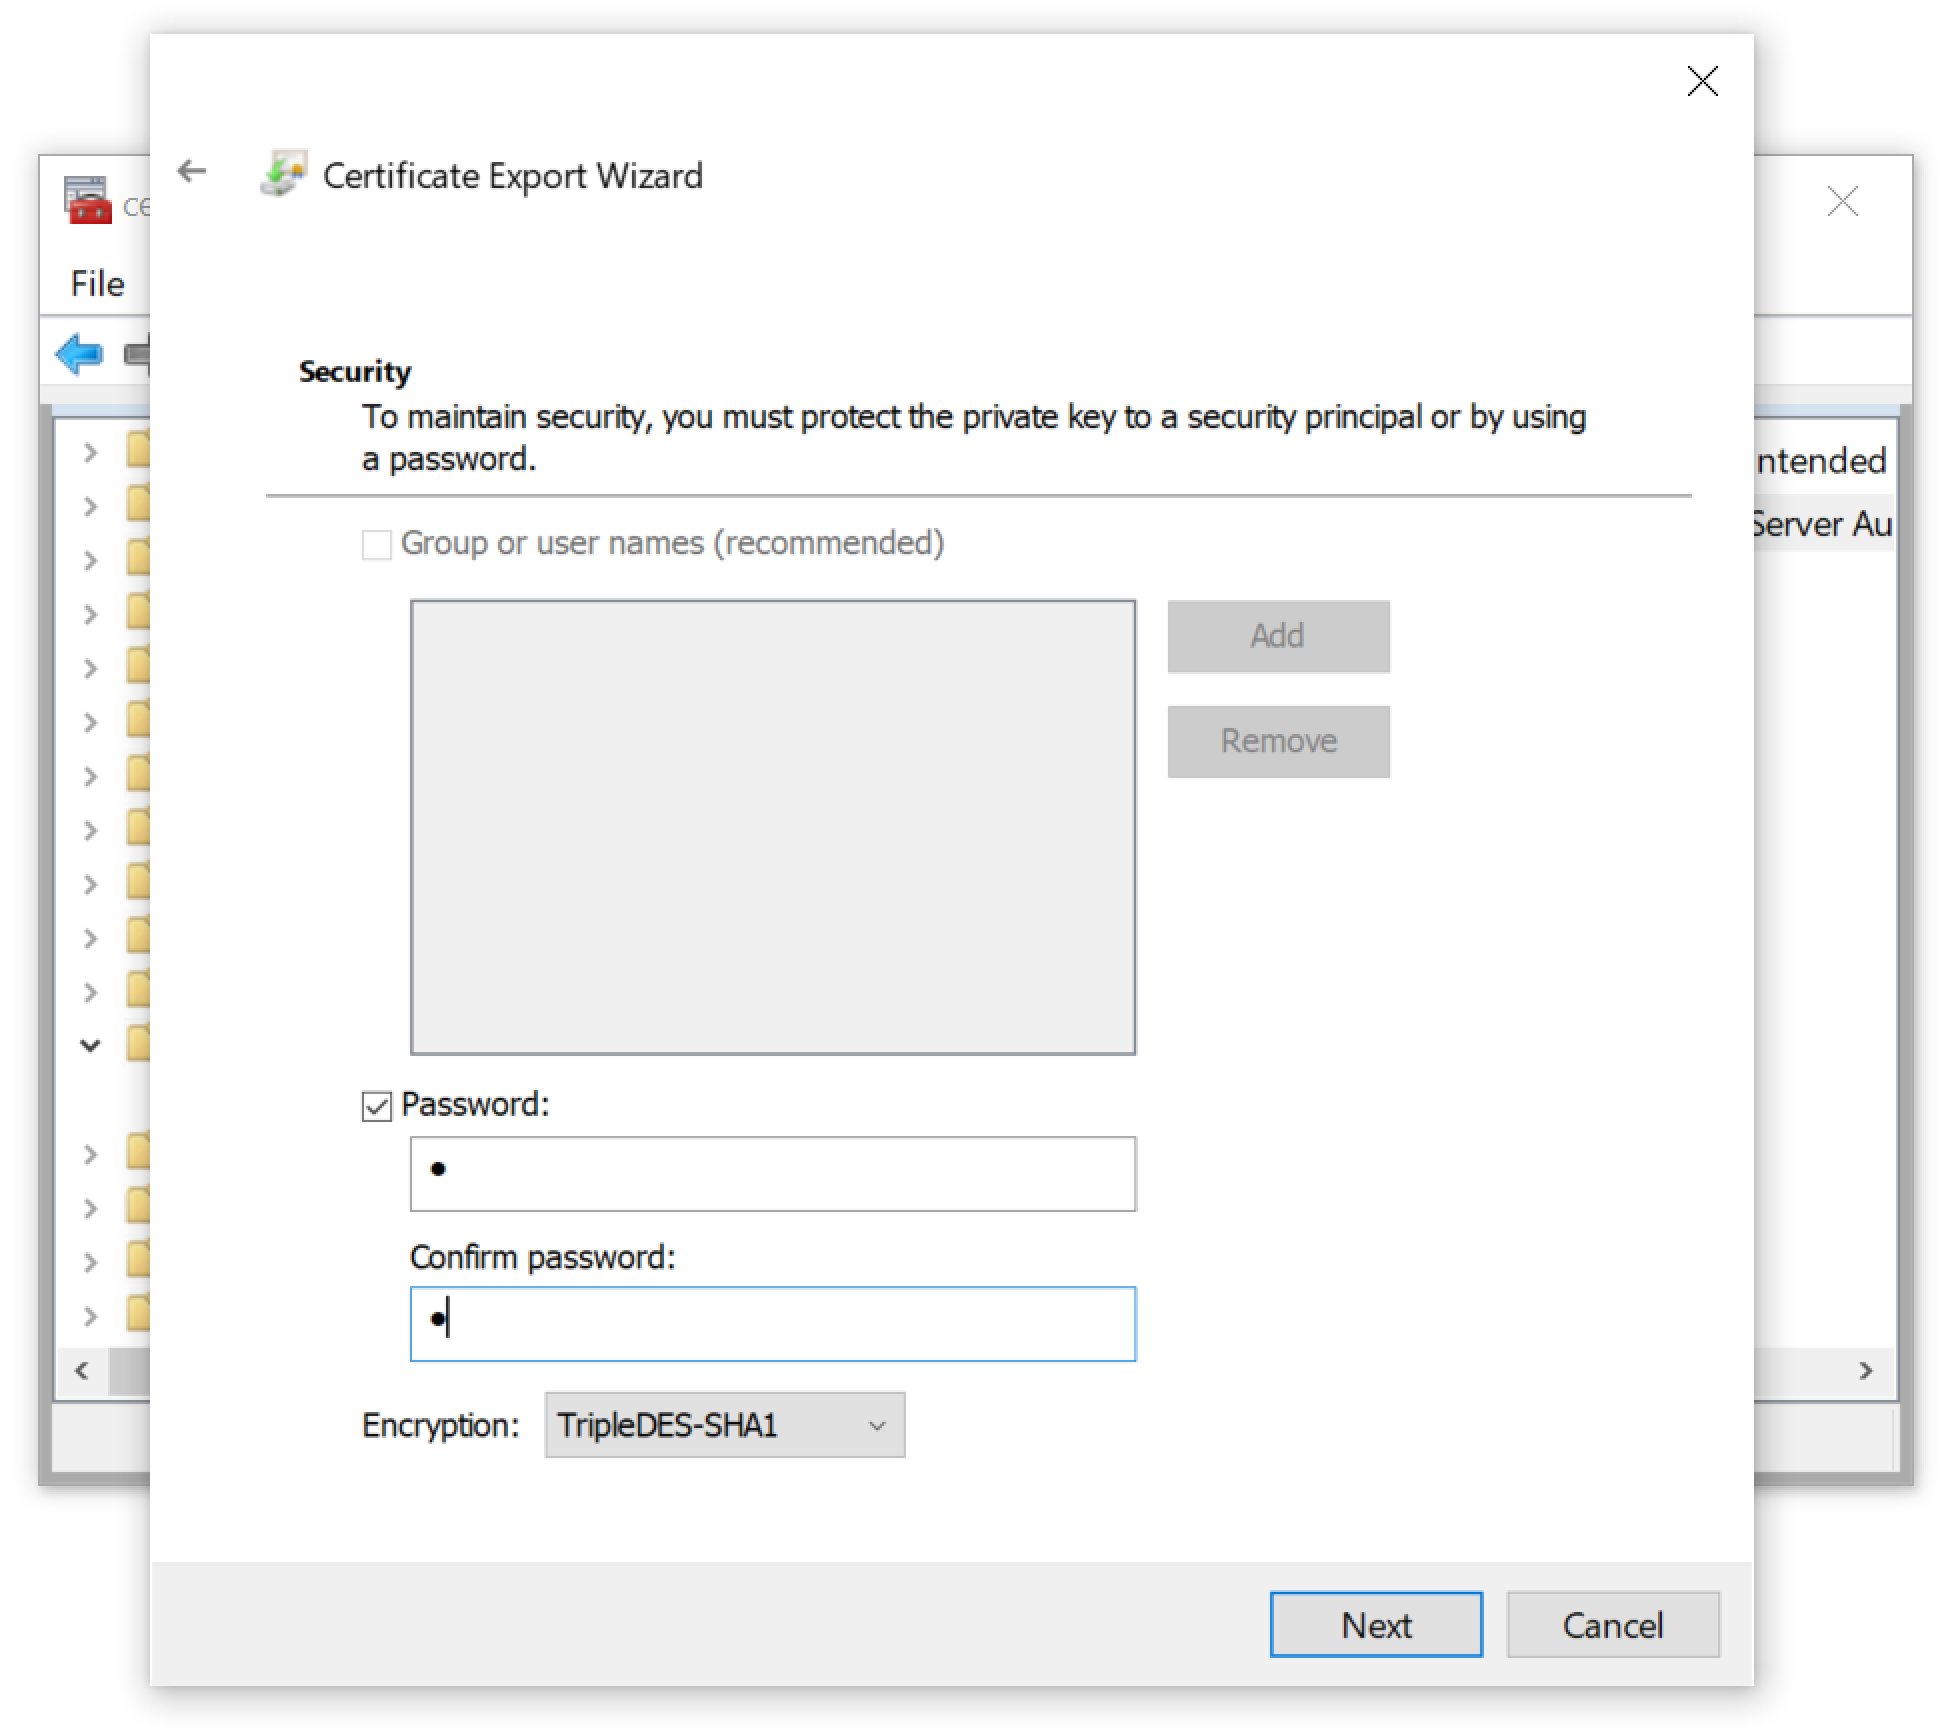
As shown below in Figure 17, the certificate had to have a password. Fortunately, we had no complexity requirements, so we used a single letter as the password.
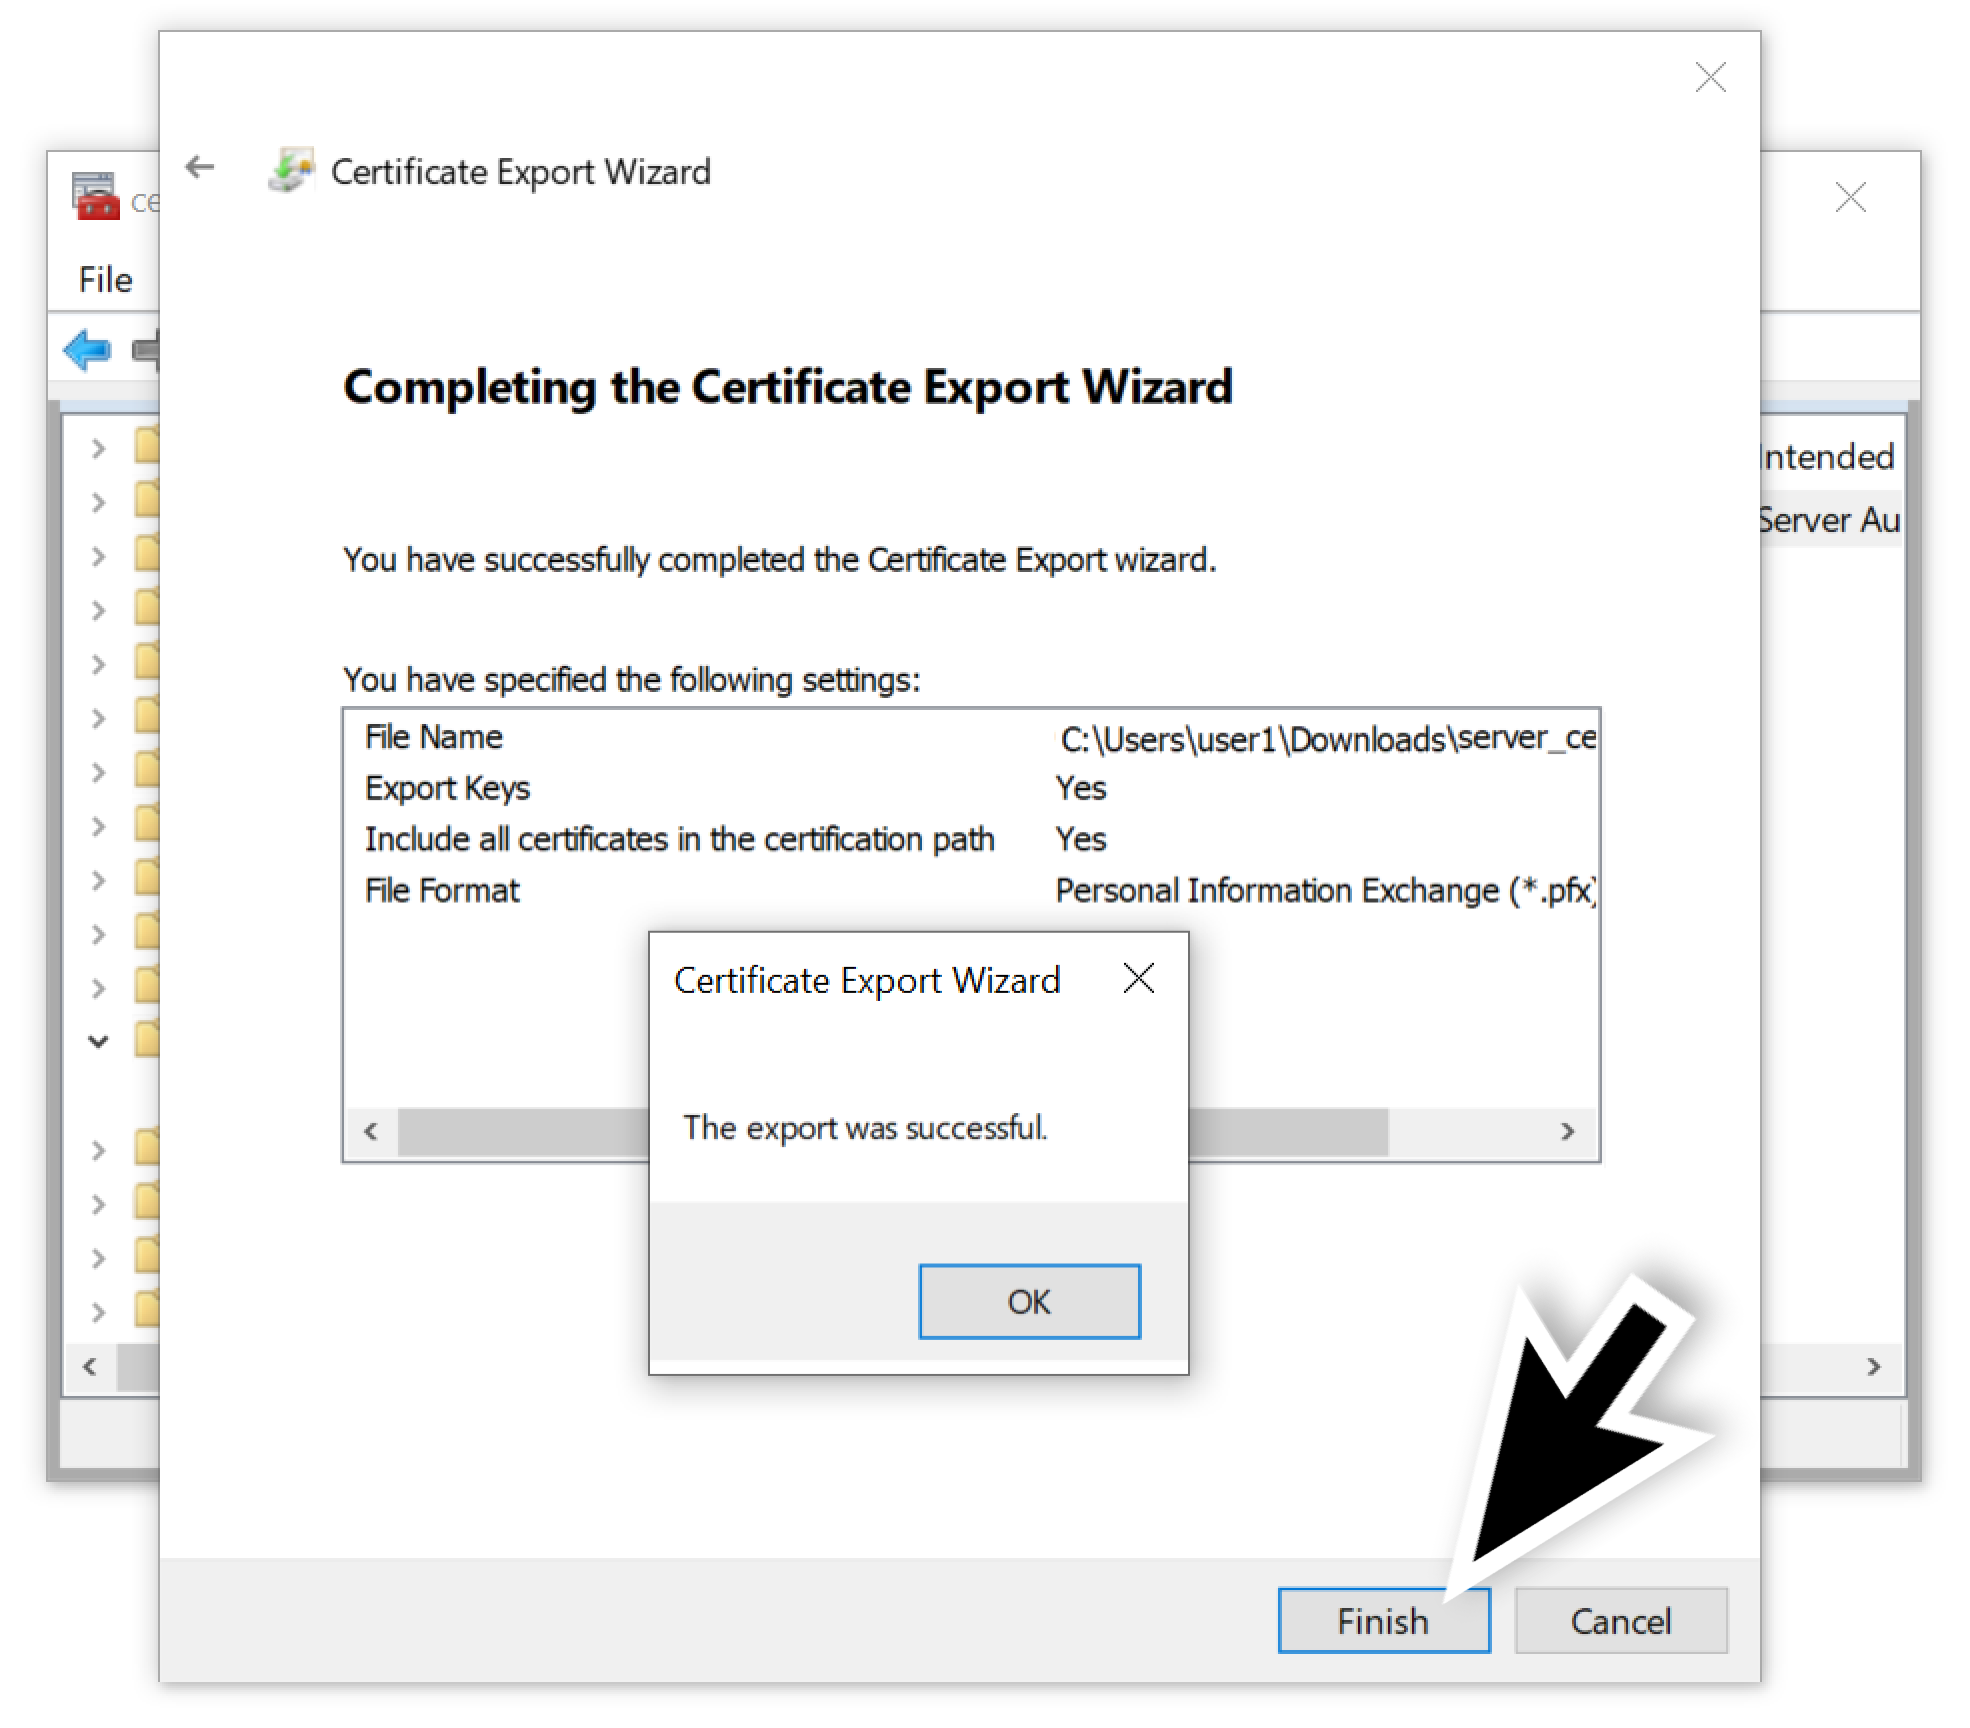
Finally, we exported our certificate with the private key as shown below in Figure 18.
As an alternative, we could have extracted the server’s certificate using Mimikatz instead of Jailbreak. The instructions for using Mimikatz to get the RDP server certificate are listed on GitHub.
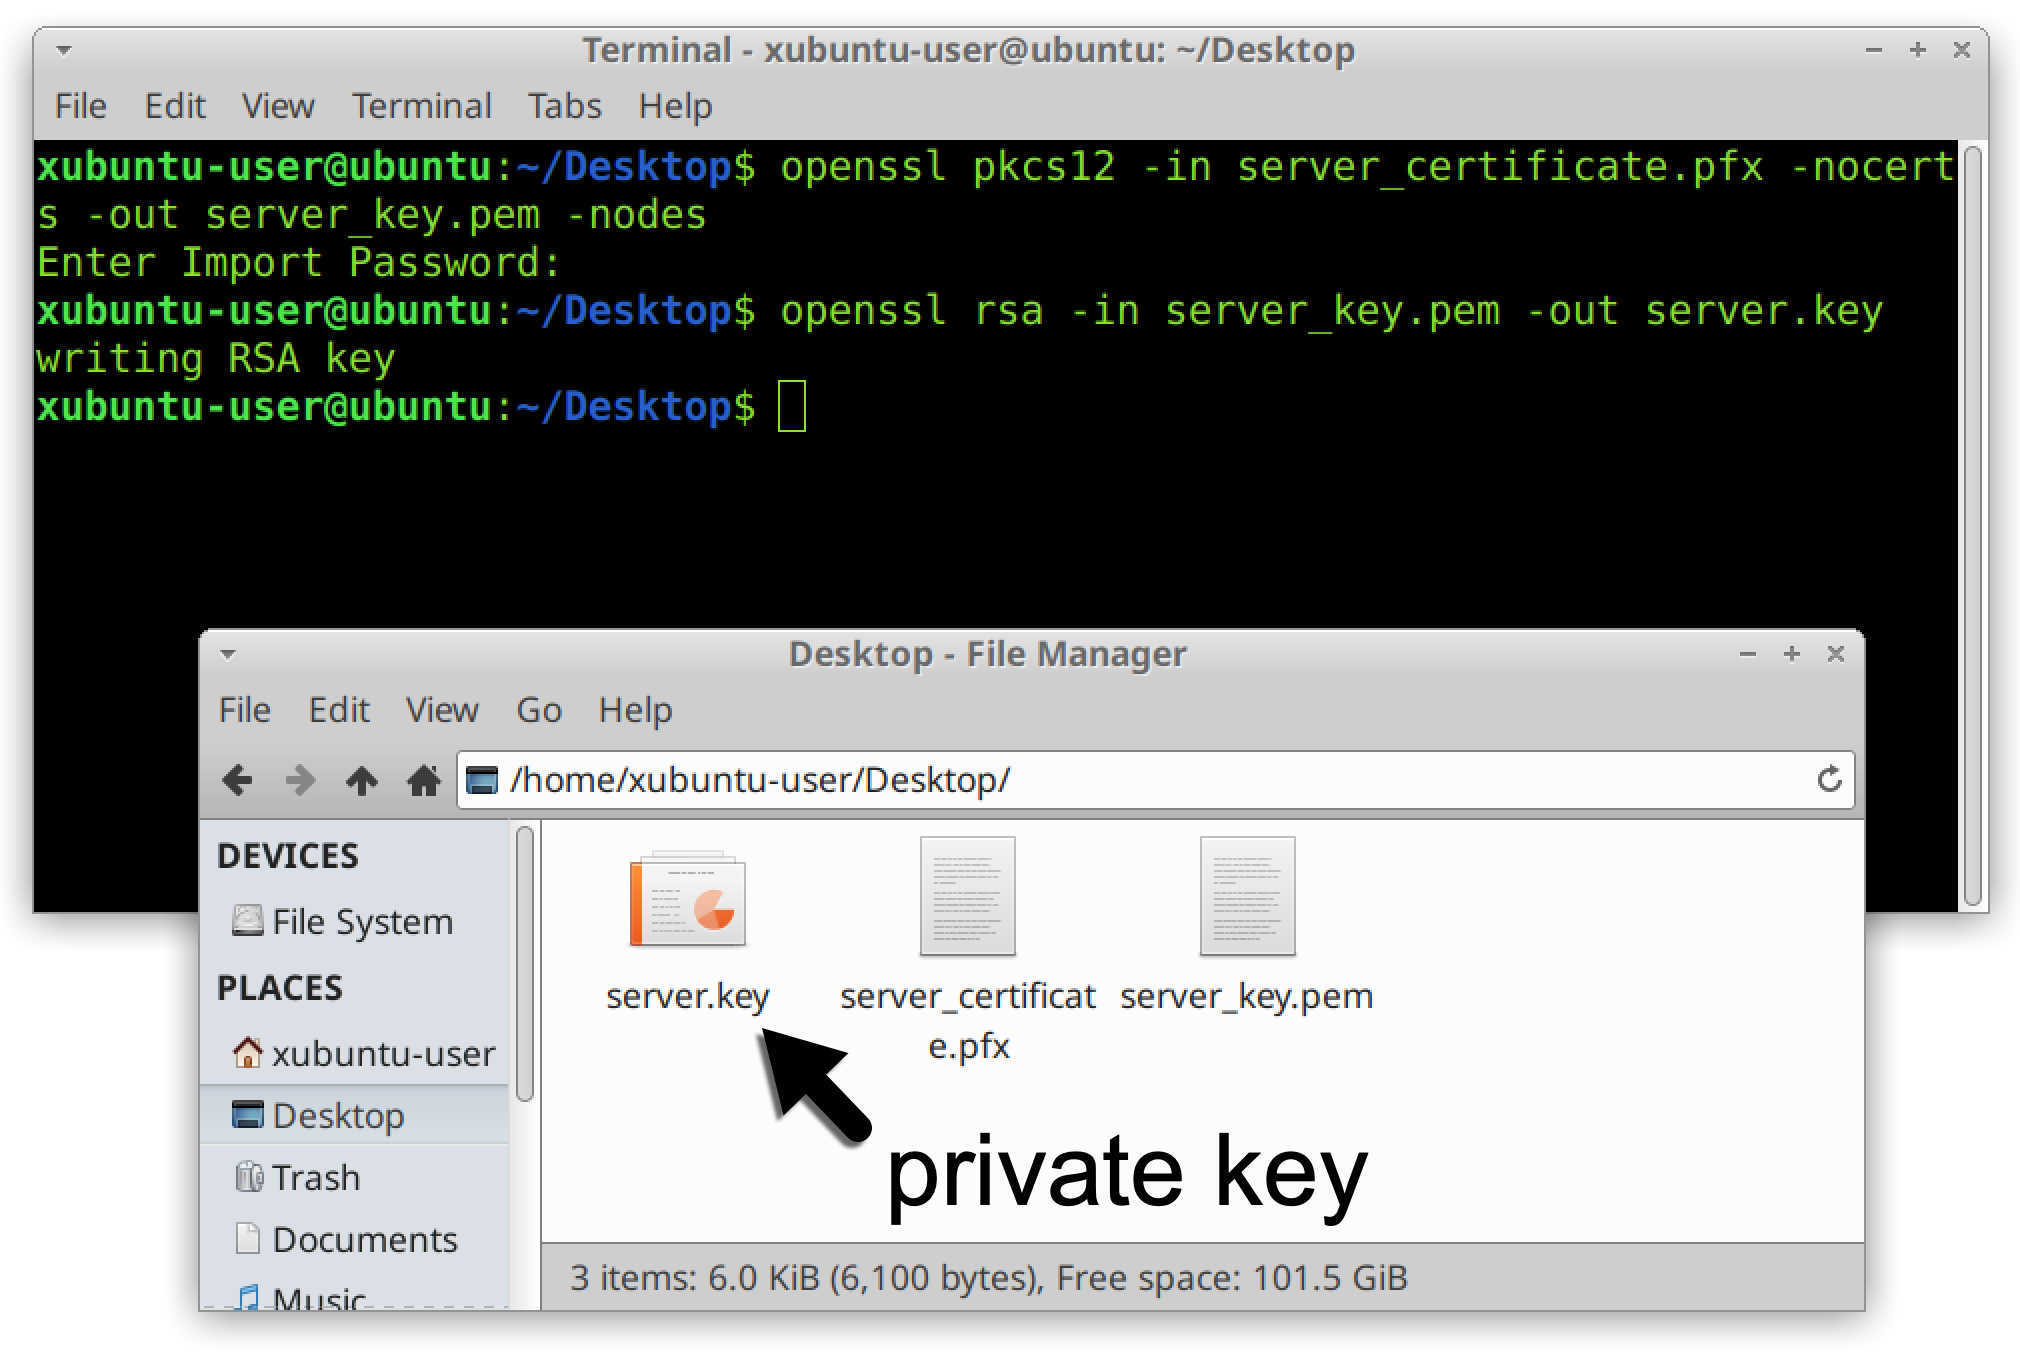
Since our certificate was obtained using Jailbreak, we moved it to a Linux host and used OpenSSL to extract the key. First, we used the following OpenSSL command to extract the key in PEM format:
- openssl pkcs12 -in server_certificate.pfx -nocerts -out server_key.pem -nodes
To remove the passphrase form the key, we also used the following command:
- openssl rsa -in server_key.pem -out server.key
This provided us with the RDP server’s private key as shown below in Figure 19.
Before we could use the private server key, we needed to record an RDP session between our two Windows hosts and save it as a pcap.
Step 4: Capture RDP Traffic
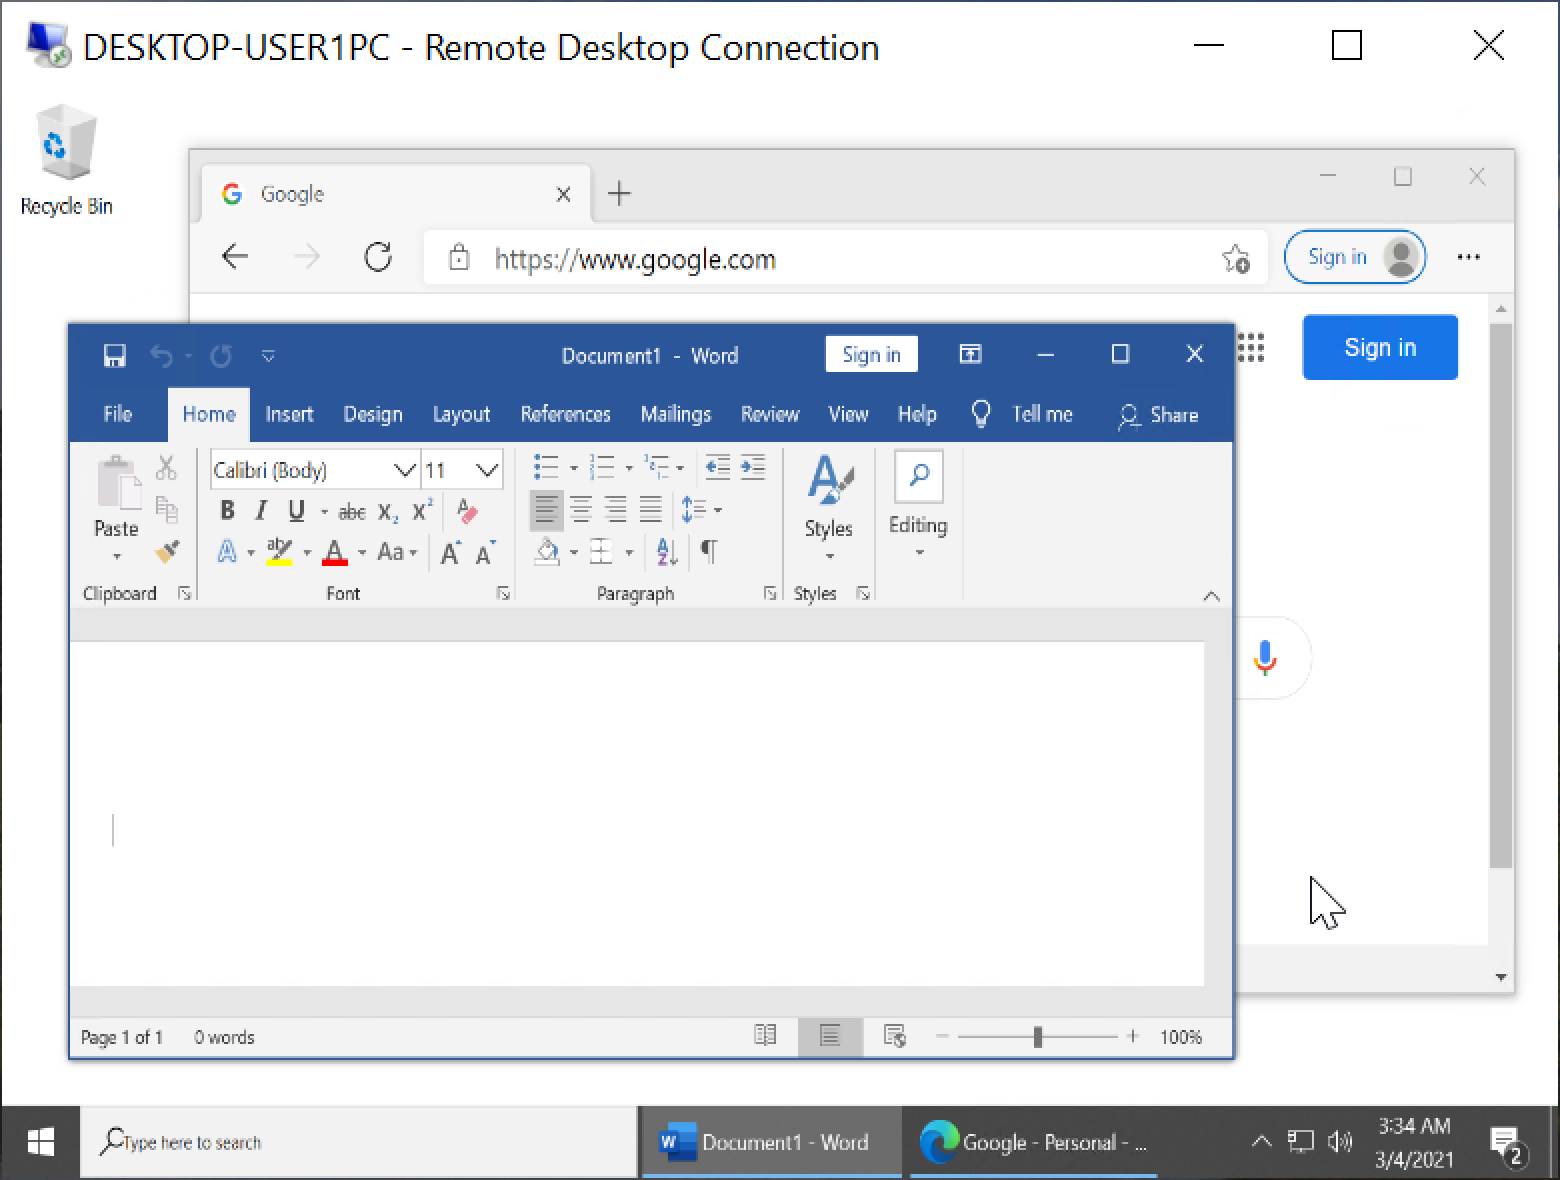
With our two Windows hosts in the same virtual environment, we could use a tool like dumpcap, tcpdump or Wireshark itself to record network traffic in the VLAN using promiscuous mode. Once the recording started, our WIndows client used RDP to log in to the other Windows host acting as an RDP server. The host name of the server was DESKTOP-USER1PC.
While the pcap was being recorded, we logged into DESKTOP-USER1PC and performed some basic tasks like opening documents and web browsing.
After a minute or so, we logged off RDP and stopped recording network traffic from our VLAN.
Step 5: Open the pcap in Wireshark
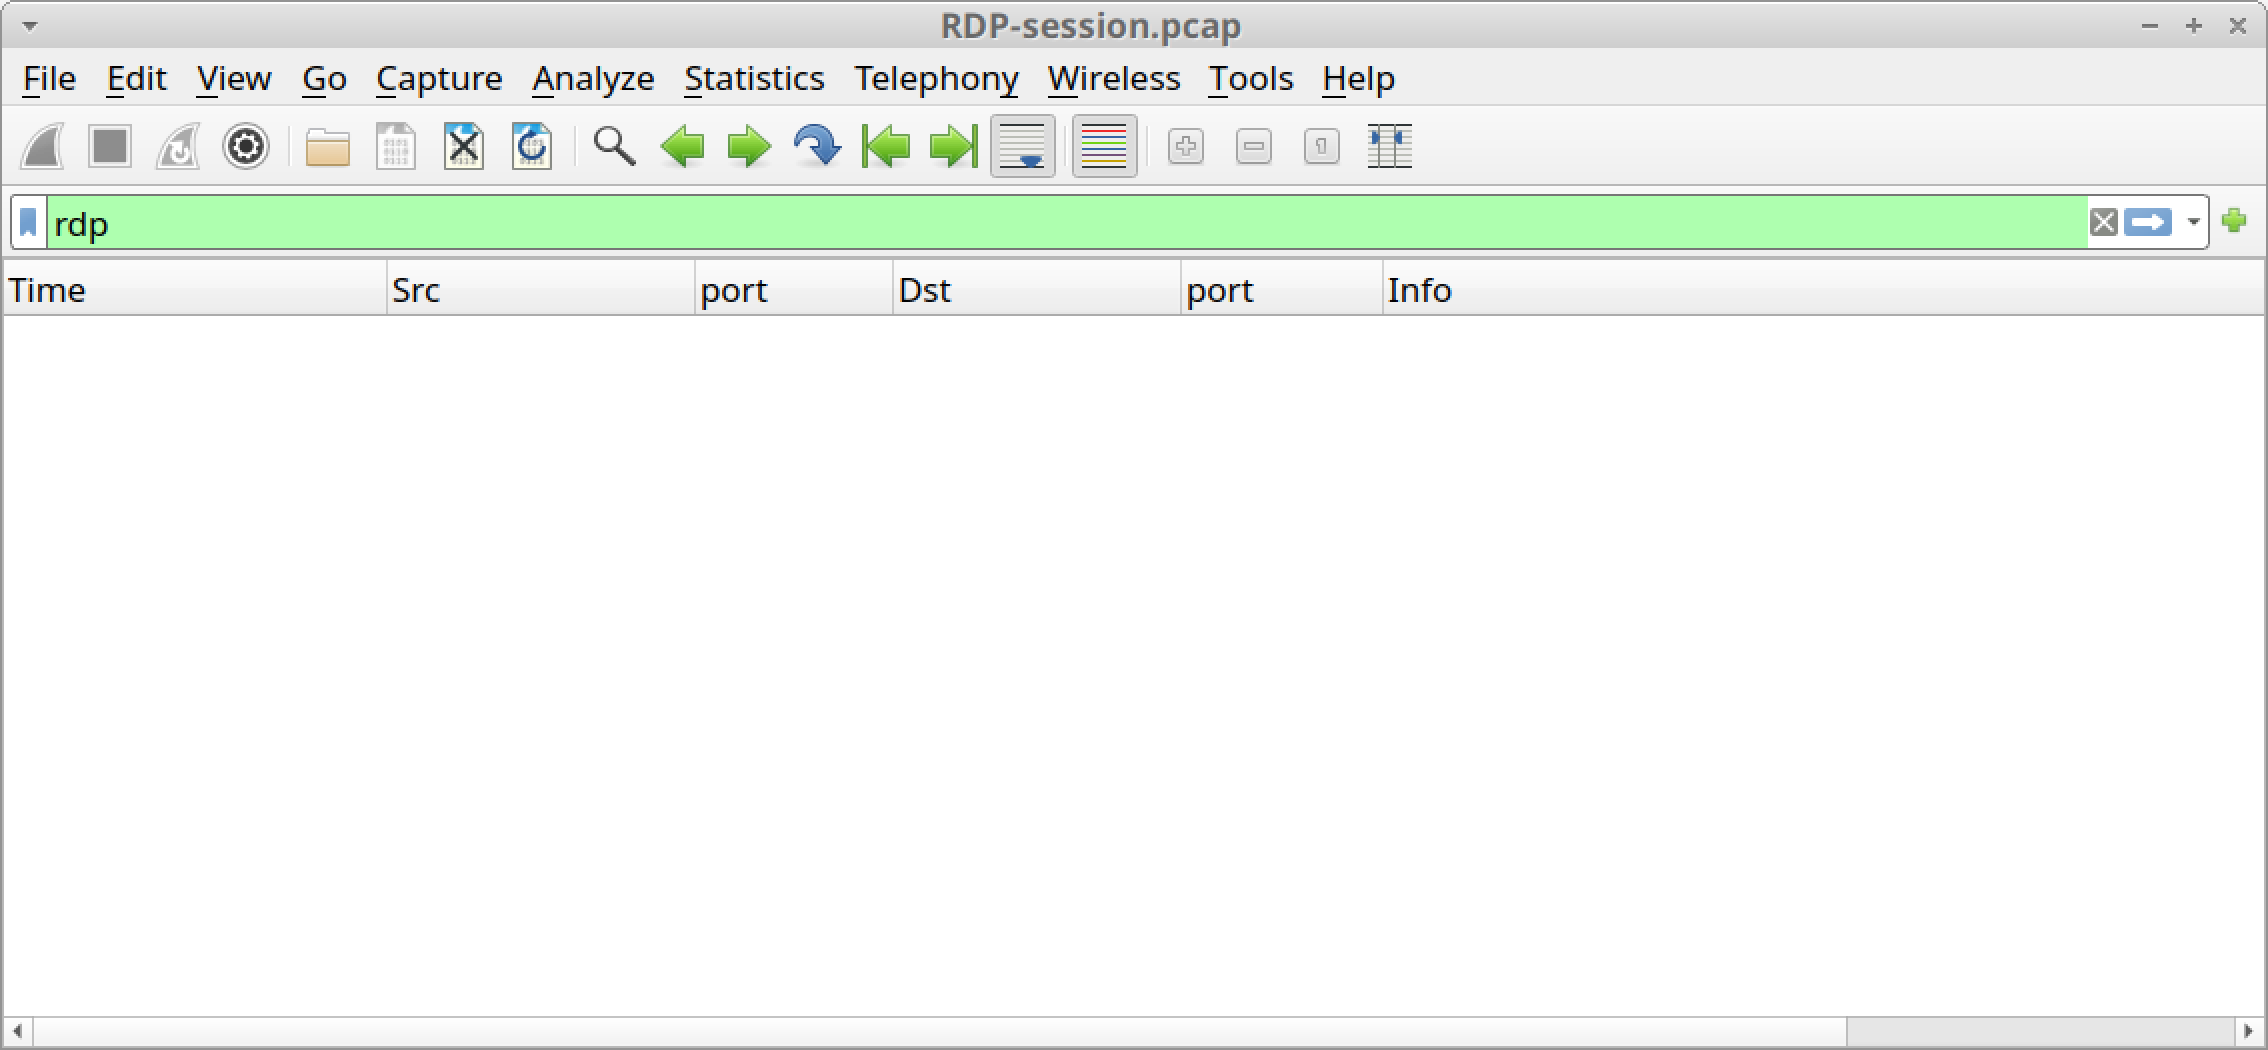
We opened the pcap of our RDP session in Wireshark. When filtering on rdp in our Wireshark display filter, we saw no results because the RDP traffic was encrypted. Figure 22 shows the blank column display we saw when filtering for RDP in our pcap.
However, when we used our private server key to decrypt RDP traffic in Wireshark, the results looked much different.
Step 6: Load the Key in Wireshark
In the pcaps we recorded, the RDP server DESKTOP-USER1PC was at IP address 10.3.4.138, and RDP traffic took place over TCP port 3389. We needed this information to properly decrypt RDP traffic in Wireshark.
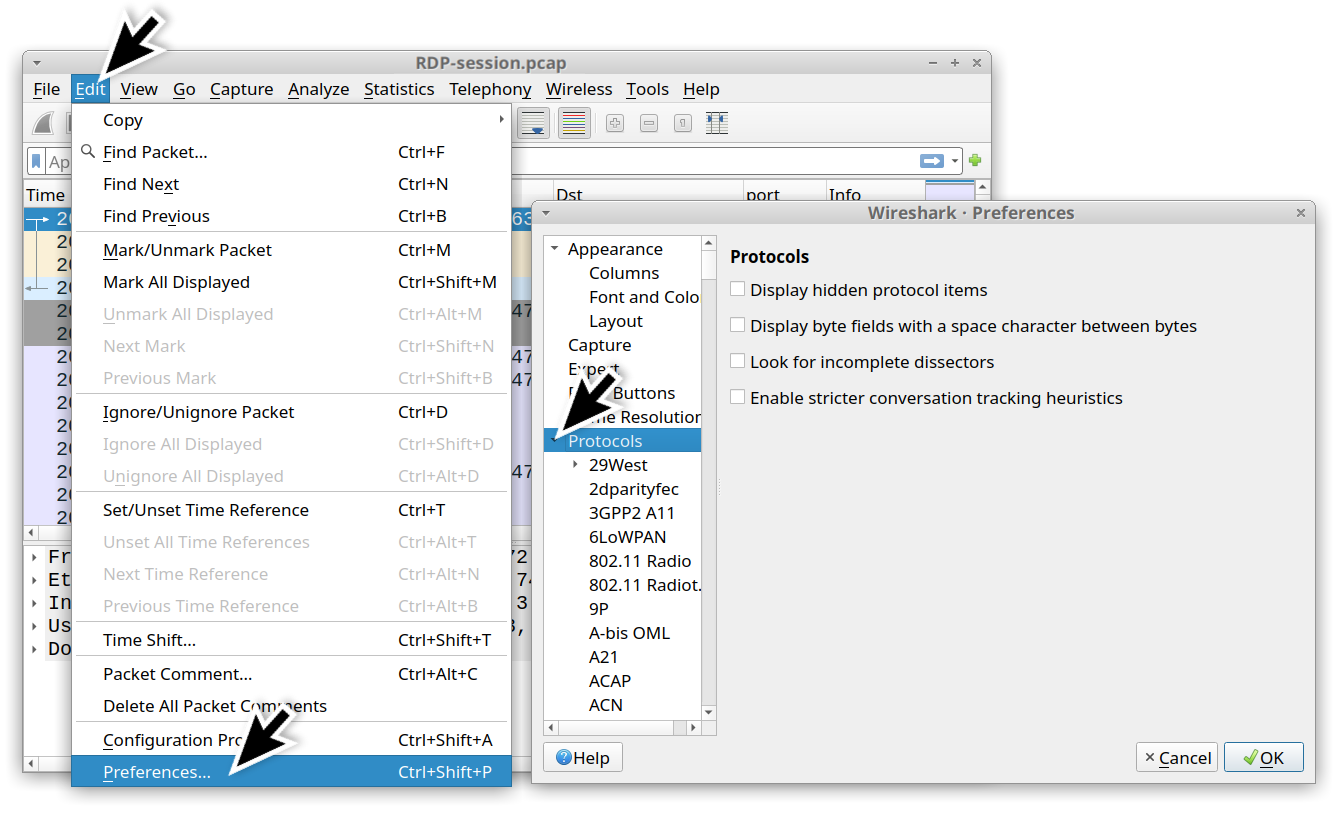
In Wireshark, we used the Preferences window and expanded the Protocols section as shown below in Figure 23.
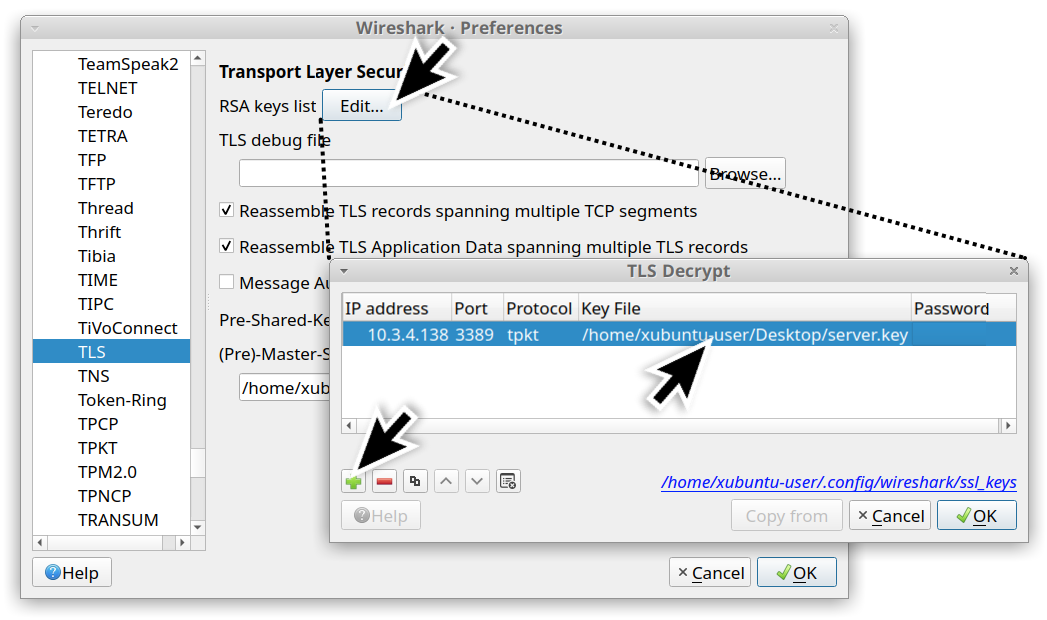
With Wireshark 3.x, use the TLS entry. If you are using Wireshark 2.x, use the SSL entry. For this section, there should be a button to edit the RSA keys list. We clicked the button and added the IP address of the RDP server, the RDP port (3389) and the location of the private key file. Our example is shown below in Figure 24.
After Wireshark was set up to decrypt RDP traffic, we had much better results when reviewing the pcap.
Step 7: Examine RDP Data
After our key was loaded, our column display was no longer blank when filtering for RDP. We had several results as shown below in Figure 25.

For security professionals who write signatures to find RDP vulnerabilities and attacks, the type of information revealed above in Figure 25 is critical to their work.
Conclusion
This blog reviewed how to establish an environment to decrypt traffic from an RDP session. This is easiest to do in a virtual LAN with two hosts running Windows 10 Professional. After ensuring the client did not use any forward secrecy ciphers, we extracted the private key from our Windows host acting as the RDP server. Then we easily recorded a pcap of network traffic. After the session finished, we were able to decrypt RDP traffic using the server’s private key.
This type of environment can help security professionals when writing signatures to detect RDP vulnerabilities and attacks.
For more help with Wireshark, see our previous tutorials:
- Wireshark Tutorial: Examining Emotet Infection Traffic
- Changing Your Column Display
- Display Filter Expressions
- Identifying Hosts and Users
- Exporting Objects from a Pcap
- Examining Trickbot Infections
- Examining Ursnif Infections
- Examining Qakbot Infections
- Decrypting HTTPS Traffic
- Examining Dridex Infection Traffic
Get updates from
Palo Alto
Networks!
Sign up to receive the latest news, cyber threat intelligence and research from us
By submitting this form, you agree to our Terms of Use and acknowledge our Privacy Statement.