Executive Summary
On March 8, 2021, Unit 42 published “Attack Chain Overview: Emotet in December 2020 and January 2021.” Based on that analysis, the updated version of Emotet talks to different command and control (C2) servers for data exfiltration or to implement further attacks. We observed attackers taking advantage of a sophisticated evasion technique and encryption algorithm to communicate with C2 servers in order to probe the victim's network environment and processes, allowing attackers to steal a user’s sensitive information or drop a new payload.
In this blog, we provide a step-by-step technical analysis, beginning from where the main logic starts, covering the encryption mechanisms and ending when the C2 data is exfiltrated through HTTP protocol to the C2 server.
Palo Alto Networks Next-Generation Firewall customers are protected from Emotet with Threat Prevention and WildFire security subscriptions. Customers are also protected with Cortex XDR.
Technical Analysis
This analysis will use custom function names (i.e., collect_process_data) that replace the regular IDA Pro's function format (i.e., sub_*) and will assume a 32-bit (x86) DLL executable with an image base address of 0x2E1000. The user can refer to the following image that contains function offsets, names and custom names for easy reference.
NOTE: Sub-functions used are not listed, since these can be easily located from the presented function offsets.

The present analysis begins from the entry point function c2_logic_ep (sub_2E2C63).
Encryption API Functions
This malware uses two main functions: encryption_functions_one and encryption_functions_two. Both functions makes use of Microsoft's Base Cryptography (CryptoAPI). The following section includes the properties used and actions performed by these crypto functions during the malware execution.
- CryptAcquireContextW - Uses a PROV_DH_SCHANNEL as provider type (0x18). The CRYPT_VERIFYCONTEXT and CRYPT_SILENT flags are combined with a bitwise-OR operation (0xf0000040) to make sure that no user interface (UI) is displayed to the user.
- CryptDecodeObjectEx - Uses a message encoding type X509_ASN_ENCODING and PKCS_7_ASN_ENCODING that are combined with a bitwise-OR operation (0x10001), a structure type X509_BASIC_CONSTRAINTS (0x13) and a total of 0x6a bytes that are going to be decoded.
- CryptImportKey - Imports a key-blob of 0x74 in size (bytes) and type PUBLICKEYBLOB (0x6) with a CUR_BLOB_VERSION (0x2) version.
- CryptGenKey - Uses an ALG_ID value that is set to CALG_AES_128 (0x0000660e) and generates a 128-bit AES session key.
- CryptCreateHash - Uses an ALG_ID value that is set to CALG_SHA (0x00008004), which, as the the name suggests, sets the SHA hashing algorithm.
- CryptDuplicateHash - Receives a handle to the hash to be duplicated.
- CryptEncrypt - This function receives two main parameters: a handle to the encryption key generated by the CryptGenKey function and a handle to a hash object generated by CryptCreateHash. This value will be used after encryption by calling the CryptEncrypt function and passing as a parameter the pointer to the C2 data.
- CryptExportKey - Uses a SIMPLEBLOB (0x1) type and CRYPT_OAEP (0x00000040) as a flag. The pointer to the buffer where the key-blob is exported is part of the malware's C2 data.
- CryptGetHashParam - As in the case of the CryptExportKey function, the destination pointer is part of the malware's C2 data.
- CryptDestroyHash - As its name implies, destroys the given hash.
Machine ID Generation and Length Checking
The generate_machine_id function, as its name states, is in charge of generating a machine identifier for the infected computer. The method used to generate the machine identifier is by making a call to the _snprintf function, which uses the format string %s_%08X to concatenate the value generated by GetComputerNameA and GetVolumeInformationW. In the particular case of the test machine used in this analysis, the resulting value is ANANDAXPC_58F2C41B.

Once the machine-id is generated, a length-check verification is also generated. This is achieved by calling the "lstrlen" function wrapper gen_machine_id_length and passing as a parameter the returning value from the previous function call. For the case of the testing machine, the resulting length was "12", and such value will reside in a particular stack variable since it will be used as part of the C2 data. Subsequently, a new function call is made to the write_GoR function. Its original purpose is unknown, however, based on the analysis and how the returning value (0x16F87C) is used. It’s presumably a delimiter, since it is located at the end of the C2 data.

Operating System Data Collection
Part of the exfiltrated data also includes OS information, and this is achieved by calling the collect_os_data function.

This function makes calls to RtlGetVersion, which stores data inside of an OSVERSIONINFOW structure, and GetNativeSystemInfo performs the same by saving its data inside a SYSTEM_INFO structure.

Once the data structures are populated, specific data is fetched by the instructions located at these offsets: 0x2EC3DB (Ret value), 0x2EC440 (MajorVersion), 0x2EC3DB, 0x2EC3D0 (MinorVersion) and 0x2EC45A (Architecture|PROCESSOR_ARCHITECTURE_INTEL).
The returning value is computed by adding and multiplying against fixed values: MajorVersion, MinorVersion, Architecture and the returning value (0x1) of the RtlGetNtProductType call, which is a symbolic constant (NtProductWinNT) of the NT_PRODUCT_TYPE enumeration data type. The following Python code simulates the logic that generates such value.

Remote Desktop Services Session Information Collection
More calls are performed, including the one to GetCurrentProcessId, which retrieves the process identifier for the current process, and the returning value is passed to the ProcessIdToSessionId function as parameter. According to the MSDN description, the ProcessIdToSessionId function "retrieves the Remote Desktop Services session associated with a specified process." The returning value of this function indicates the Terminal Services session the current process is running on.

Process Scanning and C2 Data Collection
This function collects active running processes on the system by the execution of the traditional method of calling the CreateToolhelp32Snapshot, Process32FirstW, GetCurrentProcessId and Process32NextW functions. Before entering to this function, the instruction at offset 0x2E4715 loads the address of a local variable in the EAX register and pushed onto the stack. This variable will contain a pointer generated by a call to the RtAllocateHeap function that will eventually receive the process data information.

This function also makes calls to the sub-function named copy_collected_data_parent. During its execution, it generates a new memory section made by a call to the RtlAllocateHeap function, and some subsequent calls to the memcpy wrapper function to copy collected C2 data to the new allocated section.

The next function to call is HTTP_LAUNCHER, which contains sub-functions that provide web capability, among other tasks. At this point in time, the variables are initialized with the corresponding return values from the previously executed functions. The following ASCII dump shows the variable addresses, the related data and information about which function, or instruction offset, provided the given data.

The next step is a call to the c2_data_write function, which calls the write_collected_data sub-function and passes as parameters two values:
- A pointer to the C2 data (0x2EAC3E).
- The returning value (address) of a new memory allocation generated by a call to the RtlAllocateHeap function located at offset 0x2F989B.
This newly generated data passes through an algorithm, which in addition to writing (at offset 0x2FA830) also modifies certain bytes (at offset 0x2FA6DE) of the C2 data, especially some filename extensions.

Once the data is collected, a call to write_c2_data_zero is made, which will allocate additional memory by calling the AllocateHeap (0x2E99DC) function. This function will eventually be called twice, and it will call more sub-functions in where the instructions at offset 0x2F362A of the write_c2_data_one function will generate two DWORD values: 0x1, which is a fixed value, and 0x132, which is the length of the C2 data. The next step is a call to copy_c2_data (a wrapper to memcpy at offset 0x2F794C) function, which copies the C2 data to a new location next to the two values mentioned earlier.

The next sequential function execution is a call to CryptDuplicateHash. After that, a call to copy_binary_data is made, which makes a final C2 data copy to a new memory allocation. This location will contain the last C2 data before being encrypted by the CryptEncrypt function, as will be performed in subsequent steps.

The following picture shows the buffer with its related values and description highlighted with different colors for easy reference.

The next call is to the CryptEncrypt function wrapper, which will reach the real API function via an indirect call to the EAX register located at offset 0x2F0AD4.

The following picture shows the before and after encryption status of the C2 data.

Once the C2 data is encrypted, the following step is to export the current encryption key by calling the CryptExportKey function at offset 0x2EFF2C.

After exporting the key, a loop located at offset 0x2EFF41 has an instruction at offset 0x2EFF43 that writes into C2 data 0x60 bytes of the exported key.

Now, a call to the API function CryptGetHashParam is made with a parameter that contains a pointer to CryptDestroyHash that will write 20 bytes of the generated hash into the C2 data.

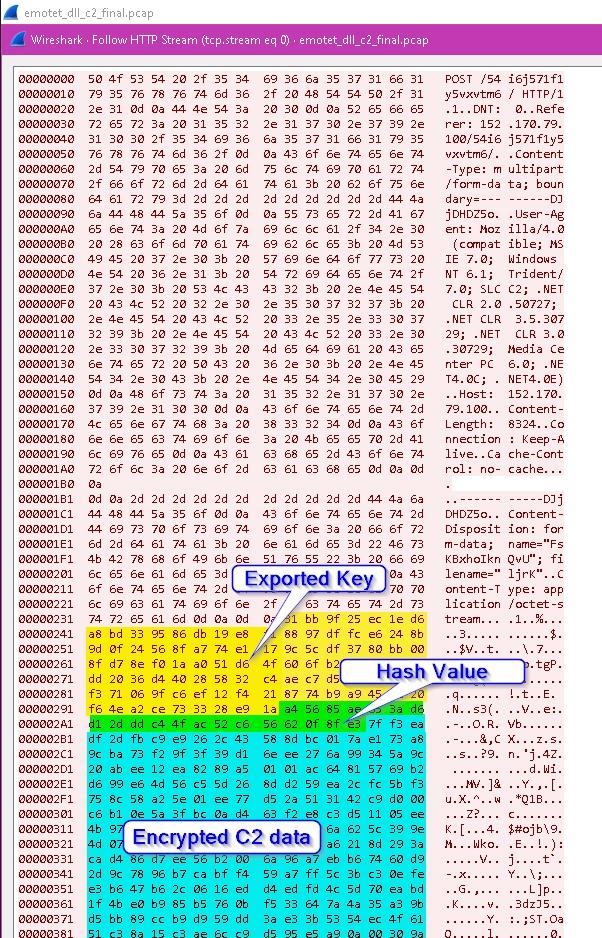
The following image shows how the final C2 data is stored in memory.

C2 Exfiltration: HTTP Post Request Generation
At this stage, the C2 data containing Exported Key, Hash Value, and Encrypted C2 data are done. Thus, the last stage is the completion of the data exfiltration. The following steps prepare the required data (e.g., IP address, HTTP form structure and values, etc.).

At this point, subsequent function calls are performed to generate the binary data that will be included within the HTTP form. The following section will describe the detailed steps that lead to such encrypted data and its exfiltration to the C2 server.
This step consists of copying the C2 data (bytes) to the web form. This is achieved by the execution of the copy_c2_data sub-function. This function will generate a binary MIME attachment of the "application/octet-stream" content type with the input data to be suitable for binary transfer.

At this stage, the final payload is preparing the environment to submit information to the C2 server. To do so, it executes function calls to retrieve the required data to finally perform the HTTP request.

As can be seen in the function call list, the HttpSendRequestW() API function is used to send the data to the server. This function allows the sender to exceed the amount of data that is normally sent by HTTP clients.

Conclusion
Emotet was active in the wild for several years before a coordinated law enforcement campaign shut down its infrastructure in late January 2021. Its attack tactics and techniques had evolved over time, and the attack chain is very mature and sophisticated, which makes it a good case study for security researchers. This research provides an example of Emotet C2 communication, including C2 server IP selection and data encryption, so we can better understand how Emotet malware utilizes this sophisticated technique to evade security production detection.
Palo Alto Networks customers are protected from this kind of attack by the following:
- Threat Prevention signatures 21201, 21185 and 21167 identify HTTP C2 requests attempting to download the new payload and post sensitive info.
- WildFire and Cortex XDR identify and block Emotet and its droppers.
Indicators of Compromise
Samples
2cb81a1a59df4a4fd222fbcb946db3d653185c2e79cf4d3365b430b1988d485f
Droppers
bbb9c1b98ec307a5e84095cf491f7475964a698c90b48a9d43490a05b6ba0a79
bd1e56637bd0fe213c2c58d6bd4e6e3693416ec2f90ea29f0c68a0b91815d91a
URLs
http://allcannabismeds[.]com/unraid-map/ZZm6/
http://giannaspsychicstudio[.]com/cgi-bin/PP/
http://ienglishabc[.]com/cow/JH/
http://abrillofurniture[.]com/bph-nclex-wygq4/a7nBfhs/
https://etkindedektiflik[.]com/pcie-speed/U/
https://vstsample[.]com/wp-includes/7eXeI/
http://ezi-pos[.]com/categoryl/x/
IPs
5.2.136[.]90
161.49.84[.]2
70.32.89[.]105
190.247.139[.]101
138.197.99[.]250
152.170.79[.]100
190.55.186[.]229
132.248.38[.]158
110.172.180[.]180
37.46.129[.]215
203.157.152[.]9
157.245.145[.]87


 Get updates from Unit 42