Executive Summary
In the race to gain a competitive edge, organizations are increasingly training artificial intelligence (AI) models on sensitive data. But what if a seemingly harmless AI model became a gateway for attackers?
A malicious actor could upload a poisoned model to a public repository, and without realizing it, your team could deploy it in your environment. Once active, that model could exfiltrate your sensitive machine learning (ML) models and fine-tuned large language model (LLM) adapters. With access to these adapters, attackers could replicate your custom tuning and optimizations, exposing sensitive information embedded in fine-tuning patterns.
Palo Alto Networks researchers recently uncovered two vulnerabilities in Google's Vertex AI platform. These vulnerabilities could have allowed attackers to escalate privileges and exfiltrate models.
We have shared these findings with our partners at Google, and they have since implemented fixes to eliminate these specific issues for Vertex AI on the Google Cloud Platform (GCP). Read on to understand how these vulnerabilities worked and how you can protect your environment from similar threats.
In this article, we outline our steps to discover two vulnerabilities in the Vertex AI platform:
- Privilege escalation via custom jobs
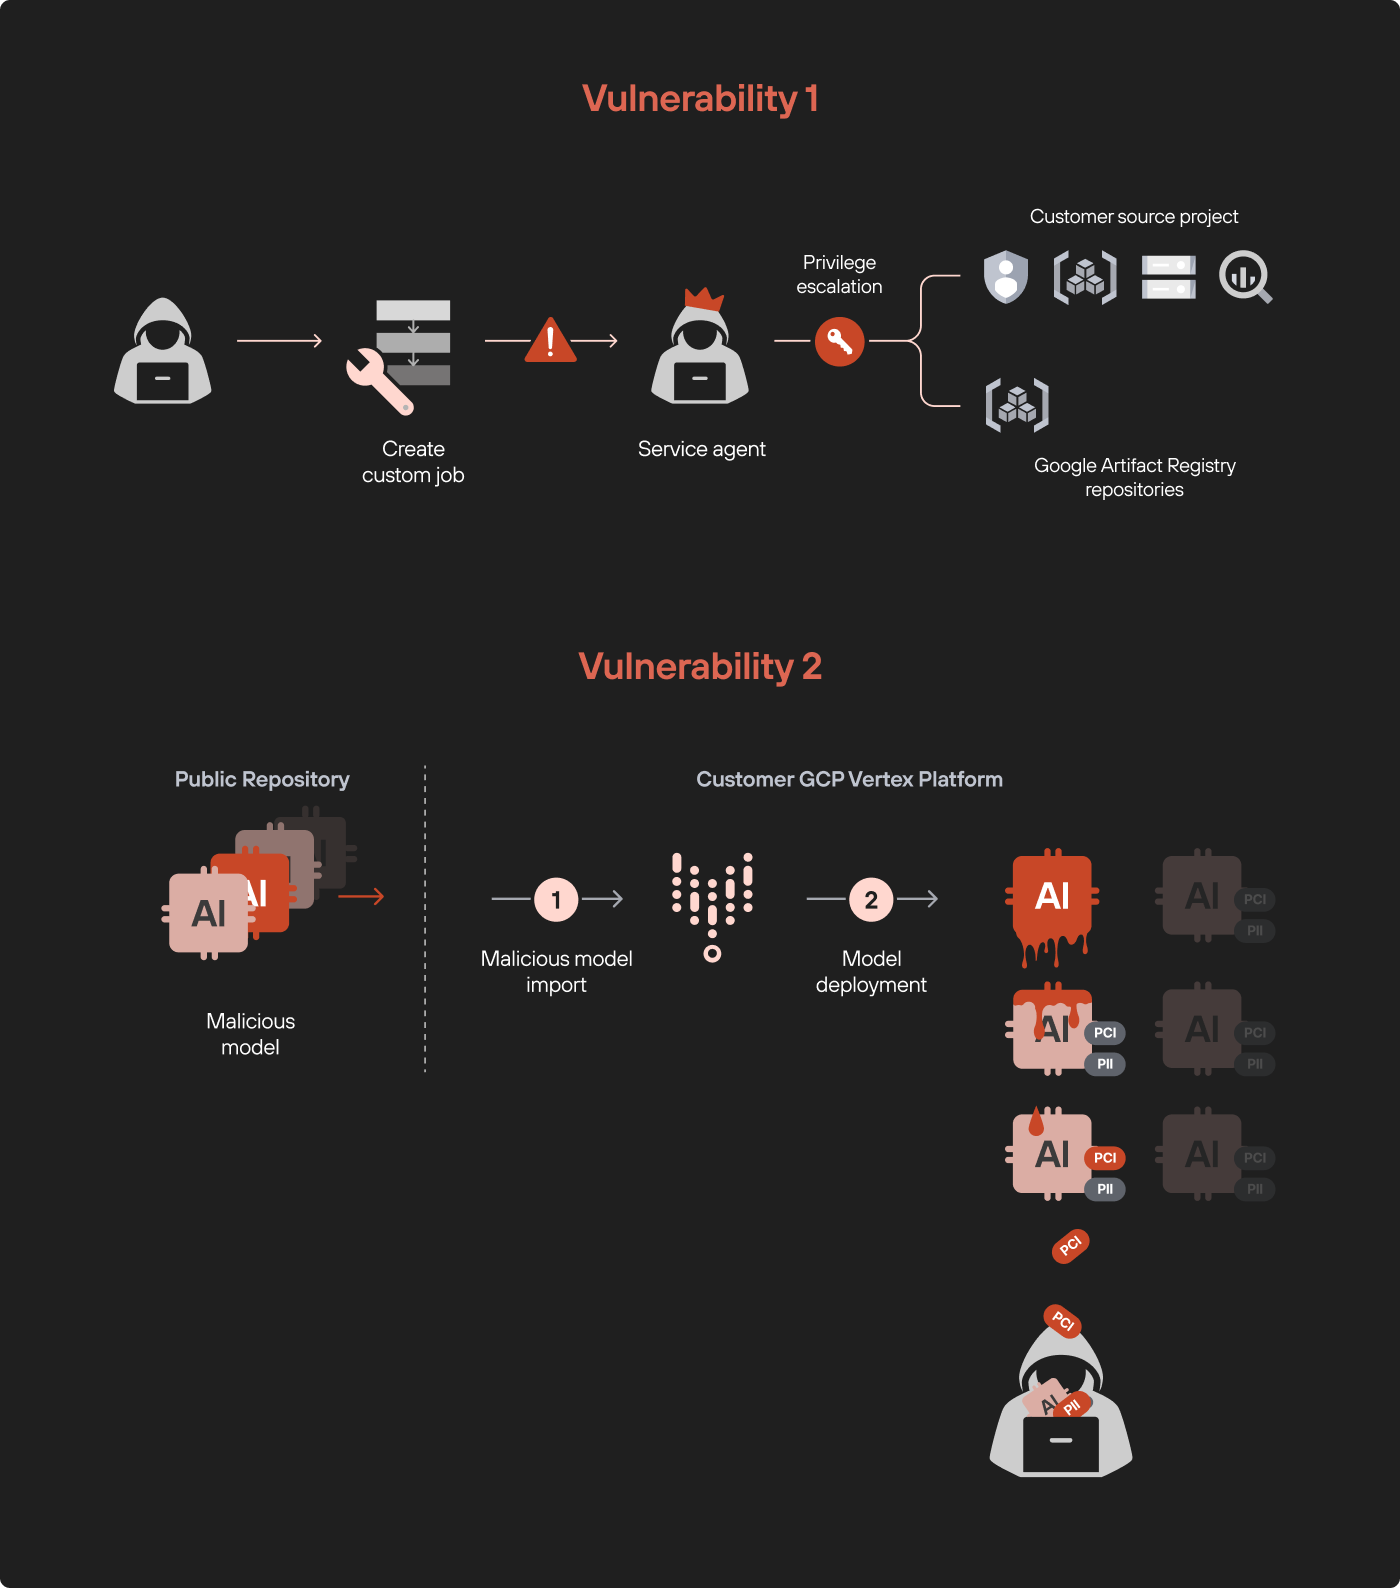
By exploiting custom job permissions, we were able to escalate our privileges and gain unauthorized access to all data services in the project. - Model exfiltration via malicious model
Deploying a poisoned model in Vertex AI led to the exfiltration of all other fine-tuned models, posing a serious proprietary and sensitive data exfiltration attack risk.
Our examination of the first vulnerability ended with a classic privilege escalation, but the second vulnerability represents a much more interesting “model-to-model” infection scenario that required an in-depth exploration.
Figure 1 shows a diagram demonstrating the two vulnerabilities.
Palo Alto Networks customers are better protected from the threats discussed in this article through our Prisma Cloud offerings.
If you think you might have been compromised or have an urgent matter, contact the Unit 42 Incident Response team.
| Related Unit 42 Topics | Cloud Cybersecurity Research, Privilege Escalation |
Privilege Escalation Through Custom Code Injection
The first vulnerability we found is a privilege escalation through custom code injection. To properly explain this method, we must first understand model tuning in Vertex AI Pipelines.
Background: Understanding Model Tuning With Vertex AI Pipelines
Vertex AI is a comprehensive platform for developing, training and deploying ML and AI models. A key feature of this platform is Vertex AI Pipelines, which allow users to tune their models using custom jobs, also referred to as custom training jobs.
These custom jobs are essentially code that runs within the pipeline and can modify models in various ways. While this flexibility is valuable, it also opens the door to potential exploitation.
Our research focused on how attackers could abuse custom jobs. By manipulating the custom job pipeline, we discovered a privilege escalation path that allowed us to access resources far beyond the intended scope.

In Figure 2, tuning a Vertex AI model (ML or LLM) happens in a remote tenant project that is dedicated to the source project (step 1). The tuning process uses custom jobs defined in Vertex AI Pipelines, which are run on a different tenant project (step 2).
When the tuning process is complete, a new tuned model is created in the model registry in the origin project (step 3). At this point, we deploy our model in a third different tenant project (step 4).
Attack Flow of the Privilege Escalation Vulnerability
When running, a custom job executes within a tenant project under a service agent identity. By default, service agents have excessive permissions to many services in the source project, such as all the source project's Cloud Storage and BigQuery datasets. With the service agent’s identity, we could list, read and even export data from buckets and datasets we should never have been able to access.
Delving Deeper: Injecting Custom Code
For a custom job to run specific code, we could either inject commands into the container spec JSON configuration or create an image that opens a reverse shell. In our case, we created a custom image as a backdoor, allowing us to gain access to the environment. Figure 3 below shows the commands we used to create this custom image.

With this custom job running in a tenant-project, we discovered that our identity was the following:
service-<PROJECT_NUMBER>@gcp-sa-aiplatform-cc.iam.gserviceaccount[.]com
This service agent is the AI Platform Custom Code Service Agent. With the service agent acting in this role, we could perform the following activities:
- Accessing the metadata service
- Acquiring the service credentials
- Extracting the user-data script
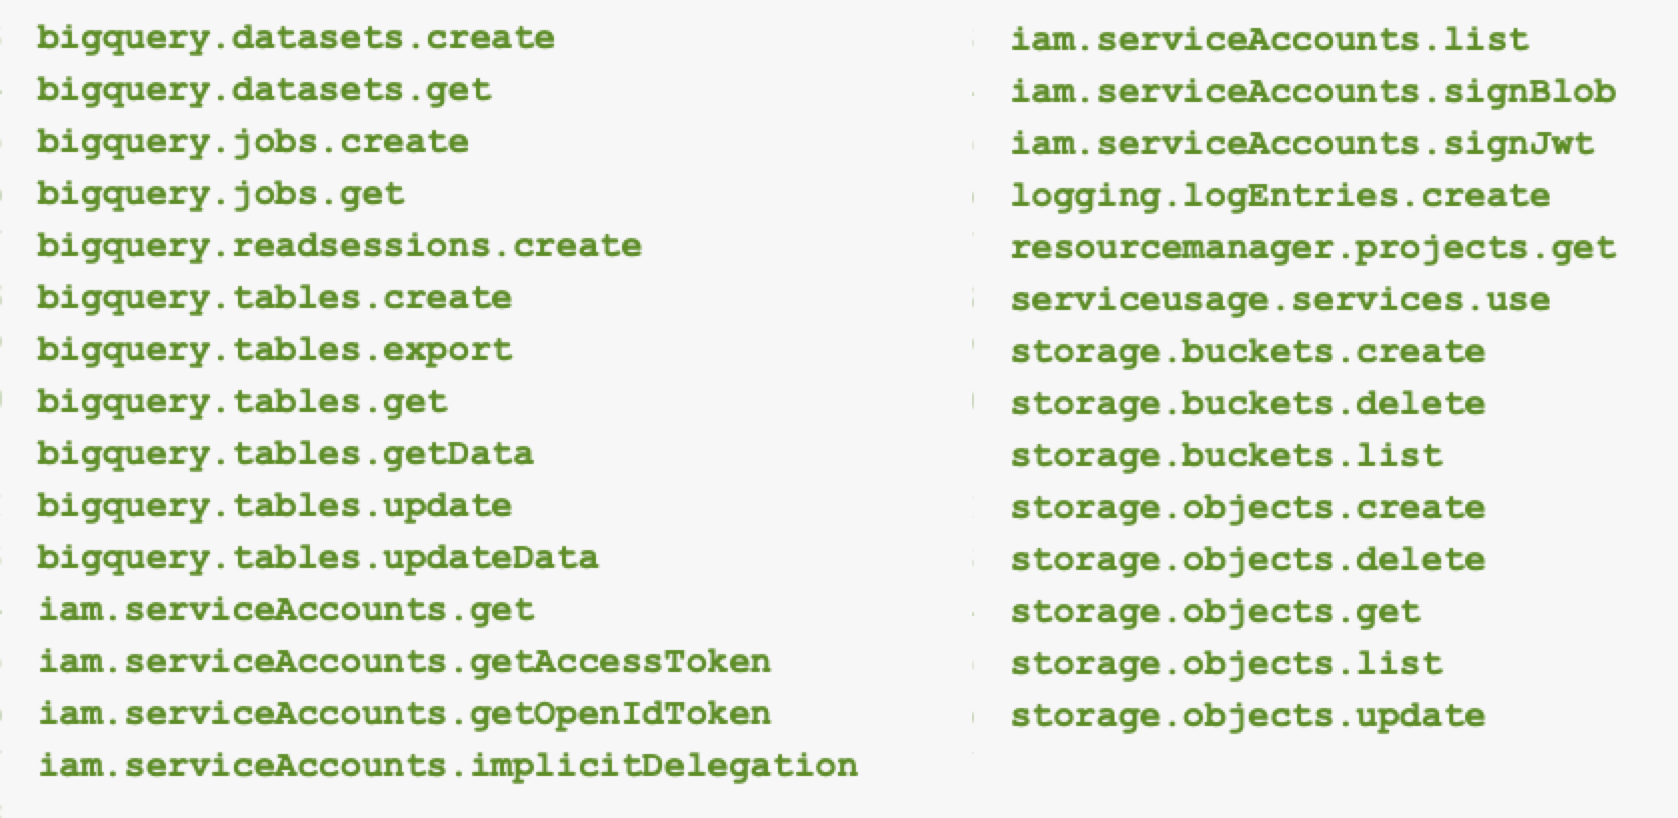
This account had extensive permissions, including the following:
- The ability to list all service accounts
- Creating, deleting, reading and writing all storage buckets
- Accessing all BigQuery tables
Figure 4 lists the specific permissions that our service agent had in the source project during our testing.
The user-data script gave us visibility into the virtual machine (VM) creation and provided us with metadata on GCP internal Artifactory repositories.
We used the metadata to access the internal GCP repositories and downloaded images that we didn’t have permissions for with our original service account. Although we gained access to restricted internal GCP repositories, we could not understand the extent of the vulnerability that we discovered, since permissions on the repository are granted at the repository level.
This is a classic privilege escalation that with the single permission of aiplatform.customJobs.create gives us the ability to access additional resources in the origin project. This is the first vulnerability we found in the Vertex AI platform. Figure 5 presents a flow diagram on privilege escalation through exploiting this vulnerability with custom jobs.

Model Exfiltration Attack via Malicious Model Deployment
This section explores the second vulnerability we discovered in Vertex AI. We demonstrate how deploying a malicious model could lead to severe consequences, including the exfiltration of other models within the environment.
Imagine a malicious actor uploading a poisoned model to a public model repository. Unaware of the threat, a data scientist within your organization imports and deploys this model in Vertex AI. Once deployed, the malicious model can exfiltrate every other ML and LLM model in the project, including sensitive fine-tuned models, putting your organization’s most critical assets at risk.
We enacted this scenario by deploying a poisoned model in a Vertex AI environment we deployed for testing. During our test, we gained access to the custom-online-prediction service account, allowing us to view and steal other AI and ML models from our test project.
Attack Flow of the Model Exfiltration Attack
The attack flow consists of two steps. First, we deployed a poisoned model in a tenant project, which gave us access to restricted GCP repositories and sensitive model data. In the second step, we used the poisoned model to exfiltrate proprietary AI models, including fine-tuned LLM adapters.
Delving Deeper: Preparing a Malicious Vertex Model
Before we dive into preparing a model and discussing Vertex platforms, let's cover some basics in Vertex.
In our previous section discussing model tuning with Vertex AI Pipelines, we outlined the flow of tuning a model. To create a malicious model, we start with an “innocent” model. When we finish the training process, we will see the new model in the Vertex AI Model Registry.
The Vertex AI Model Registry contains all the imported or trained models. This allows several functions in the GCP console, such as deploying to an endpoint. Figure 6 shows that one of these functions is an export feature to export the model to a storage bucket.
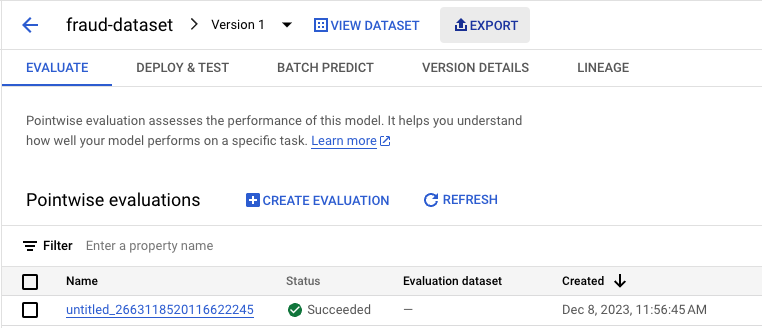
Exporting the model shown in Figure 6 reveals the model is built from vectors and runs a specified image. Below, Figure 7 identifies the specific image of the exported model in the environment.json file.
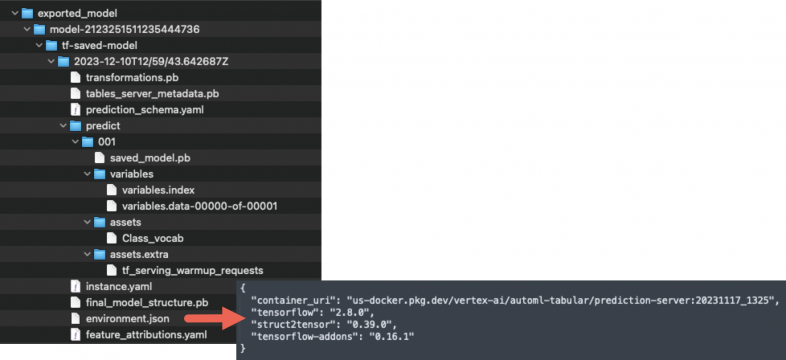
By altering the image in the model, we could customize it to create a reverse shell, then we imported our new modified model to the model registry. Deploying this altered model to an endpoint will trigger the reverse shell, allowing us to navigate the tenant project of our test environment.
After gaining a shell, we found that we were operating as the custom-online-prediction service-account in this environment, as shown below in Figure 8.

Using this method, we did not have permission to use cloudresourcemanager.projects.getIamPolicy, so we could not list our permissions in the tenant project. However, we could use cloudresourcemanager.projects.testIamPermissions to enumerate our permissions in the tenant project. Although the permissions of this service account are read-only, this level of access can yield significant power with just a bit of imagination, as we will illustrate.
Figure 9 shows the results from listing all the resources in this project, enumerating three Kubernetes clusters.

Of the three Kubernetes clusters in this project, our malicious model runs on the third cluster, which is a deployment process for an endpoint. We will review the first two clusters later, but for now, let's examine the third.
To run kubectl commands on these clusters to retrieve information on pods and namespaces, we needed appropriate privileges. We achieved this by executing the get-cluster-credentials command in GCP, using the name of the cluster that we gathered in the previous enumeration step from Figure 9. Figure 10 below shows the results.

With these credentials, we could use kubectl to explore the cluster, listing namespaces, pods, containers and service accounts. This step enabled us to move from the GCP realm into Kubernetes. This lateral movement was possible because permissions between GCP and GKE were linked through IAM Workload Identity Federation.
We found ourselves operating within a newly created cluster, where our namespace name was prediction as shown below in Figure 11.
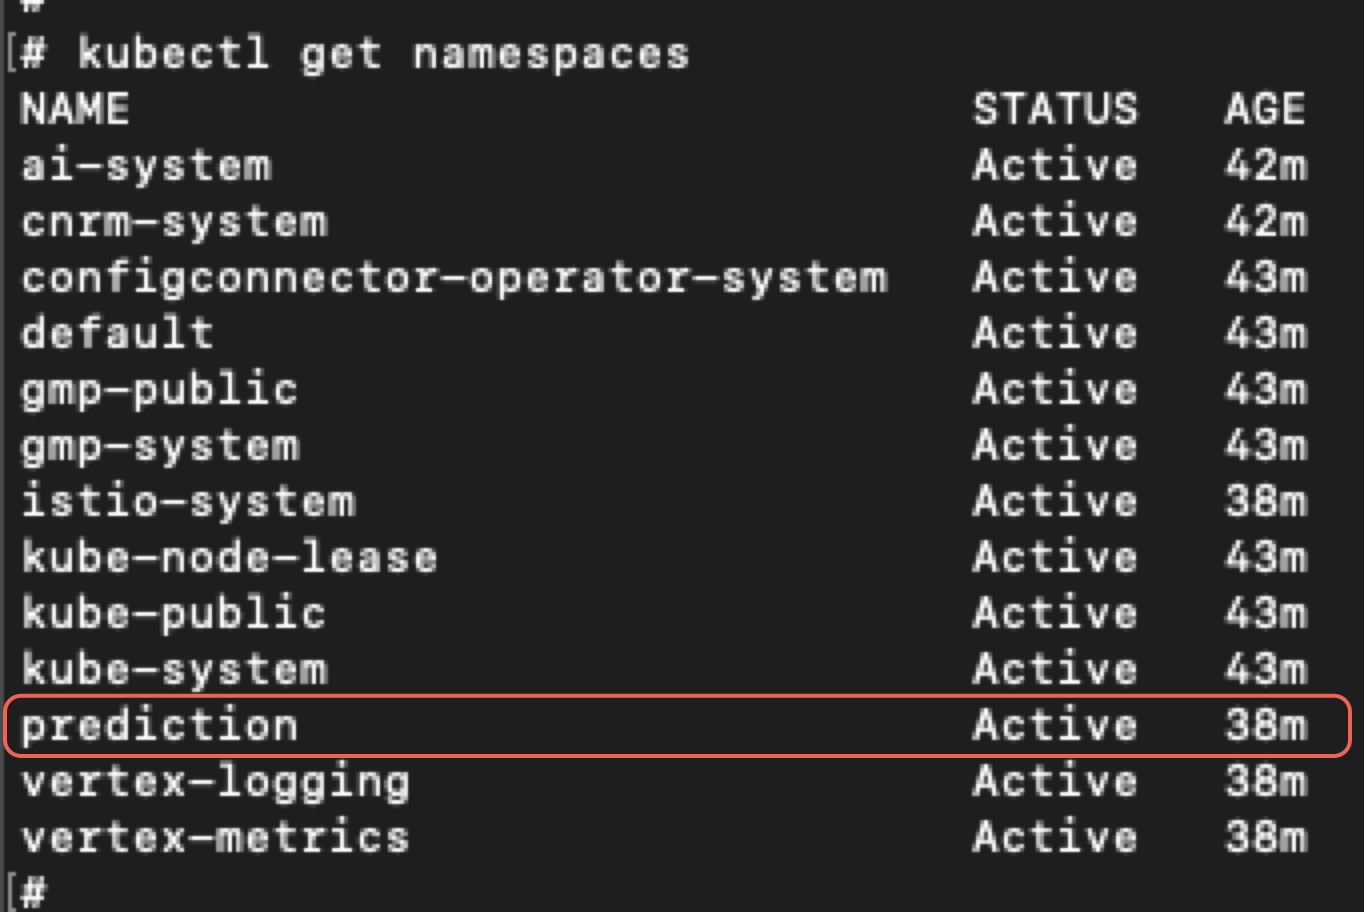
Returning to GCP, we listed the service accounts. By analyzing the IAM permissions of the GCP service account, we noticed the Kubernetes service accounts attached to it. Figure 12 shows this list revealing the service account for our newly created prediction cluster.

In the default namespace of our cluster, only the default service account was present. However, based on the information we gathered, we inferred that our GCP service account had access to other Kubernetes clusters as well. By inspecting the pod details and examining the images, we confirmed that we were running inside a container within a pod in the prediction namespace, most likely in the context of prediction/default-serving. Figure 13 below illustrates this.

Now that we had determined our identity, the next question was to determine what we could do.
We tried to create, delete, update, attach, execute and more, but we failed with no permissions. However, we could enumerate all the clusters, which gave us a great deal of information and increased our playground to try more attack vectors.
With our read-only permissions, we could list the pods in our newly created prediction cluster using the list pods command. Figure 14 shows two specific entries from this output.

Figure 14 shows the following two pods in our prediction namespace:
- predictor-resource-pool-3882551479537500160-867655f99c-2dhhc
- predictor-resource-pool-7628701944579620864-ccc8d8b94-f2chw
Both pods have containers using images from a repository located in our tenant project. Those images are:
- us-central1-docker.pkg.dev/s154574aecb0c9653-tp/dm-2118255330398830592-pipeline-6604364906047209472/lala:latest
- us-central1-docker.pkg.dev/s154574aecb0c9653-tp/dm-1402464464623632384-pipeline-1229318750780522496/lala:latest
Each of the two image entries above show lala:latest at the end of each name, indicating these are our own malicious images. It’s worth noting, our malicious images were stored in different repositories, representing distinct versions of the same image.
For each new deployment, GCP automatically uploads the image into a dedicated repository within the tenant project. Although we were running in the context of our own deployment (dm-2118255330398830592-pipeline-6604364906047209472), we now had visibility into other deployments that existed within the cluster.
Extracting the Model Images
While we could view our newly created image within the Kubernetes cluster, the question remained, could we extract or pull it? We had confirmed the image's existence by inspecting it in the Kubernetes context. However, to retrieve more detailed information about the image, we used GCP commands to describe it as shown below in Figure 15.

This step revealed a critical piece of information. While the image name ends with lala:latest, we could not successfully use the string latest in our command because that is not a valid version identifier. Instead, our attempt returned the image digest, which serves as a unique identifier for the image version.
With the digest, we could theoretically pull the image, but the process wasn’t straightforward. We lacked the permissions to create a new container, and since the Docker socket wasn’t mounted to our container, we could not use Docker to pull the images.
Instead, we used crictl, a lightweight container runtime interface (CRI) tool combined with our GCP service account authentication token. This allowed us to pull images from outside the container using the permissions of the online-prediction service account.
By setting the authentication token of the online-prediction service account as an environment variable, we were able to pull the images using the commands shown in Figure 16.

After pulling these images, we could list the results as shown below in Figure 17.

Once pulled, we exported the images into .tar files using ctr, allowing us to move and load them elsewhere.
Switching Context: Exploring Other Clusters
Now that we had gathered information from the first cluster, it was time to explore the other clusters we had discovered earlier. Since we had access to the get-cluster-credentials command and our GCP service account was bound to the clusters via IAM Workload Identity Federation, we switched context to cluster 2 as shown below in Figure 18.

Now we are operating in the context of cluster 2. Figure 19 shows the cluster 2 namespaces.
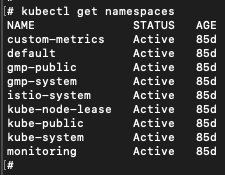
In this cluster, the prediction namespace was no longer present. We began by enumerating the pods and containers. Much of the cluster was composed of default Kubernetes resources, and we found images with prediction-server in the name stored in our tenant project’s repository, like Figure 20 shows:
- us-central1-docker.pkg.dev/s154574aecb0c9653-tp/ucaip-deployed-model-1558744649349201920/prediction-server:20231117_1325

In cluster 2, we identified one such image. Pivoting on that, we found two additional images in cluster 1 with the same production-server string in the name:
- us-central1-docker.pkg.dev/s154574aecb0c9653-tp/ucaip-deployed-model-1932543418420953088/prediction-server:20231117_1325
- us-central1-docker.pkg.dev/s154574aecb0c9653-tp/ucaip-deployed-model-6762636426589765632/prediction-server:20231117_1325
These images represent other deployments that other teams created in our project. Surprisingly with the same method previously described, we could download those images from other clusters. In fact, we had access to download images of all deployed models in the project.
Vertex AI Fine-Tuned Adapter Layer Extraction
As the above method was effective for ML model images, we also wanted to access LLM-based Vertex AI models. While ML models can be exported from GCP as we just demonstrated, LLM models have more restrictions in GCP. For example, Figure 21 shows a screenshot of a GCP panel with an LLM model where the export function is grayed out.
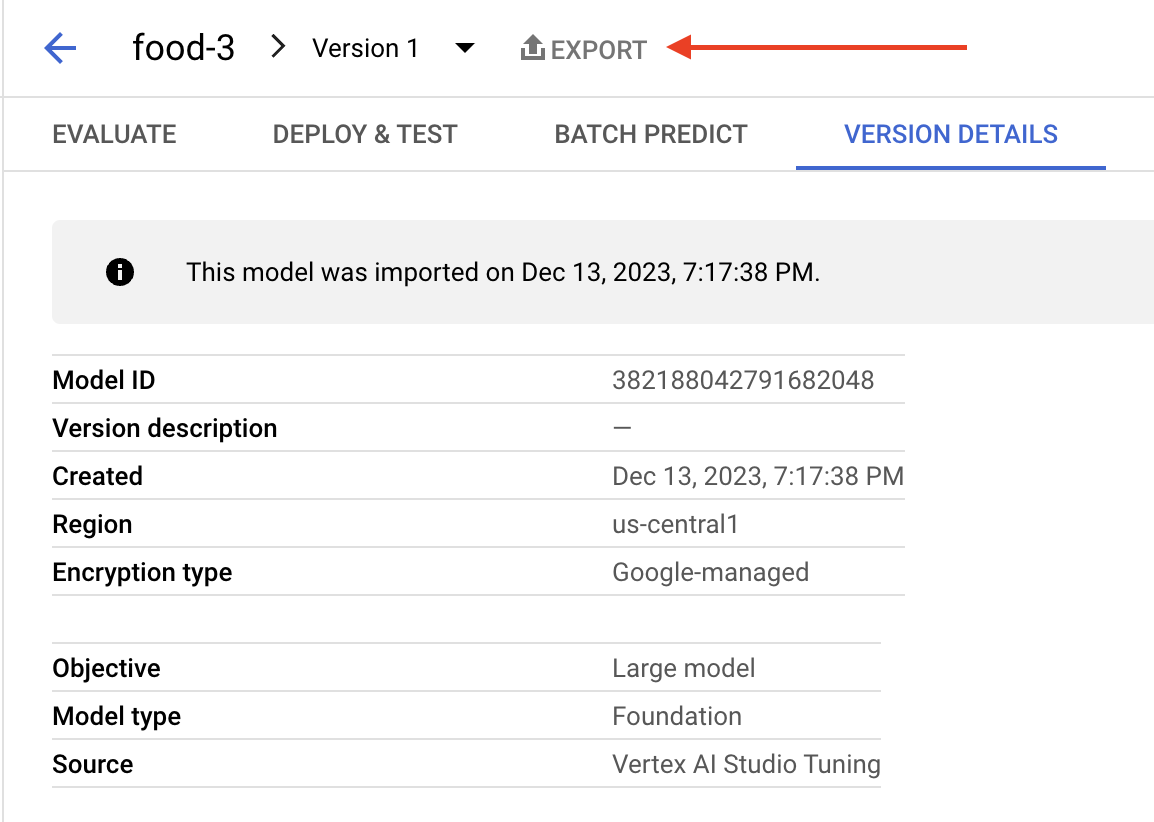
When creating a fine-tuned LLM model, GCP adds a fine-tuning layer called an adapter. This adapter layer is the additional weights created by the fine-tuning data.
By listing all the buckets in our tenant project, we discovered that all deployed models were uploaded there. Since our GCP service account had viewer permissions, not only could we list these buckets, but we could copy them. Within the buckets, we uncovered a directory structure resembling that of ML models. Figures 22 and 23 show that these bucket identifiers all start with the string caip.

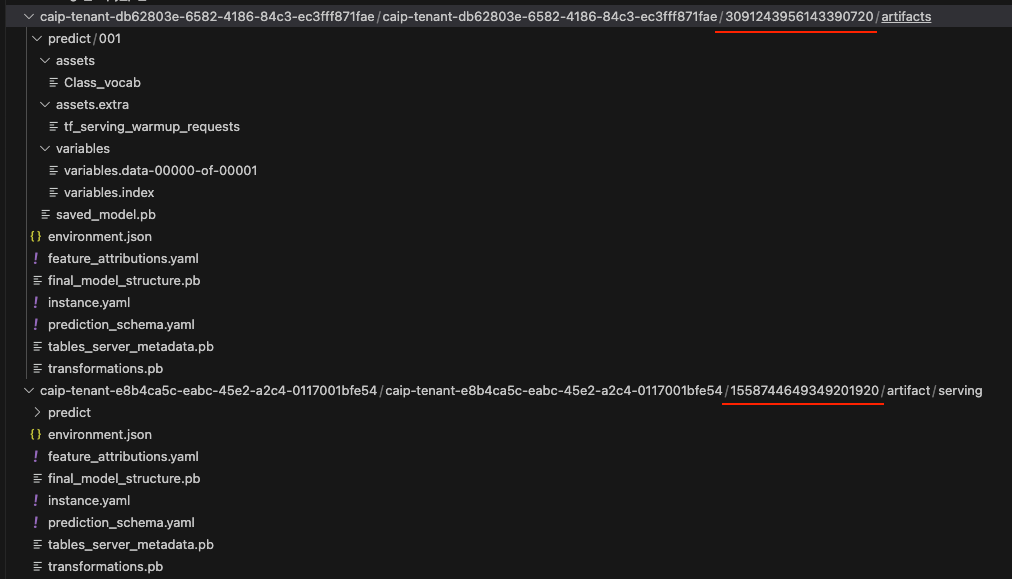
Figure 23 highlights two strings of numbers in the bucket path that act as a deployed model ID for each bucket. We could use this information to trace these buckets back to the original model ID in our source project model registry.
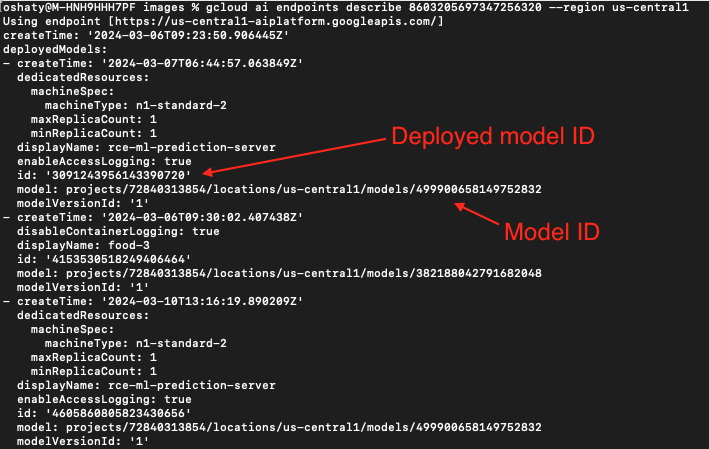
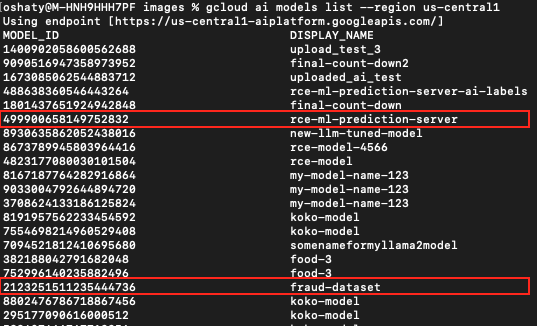
Using the first example in Figure 23 of 3091243956143390720, we traced this bucket back to our source project model registry as illustrated below in Figures 24, 25 and 26.
In Figure 24, our search revealed an endpoint with the same ID string as the deployed model ID from the first bucket listed in Figure 23. Directly below that is an associated model ID.
In Figure 25, we pivot on that same deployed model ID to find yet another associated model ID.
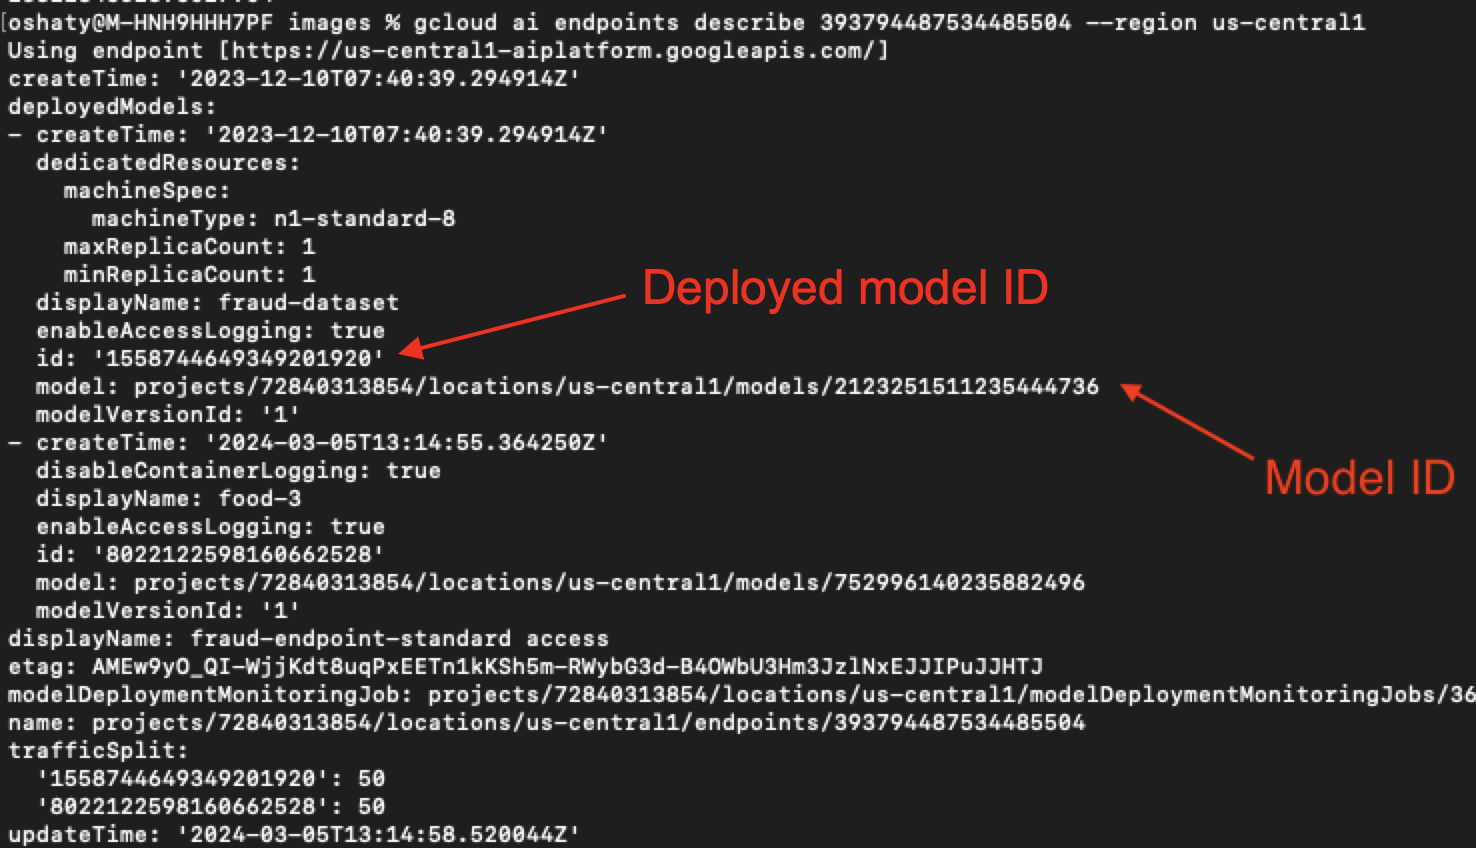
Figure 26 shows these same associated model IDs were present when we checked our source project.
Impact
We found out that we had all the ML models that have been deployed to endpoints. So at the beginning, we had all the images of the models, and now we also had all the ML models.
Even more alarmingly, we discovered adapter files within these buckets as Figure 27 below shows. These adapter files are critical components of the fine-tuning process for LLM models, and they contain the weights that directly alter the behavior of the base model.
Although the name of the example in Figure 27 is adapter.txt, the content is not readable text. However, the content of these adapter files contains weights representing highly sensitive, proprietary data, which makes them an invaluable target for attackers.

In summary, by deploying a malicious model, we were able to access resources in the tenant projects that allowed us to view and export all models deployed across the project. This includes both ML and LLM models, along with their fine-tuned adapters.
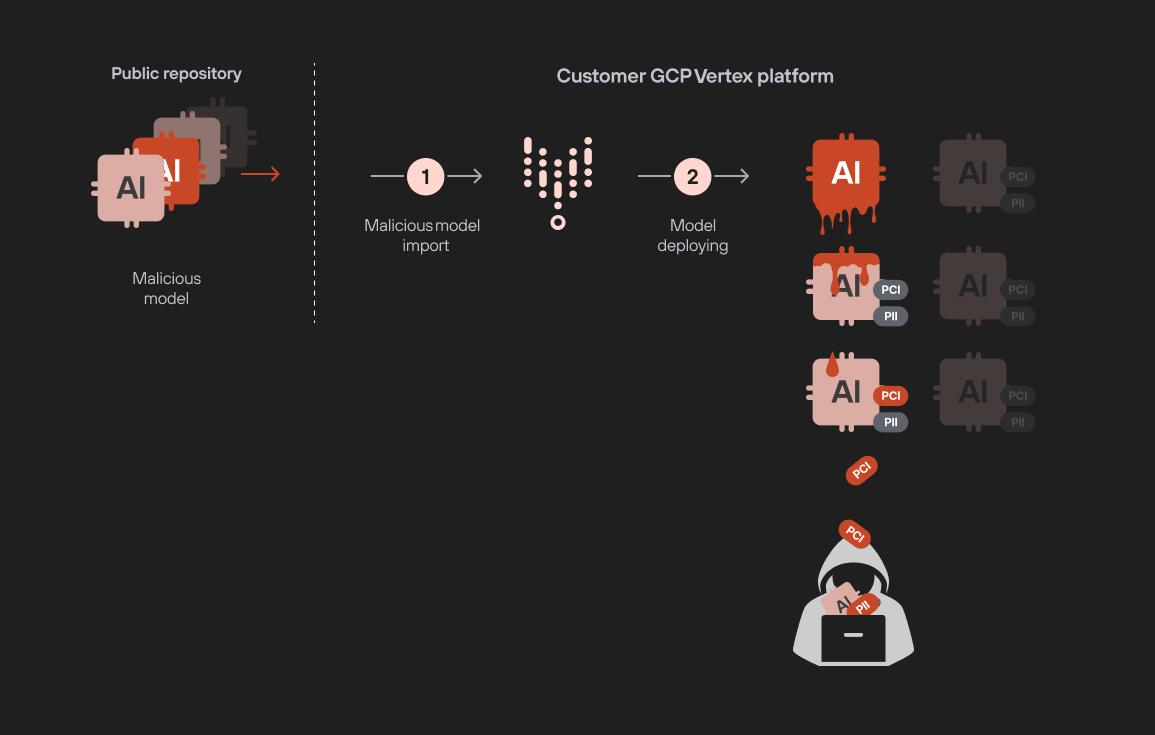
This method presents a clear risk for a model-to-model infection scenario. For example, your team could unknowingly deploy a malicious model uploaded to a public repository. Once active, it could exfiltrate all ML and fine-tuned LLM models in the project, putting your most sensitive assets at risk.
The flow diagram in Figure 28 shows an example of this model infection attack using the following steps:
- Poisoned model is prepared and uploaded to a public repository
- Data engineer downloads and imports the model
- The model is deployed, granting access to the attacker
- The attacker downloads the model images
- The attacker downloads the trained models and LLM adapter layers
Conclusion
This research highlights how a single malicious model deployment could compromise an entire AI environment. An attacker could use even one unverified model deployed on a production system to exfiltrate sensitive data, leading to severe model exfiltration attacks.
The permissions required to deploy a model might seem harmless, but in reality, that single permission could grant access to all other models in a vulnerable project. Only a very few individuals should have the permission to deploy new models in a project containing sensitive or production models without strict oversight.
To protect against such risks, we must implement strict controls on model deployments. A fundamental security practice is to ensure an organization's development or test environments are separate from its live production environment. This separation reduces the risk of an attacker accessing potentially insecure models before they are fully vetted. Whether it comes from an internal team or a third-party repository, validating every model before deployment is vital.
This highlights the critical need for Prisma Cloud AI Security Posture Management (AI-SPM) to help ensure robust oversight of AI pipelines.
If you think you may have been compromised or have an urgent matter, get in touch with the Unit 42 Incident Response team or call:
- North America Toll-Free: 866.486.4842 (866.4.UNIT42)
- EMEA: +31.20.299.3130
- APAC: +65.6983.8730
- Japan: +81.50.1790.0200
Palo Alto Networks has shared these findings with our fellow Cyber Threat Alliance (CTA) members. CTA members use this intelligence to rapidly deploy protections to their customers and to systematically disrupt malicious cyber actors. Learn more about the Cyber Threat Alliance.


 Get updates from Unit 42