Executive Summary
During the analysis of an AutoIT compiled malware sample, a message box popped up indicating the possible execution of the sample when using Exe2Aut decompiler. This triggered my interest in how this decompiler works and how AutoIt scripts are compiled in the first place. In this writeup, I will explain how the two most common AutoIT decompilers (Exe2Aut and myAut2Exe) work and how they can be tricked into decompiling a decoy script instead of the real script.
What is a “Compiled” AutoIT Executable?
A compiled AutoIT executable basically consists of two parts: a standalone AutoIT interpreter and the compiled script bytecode present as a resource in the PE file. The creators of AutoIT have taken some measures against easy decompilation and applied a form of compression and encryption on the bytecode. The decompression of the bytecode is performed by the compiled AutoIT binary before it is interpreted and executed.
Let’s Analyze the Exe2Aut Decompiler
If you would dynamically analyze Exe2Aut during decompilation, you would notice the following:
-
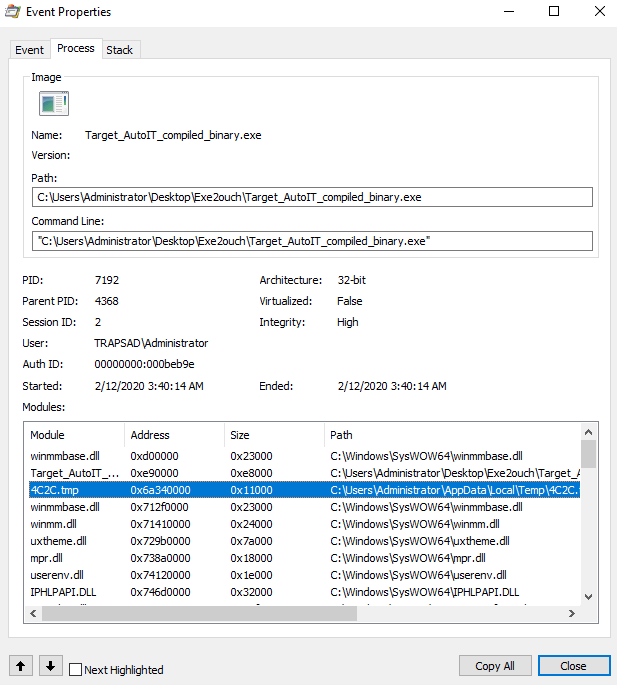
- A .tmp file is written to the %TEMP% folder.
- The target binary is loaded as a child process of Exe2Aut.
- The .tmp file is injected in the target binary.
- The target binary will write the decompiled autoIT script to the current working directory.
Because of this, you can conclude that Exe2Aut utilizes the embedded interpreter to decrypt and decompress the script bytecode and extracts this by injecting a dynamic link library (DLL) into the target binary. This hooks the function that will execute the bytecode and decodes the bytecode back to the function names instead -- making it a dynamic approach. Due to this, it's possible to add code to detect the injection and change its behavior. By doing so, we can trick Exe2Aut to decompile a decoy script instead of the real script, which is executed when running the application.
What About MyAut2Exe?
Unlike Exe2Aut, MyAut2Exe extracts the bytecode resource and unpacks and decodes it without the help of the embedded interpreter -- making it a full static decompiler because of this, there is no risk of accidentally executing anything.
MyAut2Exe is more advanced than Exe2Aut. It supports multiple versions of AutoIT and AutoHotkey compiled scripts. Therefore, it has more settings to adjust the extraction and unpacking of the compiled script code. To take the hassle out of correctly configuring it, it comes with a feature called "automate". This brute forces the decompiler settings until a script is successfully decompiled. When the "automate" functionality is used, MyAut2Exe parses the executable for AutoIT magic bytecode signatures. Once found, it extracts and decompiles the code. As the parsing and decompilation stops on the first occurrence of the magic bytecode sequence, MyAut2Exe can be easily tricked into decompiling a decoy script as long as it's placed at a lower offset than the real compiled script resource.
Allow Me to Demonstrate
Theory is all nice and well, but in the world of cybersecurity, a proof of concept (POC) is worth far more than any theory.
The idea is to have a compiled AutoIt executable with three different bytecodes. Once decompiled by either Exe2Aut or MyAut2Exe, one of the decoy scripts gets decompiled instead of the real code.
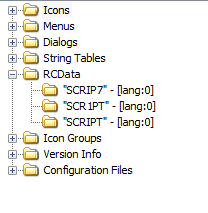
The decoy script for MyAut2Exe is placed before the real bytecode as explained earlier. For Exe2Aut, the script resource name for the decoy and real script is renamed at runtime to make it decompile the wrong code.
I have compiled three different AutoIt scripts and added those as resources to the .rsrc section. Two of them are decoy scripts, while the third is a real one. Afterward, I set the permissions of the .rsrc section to read / write in the portable executable (PE) header.
Next, I wrote a small assembly shellcode to walk through the PEB_LDR_DATA structure in the Process Environment Block to check for the presence of the DLL injected by Exe2Aut. It is also possible to search for the (UPX packed) DLL on disk, as it is placed in the Windows %TEMP% directory under a random file name before being injected. I have chosen this approach because it’s more reliable and harder to detect. Walking the Process Environment Block to check for a loaded module with the presence of the section name .UPX0 in all loaded modules is a more elegant way to identify Exe2Aut's injected module, as none of the other DLLs would normally be UPX packed. This method might even detect a wide range of Exe2Aut versions and not just the one I used or even some custom decompilers as well.
After I’ve created the shellcode, I need to find a location in the prepared executable to inject my shellcode into. I found a codecave of around 210 bytes at the end of the .text section, where my shellcode would fit easily. In order to execute my shellcode, I decided to jump to it right after the call to IsDebuggerPresent and return to normal execution flow once the execution was done.
|
1 2 3 4 5 6 7 8 9 10 11 12 13 14 15 16 17 18 19 20 21 22 23 24 25 26 27 28 29 30 31 32 33 34 35 36 37 |
saveRegisters: push ecx push ebx push edx checkInjected: mov ebx, fs:[0x30] ; Get PEB address mov ebx, [ebx+0xC] ; Get LDR Table address mov ebx, [ebx+0x14] ; first entry of LDR table. (the first entry is the that of the executable) mov edx, [ebx+0x10] ; Store the offset in edx ; I need this later to calculate the offsets ; of the resource names nextModule: mov ebx, [ebx] ; Get address of next LDR entry mov ecx, dword ptr ds:[ebx+0x28] ; Pointer of the module name test ecx, ecx ; If the pointer is OxO it means we have reached ; the end of our LDR table and we want to je restoreRegisers ; continue normal execution mov ecx,dword ptr ds:[ebx+0x10] ; Get the modules base offset mov ecx, dword ptr ds:[ecx+0x178] ; load a dword from the modules base offset+0x178 cmp ecx,0x30585055 ; and check if it is "UPX0" je swapResouces jmp nextModule swapResouces: mov byte ptr ds:[edx+ 0xc7656], 0x49 ; Replace the '1' for a 'I' in "SCR1PT" mov byte ptr ds:[edx+ 0xc765e] , 0x35 ; Replace the 'S' for a '5' in "SCRIPT" restoreRegisers: pop edx pop ebx pop ecx test eax, eax ; Restore the instructions that were overwritten by jnz debugerIsPresent ; the jump to the codecave jmp debugerNotPresent ; Return to the normal program flow |
Figure 3. The assembly shellcode. (70 bytes)
Figure 4. Demonstration video
Conclusion
What we can learn from this POC is that we shouldn't always blindly trust the output of our tools. Reverse engineers should be aware of how their tools work and how they can possibly be tricked into returning a misleading output. While the tricks presented here might mislead two decompilers, they don't affect the results of a dynamic analysis in a sandbox.
Our threat prevention platform Traps, Cortex XDR™ and the dynamic analysis in WildFire are capable of detecting malicious behavior from benign scripts, like the ones described above, from being executed.
Table of Contents
Related Malware Resources

 High Profile Threats


 Threat Actor Groups