Executive Summary
Also known as Chanitor, Hancitor is malware used by a threat actor designated as MAN1, Moskalvzapoe or TA511. Hancitor establishes initial access on a vulnerable Windows host and sends additional malware. This Wireshark tutorial reviews activity from recent Hancitor infections. It provides tips on identifying Hancitor and its followup malware. In this tutorial, we cover examples of Hancitor with Cobalt Strike, Ficker Stealer, NetSupport Manager RAT, a network ping tool and Send-Safe spambot malware.
This tutorial is designed for security professionals who investigate suspicious network activity and review packet captures (pcaps). Familiarity with Wireshark is necessary to understand this tutorial, which focuses on Wireshark version 3.x.
Note: These instructions assume you have customized Wireshark as described in our previous Wireshark tutorial about customizing the column display.
You will need to access a GitHub repository with ZIP archives containing the pcaps used for this tutorial.
Warning: The pcaps for this tutorial contain Windows-based malware. There is a risk of infection if using a Windows computer. If possible, we recommend you review these pcaps in a non-Windows environment such as BSD, Linux or macOS.
Chain of Events for a Hancitor Infection
Hancitor is distributed through email. These emails each contain an HTTPS link for a Google Drive URL through docs.google.com. These Google Drive pages link to a different domain that returns a malicious Word document. Enabling macros on the Word document starts the infection by dropping a DLL.
The infected host first generates Hancitor command and control (C2) traffic. Then we see URLs for followup malware such as Ficker Stealer. If the infected host is part of an Active Directory (AD) environment, Hancitor will also send Cobalt Strike. Cobalt Strike provides another access channel for further malicious files such as a network ping tool or NetSupport Manager RAT-based malware. In some cases, we also see Send-Safe spambot malware, which turns the infected Windows host into a spambot pushing more Hancitor emails.

Knowing this chain of events will better help you understand traffic generated during a Hancitor infection. More details can be found in our blog about recent Hancitor infections.
Pcaps of Hancitor Infection Activity
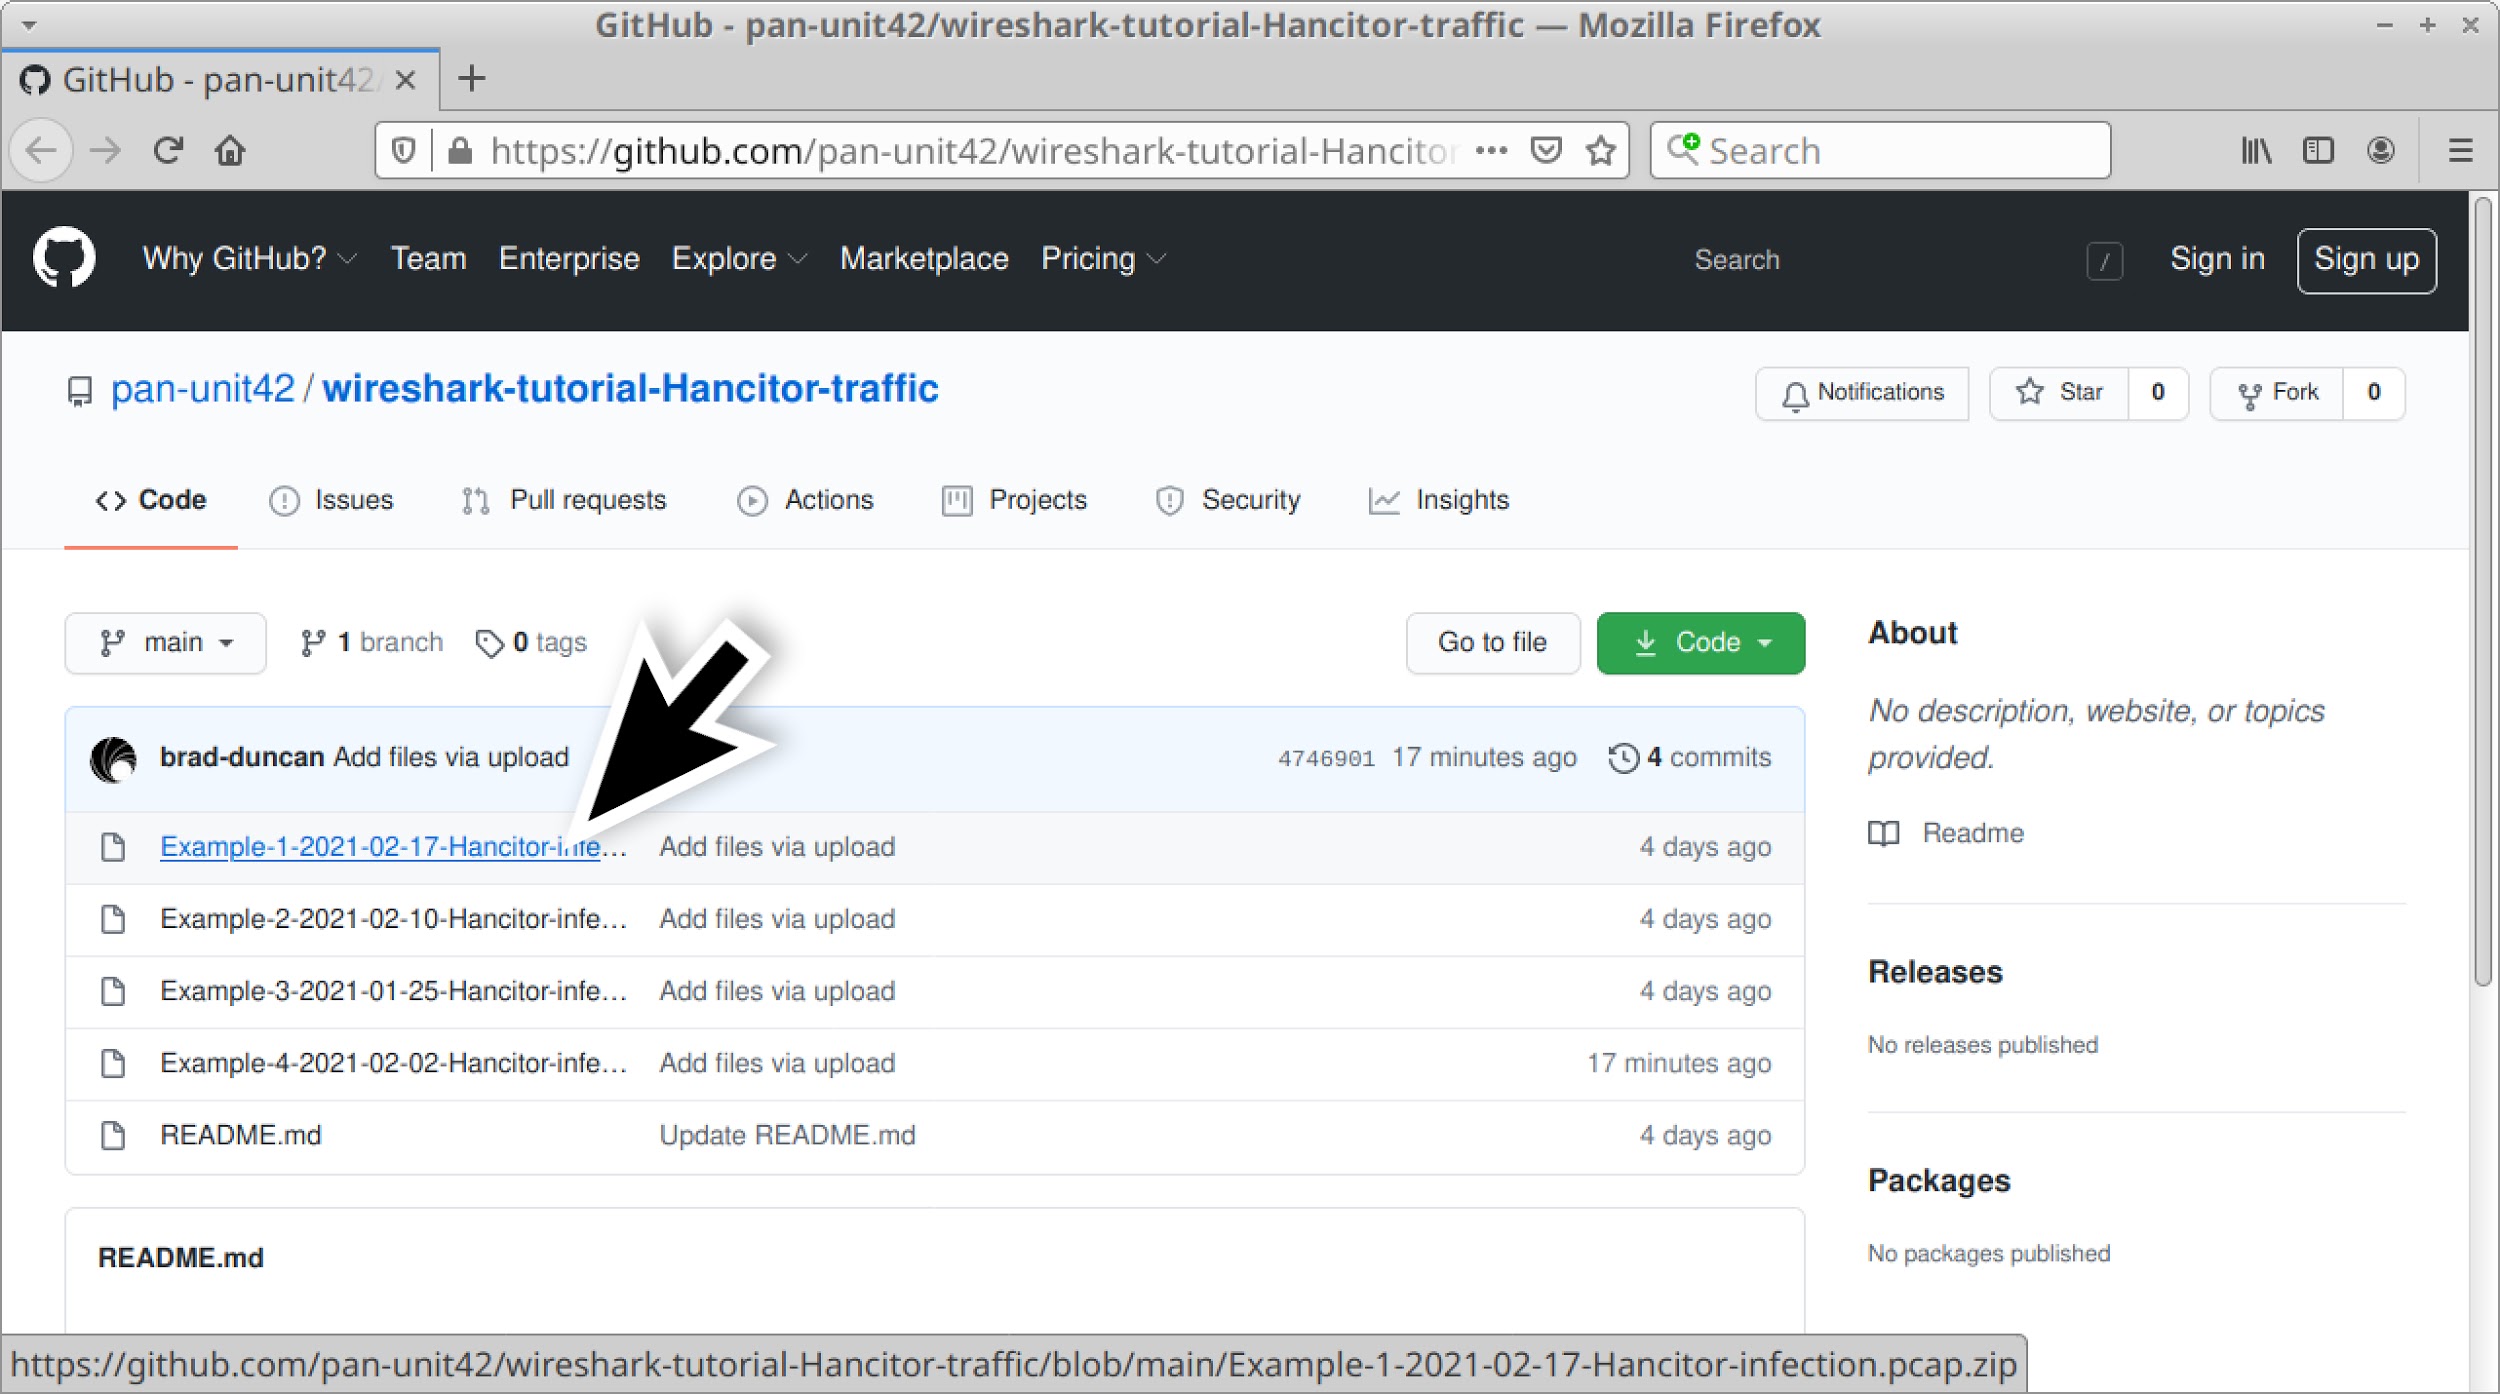
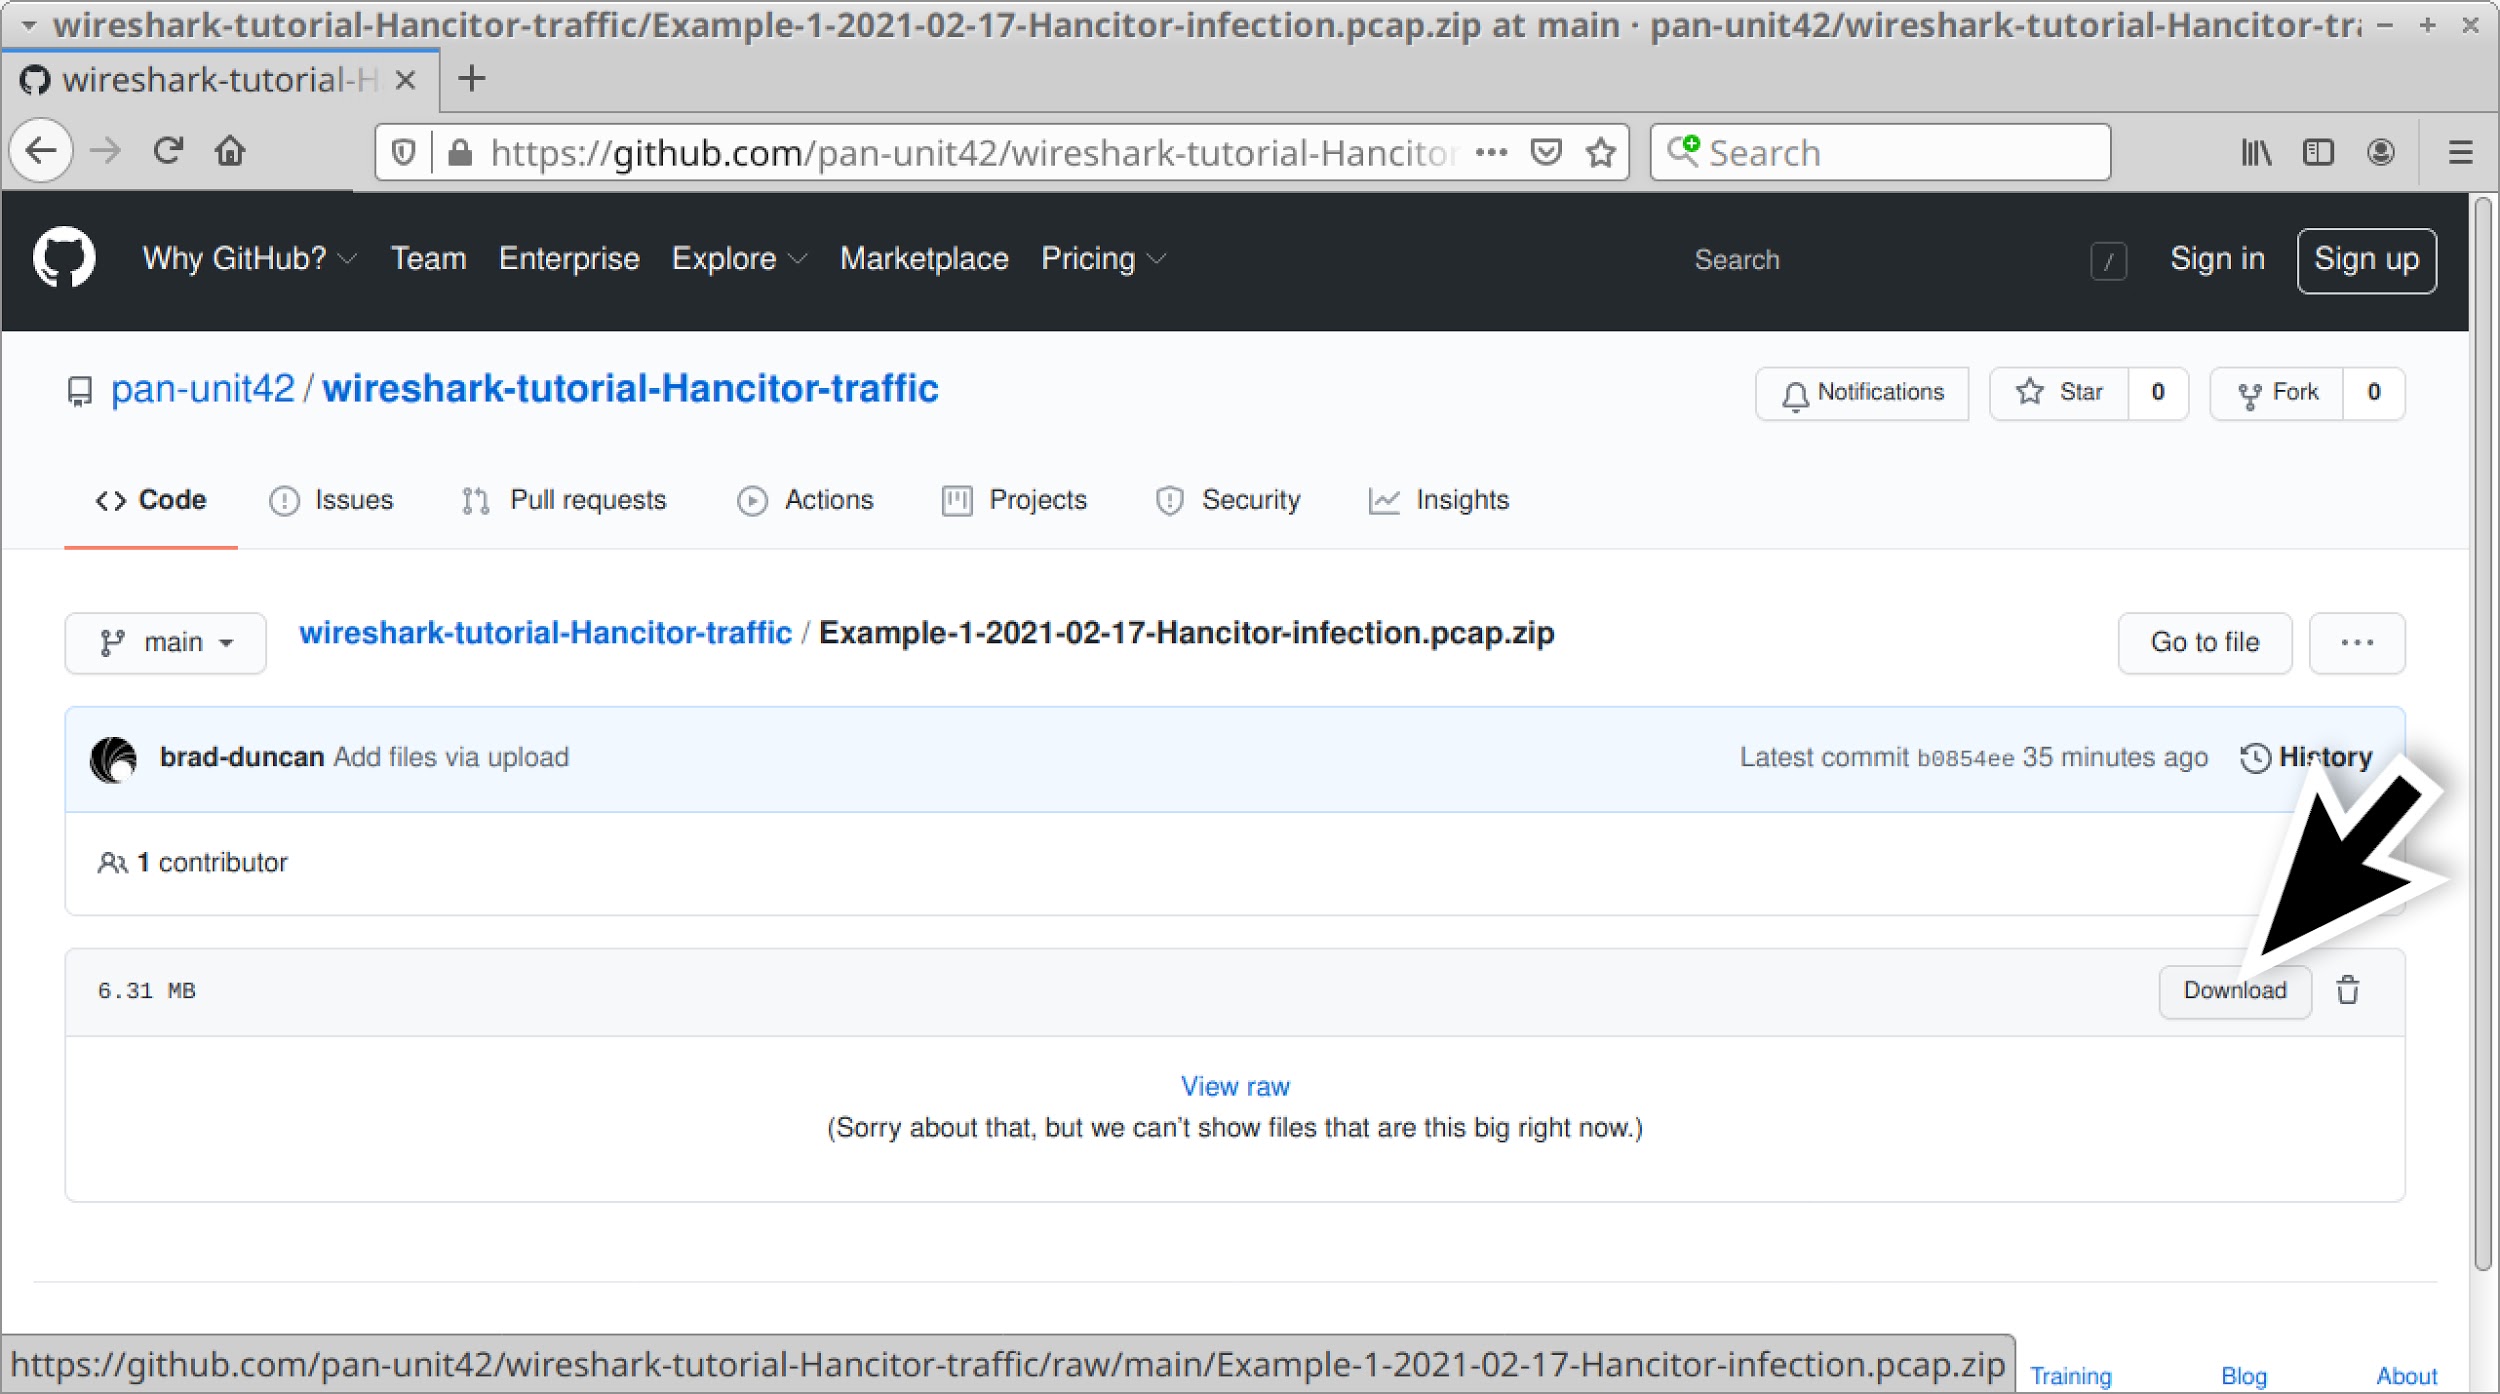
Four password-protected ZIP archives containing five pcaps of recent Hancitor activity are available at this GitHub repository. From the GitHub page, click on each of the ZIP archive entries and download them, as shown in Figures 2 and 3.
Use infected as the password to extract pcaps from these four ZIP archives. This should give you the following five pcap files:
- Example-1-2021-02-17-Hancitor-infection.pcap
- Example-2-2021-02-10-Hancitor-infection-part-1-of-2.pcap
- Example-2-2021-02-10-Hancitor-infection-part-2-of-2.pcap
- Example-3-2021-01-25-Hancitor-infection.pcap
- Example-4-2021-02-02-Hancitor-infection.pcap
Example 1: Hancitor with Ficker Stealer and Cobalt Strike
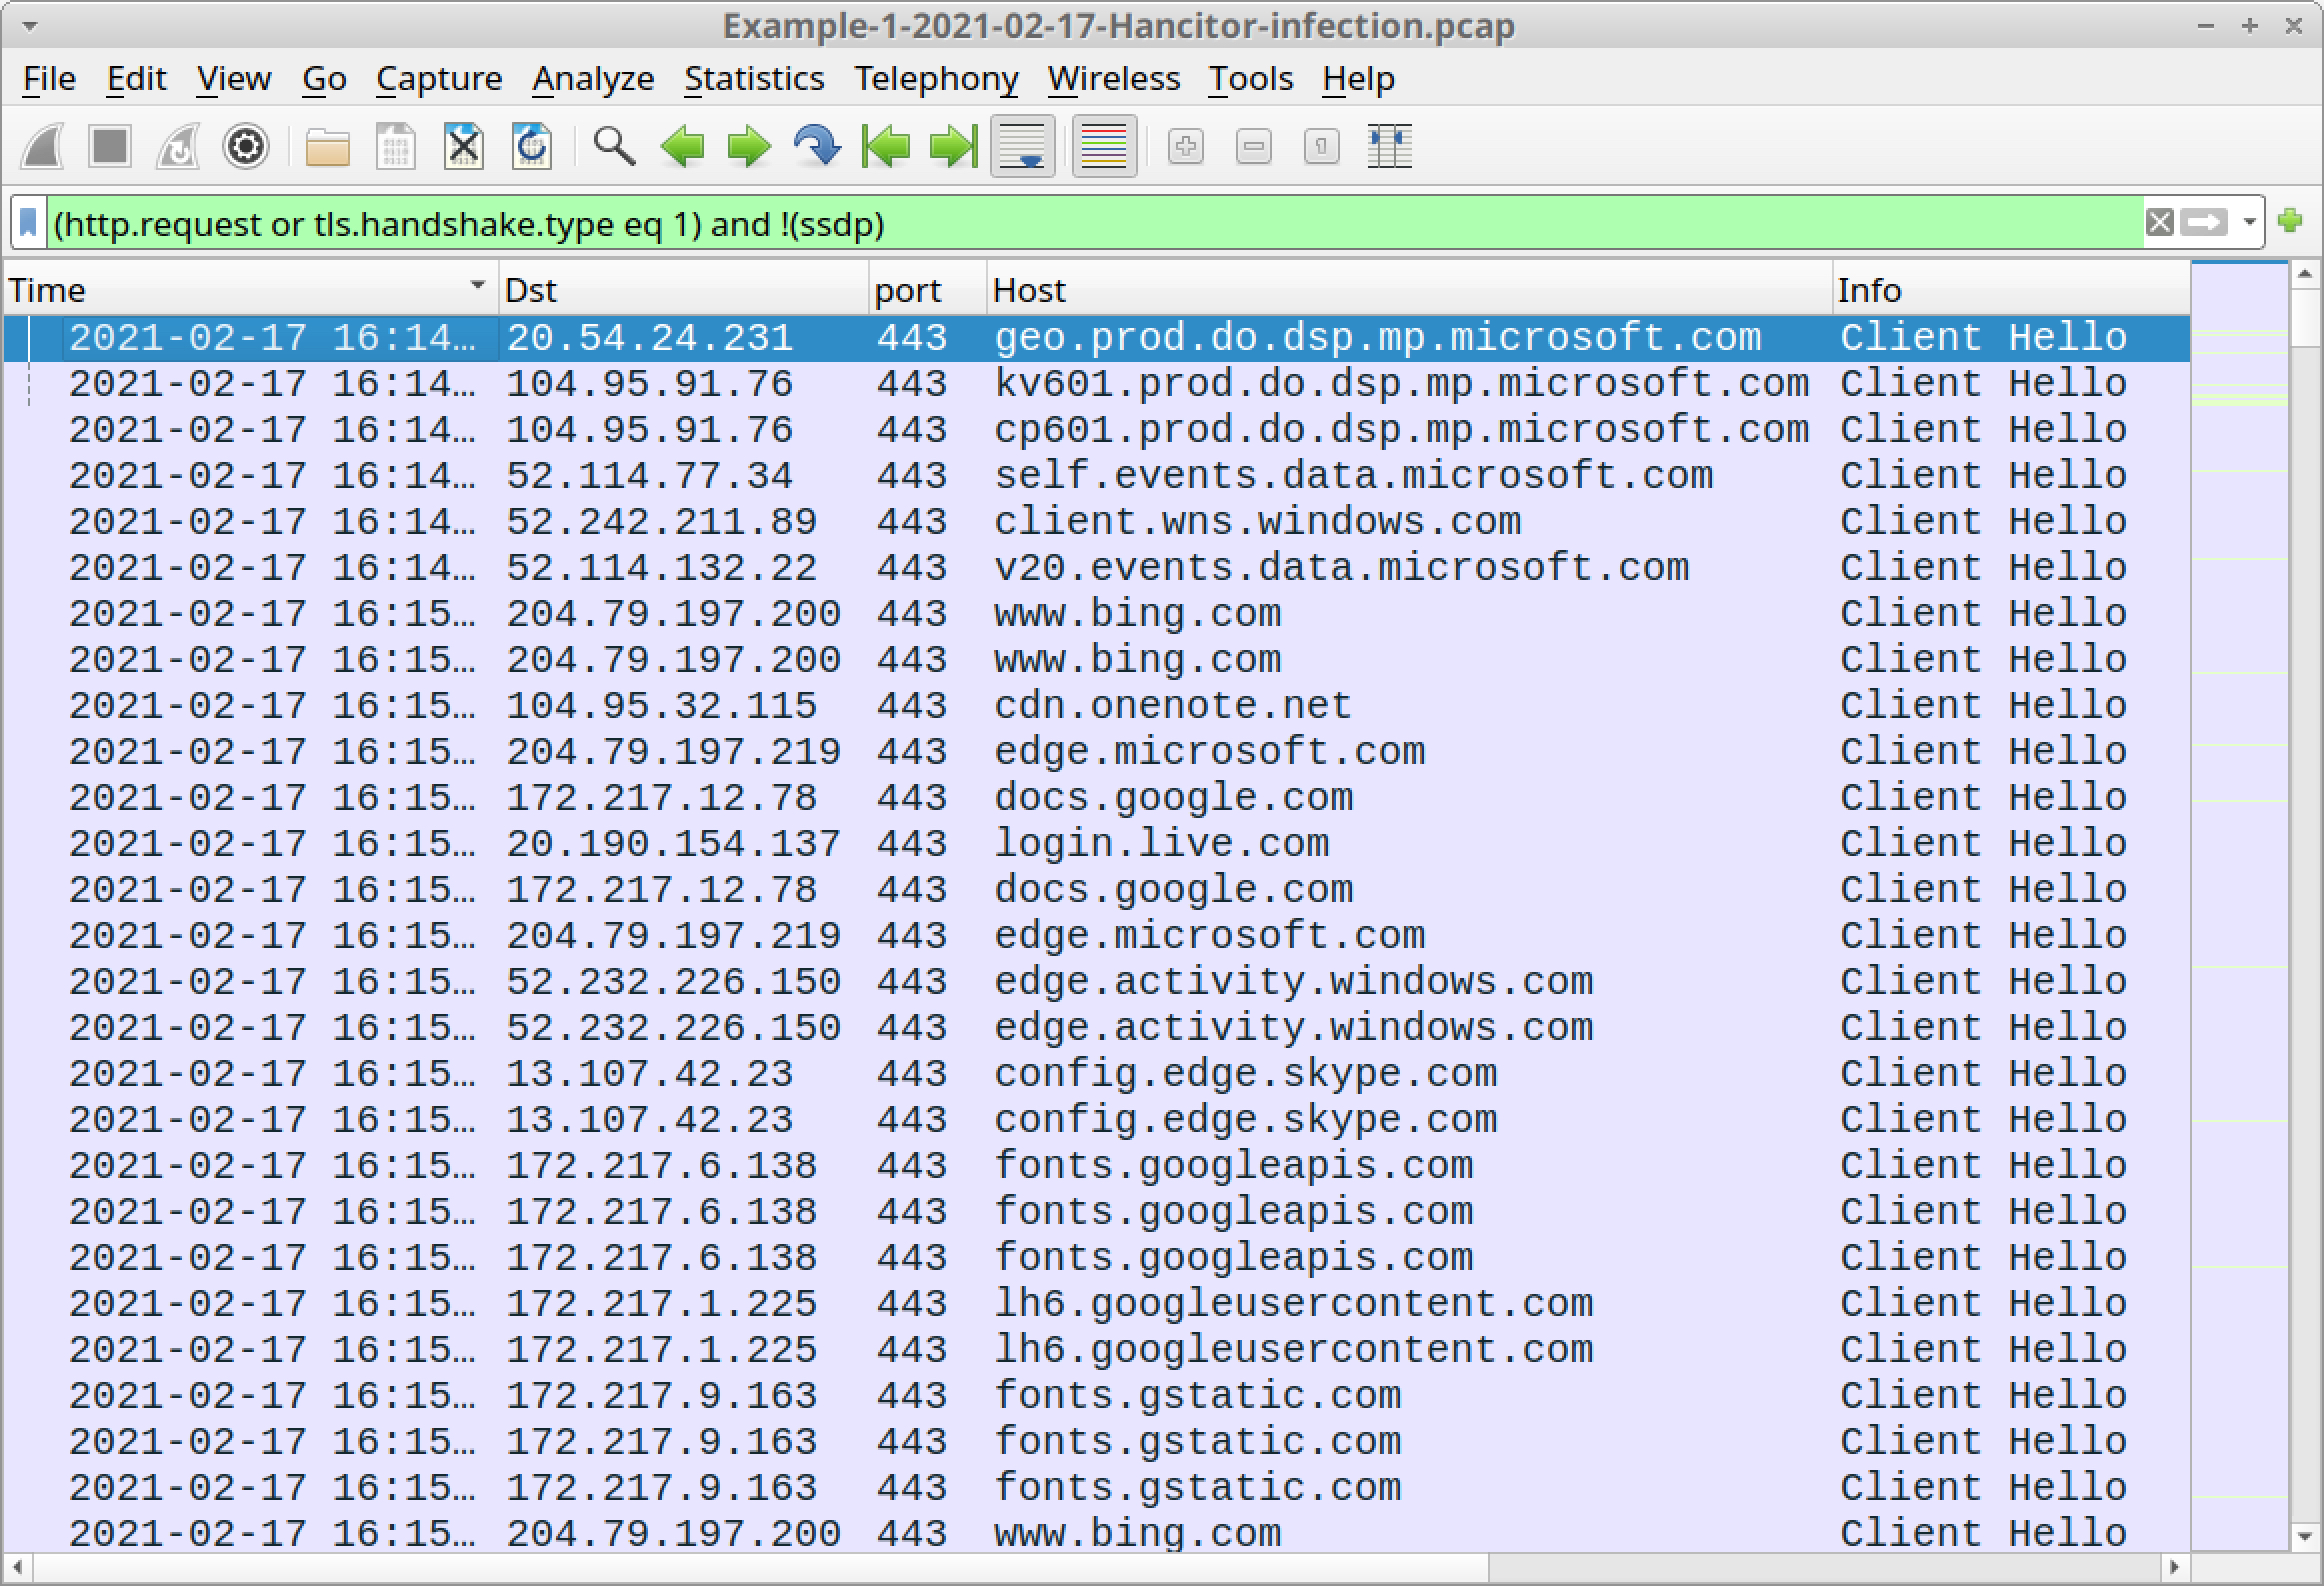
Open Example-1-2021-02-17-Hancitor-infection.pcap in Wireshark and use a basic web filter as described in our previous tutorial about Wireshark filters. The basic filter for Wireshark 3.x is:
(http.request or tls.handshake.type eq 1) and !(ssdp)
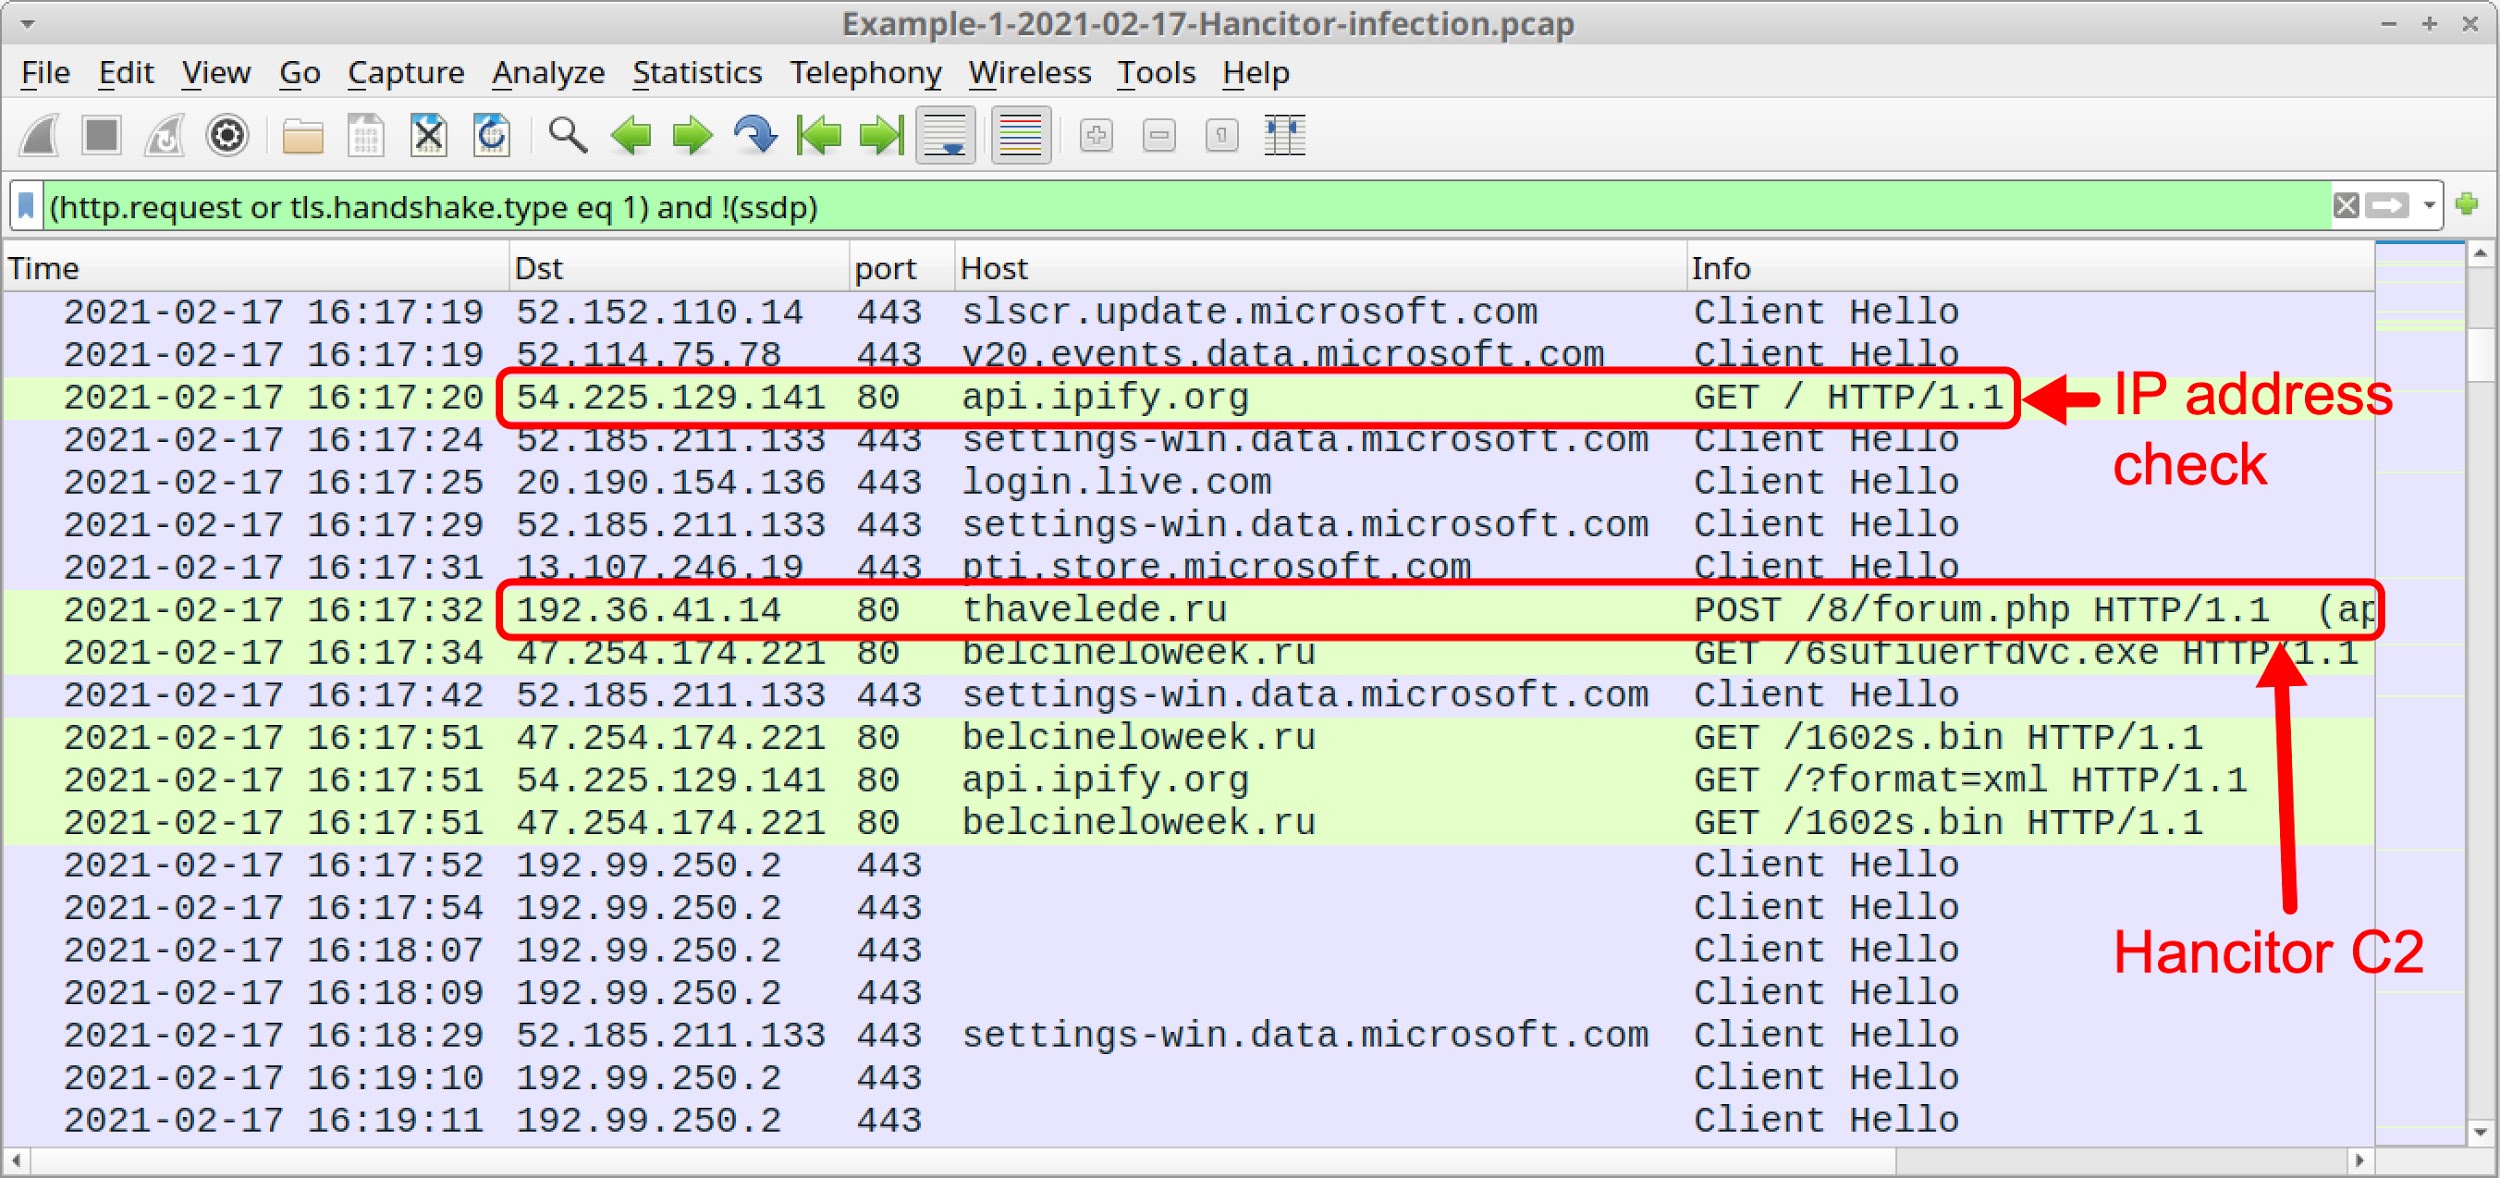
If you’ve set up Wireshark according to our initial tutorial about customizing Wireshark displays, your display should look similar to Figure 4.
The pcap comes from an AD environment with the following characteristics:
- LAN segment range: 10.2.17.0/24
- Domain: bean-genie.com
- Domain controller: 10.2.17.2 - Bean-Genie-DC
- LAN segment gateway: 10.2.17.1
- LAN segment broadcast address: 10.2.17.255
- IP address of the infected Windows host: 10.2.17.101
- Host name of the infected Windows host: DESKTOP-GBW8K4N
- User account name on the infected Windows host: frankie.muntz
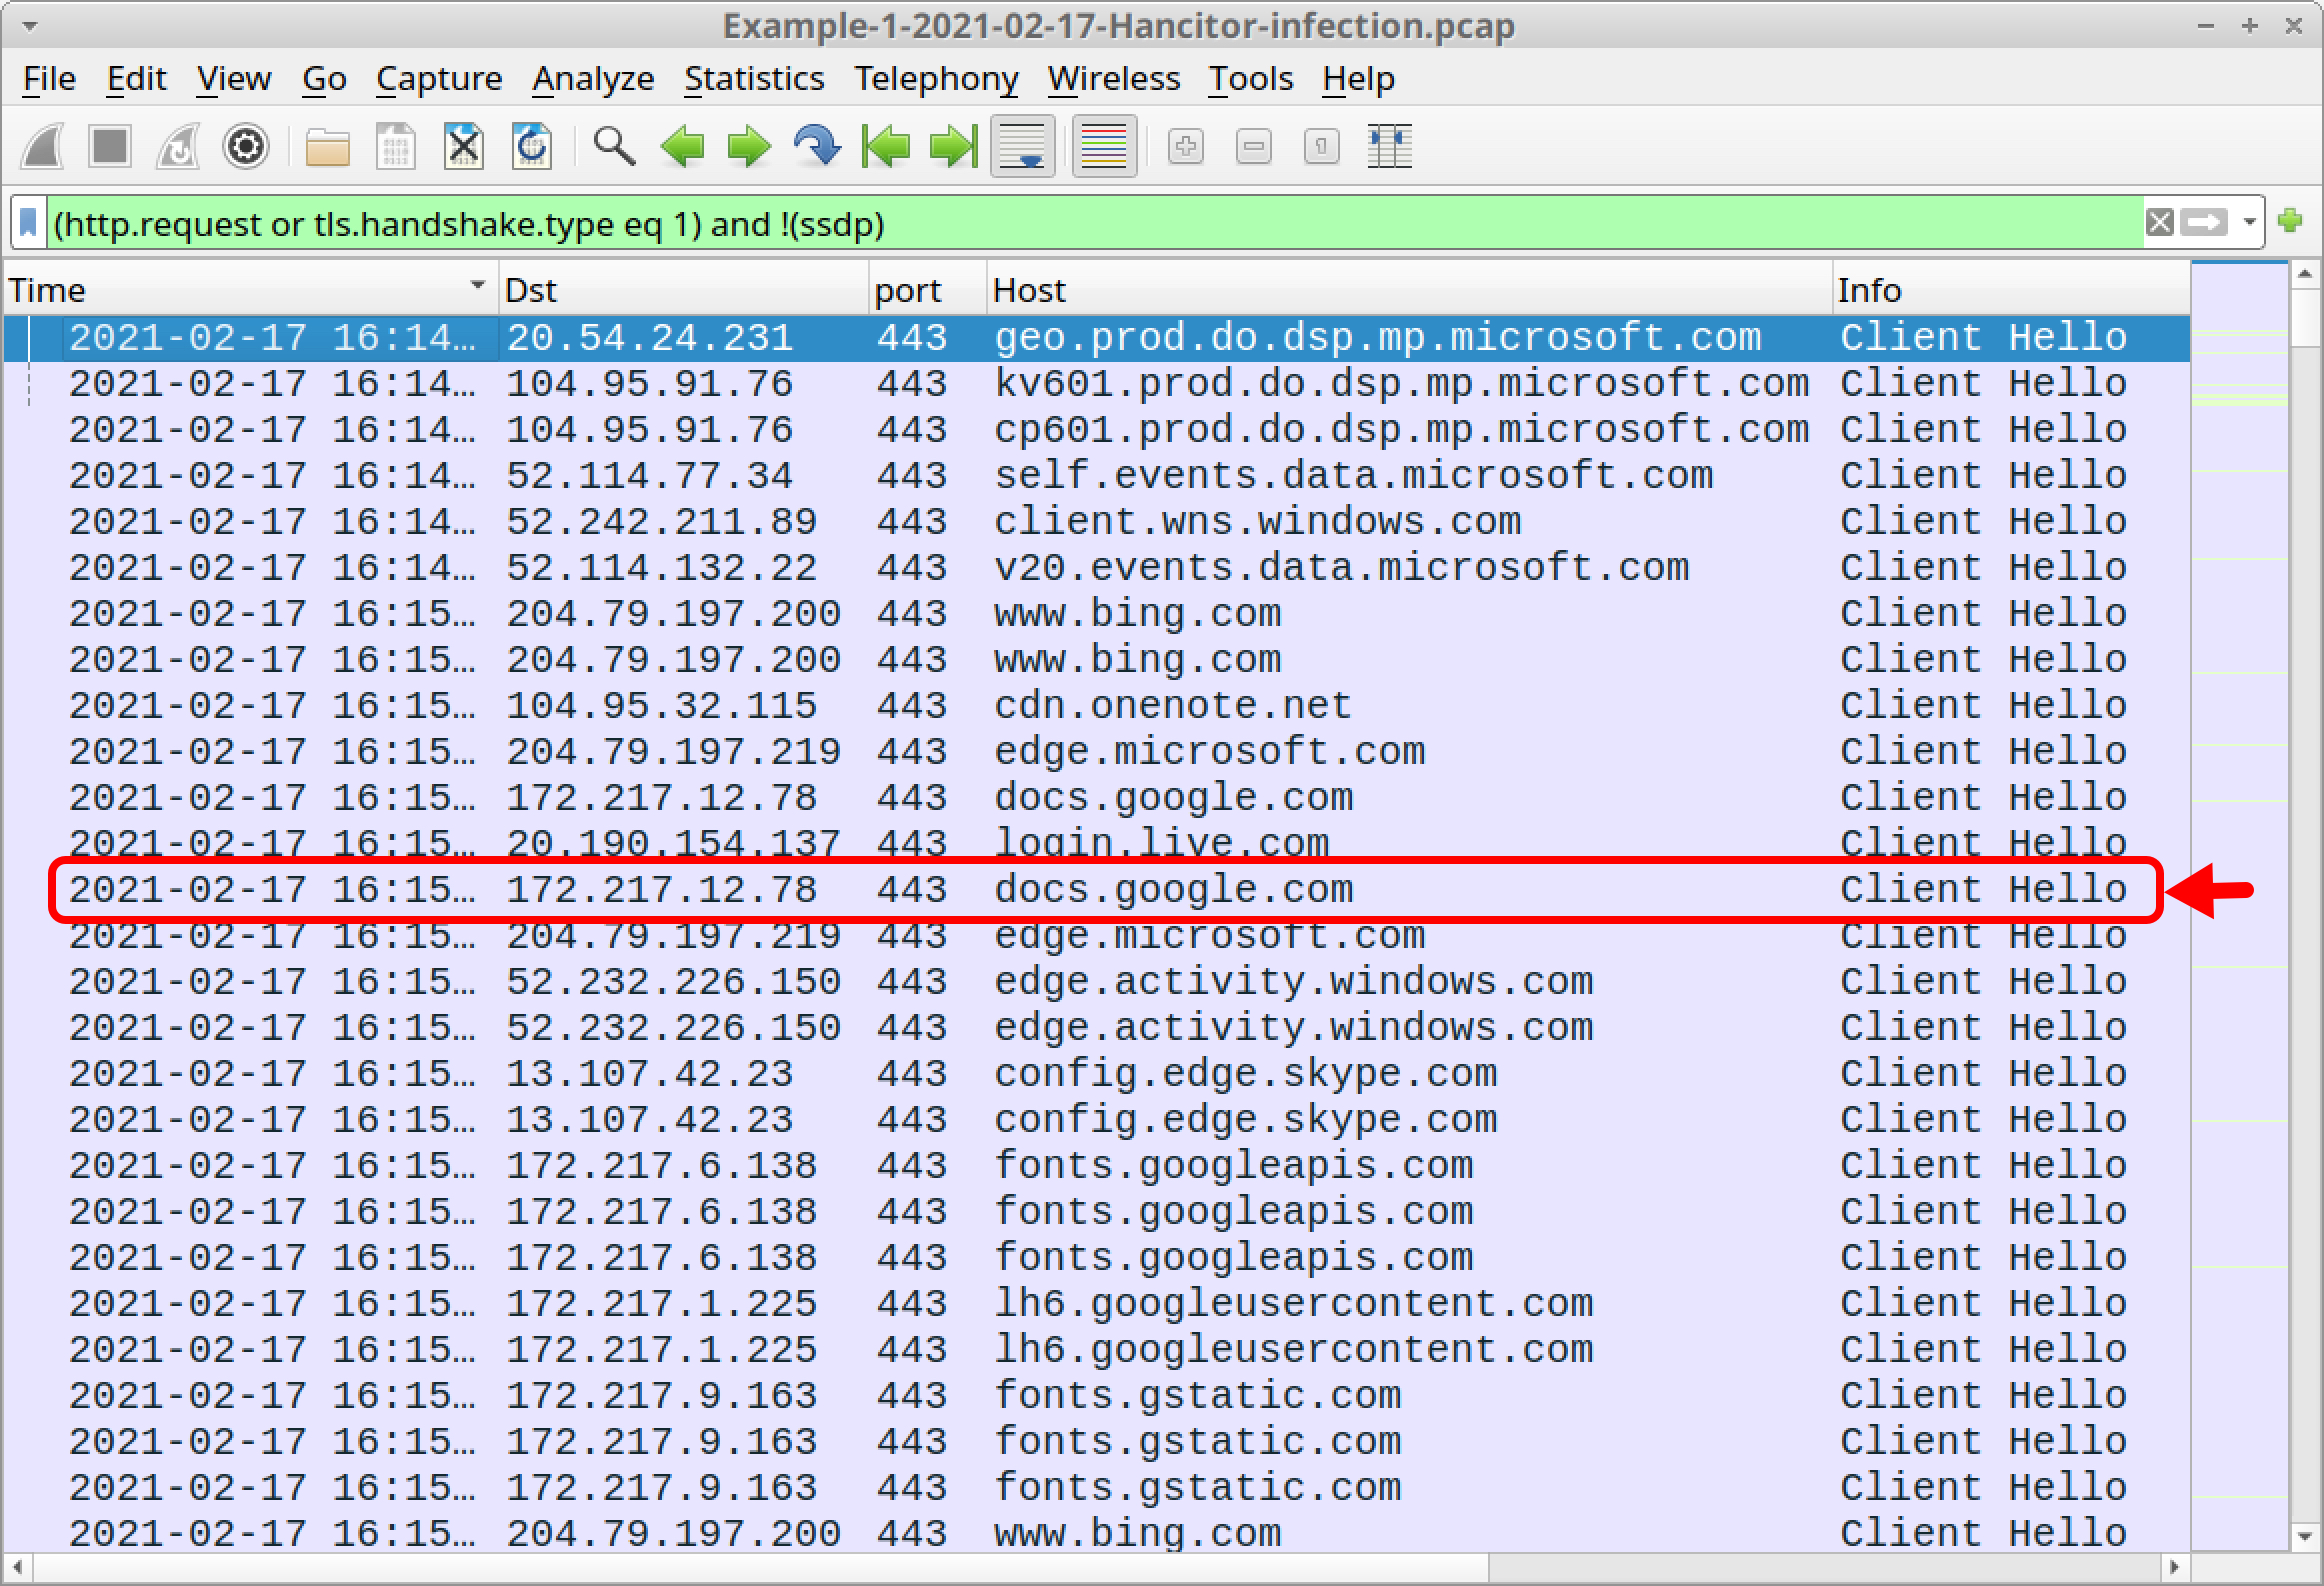
Emails pushing Hancitor use HTTPS links to docs.google.com. In our first pcap, the 13th frame listed in the column display uses this domain name. Below, Figure 5 highlights docs.google.com in our Wireshark column display.
Of note, docs.google.com is a legitimate domain, and it is not inherently malicious. However, Google Drive is frequently abused by the criminals behind Hancitor. Below, Figure 6 shows a web page from one of these URLs created by MAN1/Moskalvzapoe/TA511 for Hancitor.
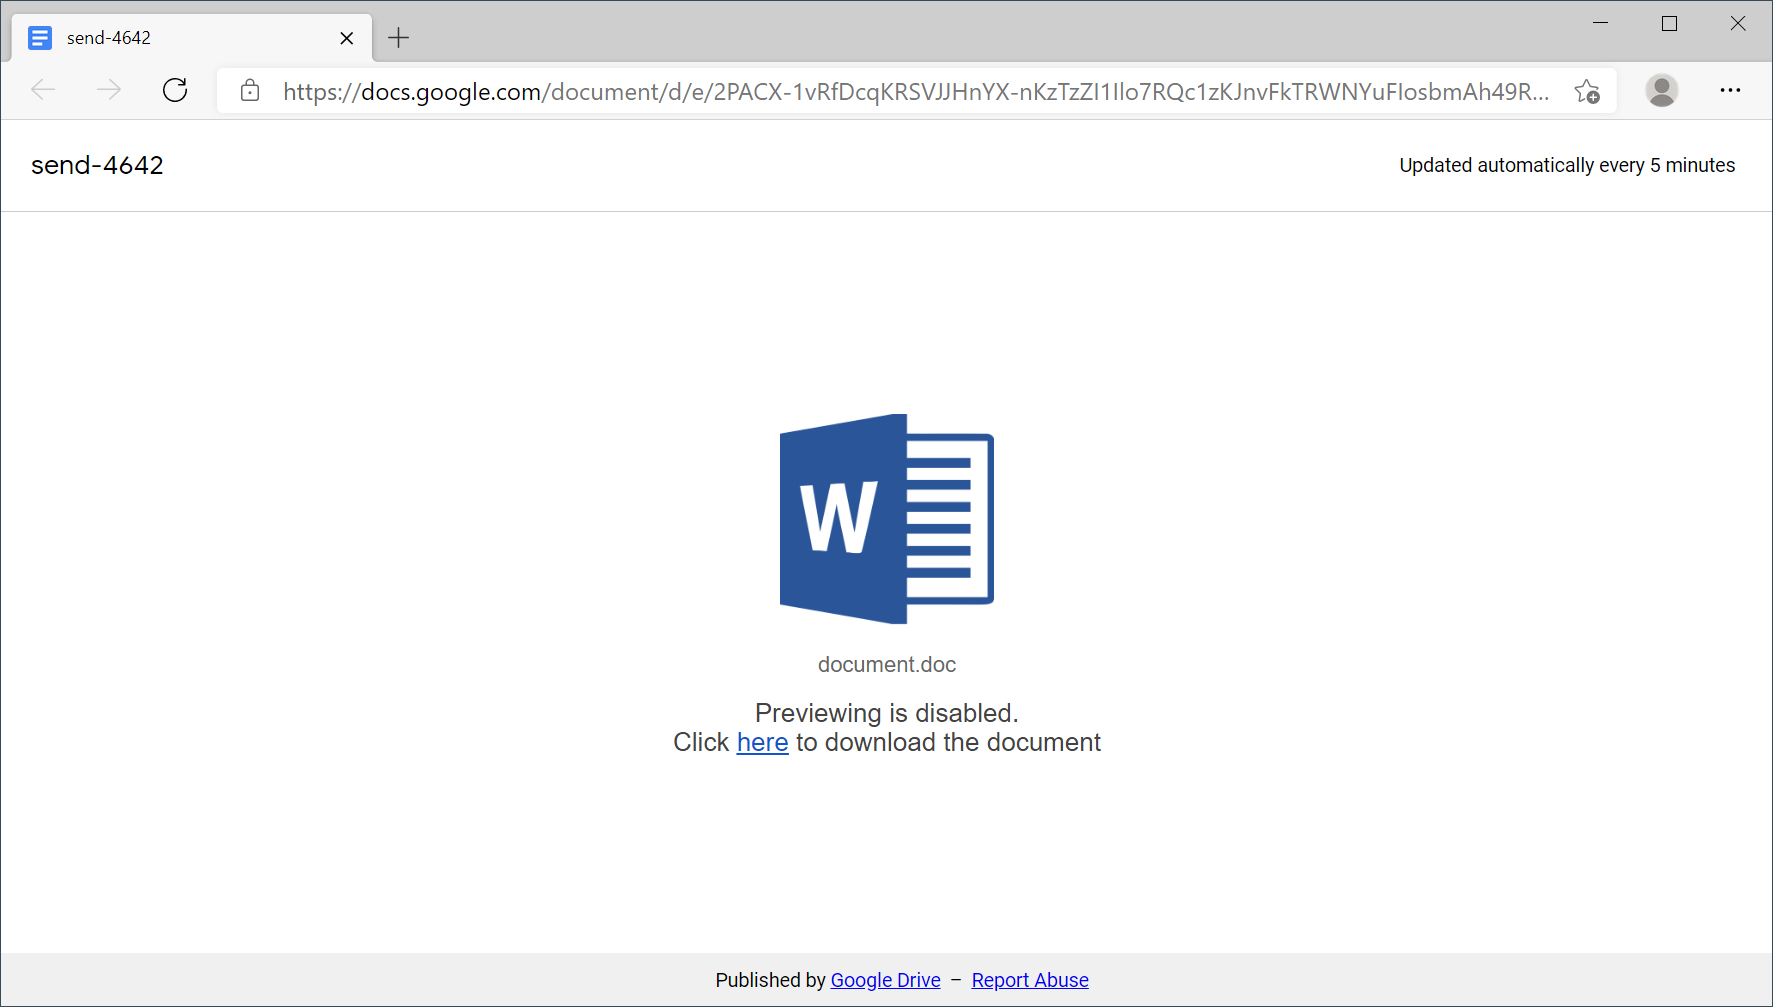
Above in Figure 6, the link in "Click here to download the document" leads to a page that provides the malicious Word document. URLs for these pages end with .php. In many cases, these URLs also use HTTPS. Fortunately, in this tutorial, all four examples have unencrypted HTTP as the URL for the Word document. That makes them easy to find in our pcaps.
Still using your basic web filter, scroll down until you see two HTTP GET requests to the same domain that end with .php. Below, Figure 7 shows these two HTTP GET requests in the Wireshark column display. They are both for:
somdeeppalace[.]com - GET /slickness.php
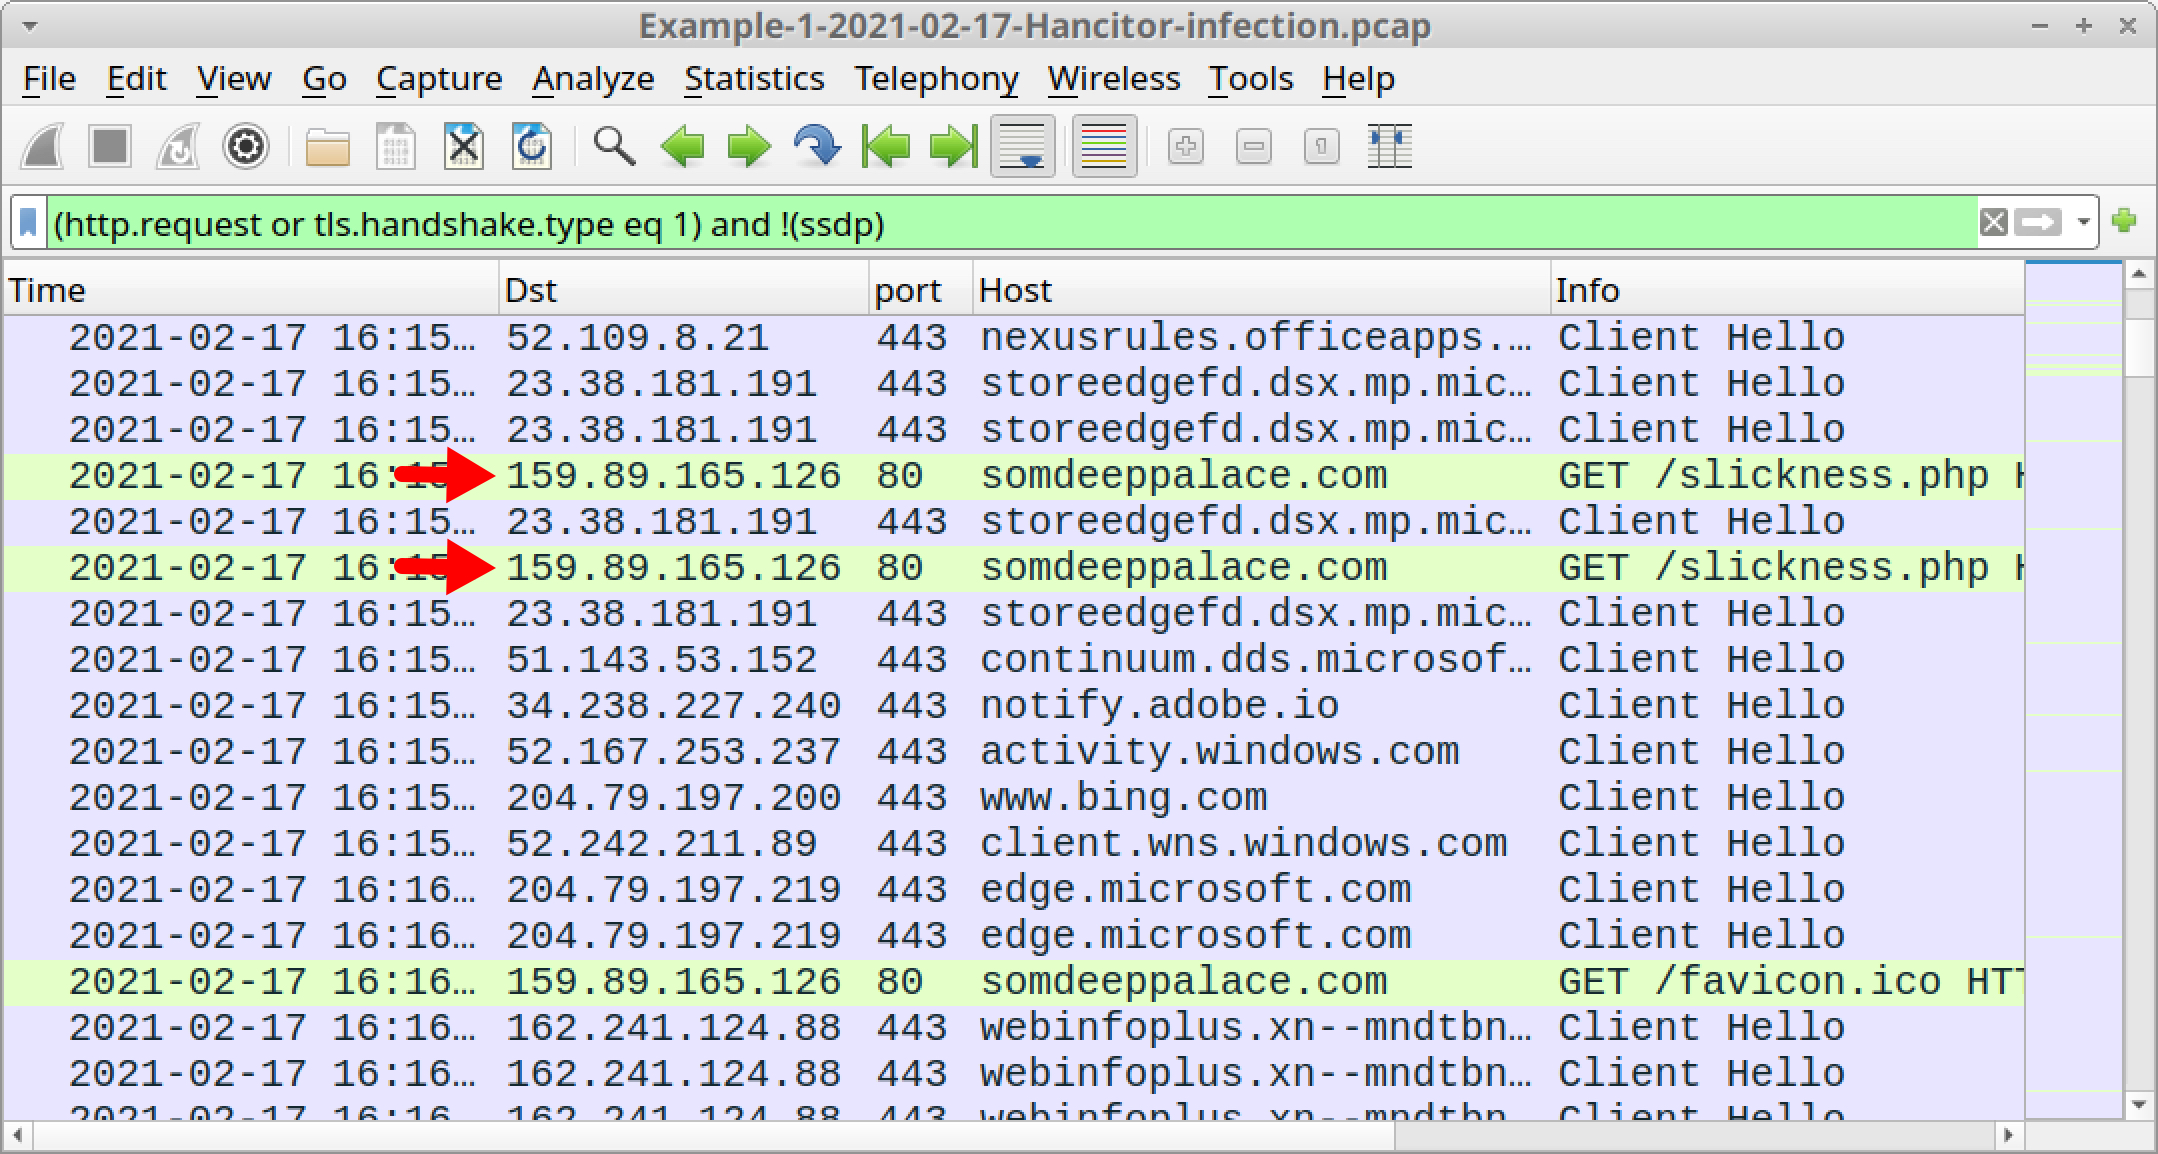
You could also use the following Wireshark filter to more quickly find these two URLs:
http.request.method eq GET and http.request.uri contains .php
Below, Figure 8 shows the results of this filter.
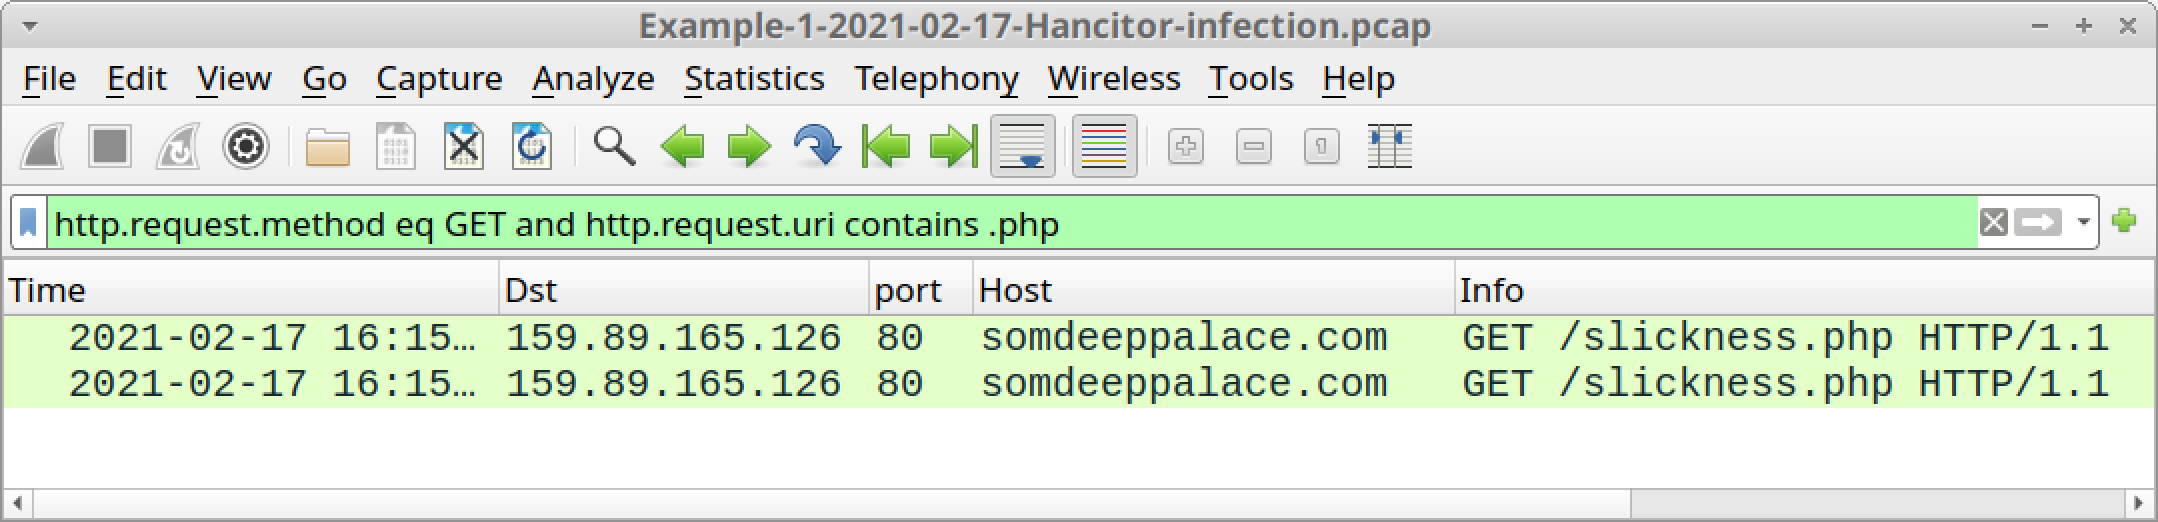
Right-click on either HTTP GET request for slickness.php in your column display and follow the HTTP stream, as shown below in Figure 9.
![The large black arrow indicates what selections to make to follow the HTTP stream for traffic to somdeeppalace[.]com, where malicious Word documents for Hancitor are being hosted.](https://unit42.paloaltonetworks.com/wp-content/uploads/2021/04/word-image-8.jpeg)
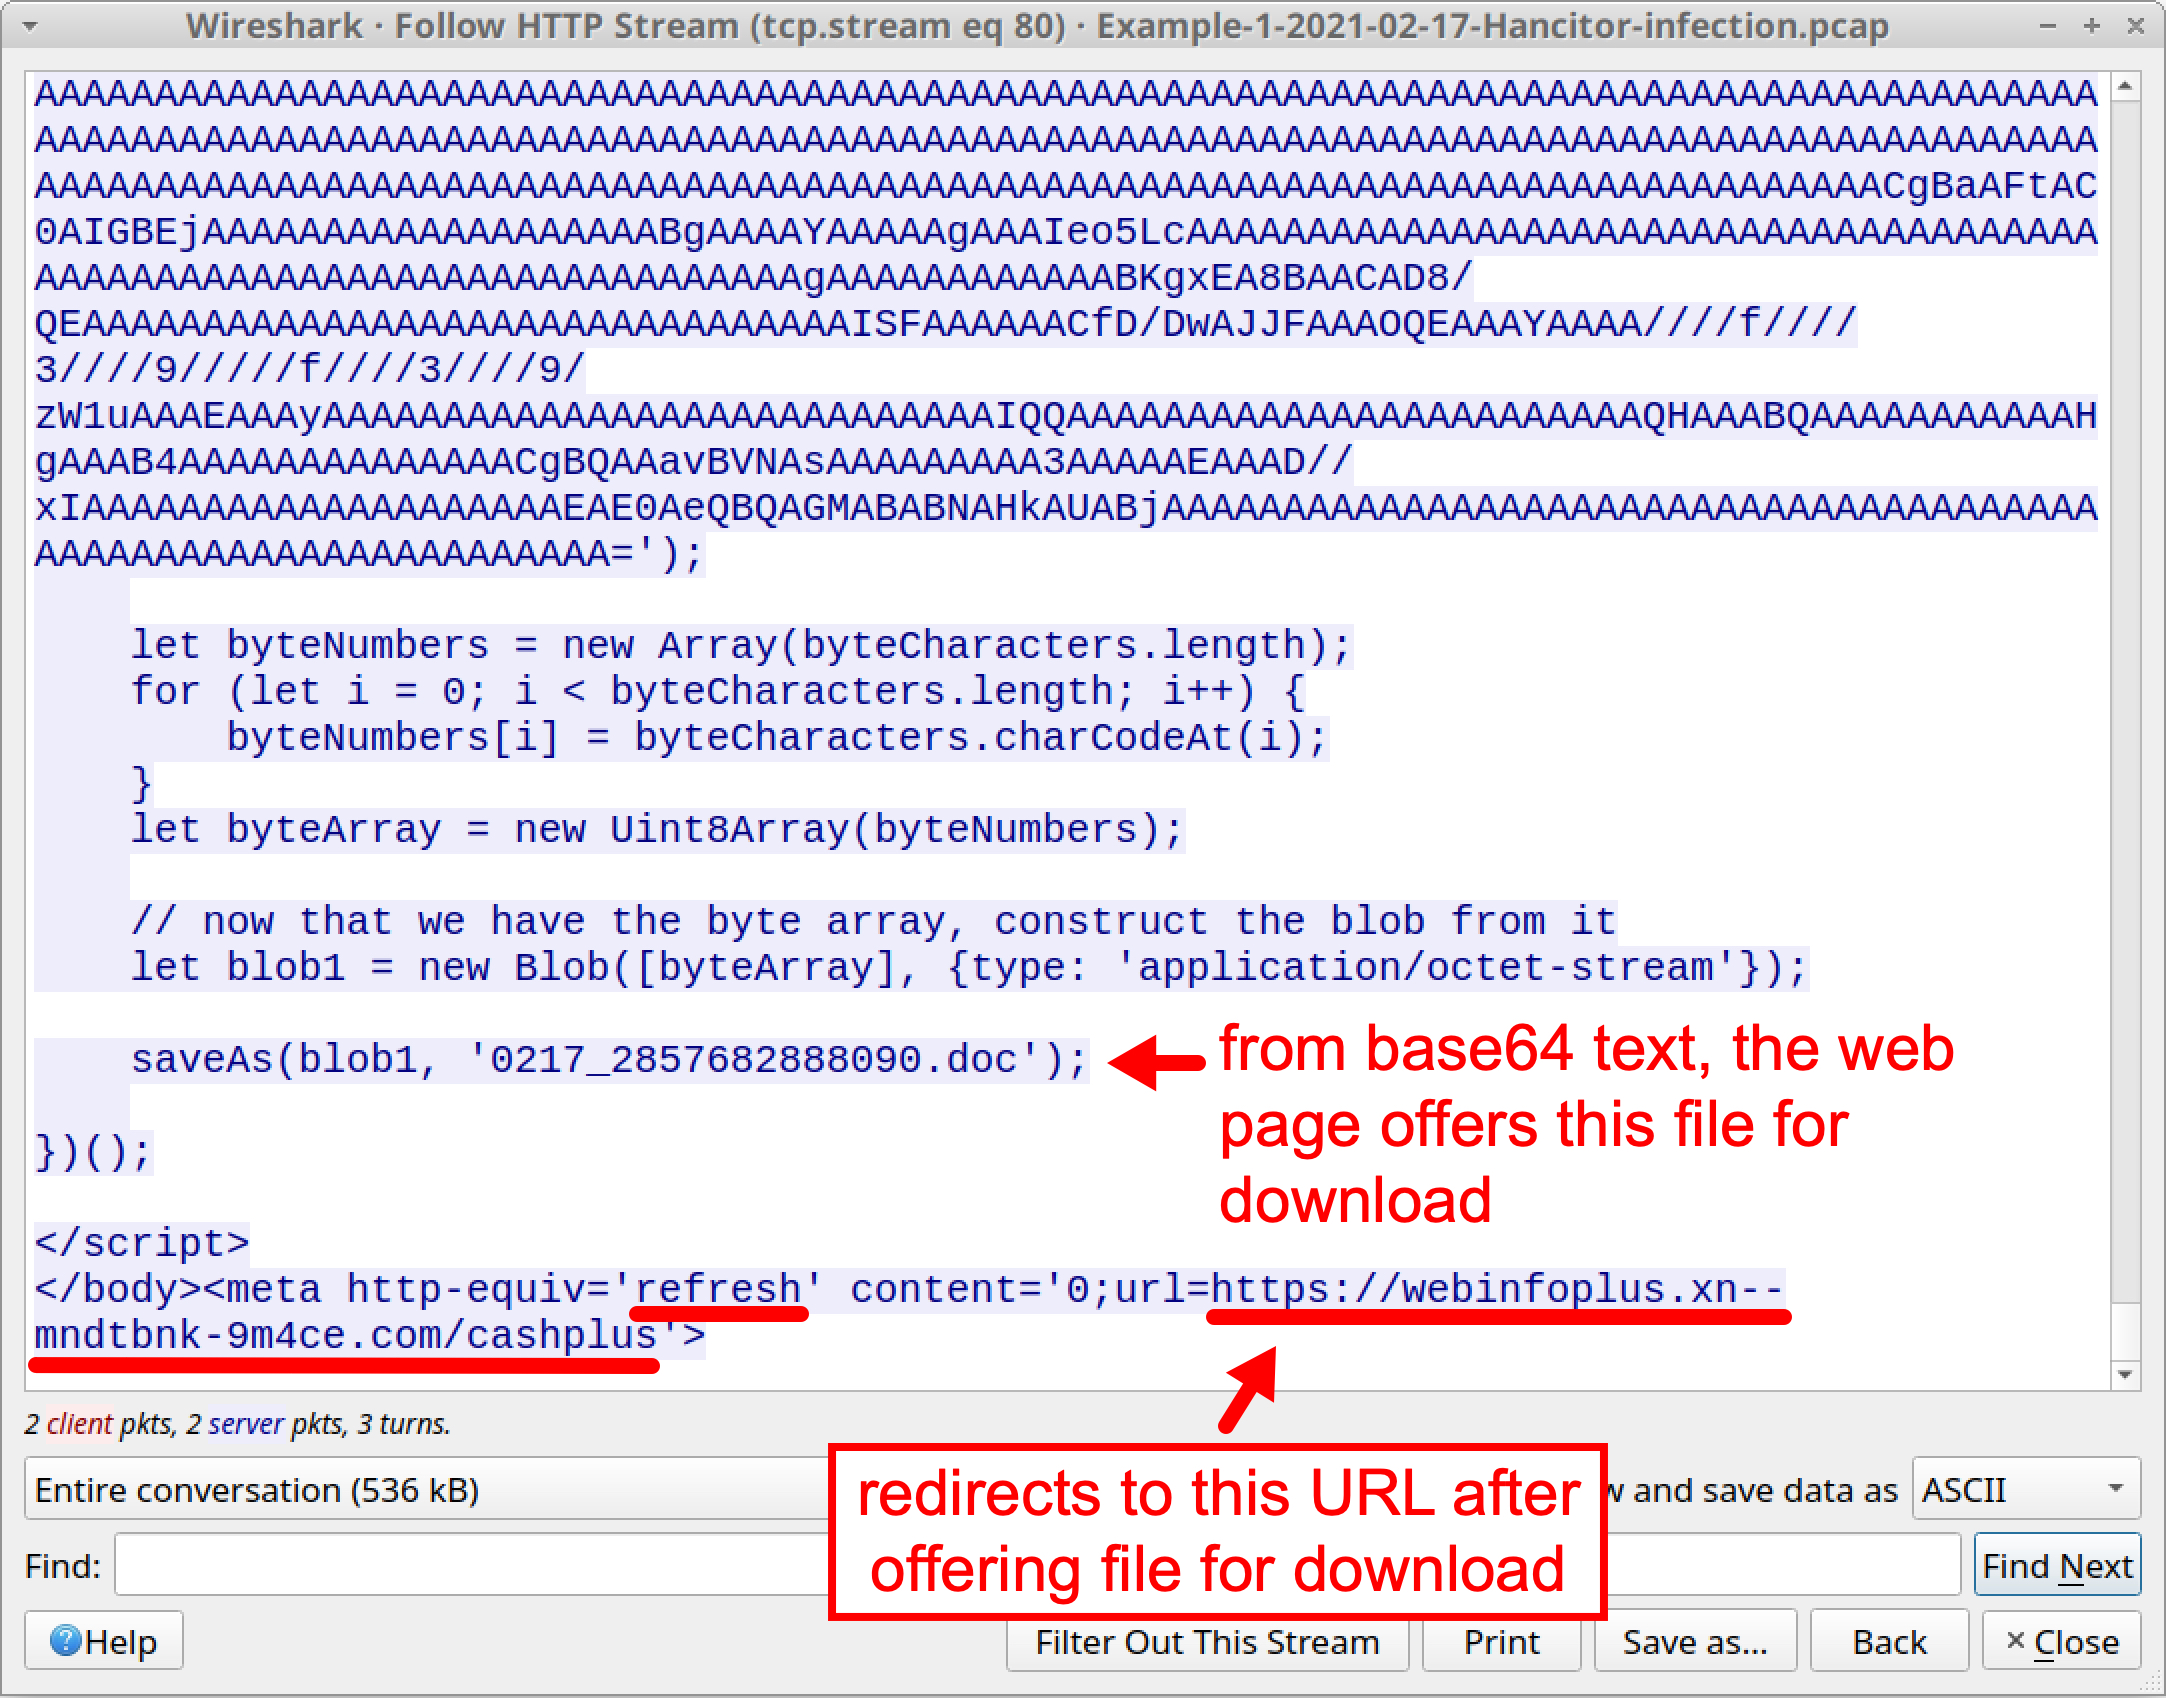
Scroll down to the end of the HTTP stream. You should find a script that offers to save a file named 0217_2857682888090.doc created from the base64 text. This is the malicious Word document. After the closing </body> tag, additional script refreshes the web page to a different URL. See Figure 11 below for details.
We can obtain a copy of this malicious Word document by exporting the web page from the pcap and opening it in a web browser. Since this is malware, we recommend you do this in a non-Windows environment or a controlled lab setting.
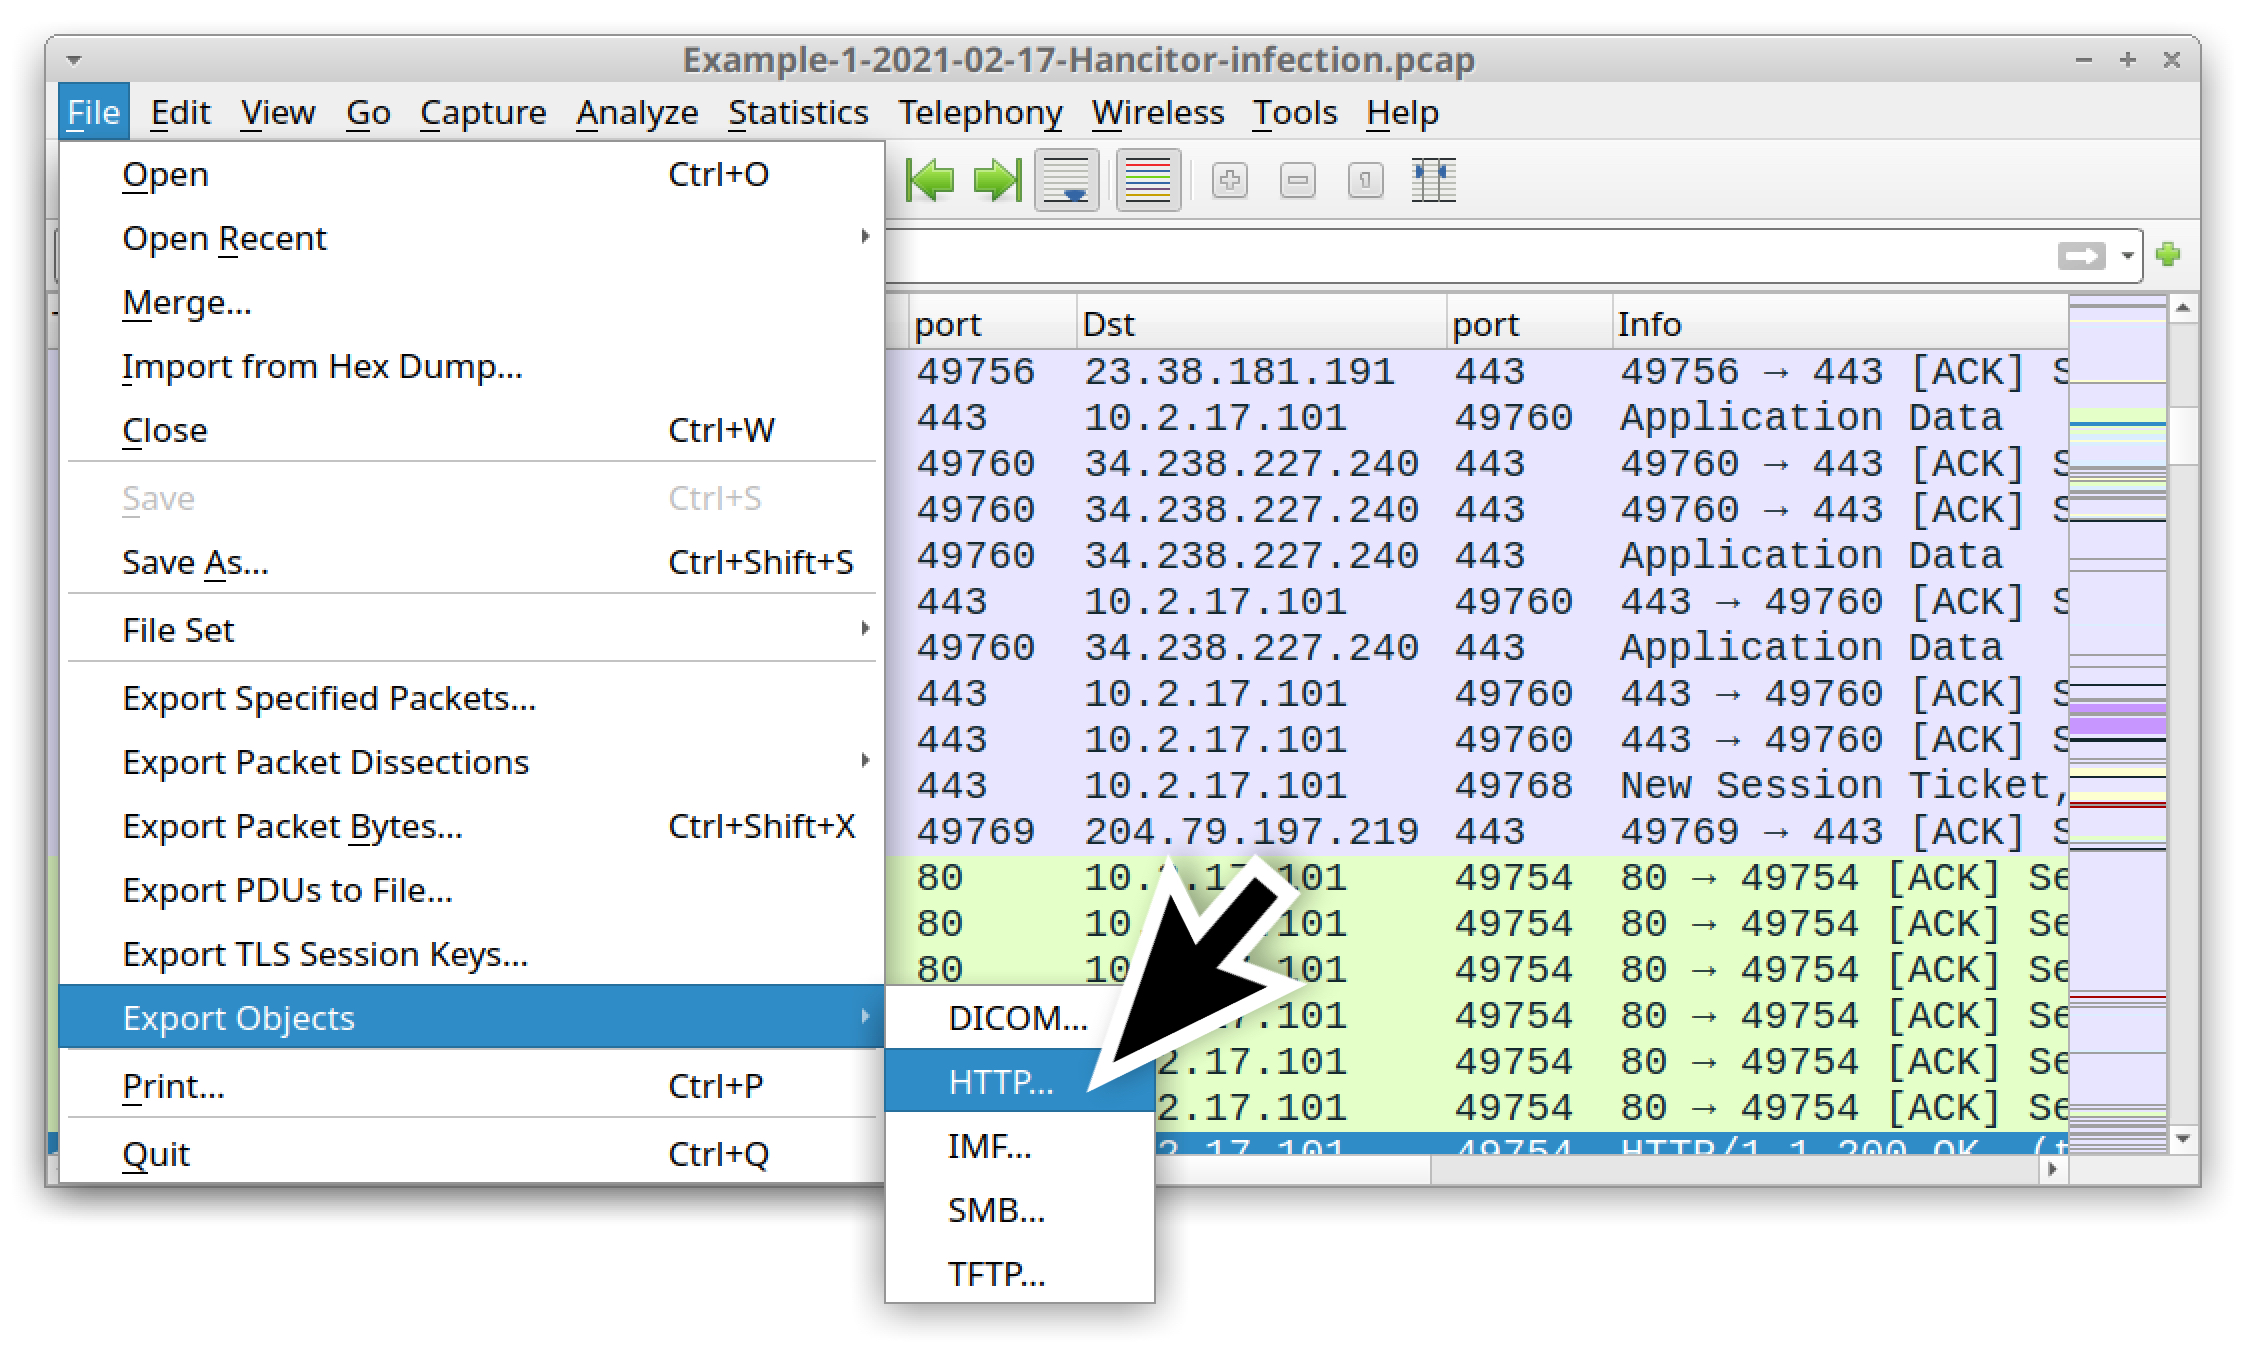
First, export the web page by using the following menu path, as shown below in Figure 12:
File --> Export Objects --> HTTP
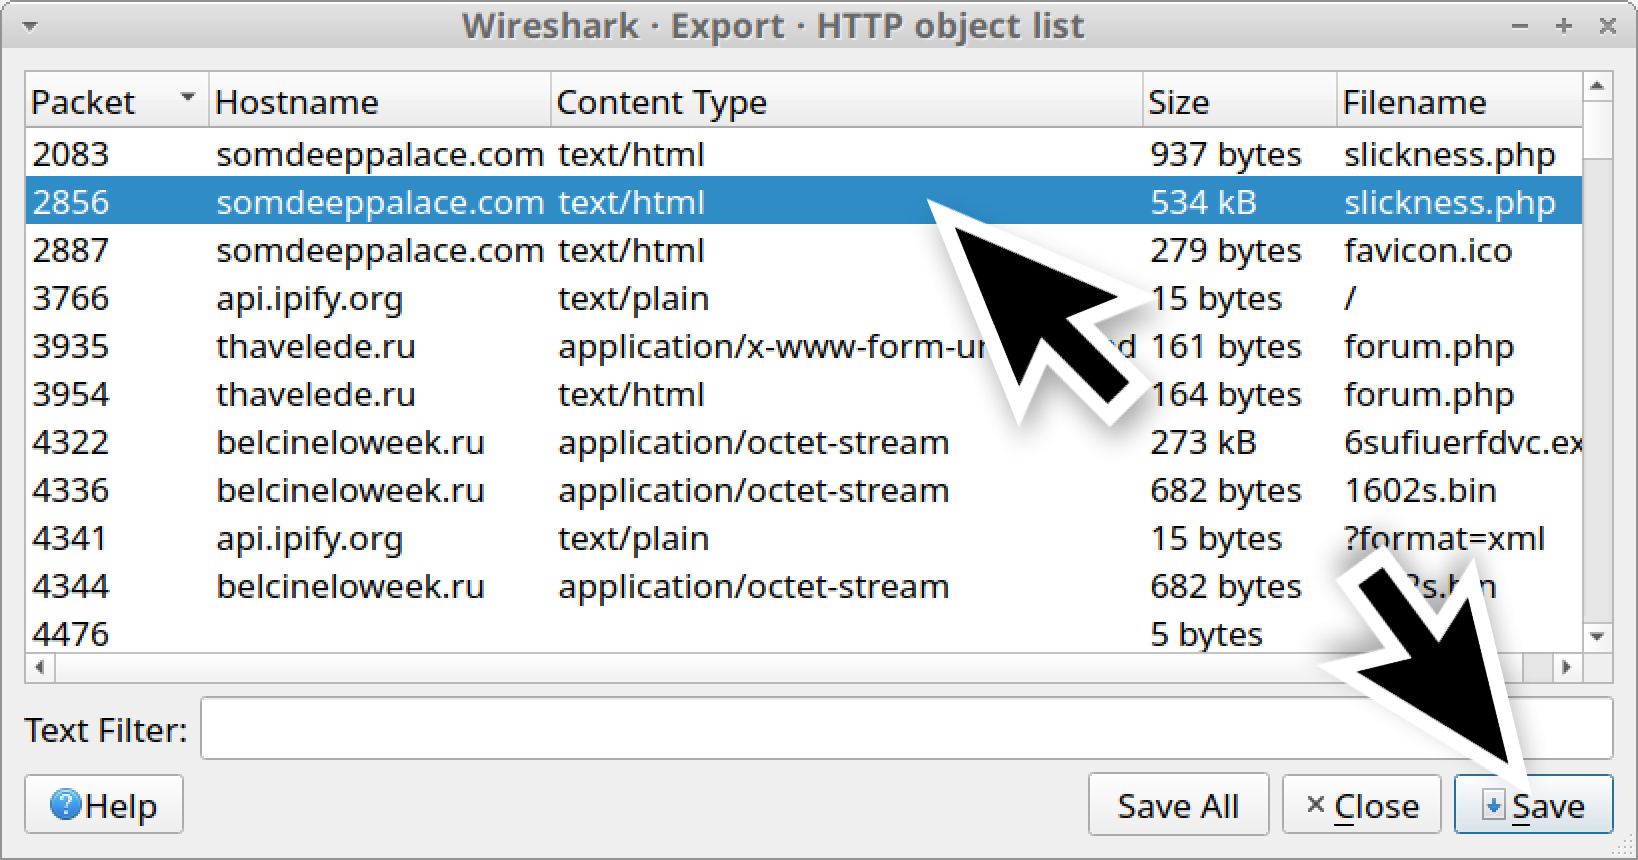
Find the second entry for slickness.php from somdeeppalace[.]com that is 534 kB, as shown below in Figure 13. Then save it as a web page using a file name ending with .htm or .html.
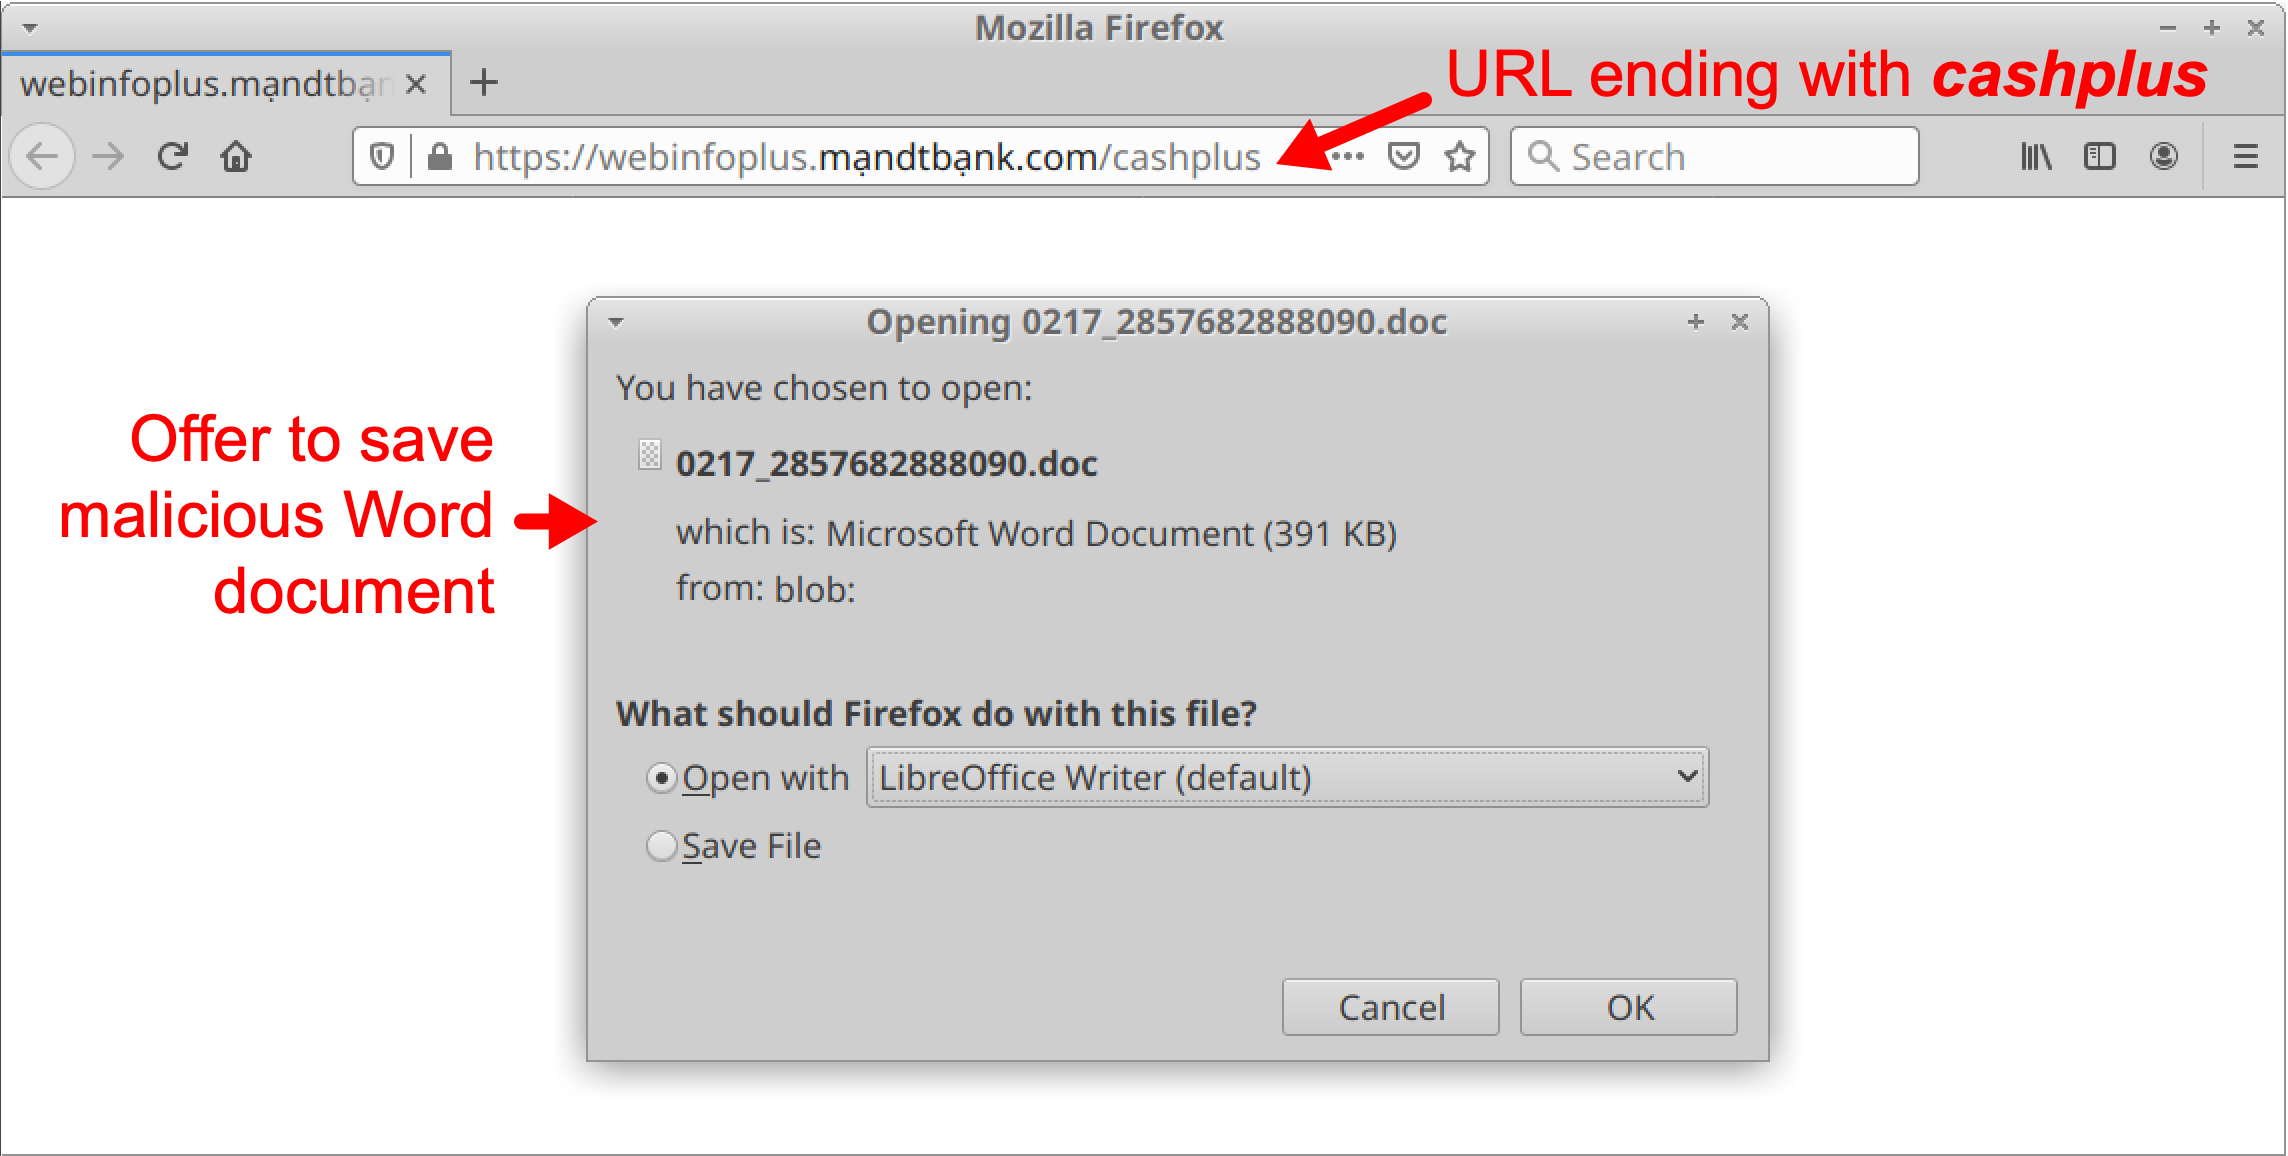
Open your saved HTML page in a web browser. You should see a pop-up menu including the option to save the malicious Word document. You should also see that your web browser has been refreshed to a URL ending with the string cashplus. See Figure 14 below for details.
This malicious Word document caused Hancitor C2 traffic that starts less than two minutes later in the pcap.
What does Hancitor C2 traffic look like?
Hancitor first causes an IP address check to api.ipify.org by the infected Windows host. Then it causes the C2 traffic. Hancitor C2 traffic consists of HTTP POST URLs that end with /8/forum.php.
Of note, traffic to api.ipify.org is an indicator, but it’s not inherently malicious by itself.
Using your basic web filter, scroll down to find an IP address check to api.ipify.org followed by the first HTTP POST request for Hancitor C2 traffic to thavelede[.]ru. Below, Figure 15 shows where you can find these two items.
Since November 2020, URLs for Hancitor C2 traffic have always ended with /8/forum.php. The easiest way to check for Hancitor-specific traffic in Wireshark is using the following filter:
http.request.uri contains "/8/forum.php" or http.host contains api.ipify.org
The above Wireshark filter should show you Hancitor’s IP address check followed by HTTP POST requests for Hancitor C2 traffic, as shown below in Figure 16.
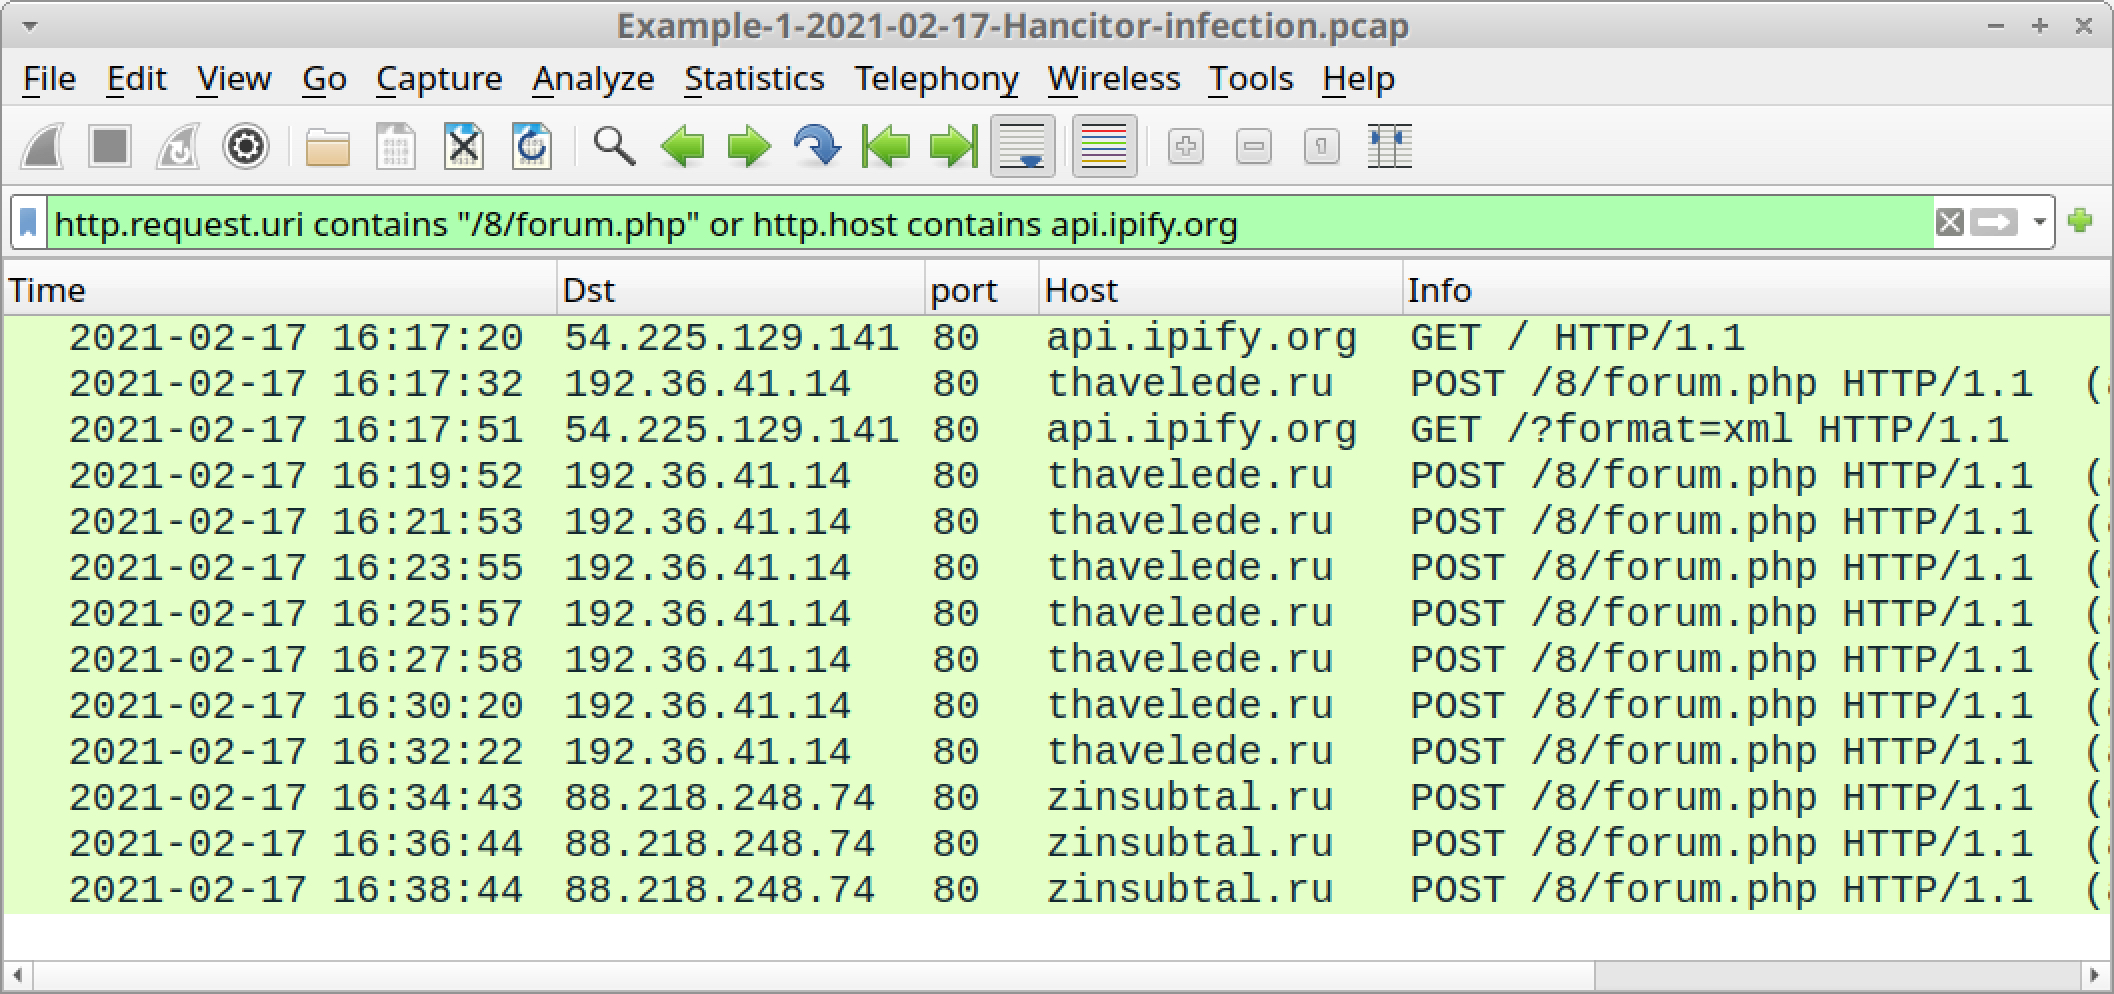
- api.ipify.org - GET /
- thavelde[.]ru - POST /8/forum.php
- zinsubtal[.]ru - POST /8/forum.php
The results also include the following HTTP GET request generated by Ficker Stealer malware:
- api.ipify.org - GET /?format=xml
We will cover Ficker Stealer traffic later. First, let us examine how Hancitor sends its followup malware.
Hancitor uses a specific domain to send Ficker Stealer and Cobalt Strike as followup malware. This domain changes each day Hancitor is active, but you should see three HTTP GET requests to the same domain for followup malware. One of the URLs ends with .exe, which is for Ficker Stealer. Two of the URLs end with .bin, which are for Cobalt Strike.
Use the following Wireshark filter to find URLs for Ficker Stealer and Cobalt Strike:
http.request.uri contains .exe or http.request.uri contains .bin
The results are shown below in Figure 17.
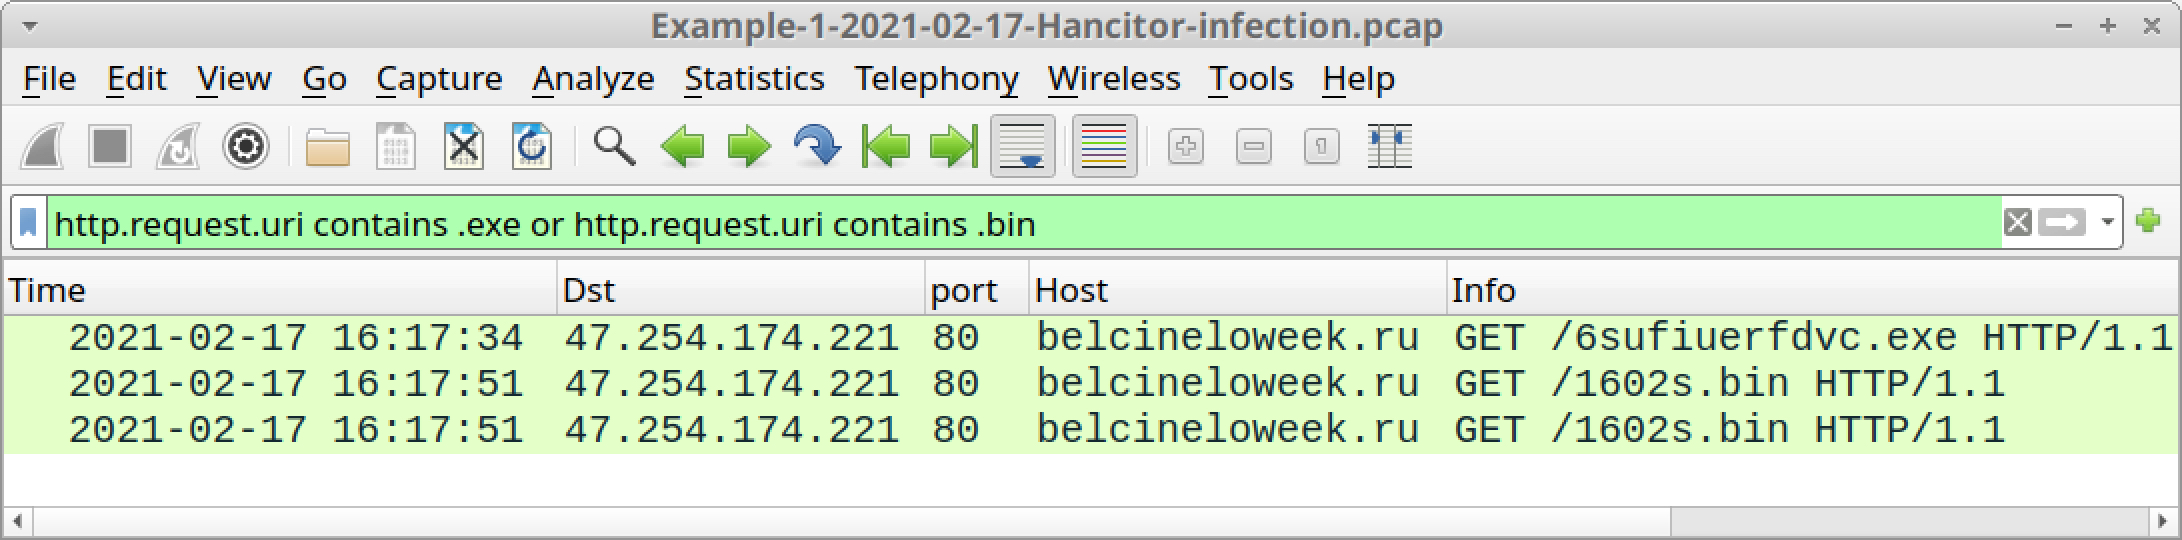
As shown above in Figure 17, filtering for followup malware from Hancitor should reveal the following traffic in our first pcap:
- belcineloweek[.]ru - GET /6sufiuerfdvc.exe
- belcineloweek[.]ru - GET /1602s.bin
- belcineloweek[.]ru - GET /1602s.bin
The first HTTP GET request returned an EXE file for Ficker Stealer. The next two HTTP GET requests returned encoded data used to infect the victim with Cobalt Strike.
What does Ficker Stealer infection traffic look like?
Ficker Stealer is the same EXE file for several weeks at a time. Since 2021-01-20 until as recently as 2021-03-04, the SHA256 hash for Ficker Stealer has been:
94e60de577c84625da69f785ffe7e24c889bfa6923dc7b017c21e8a313e4e8e1
The above EXE for Ficker Stealer causes an IP address check to api.ipifiy.org/?format=xml, which is not inherently malicious on its own. Ficker Stealer then generates a DNS query for sweyblidian[.]com and sends non-HTTP traffic over TCP port 80 to that domain. This traffic consists of data stolen from the infected Windows host.
To find the IP address used for sweyblidian[.]com, search for the associated DNS query using the following Wireshark filter:
dns.qry.name contains sweyblidian
The answer to this query is the IPv4 address 185.100.65[.]29, as shown below in Figure 18.
![The red arrow indicates the IP address used for sweyblidian[.]com](https://unit42.paloaltonetworks.com/wp-content/uploads/2021/04/word-image-17.jpeg)
ip.addr eq 185.100.65.29 and tcp.flags eq 0x0002
The results should reveal three TCP SYN segments for two TCP streams (one of the TCP SYN segments is a retransmission), as shown below in Figure 19.
![The screenshot shows how the Wireshark column display should appear after filtering for TCP streams to the IP address used for sweyblidian[.]com.](https://unit42.paloaltonetworks.com/wp-content/uploads/2021/04/word-image-18.jpeg)
After exfiltrating its data, Ficker Stealer goes quiet and we don’t see anything more from it. At this point, if the infected computer is a standalone Windows host, we will only see Hancitor C2 traffic. But if the infected computer is part of an AD environment, we should also see Cobalt Strike.
Let’s look at the initial requests for Cobalt Strike by Hancitor using the following Wireshark filter:
http.request.uri contains .bin
This should return the following lines:
- belcineloweek[.]ru - GET /1602s.bin
- belcineloweek[.]ru - GET /1602s.bin
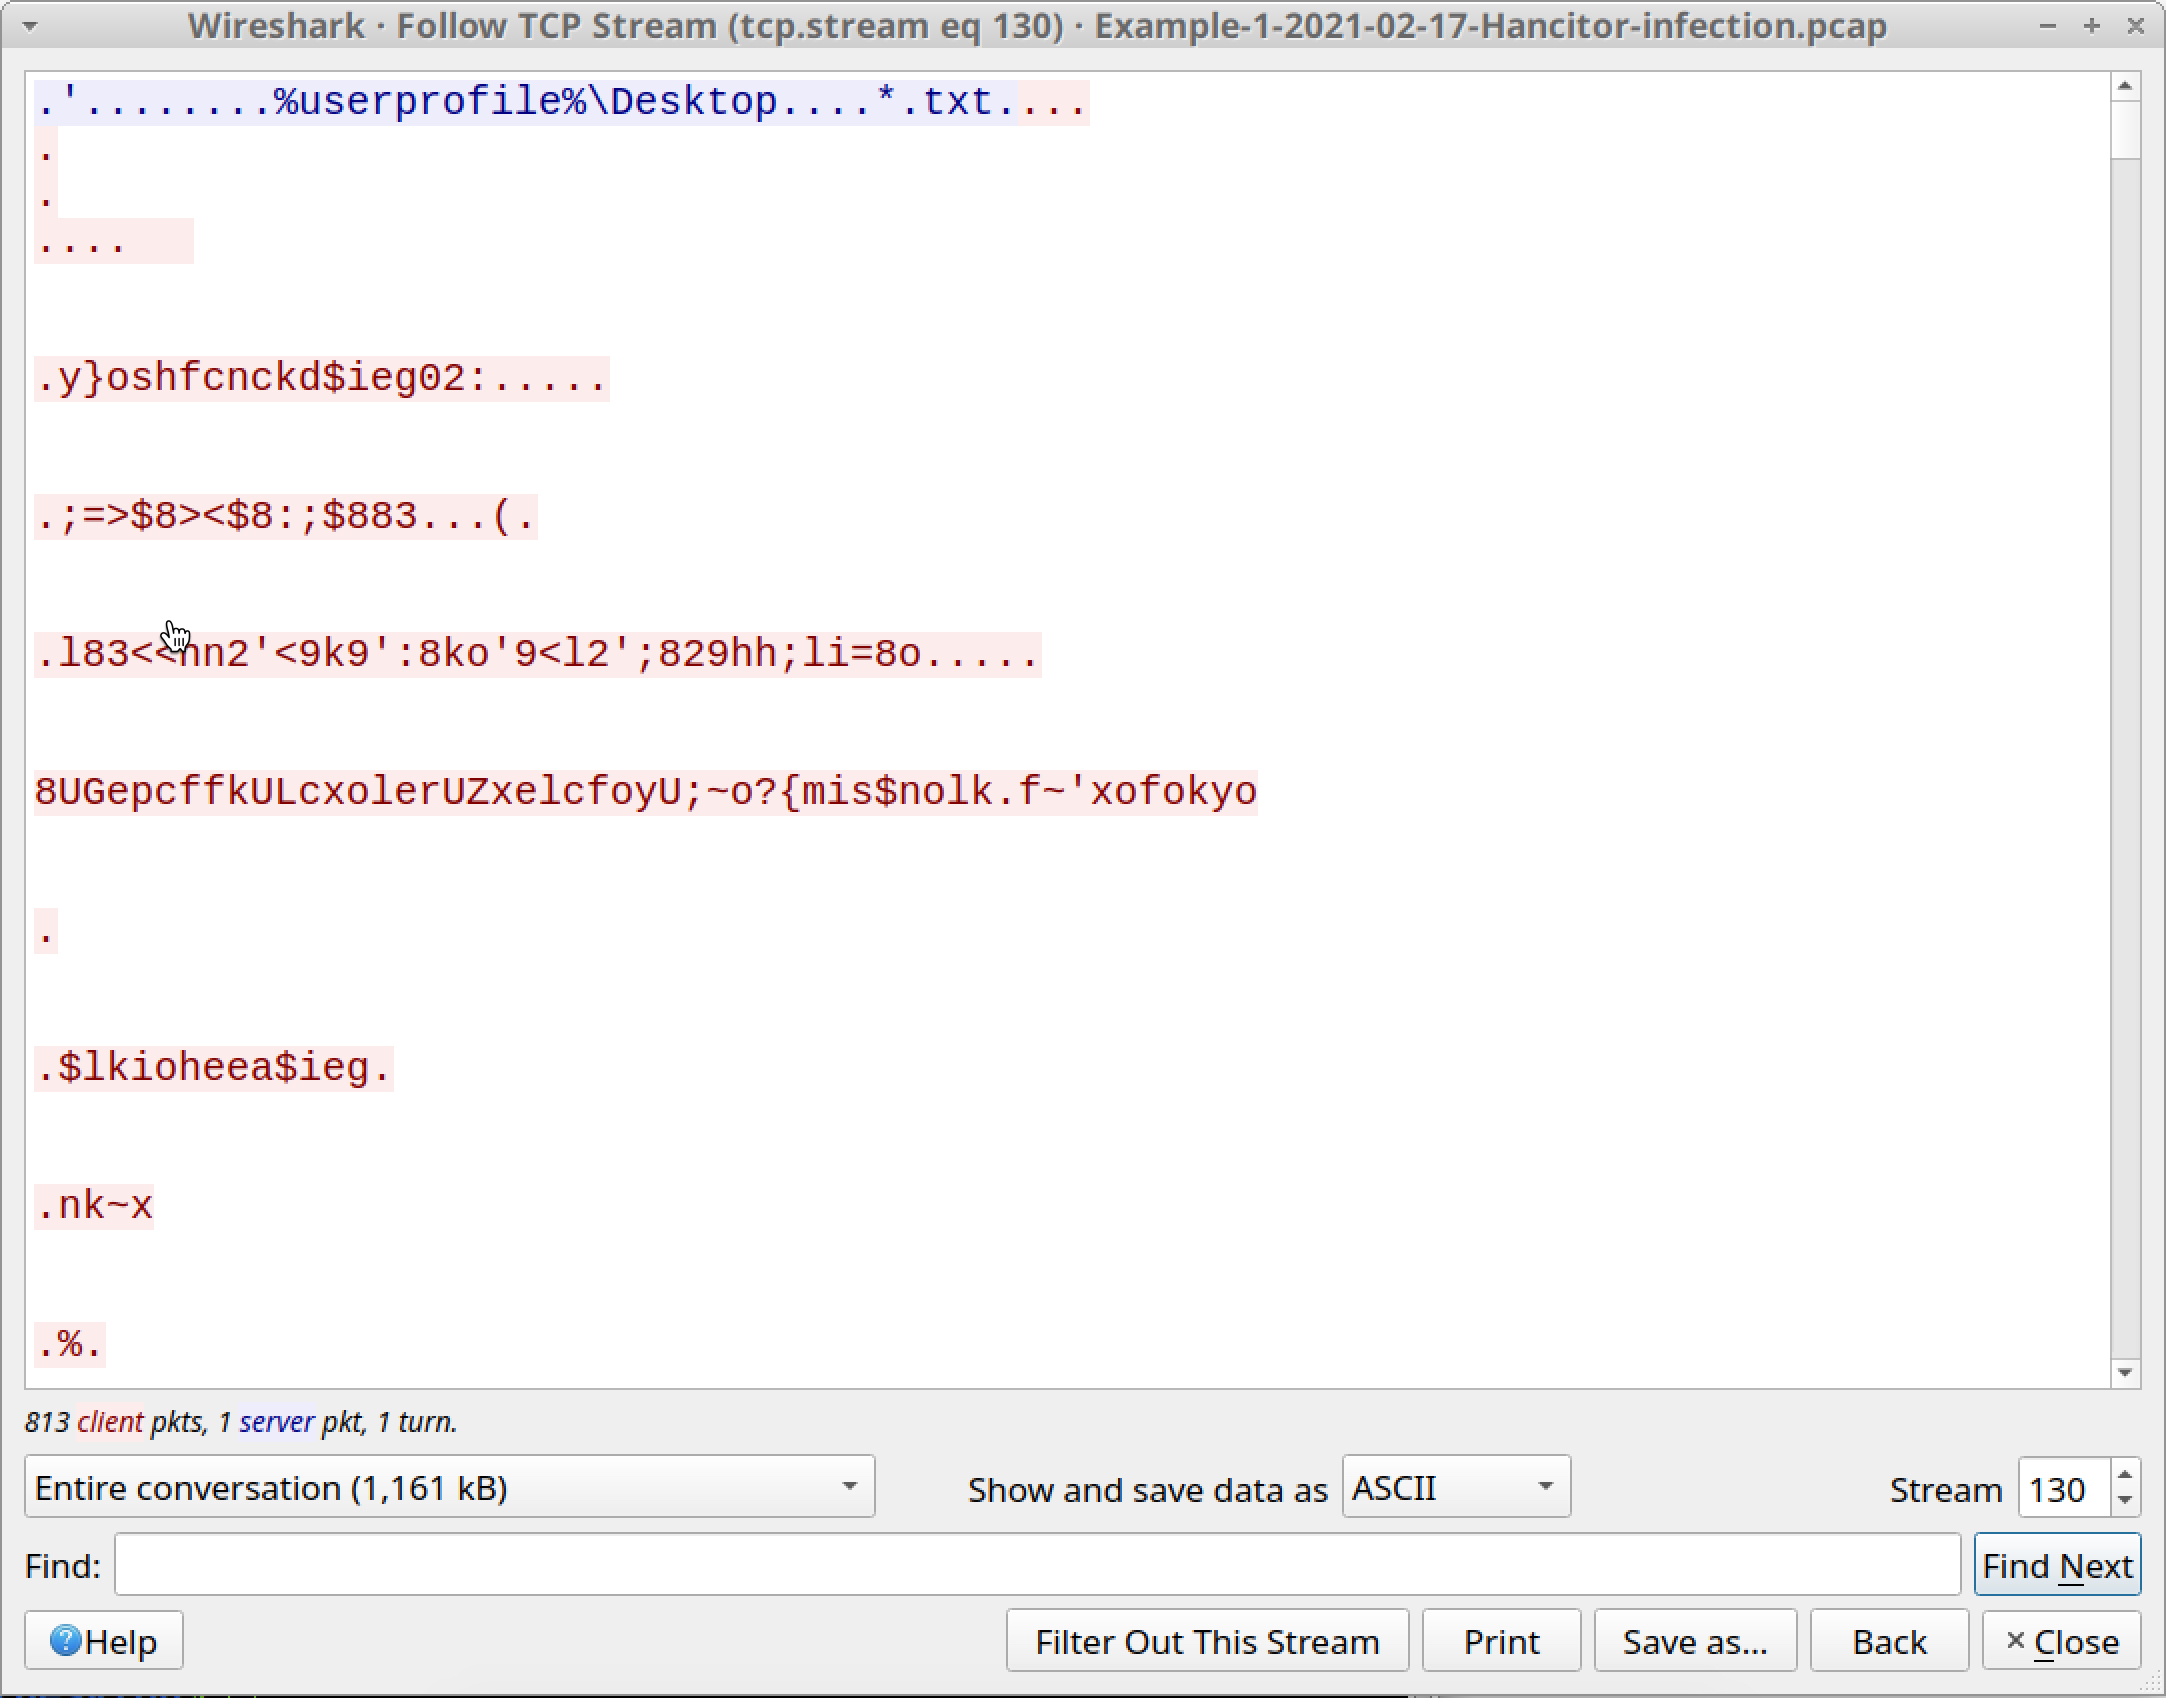
Follow the TCP stream for either of those HTTP GET requests. This TCP stream contains all three HTTP GET requests and responses to and from belcineloweek[.]ru, so you must scroll past a large amount of data representing the Ficker Stealer EXE. Near the end of the TCP stream, you should find two identical HTTP GET requests for 1602s.bin. Both requests return the same 682 bytes of data as shown below in Figure 21. This data is used to infect the victim with Cobalt Strike.
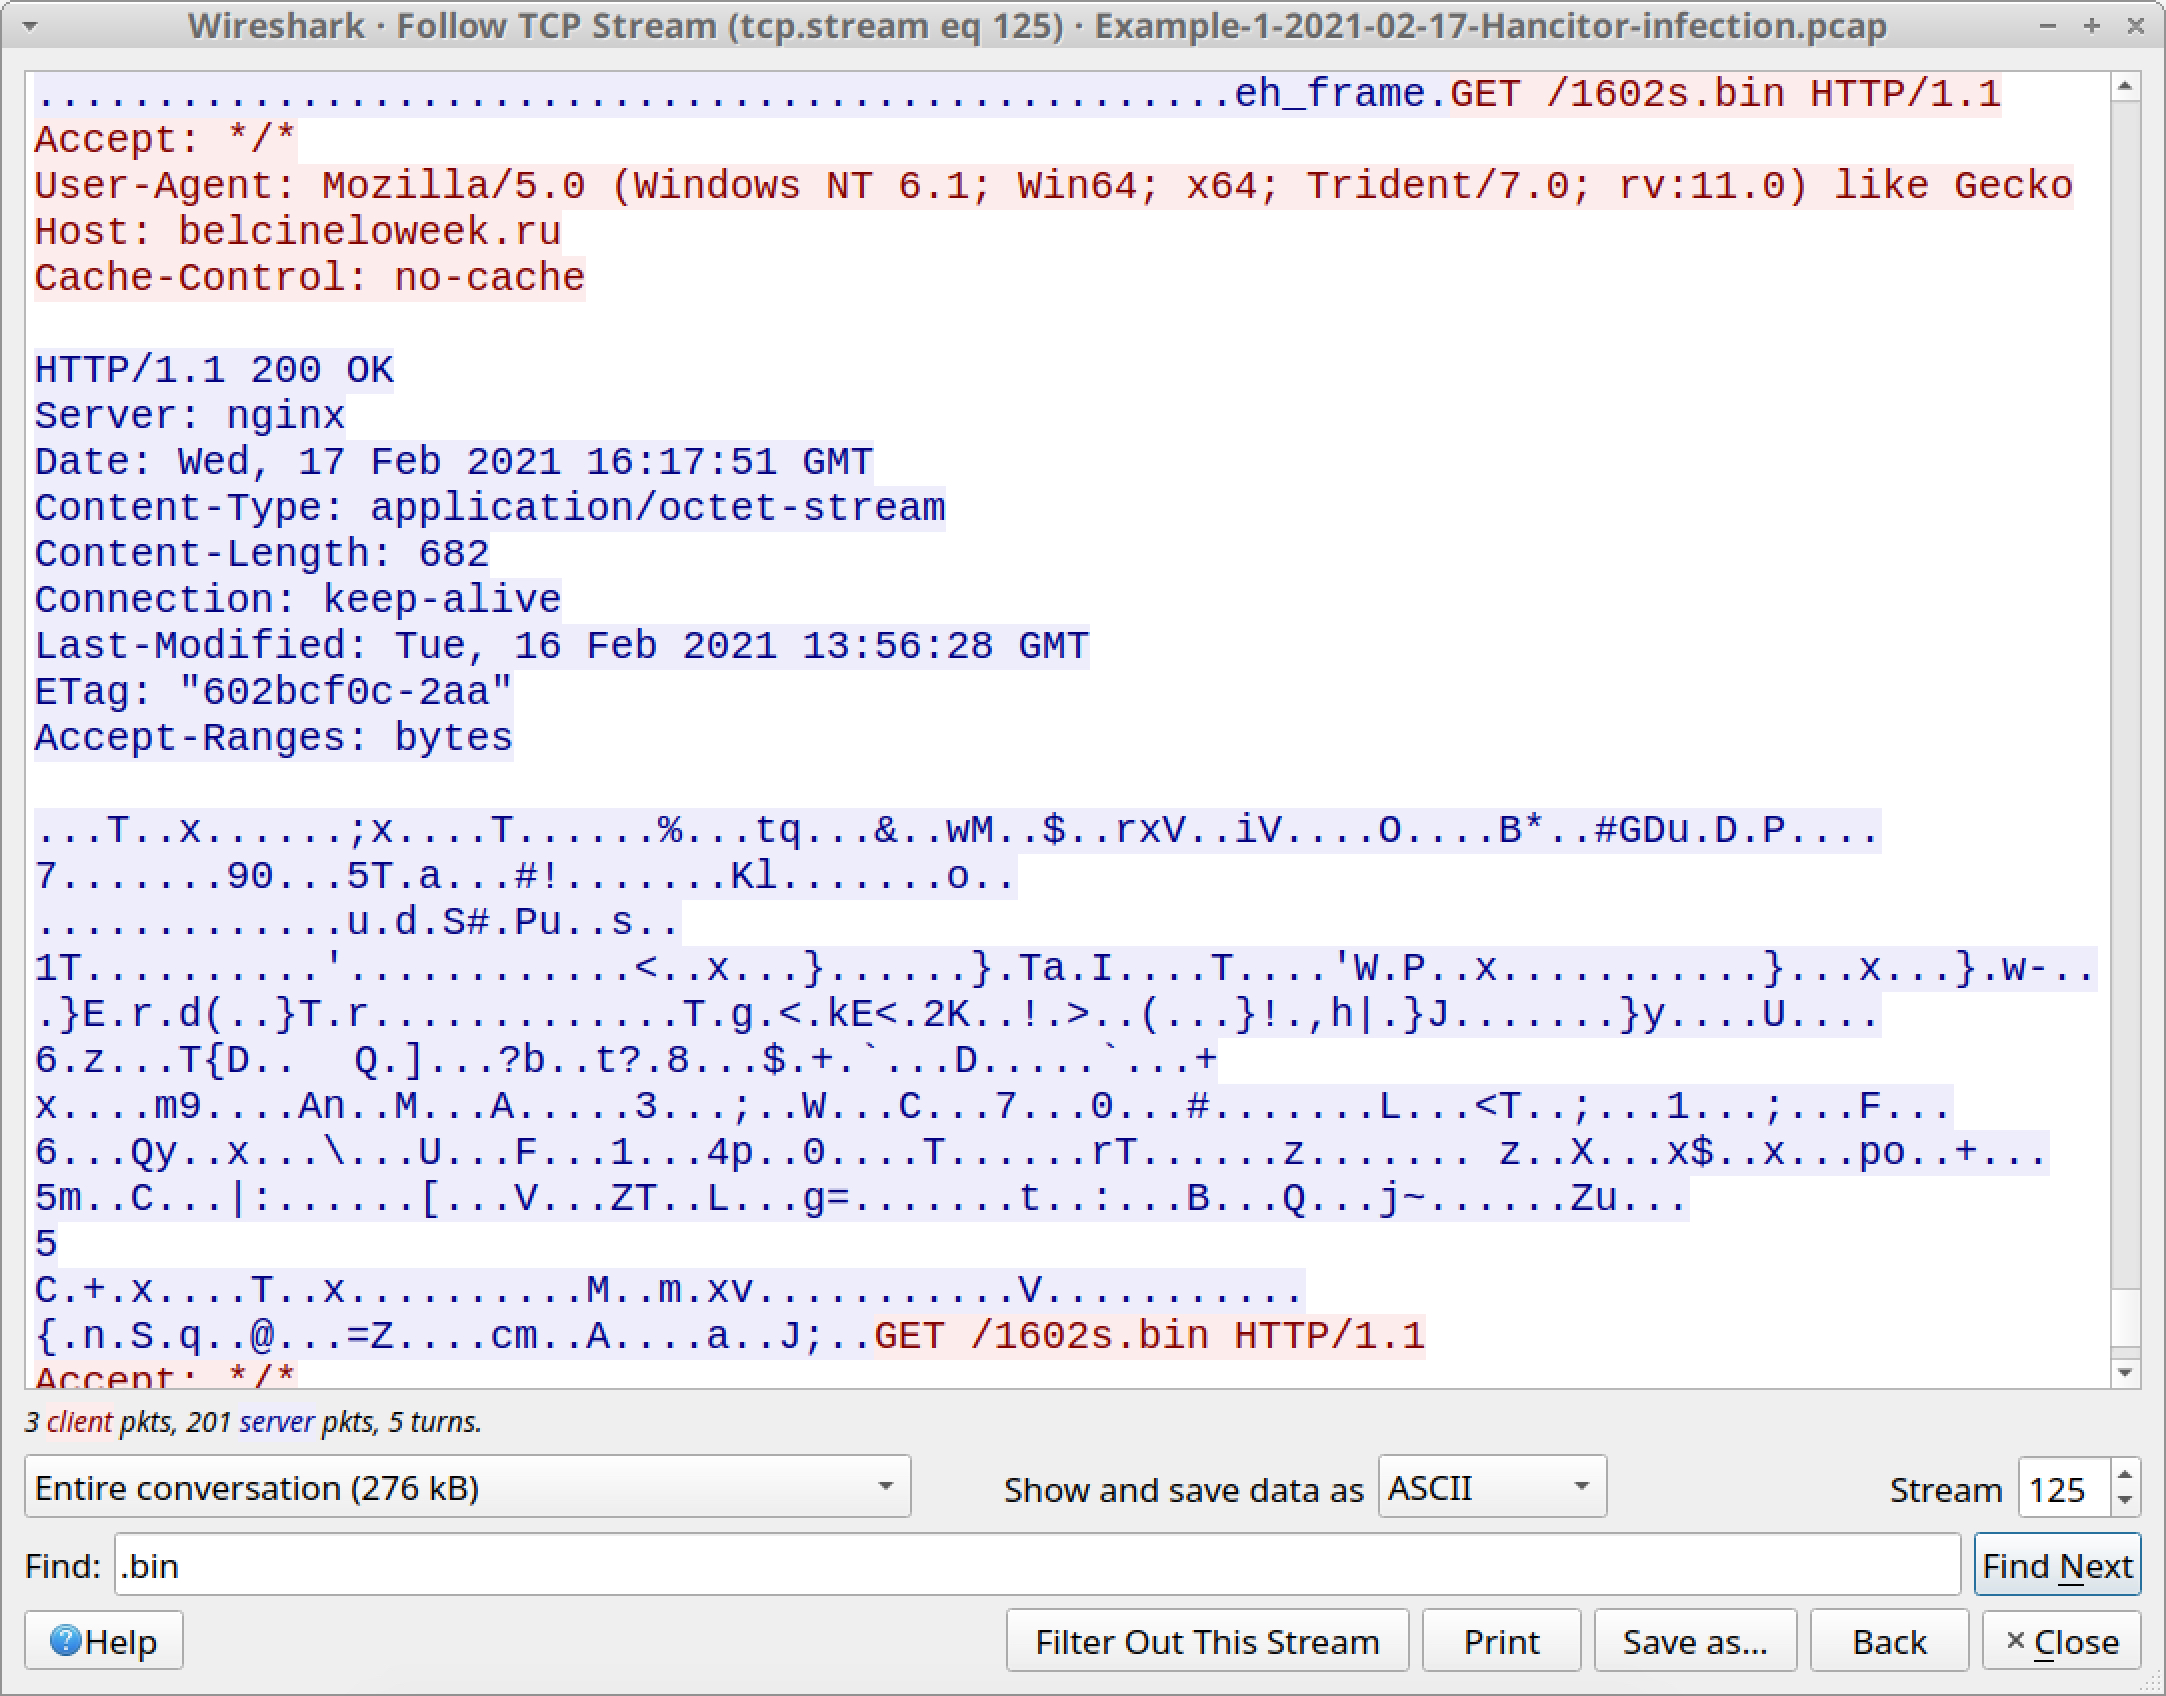
What does Cobalt Strike traffic look like?
It can be HTTP or HTTPS. In this pcap, HTTP GET requests by Hancitor for Cobalt Strike use the letter s in the URLs. The request for 1602s.bin indicates Cobalt Strike for this infection uses HTTPS traffic.
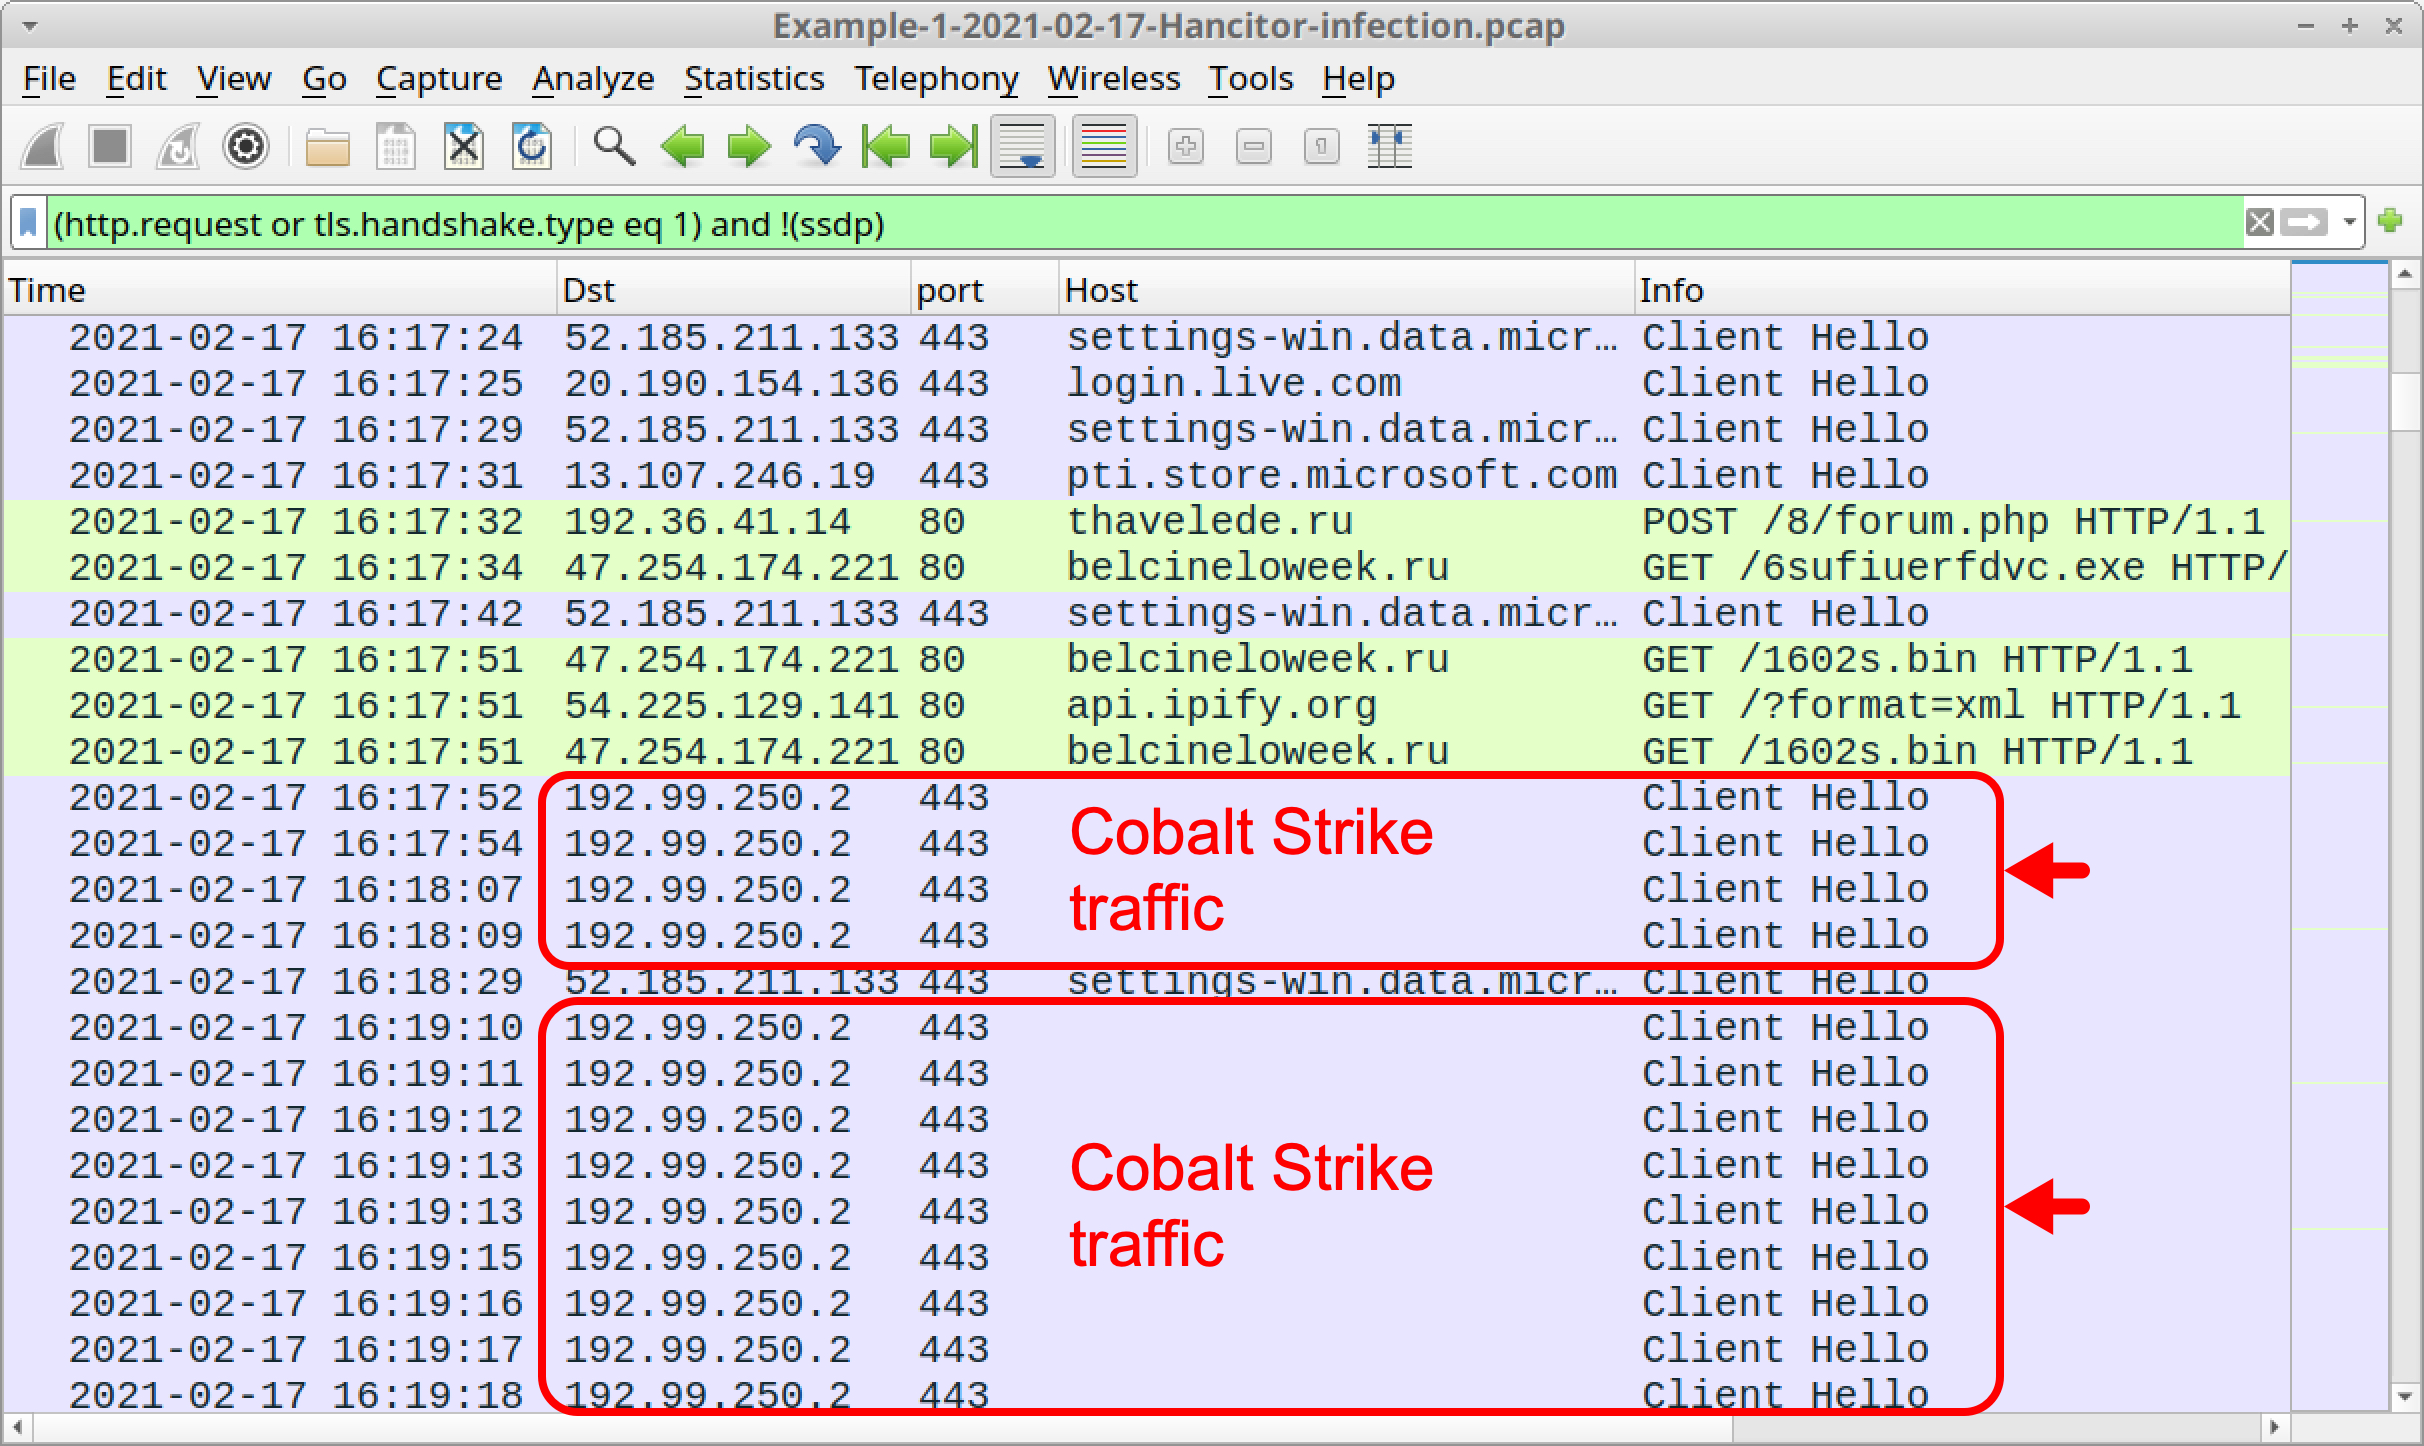
That is indeed what happened. Use your basic web traffic filter, then scroll down, and you should see several frames in the column display to 192.99.250[.]2 over TCP port 443 as shown below in Figure 22. This is Cobalt Strike traffic. Cobalt Strike traffic to this IP address does not have an associated domain, so the host name is blank in the column display.
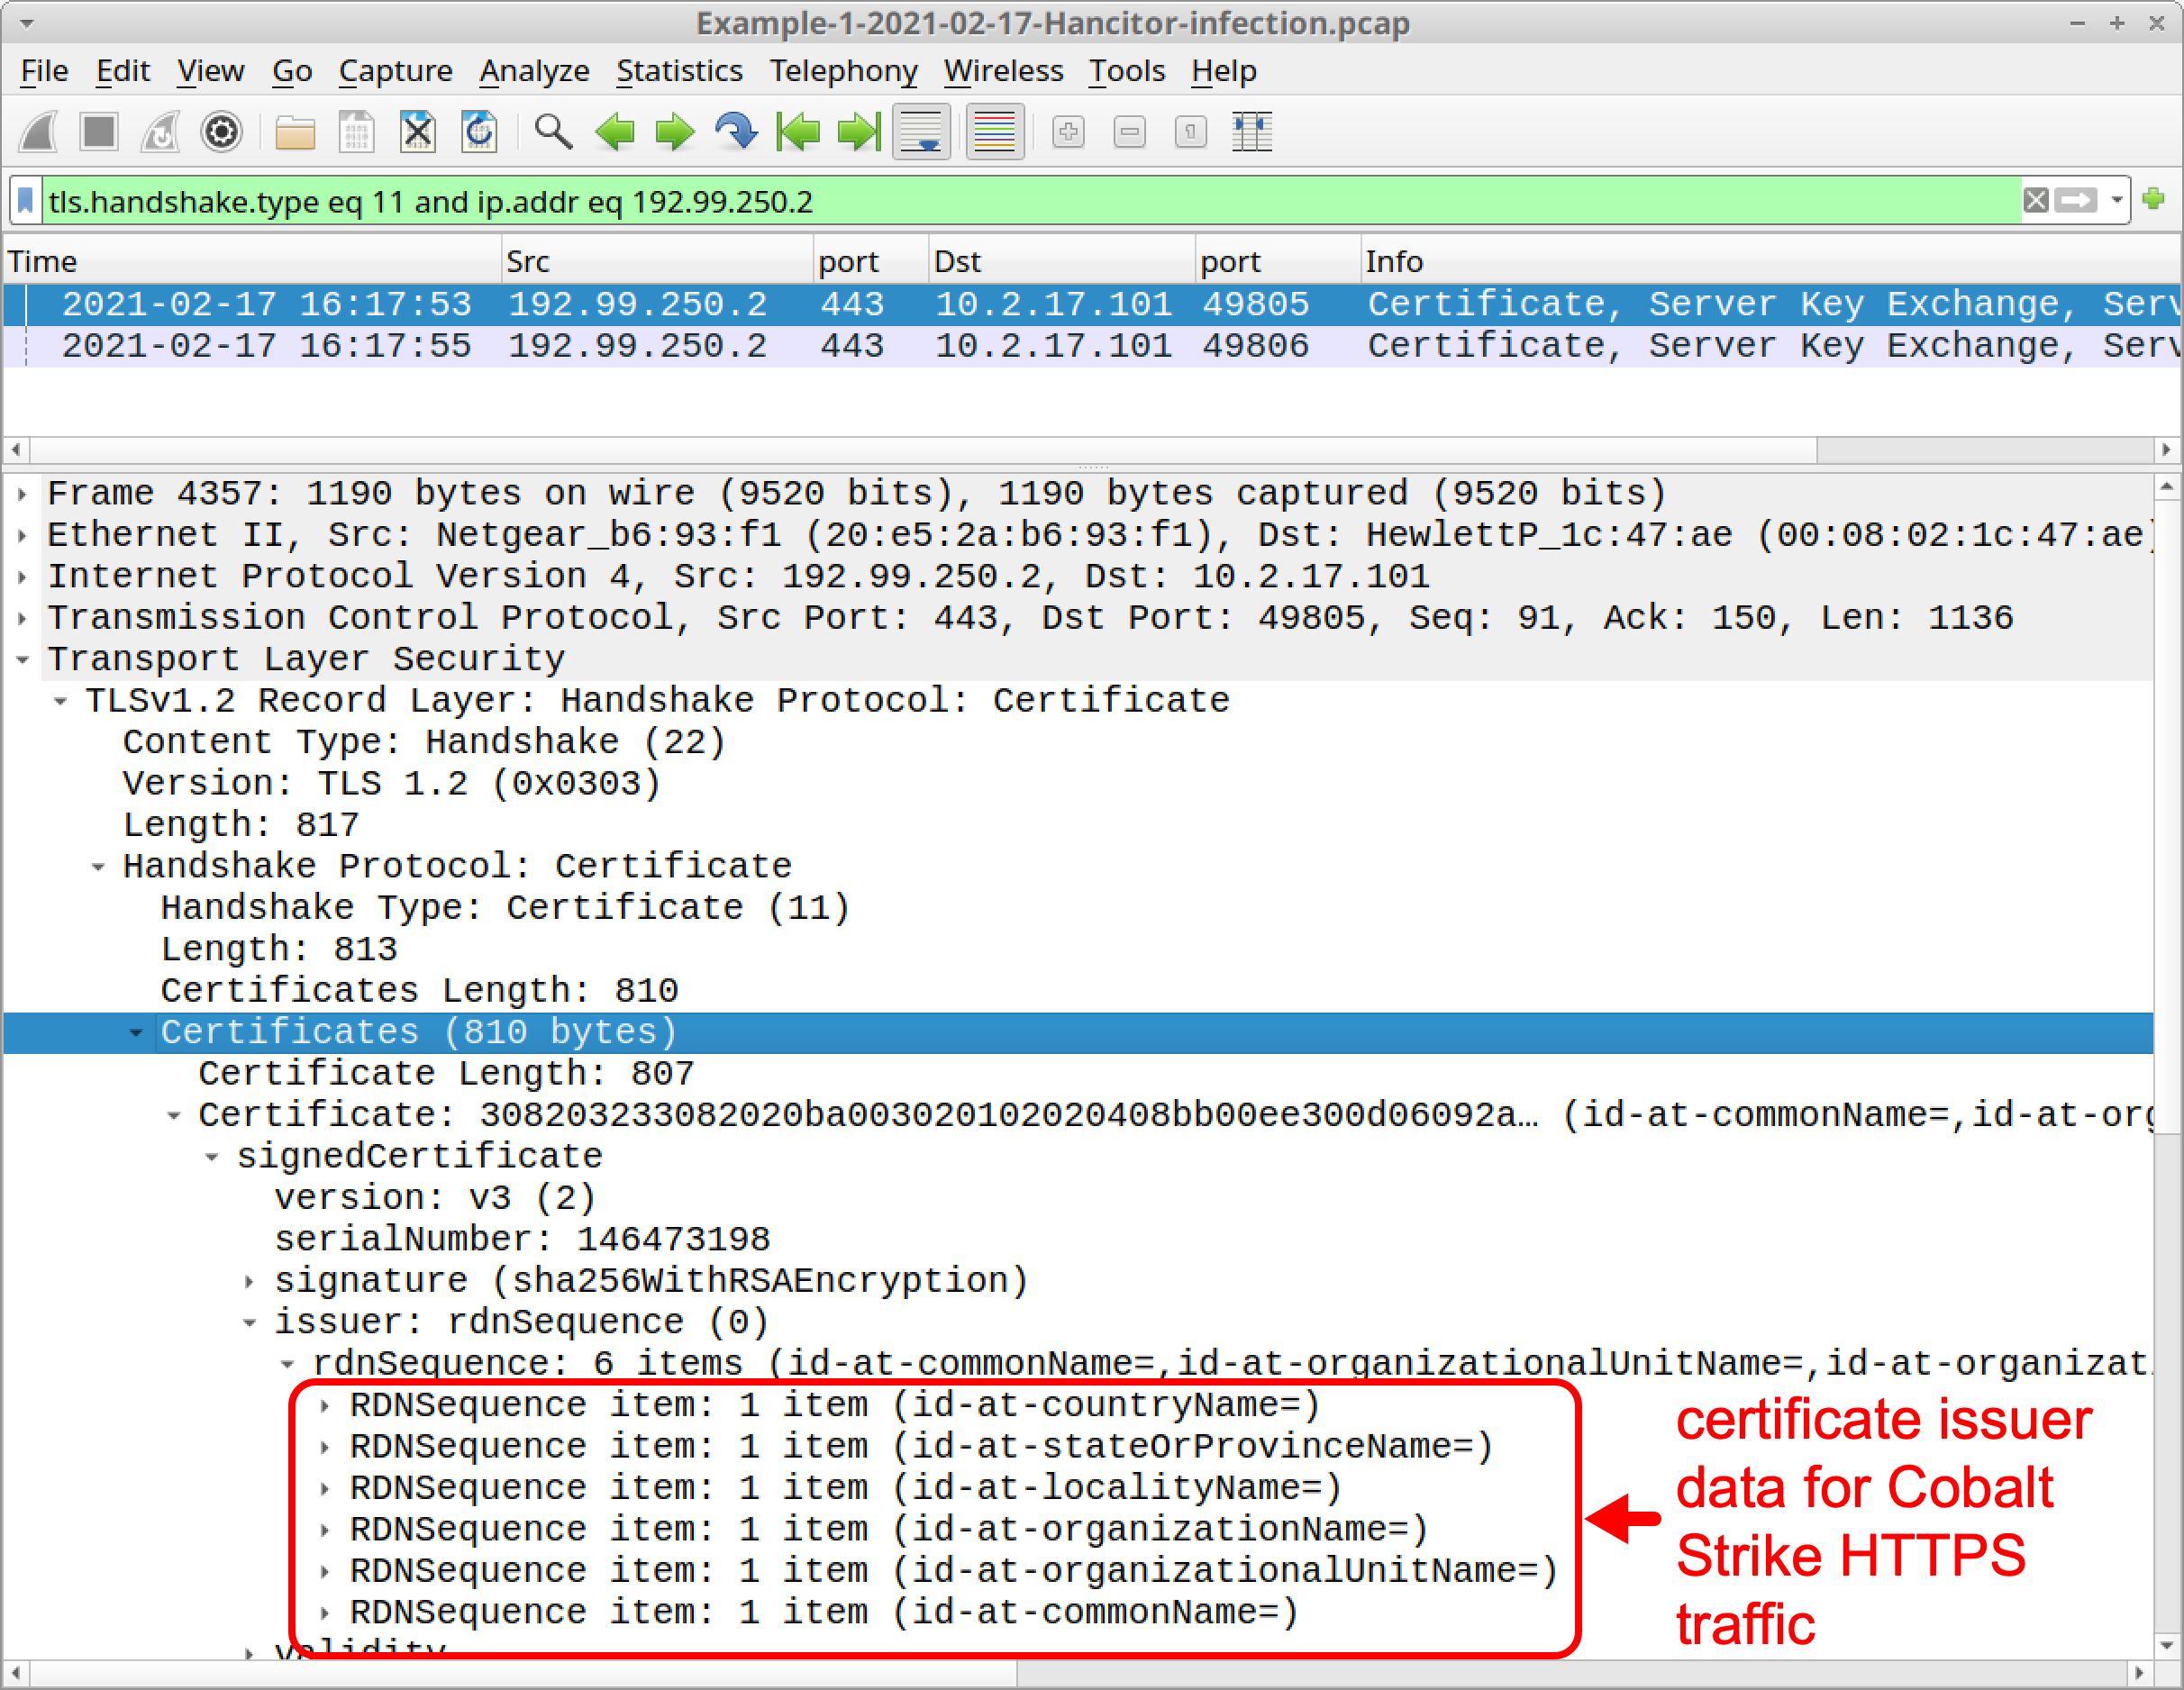
Certificate issuer data for HTTPS traffic caused by Cobalt Strike HTTPS is unusual. Why? Because all of the identification fields for items like country, locality and organization are blank. We can filter for certificate data in Cobalt Strike’s HTTPS traffic and expand the frame details to see this.
First, find certificate data from the IP address for Cobalt Strike traffic by using the following Wireshark filter:
tls.handshake.type eq 11 and ip.addr eq 192.99.250.2
This should reveal two frames in your column display. Expand frame details for either of these frames until you find fields for certificate issuer data. These fields should be blank. Below, Figure 23 shows an example.
For the rest of this pcap, we see HTTP GET requests for Hancitor C2 and HTTPS traffic for Cobalt Strike. Hancitor C2 traffic happens approximately every 2 minutes. HTTPS traffic for Cobalt Strike happens nearly every second.
Example 2, Part 1: Hancitor with Ficker Stealer and Cobalt Strike
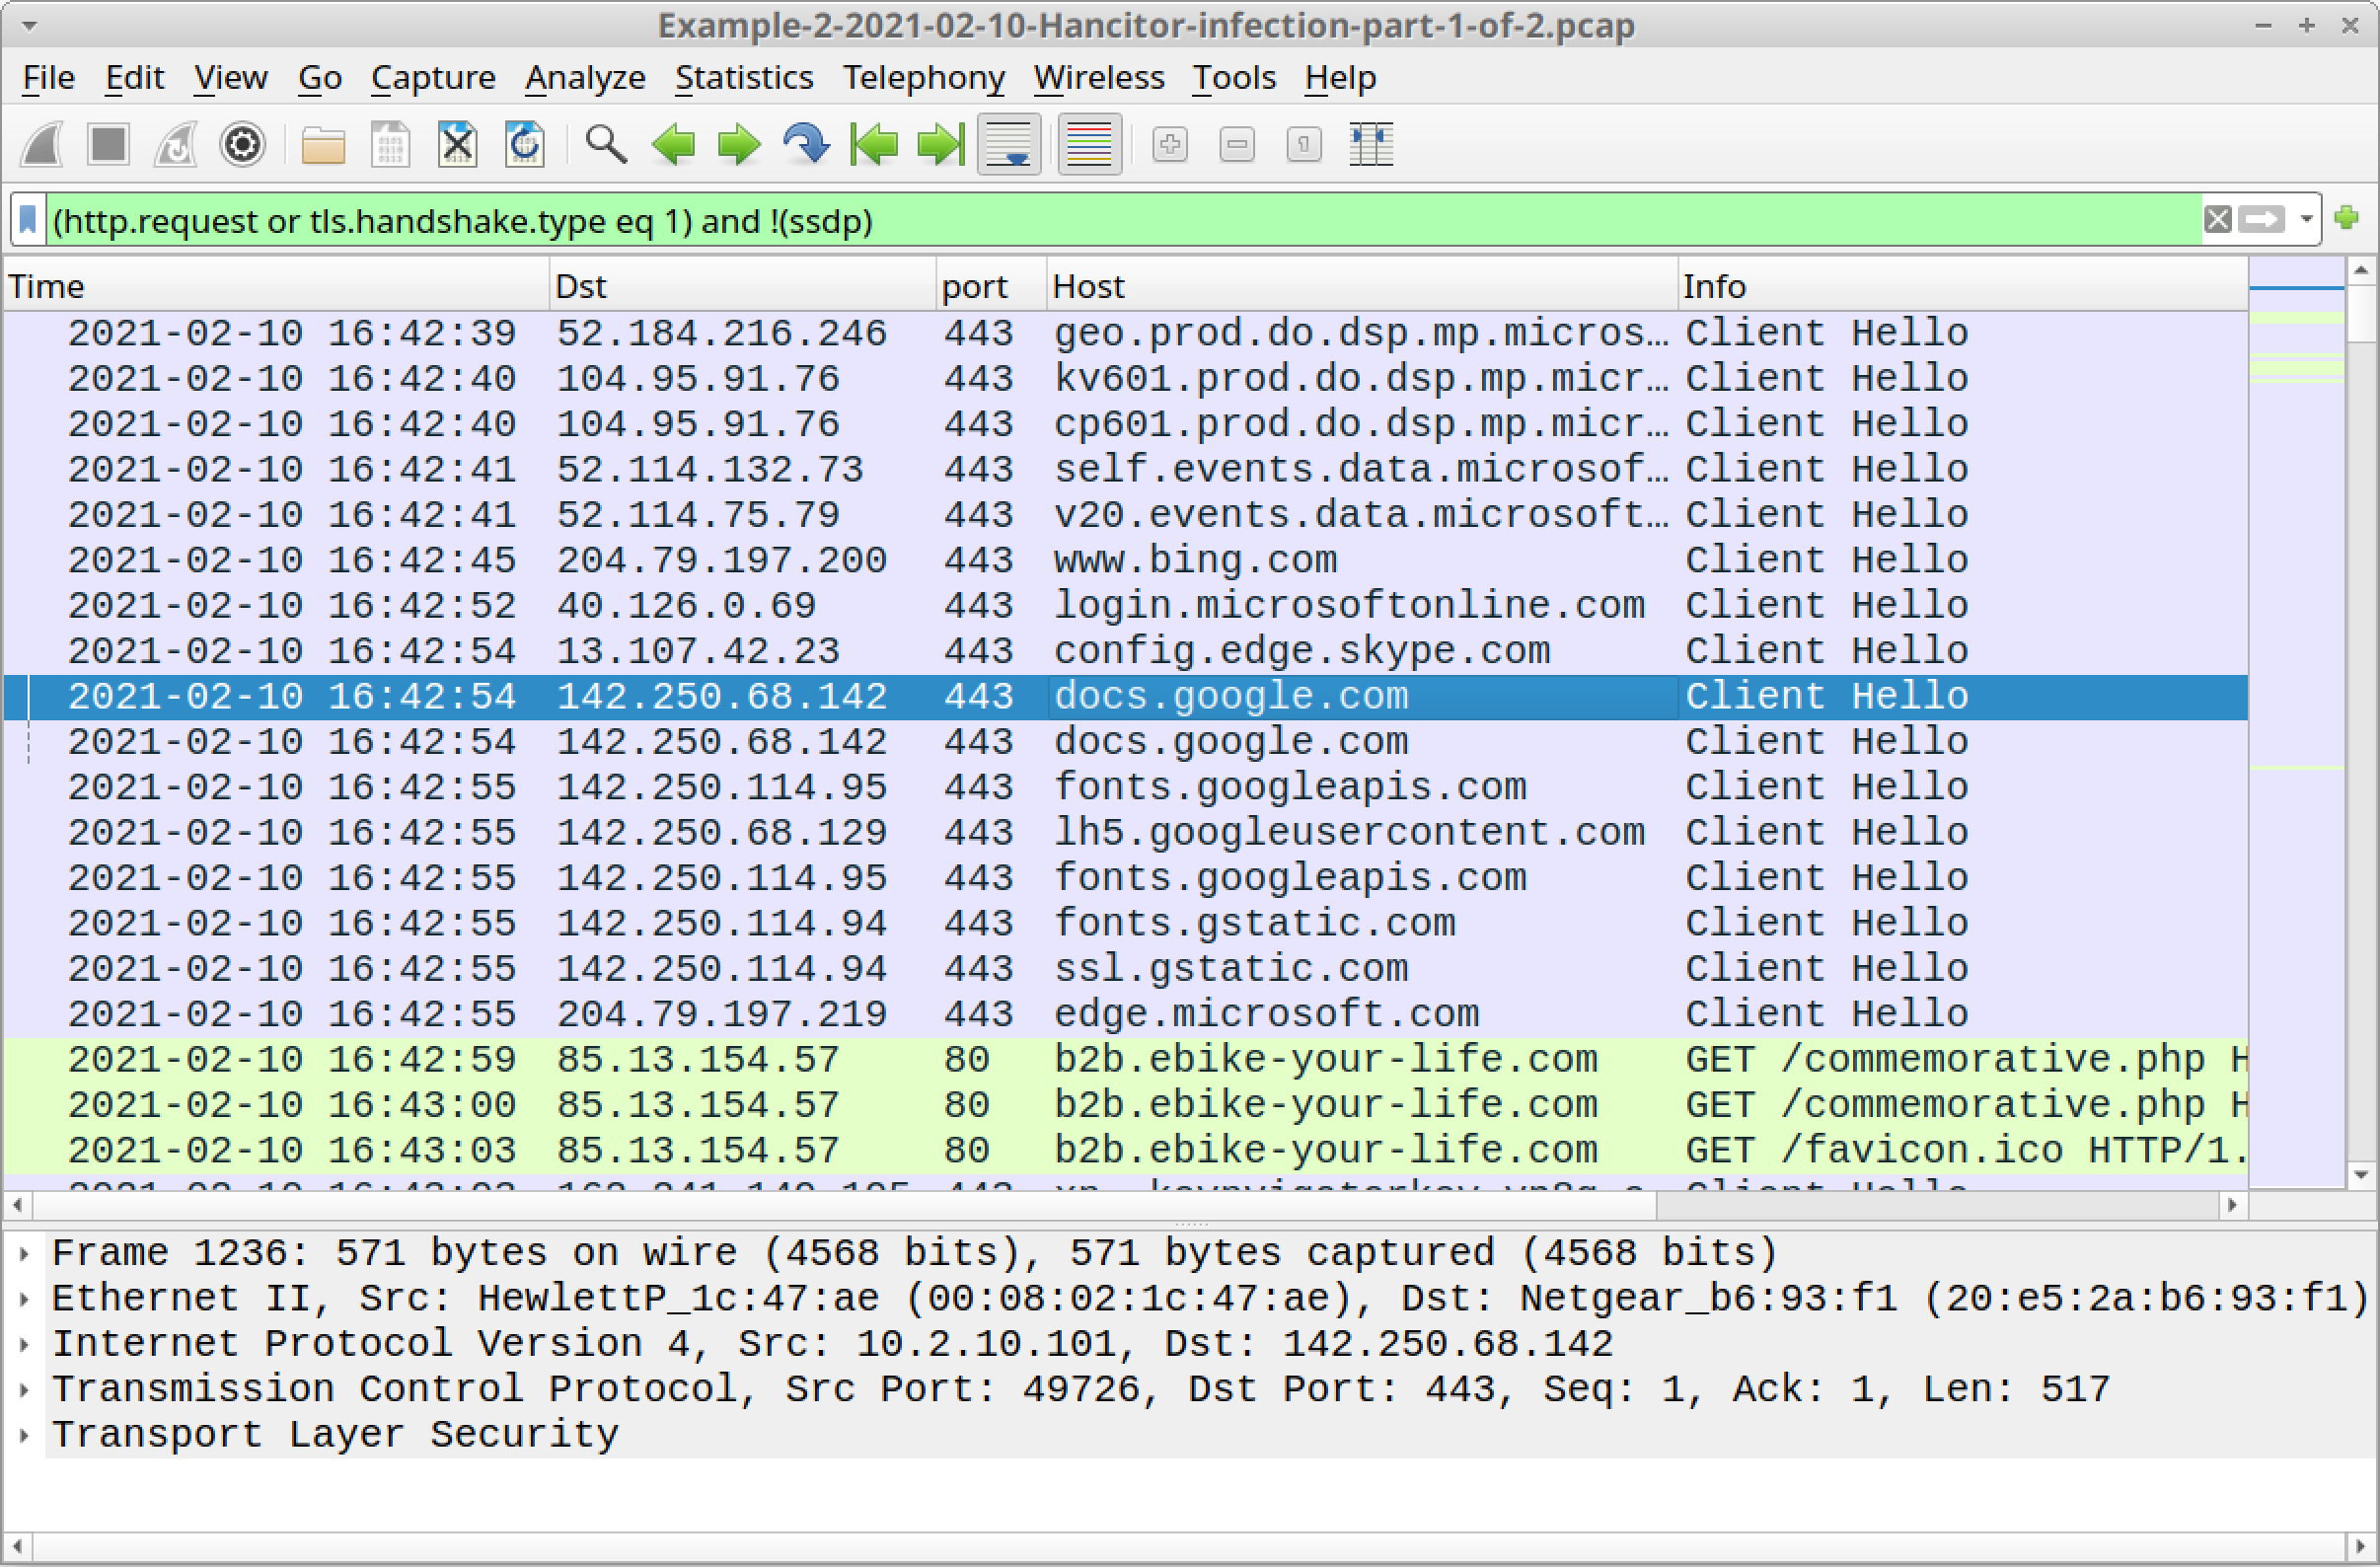
Open Example-2-2021-02-10-Hancitor-infection-part-1-of-2.pcap in Wireshark and use a basic web filter, as shown in Figure 24.
The pcap comes from an AD environment with the following characteristics:
- LAN segment range: 10.2.10.0/24
- Domain: pizzawithapples.food
- Domain controller: 10.2.10.10 - Apples-DC
- LAN segment gateway: 10.2.10.1
- LAN segment broadcast address: 10.2.10.255
- IP address of the infected Windows host: 10.2.10.101
- Host name of the infected Windows host: DESKTOP-TRH50EJ
- User account name on the infected Windows host: dave.thomas
Above in Figure 24, we see a link to docs.google.com followed by HTTP GET requests to b2b.ebike-your-life[.]com/commemorative.php. As we did in our first example, we can export the HTML page from b2b.ebike-your-life[.]com from our second example and open it in a web browser to get the malicious Word document.
The SHA256 hash for your Word document should be 793d134cdb4bcba47e1f678d052c4d7747b93ea4199714efb8b614321b58dca7, and its name should be 0210_1723194332604.doc.
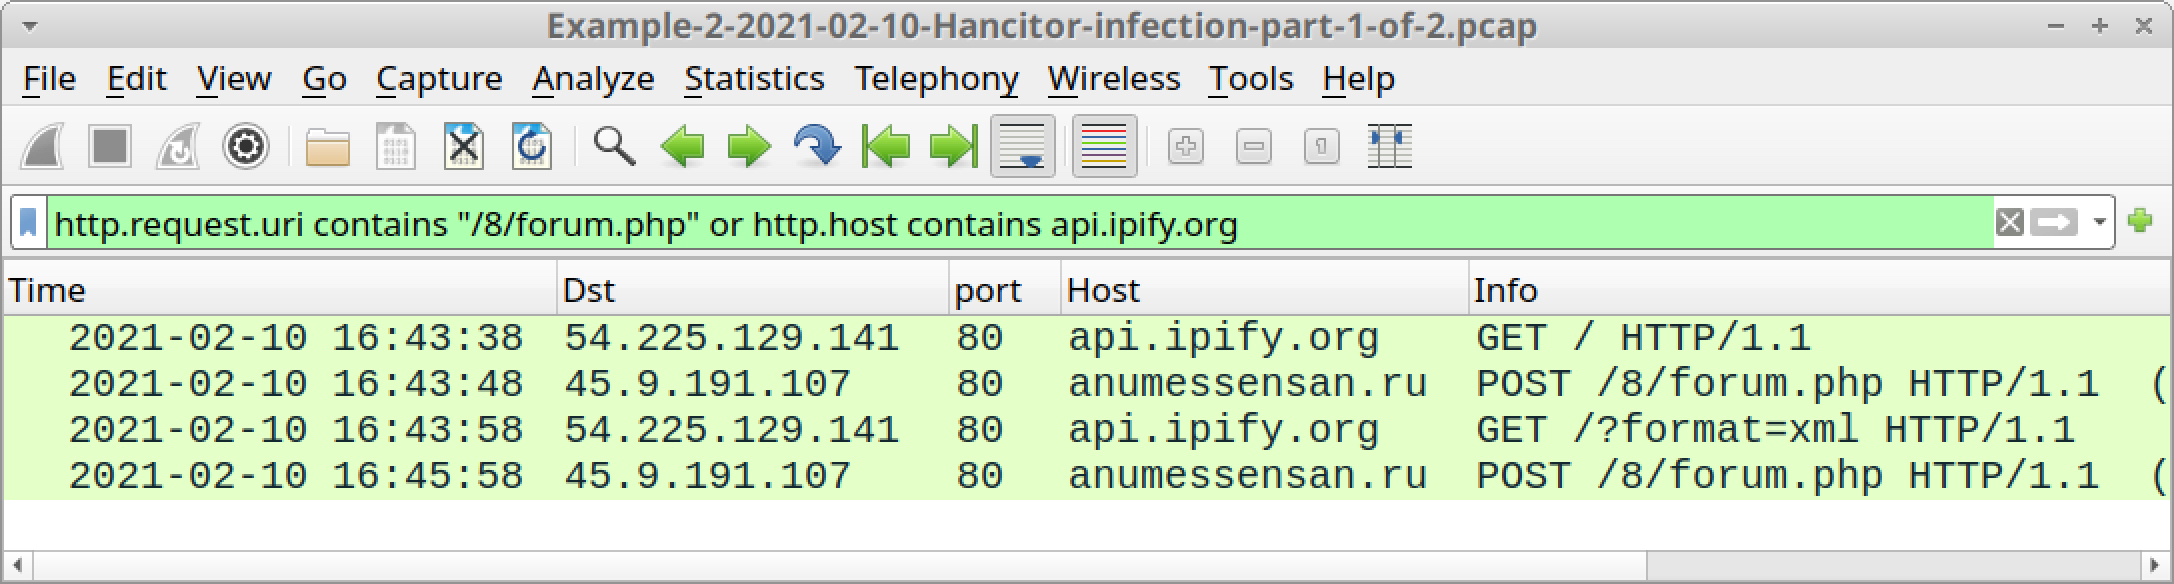
Also as we did for our first example, find Hancitor C2 activity using the following Wireshark filter:
http.request.uri contains "/8/forum.php" or http.host contains api.ipify.org
This returns IP address checks by Hancitor and Ficker Stealer, along with Hancitor C2 traffic, as listed below and shown in Figure 25.
- api.ipify.org - GET /
- anumessensan[.]ru - POST /8/forum.php
- api.ipify.org - GET /?format=xml
Filter for followup malware sent by Hancitor using the following Wireshark filter:
http.request.uri contains .exe or http.request.uri contains .bin
This should reveal Hancitor sending followup malware for Cobalt Strike and Ficker Stealer, as listed below and shown in Figure 26:
- backupez[.]com - GET /0902.bin
- backupez[.]com - GET /0902s.bin
- backupez[.]com - GET /6yudfgh.exe
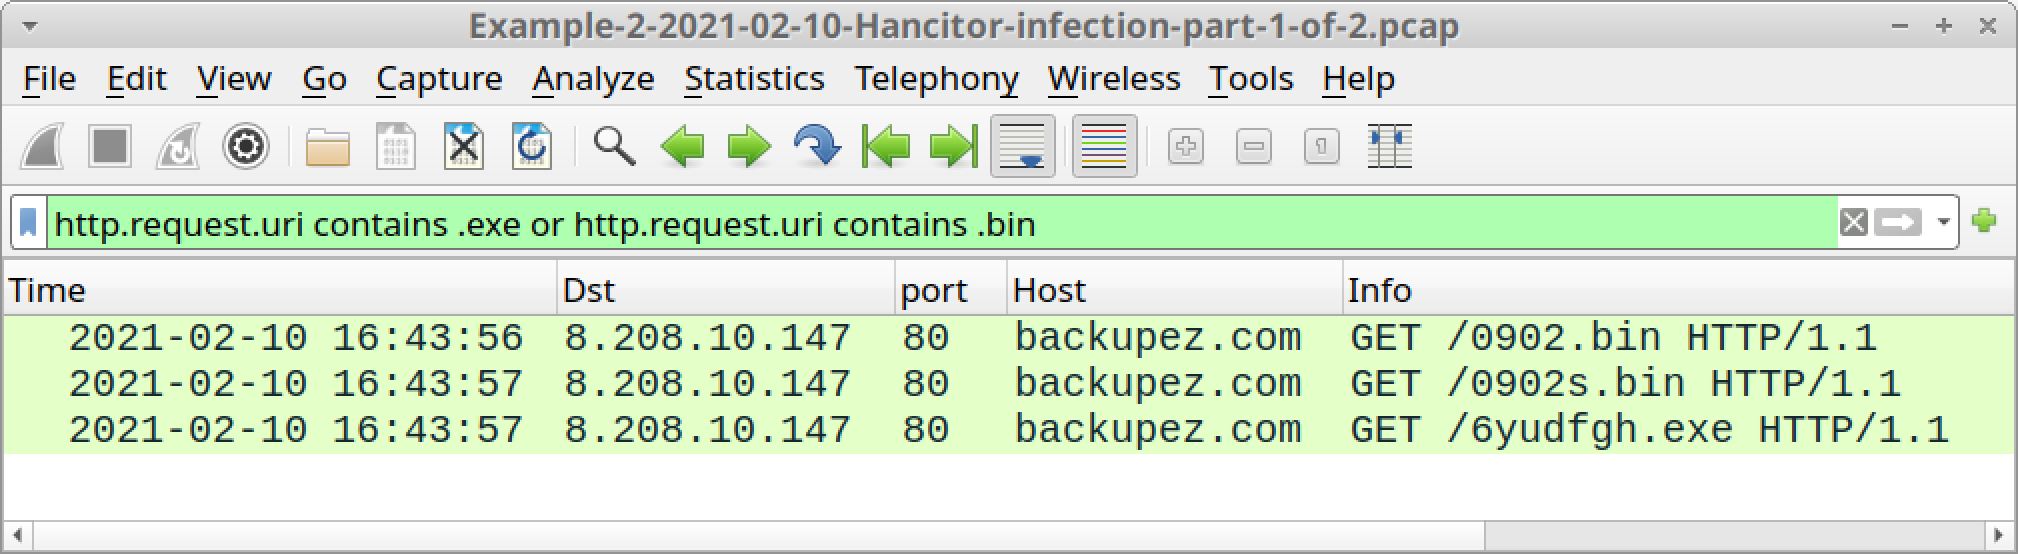
In this case, one of the GET requests for Cobalt Strike has an s in the URL, but the other does not, so we should see both HTTP and HTTPS traffic caused by the Cobalt Strike.
Return to your basic web filter, then scroll down to see what type of HTTP requests happen after the traffic to backupez[.]com. The results should show HTTP traffic over TCP port 1080 and HTTPS traffic over TCP port 4443.
Your Wireshark setup might not display any HTTP traffic over TCP port 1080, so you might have to set up Wireshark to show it. First, use the menu path Analyze --> Decode As shown below in Figure 27 to bring up the Decode As window.
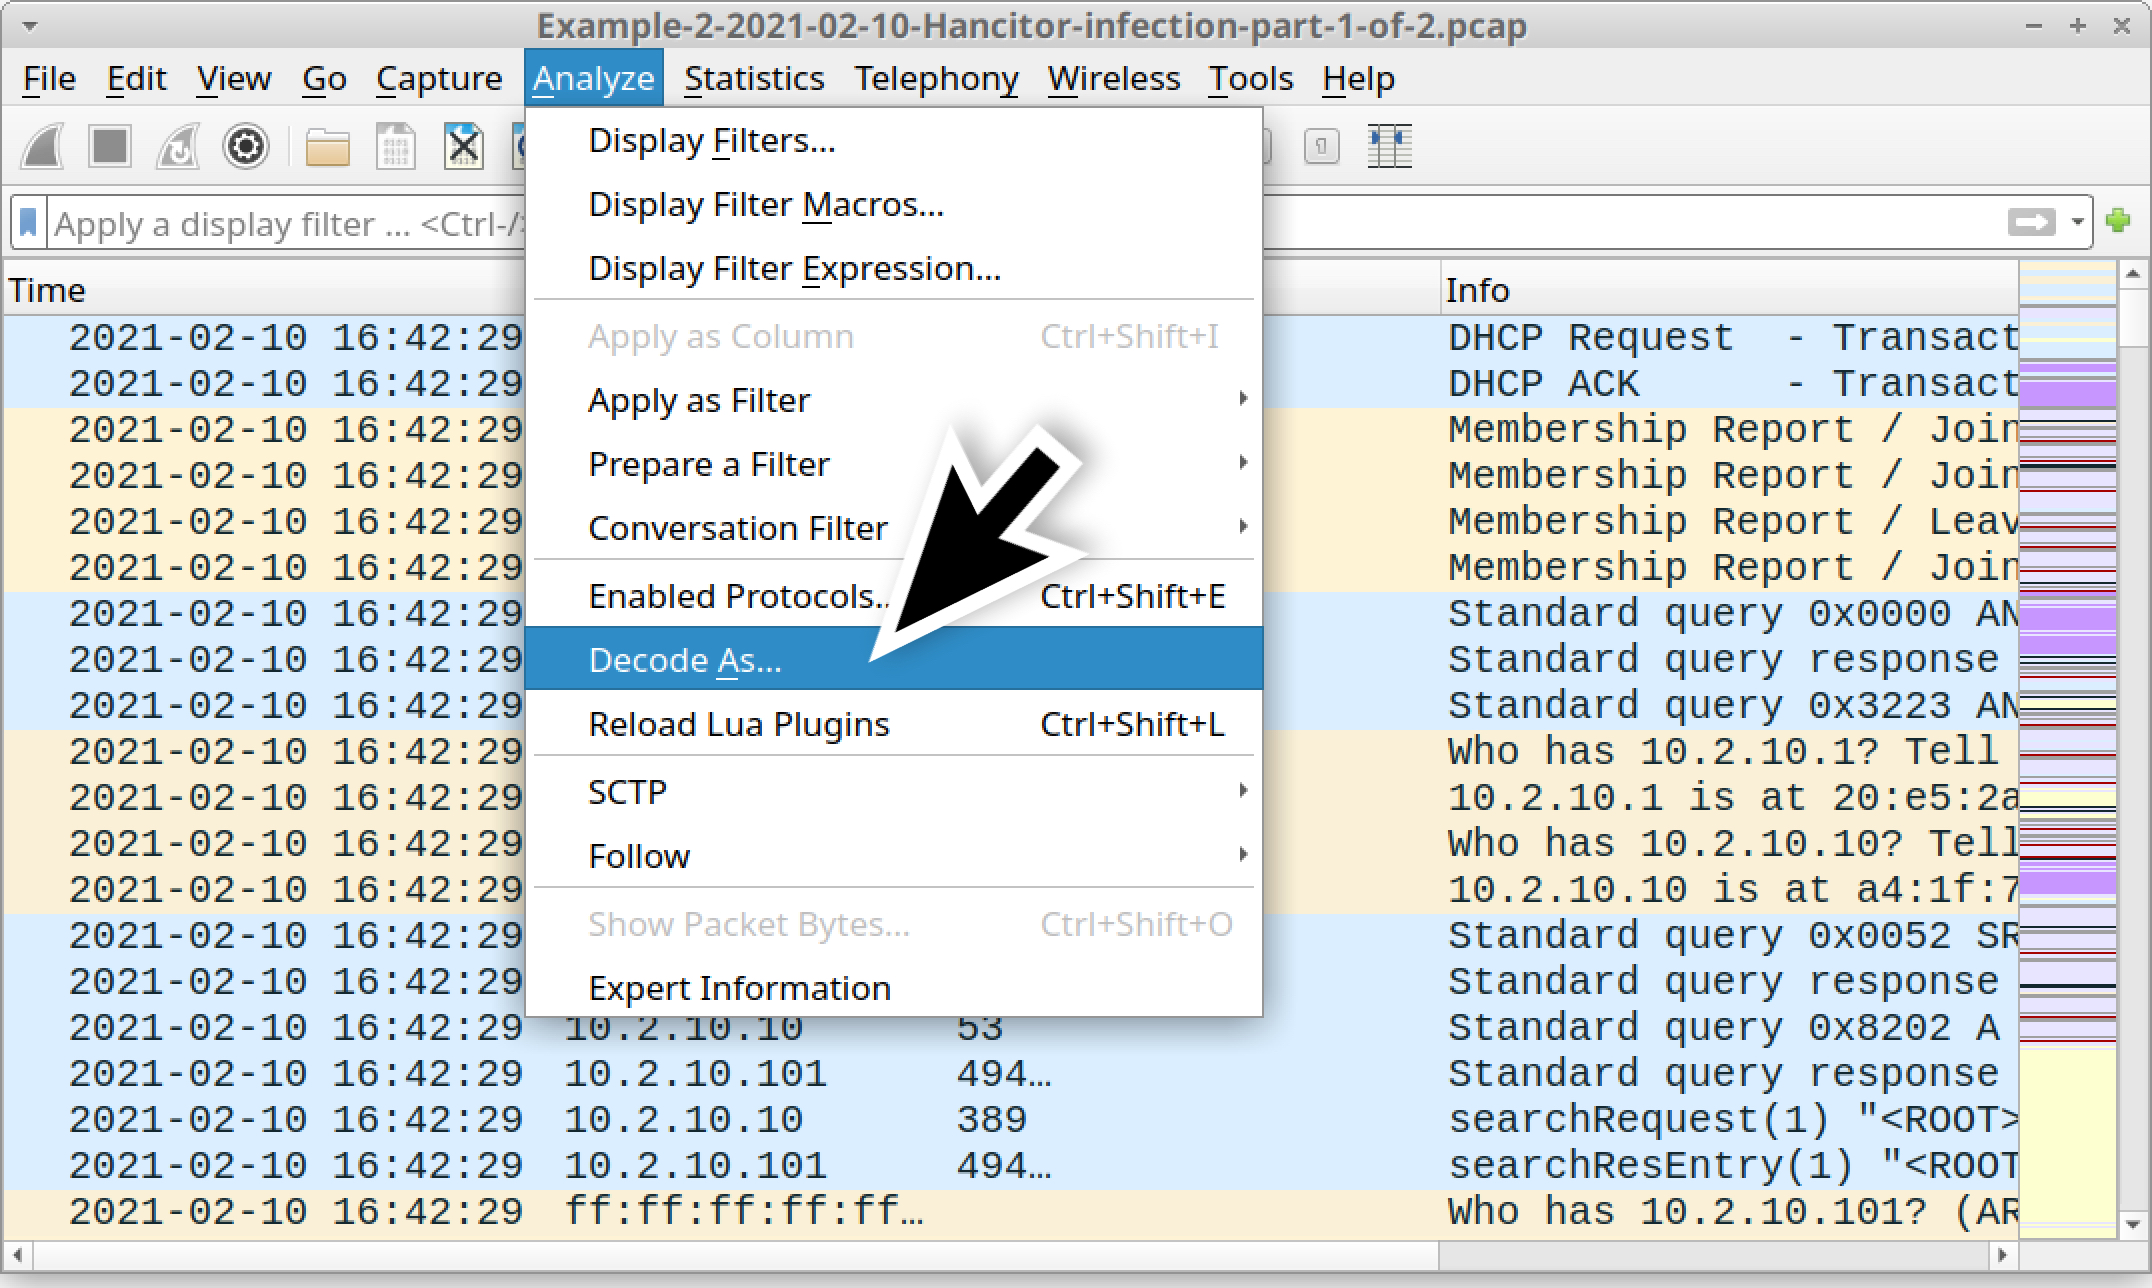
Once you have the Decode As window, create a new entry to decode TCP port 1080 as HTTP, as shown below in Figure 28.
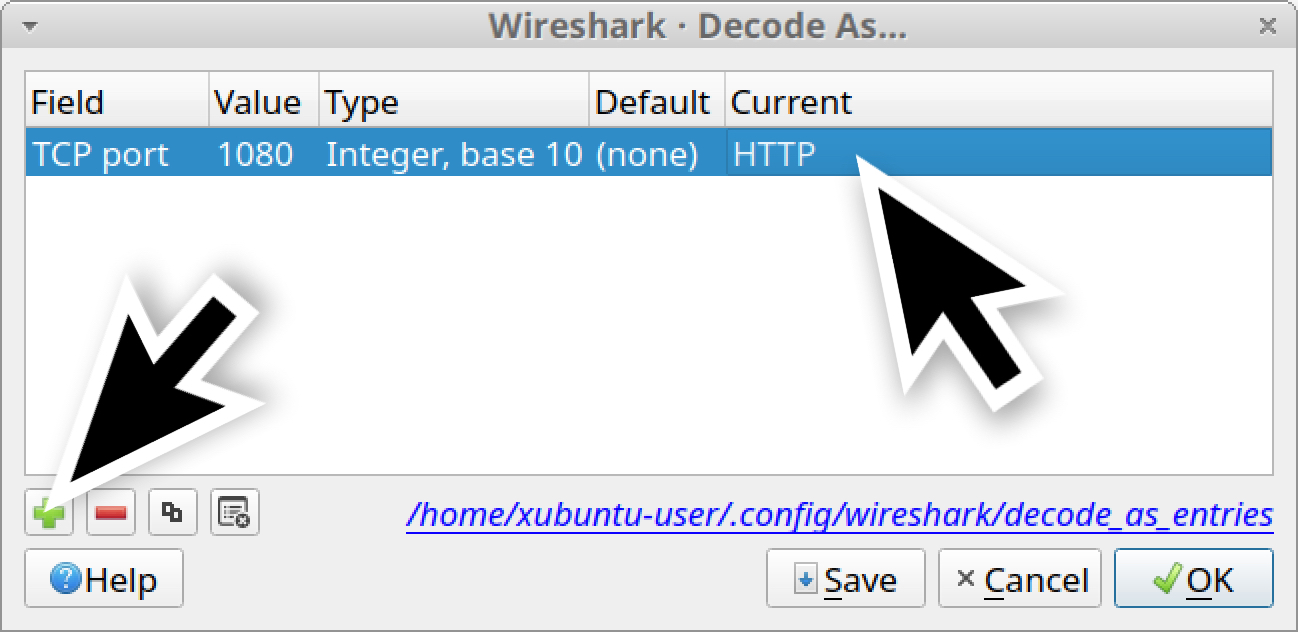
When you’ve created the new entry, either click the OK button or click the Save button. The Save button literally saves the entry, so it will work after you close and open Wireshark again. The OK button applies the decoding only as long as your current Wireshark session stays open.
In this case, we should click the Save button.
After saving the entry, go back to your Wireshark column display and use the basic web filter. Scroll down, and you should see both HTTP and HTTPS traffic for Cobalt Strike, as highlighted below in Figure 29.
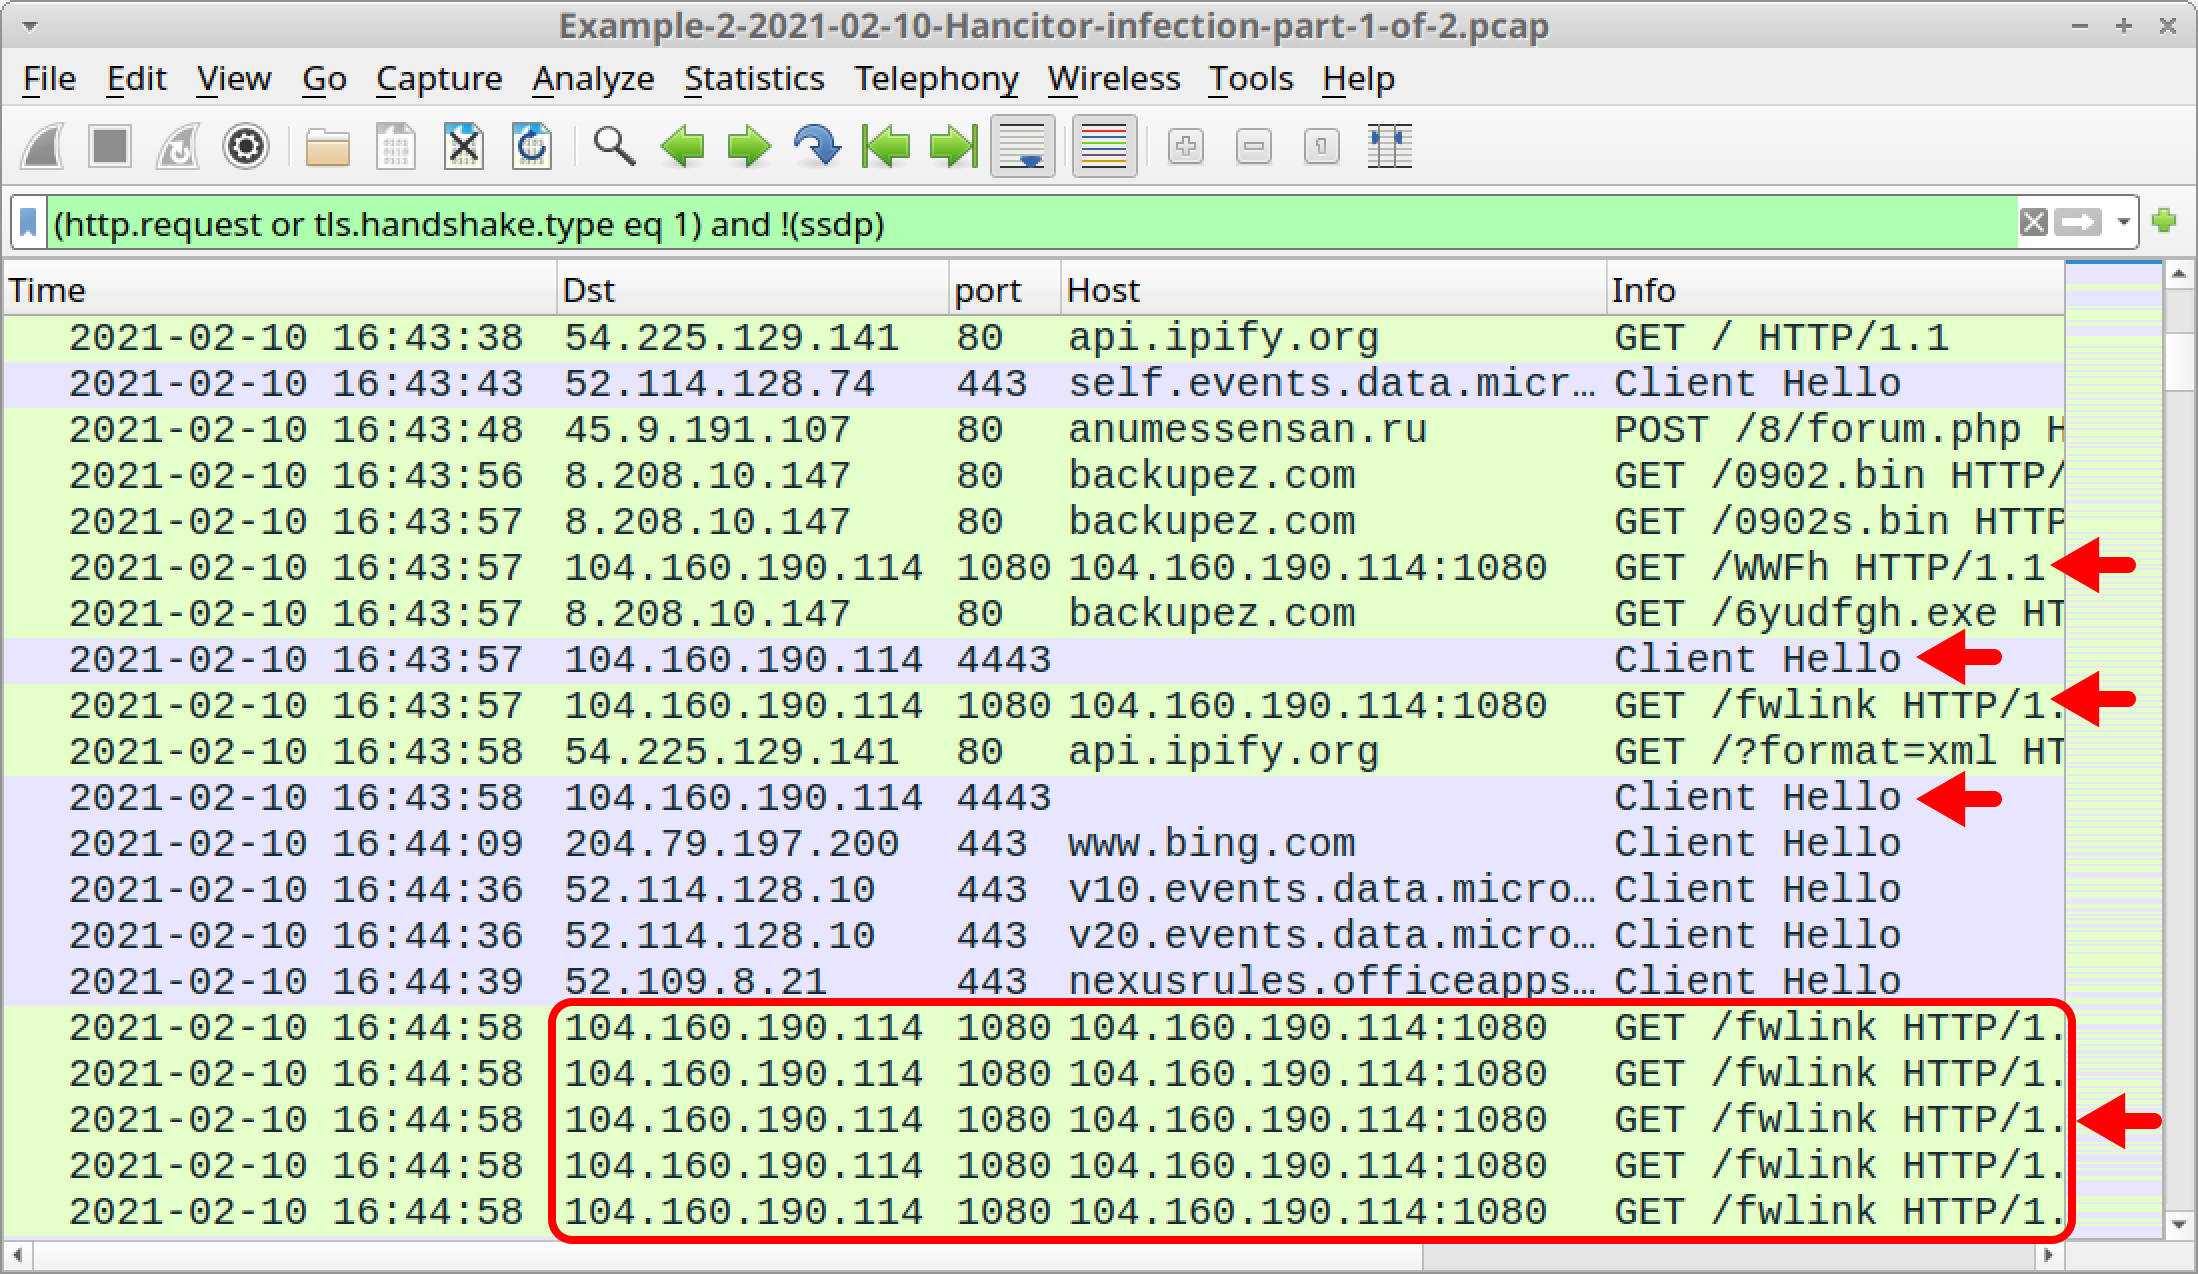
Shown above in Figure 29, traffic caused by Cobalt Strike is:
- 104.160.190[.]114:8080 - GET /WWFh
- 104.160.190[.]114:8080 - GET /fwlink
- 104.160.190[.]114 port 4443 - HTTPS traffic
The first HTTP GET request, ending with WWFh, returned 208,473 bytes of an encoded binary that most likely decodes to a Windows binary used for Cobalt Strike. Follow the TCP stream for this HTTP request, and you should see information shown below in Figure 30.
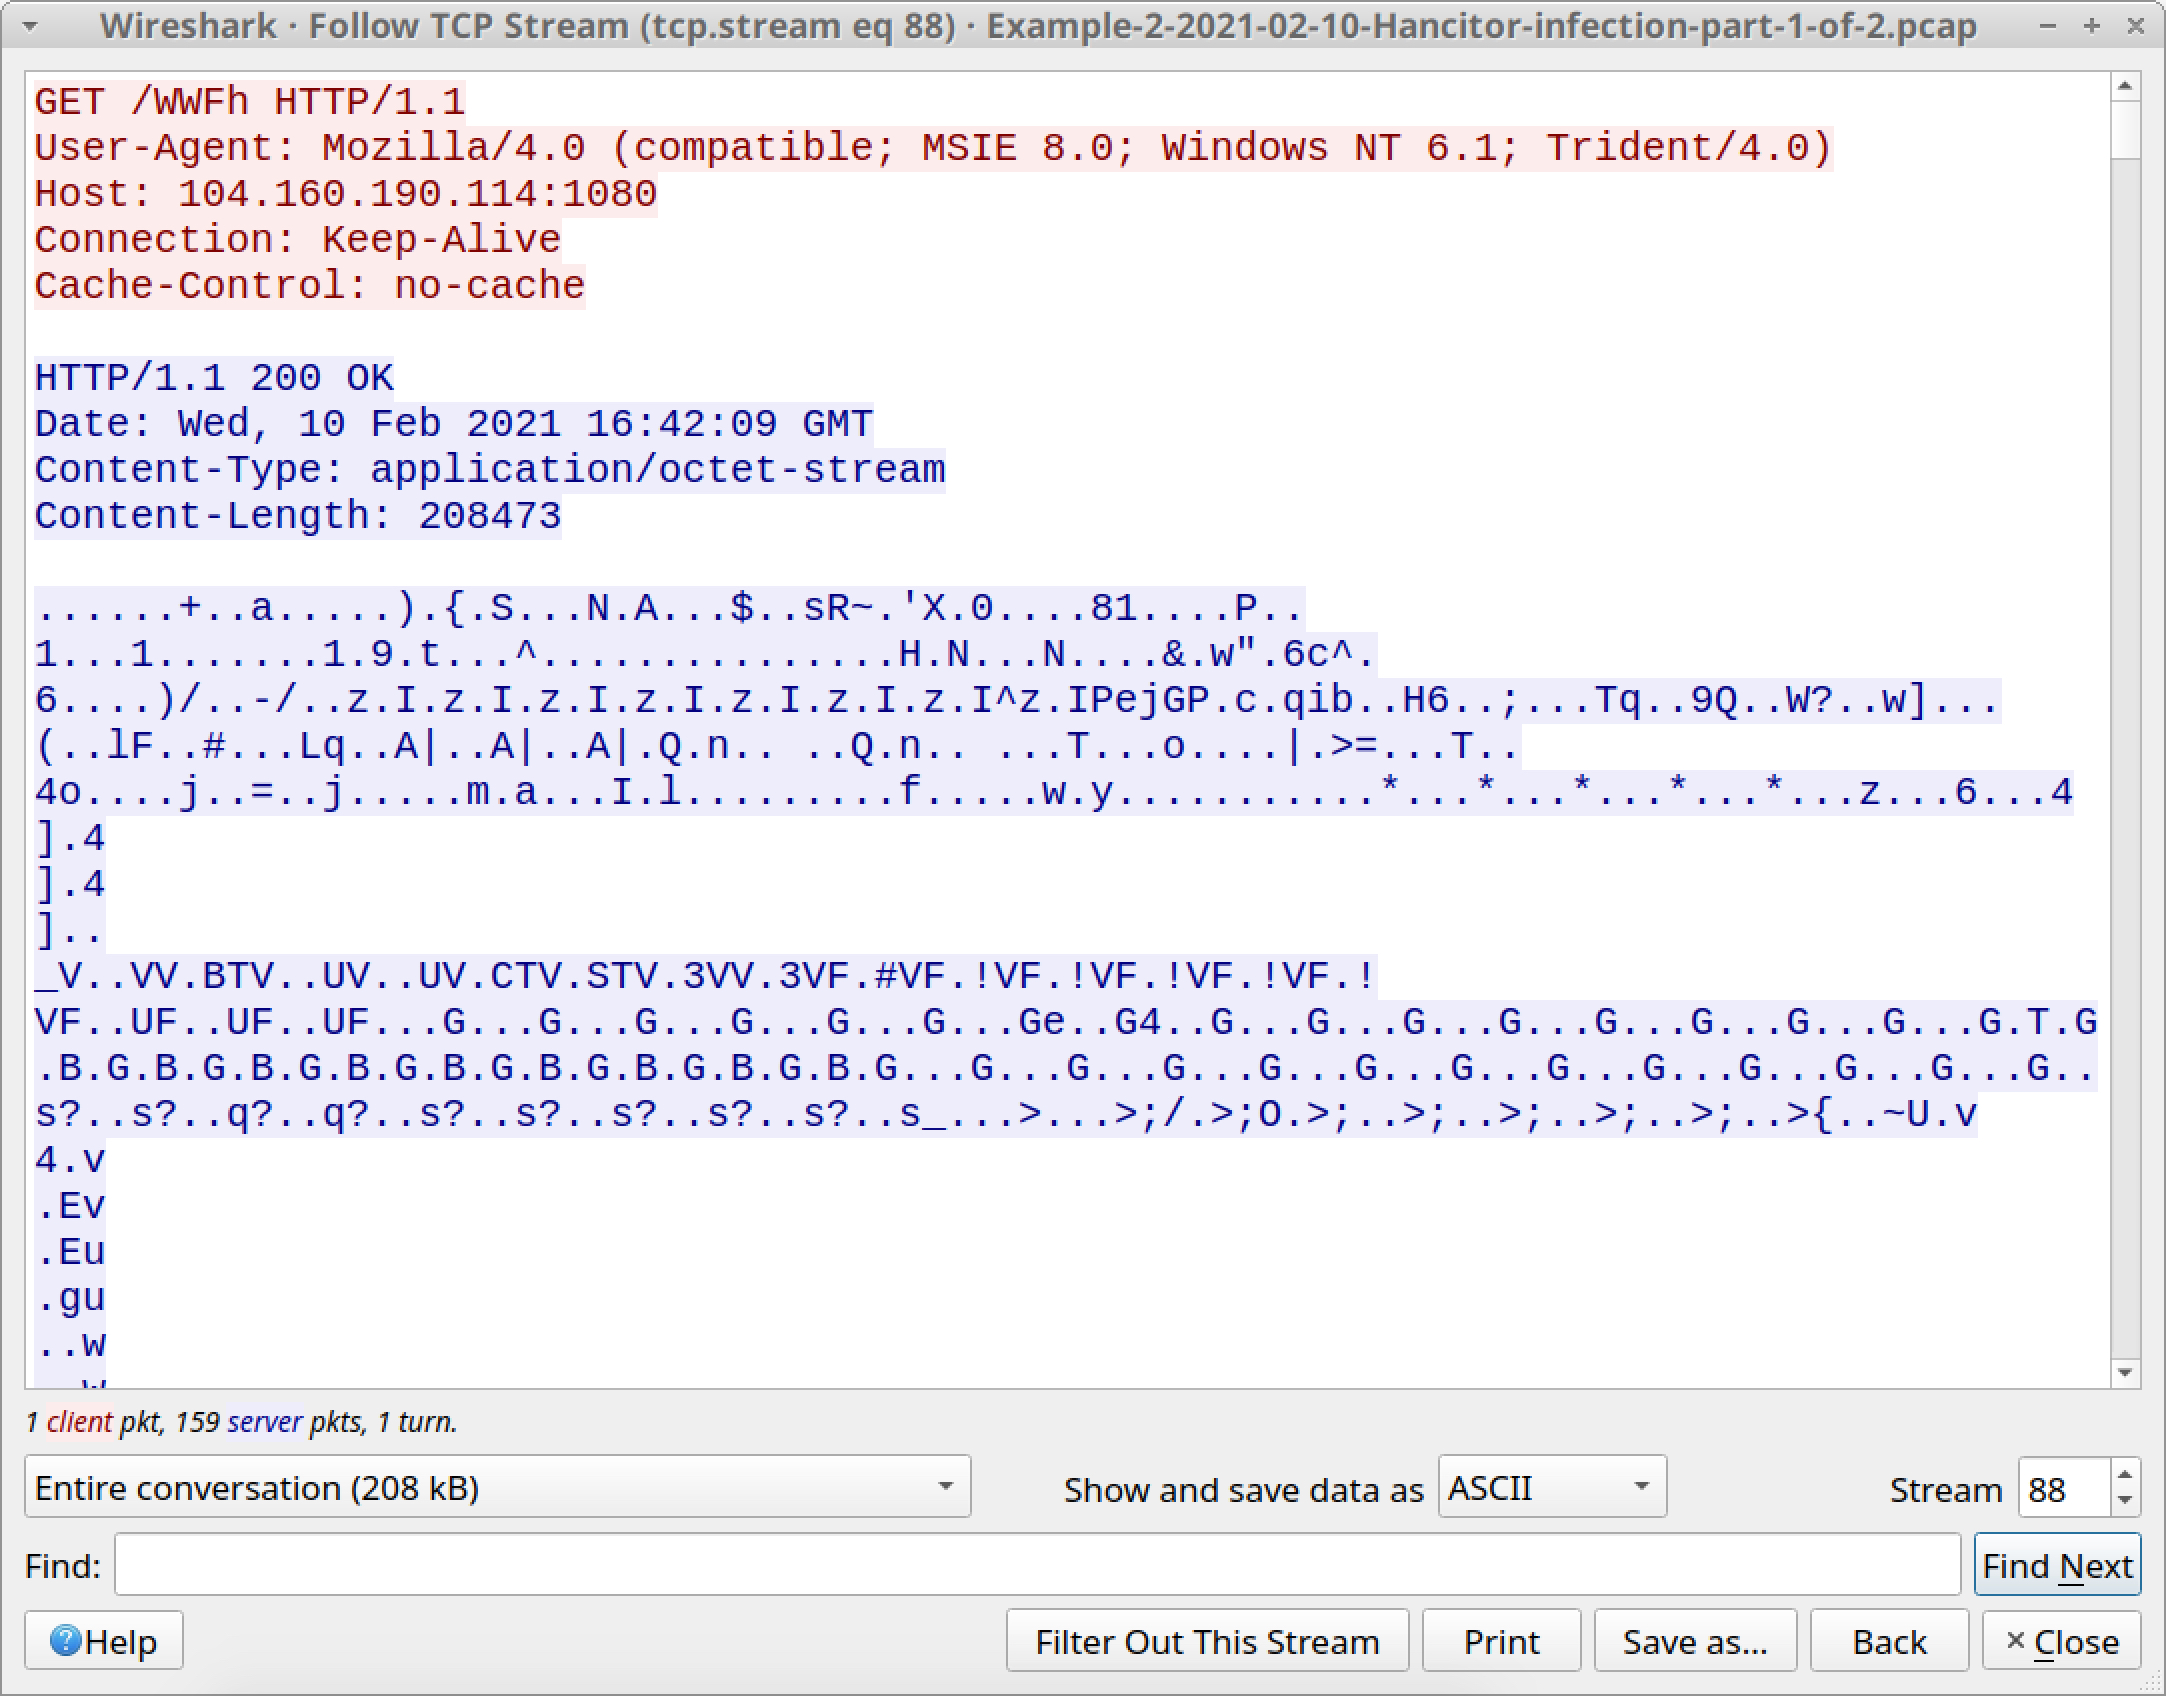
![The first HTTP request to 104.160.190[.]114:8080 for fwlink returned 48 bytes of encoded data, shown here.](https://unit42.paloaltonetworks.com/wp-content/uploads/2021/04/word-image-30.jpeg)
Our next pcap for our second example is from later during the same infection, when we see indicators of Send-Safe spambot malware.
Example 2, Part 2: Hancitor C2, Cobalt Strike C2 and Send-Safe Spambot Malware
Open Example-2-2021-02-10-Hancitor-infection-part-2-of-2.pcap in Wireshark and use a basic web filter, as shown in Figure 32.
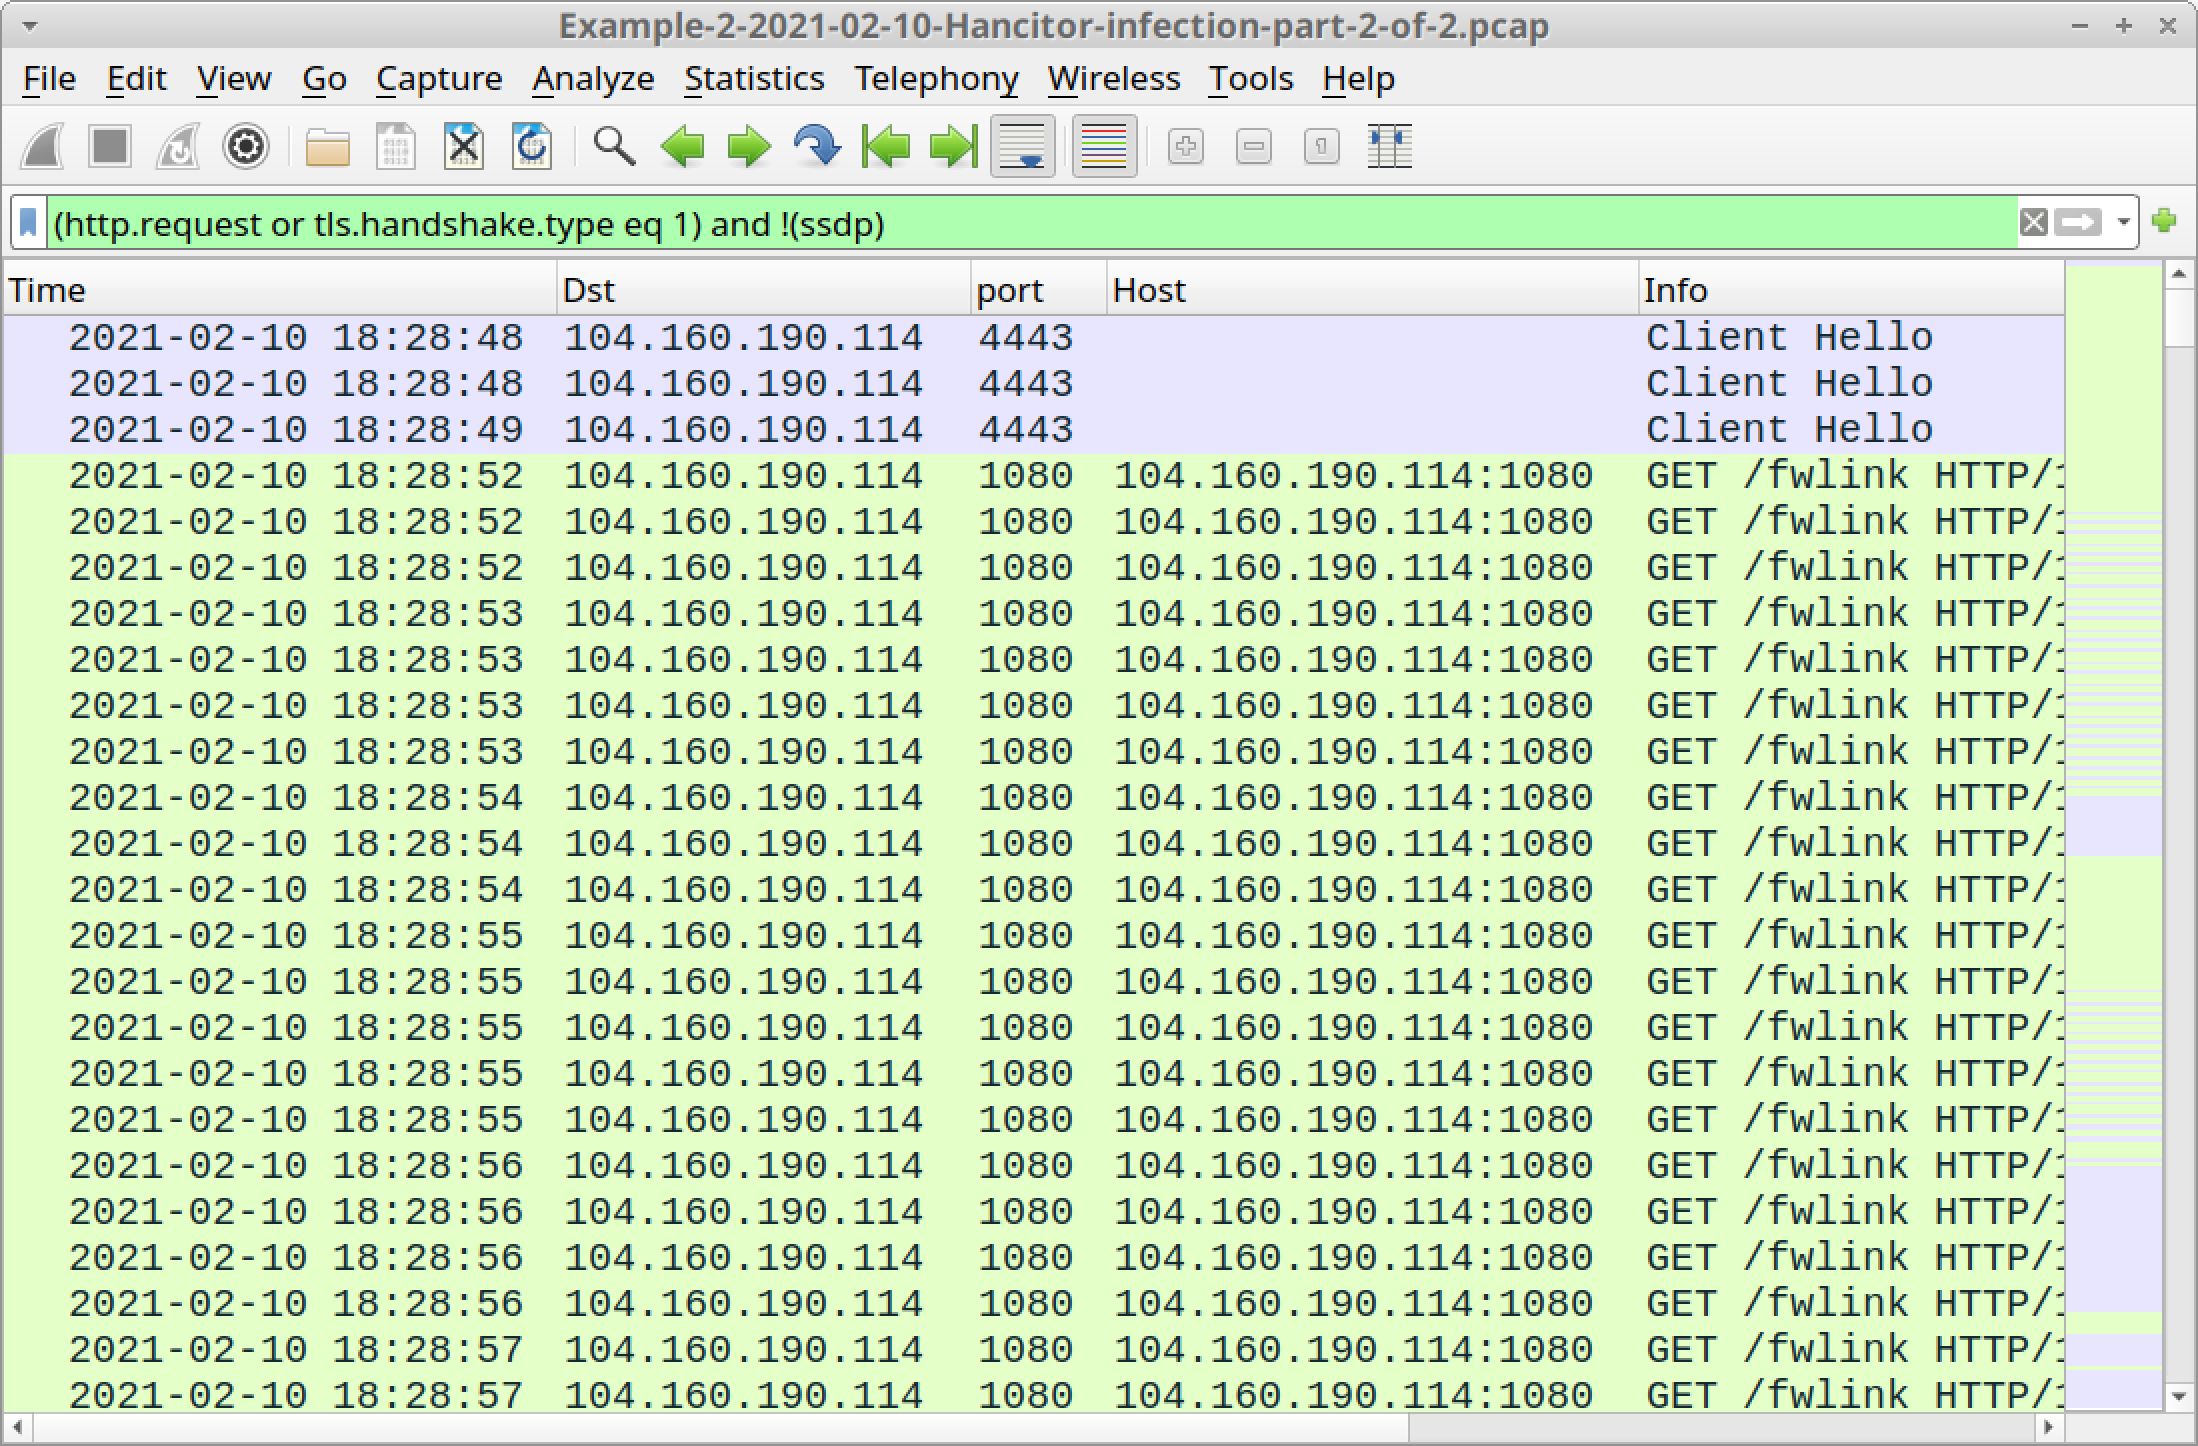
This pcap happens later during the same infection as our previous pcap. At times, we see up to three or four HTTP GET requests for Cobalt Strike C2 traffic during the same second.
However, this pcap reveals that Hancitor sent another Windows executable file, and that executable is Send-Safe-based spambot malware.
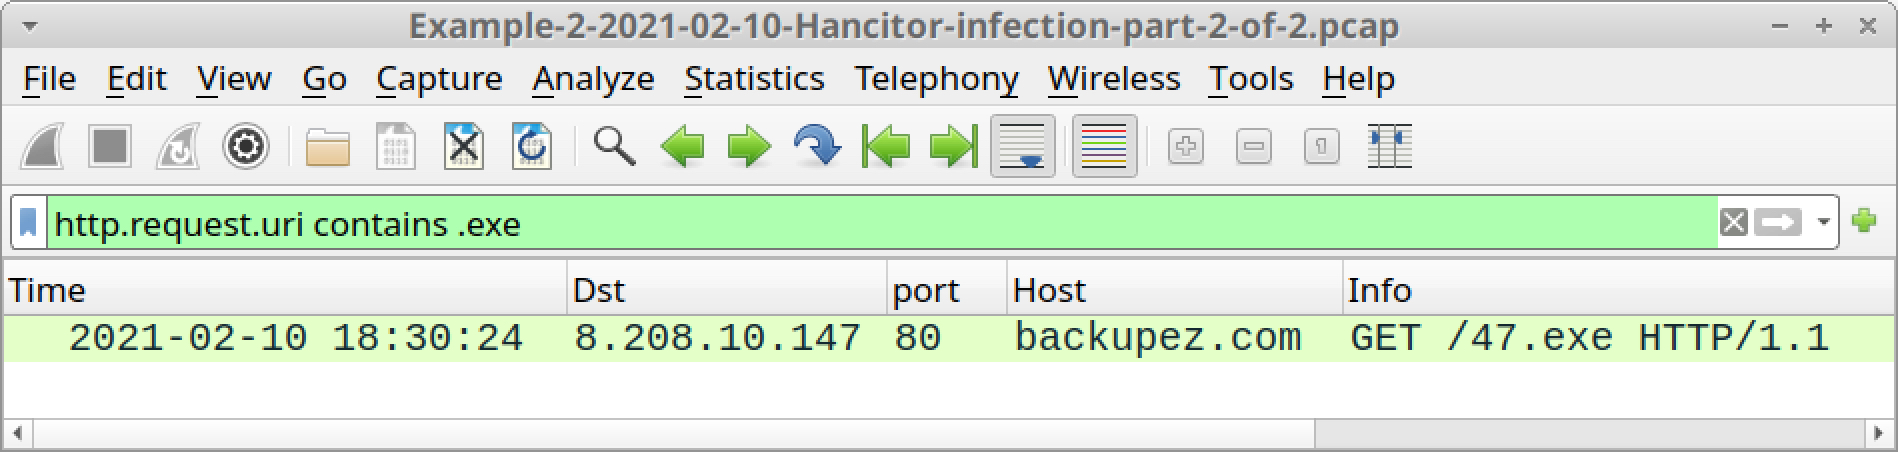
To find this Windows executable file, use the following Wireshark filter:
http.request.uri contains .exe
The result is another HTTP GET request to backupez[.]com, which is the domain used by Hancitor to push followup malware in part one of this example. The URL ends with 47.exe. See the result below in Figure 33.
You can export this file from the pcap using the menu path File --> Export Objects --> HTTP. Select the entry for 47.exe from backupez[.]com, as shown below in Figure 34.
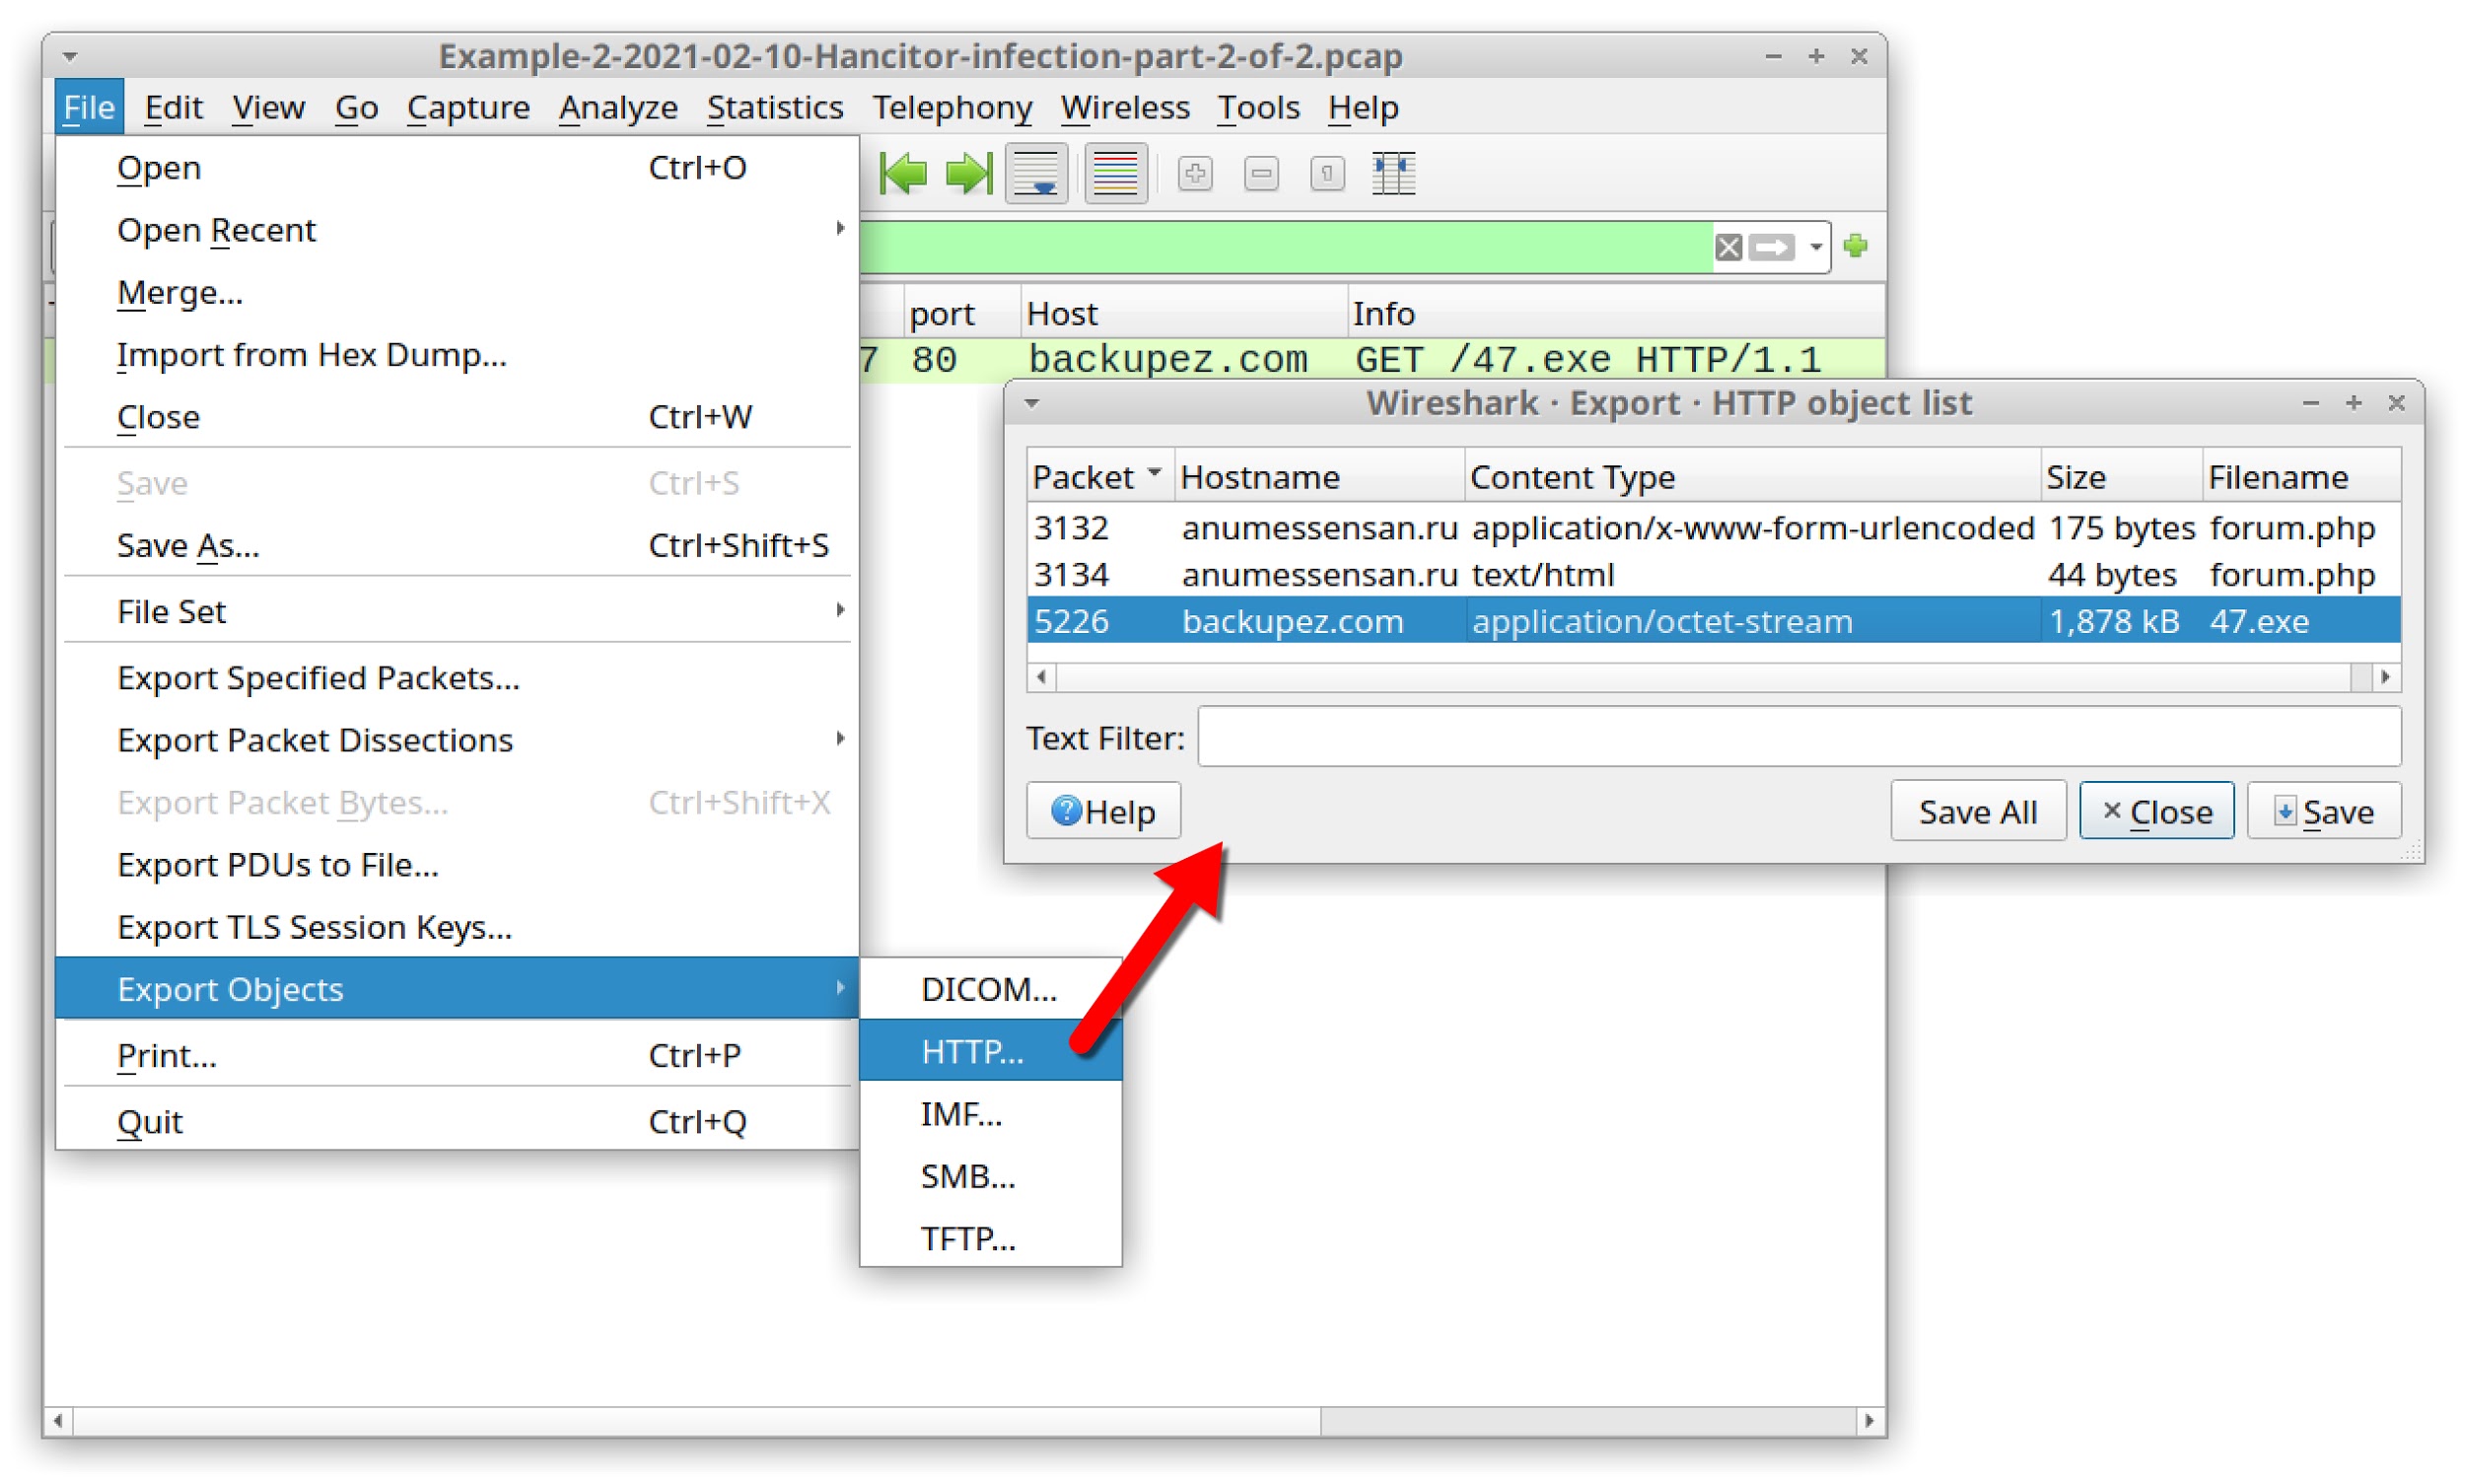
The SHA256 hash of 47.exe is:
51ca66a8ac7f4e072b39ef886d7d414d6c6868d0d67a46150835297e65493dc6
Send-Safe was a commercially available program sold through a now-defunct website named send-safe[.]com. It was advertised as "...a bulk-emailing program that allows you to send email from your own computer, or a remote computer with or without the use of proxies."
This program has been used by various threat actors as malware to turn infected Windows computers into spambot hosts.
What does Send-Safe spambot traffic look like? Our infected Windows host generated the following traffic:
- HTTPS traffic to 31.44.184[.]47 over TCP port 50025
- Traffic to 31.44.184[.]47 over UDP port 50026
- SMTP traffic sending out malicious spam pushing Hancitor.
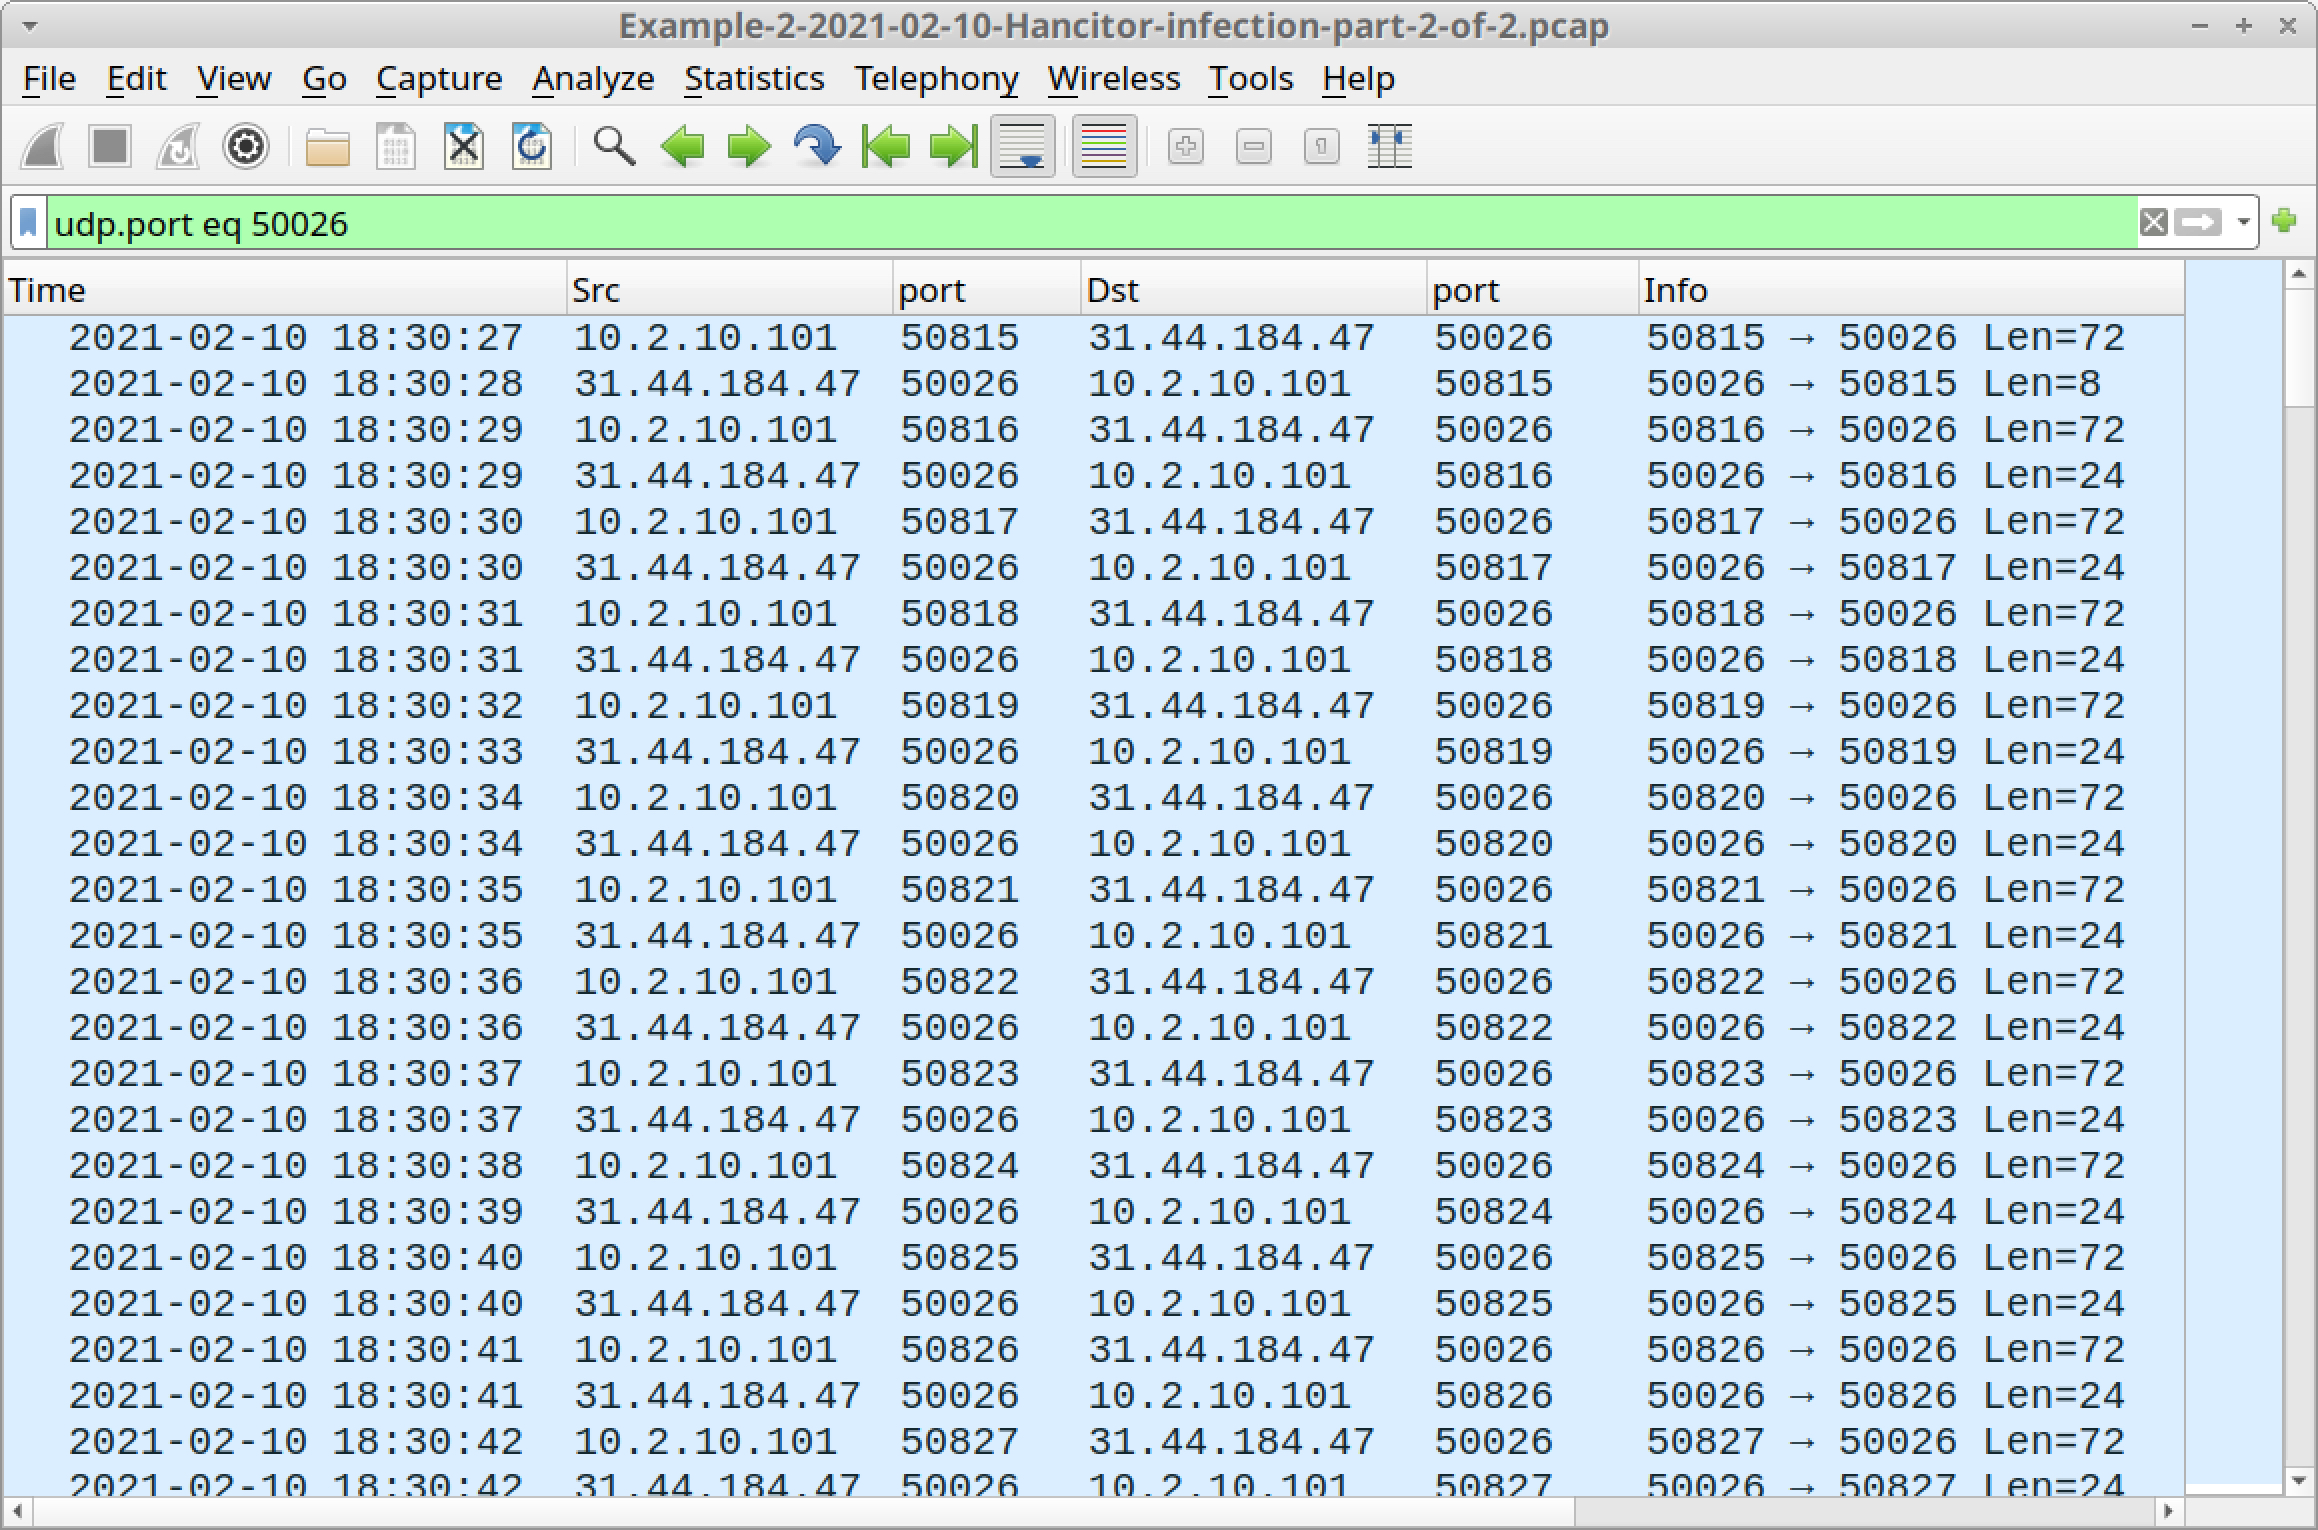
To find Send-Safe UDP traffic, use udp.port eq 50026 for your Wireshark filter. The results should look like Figure 35 below.
To view Send-Safe SMTP traffic and HTTPS traffic, use the following Wireshark filter:
(tcp.port eq 50025 and tls.handshake.type eq 1) or smtp.data.fragment
Your results should look similar to Figure 36.

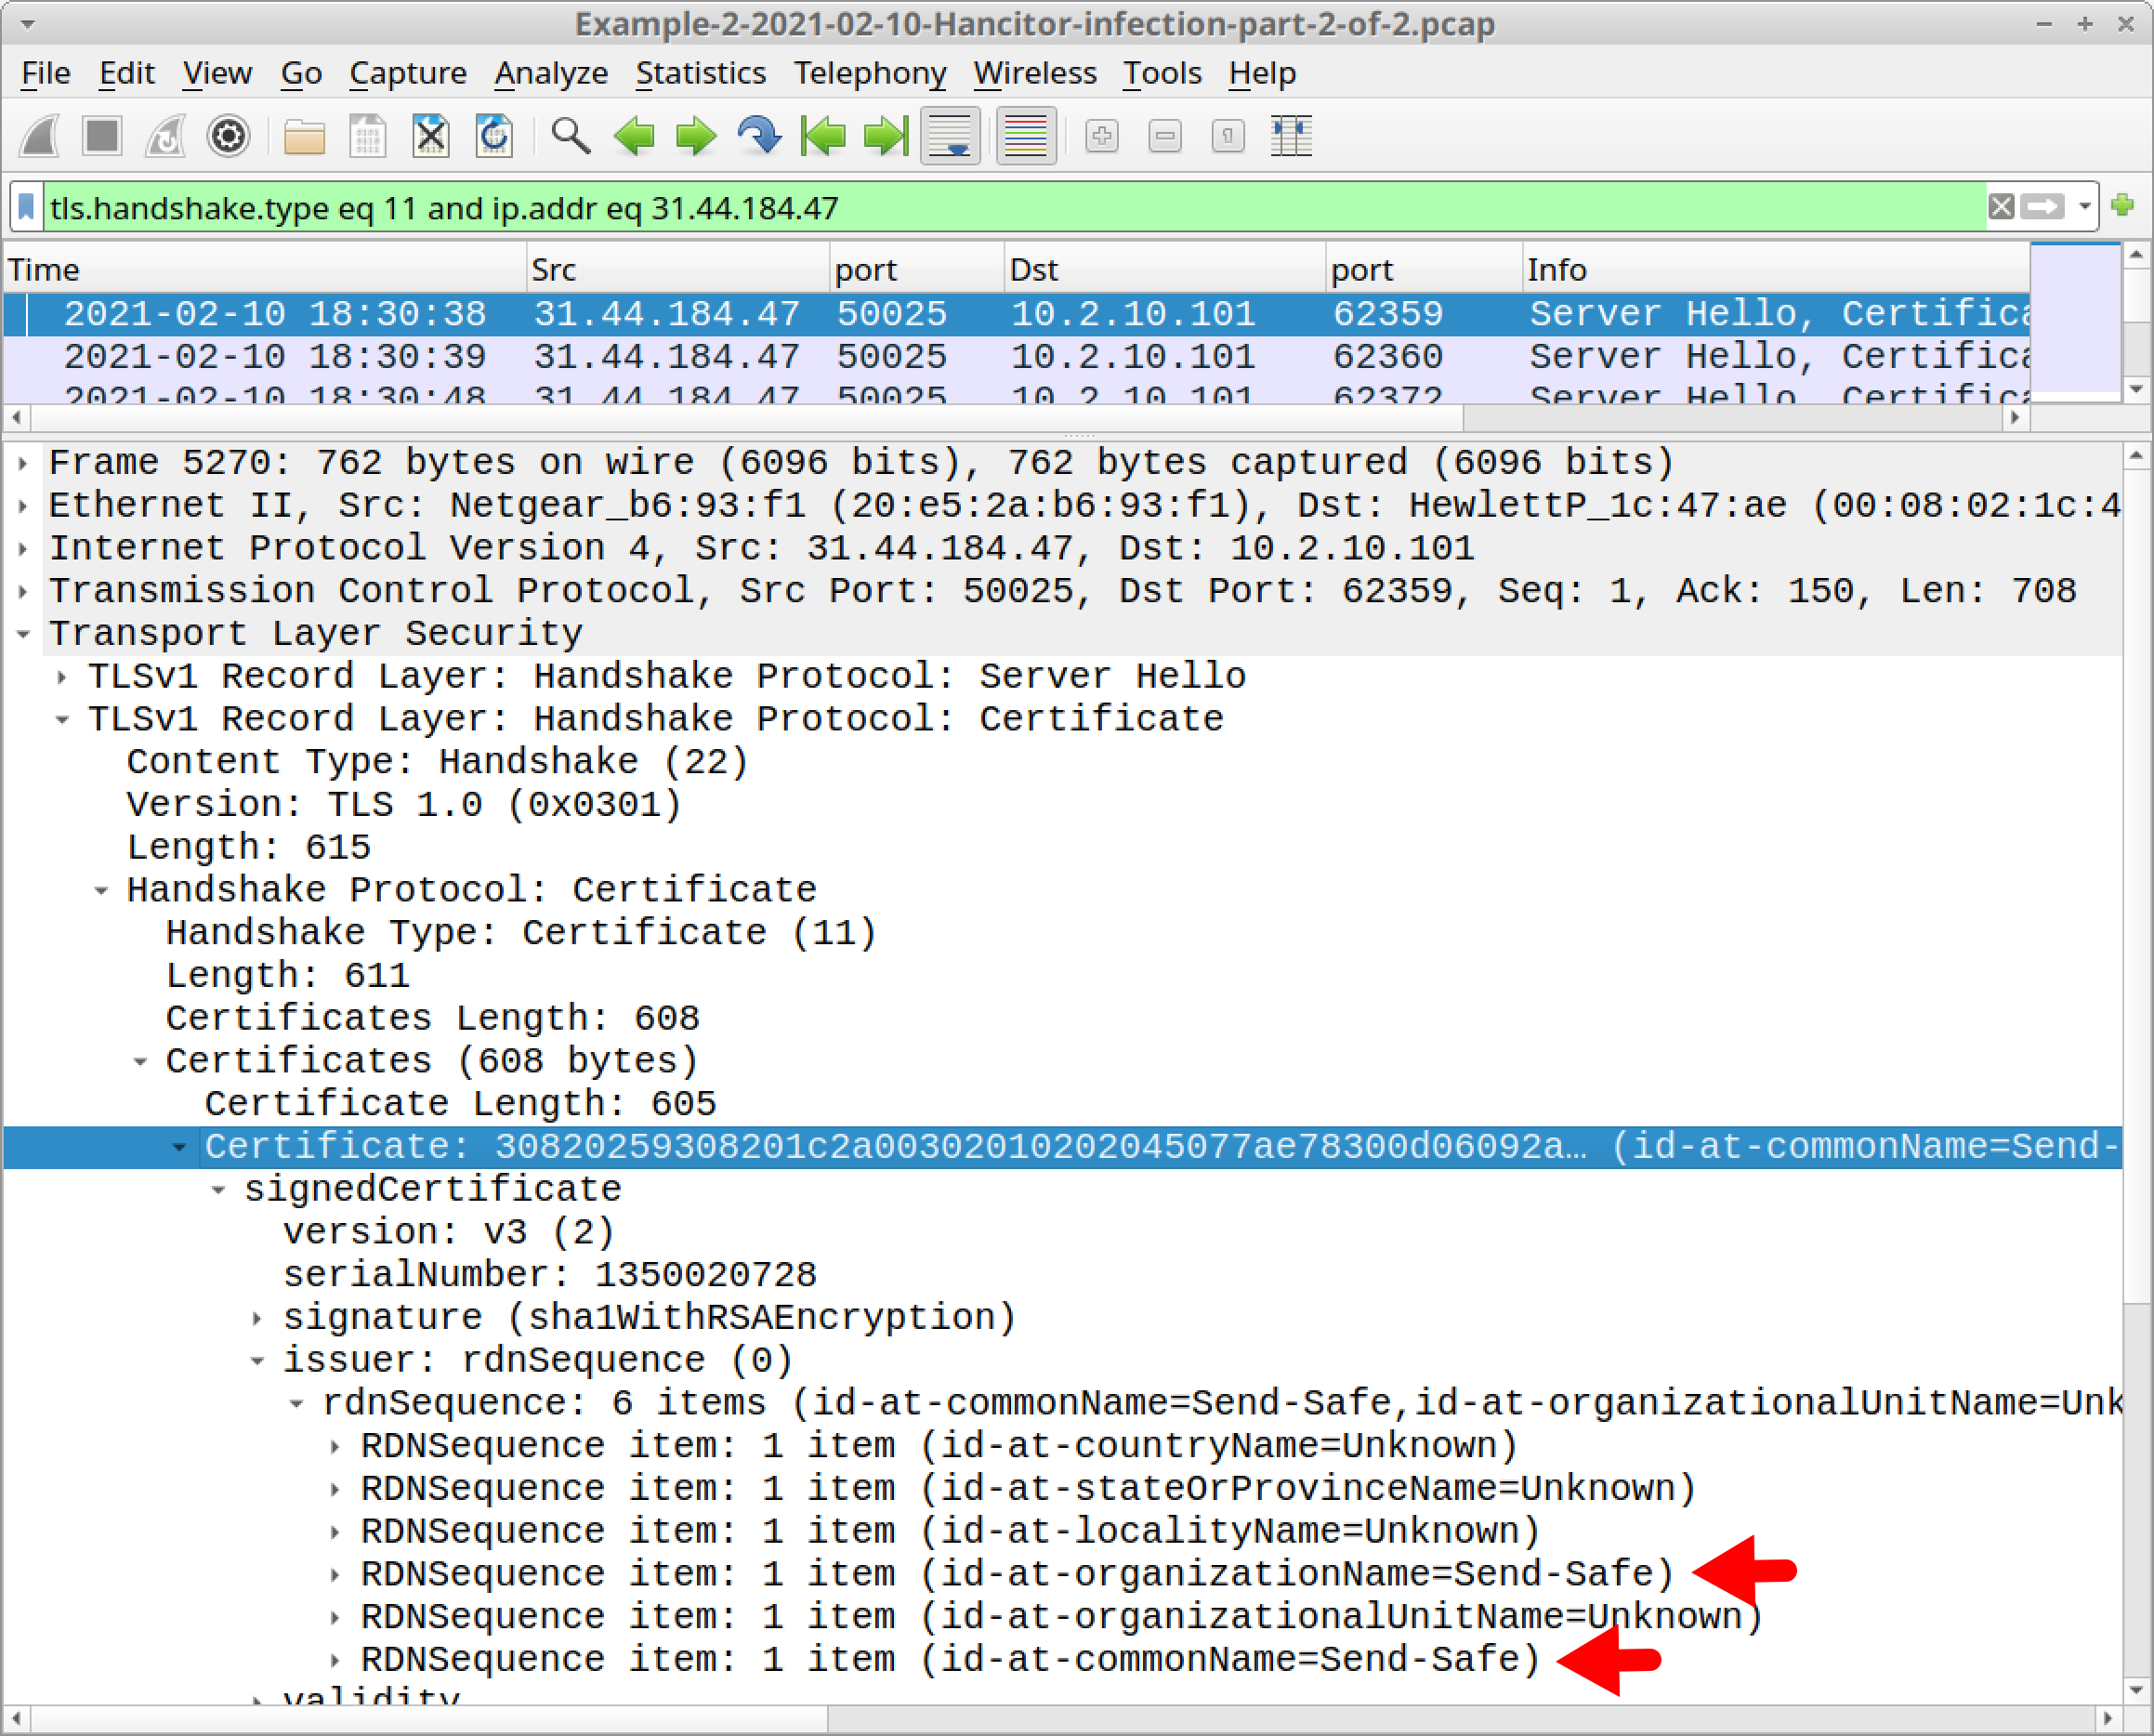
HTTPS traffic over TCP port 50025 caused by Send-Safe has certificate issuer data that uses Send-Safe as the organizationName and commonName, as shown below in Figure 37.
Since the SMTP traffic in this pcap is unencrypted, you can extract the emails using Wireshark. The menu path is File --> Export Objects --> IMF as shown below in Figure 38.
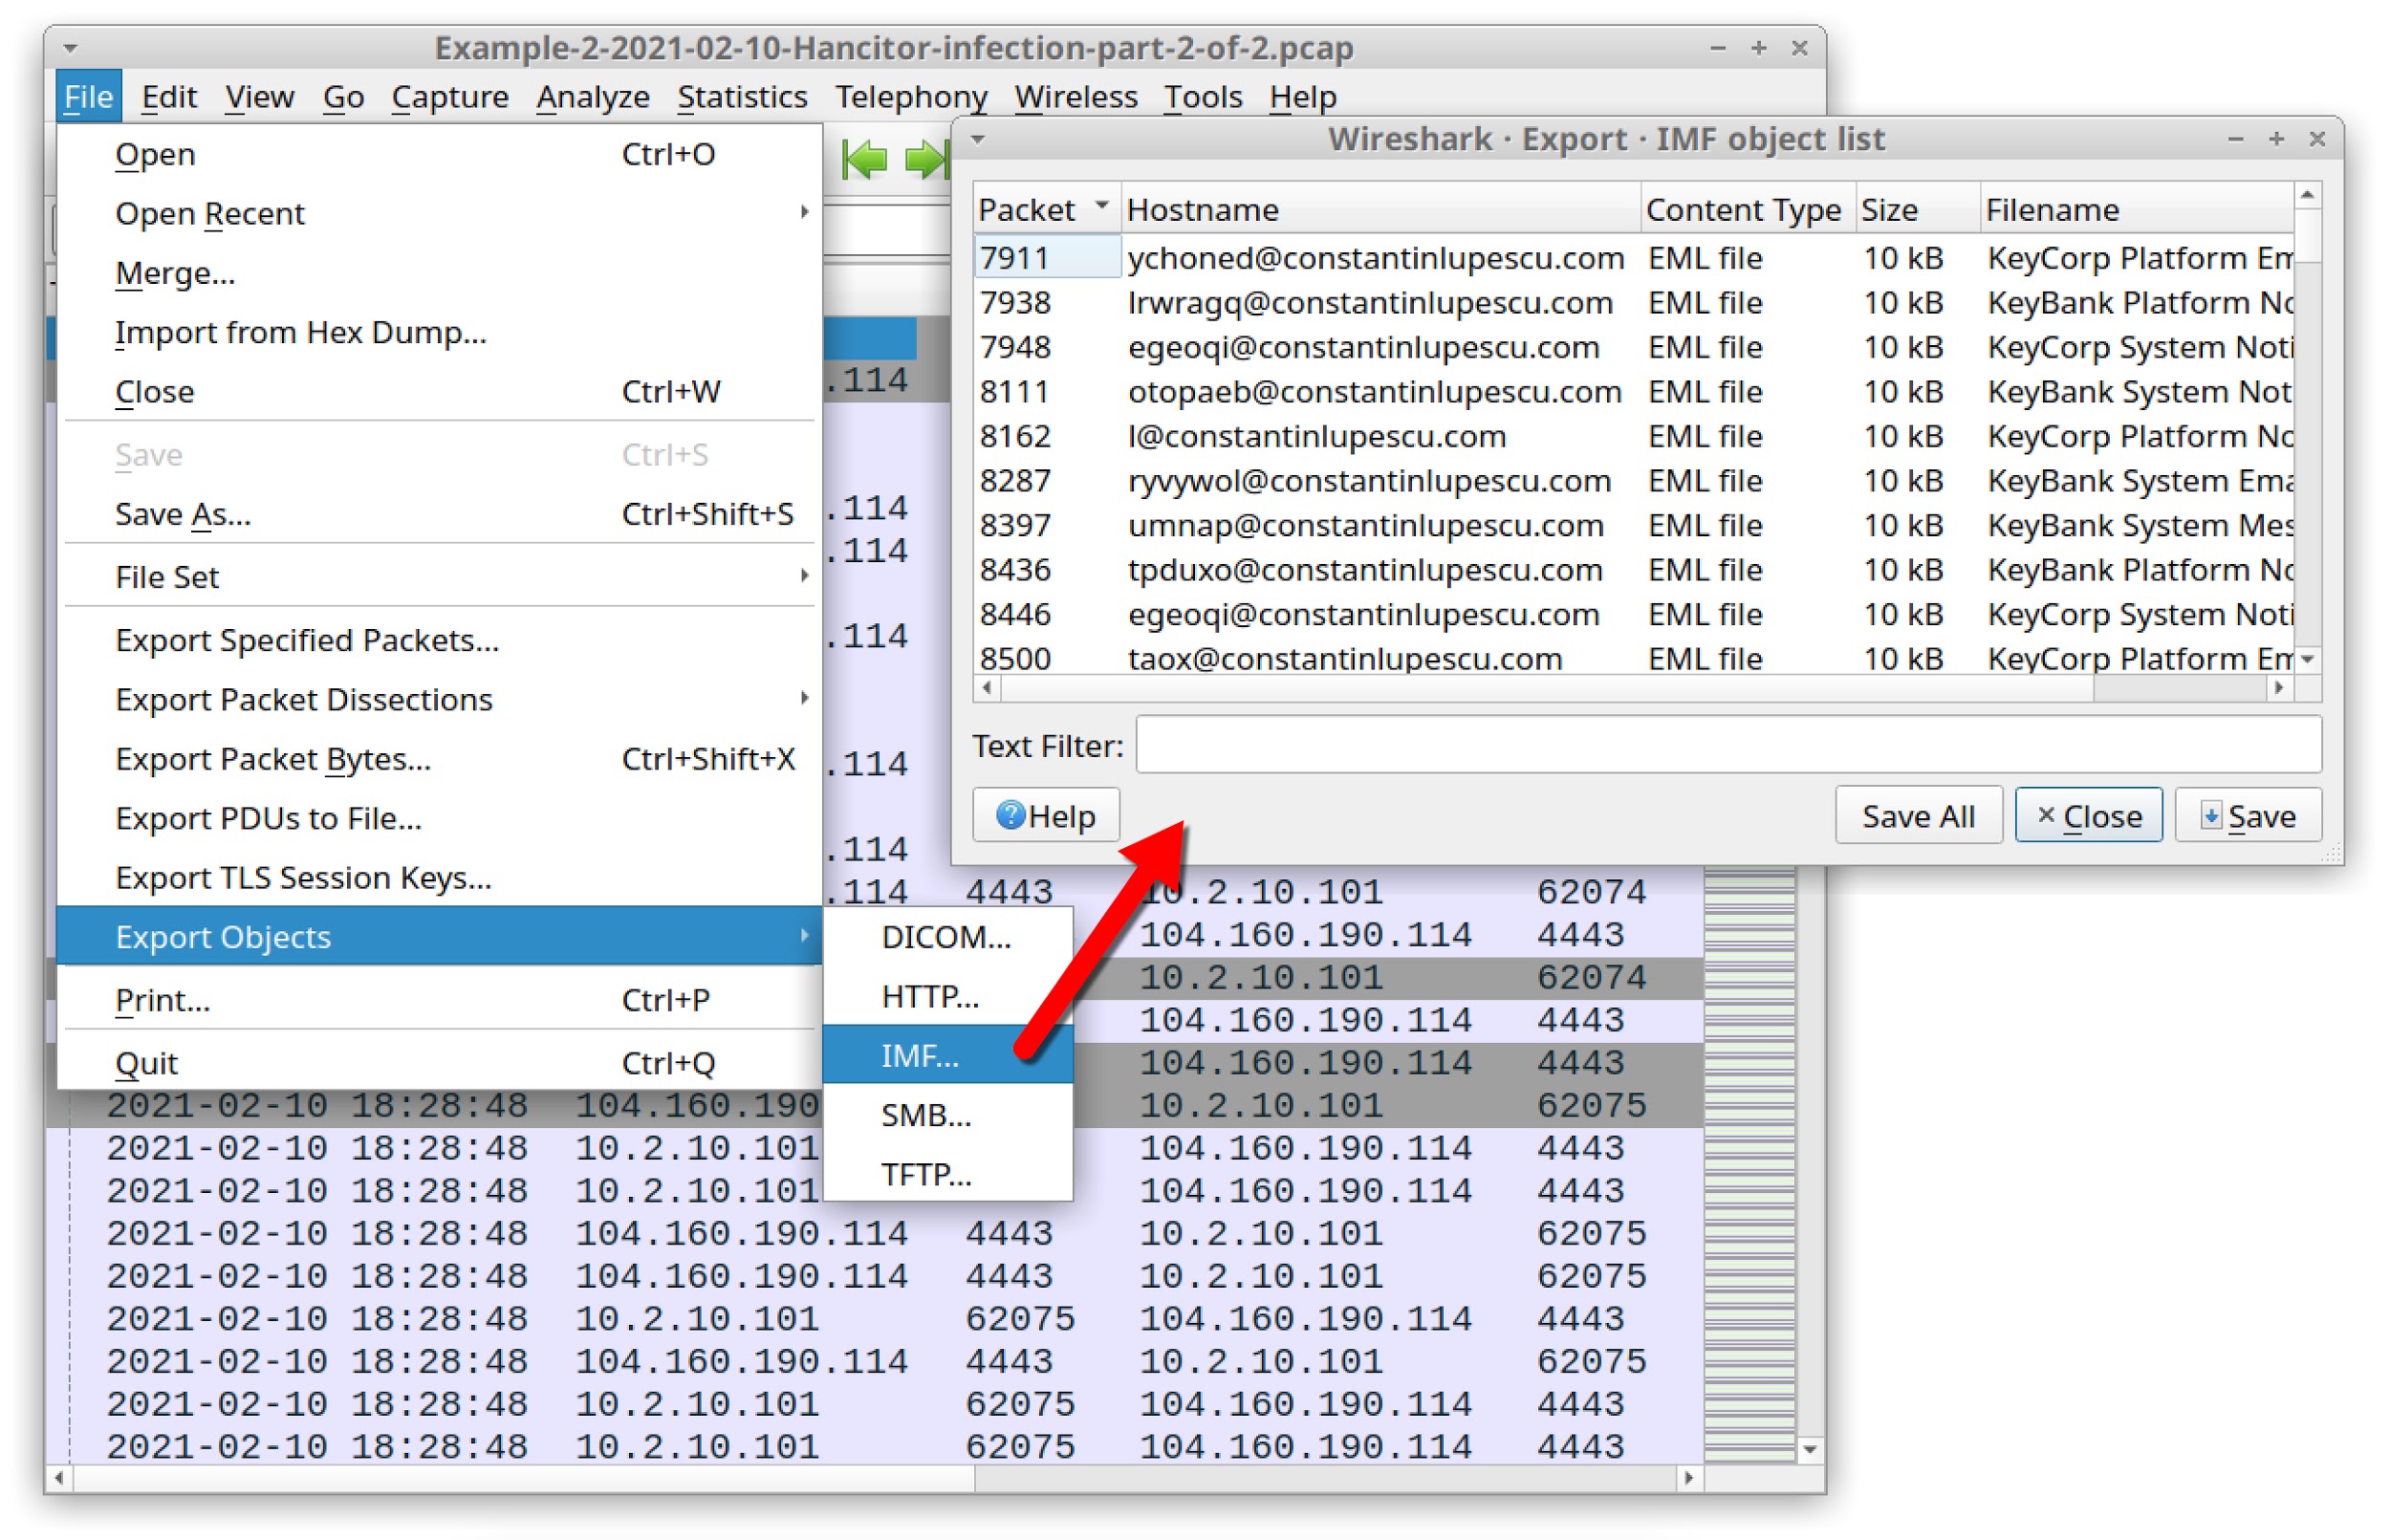
This pcap contains 167 emails you can export. On average, several messages were pushed out each second from this Send-Safe-infected Windows host.
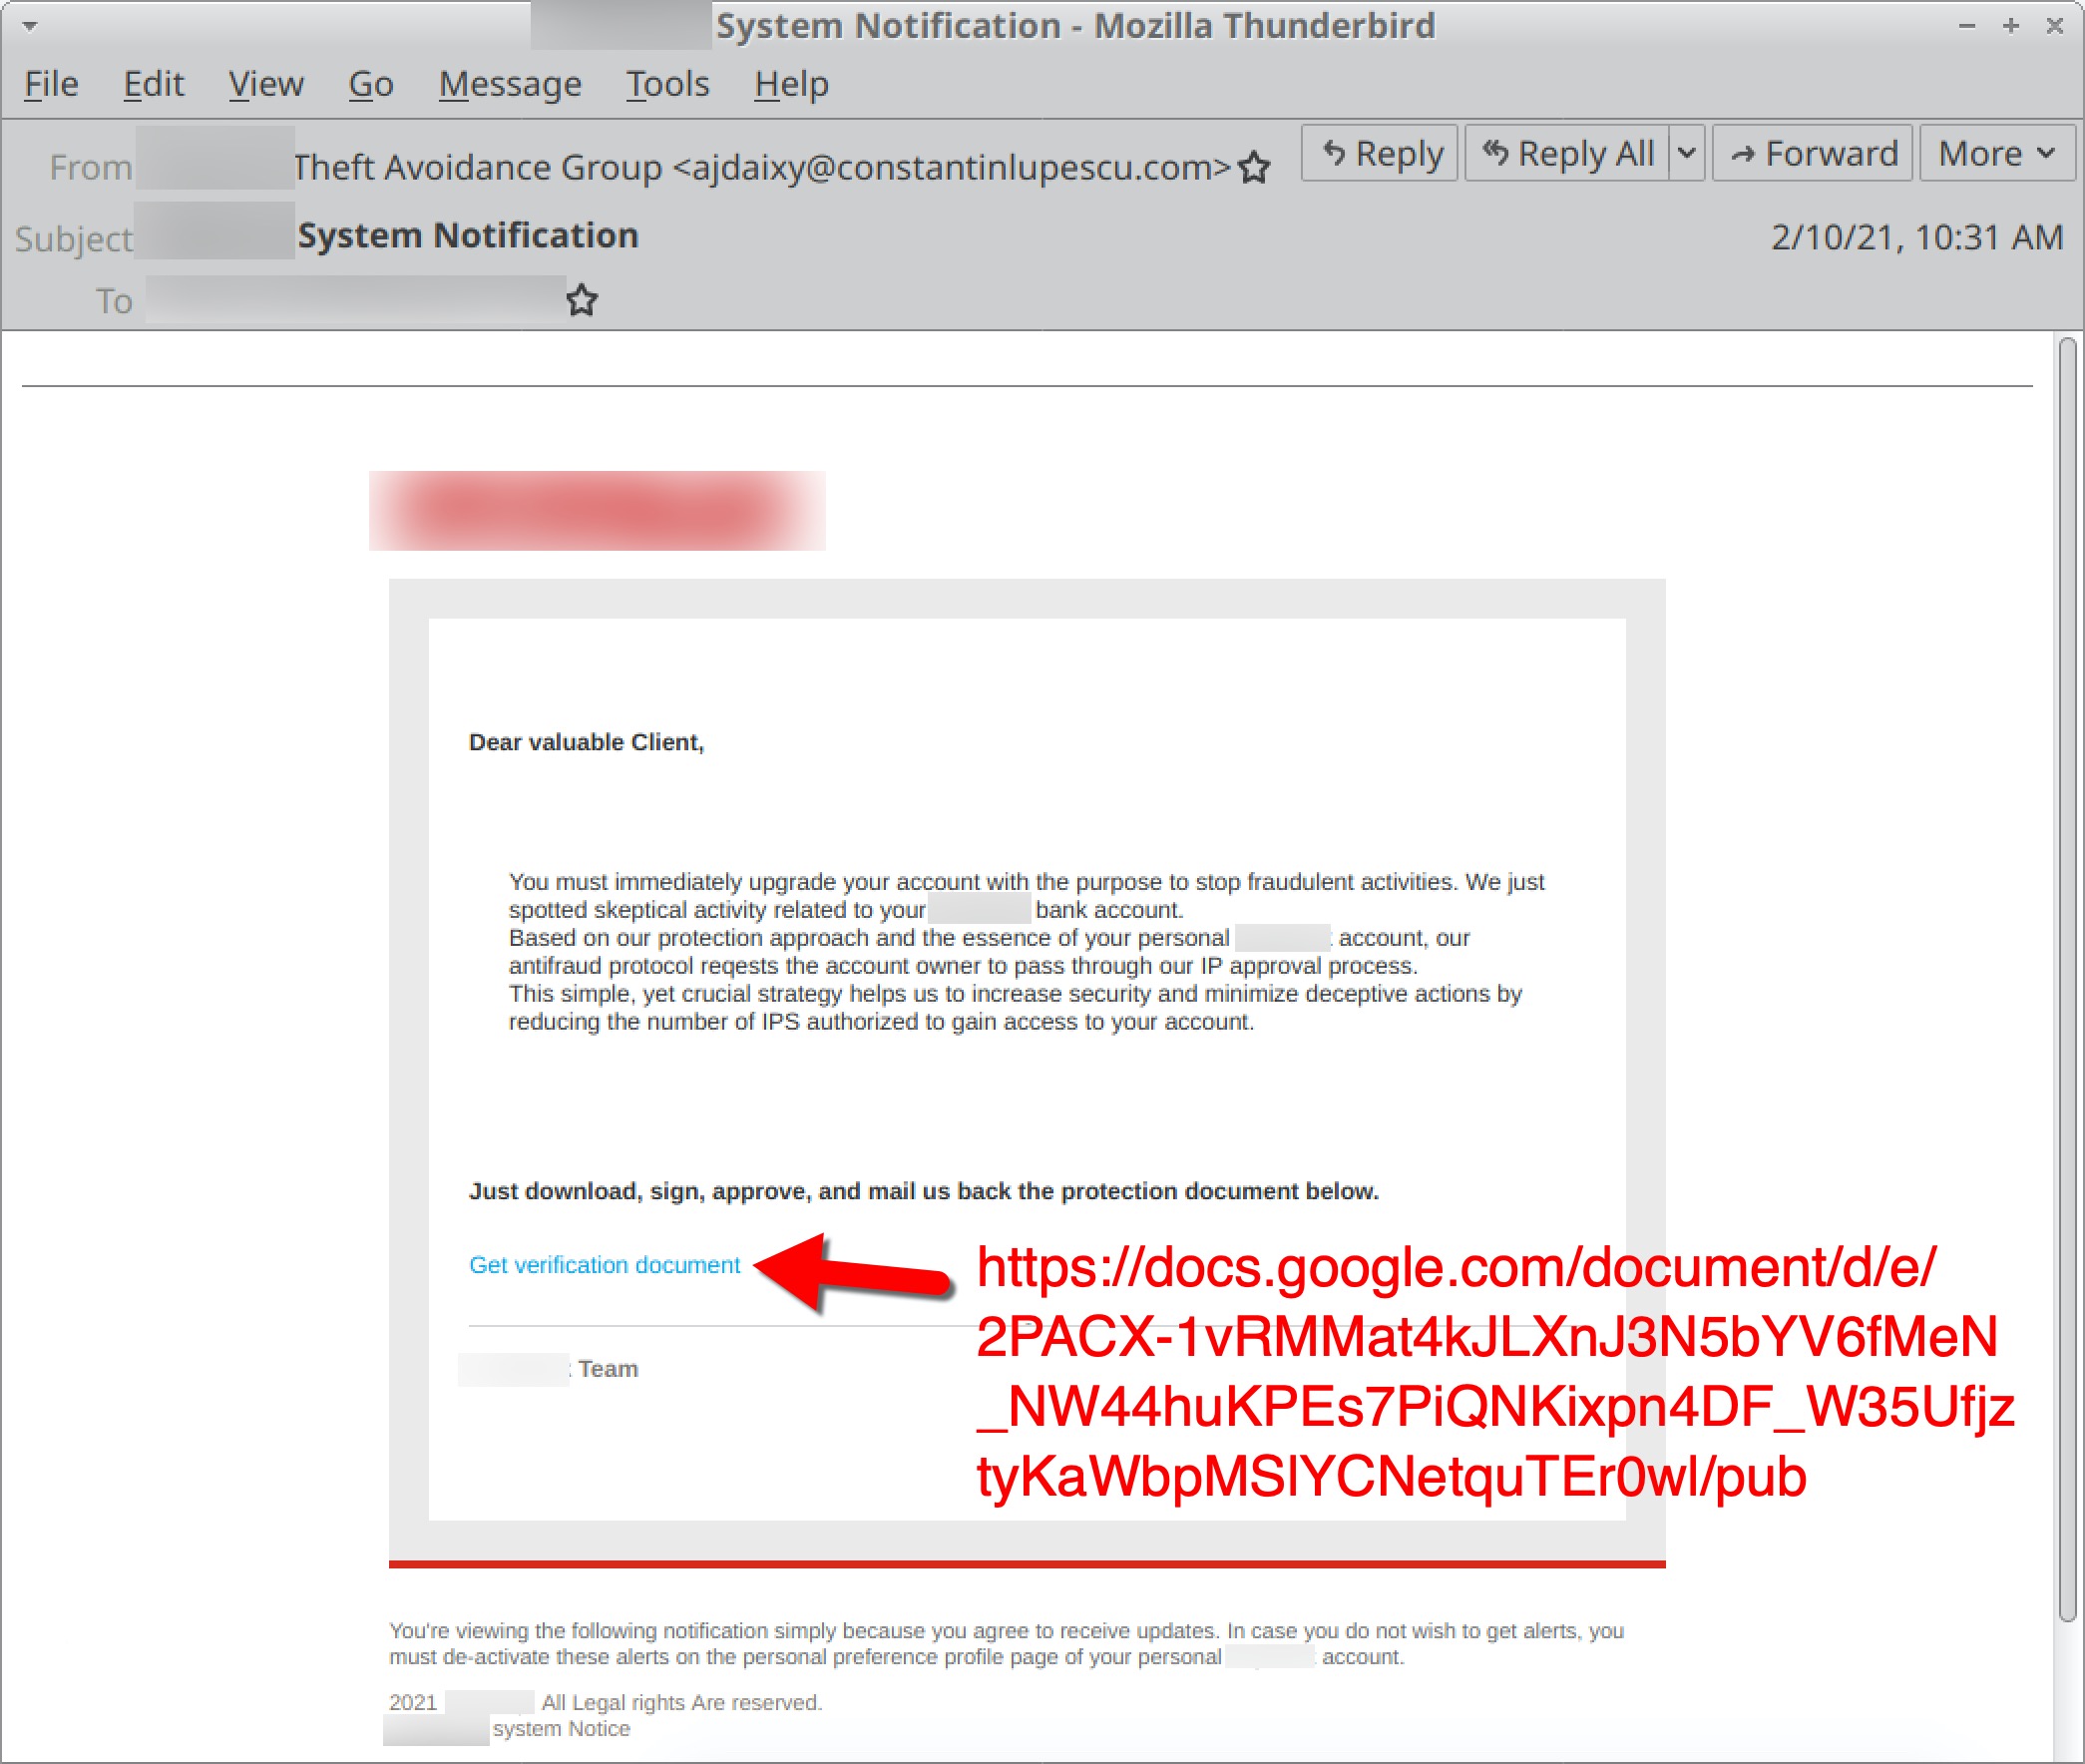
Below, Figure 39 shows what one of the exported items of Hancitor spam looks like in a Thunderbird email client. The template for this specific wave of Hancitor spam spoofed a well-known bank.
Example 3: Hancitor with Ficker Stealer, Cobalt Strike and a Network Ping Tool
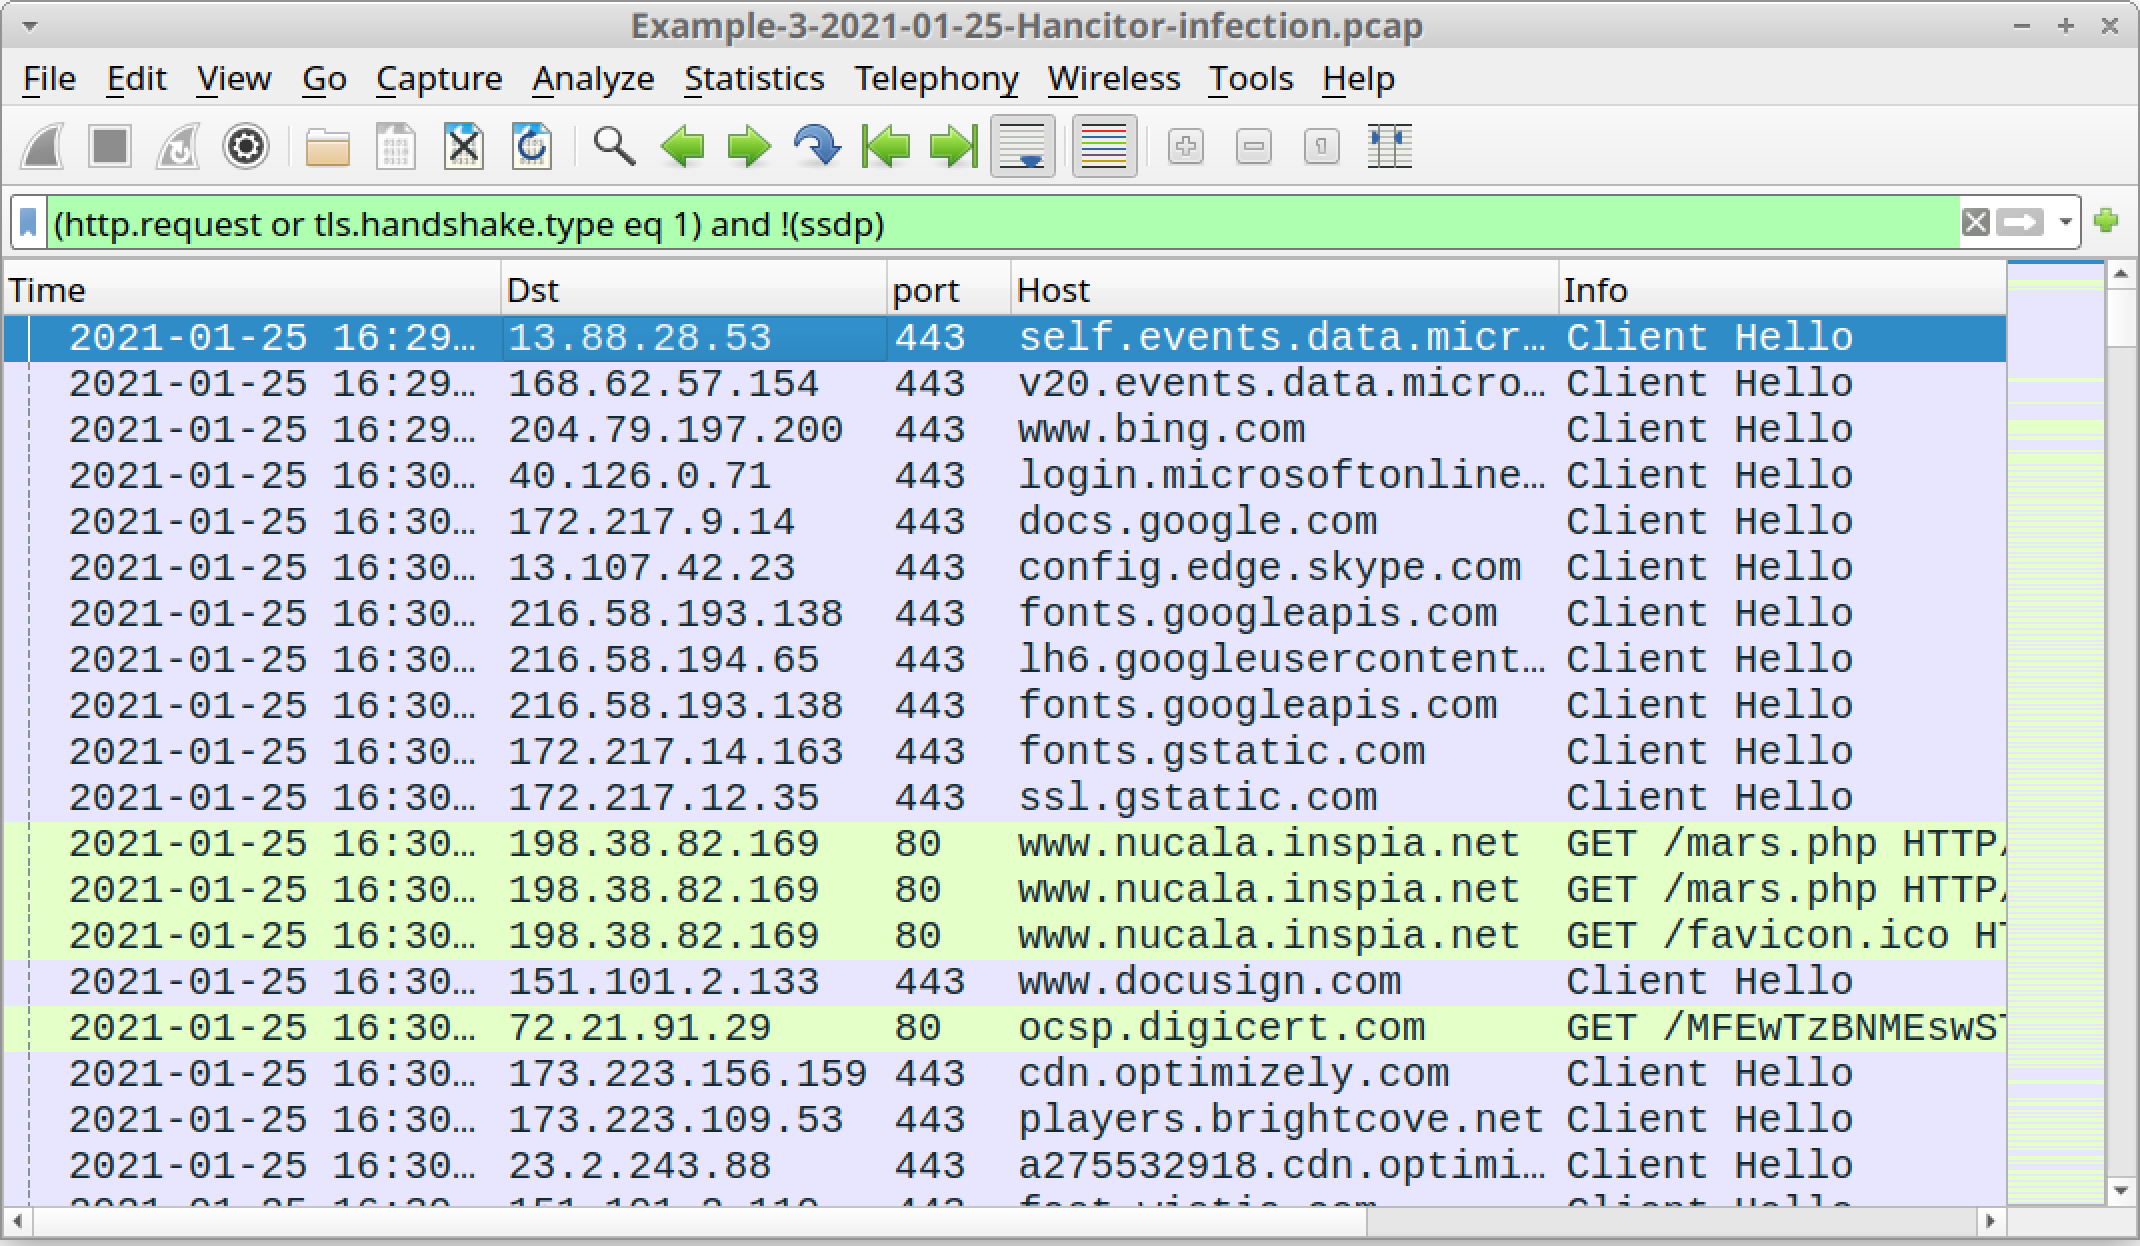
Open Example-3-2021-01-25-Hancitor-infection.pcap in Wireshark and use a basic web filter, as shown in Figure 40.
The pcap comes from an AD environment with the following characteristics:
- LAN segment range: 10.1.25.0/24
- Domain: permafrostie.com
- Domain controller: 10.1.25.2 - Permafrostie-DC
- LAN segment gateway: 10.1.25.1
- LAN segment broadcast address: 10.1.25.255
- IP address of the infected Windows host: 10.1.25.101
- Host name of the infected Windows host: DESKTOP-GAL3OV5
- User account name on the infected Windows host: barry.paulsen
The page that delivered the initial Word document was www.nuicala.inspia[.]net/mars.php. As we did in our two previous examples, we can export the web page, open it in a browser and get the malicious Word document used to kick off this Hancitor infection.
The SHA256 hash and name for the extracted malicious Word document is:
8922dbb1e7f157c62fe64d03278757d78d136eb94d00ac2df101789d602f1224 0125_206410993.doc
Based on techniques from our first two examples, you can find the following information from this Hancitor infection:
Hancitor traffic:
- port 80 - api.ipify.org - GET /
- 83.220.169[.]45 port 80 - wasintodese[.]ru - POST /8/forum.php
Followup malware for Cobalt Strike:
- 8.209.78[.]68 port 80 - drivewaysnowservice[.]com - GET /2101.bin
- 8.209.78[.]68 port 80 - drivewaysnowservice[.]com - GET /2101s.bin
Followup malware for Ficker Stealer
- 8.209.78[.]68 port 80 - drivewaysnowservice[.]com - GET /6gfbd5ws.exe
Cobalt Strike traffic:
- 23.106.80[.]14 port 1080 - 23.106.80[.]14:1080 - GET /JdHf
- 23.106.80[.]14 port 1080 - 23.106.80[.]14:1080 - GET /match
- 23.106.80[.]14 port 1080 - 23.106.80[.]14:1080 - POST /submit.php?id=2612103345
- 23.106.80[.]14 port 4443 - HTTPS traffic
Ficker Stealer traffic:
- port 80 - api.ipify.org - GET /?format=xml
- 185.100.65[.]29 port 80 - sweyblidian[.]com - TCP traffic
Of note, Ficker Stealer is the same binary for all examples in this tutorial, so we should see the same post-infection traffic by this malware. For Cobalt Strike, any HTTP POST request containing /submit.php?id= has an identification number that’s unique for each infected Windows host.
If you see these HTTP POST requests with /submit.php?id= from Cobalt Strike, be alert for indicators of additional malware.
Malware sent through Cobalt Strike appears as an encoded binary that is decoded on the victim host. Because of this, we will not find the actual malware binary in the pcap. Instead, followup malware sent through Cobalt Strike is identified by its post-infection traffic.
In this case, we see ICMP scanning that indicates a network ping tool was sent through Cobalt Strike. Use the Wireshark filter icmp in the pcap, and your column display should look similar to Figure 41 below.

As described in our recent blog about Hancitor, samples of the network ping tool recovered from infected Windows hosts generate approximately 1.5 GB of ICMP traffic, as they ping more than 17 million IP addresses targeting internal, non-routable IPv4 address space.
Based on our tests, these network ping tools hit the following address space:
- 192.168.0.0 through 192.168.254.254
- 172.16.0.0 through 172.31.254.254
- 10.0.0.0 through 10.254.254.254
This much ping traffic is prohibitively slow to display in Wireshark. The pcap for our third example of Hancitor has ping traffic to 192.168.0.0/16 and some of the ping traffic hitting the 172.16.0.0/12 address space before the recording was stopped.
Example 4: Hancitor with Ficker Stealer, Cobalt Strike and NetSupport Manager RAT
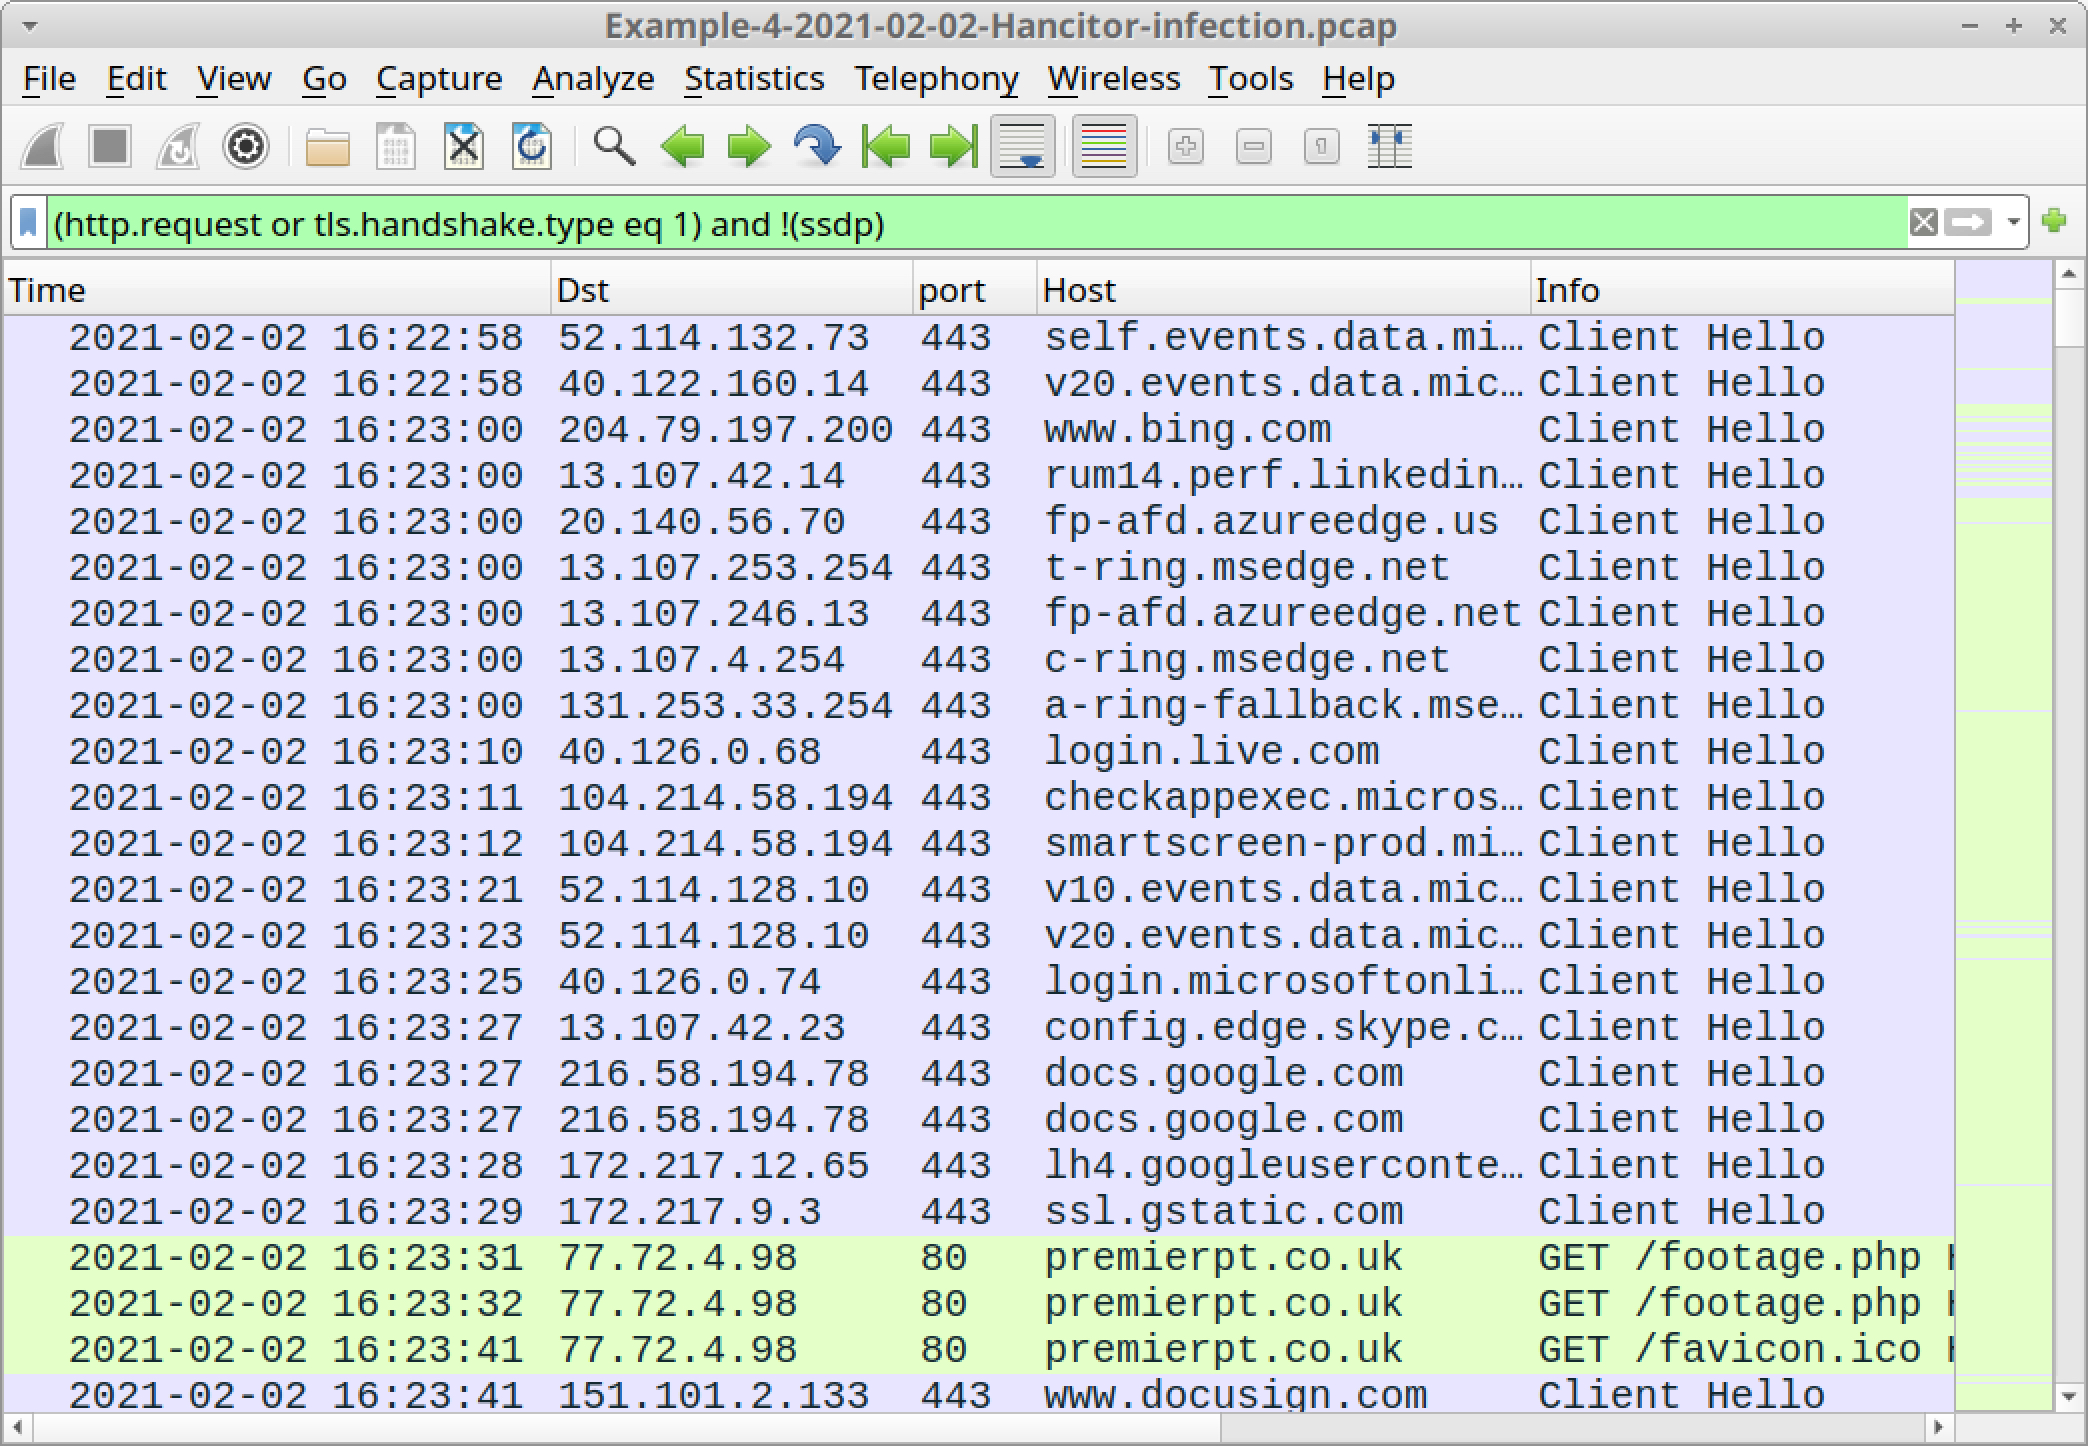
Open Example-4-2021-02-02-Hancitor-infection.pcap in Wireshark and use a basic web filter, as shown in Figure 42.
The pcap comes from an AD environment with the following characteristics:
- LAN segment range: 10.2.2.0/24
- Domain: sillybobcat.com
- Domain controller: 10.2.2.2 - Cats-DC
- LAN segment gateway: 10.2.2.1
- LAN segment broadcast address: 10.2.2.255
- IP address of the infected Windows host: 10.2.2.101
- Host name of the infected Windows host: DESKTOP-NDGEE4D
- User account name on the infected Windows host: baxter.murdoch
The page that delivered the initial Word document was premierpt.co[.]uk/footage.php. As we did for our previous examples, we can export the web page, open it in a browser and get the malicious Word document used to kick off this Hancitor infection.
The SHA256 hash and name for the extracted malicious Word document is:
b60431e0fe5bf2b5c7cd5e01add62d24cd6ad2c99eb6a23fb5a2967d812cbf08 0202_10846666250132.doc
Based on techniques from our previous examples, you can find the following information from this Hancitor infection:
Hancitor traffic:
- port 80 - api.ipify.org - GET /
- 45.9.191[.]107 port 80 - knorshand[.]ru - POST /8/forum.php
Followup malware for Cobalt Strike:
- 8.209.78[.]68 port 80 - bobcatofredding[.]com - GET /0102.bin
- 8.209.78[.]68 port 80 - bobcatofredding[.]com - GET /0102s.bin
Followup malware for Ficker Stealer
- 8.209.78[.]68 port 80 - bobcatofredding[.]com - GET /6lavfdk.exe
Cobalt Strike traffic:
- 192.254.79[.]71 port 8080 - 23.106.80[.]14:1080 - GET /EbHm
- 192.254.79[.]71 port 8080 - 23.106.80[.]14:1080 - GET /ptj
- 192.254.79[.]71 port 8080 - 23.106.80[.]14:1080 - POST /submit.php?id=242569267
- 192.254.79[.]71 port 443 - HTTPS traffic
Ficker Stealer traffic:
- port 80 - api.ipify.org - GET /?format=xml
- 185.100.65[.]29 port 80 - sweyblidian[.]com - TCP traffic
As we discussed in our previous example, if you see HTTP POST requests with /submit.php?id= from Cobalt Strike, be alert for indicators of additional malware. Also like our previous example, we cannot find the malware binary in the pcap, so we must identify followup malware by its post-infection traffic.
In this case, we find indicators for NetSupport Manager RAT malware.
This RAT first does an IP address check to the domain geo.netsupportsoftware[.]com . Then it generates traffic with NetSupport Manager as part of the User-Agent string in its HTTP request headers.
Search for this traffic by using the following Wireshark display filter:
http.user_agent contains "NetSupport Manager" or http.host contains netsupport
The results should look similar to Figure 43 below:
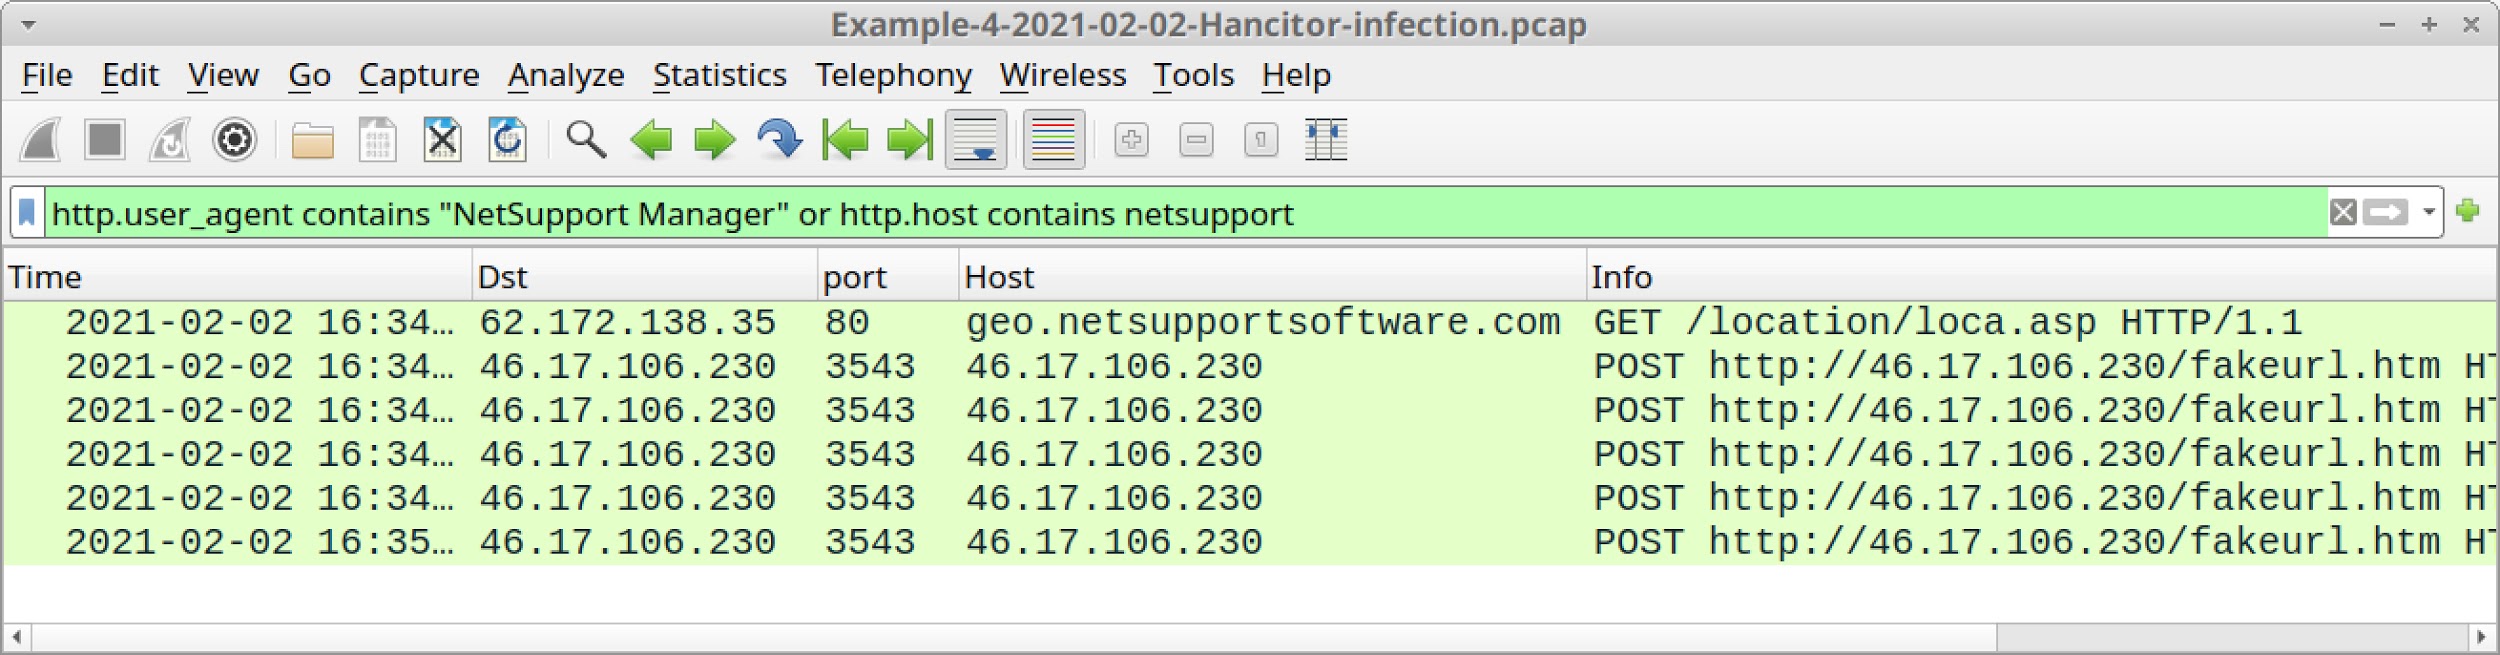
Traffic seen above in Figure 43 is:
- 62.172.138[.]35 port 80 - geo.netsupportsoftware[.]com - GET /location/loca.asp
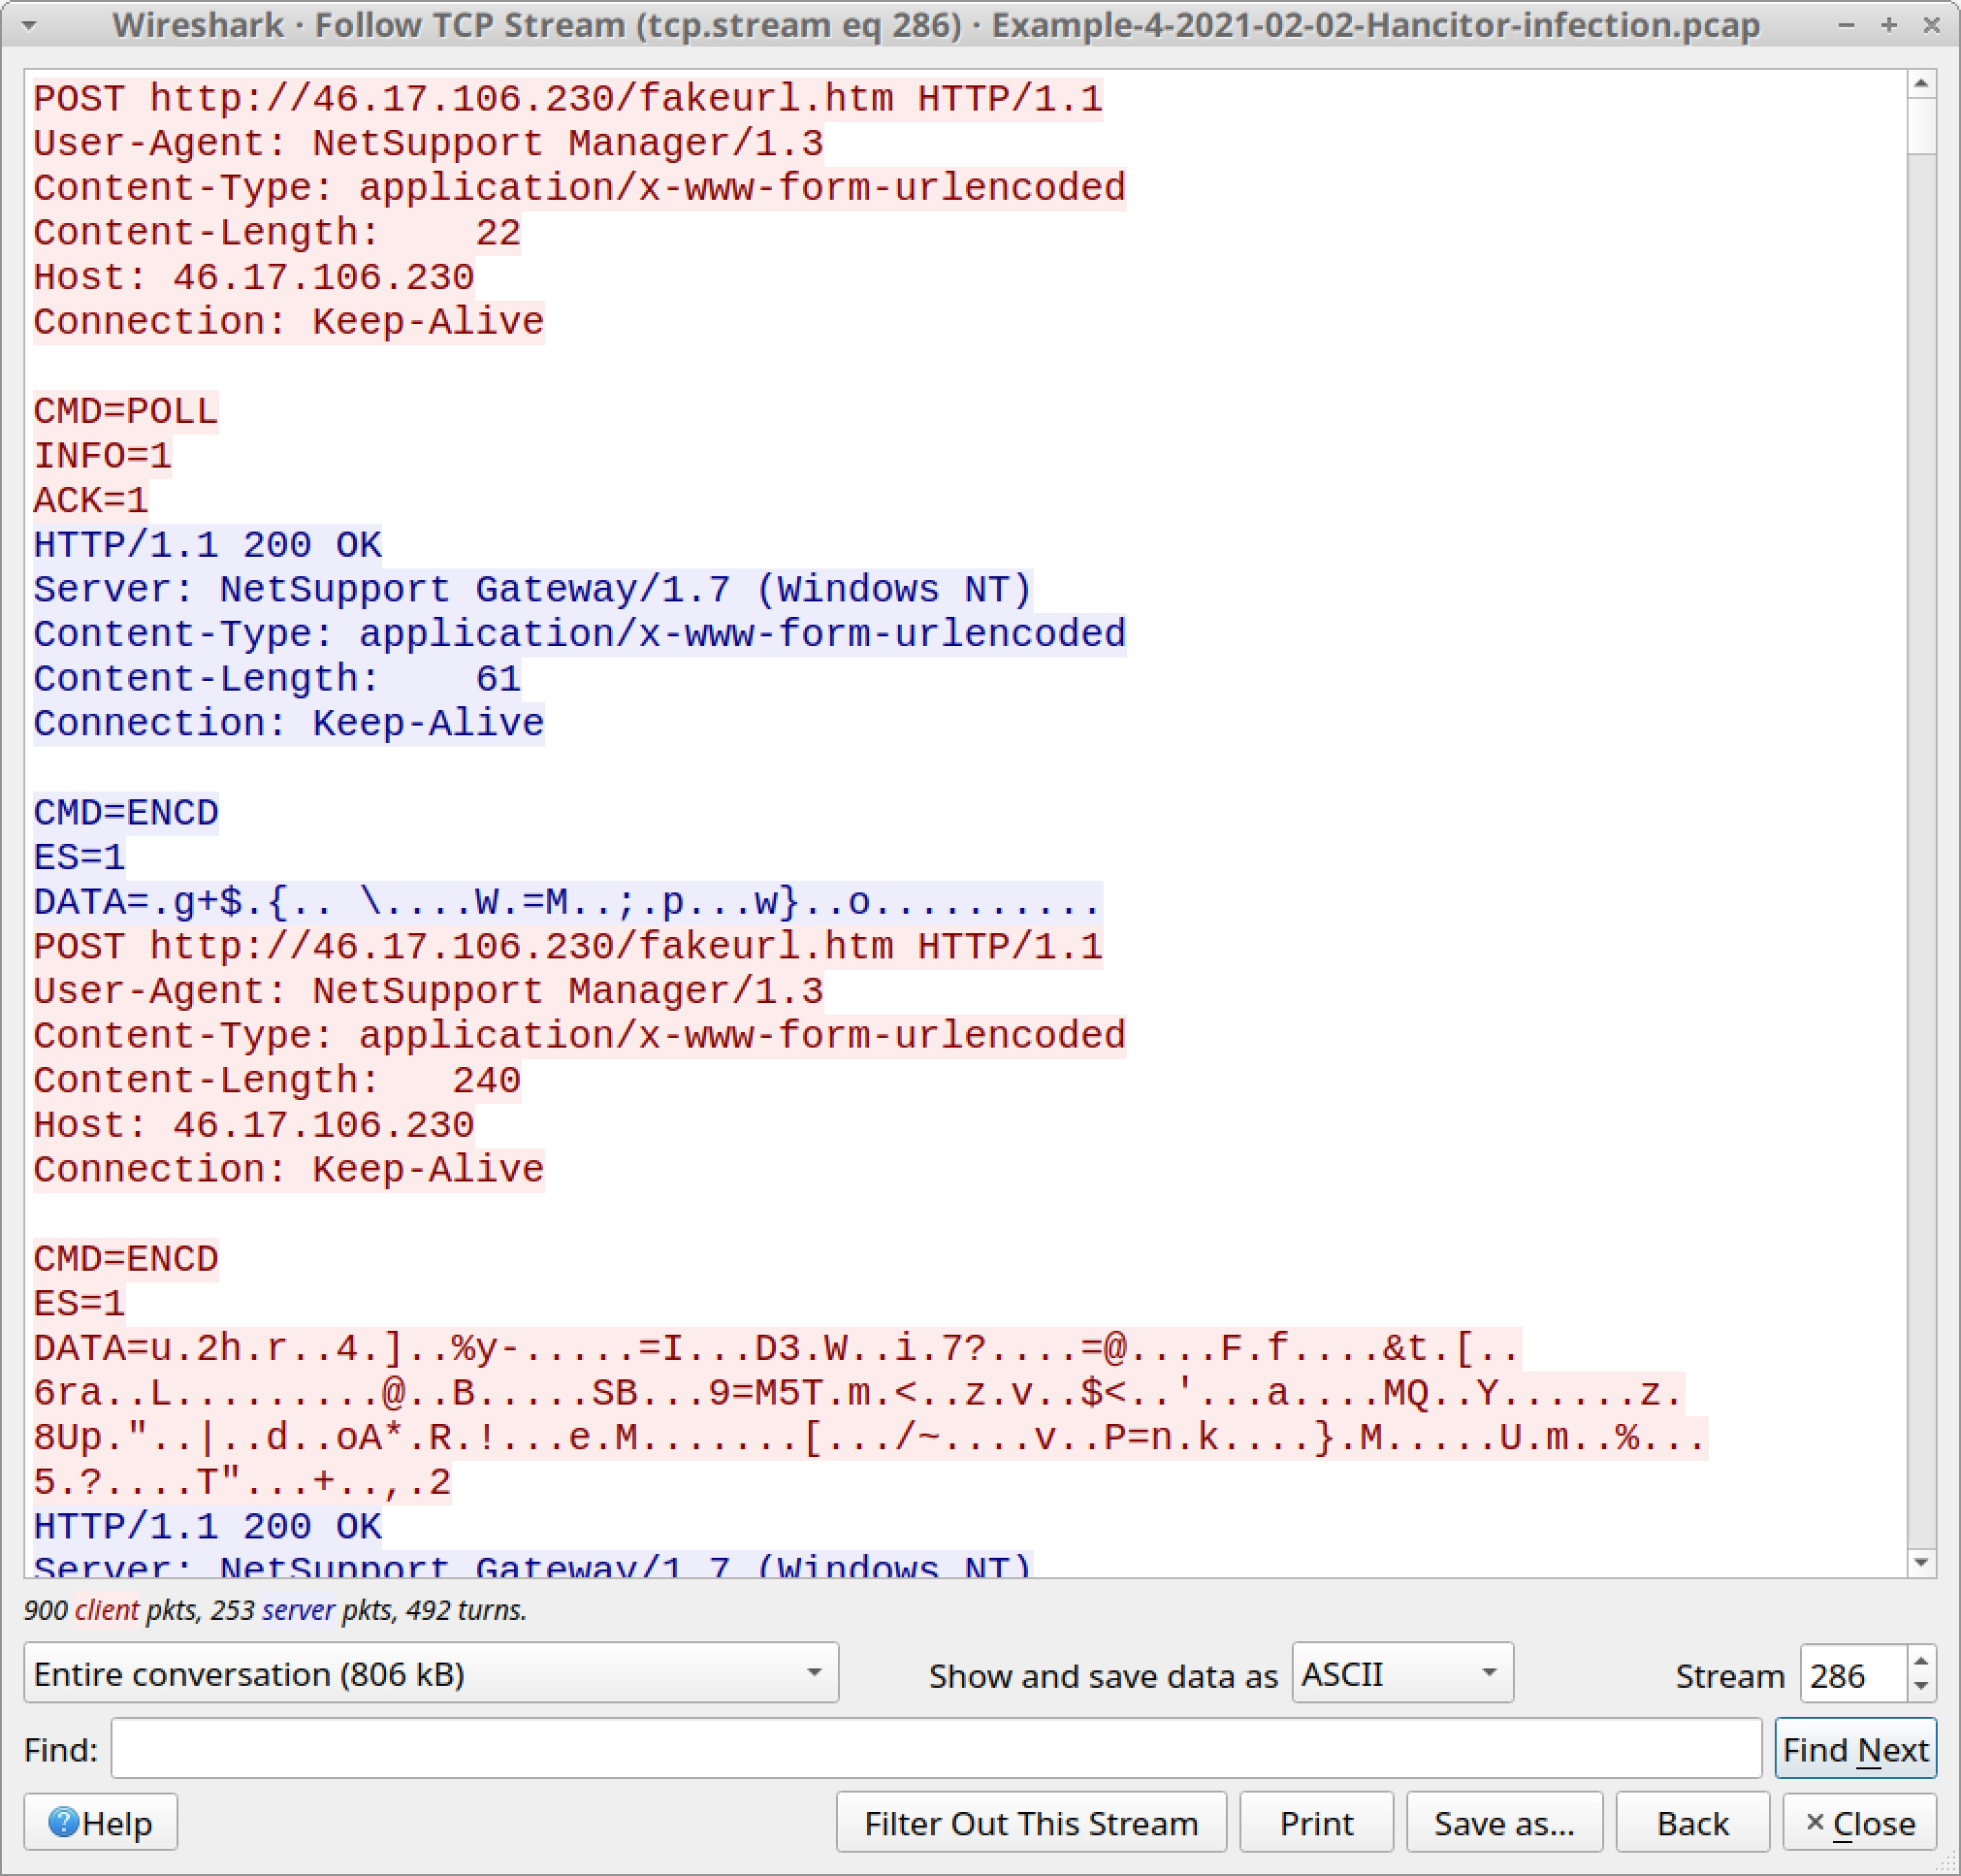
- 46.17.106[.]230 port 3543 - 46.17.106[.]230 - POST hxxp://46.17.106[.]230/fakeurl.htm
Follow the TCP stream for any of the HTTP POST requests to see what NetSupport Manager C2 traffic looks like. The results should look similar to Figure 44 below.
Of note, this tutorial only contains two examples of followup traffic from Cobalt Strike after a Hancitor infection. Cobalt Strike can be used to send other types of malware, not just a network ping tool or NetSupport Manager RAT.
So if you examine activity from a Hancitor infection with Cobalt Strike, we recommend you search for indicators from any other type of malware.
Conclusion
This tutorial reviewed how to identify Hancitor activity and its followup malware from pcaps of infection traffic. We reviewed five pcaps from four recent examples and found consistent patterns from the network traffic. These patterns are fairly unique and can be used to identify Hancitor activity and its associated malware within your network.
This knowledge can help security professionals better detect and catch Hancitor when reviewing suspicious network activity.
For more help with Wireshark, see our previous tutorials:
- Changing Your Column Display
- Display Filter Expressions
- Identifying Hosts and Users
- Exporting Objects from a Pcap
- Examining Trickbot Infections
- Examining Ursnif Infections
- Examining Qakbot Infections
- Decrypting HTTPS Traffic
- Examining Dridex Infection Traffic
- Examining Emotet Infection Traffic
Table of Contents
Related Resources


 High Profile Threats

 Threat Actor Groups